© The Author(s), under exclusive license to APress Media, LLC, part of Springer Nature 2022
G. ByrneTarget C#https://doi.org/10.1007/978-1-4842-8619-7_19

19. Structs

Gerard Byrne1  
(1)
Belfast, Ireland
 

Concept of a Struct as a Structure Type

In the previous chapter, we looked at serialization, which allows us to store the state of an object, where an object is an instance of a specific class. We looked at different ways to serialize and store the data, and two such formats were XML and JSON. We also learned how to deserialize the serialized data, which is usually stored in a file, and therefore convert it to the same class structure it was in originally. The reason we serialize an object or objects is to allow it to be transferred across a network or shared with other people. Serialization also works across programming languages . In Chapter 13 we gained knowledge of classes and objects, which formed the foundations for the serialization and deserialization processes. Classes are a structure, and in this chapter we will extend our knowledge of structures by looking at the C# struct.

In C# a struct is a lightweight alternative to a class, but it is not a class. The struct can have members and methods, or put another way, we say it can have data and functionality. A struct in C# is defined using the keyword struct. Interestingly, we have, without thinking, used simple structs already when coding our applications, since all the value types we have used for example, int, float, double, bool, char, etc. are structs. Before we begin, let us take a look at the difference between value types and reference types in relation to structs and classes.

Value and Reference Types

Structs are value types , whereas a class is a reference type, and they are dealt with by the runtime in different ways:
  • When a value type instance is made, there is one single space allocated in memory to store the value. We have discussed primitive data types such as int and float and these are value types like a struct. When the runtime deals with the value type, it is dealing directly with the data.

  • On the other hand, with reference types, an object is created in memory and dealt with through a pointer.

Example for a Struct
CustomerStruct myCustomerStruct = new CustomerStruct();
Here one single space is allocated in memory to store the myCustomerStruct, and if we were to copy the struct object to a new variable as
CustomerStruct myCustomer2Struct = myCustomerStruct;

then myCustomer2Struct would be completely independent of myCustomerStruct and have its own fields.

Example for a Class
CustomerClass myCustomerClass= new CustomerClass();
Here two spaces are allocated in memory. One stores the CustomerClass object, and the other stores its reference myCustomerClass. So we could show the example code like this:
CustomerClass myCustomerClass;
myCustomerClass = new CustomerClass();
Now if we were to copy the class object to a new variable as
CustomerClass myCustomer2Class = myCustomerClass;

then myCustomer2Class would be simply a copy of the reference CustomerClass, and therefore myCustomerClass and myCustomer2Class point to the same object.

Difference Between Struct and Class

Some ways in which structs differ from classes are as follows:
  • Structs are value types, and we use the actual struct. On the other hand, a class is a reference type, and we point to the actual class.

  • Structs cannot be coded by us to have a constructor that has no parameters, a default constructor , since the default constructor is automatically defined and not available to change.

  • Structs cannot inherit from other structs or classes, whereas a class can inherit from other classes.

  • Structs can implement one or more interfaces .

  • Structs cannot declare a finalizer , which is a destructor used to garbage collect.

  • If we use the new keyword to create an object of the struct, the default constructor is called and the object is created. A struct can be instantiated without using the new keyword, whereas a class cannot be instantiated without using the new keyword.

  • If the struct is used without the new keyword, the members of the struct will remain unassigned and we cannot use the struct object until we have initialized all the members.

  • Members, fields, cannot be initialized, for example, public int policy_number = 0; causes an error in C# 10 or lower.

In writing our code, there may be times when we wish to access an object directly, in the same way that value types are accessed. To address these concerns, C# offers the structure as described previously and, in our programming, we would use structs to represent more simple data structures. The format of the struct declaration is
struct name
{
  member declarations
  constructor if required
}

Let's code some C# and build our programming muscle.

We will create a Customer struct in a similar manner to the Customer class we created when we completed Chapter 13 on classes and objects.

Add a new project to hold the code for this chapter.
  1. 1.

    Right-click the solution CoreCSharp.

     
  2. 2.

    Choose Add.

     
  3. 3.

    Choose New Project.

     
  4. 4.

    Choose Console App from the listed templates that appear.

     
  5. 5.

    Click the Next button.

     
  6. 6.

    Name the project Chapter19 and leave it in the same location.

     
  7. 7.

    Click the Next button.

     
  8. 8.

    Choose the framework to be used, which in our projects will be .NET 6.0 or higher.

     
  9. 9.

    Click the Create button.

     
Now we should see the Chapter19 project within the solution called CoreCSharp.
  1. 10.

    Right-click the Chapter19 project in the Solution Explorer panel.

     
  2. 11.

    Click the Set as Startup Project option.

     
Notice how the Chapter19 project name has been made to have bold text, indicating that it is the new startup project and that it is the Program.cs file within it that will be executed when we run the debugging.
  1. 12.

    Right-click the Program.cs file in the Solution Explorer window.

     
  2. 13.

    Choose Rename.

     
  3. 14.

    Change the name to CustomerExample.cs.

     
  4. 15.

    Press the Enter key

     
  5. 16.

    Double-click the CustomerExample.cs file to open it in the editor window.


Struct with a Default Constructor Only

We will now add a Main() method. Then we will add a struct called Customer , which is outside the class but inside the namespace and will hold the variables we require. In the code in Listing 19-1, the Customer struct has been created above the Main() method , but it could also have been created below the Main() method. The Customer struct will not be given a constructor in our code, but the default constructor still exists.
  1. 17.

    Amend the code, as in Listing 19-1.

     
namespace Chapter19
{
  struct Customer
  {
    public int AccountNo;
    public int Age;
    public string Name;
    public string Address;
    public int LoyaltyYears;
  } // End of Customer struct
  internal class CustomerExample
  {
    static void Main(string[] args)
    {
    } // End of Main() method
  } // End of CustomerExample class
} // End of Chapter19 namespace
Listing 19-1

Customer struct inside namespace

We will now add code inside the Main() method to create an instance of the Customer struct, then assign values to the Customer struct fields, and then display the Customer struct values in a formatted display. This should all look familiar to us as we have coded applications using classes and objects.
  1. 18.

    Amend the code, as in Listing 19-2.

     
  internal class CustomerExample
  {
    static void Main(string[] args)
    {
      // Create an object, myCustomer, of type struct Customer
      Customer myCustomer;
      // Assign values to the myCustomer properties
      myCustomer.AccountNo = 123456;
      myCustomer.Age = 30;
      myCustomer.Name = "Gerry Byrne";
      myCustomer.Address = "1 Any Street";
      myCustomer.LoyaltyYears = 10;
      // Display the myCustomer struct details
      Console.WriteLine($"{"Customer account number is",-30} {myCustomer.AccountNo,15}");
      Console.WriteLine($"{"Customer age is",-30} {myCustomer.Age,15}");
      Console.WriteLine($"{"Customer name is",-30} {myCustomer.Name,15}");
      Console.WriteLine($"{"Customer address is",-30} {myCustomer.Address,15}");
      Console.WriteLine($"{"Customer loyalty years",-30} {myCustomer.LoyaltyYears,9} years");
    } // End of Main() method
  } // End of CustomerExample class
Listing 19-2

Assign values to the Customer struct fields and display the data

  1. 19.

    Click the File menu.

     
  2. 20.

    Choose Save All.

     
  3. 21.

    Click the Debug menu.

     
  4. 22.

    Choose Start Without Debugging.

     
The console window will appear, as shown in Figure 19-1, and show details of this Customer instance.

A series of codes on the console window indicates the specifics of the customer struct objects.

Figure 19-1

Struct details displayed for the instance

  1. 23.

    Press the Enter key to close the console window.


Struct with a User Constructor

As we have seen, a C# struct is a value type. This means that when we create an instance of the struct, we must pass to it values for each of its members. This can be achieved by
  • Using the default constructor method to give default values of the members

  • Having a user-defined constructor method to assign values to the members

We will code an example of an insurance policy that we might have for our home building insurance, home contents insurance, car insurance, travel insurance, etc. All these policy types will have common data that needs to be stored for the specific customer policy, the policy object. We will create a sample C# policy struct and include a constructor , which we did not use in the last example.
  1. 24.

    Right-click the Chapter19 project in the Solution Explorer window.

     
  2. 25.

    Choose Add.

     
  3. 26.

    Choose Class.

     
  4. 27.

    Name the class PolicyExample.cs.

     
  5. 28.

    Open the PolicyExample.cs file in the editor window.

     
  6. 29.

    Amend the code, as in Listing 19-3, to create a Policy struct outside the class and inside the namespace.

     
namespace Chapter19
{
  struct Policy
  {
    public int policyNumber;
    public string policyType;
    public double monthlyPremium;
    public string policyEndDate;
  } // End of Policy struct
  internal class PolicyExample
  {
  } // End of PolicyExample class
} // End of Chapter19 namespace
Listing 19-3

Create a struct called Policy

Struct Instantiation Without the New Keyword

We will now create a Main() method inside the class and instantiate the struct WITHOUT using the new keyword , and then we will display the four struct values in the console.
  1. 30.

    Amend the code as in Listing 19-4.

     
  internal class PolicyExample
  {
    static void Main(string[] args)
    {
      /*
      Using an instance without the new keyword
      if the struct is used without the new keyword the members
        of the struct will remain unassigned, no values, and
        we cannot use the struct object until we have
        initialised all the members
        Using the code below we will see that
          - myPolicy is an instance of Policy
          - myPolicy.PolicyNumber is unassigned but
          - doing myPolicy.PolicyNumber = 123456 means it exists
          - same applies for all members
      */
      Policy myPolicy;
      Console.WriteLine(myPolicy.policyNumber);
      Console.WriteLine(myPolicy.policyType);
      Console.WriteLine(myPolicy.monthlyPremium);
      Console.WriteLine(myPolicy.policyEndDate);
    } // End of Main() method
  } // End of PolicyExample class
Listing 19-4

Instantiate the Policy struct without using the new keyword

Now if we look at the code, we will see that under the four struct member names, we will have a red underline indicating there are errors .
  1. 31.

    Hover over the policyNumber code that has the red underline and look at the error message, as shown in Figure 19-2.


A series of codes on the console window using a field that is the policy number, which may or may not has been assigned.

Figure 19-2

Errors because of unassigned values

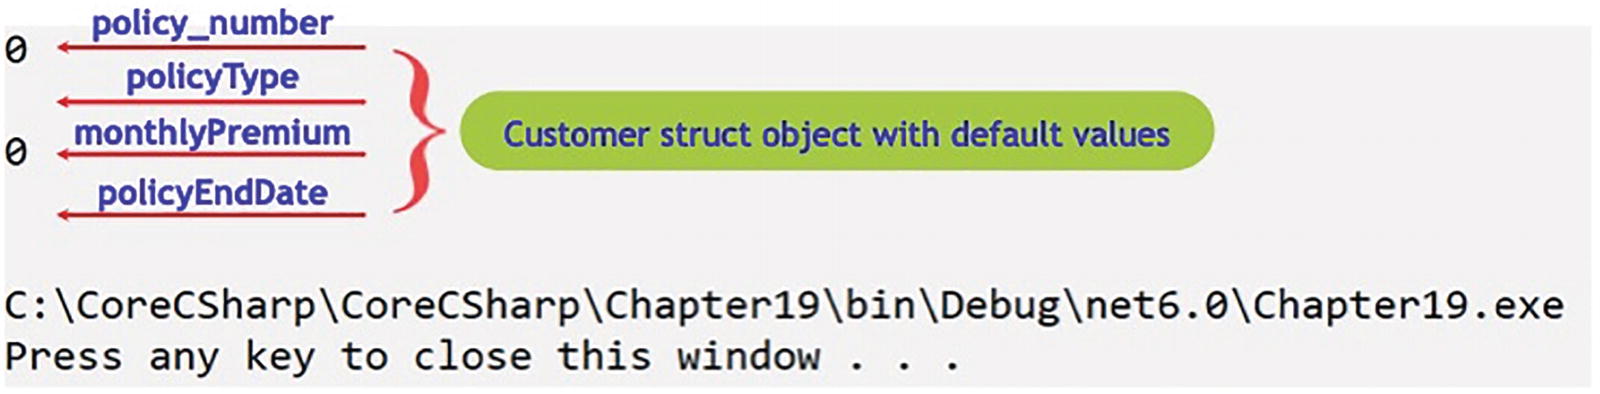
A series of codes on the console window depicts the customer struct object with default values as 0.

Figure 19-3

Struct default values 0 and null by using the default constructor

The message tells us what we already know from reading the earlier sections of this chapter:

If the struct is used without the new keyword, the members of the struct will remain unassigned and we cannot use the struct object until we have initialized all the members.

Struct Instantiation with the New Keyword

We will now instantiate the struct WITH the new keyword and then display the four struct values to the console.
  1. 32.

    Amend the code, as in Listing 19-5. Only one line of code needs amended.


A series of codes on the console window indicates the customer struct object with the values that were specified by the customer constructor.

Figure 19-4

Struct values as set by the instance using the custom constructor

      Policy myPolicy = new Policy();
      Console.WriteLine(myPolicy.policyNumber);
      Console.WriteLine(myPolicy.policyType);
      Console.WriteLine(myPolicy.monthlyPremium);
      Console.WriteLine(myPolicy.policyEndDate);
    } // End of Main() method
Listing 19-5

Instantiate the Policy struct using the new keyword

As we will see, the four struct member names are error-free. We read earlier that if we use the new keyword to create an object of the struct, the default constructor is called and the object is created, and the members will be assigned the default value for their specific data type. The default values for our struct members will be 0 for an int and null for a string, which will therefore display nothing. Let us see if this is the case by running the code.
  1. 33.

    Right-click the Chapter19 project in the Solution Explorer panel.

     
  2. 34.

    Choose Properties from the pop-up menu.

     
  3. 35.

    Choose the Chapter19.PolicyExample class in the Startup object drop-down list.

     
  4. 36.

    Close the Properties window.

     
  5. 37.

    Click the File menu.

     
  6. 38.

    Choose Save All.

     
  7. 39.

    Click the Debug menu.

     
  8. 40.

    Choose Start Without Debugging.


The console window will appear, as shown in Figure 19-3, and show details of the policy. The display shows the default values of 0 for the int and double and null for the two strings.

  1. 41.

    Press the Enter key to close the console window.


Creating a Constructor

The default constructor is automatically defined and not available for change. Remember, a default constructor is parameterless; it accepts no values. However, a struct allows a constructor to be added that contains parameters.

We will now add a custom constructor to the struct and this constructor will accept values for all the struct members. The constructor will therefore have four parameters, which will accept the values passed to it when a new instance of the struct is created.
  1. 42.

    Amend the code, as in Listing 19-6.

     
  struct Policy
  {
    public int policyNumber;
    public string policyType;
    public double monthlyPremium;
    public string policyEndDate;
    public Policy(int policyNumber, string policyType,
      double monthlyPremium, string policyEndDate)
    {
      this.policyNumber = policyNumber;
      this.policyType = policyType;
      this.monthlyPremium = monthlyPremium;
      this.policyEndDate = policyEndDate;
    } // End of user constructor
  } // End of Policy struct
Listing 19-6

Add a constructor to the struct

We should note that the existing code we have, where we are creating an instance of the Policy, Policy myPolicyNew = new Policy();, still works because the default constructor still exists. However, we will amend this code line to pass the new constructor four values for this new policy.
  1. 43.

    Amend the code to add the four values to be passed to the constructor of the struct. Only the one line of code needs amended, as Listing 19-7:

     
      Policy myPolicy = new Policy(123456, "Computer Hardware", 9.99, "31/12/2021");
      Console.WriteLine(myPolicy.policyNumber);
      Console.WriteLine(myPolicy.policyType);
      Console.WriteLine(myPolicy.monthlyPremium);
      Console.WriteLine(myPolicy.policyEndDate);
    } // End of Main() method
  } // End of PolicyExample class
Listing 19-7

Instantiate using the custom constructor

  1. 44.

    Click the File menu.

     
  2. 45.

    Choose Save All.

     
  3. 46.

    Click the Debug menu.

     
  4. 47.

    Choose Start Without Debugging.


The console window will appear, as shown in Figure 19-4, and show details of the policy with the new initialized values passed to the constructor from the instance.

  1. 48.

    Press the Enter key to close the console window.


Creating Member Properties (Get and Set Accessors)

Members of a struct can, like members of a class, have a property, which is used to get and set the value of the member. We saw this being used in Chapter 13 on classes, so now we will see it in action with structs. We also saw in the last chapter that there can be several flavors of properties.
  1. 49.

    Amend the code, as in Listing 19-8, to make the members of the struct have access modifiers of private.

     
  struct Policy
  {
    private int policyNumber;
    private string policyType;
    private double monthlyPremium;
    private string policyEndDate;
Listing 19-8

Make members private

Look at the display lines of the code where we have used the dot notation to access the struct members, and we will see that we have errors . Hovering over one of the errors, as shown in Figure 19-5, tells us what we should realize the member is not accessible as it is private to the struct.

A series of codes on the console window indicates that the policy number cannot be accessed due to the high level of protection it provides.

Figure 19-5

Inaccessible members due to access modifier

We will now create the property for each member, and because we are more experienced in our understanding of C# code, we will use the Visual Studio 2020 help, in the form of Quick Actions and Refactorings, which we discussed in Chapter 6.
  1. 50.

    Highlight the four members of the struct.

     
  2. 51.

    Right-click in the highlighted code.

     
  3. 52.

    Choose Quick Actions and Refactorings as shown in Figure 19-6.


A console window depicts the popup window, which includes quick actions and refactorings, rename, remove and sort usings with their keyboard shortcut.

Figure 19-6

Quick Actions and Refactorings to add properties

  1. 53.

    Choose Encapsulate field (but still use field).

     
The property for each member will appear either above or below the constructor. Either is fine, as shown in Listing 19-9. The struct will now have the members, the constructor, and the properties, just like a class can have these.
struct Policy
  {
    private int policyNumber;
    private string policyType;
    private double monthlyPremium;
    private string policyEndDate;
    public Policy(int policyNumber, string policyType,
      double monthlyPremium, string policyEndDate)
    {
      this.policyNumber = policyNumber;
      this.policyType = policyType;
      this.monthlyPremium = monthlyPremium;
      this.policyEndDate = policyEndDate;
    } // End of user constructor
    public int PolicyNumber
    {
      get => policyNumber;
      set => policyNumber = value;
    }
    public string PolicyType
    {
      get => policyType;
      set => policyType = value;
    }
    public double MonthlyPremium
    {
      get => monthlyPremium;
      set => monthlyPremium = value;
    }
    public string PolicyEndDate
    {
      get => policyEndDate;
      set => policyEndDate = value;
    }
  } // End of Policy struct
Listing 19-9

Member properties created, the get and the set

Now we need to change the dot notation in the WriteLine() code lines that refer to the members directly and refer them instead to the property of the member. The property uses the capitalized form of the member.
  1. 54.

    Amend the code, as in Listing 19-10, to refer to the property.

     
      Console.WriteLine(myPolicy.PolicyNumber);
      Console.WriteLine(myPolicy.PolicyType);
      Console.WriteLine(myPolicy.MonthlyPremium);
      Console.WriteLine(myPolicy.PolicyEndDate);
    } // End of Main() method
  } // End of PolicyExample class
} // End of Chapter19 namespace
Listing 19-10

Call the property, not the member, with a capital letter

  1. 55.

    Click the File menu.

     
  2. 56.

    Choose Save All.

     
  3. 57.

    Click the Debug menu.

     
  4. 58.

    Choose Start Without Debugging.

     
The console window will appear, as shown in Figure 19-7, and details of the policy will be displayed.

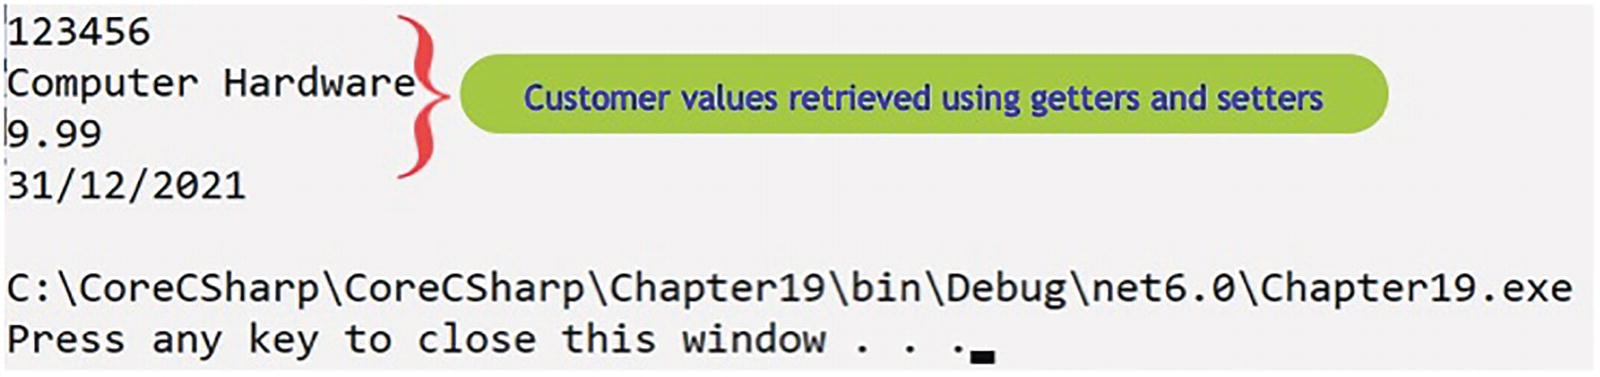
A series of codes on the console window indicates the values for individual customers that were retrieved using getters and setters.

Figure 19-7

Values retrieved using property accessors

  1. 59.

    Press the Enter key to close the console window.


Encapsulation

The code we have just run produced the same result as the previous example, but we have made use of the properties, get and set, for the private variables. This has therefore given us a little exposure to encapsulation, where we refer to encapsulation as hiding the variables of a class or struct so that they can only be accessed from outside the class or struct by special methods called properties. We achieve encapsulation, as we have just seen, by making the access modifier of the fields private and then generating a property for each member. We do not need to have a property for every member if we do not want to, and we do not have to have a get and a set in each property. This will depend on what we wish for the given situation.

A struct can include concrete methods just like classes can include concrete methods. We have not included methods in our examples, but it would be easy to do so, in the same way we did when we coded the applications in Chapter 13 on classes and objects.

Readonly Struct

When we want to limit access to the struct data, we can make the struct readonly . The keyword readonly is therefore a modifier indicating that something cannot be changed. With structs we can use the readonly modifier with the
  • struct In which case the whole struct is readonly. We could therefore say that the structure is immutable; it is “final.” In this case all the members are readonly, and consequently every member property does not require a set accessor, a setter remember YAGNI. The only way to change the member values is at the time of creating the instance object, which calls the constructor whose purpose is to set the initial values of the members. The members of the readonly struct are readonly, and therefore no method in the struct can change its value, which essentially means that we will not see a statement like myPolicy.PolicyType = "Jewellery".

  • Member of the struct – From C# 8, a member can be set to readonly, in which case the value of the member cannot be changed. If the member is readonly, then its property does not require a set accessor, a setter. Allowing readonly members means we do not need to make the whole struct readonly.

Creating a Readonly Struct

We will use the PolicyExample as our starting point for this exercise on readonly structs.
  1. 60.

    Open the PolicyExample.cs file in the Chapter19 project.

     
  2. 61.

    Amend the code, as in Listing 19-11, to make the Policy struct readonly.

     
  readonly struct Policy
  {
    private int policyNumber;
    private String policyType;
    private double monthlyPremium;
    private String policyEndDate;
Listing 19-11

Readonly struct

Now we will see that there are errors indicated under the struct members because they will need to be made readonly as well. Hovering over the error will display the error message, as shown in Figure 19-8.

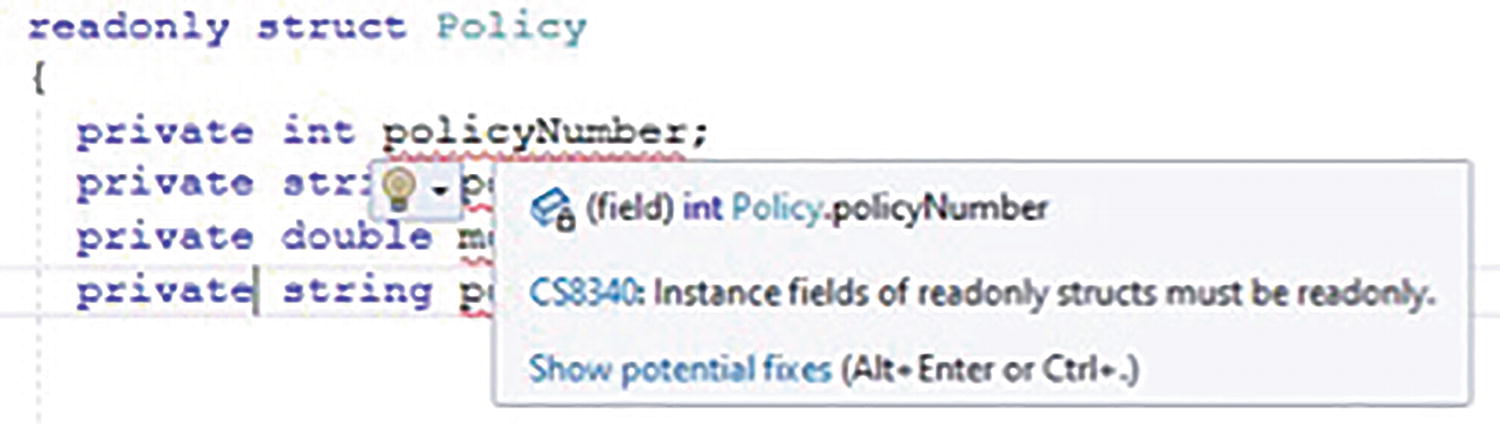
A console window in which the code starts with the line, read only struct policy. In the next line, the declared variable policy number is highlighted. A pop up says that instance fields of read only structs must be read only.

Figure 19-8

Readonly struct needs readonly fields

  1. 62.

    Amend the code, as in Listing 19-12, to make the member fields readonly.

     
  readonly struct Policy
  {
    readonly int policyNumber;
    readonly String policyType;
    readonly double monthlyPremium;
    readonly String policyEndDate;
Listing 19-12

Readonly fields

Now we will see that the errors for the members are removed. However, we will also see errors in the set accessor of each member property. We will now correct the set errors by commenting the code. This is not a normal programming practice (YAGNI), but we will keep the code for reference.
  1. 63.

    Amend the code, as in Listing 19-13, to comment the setters.

     
   public int PolicyNumber
    {
      get => policyNumber;
      //set => policyNumber = value;
    }
    public string PolicyType
    {
      get => policyType;
      //set => policyType = value;
    }
    public double MonthlyPremium
    {
      get => monthlyPremium;
      //set => monthlyPremium = value;
    }
    public string PolicyEndDate
    {
      get => policyEndDate;
      //set => policyEndDate = value;
    }
  } // End of Policy struct
Listing 19-13

Setters are not required; comment them

Within the Main() method , the code that uses the members is accessing them through the property of the member, really the get accessor of the property, so this will still work because we do have the getters but not the setters as the struct is readonly. Perfect! Our code should work well.
  1. 64.

    Click the File menu.

     
  2. 65.

    Choose Save All.

     
  3. 66.

    Click the Debug menu.

     
  4. 67.

    Choose Start Without Debugging.

     
The console window will appear displaying details of the policy, as shown in Figure 19-9.

A series of codes on the console window indicates that the struct can only be read and that the data are retrieved using the getters.

Figure 19-9

Readonly struct, readonly fields with no setters code works

  1. 68.

    Press the Enter key to close the console window.

     
We have achieved the same result, but we have seen the use of a readonly struct, with readonly members and member properties that only require a get accessor since the member values cannot be changed, unless it is done through the constructor. Now we will try and assign a new value to a readonly struct member.
  1. 69.

    Amend the code in the Main() method to attempt to assign a new value to the policyNumber as shown in Listing 19-14.

     
      Console.WriteLine(myPolicy.PolicyEndDate);
      myPolicy.PolicyNumber =
    } // End of Main() method
  } // End of PolicyExample class
} // End of Chapter19 namespace
Listing 19-14

Attempt to assign a value to a readonly struct

Even before we have completed the line of code, we will see that the compiler is complaining, and this is indicated in Visual Studio 2022 by the red underline. On hovering over the red underline, a pop-up window with a message appears, and we should note that we are being told it is not possible to assign a value, because we are dealing with a readonly struct member.
  1. 70.

    Hover over the red underline of PolicyNumber as shown in Figure 19-10.


A console indicates the option that the policy number cannot be applied to the read-only attribute of the variable.

Figure 19-10

Cannot change readonly struct member

  1. 71.

    Remove the partial line of code.

     
  2. 72.

    Click the File menu.

     
  3. 73.

    Choose Save All.


C# 8 readonly Members

Prior to C# 8 we could have a readonly struct and all the fields had to be readonly, as we have just seen in the example we coded. From C# 8 we were introduced to a new feature for the struct , which allows us to declare members of the struct as readonly without the struct being readonly. This has the advantage of making the code more specific and more granular, because we target those fields that need to be readonly rather than having to make all the fields readonly.

We will now use the same Policy struct code we used earlier, to illustrate the use of the readonly field without the struct being readonly. As we already have a Policy struct in the namespace, we will have to rename the struct from Policy, so we will call it PolicyReadOnlyMembers.
  1. 74.

    Right-click the Chapter19 project in the Solution Explorer window.

     
  2. 75.

    Choose Add.

     
  3. 76.

    Choose Class.

     
  4. 77.

    Name the class PolicyExampleReadOnlyMember.cs.

     
We will now amend the code to add a struct, which will have two readonly fields, two private fields, and a property for each field with a get for all fields and a set for the non-readonly fields.
  1. 78.

    Amend the PolicyExampleReadOnlyMember class code, as shown in Listing 19-15.

     
namespace Chapter19
{
  struct PolicyReadOnlyMembers
  {
    private readonly int policy_number;
    private string policyType;
    private double monthlyPremium;
    private readonly string policyEndDate;
    public PolicyReadOnlyMembers(int policy_number,
    string policyType, double monthlyPremium,
           string policyEndDate)
    {
      this.policy_number = policy_number;
      this.policyType = policyType;
      this.monthlyPremium = monthlyPremium;
      this.policyEndDate = policyEndDate;
    } // End of user constructor
    // Properties used to get and set the members
    public int Policy_number
    {
      get => policy_number;
    } // End of Policy_number property
    public string PolicyType
    {
      get => policyType;
      set => policyType = value;
    } // End of PolicyType property
    public double MonthlyPremium
    {
      get => monthlyPremium;
      set => monthlyPremium = value;
    } // End of MonthlyPremium property
    public string PolicyEndDate
    {
      get => policyEndDate;
    } // End of PolicyEndDate property
  } // End of PolicyReadOnlyMembers struct
  internal class PolicyExampleReadOnlyMember
  {
  } // End of PolicyExampleReadOnlyMember class
} // End of Chapter19 namespace
Listing 19-15

Creating the struct with readonly fields

We will now add a Main() method that will contain the code to instantiate the struct and have two lines of code to set the values of the two readonly fields.
  1. 79.

    Amend the class code, as in Listing 19-16.

     
  internal class PolicyExampleReadOnlyMember
  {
    static void Main(string[] args)
    {
      PolicyReadOnlyMembers PolicyReadOnlyMember =
        new PolicyReadOnlyMembers(123456, "Computer Hardware",
                                  9.99, "31/12/2021");
      Console.WriteLine(PolicyReadOnlyMember.Policy_number);
      Console.WriteLine(PolicyReadOnlyMember.PolicyType);
      Console.WriteLine(PolicyReadOnlyMember.MonthlyPremium);
      Console.WriteLine(PolicyReadOnlyMember.PolicyEndDate);
      PolicyReadOnlyMember.Policy_number = 567890;
      PolicyReadOnlyMember.PolicyType = "Monitor";
      PolicyReadOnlyMember.MonthlyPremium = 5.99;
      PolicyReadOnlyMember.PolicyEndDate = "01/01/2099";
    } // End of Main() method
  } // End of PolicyExampleReadOnlyMember class
} // End of Chapter19 namespace
Listing 19-16

Instantiate the struct and try to assign values to readonly fields

Now look at the assignment lines that are trying to set the values of the readonly fields; they have a red underline indicating a problem. If we hover over the red underline of any of the assignments, we will see a message telling us we cannot assign a value to a readonly field.
  1. 80.

    Hover of the red underline of any of the assignment lines, and note the message, as shown in Figure 19-11.


A series of codes on the console window indicates that the policy members and the policy end date cannot be given to its read-only.

Figure 19-11

Readonly error message only on readonly fields

This is the C# 8 readonly field of a struct in action. The struct is not readonly, but the fields marked with the readonly keyword are, and as we know, we cannot change the value of a readonly member.
  1. 81.

    Comment the two lines that are causing the error , as in Listing 19-17.

     
      //PolicyReadOnlyMember.Policy_number = 567890;
      PolicyReadOnlyMember.PolicyType = "Monitor";
      PolicyReadOnlyMember.MonthlyPremium = 5.99;
      //PolicyReadOnlyMember.PolicyEndDate = "01/01/2099";
    } // End of Main() method
  } // End of PolicyExampleReadOnlyMember class
} // End of Chapter19 namespace
Listing 19-17

Comment the lines causing the error (or delete them)

  1. 82.

    Right-click the Chapter19 project in the Solution Explorer panel.

     
  2. 83.

    Choose Properties from the pop-up menu.

     
  3. 84.

    Choose the PolicyExampleReadOnlyMember class in the Startup object drop-down list.

     
  4. 85.

    Close the Properties window.

     
  5. 86.

    Click the File menu.

     
  6. 87.

    Choose Save All.

     
  7. 88.

    Click the Debug menu.

     
  8. 89.

    Choose Start Without Debugging.

     
Figure 19-12 shows the console window displaying the details of the policy.

A series of codes on the console window indicates that the two fields could not be edited and could only be read. It exhibits the values set with the constructor.

Figure 19-12

Using readonly fields

So we have shown that readonly members cannot be assigned new values. The values are set through the custom constructor, if there is one, or the parameterless default constructor.

C # 8 Nullable Reference Types

In Chapter 6 on data types, we looked at conversion and parsing, and we read about the C# 8 nullable reference type . We read how we could use the ? to ensure that a null value was acceptable, given that from C# 8, reference types are non-nullable by default. In our reading we used two code examples using strings, one using the ? and the other not using it:

Example 1 was
  /*
  This will cause a warning as all reference types are
  non-nullable by default. The warning will be similar to:
  Converting null literal or possible null value to
  non-nullable reference type.
  */
 string policyId = null;
Example 2 was
  /*
  This will not cause a warning as null is acceptable
  */
  string? policyId = null;

For some reinforcement, we will apply the nullable reference type to the struct example we have just completed, but this will require the project to have Nullable enabled, which is done within the project’s .csproj file.

The Microsoft site says

Null-state analysis and variable annotations are disabled by default for existing projects meaning that all reference types continue to be nullable. Starting in .NET 6, they're enabled by default for new projects.

The line of code, <Nullable>enable</Nullable>, would need to be added to the .csproj file, but as we have been using .NET 6, we will not need to make this change, as Nullable is enabled by default. Listing 19-18 shows the contents of our Chapter19.csproj file, and we can see that Nullable is indeed enabled.
<Project Sdk="Microsoft.NET.Sdk">
  <PropertyGroup>
    <OutputType>Exe</OutputType>
    <TargetFramework>net6.0</TargetFramework>
    <ImplicitUsings>enable</ImplicitUsings>
    <Nullable>enable</Nullable>
    <StartupObject>Chapter19.PolicyExampleReadOnlyMember</StartupObject>
  </PropertyGroup>
</Project>
Listing 19-18

Enable Nullable in the .csproj file

We can also enable or disable the nullable reference type within the code of a .cs file. This is achieved by using the code line #nullable enable above any line where the action is required or #nullable disable above any line where the action is not required. This can be seen in this code snippet where the nullable reference type has been disabled for the policyId field because it was enabled at the project level:
      #nullable disable
      string policyId = null;
The Microsoft site also says

The nullable annotation context and nullable warning context can be set for a project using the <Nullable> element in your .csproj file. This element configures how the compiler interprets the nullability of types and what warnings are emitted.

Note:

Deference warnings occur when the application deferences (tries to obtain the address of something held in a location from a pointer) and expects it to be valid but is returned a null.

An assignment warning is issued when we try to assign incorrectly, for example, in an if construct, we might try to do if(amount = amountLimit) but we would get an assignment warning as it should be if(amount == amountLimit).

The Microsoft site also gives us details about the contexts we can use:

If we use disable, then
  • All reference types are nullable.

  • We do not need to use the ? suffix.

  • Deference warnings are disabled.

  • Assignment warnings are disabled.

If we use enable, then
  • All reference types are non-nullable unless declared using the ?.

  • We can use the ? suffix.

  • Deference warnings are enabled.

  • Assignment warnings are enabled.

If we use warnings, then
  • All reference types are nullable but members are considered not null at the opening brace of methods.

  • We can use the ? suffix but it produces a warning.

  • Deference warnings are enabled.

  • Assignment warnings are not applicable.

If we use annotations, then

  • All reference types are non-nullable unless declared using the ?.

  • We can use the ? suffix and it declares the nullable type.

  • Deference warnings are disabled.

  • Assignment warnings are disabled.

  1. 90.

    Amend the PolicyReadOnlyMembers struct so that the policyType is assigned a null value within the constructor, as in Listing 19-19.

     
    public PolicyReadOnlyMembers(int policy_number,
      string policyType, double monthlyPremium,
             string policyEndDate)
    {
      this.policy_number = policy_number;
      //this.policyType = policyType;
      this.policyType = null;
      this.monthlyPremium = monthlyPremium;
      this.policyEndDate = policyEndDate;
    } // End of user constructor
Listing 19-19

Assign a null value to the policyType field

Hovering over the word null will show a pop-up window with a message, and reading this message tells us that we cannot have a nullable the string field policyType cannot be assigned a null value.
  1. 91.

    Hover over the word null, as in Figure 19-13, and read the warning message.


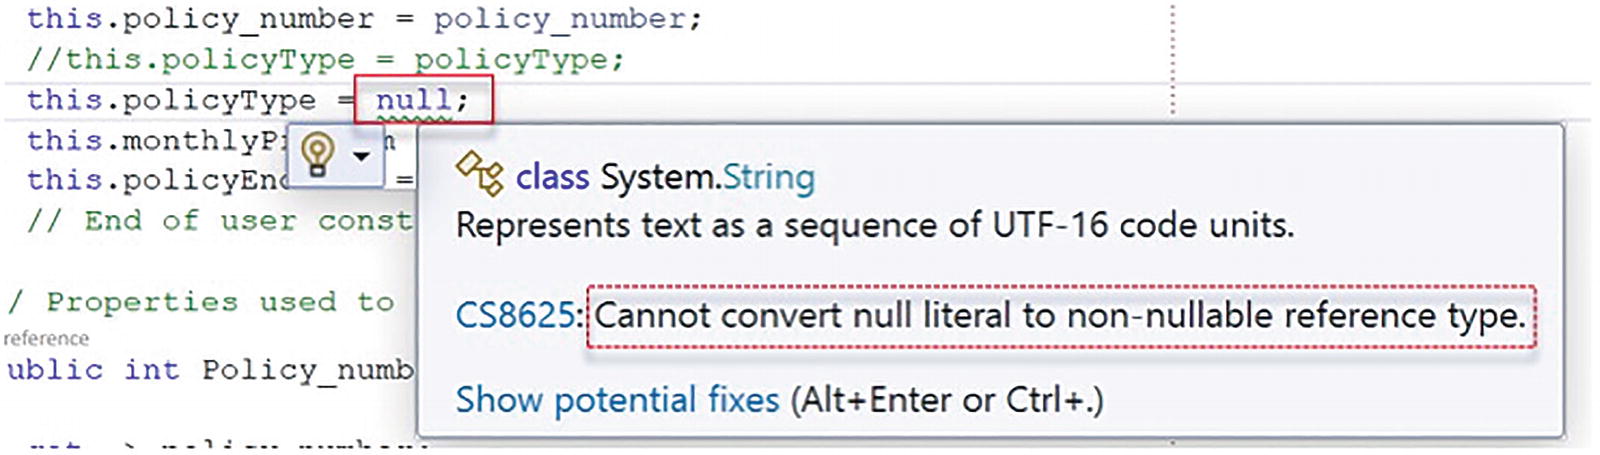
A series of codes on the console window indicates that it is impossible to convert the null literal to a reference type that cannot be null.

Figure 19-13

Null literal error message

We will now amend the declaration of the policyType within the struct, so that the type string is marked with the ?:

private string ? policyType;

This will enable the policyType to accept a null value.
  1. 92.

    Amend the code, as in Listing 19-20.

     
  struct PolicyReadOnlyMembers
  {
    readonly private int policy_number;
    private string? policyType;
    private double monthlyPremium;
    readonly private String policyEndDate;
Listing 19-20

Using the ? to permit a null value

Notice the warning under the null in the code has disappeared.
  1. 93.

    Click the File menu.

     
  2. 94.

    Choose Save All.

     
  3. 95.

    Click the Debug menu.

     
  4. 96.

    Choose Start Without Debugging.

     
The console window will appear displaying details of the policy, as shown in Figure 19-14. We can see that the nullable value has been accepted, and this is where the second line is displaying as “empty.”

A series of codes on the console window indicates that the null value can be used whenever the private string is being accessed.

Figure 19-14

Null value used for policyType field

Chapter Summary

So, finishing this chapter on structs, we can see the similarity with classes and objects. A struct is a value type, which must have a default parameterless constructor, but they can also have custom constructors. The fields can be set to private and we can use properties, getters and setters, to access them. The whole struct can be set to readonly and this means all fields must also be readonly, but from C# 8 we can have readonly fields without the struct being readonly. Finally, we looked at nullable references and the use of the ? to permit null values.

Wow, what an achievement. This is not basic coding. We are doing some wonderful things with our C# code. We should be immensely proud of the learning to date. In finishing this chapter, we have increased our knowledge further and we are advancing to our target.

An illustration of concentric circles with two differently colored regions above a text that reads, Our target is getting closer.

..................Content has been hidden....................

You can't read the all page of ebook, please click here login for view all page.
Reset
3.129.9.48