Chapter 9
Create Composite Images
With digital, you can change every pixel into anything you want, and you can perform any operation with the film footage that you can imagine. My brother [John Knoll] said, “This is the future of special effects in movies,” and decided to teach himself computer graphics in his spare time.1
Tom Knoll Co-Developer, with his Brother John, of Photoshop
[1] https://theblog.adobe.com/photoshop-turns-25-qa-with-thomas-knoll/
Chapter Goals
In the previous chapter, we gained an introduction to Adobe Photoshop, with an emphasis on single-layer images. However, while its basic editing capability is impressive, the true power of Photoshop lies in two features we haven’t covered yet: selections and layers. These features allow the software to create multilayer images, called “composites,” which is what this chapter is about.
Time to learn more sophisticated techniques of image editing. Specifically:
 Add and format text
- Use layers and selections
- Place multiple images into an image to create a composite
- Use filters and effects
- Use blend modes
“COMPOSITING” MEANS to create a new image by combining two or more images into one. Composite images are the true magic of Photoshop. Whether the composite is as simple as adding text to an image or as complex as creating a fantasy dragon, Photoshop can unleash your inner artist—or overwhelm you with all its possibilities. Let’s start with something simple and see where it takes us.
Compositing
creates a new image by combining two or more images into one.
Creating a New Photoshop Document
In Chapter 8, “Edit and Repair Still Images,” we spent our time working with existing images because it is the easiest way to learn the software. Now, we’ll discover, for example, how to create a new image to be used on the web. Starting new is useful when you need to create an image at a specific size, rather than try to scale an existing image to fit.
Choose File > New to display key settings in the New Image dialog (Figure 9.1). Give your new file a name at the top then specify its dimensions in pixels. Remember to keep Resolution at 72, simply because Pixels/Inch applies only to images that are printed.
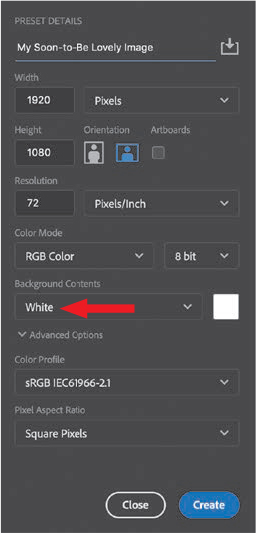
Figure 9.1 These are the settings to create a new image for HD video.
Always use RGB for any digital image; other options are only for specialized uses. This is also where you set the color for the background. The default is white, but you can also pick black, transparent, or a custom color. I’ll explain more about Photoshop’s colors later in this chapter.
Another important setting is Pixel Aspect Ratio. Use Square Pixels for anything going to the web and virtually all digital video. (Standard definition, HDV, and early versions of Panasonic P2 media use nonsquare pixels.)
Adding and Formatting Text
The easiest way to illustrate compositing is to add text to an image. Figure 9.2 is a composited image consisting of a background image and foreground text. (The image is near dawn on Mulholland Drive near Los Angeles early last winter. The text is Calligraphic 421 BT from Bitstream.)
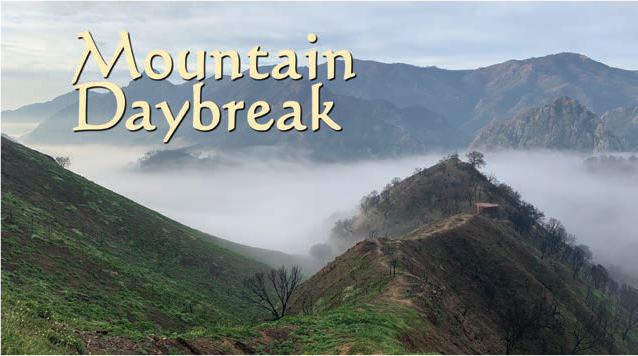
Figure 9.2 Here’s the finished result: Mulholland Drive near dawn.
Newer versions of Photoshop display pseudo-Latin placeholder text when you click the Text tool on an image. This is to show you what your current text settings look like. Just start typing and it will disappear.
Keep Text Away from the Edges
It is a good design technique to keep text away from the edges of an image; this is especially true for video or print. Since it is possible for images to be cropped during distribution, keeping a safety margin between your text and the edges of the image means that essential information, such as titles, URLs, or phone numbers, won’t get lost. In Chapter 15, “Motion Graphics: Make Things Move,” you’ll learn about Safe Zones, which provide guides to positioning text and other essential visual elements.
Let’s start by opening an image in Photoshop (File > Open). Search for and select the Text tool; Adobe calls this the “Horizontal Type tool.” Its icon looks like the letter “T” (Figure 9.3). Click where you want the text to appear on your image and start typing.
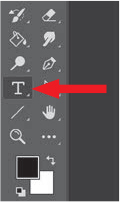
Figure 9.3 The Horizontal Type tool has an icon that looks like the letter “T.”
As you type, look over to the Layers panel on the right side of the interface. A new layer appears, above the background, that displays the first portion of your text. The Layers panel is a major feature in Photoshop because it is how we can add, rearrange, modify, and delete individual elements within the scope of the whole picture (Figure 9.4). There is no practical limit to the number of layers you can add to a single Photoshop document.
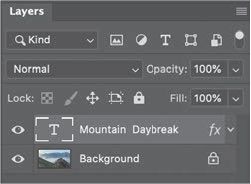
Figure 9.4 The Layers panel in Photoshop.
The top layer represents the foreground; the bottom layer is the background. You can change which image is in front by dragging a layer to change the “stacking order,” the order of layers from top to bottom. Click the “eye” icon on the left to make a layer invisible or visible. Adjust the opacity to make a layer translucent. Select a layer and press Delete to remove it.
Layer Options
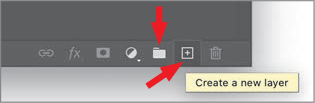
The icons shown in this image appear at the bottom of the Layers panel. The folder icon creates folders so you can group (organize) layers. The button to its right creates new, empty layers. There are many reasons to create an empty layer; the exercise at the end of this chapter will illustrate one.
With the text layer selected, look above the Layers panel and select the Character panel (Figure 9.5). If this is not displayed, open it by going to the menu bar at the top of your monitor and choosing Window > Character. The four options at the top of the panel are the most important:

Figure 9.5 The Character panel modifies text formatting. These are the text settings I used in Figure 9.2.
- Change the font.
- Change the weight.
- Change the size.
- Change the vertical line spacing, which Adobe calls “leading.”
I used a pale yellow color to reinforce the “early morning” theme. (While I’ll show you how to change colors in a few pages, the color chip in Figure 9.5 is a clue.) Because this is a title, I tightened the vertical line spacing to bring the two lines closer together.
Next, let’s add our first effect: a drop shadow. Again, make sure the text layer is selected and choose Layer > Layer Style > Drop Shadow.
Figure 9.6 illustrates my drop shadow settings for text. The key to using a drop shadow successfully is to make your text more readable, not call attention to the shadow itself. Keep the shadow opacity dark so that the edges of the text are clearly defined.

Figure 9.6 My preferred drop shadow settings. Opacity: 90–95%, Angle: 135°, Distance: 8–12, Spread: 5-8, and Size: 4–8.
One last tweak. I didn’t like the spacing between the “D” and “a” in “Daybreak,” (Figure 9.2) so I kerned them by selecting the Text tool, placing the cursor between the two letters I wanted to adjust, then pressed Option+left/right arrow. This adjusts the spacing between just these two letters.
For Windows users, substitute Ctrl for Cmd, Alt for Option, and Backspace for Delete in these keyboard shortcuts.
Personally, I’m not a fan of effects just for the sake of effects. But as long as we’re here, let’s give this text a curve.
Select the text layer; then choose Type > Warp Text. This displays the dialog shown in Figure 9.7. Select a shape from the Style popup menu at the top then adjust the settings and watch what happens. Some of these are just gosh-awful, but others can be useful, depending upon your story.

Figure 9.7 To curve text, choose Type > Warp Text and, ah, play.
Leading
adjusts the vertical line spacing between lines of text.
Before we go further, I want to reinforce two points:
- Layers determine the order of elements from foreground to background.
- All text can be modified.
Layers vs. Background
An important point that I intentionally omitted in Chapter 8 is that when you open an image, it is placed on a special layer called the Background layer. This limits what we can do with the image.
An image placed on the Background layer can’t be repositioned, nor can it easily be made transparent. For simple image editing, backgrounds are fine. But we can quickly unlock a background image and convert it into a regular layer by clicking the small lock icon (Figure 9.8, red arrow).
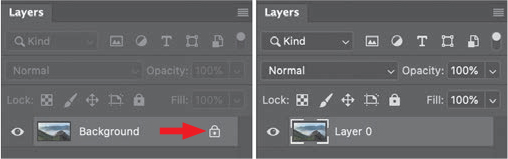
Figure 9.8 The Background layer (left) and a normal layer. Notice none of the layer controls are enabled for a background image.
For example, open a JPEG image in Photoshop. Select the Move tool (Shortcut: V) then try to drag the background image. You can’t. Convert Background to a normal layer and try again. Now you can move it.
Quickly unlock a background image and convert it into a regular layer by clicking the small lock icon.
Scaling Explained
Scaling is the process of making something larger or smaller. Bitmaps, as we learned earlier, are composed of pixels, each of a fixed size and arrayed on a fixed rectangular grid. When we resize a bitmapped image, the pixels are not changing size. Instead, we are removing pixels from the image to make it smaller, or we are adding pixels to make it bigger.
This means that if we scale a layer smaller then scale it larger, first Photoshop throws away pixels to make the image smaller. Then, because those pixels are truly gone, Photoshop does its best to imagine what those pixels might have looked like and puts these “guessed” pixels back into the image to make it larger. Again, we are not changing the size of the pixels; we are changing the number of pixels the image contains.
Figure 9.9 illustrates this. The image on the left is the source, while the image on the right has been scaled to 5 percent then back. The image is blurry, details in the feathers are lost, and the sparkle is gone.

Figure 9.9 The Source image (left), a Smart Object scaled to 5 percent and back (middle), a bitmapped image scaled to 5 percent and back (right). Repeated scaling of bitmaps makes them blurry.
To fix this, Adobe invented a new “form” of bitmap: a Smart Object. When you scale a Smart Object, instead of using the current bitmap displayed in Photoshop (which could be missing a lot of pixels), Photoshop accesses the source file on your hard disk. Since this is always at the highest quality and not changed when Photoshop manipulates an image, this means that scaling and re-scaling will not damage image quality. The Smart Object in Figure 9.10 (middle) was scaled smaller and larger six times yet still looks like the source.
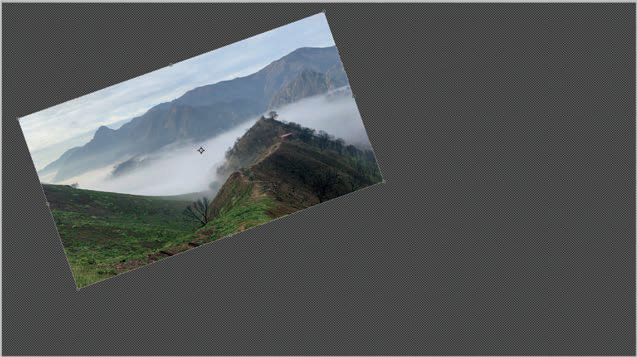
Figure 9.10 Modifying the size, rotation, and position of an image on a layer using Free Transform.
While Smart Objects are a good thing, there’s a trade-off. You can’t crop or apply most effects to a Smart Object. Once you have your image scaled and in place, select the layer containing the Smart Object (it has a small white square in the lower-right corner of its icon) and choose Layer > Rasterize > Smart Objects. That converts it back into an ordinary bitmap.
CAUTION: Because images in Photoshop are treated as bitmaps, enlarging any bitmap more than 100 percent of its original size will look blurry. This is true for both normal bitmaps and Smart Objects. Scaling bitmaps smaller does not damage image quality, though it may reduce detail.
Manipulating Images Using Free Transform
The Transform controls change scale, rotation, distortion, perspective, and warp. Most of the time, we’ll use them to change scale or rotation. For example, after converting an image to a normal layer, choose Edit > Free Transform. (This option is not available for images opened into the Background layer.) Drag a corner to change the size of the image (Figure 9.10). Click just outside a corner and drag to rotate an image. (This is exactly the same technique we used in the previous chapter to adjust the cropping area for an image.) Click and drag the center of the image to reposition it. When you are happy with the new location, press Return. To adjust the image again, reselect Free Transform.
Free Transform can be used on any element on any layer, except the Background layer. Images can be moved, resized, and rotated as needed.
Place vs. Open
So far, when we wanted to work with an existing image, we opened it. But, now that we know about layers, a new option is available: Place. Choosing File > Place Embedded places this new image into an empty layer above an existing image. In other words, Place creates an instant composite. A fast way to place an image is to drag it from the Finder into the existing image.
A fast way to place an image is to drag it from the Finder onto an open image in Photoshop.
In Figure 9.11, I used Free Transform to scale and reposition the bottom image. I then added text, darkening the color of the text in the top right to make it more visible against the white background. Then, I chose File > Place Embedded and selected the Berries file. Photoshop opened and placed it into a higher layer above the background image, with a Free Transform rectangle around it. All I needed to do was scale and reposition it.

Figure 9.11 The bottom image was scaled using Free Transform. The top image was placed then scaled and repositioned by dragging.
Notice how the berries image overlaps the mountain image? Since the stacking order of elements in the Layers panel determines foreground versus background, the layer containing the berries image needs to go above the layer containing the mountain image. There is no limit to the number of images you can place, stack, or overlap in a Photoshop document.
Embedded vs. Linked
There are two Place options: Embedded and Linked. Unless you are working with gigantic files, Embedded is a better choice because it includes (“embeds”) the image inside the Photoshop document file. We’ll discuss linking when we cover video in Section 3.
Selections Create Magic
Selections are the other major feature in Photoshop. In fact, the primary interface rule for Photoshop is “select something then do something to it.”
There are close to 20 different ways to select something in Photoshop. We’ve already glimpsed one: Crop. But cropping always changes the size of the image. What if we want the image to stay the same size but remove portions from it? That’s where selections come in. For instance, we use selections to:
The primary interface rule for Photoshop is “Select something then do something to it.”
- Remove a portion of an image.
- Add an effect to a portion of an image.
- Move a portion of an image.
Some people call selections “masks,” because they mask, or hide, a portion of an image. But, in Photoshop, selections do far more than masks. As you learn more, you’ll use both. Common selection tools include:
- Marquees
- Lassos
- Select > Subject
- Object Selection, Quick Selection, and Magic Wand tools
- Quick Mask and other masking tools
Let me illustrate some of the more popular selection tools.
Near the top of the Tool panel are the geometric Marquee tools, shown in Figure 9.12. When a tool has a small (really small) triangle in the lower-right corner, click and hold the mouse button on the tool to reveal the other tools grouped with it. The Rectangular Marquee tool selects rectangular or square areas, while the Elliptical Marquee tool selects oval or circular areas.

Figure 9.12 There are four geometric Marquee selection tools. The two most useful draw rectangles or ovals.
When using either the Rectangular Marquee tool or the Elliptical Marquee tool, press Shift to constrain the shape to a perfect square or circle. Press Option to draw from the center, rather than a corner. Press both Shift and Option to draw perfect shapes from the center.
Select a layer then select the Marquee tool. Drag across an element in the image. You just created a selection! Here’s what we can do with it:
- Press the Delete key to remove the selected area. (Press Cmd+Z to undo your deletion.)
- Choose Select > Inverse then press the Delete key. You just deleted everything except the area you selected. (Press Cmd+Z to undo.)
- Try the same things using the Elliptical tool and see that it works the same way, except that this tool selects ovals or circles.
Tweaking a Selection
If you have a selection but need to make adjustments, choose a selection tool then do the following:
To add the new area to an existing selection press Shift and drag.
To remove the new area from an existing selection press Option and drag.
Not all selection tools require dragging, but Shift or Option will always add to or remove from a selection.
Now that we know how to select an area, let’s put this knowledge to work.
Figure 9.13 illustrates using the Rectangular Marquee tool to draw a selection rectangle to isolate the park bench. (Because these lines “vibrate,” they are often called “marching ants.”) With that area selected, I can now do something with it. For example, choose Image > Crop and only the selected area is retained. This is another way to crop an image that doesn’t use the Crop tool.
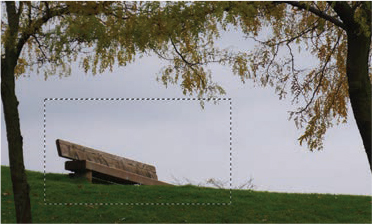
Figure 9.13 This image has a selection rectangle around the park bench. These lines are often called “marching ants.”
Selection tools also work with the Background layer, but if you try deleting a selection from the background, you’ll get an error message.
In this example, I used a selection to crop an image to reduce the size of an image. In the next example, I’ll use a selection to remove a portion of an image without changing the size of the image.
Figure 9.14 illustrates three more selection tools: the Lasso tools.
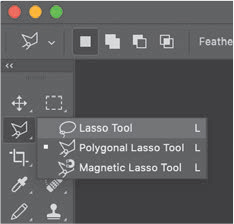
Figure 9.14 The Lasso tools select elements that are not geometric in shape.
- Lasso tool. This draws selections freehand (which, um, works better if you can actually draw).
- Polygonal Lasso tool. This creates selections by connecting a series of straight lines. To use this tool, click to set the end of each line.
- Magnetic Lasso tool. The selection is attracted to edges that are close to where you are drawing.
All of these tools are useful for selecting objects.
Figure 9.15 shows a benefit of using a Lasso tool—we can pretty easily select odd-shaped objects. However, selecting those roof lines was tricky because of the shape of the chimney and the overlap of the roof to the walls made selection difficult.

Figure 9.15 In the left image, I used the polygonal lasso to trace the rooftops of the fishing shacks. In the right image, I removed the sky, which I can then replace with a better version from a different shot.
Figure 9.16 highlights three more selection tools. Drag the Object Selection tool loosely around an object to select it. The Quick Selection tool selects areas based on edges. The Magic Wand tool, which is one of the oldest selection tools in Photoshop, selects similar colors.
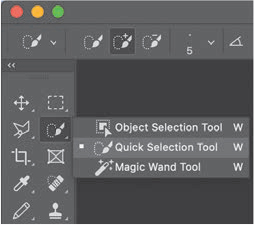
Figure 9.16 These tools allow you to select objects, edges, or similar colors.
In fact, in Figure 9.15, I cheated. While I could use the Polygonal Lasso tool, instead I chose the Quick Selection tool and dragged it through the sky to select the boundaries between sky and roof.
It took me a couple of minutes to create the selection using the Lasso tool. But, it took less than a second to do the same thing with the Quick Selection tool; and the Quick Selection tool did a better job! This is one of the reasons Photoshop has so many selection tools—we often need different ways to select an object.
So far, we’ve used selections to crop an image and remove a portion of an image. In Figure 9.17, I’m using a selection to copy a portion of an image, a balloon, to bring into another image, a mountain scene.
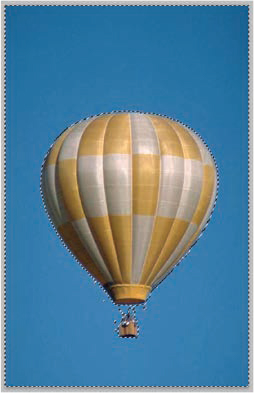
Figure 9.17 This selection was created by clicking the Magic Wand tool on the blue sky, which selected similar blue colors.
Select this balloon by clicking the Magic Wand tool on the blue sky. This selects everything blue, depending upon the Tolerance setting (see the “Tolerance” sidebar).
Choose Select > Invert to select everything except the blue sky.
Copy the image to the clipboard (Edit > Copy).
Open the image to which you want to add the balloon.
Choose Edit > Paste to paste the image and create a composite.
Drag the image to reposition it, or choose Edit > Free Transform to scale, rotate, and reposition it.
Figure 9.18 illustrates a big reason to use selections: We can use them to select a portion of one image then copy/paste it into a different image to create an entirely new image. If we do it right, the images look like they belong together.
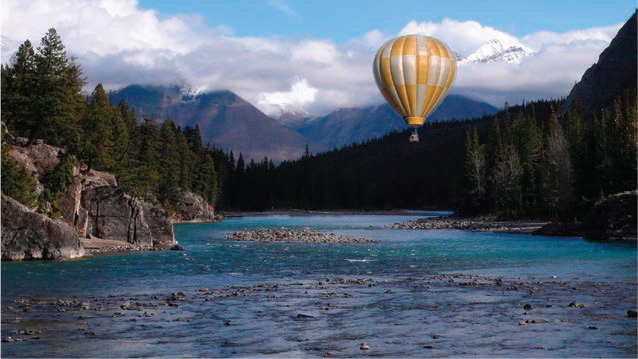
Figure 9.18 A composite with the balloon added to a photo of the Bow River.
When compositing, pay attention to the lighting between the composited elements. In Figure 9.18, the light direction and intensity of both the balloon and the mountain match. This makes the composite look more believable.
Figure 9.19 illustrates another technique: using selections to edit images. Moving elements is hard to illustrate in a book. So, for this example, I selected an edge and moved it 557 pixels to the right. It looks awful but clearly shows what moved.
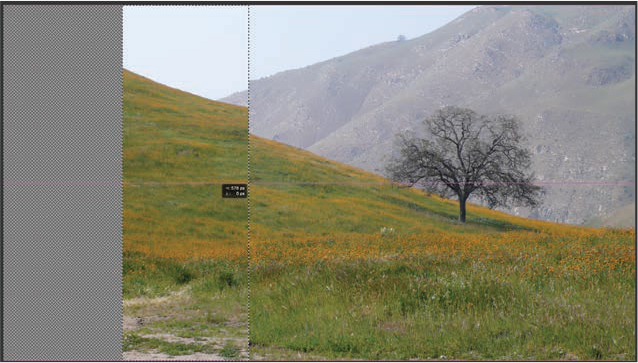
Figure 9.19 This illustrates how to use the Rectangular Marquee tool to select and move a portion of an image.
You can’t move portions of the Background layer. It needs to be converted to a normal layer first.
Using the Rectangular Marquee tool, follow these steps:
Select the area you want to move.
Switch to the Move tool (Shortcut: V).
Use Shift+left/right arrows to move the selection. (Moving a portion of an image reveals transparent pixels under each layer, which is indicated by the dark gray grid where the image used to be.)
To remove the transparent (blank) space on the edges, choose Image > Trim, and make sure Transparent pixels are selected.
Tolerance
Some tools, like the Magic Wand tool, have a Tolerance setting in the Options bar at the top of the interface. Tolerance determines the amount of variation from the selected color that the tool will accept. For example, setting Tolerance to 0 means only the selected color will be chosen. A Tolerance setting of 255 means all colors will be chosen. Generally, you want some Tolerance, but not a lot. If you aren’t selecting all the colors you need, increase Tolerance. If you are selecting too many, decrease it. The default setting for the Magic Wand tool is 32.

Many of the screen shots posted to my website have been narrowed this way simply because they don’t otherwise fit. Done right, you’ll never notice the change.
Selection tools “select” a portion of an image so we can do something to it. So far, we’ve mostly looked at getting rid of stuff. It’s time to expand into effects.
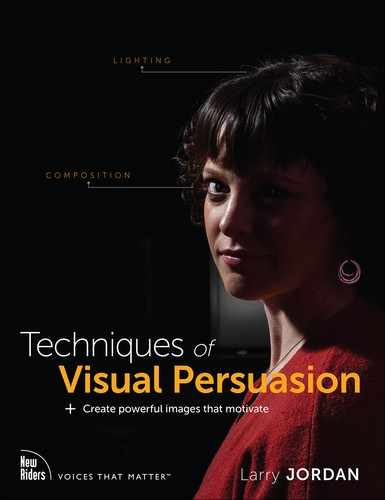
Another powerful visual effect, as shown in Figure 9.20, is for everything to be black-and-white except the area you want the viewer to see first. (We also used this effect for the cover of this book.) Selections make this easy to do.

Figure 9.20 First, I selected the berries, then inverted the selection, then removed all the color from the selected area.
Transparent Pixels
Remember the definition of pixels? They are fixed in size, contain exactly one color, and can be transparent, translucent, or opaque. A transparent pixel is exactly that: a single pixel that we can see through.
Open an image, and choose Select > Subject. Photoshop will select the dominant subject in the frame. Choose Select > Invert; this selects everything except the berries, in my case. Then choose Image > Adjustments > Hue & Saturation and slide the Saturation slider all the way to the left.
Selection tools don’t always select something perfectly. It is common to clean up a selection by tweaking what’s included and what isn’t. Selections can also be saved (Select > Save Selection) as needed.
What the selection does is isolate an effect—in this case desaturation—to only the area bounded by the selection marquee. Here’s another example.
Remember that the eye is attracted to that which is in focus. So, to make sure the background didn’t distract from the title, I blurred, darkened, and desaturated it (Figure 9.21). The eye now goes first to the text, then the tree, then is free to wander hither and yon. (I’ll explain how to blur a selection or layer in the next section.)

Figure 9.21 The background is blurred so that the eye goes first to the text, because it is brighter, then to the image of the tree.
As you can see, there are a ton of things we can do with selections. Take some time to explore the Selections menu and discover all the different options for selecting stuff. TABLE 9.1 shows selection shortcuts I use all the time. The Appendix has more.
TABLE 9.1 Shortcut Summary
SHORTCUT |
WHAT IT DOES |
Cmd+A |
Selects entire layer |
Cmd+D |
Deselects selection |
Shift+Cmd+I |
Selects the inverse of the selection |
V |
Chooses the Move tool |
M |
Chooses the last-used Marquee tool |
L |
Chooses the last-used Lasso tool |
Filters and Effects
The cool thing about filters is that if the effect looks good to you, it is good. There’s no technical spec you need to meet. Each image and story is different, which is why there are so many different effects.
At the top of the Filter menu is the Filter Gallery (Figure 9.22). This contains hundreds of stylistic effects to change the look of an image. The easiest way to explore filter effects is to open an image, select something, apply a filter, then tweak with wild abandon. I don’t use these a lot because most of my work is to repair and highlight sections of an image, rather than create something artistic.
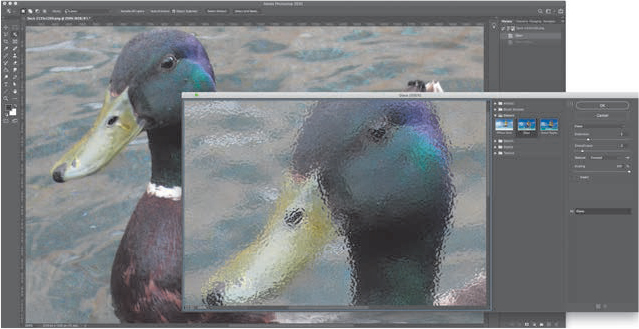
Figure 9.22 Choosing Filter > Filter Gallery provides hundreds of different looks. This is the Glass effect.
The lower half of the Filter menu provides other effects options. The one I find most useful—as I illustrated in Figure 9.21—blurs a background to make the foreground more visible: Gaussian Blur (Figure 9.23). I’m always looking for ways to direct where the eye looks, and a blur creates the illusion of depth of field. The amount of the blur is determined by the Radius setting.
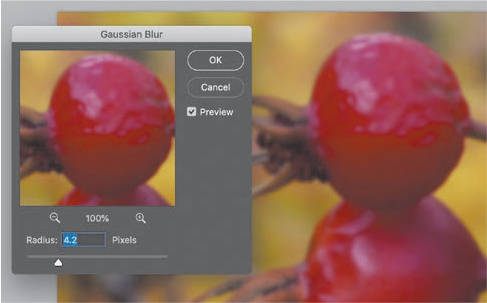
Figure 9.23 The Gaussian Blur dialog (choose Filter > Blur > Gaussian Blur). Blur settings are previewed immediately in the main image but not applied until you click the OK button.
See how, in Figure 9.24, blurring the background of the image makes the text more readable? Blurring means that nothing in the background competes with the text. This technique of blurring backgrounds, or portions of backgrounds, is one that I use all the time.

Figure 9.24 The left example shows text superimposed over an in-focus image. In the right image, I blurred the bottom half of the image, which makes the text more prominent.
Why Is There a Small Preview Window?
The small preview window in many filters is a holdover from the days of slower computers. Photoshop could render a small preview quickly, allowing you to see what the effect will look like once you approve it. I still remember the days of waiting 30 seconds for Photoshop to blur even a small image. If you don’t see a preview in the larger window, be sure Preview is checked.
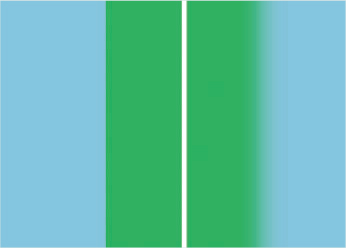
What Is Feathering?
Feathering means to soften an edge. It’s an old photo-retouching term. The colors on the left have a hard edge, Feather = 0. The colors on the right have a feathered edge, Feather = 200. The amount of feathering can be varied from none to a lot.
To achieve this effect, after opening an image and adding the text:
Make sure the lower layer is selected. In this case, it’s the background layer.
Use the rectangular marquee to select the bottom half of the screen.
Choose Select > Modify > Feather to soften the edges of the selection.
The larger the feather value, the softer the edge. This example uses a Feather value of 150.
Now, when your eye looks at the image, it sees the in-focus area at the top and the text at the bottom, without a busy background distracting you from reading the text. Even better, your eye never notices that the background is blurred behind the text because the transition is feathered.
Choosing a Color
There are two main color pickers in Photoshop: Foreground color and Background color. (As well, text and other effects have their own color pickers. They all operate the same way.)
You can “nudge” a color by selecting a numeric value then pressing the up/down arrow keys.
Photoshop provides a variety of ways to select colors, but they all start by clicking a color chip. The color chips are located in the middle of the Tools panel, as shown in Figure 9.25. Within the dialog itself, click and drag within the big color block to choose hue and saturation. Drag the small white triangles next to the green bar, in my example, to modify brightness. (You can also enter a specific color value using the numbers on the right. Professional designers use these all the time to precisely match colors.)
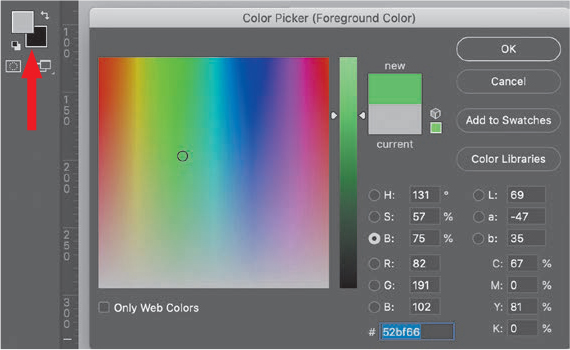
Figure 9.25 Color chips are located in the Tools panel. The color chip on the left picks the foreground color; the chip on the right picks the background color. To display the Color Picker, click once on either chip.
A faster way to pick a color is to open the Color Picker then click your cursor on any color in an image in Photoshop. That color is instantly “picked.” Click OK to close this dialog.
TABLE 9.2 shows some handy shortcuts to working with the Color Pickers.
TABLE 9.2 Color Picker Shortcuts
SHORTCUT |
WHAT IT DOES |
D |
Resets both Color Pickers to their default colors (black-and-white) |
X |
Swaps positions between foreground and background color |
Cmd+A |
Selects all of a layer |
Option+Delete |
Fills the selected area with the foreground color |
Cmd+Delete |
Fills the selected area with the background color |
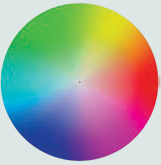
Picking Complementary Colors
If picking colors is new to you, the color wheel is a useful way to find complementary colors. Try picking colors on opposite sides of the wheel, but with different levels of brightness and/or saturation. Another good color resource is color.adobe.com. This is an interactive guide to picking compatible colors.
Adding a Background Behind a Layer
Let’s say you opened an image full-screen, which put it on the Background layer, then decided you wanted to scale it smaller and put it against a white background (Figure 9.26). How do you create a white background? Easy. Here’s how:
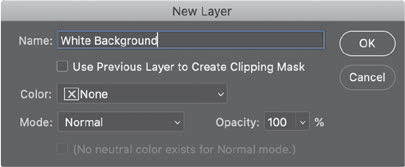
Figure 9.26 Create a new layer.
A good color resource is: color.adobe.com.
Convert the Background layer to a normal layer so you can put a new layer below it.
Choose Layer > New Fill Layer > Solid Color.
Name the layer.
Click OK.
Select the color you want from the Color Picker.
Click OK.
New layers are always created on top. Drag the layer below the current image.
This seems like a lot of steps, but after you’ve done it a couple of times, it will seem second nature. We are always adding new layers, always changing their order, and always selecting stuff. The only new thing we did here is to create a layer of color.
Blend Modes
Blend modes are a special kind of effect that combine textures between layers. They are often used with text, especially with motion graphics, which I’ll cover in Section 3, “Persuasive Moving Images.” I often use blend modes when I want to blend white text with a background.
Blend modes are applied separately to each layer, as shown in Figure 9.27. You can apply only one blend mode per layer, but every layer can have a different blend mode applied. Select the layer then choose the option you want from the blend mode menu (indicated with a red arrow in Figure 9.27).
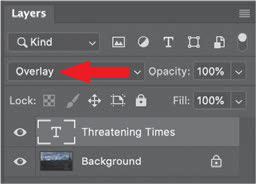
Figure 9.27 Blend modes are applied to all the elements on a layer, using this popup menu. Here, I’m applying the Overlay blend mode.
There are a wide variety of blend modes to choose from, grouped into categories. Blend modes apply simple math to combine grayscale or color pixel values between images on adjoining layers. Unlike a filter, there are no settings to adjust. Figure 9.28 illustrates the blend mode options in Photoshop:

Figure 9.28 Blend modes are grouped into categories, based upon how they manipulate pixel values.
Multiply category. Combines elements based upon shadow pixel values. My favorite choice within this category is Multiply.
Screen category. Combines elements based upon the highlight pixel values. My favorite choice in this category is Screen.
Overlay category. Combines elements based upon midtone pixel values. My favorite choices in this category are Overlay and Soft Light.
Difference category. Combines elements based upon color pixel values. Each of these creates a very surreal look. My favorite choice is Difference.
Hue category. Combines elements based, mostly, upon color values, but in a different fashion from the Difference category.
In Figure 9.29, I’m using darker text placed above a dramatic sky, then applying four different blend modes to create four different effects. You can also vary results by changing the brightness, color, or opacity of the source text or background image.

Figure 9.29 Source image and text (top), followed by four blend modes: Screen, Overlay, Multiply, and Difference (from top to bottom). With all blend modes, the texture of the lower image is combined with the text.
In all cases, Blend modes combine the textures of the foreground and background. This makes text look more organic and part of the environment, rather than pasted in front of an image. Screen combines brighter pixels, Multiply combines darker pixels, and Overlay combines pixels in the middle. Difference displays the color 180° opposite to the source color on a color wheel (see Chapter 5, “Persuasive Colors”).
Blend modes are a special kind of effect that combine textures between layers.
However, blend modes can do much more. Here are some additional examples.
Blend modes combine textures between layers so that they look more organic, more “integrated.” In Figure 9.30, for instance, the text looks like it was spray-painted on the background, rather than floating above it. This uses the Overlay blend mode.
We can also use blend modes to replace the solid color of the text with something more visually intriguing, including video or animation (Figure 9.31). The specific technique to create this blend mode varies by application.
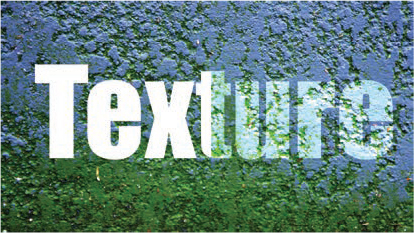
Figure 9.30 The text on the left, being a solid color, is pretty stark. Look how much more interesting it is when it picks up the texture from the background.
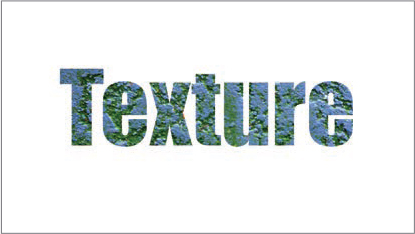
Figure 9.31 Another blend mode replaces the solid white color of the text with a more interesting color and texture.
What makes blend modes so much fun to work with is that there are no settings to adjust.
In Figure 9.32, we stacked a black-to-white gradient on top of a photo then applied the Overlay blend mode to the top image. (The gradient was created in Photoshop using the Gradient tool.) The darker values at the top darkened the sky, making the clouds more dramatic, while lightening the foreground and making it more “present.” Gradients and blend modes can enhance almost every landscape image.
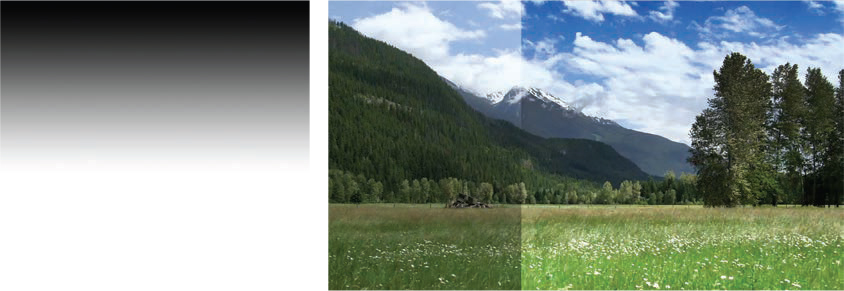
Figure 9.32 By stacking a gradient on a layer above this image then applying the Overlay blend mode, we can improve most outdoor images (before the effect on the left, after on the right). (Image courtesy of EditStock.com)
What makes blend modes so much fun to work with is that there are no settings to adjust. They are simple mathematical calculations performed on each pixel. Either you like the results or you don’t. Instead of tweaking a filter, try different blend mode settings, modify the opacity, or slightly adjust the levels for the image.
I use blend modes all the time to make two separate images look related, rather than merely superimposed on each other.
One Last Effect
As we wrap up this chapter on Photoshop, I want to illustrate an effect that I assign to my students: creating a cast shadow. Figure 9.33 shows the finished results. This highlights a variety of techniques we’ve learned over the past two chapters.

Figure 9.33 Here’s the finished effect, a glass that casts a soft shadow; though that shadow was not in the original image.
Here are the steps:
Open an image with a strong foreground object and bland background.
Choose Select > Subject. This puts a marquee around the foreground object. (This doesn’t need to be perfect, but some tweaking may be necessary.)
Copy the selection to the clipboard (Edit > Copy).
Paste the selection. This automatically creates a new layer, places the pasted object on it, and matches its original position.
Create a new layer and drag it between the image and the subject in the Layers panel (Figure 9.34).
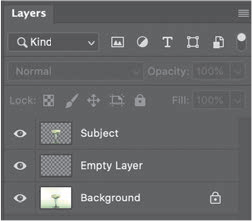
Figure 9.34 Here’s where we are now—the image on the bottom (it doesn’t need to be converted to a layer), an empty layer (which will hold the shadow), and the copied subject image at the top.
The stacking order of the layers is important, as you’ll see. (I renamed the layers in Figure 9.34 to make it easier to see what’s going on. To rename a layer, double-click the layer name.)
Rename the middle layer to “Shadow.”
Press D to reset the Foreground and Background color pickers to black and white, respectively.
Cmd+click the icon in the Subject layer to reselect the subject.
Without deselecting the image, select the Shadow layer.
Press Option+Delete. This creates a solid black shape that exactly matches the shape and position of the selection and places it in the Shadow layer.
With the Shadow layer still selected, choose Edit > Transform > Distort.
Grab the dot in the middle of the top bar and drag down to create the shadow, as shown in Figure 9.35. Click OK or press Return.
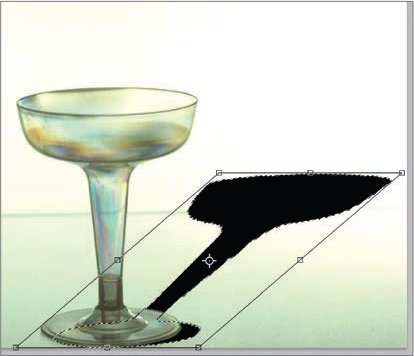
Figure 9.35 The black shape, which matches the subject, is distorted to look like a shadow cast by the glass.
With the Shadow layer still selected, change Opacity to 25%.
Choose Filter > Blur Gallery > Tilt/Shift to apply a variable blur.
Rotate the Tilt/Shift blur until the shadow closest to the glass is sharp, while that farthest away is blurry (Figure 9.36).
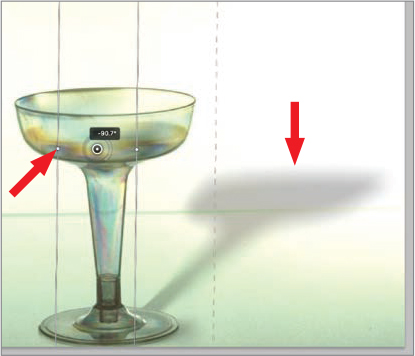
Figure 9.36 Grab a rotation dot (left arrow) and rotate the shadow until it is sharp near the glass and softer farther away.
Adjust layer opacity to suit.
Done!
This illustrates how different aspects of Photoshop combine to create an effect. Most of the time, the effects we need to create are simple: add text, crop an image, adjust exposure, and so on. However, Photoshop is a very deep and powerful tool; the more you explore, the more there is to discover—and have fun with.
Photoshop is a very flexible, powerful and deep tool—the more you explore, the more there is to discover.
Key Points
This chapter wraps this section on still images. In the next section, we take everything we’ve learned and apply it to moving images. And, as you might suspect, that starts with planning.
When it comes to this chapter, here’s what I want you to remember:
- Composite images are images composed of multiple images or elements such as text.
- The Layers panel allows us to add, rearrange, modify, and delete elements.
- While the Background layer can be edited, converting it to a layer provides more flexibility, including changing position and transparency.
- Choosing Edit > Free Transform is a useful way to modify elements on a layer.
- To add multiple elements to the same image, choose File > Place, or drag the elements into the image from the desktop.
- Selections mark areas of a layer to be modified.
- There are many different selection tools, each designed for a specific purpose.
- Filters change the look of an image or selection.
- Blurring a background makes text easier to read.
- Blend modes combine textures between layers.
Practice Persuasion
Your challenge is to use “nonsense” text to create two ads using Photoshop. The purpose is to separate emotions from content. Then, see how composition and color combine to convey a message.
Create two Photoshop ads. One is for a boutique cupcake store, and the other is for a plumbing contractor. Each ad:
- Must use only the pseudo-Latin text from www.lipsum.com or the pseudo-Latin characters that travel with the Text tool.
- The actual content of your words must be gibberish.
- You can use images.
- Must have a Call to Action with a URL.
The goal is to get you thinking about design, not writing. Visuals, not content. Think about how a message looks, rather than what a message says.
Everything else is up to you.
PERSUASION P-O-V
RE-CREATING NORMAN ROCKWELL’S CREATIVE PROCESS
Loren Miller (and Rachel Victor)
Producers, Jarvis Rockwell.
Jarvis Rockwell is a film I co-produced with Rachel Victor. (It was released in the summer of 2020.) It’s a biography of Jarvis Rockwell, the oldest son of Norman Rockwell, one of America’s most famous illustrators.
The core story of our film involves how Jarvis veered from his dad’s expectations that he would also become a realist oil painter. Jarvis showed early brilliance as a sketch artist, with little formal training. But Jarvis was destined for other, more conceptual paths, as were his younger siblings. Tom became a novelist and poet, and Peter became a stone sculptor.
Tom and Peter both credit Jarvis for navigating difficulties with “Pop,” chief among them his preoccupation with work. At the heart of that preoccupation was Norman’s actual process for developing his iconic paintings of 20th century American life.
It wasn’t just the content, but how he got there. Jarvis paints his father as a workaholic “eight days a week.” Norman’s process very much resembled the previsualization planning and techniques of a contemporary filmmaker. Norman was brilliant. But the process took a toll on him and his family. He never called himself a painter or artist; he used the term “illustrator.”
Norman’s art editors at the Saturday Evening Post needed his iconic cover paintings on time, demanding a full-sized canvas every other month, and he had to find a method to accelerate the process to fulfill the images in his head and meet nearly impossible deadlines. He successfully delivered 323 classic cover paintings for the Post over 47 years.
When Jarvis visited his father’s studio, Pop was usually preoccupied with what Jarvis perceived as an unreal world of props and costumes, awkward poses, cameras, lights, and photo projectors, or actual paintings.
Norman would draw him into the process, using him as a child model. This role-play often substituted for family time and became the heart of Jarvis’ identity crisis, which has taken a lifetime to shake off.
By showing the detailed process Norman used to construct his illustrations, we highlight the extent to which Norman was preoccupied with his elaborate workflow, resulting in a mutually challenging environment for father and son. This workflow, which allowed Norman to provide for his family and brought him fame, resulted in Jarvis’ adult struggle to forge a different, ultimately successful, path.

Norman directing a model with Louie Lamond at camera (left). Printed reference photo of young Jarvis for “Homecoming Marine” (right). (Courtesy of Rockwell Family Agency, Norman Rockwell Museum Image Services.
First, Norman would freehand-sketch a previsualization of a proposed painting. It would contain all the characters he envisioned and a basic setting such as a luncheonette, a garage, a barbershop, or a train car.
Then he would cast photo models—often his sons, as well as his wife, neighbors, townspeople, even himself.
Then he would painstakingly direct the poses and expressions of his models. He has stated, “Directing models is an art unto itself.”
Employing a cycling cadre of professional cameramen, he would photograph several takes of each model with a Speed Graphic 5"×7" plate camera, the high-resolution model of its day.
He would develop these studio reference photos and print them himself in a darkroom alongside the studio. (Today you can visit the Digital Collection at the Rockwell Museum’s website to view them.)
He would lay out the prints of each model on a table or window seat to select the best takes of each, searching for the most effective facial and body expressions.
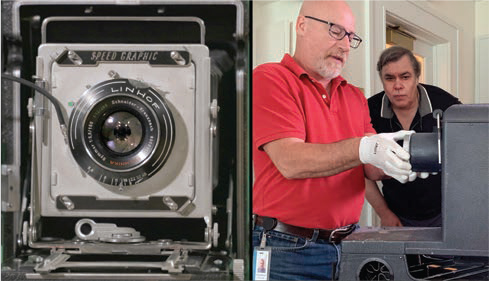
Process hardware of the day: Norman’s Speed Graphic plate camera (left). Museum Image Services’ Thomas Mesquita handles Norman’s Balopticon projector for our insert shooting as producer Loren Miller looks on (right). (Image Credits: Courtesy of Harlan Reiniger. © 2019 Rachel Victor Films, LLC (left). Courtesy of Loren Miller. © 2020 Rachel Victor Films, LLC (right))
Then he would cut and snip each character into a highly composed photo collage. These “edited selects” replaced large parts of the original previsualization sketch to such a point that few if any exist today.
He would then photograph the resulting collage itself and load the resulting print into a Bausch and Lomb Balopticon projector, aimed at his full-size canvas.
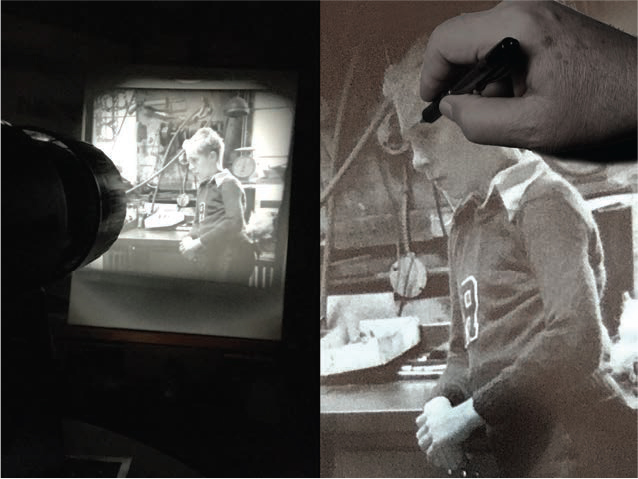
Re-creating Norman rotoscoping Jarvis onto canvas from projector. (Photo credits: Loren Miller. © 2020 Rachel Victor Films, LLC.)
He would then trace each face and body in fine detail onto the canvas using a charcoal pencil as shown in the image.
Finally, he would mix the paints and leverage his Art Student League training and expertise in oils. If you compare his photos to the final paintings, you often see exact expressions preserved, but with large amounts of invented reality; it was not at all a “paint by numbers” process. But the painting would be done in record time and shipped to the Post.
Norman never kept the process a secret—he even composed a booklet for art students detailing it. Many artists use it.
Our goal, with the images we’ve created is to bring our audience to better understand Norman Rockwell, the artist, and Jarvis Rockwell, his son, whose journey has been an amazing path no less unique than his father’s and well worth the trip.