Chapter 14
Video Post-Production
If chess has any relationship to film-making, it would be in the way it helps you develop patience and discipline in choosing between alternatives at a time when an impulsive decision seems very attractive.1
Stanley Kubrick
Filmmaker
[1] September, 1968, Interview in Playboy Magazine
Chapter Goals
The goals for this chapter are to showcase an effective editing workflow and editing techniques that allow you to take the images captured during production and turn them into a program that someone else will want to watch.
The goals of this chapter are to:
 Share a workflow for editing that applies to all editing systems and visual storytelling
- Explore each step of the workflow as a way to learn basic editing
- Discover how to use Apple Final Cut Pro X for storytelling
- Learn what to consider when editing any project
The purpose of editing is to create a clear, compelling, and engaging message from the elements shot during production.
THE EVIDENCE WAS ALL THERE: super-fast, unjustified switching between shots coupled with overwhelming and distracting visual effects. The verdict: an insecure editor. Fast cutting in an action sequence makes sense; fast cutting in an interview does not. The old adage applies: “Just because you can does not mean you should.”
The purpose of editing is to create a clear, compelling, and engaging message from the elements shot during production. To accomplish this, an editor has two options: one, showcase the talent on camera or, two, hide the fact that the person on camera has no talent. Either way we still need to create a clear, compelling, and engaging message.
What Is “Good” Editing?
As you might guess, editing is assembling a series of video clips together to tell a story. But what is “good editing”?
As I was researching this chapter, I did a Google search for “bad video editing.” I found lots of different lists and discovered that errors consistently fell into three groups (TABLE 14.1).
TABLE 14.1 Indicators of Poor Editing
AUDIO |
NOT SEEING WHAT’S ON THE SCREEN |
CONTENT |
|
Poor audio mix. Audio is out of sync with video. The emotions in the music don’t match the tone of the video. |
Flash frames caused by edits where extra frames of old clips are left at an edit point. Jump cuts. Unjustified, instantaneous shifts in position. Bad transitions. Images changing in the middle of a dissolve. Inconsistent graphics/fonts/styling. Poor camera framing. Poor color. |
Pacing is too fast. Pacing is too slow. Holding shots too long or too short. Keeping shots that are lovely but don’t belong. |
It was interesting to me that poor audio made the “top three” problems on every list I reviewed. Audio is really that important to video.
It’s a depressing list. However, these problems can all be fixed by following a simple precept: “Slow down and pay attention.” Your ears will tell you if the audio mix doesn’t sound right. Concentrate during playback and actually see what’s on the screen, as opposed to what you expect to see on the screen. Finally, ask yourself: Does my story make sense? Am I telling my story too quickly? Am I distracting the audience with images or sound that don’t relate to my story?
“Slow down and pay attention” fixes most problems.
Slow down and pay attention—you are spending days, even weeks, assembling a project. Your audience gets to see it only once. Do everything you can to share your story clearly with an audience that may not be paying full attention.
There are lots of excellent resources on the web that can help you improve. In addition to my website (LarryJordan.com), there are blogs at PremiumBeat.com, MotionArray.com, Videomaker.com, and Pond5.com, as well as training at NoFilmSchool.com, Moviola.com, and many others.
See What’s There
Over the years, my students have proven that when they are editing video, they see what they expect to see, not what’s actually on the screen. I don’t know an easy way to correct this except to point out—as I did in Figure 3.4 in Chapter 3, “Persuasive Writing”—the Google goggles. Not seeing what’s right in front of you is an easy trap to fall into.
Find the Rhythm
A key editing concept is “rhythm.” Speech is rhythmic. Music is rhythmic. Movement is rhythmic. We respond to rhythm, and we need to reflect that rhythm in our editing, not just in the dialogue, but in the timing, pacing, and sequencing of our shots.
When Should You Cut?
Walter Murch, Oscar-winning editor of Apocalypse Now, The English Patient, and many other major feature films, spent 100 pages in his outstanding book “In the Blink of an Eye” discussing where to cut between two shots. The short answer is: Edit when your talent blinks.
As we edit, we use pictures to show what is happening, dialogue to tell the story, sound effects to make the pictures believable, and music to drive the emotion. Nothing appears in a video by accident. You may not have planned for that prop to break, for that ad-libbed line, or for an interesting juxtaposition of shots that caught your attention during the edit—but, once you put it on the Timeline, it stays there because you want it there.
I frequently refer to Apple Final Cut Pro X as “Final Cut” and “FCP X.” Also, just so you know, it’s pronounced “Final Cut Pro Ten.”
I’ve written eight books, so far, about editing. There’s no way in a chapter I can teach you everything you need to learn. Instead, I want to share with you a way to think about editing that will make learning and using any editing software faster and easier.
To do this, I’ll use examples from Apple Final Cut Pro X. Why? Because years of teaching Final Cut and Adobe Premiere Pro and working with other editing software have shown me that Final Cut Pro X is faster and easier for noneditors to learn and use successfully. Apple, Adobe, Avid, Blackmagic Design, and others make professional-grade software that can edit everything from home movies to major motion pictures. They all do professional-level work.
Will other editing software work for your projects? Most likely, yes. Will it deliver excellent results? Again, probably yes. Pick the tool that works best for you. For this book, that tool is Apple Final Cut Pro X.
I often use “cutting” as a synonym for editing, because editing began first with film that was cut with a razor, then glued back together.
Another reason for learning to cut using professional tools is that when the chips are down and deadlines are looming, you need software that has the depth of features and stability to get your work done. If all you need to edit is a home movie, any editing software will do. But, when money and reputation are at stake, you need software that, when you really lean on it, it supports you.
With very few exceptions, video editing is the most technologically challenging task you can do on a computer. It requires a high-power system, especially as codecs get more and more efficient at compressing media. Editing depends on the tightly integrated efforts of the CPU, GPU, RAM, storage, operating system, software…every component in your computer is challenged during video editing. Editing may appear easy, but, under the hood of your computer, there is a lot going on.
As the editor, you need to balance creativity with technology.
Editing is also a highly creative task because there is an unlimited number of ways to tell the same story. Even in adjusting where clips touch and how we change from one shot to the other, hours can be spent deciding the best place to make the change.
Beyond the creativity and the technology, editing is also a highly logical task. Organizing the story, tracking clips, managing media, meeting deadlines…all of these different challenges are consolidated into one activity: editing.
As the editor, you need to balance creativity with technology. You need to look at the story you are telling from the audience’s point of view: create a rhythm and flow to your story. Make sure there aren’t any jarring edits, jump cuts, or visual distractions that take viewers out of your story.
This chapter looks at the process of editing. Along the way, I’ll provide some tips on the creative side, but, like most creative activity, the best way to learn something is to do it, watch it, critique it, then try again.
An Editing Workflow
There is never enough time—not in planning, not in production, and definitely not in editing. No creative task is ever completed; instead, they are abandoned as time runs out. This means we need to be as efficient with our time as possible and that means we need a workflow.
Over the years, I’ve developed a 12-step editorial workflow that answers the question, “What should I be doing right now?” When I teach high-school students, they first want to learn to create effects. When I teach college students, they first want to learn to edit.
Chapter 10, “Video Pre-production,” defined media management as organizing clips by camera card and source. Once we move into editing, organization shifts to subject and scene. For most edits, how we organize clips in our video editing software does not match how clips are stored on our hard disk.
Where we really need to start, though, is planning. That’s where this editorial workflow fits; it keeps all our energy and enthusiasm focused. This chapter is organized around a 12-step workflow presented in TABLE 14.2.
TABLE 14.2 The 12-step Editorial Workflow
CREATE THE STORY |
POLISH THE STORY |
|
1. Plan the project. 2. Gather the media. 3. Organize the media. 4. Build the story. 5. Organize the story in the Timeline. 6. Trim the story. |
7. Add transitions. 8. Add text and effects. 9. Create the final audio mix. 10. Finalize the look and colors. 11. Output the project. 12. Archive the project. |
Define Terms
I will frequently use the term “hard disk.” This refers to all the different storage options connected to your system: internal SSD, internal hard disk, external hard disk, external SSD, external RAID, server volumes…the list seems endless. “Hard disk” is how I refer to all of it.
Before we jump into the process of editing, there are five Final Cut terms I need to define:
- Library. This is the master container Final Cut uses for your edit. It holds the information necessary to find your media and how it is edited. While it is an icon you see on the desktop, a library is a “super-folder” that acts like a single file but actually holds lots of different stuff.
- Event. This is a fancy name for a folder inside Final Cut. Events hold the projects, video, audio, and stills that you need for your edit. There’s no limit to how many files you can put in one event. Events are stored inside the library, but you can’t store one event inside another.
- Project. This holds the instructions about how you want your media edited. Projects are opened in the Timeline. The Timeline is the tool that holds the clips we edit into a project. Timelines can be up to 12 hours long and hold thousands of clips. Projects, like events, are stored inside the library.
- Media. These are the clips that we edit. Clips can contain still images, video, audio, timecode, captions…lots of different elements can be stored in a clip. Media files are huge. Media can be stored inside or outside of the library.
- ProRes 422. This is the default codec for editing in Final Cut Pro X. ProRes is an excellent codec family; it was invented by Apple and is used by lots of different companies.
The script creates the idea, production records the story, and the story is told through editing.
OK, let’s get started.
Intermediate Codecs for Editing
We frequently convert media from camera native to an intermediate (or middle) codec for editing. This is done for faster performance and exports, as well as improved image quality for color grading and effects. Final Cut makes this easy using an import option called Optimize Media, which I’ll cover in a few pages. Then, during export, we convert our project to a third codec for final distribution.
Step 1: Plan the Project
Unlike many other applications, Final Cut Pro X automatically saves your files the instant you make a change. This means you never need to worry about saving a project as you work.
We covered this extensively in Chapter 10. Here, I simply remind you to understand your message and your audience, to make sure your gear is working and that you know how to use it, and to make sure you know the content, duration, and format to deliver when you are done.
Step 2: Gather the Media
This is part of the production phase, covered in Chapter 13, “Video Production,” where we shoot new material and gather existing material from other sources, such as prior projects or stock footage houses, that we need to tell our story.
Nonlinear Editor (NLE)
Computer software that can access and edit media clips in any order (nonlinear), unlike earlier film editing systems, which were not computer-based. Another way to think of an NLE is as video editing software,, but NLE is faster to write.
This is also the step where the media management we covered in Chapter 10 comes into play. We need to safely transfer the media we shot during production to our storage, make backups, then label the folders so that we know what we shot and where it’s stored.
Once our media is safely stored, we need to find specific shots. There are a lot of different systems we can use, from simple paper lists to spreadsheets to media asset management software such as Kyno, Axle.ai, and KeyFlow Pro. It may seem that you could keep all your shots in your head, but, ultimately, you’ll discover it will be easier to off-load that media tracking to software. For simple projects, spreadsheets are great; we all know how to use them, and they work.
Step 3: Organize the Media
This step starts the editing process, because clip organization takes place in Final Cut, rather than the Finder.
For this chapter, I’m using air show footage courtesy of Hallmark Broadcast Ltd. (HallmarkMediaGroup.com). I’m grateful to them for sharing their clips.
Continuing the trend of impossibly dark interfaces for media software, Figure 14.1 shows the interface for Apple Final Cut Pro X. While it can support two monitors, it is designed to fit into one. There are four principal sections to the interface:
Libraries sidebar and browser. This is where we view and organize clips.
Viewer. This is where we watch clips and projects.
Timeline. This is where clips are edited into finished projects.
Inspector. This is where we make changes to clips and effects.

Figure 14.1 The Final Cut Pro X interface. 1. Libraries sidebar and browser, 2. Viewer, 3. Timeline, and 4. Inspector.
We’ll work exclusively with the Browser and Viewer to get clips reviewed and organized. Then, we include the Timeline for editing. Finally, we use the Inspector for effects.
Import Media
The first step in organizing your clips is to import media. Unlike Photoshop where all the elements for an image are stored in one file, when we import media into any video editing software, we are importing a “link,” a pointer, that shows where the media clip is stored in your computer system. Media files are always separate files from the instructions on how they are edited, which Final Cut calls a “project.”
Storing Files
Final Cut supports media stored on internal drives, locally attached storage, and servers. However, in most cases, libraries can’t be stored on a server. For the rest of this book, we’ll just assume that all files are stored locally on external devices. (“External” means hardware that is located outside your computer itself.)
Start Final Cut. If this is your first time running it, it will ask if you want to create a new library or open an existing one. Create a new library, give it a name (I used “Persuasion”), and click Save. By default, it will store these libraries in the Movies folder of your Home directory. This is fine for now. Larger libraries, and media, are best stored on external storage because external devices will, most likely, have far more capacity than your internal drive.
To import media, choose File > Import > Media (Shortcut: Cmd+I). The Media Import window (Figure 14.2) imports clips and folders that contain clips. (You can also drag clips directly into Final Cut from the desktop, but the Media Import window gives you more control over the process.)

Figure 14.2 The Media Import window. Storage devices are listed on the left, media in the middle, and import settings on the right. (Pilot and plane images courtesy of Thalo, LLC / Hallmark Broadcast Ltd. (http://hallmarkmediagroup.com)
Look at the Composition
Just as an aside, look at the close-up of the pilot in Figure 14.2. It was shot below eye level to give him a heroic look. It’s framed according to the Rule of Thirds; he is in focus and is the largest element in the frame. The filmmakers did everything except paint a big red arrow on his forehead saying, “Look here first!”
(Not to mention, the pilot is wearing a flight jacket to boost his credibility and standing in front of a strategically placed jet in the background. This shot was very carefully composed.)
On the left in Figure 14.2 are all the storage devices attached to your computer; this would include an iPhone if it were attached to your computer via a cable. In my case, I store all the media I use for training in a folder called “Training Media.” (It’s similar to the master Source Media folder I discussed in Chapter 10.) Click a hard drive or folder, on the left, to see the contents, which are displayed at the bottom center of this window. Double-click a folder to open it, which is what I did here. I opened the Air Show Footage folder, which has ten clips inside it.
Click any clip in the lower center of the window to select it. Instantly, the entire clip appears in filmstrip view, along with a large image from the start of the clip (Figure 14.3).
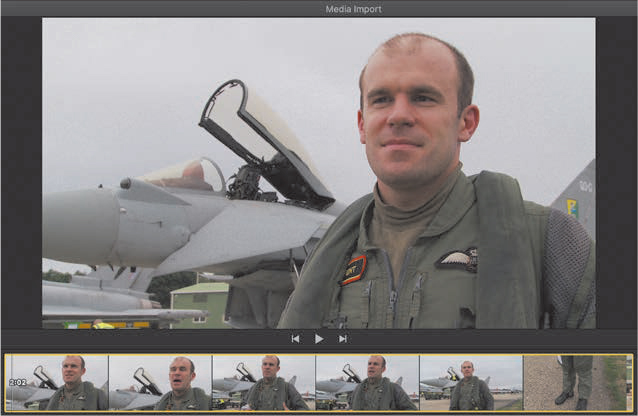
Figure 14.3 Selecting a clip displays the entire clip in filmstrip view, plus a larger shot of the frame containing the playhead.
Playhead
A vertical line that represents the frame currently displayed in the Viewer. The playhead moves in sync with a clip, or project, during playback.
Hover the cursor across the filmstrip to “skim” it. Press the spacebar to play the clip; press the spacebar again to stop. The line you see skittering across the filmstrip is called the “playhead.”
This is a fast way to view any clip—select it, skim it, select another.
There are several ways to choose which clips to import:
- Select a single clip.
- Select the first clip in a range, press the Shift key, and select the last clip. All the clips between them are selected.
- Select the first clip then continue selecting any combination of clips while pressing the Cmd key. (This is called “discontinuous selection,” a word that I try to work into my conversations as often as possible.)
- Click the left-pointing arrow next to the name of the folder (just below the thumbnail on the left). This takes you back up a level. You can then select the entire folder to bring in all the files inside it. There are advantages to bringing in entire folders, which I’ll cover when we talk about keywords.
The import settings (Figure 14.4) on the right of the Media Import window look pretty darn intimidating. But, there are only three we really care about. Once you have them set up, FCP will remember them from one import session to the next. Figure 14.4 also illustrates my standard import settings.
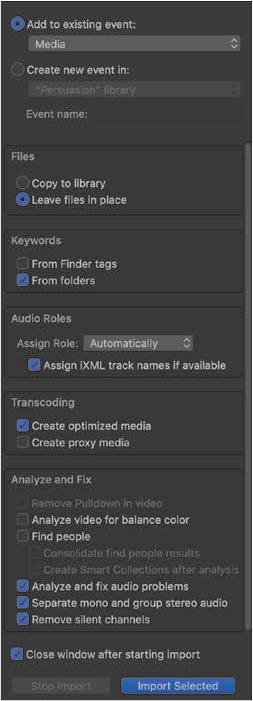
Figure 14.4 The import settings are remembered from one import to the next. These are also my typical import settings. The top menu shows the event that media will import into
The first choice is selecting the correct event. All media must be stored in an event; remember, an event is just a fancy name for a folder in Final Cut. The event you selected before you opened the Import window is displayed at the top of this panel. You can change it by selecting a different event from this menu. When you first create it, the name for an event will be a date. Don’t worry, I’ll show you how to change the name shortly.
The second choice is Files:
- Copy to library. This makes a copy of all your media and stores it in the library. This is my recommendation for new editors or editors who need to move the same library from one computer to another. However, storing media in the library makes the library file very big! And it duplicates all your media, which requires still more storage.
- Leave files in place. This leaves files in place on your hard drive, thus saving space. But, it means that if you move your library to another computer, you need to remember to move all your media as well. This is the best choice when sharing media between projects, when sharing media between editors, or when you want to avoid duplicating media.
Transcode
To convert from one media format to another.
The third choice is Transcoding:
- None. When nothing is checked, you edit the media shot by your camera, called “camera-native” media. This is the best choice when storage is limited, when you don’t plan to take a long time editing the project, and when you don’t plan to use many effects or do color correction.
- Create optimized media. This is my recommended choice for most editing projects. This copies and converts your camera-native media to ProRes 422, which allows for faster rendering and exports, along with higher-quality color and effects. But this option requires more storage space for the transcoded files.
- Create proxy media. This is my recommended choice when editing 4K frame sizes or larger or when doing multicamera editing, which Final Cut also supports. I won’t cover proxy editing in this book.
For now, with the exception of recommending you use “Copy to library,” Figure 14.4 shows my media import recommendations. Use them to get started and modify them as you learn more.
Why We Render Clips
“Render” sounds very technical, but all it means is to “calculate” a new clip from an existing clip. Rendering does not change the source clip. Typical examples include applying effects or color correction to a timeline clip. Final Cut Pro renders in the background to save you time.
Once you have your import settings the way you want, select the clips you want to import then click Import Selected in the lower-right corner of the window. (For this exercise, I moved up one level and imported the entire folder. It’s faster than selecting individual clips.)
Configure the Browser
Almost immediately, thumbnails of your clips show up in the browser, as shown in Figure 14.5.

Figure 14.5 After import, thumbnails of each clip appear in the browser (left). The currently selected clip is also displayed in the Viewer (right).
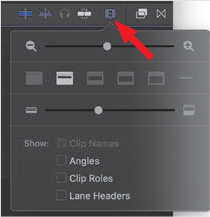
Click the small clip icon, indicated by the top red arrow in Figure 14.6. The top slider adjusts the thumbnail size. The second slider (middle red arrow) determines how often it displays a thumbnail in the clip. The All setting means one thumbnail per clip. 30s means a new thumbnail every 30 seconds. You can zoom in to a thumbnail every half-second! When waveforms are checked (bottom red arrow), you can see both image and audio on the screen at the same time.

Figure 14.6 Click the small clip icon at the top (top red arrow) to modify how clips are displayed in the browser.
You can change these settings at any time.
The list on the far left is the Libraries sidebar. It displays all the open libraries. In Figure 14.7, I have the Persuasion library open, which has three events: Smart Collections, Media, and Projects. (You can also have multiple libraries open at once.) The Libraries sidebar displays libraries, events, and other elements such as keywords, but not clips. Clips are displayed in the browser.

Figure 14.7 Right-click the blank area of the Libraries sidebar for other options.
Changing Names
While it is not a good idea to change file names in the Finder, it is an excellent idea to change them in the browser, especially if it helps you better understand the contents of a clip. Click the filename to select and change it.
Changing a media file name inside Final Cut does not change the filename of the media file stored on your hard disk.
More options are available when you right-click something in the Libraries sidebar, as shown in Figure 14.7. Here are some examples:
- To rename a library or event, click its name once to highlight the text then enter a new name. You can use any name you want, but avoid special characters.
- To create a new event, choose File > New > Event (Shortcut: Option+N).
- To delete an event, right-click its name and choose Move Event to Trash.
You can change the names of libraries, events, projects, and media at any time. Click once on the name you want to change to access it for editing. Changing library, event, or project names will change the name of these files on your hard disk. Media names will not change.
Favorites and Keywords
Now that our clips are imported, it’s time to get them organized. For simple projects, I create two events: Media and Projects. For complex projects, I create more, but I don’t usually create a lot. While you can organize media by storing it in different events—and I do—there are two options that make working with media a lot easier: Favorites and Keywords.
A Favorite is simply a clip that you like and that you expect to use in your edit. Click the clip to select it—a gold box appears around it—then press F. The green bar at the top indicates it is a Favorite (Figure 14.8). To see only favorite clips, go to the All Clips menu (red arrow) and choose Favorites. Favorites are a fast way to flag just the clips you like.
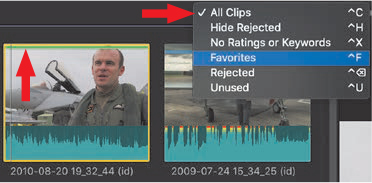
Figure 14.8 The Clip Filter menu—which defaults to Hide Rejected—controls which clips are displayed in the browser. Undisplayed clips are not removed, just hidden.
What Cmd+Delete Actually Removes
When you select a clip in the browser and press Cmd+Delete, one of two things will happen:
If you imported the clip using Copy to Library, the clip in the library will be moved to the Trash in the Finder. However, the original clip on your hard disk, from which this copy was made, will not be touched.
If you imported the clip using Leave Files in Place, the alias to the source clip that was imported into the library will be moved to the Trash in the Finder. However, the source clip stored outside the library on your hard disk will not be touched.
Other options include:
- To hide an unwanted clip in the browser but not remove it from the library, select the clip, and press Delete. The default setting of Hide Rejected in the Clip Filter menu means rejected clips will not be displayed.
- To reveal rejected clips, choose All Clips from the Clip Filter menu.
- To permanently remove a clip from the browser, press Cmd+Delete.
- Type U to remove a Favorite or Rejected flag from a selected clip.
Another way to organize clips, and one I use for all my major projects, is keywords. Keywords, as shown in Figure 14.9, can be applied automatically, which I did when I imported the Air Show folder. The folder name is applied as a keyword to all the imported clips inside it. (This is an excellent reason for carefully thinking about folder names before importing clips.)

Figure 14.9 Open the floating Keyword panel by clicking the key icon at the top then add keywords, separated by commas, in the floating Keyword panel.
Keywords can also be applied manually, using the floating Keyword panel. To open it, click the key icon at the top, indicated by the top red arrow in Figure 14.9. This allows tagging each clip with relevant keywords in the Keyword panel, shown by the lower red arrow. Use commas to separate each term.
Decoding the Colors
Clips in the browser can display different color stripes.
Red. The clip was marked as Rejected.
Green. The clip was marked as Favorite.
Blue. The clip has keywords applied to it.
Purple. The clip was analyzed, i.e., for image stabilization.
Orange. The portion of a clip that was used in the Timeline. Enable this display from the View > Browser menu.

Favorites and keywords can also be applied to a range within a clip, which we will cover in a minute as we discuss In and Out. To delete a keyword, select the clip then delete the keyword from the floating Keyword panel.
To find all the clips with a particular keyword applied, click a keyword collection in the Libraries sidebar on the left; for example, Flight. Keywords are a fast and flexible way to organize clips without needing to drag them into separate events.
Step 4: Build the Story
Now that we’ve imported and organized our clips—which always takes longer than we’d like—it’s time to start the fun part: editing. Editing has two parts: reviewing each clip and selecting the part you want to use (this is called “marking the clip,” which is shown in Figure 14.10). The second part is creating a new project and editing clips into it using the Timeline.
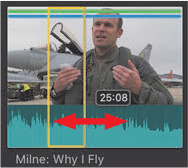
Figure 14.10 To mark a clip, press I to set an In; press O to set an Out. The yellow box defines the range.
If the skimmer is active, it takes precedence over the playhead. I am a big fan of the skimmer in the browser but not in the Timeline—it gets in my way. To toggle the skimmer on or off, press S.
Review and Mark Clips
To review and mark a clip:
- Hover your cursor inside a clip then “skim” left and right.
- Click anywhere in the clip and press spacebar to play the clip. (Press Shift+spacebar to play in reverse.)
- To set an In point (In), which marks the start of a section you like, position the skimmer, or playhead, on the frame you want and press I.
- To set an Out point (Out), which marks the end of the section you like, position the skimmer or playhead on the frame you want and press O.
- To change an In or Out, either retype it or drag a vertical yellow edge.
Mark
To set an In and/or an Out for a clip. If no In or Out is set, the beginning or end of the clip is used.
This process of setting Ins and Outs—which is called “marking”—is repeated for every clip, which is why Final Cut makes marking clips both fast and flexible.
Selections of clips or other elements are indicated by yellow outlines throughout Final Cut.
The process of reviewing a clip is easy to write: play the clip, set an In, then set an Out. The process is easy; the hard part is deciding which part of each clip you like and the order you want to build the clips. Final Cut can’t help you with the thinking, only the doing.
Quick Review Shortcuts
To remove the In and Out from a clip, either drag the yellow bars to the edge of a clip or, my preference, press Option+X.
To select the entire clip, put the skimmer or playhead in it and press C.
In general, a clip can have only one In and one Out at a time.
Create a New Project
With clips reviewed and marked, it’s time to edit them into…wait! We haven’t created our project yet. It’s time to do that. Choose File > New Project (Shortcut: Cmd+N) (Figure 14.11).
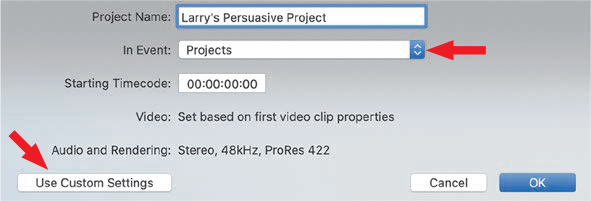
Figure 14.11 Choose File > New > Project. Give it a name, pick an event to store it in, and click OK.
There are several ways to create a project, but this is the easiest: File > New > Project. Make sure the button in the lower left says “Use Custom Settings.” If it doesn’t, click the Use Automatic Settings button. Give the project a name and pick an event to store it in. I always create an event called “Projects” for my projects. It makes them easier to find. Click OK when done.
The Timeline opens to display a new project. (I’d show you a screen shot, but it’s another big block of basic black.) In the middle of the Timeline is a darker bar of black. This is the Primary Storyline, and all your clips will head there first when you edit them. It’s what makes Final Cut different from other editors. I’ll explain what it does in a minute.
You cut from one shot to the next when you want to show the audience something new.
Configure a Project
The easiest way to configure a project for editing is to drag a clip that matches the specs of your deliverable into an empty Timeline. This forces the project to define itself in terms of that clip; for example, codec, frame size, frame rate, and color space. If none of your clips matches your deliverable format, you’ll need to configure the project manually. To do so, look up “Project Settings” in the Final Cut Help.
Editing
Editing is the process of moving clips from the browser into the Timeline in a certain order that tells a story. You cut from one shot to the next when you want to show the audience something new. If there’s nothing new to show, don’t cut.
You can easily drag any clip from the browser to the Timeline, but dragging is slow. A faster way is to click one of the four editing icons, as shown in Figure 14.12, to edit clips into the Timeline. And, after you’ve clicked the same icon twice, you may want a keyboard shortcut, which, for me, is the fastest way to edit.
Figure 14.12 Buttons at the top left of the Timeline, from left to right: Show/Hide Timeline Index, Connected Clip edit (Q), Insert edit (W), Append edit (E), Overwrite edit (D), Audio/Video edit arrow, and Tool palette (shortcuts vary by tool).
- Append edit (Shortcut: E). Edits a clip into the Primary Storyline and places it at the end of all clips in the Timeline. This is the most frequently used editing option.
- Insert edit (Shortcut: W). Edits a clip at the position of the playhead (or skimmer, which is why I turn the skimmer off) and pushes any clips after the playhead to the right. This edit always changes the duration of the project.
- Overwrite edit (Shortcut: D). Edits a clip at the position of the playhead and deletes whatever clips were under it. This edit generally doesn’t change the duration of the project.
- Connected clip (Shortcut: Q). Places a clip at the position of the playhead, but on a higher layer. This is the best option when you have someone talking on camera then want to show a picture of what they are talking about; this “picture clip” is often called “B-roll,” which is an old film term, and placed on a higher layer.
When you edit clips into the Primary Storyline, each clip acts like a “magnet,” attracting any downstream clips so they touch. (Apple calls this the “Magnetic Timeline.”) One of the big problems with other editing systems is that it is easy to accidentally leave gaps, which cause flashes of black, between clips. The Magnetic Timeline prevents this.
Decode the Jargon
Talking head. A clip with a close-up of someone talking; for example, a pilot talking about flying. “Talking head” refers to the visual element of a clip.
Sound bite. A clip with audio, generally dialogue, that the audience needs to hear. The pilot’s clip is often called a sound bite. “Sound bite” refers to the audio portion of a clip.
B-roll. Media that shows what the speaker is talking about. B-roll would be shots of the plane flying as the pilot talks about it.
Title. Text displayed on the screen. Titles are used to tell the audience something they won’t learn from the dialogue, such as the name of the pilot.
When you edit a clip to a higher layer, it connects with the clip below it on the Primary Storyline. This means that if you have someone talking in the Primary Storyline then add B-roll on top, when you move the clip in the Primary Storyline somewhere else in the Timeline, the B-roll clip connected to it moves too.
These two concepts, Magnetic Timeline and connected clips, are unique to Final Cut Pro X. They are designed to solve problems like flashes of black, audio and video clips getting out of sync, and B-roll getting out of sync with the talking head that refers to it. The controversy over this—and there was a lot of controversy when FCP X was first released—was that traditional editors weren’t used to this behavior. This is one of the reasons I recommend Final Cut for new users. It solves problems automatically that other software requires to be solved manually.
The Rule of Threes
Just like framing a shot, the sequence of shots you use and how you transition between them has meaning, separate from the content of the shots themselves. Filmmakers call this the “grammar” of film.
Film editor Norman Hollyn called the grammar of shot order the Rule of Threes. He said the shot you are looking at now is informed by the shot that came before it and the shot that comes after it. “We don’t watch a single clip in a vacuum, we watch a series of clips in context with each other, whose order conveys meaning.”2
[2] (Hollyn, 2008)
Edit your clips into the Timeline (Figure 14.13) in the order you want viewers to watch them. My general suggestion is to edit your story in multiple passes; don’t try to do everything all at once.

Figure 14.13 Four clips edited into the Primary Storyline in the Timeline. To make these easier to see, I also selected them (Cmd+A), which isn’t necessary for the editing itself.
- Pass 1. Edit your clips by focusing on what they say, not on how they look. I call this “creating a radio edit.” Yes, edit the video with the audio, but concentrate on the story they tell, not specific images. Once the story is complete, go back and clean up the visuals.
- Pass 2. Add B-roll to cover edit points and illustrate what the speakers are talking about. This is the phase where we concentrate on the visuals, because the story is reasonably complete.
- Pass 3. Add titles and transitions.
- Pass 4. Add all remaining effects.
The benefit to this system is that you are focusing on one thing at a time, for example, telling the story, illustrating the story, or polishing the story. Otherwise, there is so much to do you get distracted and don’t finish anything fully.
The next step, once the basic story is complete, is to add B-roll. B-roll images illustrate what a speaker is talking about. That’s where the connected clip icon comes in. It places a clip on a higher layer and “connects” it to a clip on the primary storyline, as shown in Figure 14.14.
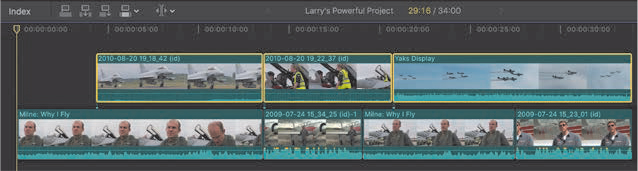
Figure 14.14 B-roll clips are added to the layer above the Primary Storyline. Again, I selected them to make them easier to see; selection is not required for editing.
In the case of our pilots, we want to hear them talking about flying and see them actually flying the planes. Viewers are easily able to hear one thing while looking at something else. This is a common editing technique.
Select each clip you want to use in the browser; then click the Connected Clip icon (Shortcut: Q) to put it on the layer above the talking heads. Do this until you’ve illustrated their story. As before, drag clips around to get them in the order you like.
Stacking and Visibility
By default, all clips in Final Cut are full-screen. What this means is that whatever clip is on the highest layer will be visible and block the visibility of any clips below it. This is why we put B-roll clips above talking heads. B-roll covers the images of the talking head, without blocking the audio. (All audio is audible all the time. Stacking order has no effect on audio clips.)
Final Cut makes it fast and easy to get clips from the browser into the Timeline. That isn’t the hard part of editing. The hard part is figuring out the order of your clips and the best way to use them to tell your story. This often takes lots of trial and error, as well as stepping back and watching your program with fresh eyes. FCP makes the editing process easy, but, again, the thinking is up to you.
Adjust Audio Levels
Part of the editing process is adjusting audio levels so the viewer hears what we want them to hear. This isn’t the full audio mix at this point; rather, we are “roughing in” the audio levels so we can hear what’s being said. We’ll do the full audio mix when the video edit is complete.
To set levels, drag the thin, horizontal yellow line, located in the audio waveform of each clip and shown in Figure 14.15, up (to make the volume for that clip louder) or down (to make it softer). At this stage, your audio levels don’t need to be too precise.

Figure 14.15 Adjusting audio levels is part of the editing process. Grab the horizontal yellow line, which represents the audio level of a clip, and drag it up to raise the volume or down to lower it.
The audio meters (Figure 14.16) are hidden by default, which makes no sense to me. To display them, choose Window > Show in Workspace > Audio Meters (Shortcut: Shift+Cmd+8).

Figure 14.16 The audio meters are the only accurate judge of levels. You want the total mix bouncing between –3 and –6 dB and never over 0 dB.
When and Where to Mix
If I’m editing a simple project that’s mostly dialogue on a short deadline, I’ll do all the audio mixing in Final Cut. There aren’t a lot of clips, and FCP has adequate tools for adjusting levels.
However, if I’m doing a complex project with lots of dialogue, sound effects, and music, I’ll use Final Cut to edit them into the Timeline so the timing is perfect then move my project into Audition or ProTools for the final mix. Just as Final Cut is optimized for video editing, audio mixing software is optimized to make your audio sound as good as it can.
As we learned in Chapter 12, “Sound Improves the Picture,” audio levels don’t matter until it is time to export. Still, get in the habit of setting your mix to bounce the meters between –3 and –6 dB. Remember, the more clips playing at once, the louder the audio. Audio must never export with the meters bouncing over 0 dB.
Deleting a clip from the Timeline does not delete the clip from the browser, library or hard disk.
Adjust the Timeline Display
To adjust how clips are displayed in the Timeline, click the small clip icon in the top-right corner of the Timeline. The icons determine how big to display waveforms, while the sliders determine Timeline scale and clip size.
Step 5: Organize the Story in the Timeline
If a clip doesn’t move when you drag it, make sure you have the Arrow tool (Shortcut: A) selected. This general-purpose tool selects and moves elements. Apple calls this the “Select” tool. This is the most frequently used tool in Final Cut.
At any point in the editing process, you can change the order of clips by dragging them where you want them to appear. Similar to moving children’s blocks, shuffle the clips until your story makes the most sense.
In the Timeline, drag clips to move them. This either adds them to an existing layer or creates a new one. Whichever clip is on top is the one you see in the Viewer. (Later in this chapter, you’ll learn how to create a “picture-in-picture” where you can see multiple images on-screen at once.) To hide a clip so you can see what’s beneath it in the Timeline, press V. (V toggles clip visibility.)
To delete a clip from the Timeline, select it and press the Delete key. If the clip is on the Primary Storyline, all the downstream clips will close up so there’s no gap. If any clips are connected to the deleted clip, they will be removed as well.
If, instead of closing the gap, the clip in the Primary Storyline is replaced by a dark gray clip, which displays black in the Viewer, you pressed the wrong Delete key. The big Delete key, above the Return key, deletes the clip and deletes any gap. The small Delete key, next to the End key on full-size keyboards, replaces the clip with a black gap. (If you are on a laptop, press Fn+Delete to emulate the small Delete key.)
You can also replace any clip on the Timeline with any clip in the browser (Figure 14.17).
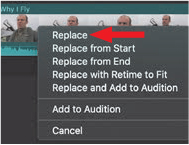
Figure 14.17 Any clip in the Timeline can be replaced by any clip in the browser.
- Set an In for the browser clip where you want the new clip to start.
- Drag the browser clip on top of the Timeline clip you want to replace.
- In the resulting pop-up menu, select Replace if you want to use the duration of the browser clip. Select Replace from Start if you want to use the duration of the Timeline clip.
The Timeline clip will be replaced by the browser clip, starting at the In of the browser clip.
Copy/Paste also works. By default, when you paste a clip, it will paste at the position of the playhead into the Primary Storyline. To paste to a higher layer, choose Edit > Paste as Connected Clip.
By now you probably noticed that when you move clips around, they snap together but don’t overwrite each other. At least, that’s the way they behave in the Primary Storyline. If you want to move a clip and have it overwrite another clip, first select the Position tool (Shortcut: P) from the Tools palette (Figure 14.18). The Position tool essentially turns off the “magnetic” aspect of the Timeline.
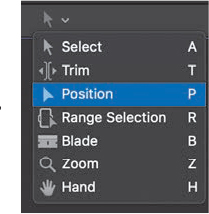
Figure 14.18 The Final Cut Tools palette.
Overwrite
This means to erase part of an existing clip when a new clip is moved over it on the same layer.
To cut a clip into multiple chunks, select the Blade tool (Shortcut: B). However, I prefer the much faster Cmd+B, which cuts all selected clips at the position of the playhead. Slicing, dicing, and moving clips is what this phase of editing is all about.
Step 6: Trim the Story
Trimming
This adjusts where two clips touch, called the “edit point.”
Organizing is about moving entire clips around. Trimming adjusts where two clips touch; the leading and trailing edges of clips to make the transition from one clip to another as smooth as possible. I once spent 45 minutes trimming one edit point before I was satisfied. It was a cut from a wide shot to a close-up of a snowboarder doing a jump; getting that cut right was maddening.
We can trim the end of the outgoing clip, the end of the incoming clip, or both the Out and the In at the same time. Trimming makes clips longer or shorter, depending upon how you drag the edit point.
Handles
Handles are essential to all trimming. This is extra footage before an In or after an Out that allow us to adjust the length of clips or add transitions, such as dissolves. When you select the end of a clip, if it turns yellow, you have handles (Figure 14.19). If it turns red, you don’t. If the handle is red, you can make a clip shorter but not longer because you have used all the media at that end of the clip.

Figure 14.19 When the end of a clip is red, there is no more media; it’s the beginning or end of the file. When an edge is yellow, the clip has handles.
Another way to see handles, and one that I teach beginning students, is the Precision Editor. Double-click any edit point in the Timeline to open it.
Why Do We Trim?
According to Oscar-winning film editor Walter Murch, A.C.E., when it comes to trimming, there are six main criteria for deciding where to cut. He called it his “Rule of Six.”
Emotion. How will this cut affect the audience emotionally at this particular moment in the film?
Story. Does the edit move the story forward in a meaningful way?
Rhythm. Is the cut at a point that makes rhythmic sense?
Eye trace. How does the cut affect the location and movement of the audience’s focus in that particular film?
Two-dimensional place of screen. Is the axis followed properly?
Three-dimensional space. Is the cut true to established physical and spatial relationships?
Murch made emotion the most important of all of categories in the list.3
[3] (Murch, 2001)
Upstream
This means to the left, upstream, or earlier in the Timeline.
Downstream
This means to the right, downstream, or later in the Timeline. These are generally used in reference to the position of the playhead or a selected clip.
The Precision Editor, shown in Figure 14.20, provides the finest illustration of handles I’ve ever seen. The upper clip is the outgoing clip. Darkened media after the Out are its handles; extra media after the Out. The lower clip is the incoming clip. Darkened media before the In are its handles. You can trim a clip until you run out of handles, meaning there is no more available media. Drag the edge of a clip to trim just that clip. Drag the gray slider between them to trim both the In and the Out at the same time. Press the Return/Enter key to exit the Precision Editor.

Figure 14.20 The Precision Editor. Double-click any edit point to open. Press Return to close.
Trimming
To trim a clip, select an edge with the Select arrow (Shortcut: A) and drag it left or right. If you do this to a clip in the Primary Storyline, all the clips downstream of the playhead move as you drag the edge of a clip.
If you drag the edge of a clip that isn’t on the Primary Storyline, the clips next to it don’t automatically tighten. Instead, you’ll either leave a gap between clips or push other clips out of the way as you move the edge.
Sometimes we want to trim both the audio and video elements of a clip together. More often, though, we need to trim the video or audio separately. Final Cut makes this easy.
Double-click an audio waveform to separate the audio from the video, as illustrated in Figure 14.21. Though separate, the two elements are still locked in sync. Double-click the audio waveform to close it back into the video clip.

Figure 14.21 We can trim audio and video together or separately. Double-click the audio waveform to adjust only the audio.
When the two elements are separate, you can trim the video or the audio, as Figure 14.21 illustrates.
To trim both the In and the Out at the same time, select the Trim tool (Shortcut: T) then drag the edit point to a new location.
Other Trimming Tricks
To delete a clip, select it and press the Delete key.
To trim an edit point frame by frame, select it then press comma or period.
To trim an edit point in larger chunks, select it then press Shift+comma or Shift+period.
While Final Cut provides lots of different ways to trim, dragging the edges are the easiest. If you are like most editors, you’ll spend more time trimming than editing. Trimming is that important.
Step 7: Add Transitions
The first six steps in this editorial workflow I call “creating the story,” because they focus on telling a story. It is essential we create the story first, before moving to effects, because without a story, there’s nothing to interest the viewer.
The last six steps I call “polishing the story,” because now we add the transitions, text, and effects that make everything look nice. We start with transitions.
There are three types of transitions, each of which has an underlying meaning, in addition to changing the shot.
- Cut. An instantaneous change in perspective.
- Dissolve. A change in time or place.
- Wipe. These break the story and take you somewhere else.
You cut between two people having a conversation. It occurs at the same time and same place. You dissolve between two people talking in the morning, then going out on a date in the evening. You wipe between the animated open of a program and the start of the program itself. A wipe says something major is changing, so pay attention.
By default, all transitions are cuts. To add a dissolve, select an edit point and press Cmd+T (Figure 14.22). To change the speed of the dissolve, drag a vertical edge of the dissolve icon longer or shorter. (The wider the icon, the slower the dissolve.) If you put a dissolve between two clips, there needs to be sufficient handles on each clip for the entire length of the dissolve; otherwise, Final Cut will display an error message.
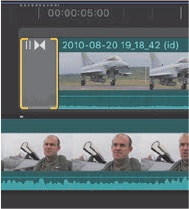
Figure 14.22 To add a dissolve, select an edit point and press Cmd+T. To change its speed, drag a vertical yellow edge.
Wipes are the sexiest, most visually interesting transitions, but they need to be used sparingly. Final Cut has more than 200 to choose from. Click the Transition Browser icon at the top-right corner of the Timeline to display the options (Figure 14.23). Transitions are grouped by category. When searching, be sure to select the All category first (top-left arrow).
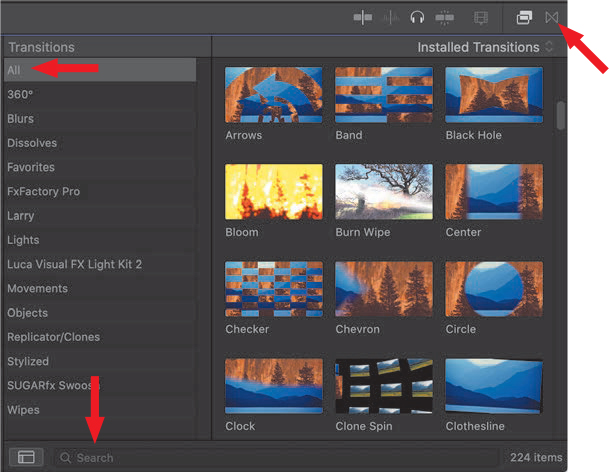
Figure 14.23 Transitions browser. Click the icon in the top-right corner of the Timeline to open (top-right arrow). Use the Search box (bottom arrow) to search for a transition by name.
To apply a transition, drag it onto the edge of the clip(s) in the Timeline to which you want to apply it. To change its length, just like a dissolve, drag an edge longer or shorter. To delete a transition, select it and press Delete.
To delete a transition applied to clips in the Timeline, select the transition icon then press Delete.
Step 8: Add Text and Effects
With our story complete and transitions added, we move on to adding text and effects. Adding and perfecting effects will fill more than all the rest of the time you have. There is always something you can tweak. This is why we get everything else done first; otherwise, we have a great opening shot and nothing after.
Inspector Controls
The Inspector, which we are about to meet, is central to all effects. This is where we make changes to selected clips, transitions, and effects. Click the far-right button (red arrow in the figure) at the top right of the Final Cut interface to toggle it open or closed (Shortcut: Cmd+4). The other two buttons hide/show the browser and Timeline.
Double-click the title at the top of the Inspector (“Wing Cmdr. Milne” in my example) to expand the Inspector to full height.

The buttons at the top left of the Inspector vary depending upon what is selected in the browser or Timeline. These include the following:
Text animation (far left)
Text formatting
Generator formatting and animation (not shown)
Transitions (not shown)
Video
Color
Audio (not shown)
Metadata (the letter “i” on the right)
Add Text
When it comes to adding text, again, there are hundreds of templates to choose from in 2D, 3D, and 360° formats. (I’ll cover 3D text formatting later in this book.) Click the Titles Browser icon in the top-left corner of the interface (shown by the left red arrow in Figure 14.24). Titles are grouped by category. You can either scroll through the list or search for a title by name (right arrow).

Figure 14.24 The Titles Browser. Titles are grouped by category (left) and searchable by name using the Search box (top right).
When you find a title, either select it and click the Connected Clip edit button (Shortcut: Q) or drag it into the Timeline. Q is faster, though dragging allows you more flexibility in placement, as the keyboard shortcut always puts clips at the position of the playhead (or skimmer, if enabled).
To change the position of text on the screen, select the text clip in the Timeline, then drag it in the Viewer. Other on-screen controls may be available, depending upon the text clip you chose.
The Inspector provides a wealth of options to make format changes to a title (or a transition, effect, or clip, for that matter). Select the text clip in the Timeline, open the Inspector (top-right blue button), and click the second-from-the-left icon to display the text formatting controls (Figure 14.25). After using the text controls in Photoshop, these settings should be fairly reassuring; you’ve used them all before.
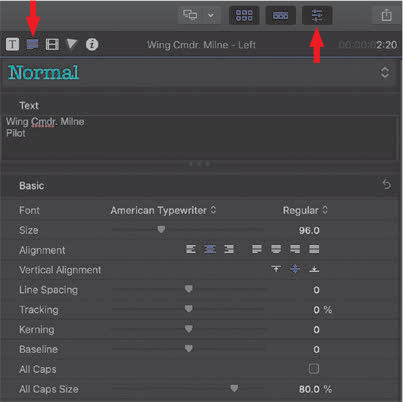
Figure 14.25 The Text Inspector determines text formatting, as well as providing a window in which to modify your on-screen text.
Double-click the text in the Viewer to alter the text on-screen. You can modify text in either the Viewer or the Inspector. The Viewer is faster; the Inspector provides more controls.
The Text Inspector also provides a window, at the top, where you can edit the text itself. This is because some text effects create very small text that is hard to edit in the Viewer. This panel provides an alternative way to enter or revise text.
Lower in the Text Inspector are the text format controls. Figure 14.26 illustrates key settings: The “hooked” arrow (top red arrow) resets any setting to its default. Click a color chip to change the color (middle red arrow). Enable an effect by checking the checkbox (bottom red arrow).

Figure 14.26 The text formatting controls at the bottom of the Text Inspector.
My recommended drop shadow settings for text are also illustrated in Figure 14.26.
Almost all transitions, titles, generators, and effects are animated. To determine what animation is available, select a title clip in the Timeline then click the Animation button on the left side of the Inspector (Figure 14.27). The icon and functions change, depending upon what is selected in either the browser or the Timeline. Text effects vary, too, but Build In and Build Out are common.

Figure 14.27 The Text Animation Inspector controls animation specific to each text clip. Not all text has them, but most do.
Adding and perfecting effects always takes all the time you have, plus a bit more. Add effects only when your story is complete.
Build In and Build Out determine whether to play the opening animation (Build In) or closing animation (Build Out) created for that text clip. These are enabled by default. To disable them, uncheck them. It is easy to see what these controls do by playing the clip. For now, it is sufficient to know where these controls are, how to access them, and how to reset them to their defaults (click the “hooked” arrow on the right side of each effect).
Add Effects
After all our text is complete, it is time to add effects. There are hundreds available in a variety of locations inside Final Cut:
- Video Inspector. This manipulates clips, including image stabilization.
- Effects Browser—Video. This contains blurs, looks, and stylized effects of all kinds. There are more than 300 to choose from.
- Effects Browser—Audio. This contains audio effects that can be applied to individual clips.
- Clip speed changes. Located in the Modify > Retime menu, these settings create slo-mo, still frames, and fast-motion.
- Generators. Located in the Titles/Generators menu, these are full-screen animated backgrounds, suitable for info graphics.
I’ve written thousands of tutorials about these, which are available on my website (LarryJordan.com). In this chapter, I want to showcase key effects available in:
- Video Inspector
- Effects Browser
- Audio Enhancements
- Audio Limiter
Video Inspector Effects
Video Inspector (Figure 14.28) effects change the size, position, and rotation of a clip. It also provides image stabilization and automatic image scaling, which are also useful.

Figure 14.28 The Video Inspector, top-right blue icon, modifies video clips for position, scale, rotation, opacity, blend modes, and more.
To change the size of a frame, select the clip in the Timeline and adjust the Transform > Scale setting. Like Photoshop, digital video images are bitmaps. You can scale them smaller, but scaling video frames larger than 100 percent will cause the image to get blurry.
If an effect setting is not displayed, roll the cursor over the name of an effect, for example “Stabilization” in Figure 14.29. This reveals the Show button to the right of the parameter name. To hide the details of a setting, click the Hide button. Show/Hide are available only as the cursor rolls over the name of the effect.
To change the rotation of an image, move the Transform > Rotation wheel, or enter a value in degrees. To change the position of an image, you can adjust the Transform > Position coordinates, but, in the “Picture-in-Picture” section, I’ll show you a much easier way by using controls in the Viewer itself.
Video not shot on a tripod should be stabilized. Enable Stabilization at the bottom of the Video Inspector (Figure 14.29). Stabilization will keep the handheld “look” but remove the more distracting bumps and wobbles. Several settings are available, but Automatic is a good first choice.

Figure 14.29 Handheld video should be stabilized. To do so, enable Stabilization in the Video Inspector. Automatic is a good setting to try first.
By default, Spatial Conform (Figure 14.30) sizes all images to fit the frame size of your project. But, sometimes we shoot larger frame sizes, like 4K on an iPhone, because we want to vary the image size during editing. In this case, select the clips you want to adjust in the Timeline and change Spatial Conform from Fit (the default) to None. This displays the frame at 100 percent size, regardless of the project settings. At this point, you can adjust the size using Transform > Scale at the top of the Video Inspector.

Figure 14.30 Spatial Conform automatically scales (sizes) your visuals to fit the frame. Most of the time, the default setting is the best choice.
Picture-in-Picture
A specific effect that’s created in the Inspector is picture-in-picture. Figure 14.31 illustrates this process. To start, stack two, or more, clips above each other in the Timeline then change the size of the top clip. You could do this using the Transform > Position controls. But a much faster and easier method is to select the top clip then click the small arrow in the lower-left corner of the Viewer—shown in Figure 14.31—and select Transform. Blue dots now surround the selected clip.

Figure 14.31 Picture-in-picture means you place two, or more, images on the screen at the same time, using the Transform settings.
In the Viewer:
- Drag a blue corner dot to resize the frame.
- Drag the middle of an image to reposition it in the frame.
- Drag the blue dot attached to the center circle to rotate the image.
- When the adjustments are done, click Done in the top-right corner of the Viewer.
There’s no limit to the number of visuals you can put on screen; the only requirement is that they all be stacked above each other in the Timeline.
Using the on-screen Viewer controls provides a fast, easy way to create the effects you want simply by adjusting the image on-screen. (The settings in the Inspector are more precise, while the Viewer is faster.) Which you use is up to you; I use both all the time.
The Effects Browser
The Effects Browser contains more than 300 effects for video and audio clips, as shown in Figure 14.32. When you open the browser, a list of effect categories is displayed on the left. Click a category and see all the effects relating to that category on the right.
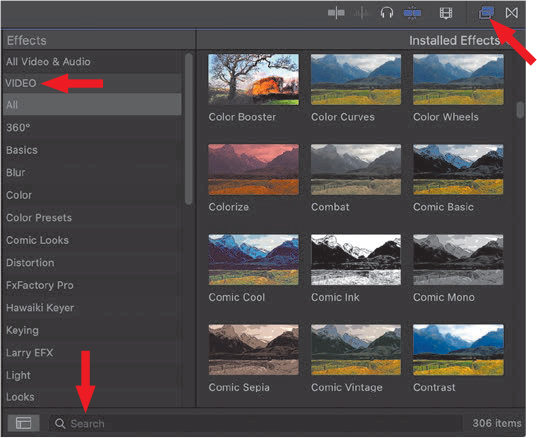
Figure 14.32 The Effects Browser (Shortcut: Cmd+5) contains hundreds of audio and video effects. Open it by clicking the icon at the top right (top-right red arrow). Search for an effect using the Search box at the bottom.
If an effect’s settings are not visible, hover the cursor over the effect name then click the word “Show” to reveal them. Click Hide when you are done to make them disappear.
For example, a really nice effect is Blur > Gaussian. I use this a lot to blur the background so text pops in the foreground. To apply an effect, either:
- Drag the effect on top of a Timeline clip to which you want to add the effect.
- Select all the clips to which you want to apply the effect then double-click the effect in the Effects Browser.
There is no limit to the number of effects you can apply to a single clip.
To modify any effect, select the clip that contains the effect, open the Inspector (Cmd+4), click the Video Inspector tab (Figure 14.33), find the effect, and tweak. The cool thing about effects is the “right” setting is the one that looks good to you.
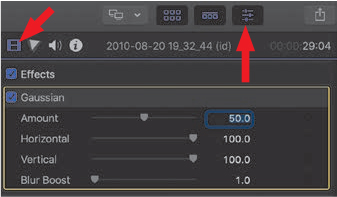
Figure 14.33 To modify any effect, select the clip in the Timeline, open the Inspector (right arrow), click the Video tab (left arrow), find the effect in the stack, and tweak.
The Inspector provides a variety of settings for each effect:
- To reset an effect, click the small arrow to the right of the name and choose Reset Parameter (Figure 14.34).

Figure 14.34 To reset all effect settings to their default values, click the small arrow to the right of the effect name and choose Reset Parameter.
- To hide the effect settings, click Hide.
- To disable an effect, without removing it or resetting its settings, uncheck the blue checkbox.
- To delete an effect, select the effect name in the Inspector and press Delete.
Effect Stacking Order Makes a Difference
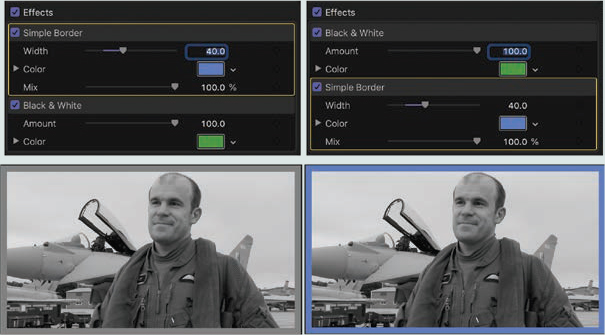
Effects in the Inspector process from top to bottom. Changing the “stacking order” will change the effect, as illustrated here. In the image on the left, first we add a blue border, then we remove all the color. This creates an overall black-and-white image.
In the image on the right, first the color is removed, then the blue border is added. The settings for both effects—and the original image—are the same. All that changed was the order of the effects applied in the Inspector.
If you don’t get the effect you were expecting, change the stacking order—by dragging the name of the effect up or down—and see whether that makes a difference.
Audio Enhancements
While Final Cut is not as good as Adobe Audition in mixing audio projects, it does have a lot of helpful audio tools, especially when you are in a hurry. Several of these are grouped under Audio Enhancements that allow you to adjust levels, remove hum, EQ a clip, and reduce noise.
To apply these, select the clip containing audio and choose Modify > Auto Enhance Audio (Shortcut: Option+Cmd+A). As Figure 14.35 illustrates, you can inspect your clips in the Audio Inspector for problems. If no problem is detected, Audio Enhancements shows a green checkbox. If there are problems, Audio Enhancements can help fix EQ, Loudness, Noise Removal (in spite of its name, this reduces noise; it won’t remove it), and Hum Removal (hum can be entirely removed). To enable or disable any setting, check the blue checkbox.
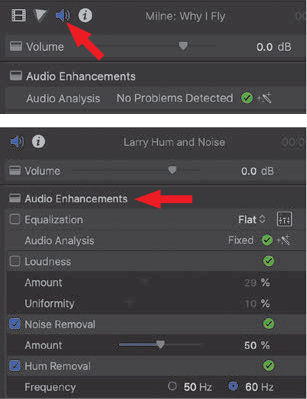
Figure 14.35 The Audio Enhancements options in the Audio Inspector (top red arrow). The top image shows a clip with no audio problems; the bottom image shows the adjustments available to fix poor audio.
Audio Limiter
In Chapter 12, “Sound Improves the Picture,” I illustrated the Multiband Compressor as a way to boost and smooth audio levels. Final Cut has something similar but simpler to use: the Limiter effect. This boosts softer dialogue without distorting louder passages. It should generally be applied to dialogue, not sound effects or music.
Ignore the Limiter filter at the top of the Levels category. It lacks a key setting that makes this version of the filter less useful.
To apply the effect, go to the Effects Browser (Shortcut: Cmd+5), as shown in Figure 14.36. Scroll down until you see the Audio section and, within that, the Levels category. Scroll through the effects on the right (which are sometimes called “filters”) until you see the subcategory Logic. Inside that, look for Limiter. (Whew! That was a lot of scrolling.) Finally, as with all effects, drag it from the Effects Browser and drop it on the clip you want to adjust.
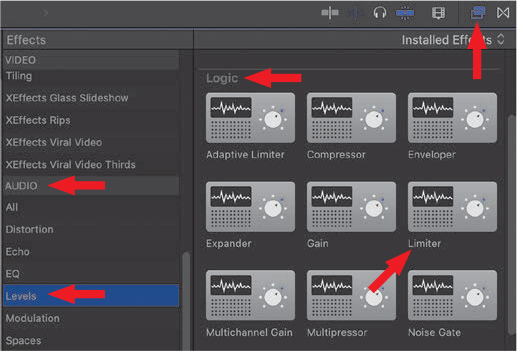
Figure 14.36 Audio effects are stored in the Effects Browser > Audio section.
To adjust the Limiter, select the clip that contains the effect in the Timeline, go to the Audio Inspector (see Figure 14.37), and click the small icon on the right side of the Limiter effect.

Figure 14.37 Open the Audio Inspector (top arrow), make sure the Limiter effect is enabled (lower-left arrow), then click the Limiter controls icon (right arrow).
Similar to the Multiband Compressor in Audition, the Limiter in Final Cut raises the level of softer passages in a clip, on an instant-by-instant basis, until the volume reaches the Output Level value. This is the upper “limit” of the audio level, from which the effect gets its name.
Figure 14.38 illustrates the Limiter effect. Four settings in this effect always use the same values:
- Set Release to 500 ms.
- Set Output Level to –4 dB.
- LookAhead remains at 2.0 ms.
- Set True Peak Detection to On.

Figure 14.38 This looks more imposing than it is. Four settings always use the same values; you only need to adjust Gain for each clip.
The only setting you need to adjust is Gain. With these settings, your audio will never get louder than –4 dB for this clip. To adjust the Gain setting, play the clip and watch the Reduction column. Increase the Gain until you see the Reduction level bouncing between –1.5 and –3 in the loudest passages (Figure 14.38). (A little more won’t hurt; a lot more will sound blatty and unpleasant.) There may be times during playback where the Reduction level doesn’t bounce at all; as long as it bounces at some point during the clip, your settings are fine. What you want to do is make sure all your levels are increased without distorting the loudest passages.
And that’s it. The Limiter filter keeps an eagle-eye on your levels, without you having to spend a lot of time adjusting each clip, just as the Multiband Compressor does in Audition.
Step 9: Create the Final Audio Mix
We talked about audio a lot in Chapter 12, and I won’t repeat that information here. Your goal, during the audio phase, is to create the audio environment the audience will hear.
- Design the sonic environment, also called “sound design.”
- Edit existing audio so that dialogue is clean.
- Add sound effects and music.
- Mix all the different audio elements and make sure that levels bounce between –3 and –6 dB and that they never exceed 0 dB.
To restate what I mentioned at the beginning, mix simple projects directly in Final Cut and export complex mixes to audio mixing software. Software to consider includes Avid ProTools, Adobe Audition, Apple Logic Pro X, Cockos Reaper, and PreSonus Studio One.
Step 10: Finalize the Look and Colors
There are two ways to work with color: to fix problems, called “color correction,” and to achieve a look, called “color grading.” Let’s start with color correction.
There is a wealth of manual color correction tools available in Final Cut. Peachpit Press has several books that show how to use all these different color tools.
Simple Color Correction
You never plan to have problems with your colors, but, when you do, there’s a fast technique to fix them.
Figure 14.39 shows a typical color problem: a clip that has a color cast—in this case, it’s too green. To fix this, select the clip with the color problem then choose Modify > Balance Color (Shortcut: Option+Cmd+B).

Figure 14.39 A typical color cast: a clip that’s too green.
In the Video Inspector (Figure 14.40), change Method to White Balance then click something in the image that’s supposed to be white or medium gray. In this example, I clicked the underside of the tail. This effect figures out how to change the colors in a clip to get the colors right.
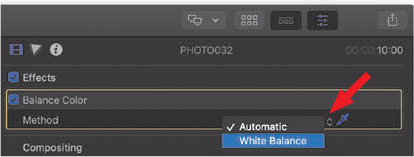
Figure 14.40 In the Video Inspector, change Method from Automatic to White Balance.
The results of using this tool are stunning. Figure 14.41 compares the before (left) to after (right). While you can spend a lot of time in Final Cut creating captivating looks, sometimes all you need to do is fix a problem. The Balance Color tool does exactly that.

Figure 14.41 The corrected result, on the right, is stunning. And instant.
Color Grading – Create a Look
In addition to fixing color problems, there are more than four dozen color presets (Effects Browser > Color Presets, Comic Looks, and Looks) that can create dramatic color treatments for your clips (Figure 14.42). You apply them the same as any other effect: drag one you like from the Effects Browser and drop it on a Timeline clip.

Figure 14.42 Here are 12 of more than 25 looks to create a color treatment that best represents your message to the audience.
Some of these effects have settings you can tweak, others don’t. If you like one, use it. If not, adjust a setting for that look in the Video Inspector to see if that helps. Otherwise, delete the effect in the Video Inspector and try something different. These are fun to help you discover how changing the look also changes your emotional response to it.
Keep Your Goal in Sight
As you plan your effects work, remember that your audience is not there to watch your effects; they are there to watch your story. Don’t lose sight of the forest for the trees. Use effects to enhance your story, not to tell your story.
There are numerous other color tools in Final Cut that manipulate color in very sophisticated ways. Looks are a simple way to start exploring what’s possible.
Step 11: Output the Project
Once all your review, editing, trimming, transitions, titles, and effects are done, it’s time to output your project and share it with the world. Apple calls this process “sharing.” (I call it “exporting.”) Select your project in the Timeline then choose File > Share > Master File.
The first screen that appears, shown in Figure 14.43, is the Info screen, where you can change the labels associated with the clip or hover your mouse over the image and skim your project to make sure you are exporting the right version.

Figure 14.43 The Info screen displays metadata (labels) that you can change. You can also skim the image to make sure you are exporting the right project.
What Should I Export?
There are two philosophies on what format to export:
Export a compressed version ready to post.
Export a high-quality master file that requires a second step to compress for posting.
My preference is to always export a master file. Why? Because if you ever need a second copy with slightly different compression settings (and you always need another copy with different compression settings), you don’t need to fire up your video editor. Instead, simply recompress the master file.
Also, exporting a master file gives you a high-quality file to archive for the future.
When exporting, the Settings screen, shown in Figure 14.44, determines what you are exporting. My general recommendation is to always export a master file in the video format that matches your project, in other words, the one at the top of the Video Codec menu with “Source” in the title. Specifically, I suggest using Apple ProRes 422.
Notice in the lower-right corner Final Cut estimates how big the exported file will be. Media files are really big, so make sure you have the room to store it.

Figure 14.44 The Settings screen determines the technical export settings.
Now What Do I Do with It?
You’ve got this master file, so now what do you do with it? The easiest answer is use Apple Compressor to create versions for YouTube, FaceBook, Vimeo, Instagram, local websites, broadcast, cable, digital satellite, and mobile devices of all sorts.
In other words, you will probably need to make lots of versions of this one project. Compressor is great for that. It has presets that simplify the process, and it integrates well with Final Cut. Best of all, it doesn’t cost much. You can also use HandBrake or Adobe Media Encoder.
And if you need help using it, my website has plenty of tutorials (LarryJordan.com).
Step 12: Archive the Project
The last step is to archive your work. Make sure you have backups of the final master file and your projects. How long you decide to store them is up to you, but don’t be in a hurry to get rid of anything.
The general rule, which I’ve learned the hard way, is that no one wants any file stored on your system until the day after you trashed it.
Key Points
The script creates the idea. Production records the story. But we tell the story through editing. This 12-step editorial workflow is an effective way to stay focused and on track. Video editing is part craft, part technology, and part logistics, with a lot of client management thrown in. Here are key thoughts from this chapter.
- Time spent planning the edit and organizing media before you start is never wasted.
- You will always need more storage. No project ever got smaller during production.
- Shoot and edit the frame rate you need to deliver.
- If people can’t hear, they won’t watch.
- Backups of all project and media files are essential. Editing without backups redefines the term “pain and suffering.”
- Keyboard shortcuts will not make you a better editor, but they will make you a faster editor.
- Build the story first then worry about effects. (The only reason for fast, jarring edits and distracting effects is to hide the fact that your talent has no talent.)
- Don’t add effects or color correction until your story edit is complete. Your audience is not there to watch your effects; they are there to watch your story.
- Always export a high-quality master file to archive, then compress later.
- No video project is ever perfect. Don’t strive for perfection; strive to get it done.
It takes a lot of work to make something look effortless. And persuasion, to be effective, should not look forced. The best, and most depressing, compliment an editor can receive is, “I really loved your program! It didn’t even need any editing.”
Practice Persuasion
Think about editing a conversation where: Each shot is a wide shot or a closeup, or where actors talk over each other or insert long pauses, or where everyone moves or no one moves. How does all this different pacing make you feel?
Persuasion P-O-V
A Life-Changing Conversation
Larry Jordan
It was 2003, and I was out of work, again. I saw an ad in the Hollywood Reporter that said, “Assistant Film Editor Needed. Must know [Apple] Final Cut.” Well, I said to myself, I know Final Cut. Apple just certified me as an Apple Final Cut trainer. So, I answered the ad.
A woman with a French accent answered, and we made arrangements to meet. At the appointed time, I walked up to a small single-story Hollywood bungalow and knocked. A woman in her mid-50s answered and invited me in.
As we walked into the living room, I looked around, admiring the photos on the wall, the comfortable furniture, and the bric-a-brac on the bookshelves.
Françoise, for such was her name, was pleasant, with graying hair, a French accent, and a direct yet pleasant manner. As we chatted, I looked again at the bookshelves and saw several awards, including a BAFTA and an Oscar!
Stunned, I pointed to them and asked, “Wow! An Oscar. What did you get it for?” She smiled and said, “Film editing.” Now, you may think, world-famous raconteur and video expert as I am, that I meet Oscar-winning editors all the time. You would be wrong. She was my first.
More importantly, it made me realize that I was in the wrong place. I turned back to her and said, “Françoise, I am not the right person for you. I know Final Cut, and I know video, but I’ve never worked on a feature film in my life. There’s no benefit for you to hire me. However, I would be really grateful if we could spend 15 minutes chatting. At which point, I promise to leave and not bother you again.” She very graciously agreed.
Now, it would help my story significantly if I could remember even one word of our conversation during those 15 minutes. I don’t get to talk to Oscar-winners often. But I can’t, except for one comment that changed my life when I asked, “Françoise, how do you know when your films are done?”
She looked down at her lap then, looking up with a small smile, she replied, “Done? Done? My films? My films are never done. They rip them from my grasp, even though I can still make them better.”
In that one answer, I learned there is never enough time for any creative project. A work of art is never completed; it is reluctantly abandoned as time runs out.
Her name was Françoise Bonnot, and while we never did work together, her advice changed my life. She edited into her 60s and died in 2018.