
Editing with VS Code
Microsoft’s Visual Studio Code (VS Code for short) is a relatively new entry in the world of code editors. First launched in 2015, it rapidly rose to become one of the most popular editors in the JavaScript community—in fact the most popular, according to the State of JavaScript 2018 survey.[19] What makes VS Code special is its incredible extensibility. There’s a rich ecosystem of VS Code extensions, especially for JavaScript development, as we’ll soon see.
In this section, we’ll get to know VS Code as we use it to start a new test-driven JavaScript project.
Launching VS Code and the Integrated Terminal
To get started, download and install the latest VS Code release.[21] Open it up and take a look around. We’ll only cover the essentials of the editor in this book; for more details on everything you’re looking at, see the User Interface[22] page in the official docs.
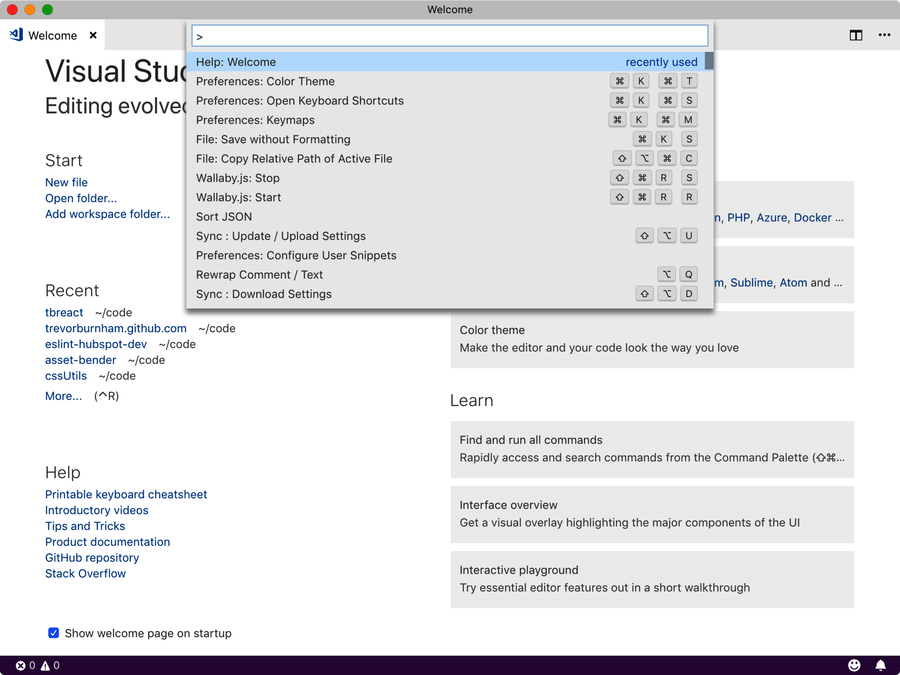
The most important feature to know about in VS Code is the Command Palette, as seen in the screenshot. The Command Palette is a single searchable list of every command that VS Code supports. Any time you hear a command referenced by name, you can find and execute it from the Command Palette. To open the Command Palette, type ⇧⌘P (macOS) or ⇧⌃P (Windows and Linux). Alternatively, you can click the gear icon in the lower-left corner of the workspace and select “Command Palette…” from the context menu.
If another editor’s built-in keyboard shortcuts are ingrained in your muscle memory, you can make the transition to VS Code easier by installing a keymap. Keymaps are a type of VS Code extension that add key bindings. From the Command Palette, select “Preferences: Keymaps.” A list of all available keymaps will appear in the sidebar. Click the green Install button for the one corresponding to your favorite (for now) editor, then click the blue Restart button that replaces it. Now those familiar keyboard shortcuts are at your ready.
If you’re on macOS, there’s one other VS Code command you should run right away: “Shell Command: Install code command in PATH.” The code utility lets you open files and directories in VS Code from the command line. If you’re on Windows or Linux, code should have already been installed for you.
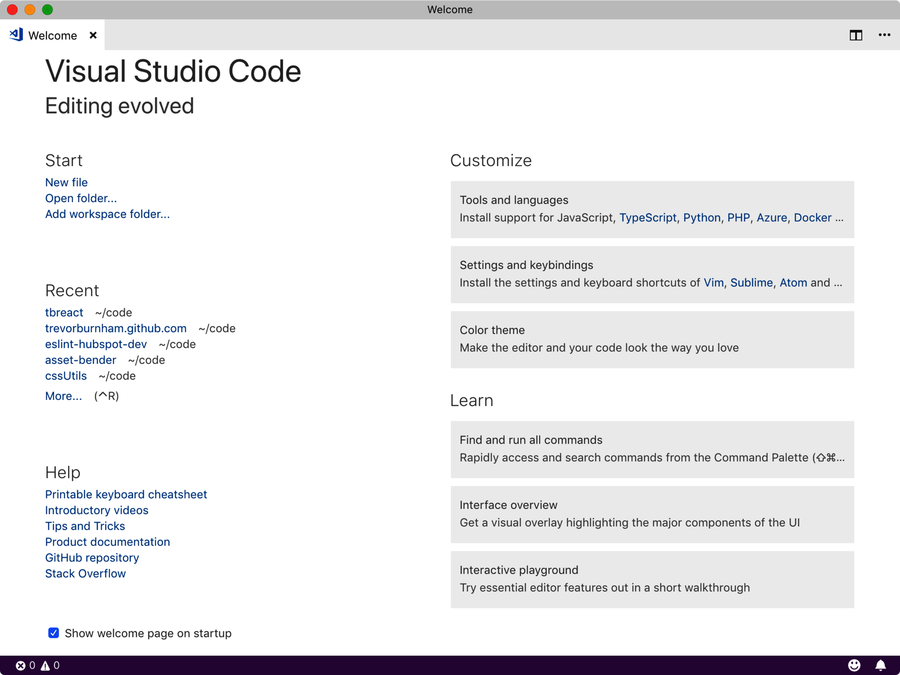
Now take another look around. Most of the workspace is occupied by the editor area. By default, that area is occupied by a Welcome page. Close that tab. With no files open, the editor area shows a handy list of commonly used keyboard shortcuts, as seen in the screenshot.
Try one of those now, “Toggle Terminal” (⌃‘). A shell will pop up from the bottom of the screen. For any developer used to switching back and forth between their editor and their terminal, this integrated terminal is a game-changer. Try using it to create the directory for this chapter’s project, test-driven-palindromes:
| | $ mkdir test-driven-palindromes |
Then open that directory using the code command-line utility. By default, code [dir] opens dir in a new window; since we don’t need our existing workspace, add the -r flag (short for --reuse-window):
| | $ code -r test-driven-palindromes |
Now VS Code knows that you’re working on a project in the test-driven-palindromes directory, which lets the editor help you out in a number of ways. For a start, every Terminal instance now opens with test-driven-palindromes as its working directory. Try it:
| | $ pwd |
| | /Users/tburnham/code/test-driven-palindromes |
Let’s start building our new project. The first file we’ll need is a package.json. Use npm init -y to create one with all of the defaults:
| | $ npm init -y |
| | Wrote to /Users/tburnham/code/test-driven-palindromes/package.json: |
| | |
| | { |
| | "name": "test-driven-palindromes", |
| | "version": "1.0.0", |
| | "description": "", |
| | "main": "index.js", |
| | "scripts": { |
| | "test": "echo "Error: no test specified" && exit 1" |
| | }, |
| | "keywords": [], |
| | "author": "", |
| | "license": "ISC" |
| | } |
Open the new package.json by clicking it in the Explorer sidebar, or you can use the handy “Go to File” command (⌘P on macOS, ⌃P on Windows and Linux) to search for it. As in Chapter 1, add a "private": true entry, keeping in mind that JSON requires a comma at the end of every entry. (If you forget, VS Code will helpfully highlight the invalid JSON syntax in red to remind you.) Then install Jest:
| | $ npm install --save-dev [email protected] |
Finally, replace the boilerplate "test" script with "jest", as in the previous chapter:
| | // package.json |
| | { |
| | "name": "test-driven-palindromes", |
| » | "private": true, |
| | "version": "1.0.0", |
| | "description": "", |
| | "main": "index.js", |
| | "scripts": { |
| » | "test": "jest" |
| | }, |
| | "keywords": [], |
| | "author": "", |
| | "license": "ISC", |
| | "devDependencies": { |
| | "jest": "^23.6.0" |
| | } |
| | } |
Then toggle the terminal again (⌃‘) to get it out of the way. You won’t need it for the next section.
Using Editor Groups
Let’s get back into the rhythm of TDD. For our project, we’re going to write a function that finds all palindromes in a string. A palindrome is a phrase that’s spelled the same forwards and backwards (ignoring spaces and punctuation). For example:
| | palindromes('What number is never odd or even, asked the Sphinx?') |
would return
| | ['neveroddoreven'] |
As frivolous as a program for finding palindromes may sound, it’s a good approximation of a real project in one important sense: the requirements aren’t precisely defined. Whereas Fizz Buzz had crystal-clear rules that we could translate directly into tests, figuring out a reasonable set of rules for the palindrome finder will require creativity and experimentation.
Create a “New Untitled File” (⌘N on macOS, ⌃N on Windows and Linux), then save it (⌘S on macOS, ⌃S on Windows and Linux) as palindromes.js. Repeat for palindromes.test.js.
Now let’s try viewing the two files side-by-side: palindromes.js on the left, palindromes.test.js on the right. There are several ways to do this. If you’re a mouse person, the fastest way is to click-and-drag the palindromes.test.js tab to the right edge of the editor area. If you’d rather stick with the keyboard, trigger the “Move Editor into Right Group” command from the Command Palette.
Now all the relevant parts of the project are in view. You can move the focus to different editor groups by pressing the primary modifier key (⌘ on macOS, ⌃ on Windows and Linux) with the number corresponding to the group’s ordinal position. So palindromes.js is ⌘1 or ⌃1, and palindromes.test.js is ⌘2 or ⌃2. This even works from the Terminal.
In palindromes.test.js, create the first test:
| | // palindromes.test.js |
| | const palindromes = require('./palindromes') |
| | |
| | describe('palindromes()', () => { |
| | it('correctly identifies one-word palindromes', () => { |
| ① | expect(palindromes('madam')).toEqual(['madam']); |
| | }); |
| | }); |
- ①
-
Previously, we’ve made equality assertions with toBe(). However, toBe() does a strict equality check, which would fail here. The toEqual() assertion method, by contrast, checks for deep object equality. So the assertion expect(x).toEqual([’madam’]) passes as long as x is an array with the string "madam" as its only entry.
In palindromes.js, write a placeholder implementation:
| | // palindromes.js |
| | module.exports = (str) => { |
| | return [str]; |
| | }; |
Then open the integrated Terminal and start Jest in watch mode:
| | $ npx jest --watchAll |
The resulting layout should resemble the following screenshot, with your code and test output visible all at once:
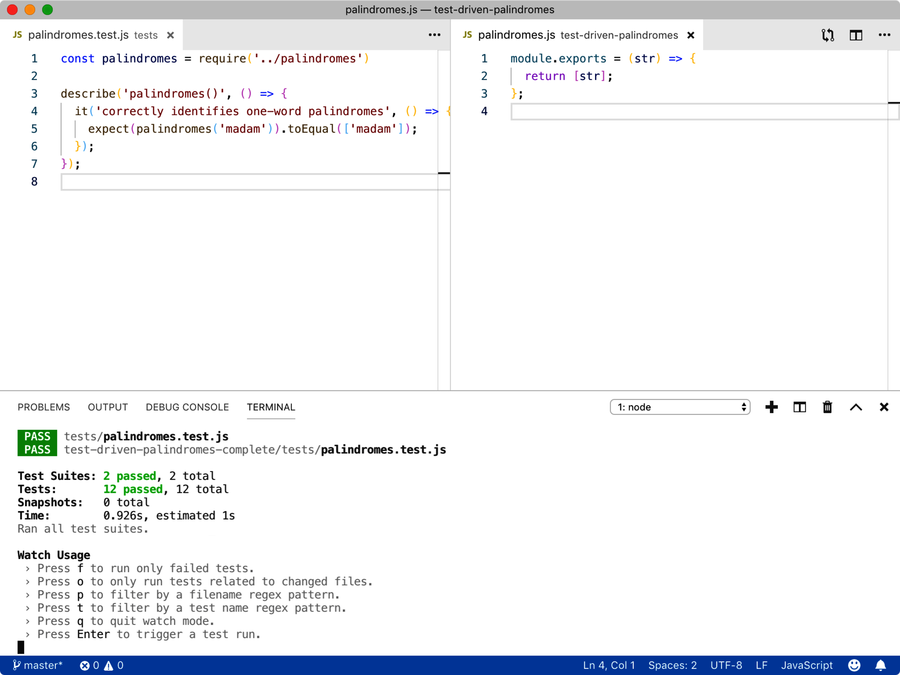
The test should light up green. Time to check your work in! In the next section, we’ll see how VS Code streamlines common Git tasks.
Integrated Source Control
VS Code features superb Git integration right out of the box. Stage changes, make commits, view diffs, switch branches, push to remotes—you can do it all without even opening the Terminal. Try opening the Command Palette and typing “git” to get a sense of all the power at your disposal.
Before you initialize Git for your new project, you’ll need to do some preemptive ignoring. That node_modules directory is going to gum up the works if you let it. So create a .gitignore file, just like the one in the previous chapter’s project:
| | # .gitignore |
| | node_modules/ |
Now use the Command Palette to run “Git: Initialize Repository.” When you’re prompted to choose a directory, accept the default. This is equivalent to running git init from the command line in the project directory.
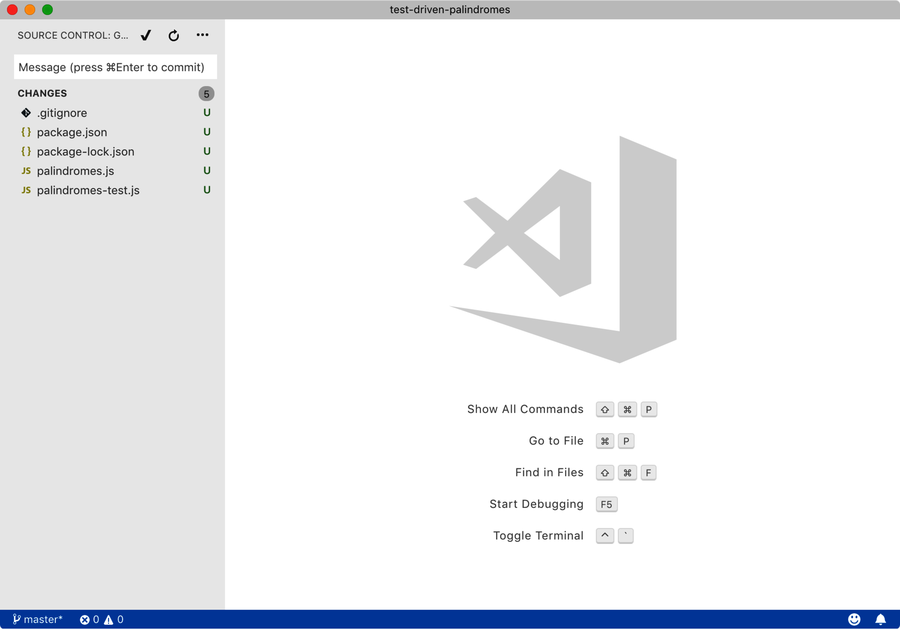
With Git initialized, the branch icon on the left edge of the window comes to life, showing a badge with the number 5. This is the number of files with uncommitted changes (which, since we have no commits yet, is all non-ignored files). Click that icon or press ⌃⇧G to open the Source Control sidebar, as seen in the following screenshot:
The Source Control sidebar shows you a list of modified files. You can click any of the file names to see a diff view, showing exactly what changes you can stage for commit. You could hover each of the files and click the + icon to stage it, but since you want to stage and commit everything, there is a faster way. Type this commit message into the “Message” box above the list of changes:
| | :tada: First commit |
Confirm the commit by pressing ⌘↩ (macOS) or ⌃↩ (Windows and Linux). You’ll get a prompt asking if you’d like for VS Code to automatically stage all your changes before committing. Select “Always.” This will write an entry in your User Settings, which is the subject of the next subsection.
User Settings
A code editor is only as good as a developer’s ability to tailor it to their needs. The VS Code team, knowing this, designed for customizability. All user-level customizations live in a single, editable JSON file, with the exception of keyboard shortcuts, which have their own dedicated customization file.
Recent versions of VS Code added a friendly, graphical settings interface. However, it’s useful to see what lurks underneath. From the Command Palette, run “Preferences: Open Settings (JSON).” This opens up a JSON file with all of your personal setting overrides. Since this view doesn’t show you the default setting, though, it’s not very useful by itself. You can remedy that by adding this setting:
| | "workbench.settings.useSplitJSON": true |
Save the file and reopen the settings file. Now you’ll be taken to a split view, with VS Code’s default settings on the left and your user-level overrides on the right, as shown in the first screenshot.

If you chose “Always” at the Git commit prompt in the last section, then there will be one other override here: git.enableSmartCommit is set to true. Hovering over the rule’s name gives you a description of its meaning:
| | Commit all changes when there are no staged changes. |
If you’d like to change the look and feel of the editor, now’s your chance! Let’s say you want to change the font. Type “font” in the search bar, and you’ll see several matching settings. Hover over any of the matches and click the pencil icon to copy that setting over to your User Settings, where you can do with it what you like. For example, if 12px is a bit squint-inducing for you, you might copy editor.fontSize to your User Settings and change the value to 14. As soon as you save, the change will take effect, as shown in the second screenshot.

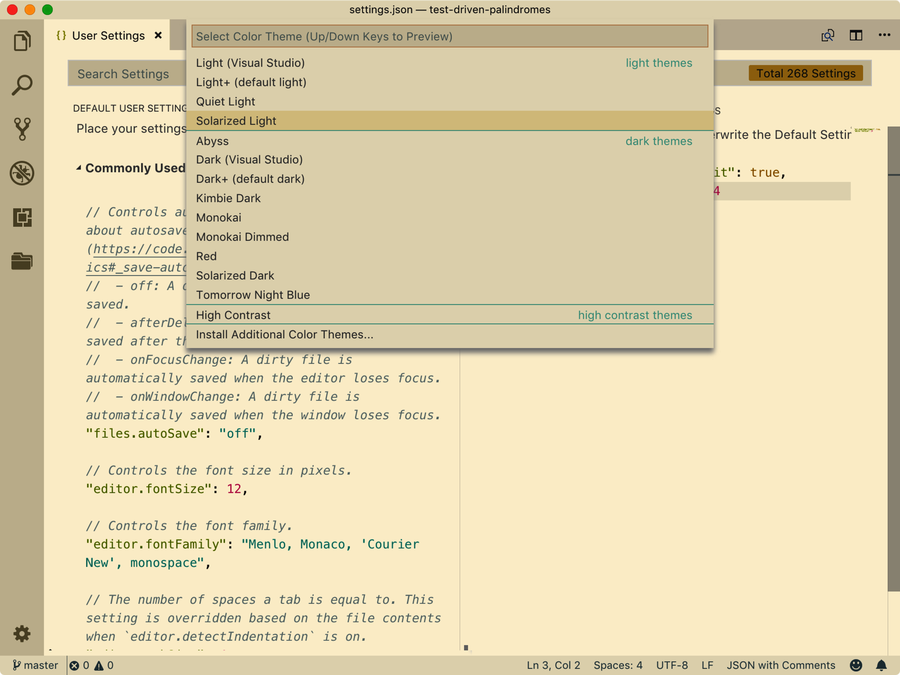
You can also change the color theme (used for both UI and syntax highlighting) via the workbench.colorTheme setting. However, there’s a useful shortcut: use the “Color Theme” command, accessible from the context menu on the gear in the lower-left corner. You’ll be presented with a list of every installed theme. You can preview them by using ↑ and ↓ to highlight each one, as in the following screenshot:
If none of the themes included with VS Code suit you, you can find many more in the VS Code marketplace.[23]
Aside from typography and color choice, perhaps nothing provokes as much developer passion as shells, at least among us Mac devotees. If you want to make the integrated Terminal launch something other than the version of Bash that came with the OS, override the terminal.integrated.shell.osx setting to point to your favorite shell.
One more setting of note: you’ve probably noticed the smiley face in the lower-right corner, soliciting feedback for the VS Code team. Many developers find it annoying. If you’re one of them, just right-click it and select “Hide” from the context menu. This’ll add an override for the workbench.statusBar.feedback.visible setting:
| | // User Settings |
| | { |
| | "git.enableSmartCommit": true, |
| | "workbench.settings.useSplitJSON": true, |
| » | "workbench.statusBar.feedback.visible": false, |
| | } |
Once you have VS Code adjusted to your liking, we’ll make some project-level tweaks.
Workspace Settings
Sometimes you’ll want to change an editor setting for a particular project. In VS Code, this feature is called Workspace Settings. Entries in Workspace Settings take precedence over User Settings.
Next to the User Settings heading above the right editor pane, you’ll notice that there’s a Workspace Settings heading. Click it. As soon as you do, a new file will materialize in the project: .vscode/settings.json. You add overrides to this file the same way that you do with User Settings.
One good use of Workspace Settings is telling VS Code to ignore non-editable files that live in the project via the files.exclude setting. For our purposes, the node_modules directory and package-lock.json are both non-editable, since we want npm to manage them for us:
| | // .vscode/settings.json |
| | { |
| ① | "files.exclude": { |
| | "node_modules": true, |
| | "package-lock.json": true |
| | } |
| | } |
- ①
-
Object settings like this one don’t replace the default; instead, the two objects are merged. To remove a key from the default files.exclude. object, copy its key and set the value to false.
Open the Explorer sidebar. You’ll notice that node_modules and package-lock.json are gone. They’ll also be excluded from all searches, including “Go to File” (though node_modules was already excluded from searches, thanks to the default search.exclude setting). It’s worth emphasizing that files.exclude and .gitignore are completely independent: Git will continue to monitor package-lock.json, which means that changes to that file will continue to be listed in the Source Control sidebar.
Another good use of Workspace Settings is indentation. VS Code defaults to using four-space indentation when it can’t automatically detect the existing indentation level of a file. Since this book uses two-space indentation for all JavaScript code, try adding a Workspace Setting that stipulates two-space indentation only within JavaScript files:
| | // .vscode/settings.json |
| | { |
| | "files.exclude": { |
| | "node_modules": true, |
| | "package-lock.json": true |
| | }, |
| » | "[javascript]": { |
| » | "editor.tabSize": 2 |
| » | } |
| | } |
- ①
-
The [javascript] key tells VS Code, “Apply all settings within this block only to JavaScript files.”
In general, the Workspace Settings file shouldn’t be checked into source control, since individual contributors to the same project may want different project-level customizations. So open .gitignore and add the .vscode directory:
| | node_modules/ |
| » | .vscode/ |
Now switch to the Source Control sidebar and commit, using the appropriate gitmoji for .gitignore changes:
| | :see_no_evil: Ignore .vscode dir |
This concludes our whirlwind tour of VS Code’s most essential features. You’ve learned how to use the super-convenient integrated terminal and source control, how to jump to files without touching the mouse, and how to open editors in a side-by-side split view. Most importantly, you realized the power to adjust every little detail of the editor to your liking through User Settings and Workspace Settings.
In the rest of the chapter, you’ll go beyond the out-of-the-box capabilities of VS Code by adding extensions specifically tailored for a refined JavaScripting experience.