
Setting Up Travis CI
Travis CI is a continuous integration service that’s become enormously popular in recent years, thanks to its convenience and versatility. Travis can run your project’s scripts automatically every time you or a collaborator pushes a change, and report the results through GitHub’s “Pull Request” interface for branches. Each run is performed in its own isolated environment, producing more reliable results than you get in the personalized environment of a developer machine.
This section will walk you through the process of giving Travis CI access to your project, allowing you to offload tests and other automated tasks to the cloud. This will be a speedy process: You’ll upload your project to GitHub, authorize Travis to access it, then add a configuration file to tell Travis to run your project’s tests. Finally, you’ll add a “badge” to show the world that your project’s tests are passing on Travis CI.
Hosting Your Project on GitHub
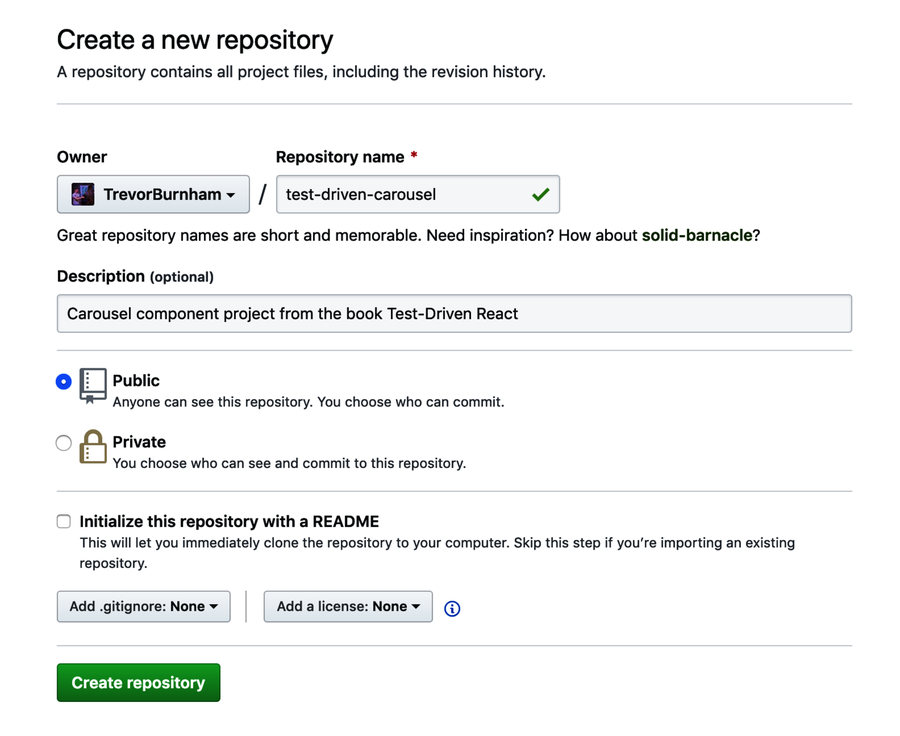
Travis CI is designed as an extension of GitHub, the preeminent source code hosting giant. If you don’t already have an account with GitHub, now would be a good time to create one.[71] Once you’re logged in, create a new repository for your personal incarnation of the test-driven-carousel project. Be sure to make it a public repository: Travis CI is free for public, open source projects. You can ignore all of the other options as shown in the screenshot.
Once your repo is in place, GitHub will show you some command-line instructions for pushing an existing Git repository. Copy-and-paste those in the directory of the test-driven-carousel project from the last chapter:
| | $ git remote add origin [email protected]:TrevorBurnham/test-driven-carousel.git |
| | $ git push -u origin master |
| | Enumerating objects: 133, done. |
| | Counting objects: 100% (133/133), done. |
| | Delta compression using up to 8 threads |
| | Compressing objects: 100% (130/130), done. |
| | Writing objects: 100% (133/133), 289.48 KiB | 6.58 MiB/s, done. |
| | Total 133 (delta 64), reused 0 (delta 0) |
| | remote: Resolving deltas: 100% (64/64), done. |
| | To github.com:TrevorBurnham/test-driven-carousel.git |
| | * [new branch] master -> master |
| | Branch 'master' set up to track remote branch 'master' from 'origin'. |
Congratulations: your project is now hosted by GitHub! By default, that means that anyone who’s interested in your project can not only download a copy, they can also suggest changes by submitting a pull request. When they do, you’ll want to know whether your tests pass against their suggested changes. That’s where Travis CI comes in.
Adding a Travis Configuration
Next, use your GitHub account to log in to Travis CI.[72] A screen will come up asking whether you want to grant the travis-pro organization access to your GitHub repositories. Authorize it—Travis needs that access to do its job. Once you’re logged in, you may be prompted to activate another layer of GitHub integration, GitHub Apps. Allow that, too.
Once Travis is able to connect to your GitHub account, you’ll see a list of your GitHub repositories, including test-driven-carousel. Click the link to the repo’s Travis page. At this point, there isn’t much to see, because Travis doesn’t know what you want it to do for the project.
To change that, you’ll need a file at the root of test-driven-carousel called .travis.yml. The .yml extension indicates that this is a YAML[73] file, which is a minimal human-readable syntax for data. Add a single entry:
| | language: node_js |
That’s all Travis needs to recognize this as a Node project. One small problem: Travis defaults to an old version of Node, which will run into problems when trying to build test-driven-carousel. Fortunately, we can specify any Node version we want by adding a configuration file for nvm, the node version manager:[74]
| | 10.15 |
This tells Travis to switch to Node 10.15.x (the latest stable release as of this writing) before doing anything else.
Commit this modest addition:
| | :wrench: Add Travis CI and nvm configs |
Then push to GitHub:
| | $ git push origin master |
Now watch as the project’s Travis page springs to life! Recognizing that test-driven-carousel is a Node project, it clones the project from GitHub, installs its dependencies from npm, then runs its tests for you:
| | > jest |
| | PASS src/tests/Carousel.test.js |
| | PASS src/tests/HasIndex.test.js |
| | PASS src/tests/AutoAdvances.test.js |
| | PASS src/tests/CarouselSlide.test.js |
| | PASS src/tests/CarouselButton.test.js |
| | Test Suites: 5 passed, 5 total |
| | Tests: 35 passed, 35 total |
| | Snapshots: 2 passed, 2 total |
| | Time: 3.318s |
| | Ran all test suites. |
Pretty cool, right? Although you should run your tests before pushing any changes, it’s reassuring to see the tests pass when another machine downloads your commit. And if anyone submits a pull request against your project, Travis will automatically run your tests against that branch and report the result there.
Adding a Status Badge
Let’s add one final touch to our Travis integration. Right now, the result of Travis’ latest test run is going to be tricky for anyone else to find. It’s on a public but obscure Travis CI page. If your tests are passing, you should shout it from the rooftops! A common way to do that is to add a small image (known as a “badge”) to the project README. Every time the badge loads, it shows the status of the latest build.
At the top of your project’s Travis CI page, next to the project name, there should be a small image that says “build passing.” That’s the status badge. Click it to open a dialog where you can pick out an embeddable link. Choose “Markdown” from the format dropdown, then copy the little code snippet it generates.
Then create a REACT.md project in the root of your test-driven-carousel project. It’s always a good idea for GitHub projects to have a README, since the README’s contents are shown on the project’s home page. Add a title, a short description, and the code you copied from Travis. The result should look something like this, with your GitHub username in place of username in the Build Status URLs:
| | # test-driven-carousel |
| | |
| | [](https://travis-ci.com/username/test-driven-carousel) |
| | |
| | Project from the book |
| | [Test-Driven React](https://pragprog.com/book/tbreact/test-driven-react). |
Save and commit using the suggested Gitmoji for documentation:
| | :memo: Add README with status badge |
Then push:
| | $ git push origin master |
Now your project’s current build status will be displayed prominently on its GitHub page, as shown in the screenshot.

That’s it for our coverage of Travis CI. There’s lots more you can do with Travis—tests are only the beginning! Travis can do just about anything you can write a script for. For more information, check out the Travis CI docs.[75]