
Packaging an App with webpack
In the beginning, preparing JavaScript for the browser was simple: put your page’s functionality in a single script and loaded it with a <script> tag. Then jQuery took off, and your script had a dependency. No problem: jQuery + app = two <script> tags. But then other libraries came around, which depended in turn on other libraries. Using Backbone.js? Better load it after Underscore.js. As more app functionality moved into the browser, the once simple act of loading code in the right order became a challenge. And what about concatenating and minifying scripts for performance? What about loading “below-the-fold” scripts asynchronously? What about development mode?
Only a few years ago, bespoke in-house tools were the norm for addressing these problems. But now, at last, there’s a Swiss Army knife for building JavaScript: webpack[46] (always lowercase). Raw scripts go into webpack; compiled, concatenated, minified bundles come out. With a little bit of configuration (OK, sometimes a lot), webpack can generate any bundle you can imagine.
In this section, you’re going to harness the power of webpack to build a small demo app for the carousel component. To get started, open the test-driven-carousel project from the last chapter. Then install webpack as a dev dependency, along with webpack-cli and a library called babel-loader that lets webpack use Babel to compile scripts:
| | $ npm install --save-dev [email protected] [email protected] [email protected] |
| | + [email protected] |
| | + [email protected] |
| | + [email protected] |
Then create a file called webpack.config.js in the root of the project:
| | // webpack.config.js |
| | module.exports = { |
| ① | mode: 'development', |
| | entry: { |
| ② | carousel: './src/Carousel.js', |
| | }, |
| ③ | module: { |
| | rules: [ |
| | { |
| | test: /.js$/, |
| ④ | loader: require.resolve('babel-loader'), |
| | }, |
| | ], |
| | }, |
| | }; |
- ①
-
Using mode: ’development’ provides good defaults for running code locally, optimizing for ease of debugging at the expense of bundle size and runtime performance. By contrast, mode: ’production’ would give you a minified bundle.
- ②
-
Each entry point defines a separate bundle for webpack to build. Here we’re telling webpack to build a bundle called carousel.js that contains src/Carousel.js and its dependencies.
- ③
-
The module block is where we tell webpack how to treat different kinds of modules, via an array of rules. A “module” in webpack can be any kind of file—JSON, CSS, even images—but we’re only concerned with JS modules, so we have just one rule.
- ④
-
This rule says “Use babel-loader for all .js files.” The loader will run each script through Babel with the config found in the root of our project.
The webpack-cli package added an executable named webpack. When it runs, it looks for a config file to tell it what to do. Although it should find the webpack.config.js in the root of the project by default, make the connection explicit by passing it a --config flag in a new build script:
| | // package.json |
| | ... |
| | "scripts": { |
| | "test": "jest", |
| | "lint": "eslint . && prettier-eslint --list-different **/*.js", |
| | "format": "prettier-eslint --write **/*.js", |
| » | "build": "webpack --config webpack.config.js" |
| | }, |
| | ... |
Now try building your project:
| | $ npm run build |
| | Hash: ccc06a7f00b25a1780c4 |
| | Version: webpack 4.26.1 |
| | Time: 619ms |
| | Built at: 2018-12-02 18:48:29 |
| | Asset Size Chunks Chunk Names |
| | carousel.js 106 KiB carousel [emitted] carousel |
| | Entrypoint carousel = carousel.js |
| | [./src/Carousel.js] 5.31 KiB {carousel} [built] |
| | [./src/CarouselButton.js] 269 bytes {carousel} [built] |
| | [./src/CarouselSlide.js] 1.46 KiB {carousel} [built] |
| | + 11 hidden modules |
If you look in the dist dir of the project, you’ll see the carousel.js bundle. As the output indicates, that bundle includes Carousel, CarouselButton, and CarouselSlide.
Sharp-eyed readers will notice that the size of the bundle (106 KiB) is many times greater than the total size of the three carousel components. The gap is explained by the “hidden modules” mentioned at the end of the output. By default, webpack is silent regarding modules from node_modules. In this case, those modules are the imports from the react and prop-types packages. If you’re curious to see them, run webpack again with the --display-modules flag.
A bit of housekeeping before we continue. ESLint is unaware that dist/carousel.js is generated code, so it considers that code to be within its purview:
| | $ npx eslint . |
| | |
| | /Users/tburnham/code/test-driven-carousel/dist/carousel.js |
| | 16:24 error Missing trailing comma comma-dangle |
| | 45:48 error 'Symbol' is not defined no-undef |
| | ... |
| | |
| | ✖ 81 problems (81 errors, 0 warnings) |
| | 36 errors and 0 warnings potentially fixable with the `--fix` option. |
81 errors! Fortunately, ESLint allows you to ignore directories the same way that Git does, by listing patterns in an ignore file:
| | dist/ |
It’s also a good idea to tell Prettier to ignore that directory:
| | dist/ |
Additionally, if you’re using VS Code, you might consider adding dist to the files.exclude section of your Workspace Settings, since you shouldn’t have to view or edit its contents directly:
| | { |
| | "files.exclude": { |
| » | "dist": true, |
| | "node_modules": true, |
| | "package-lock.json": true |
| | }, |
| | "[javascript]": { |
| | "editor.tabSize": 2 |
| | }, |
| | "editor.formatOnSave": true |
| | } |
Now you’ve got a browser-friendly bundle of this project’s components! All you need is an example page to show them off on. But first, save your progress:
| | :wrench: Initial webpack setup |
Adding an Example Page
Create an example dir. Since it’s going to contain web app code, it should be based on the same ESLint config as the src dir. However, one adjustment is in order: as it is, the linter will complain any time we return JSX from a function if that function doesn’t declare its arguments as propTypes. This is a bit of a nuisance, so disable the react/prop-types rule[47] within the example dir:
| | module.exports = { |
| | env: { |
| | browser: true, |
| | }, |
| | rules: { |
| | "react/prop-types": "off", |
| | } |
| | }; |
Then add an index.js with some placeholder code:
| | // example/index.js |
| | import React from 'react'; |
| | import ReactDOM from 'react-dom'; |
| | |
| | const container = document.createElement('div'); |
| | document.body.appendChild(container); |
| | ReactDOM.render(<h1>Hello, webpack!</h1>, container); |
Declare that JS file as a second entry point in the project’s webpack config:
| | // webpack.config.js |
| | module.exports = { |
| | mode: 'development', |
| | entry: { |
| | carousel: './src/Carousel.js', |
| » | example: './example/index.js', |
| | }, |
| | ... |
| | }; |
We need a page to host this app. Rather than writing up the HTML, you can make webpack generate it as part of the build process using html-webpack-plugin:
| | $ npm install --save-dev [email protected] |
| | + [email protected] |
Once the plugin is installed, add it to the webpack config:
| » | const HtmlWebpackPlugin = require('html-webpack-plugin'); |
| | module.exports = { |
| | mode: 'development', |
| | entry: { |
| | carousel: './src/Carousel.js', |
| | example: './example/index.js', |
| | }, |
| » | plugins: [ |
| » | new HtmlWebpackPlugin({ |
| » | title: 'Carousel Example', |
| » | chunks: ['example'], |
| » | }), |
| » | ], |
| | module: { |
| | rules: [ |
| | { |
| | test: /.js$/, |
| | loader: require.resolve('babel-loader'), }, |
| | ], |
| | }, |
| | }; |
- ①
-
The title option sets the title of the generated HTML page.
- ②
-
By default, the page generated by the plugin includes every bundle listed in entry. We only want the bundle corresponding to the example entrypoint. Later in this chapter, when example/index.js imports the Carousel component, Carousel and all of its dependencies—including React—will be included in the example bundle.
Run another build:
| | $ npm run build |
Once that completes, you’ll see that a dist/index.html has been generated along with the JavaScript assets. Open it up in a browser, and you should see a page with the message rendered by the example code:
Hello, webpack!
Now you can implement a working carousel example. The bulk of the code is going to be the slides themselves, so create a separate slides.js for that:
| | import React from 'react'; |
| | |
| | const referralParams = 'utm_source=test-driven-carousel&utm_medium=referral'; |
| | |
| | const getUsernameUrl = username => |
| | `https://unsplash.com/@${username}?${referralParams}`; |
| | |
| | const getAttribution = ({ name, username }) => ( |
| ① | <> |
| | Photo by <a href={getUsernameUrl(username)}>{name}</a> on{' '} |
| | <a href={`https://unsplash.com/?${referralParams}`}>Unsplash</a> |
| | </> |
| | ); |
| | export default [ |
| | { |
| | description: 'Seattle', |
| | attribution: getAttribution({ |
| | name: 'Ganapathy Kumar', |
| | username: 'gkumar2175', |
| | }), |
| | imgUrl: |
| | 'https://images.unsplash.com/photo-1469321461812-afeb94496b27?w=1080' + |
| | '&ixid=eyJhcHBfaWQiOjIzODE4fQ&s=568095e79ee2cb55a795ad454ac9cf5e', |
| | }, |
| | { |
| | description: 'Chicago', |
| | attribution: getAttribution({ |
| | name: 'Austin Neill', |
| | username: 'arstyy', |
| | }), |
| | imgUrl: |
| | 'https://images.unsplash.com/photo-1484249170766-998fa6efe3c0?w=1080' + |
| | '&ixid=eyJhcHBfaWQiOjIzODE4fQ&s=f56c763ccf86e87644b049c9abbcf455', |
| | }, |
| | { |
| | description: 'Barcelona', |
| | attribution: getAttribution({ |
| | name: 'Enes', |
| | username: 'royalfound', |
| | }), |
| | imgUrl: |
| | 'https://images.unsplash.com/photo-1464790719320-516ecd75af6c?w=1080' + |
| | '&ixid=eyJhcHBfaWQiOjIzODE4fQ&s=e836c604036680eeba5c77ebdb171c73', |
| | }, |
| | { |
| | description: 'New York', |
| | attribution: getAttribution({ |
| | name: 'Anthony DELANOIX', |
| | username: 'anthonydelanoix', |
| | }), |
| | imgUrl: |
| | 'https://images.unsplash.com/photo-1423655156442-ccc11daa4e99?w=1080' + |
| | '&ixid=eyJhcHBfaWQiOjIzODE4fQ&s=54a272d03f5c06c416e8899f113dff06', |
| | }, |
| | { |
| | description: 'Rio de Janeiro', |
| | attribution: getAttribution({ |
| | name: 'Agustín Diaz', |
| | username: 'agussdiaz28', |
| | }), |
| | imgUrl: |
| | 'https://images.unsplash.com/photo-1483729558449-99ef09a8c325?w=1080' + |
| | '&ixid=eyJhcHBfaWQiOjIzODE4fQ&s=966003791f746c210b73863cf6170e6c', |
| | }, |
| | ]; |
- ①
-
The <> tag is a fragment, a special kind of React element that has no corresponding DOM element. Fragments are a relatively new feature, introduced in React 16.2.0.[48]
Then update index.js to render a Carousel with these slides:
| | import React from 'react'; |
| | import ReactDOM from 'react-dom'; |
| » | import Carousel from '../src/Carousel'; |
| » | import slides from './slides'; |
| | const container = document.createElement('div'); |
| | document.body.appendChild(container); |
| » | ReactDOM.render(<Carousel slides={slides} />, container); |
With that, the example should be ready to view in the browser. Update the JavaScript bundle with npm run build, then refresh the page:
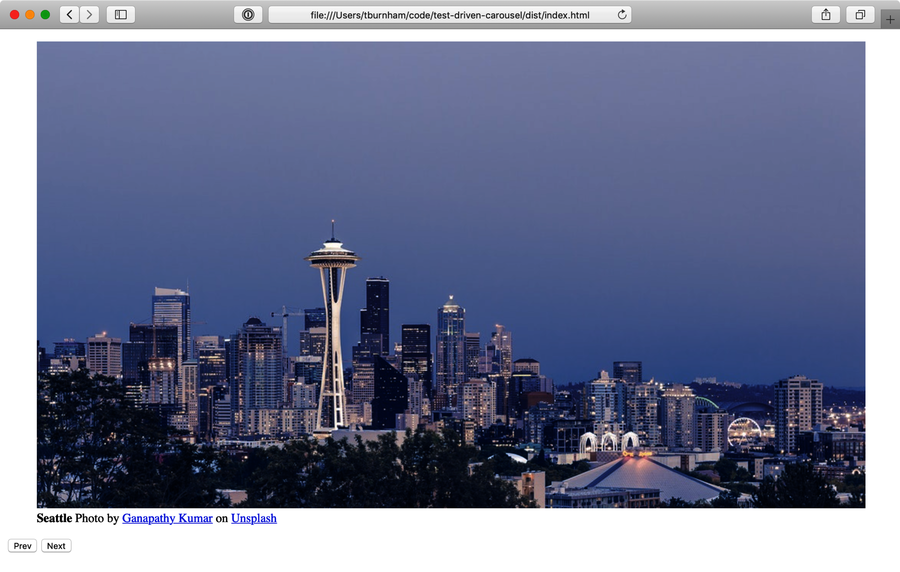
Success! That’s your carousel component, unstyled but fully functional. This is a good time for a commit using the gitmoji for adding code documentation (there’s one for everything!):
| | :bulb: Add example page |
One last bit of setup before we move on to styled-components. Right now, if you wanted to make changes to either the Carousel components or the example code and see them in the browser, you’d need to run npm run build and refresh the page. Let’s improve on that experience.
Running webpack-dev-server
The experience of building an app and the experience of doing local development are closely linked: every time you make changes during local development, you need to run a build. Ideally, those builds should be incremental, meaning that only the code that’s changed is recompiled, allowing you to see the new code in the browser as quickly as possible.
Enter webpack-dev-server, the missing link between your local code and your browser. Add it to the project’s devDependencies:
| | $ npm install --save-dev [email protected] |
| | + [email protected] |
By default, webpack-dev-server serves dist/index.html. That’s exactly what we want, so no additional configuration is required. All you need is another scripts entry:
| | // package.json |
| | ... |
| | "scripts": { |
| | "test": "jest", |
| | "lint": "eslint . && prettier-eslint --list-different **/*.js", |
| | "format": "prettier-eslint --write **/*.js", |
| | "build": "webpack --config webpack.config.js", |
| » | "dev": "webpack-dev-server --config webpack.config.js --open" |
| | }, |
| | ... |
The --open flag means that webpack-dev-server will open your system’s default browser automatically when it’s ready. Give it a try:
| | $ npm run dev |
| | > [email protected] dev /Users/tburnham/code/test-driven-carousel |
| | > webpack-dev-server --open |
| | |
| | ℹ 「wds」: Project is running at http://localhost:8080/ |
And with that, the example app should be open in a new browser tab. Now for the cool part: try making a change to the app. Hit save, and you’ll see that change in the browser! What sorcery is this? The dev server injected some code into the browser that listens (via a WebSocket) to the server process. When the server tells it that a change has occurred, the browser code triggers a refresh to bring in the changes.
Now that your dev server is fired up, you’re ready to start styling. Don’t forget to make a commit:
| | :wrench: Initial webpack-dev-server setup |