
Checking Code Quality with ESLint
A linter is a program that uses a set of rules to detect code that, though syntactically valid, is likely to contain mistakes. A classic example is using = (assignment) instead of == or === (equality) in an if statement:
| | if (savings = 0) { |
| | // This "condition" would empty your account! |
| | } |
Linting JavaScript is especially valuable because of its relatively freewheeling nature. If you mistype window as wimdow, your program won’t refuse to run; it just won’t run the way you’d hoped. Of course, one way to avoid such fat-finger bugs is to have extensive test coverage. But a linter can often identify such problems sooner, and give you more helpful information for fixing them. Enter ESLint.[24]
Although other JavaScript linters have been tried before, ESLint is the first to really take off, thanks to its pluggable architecture. There are plugins for React, Angular, and every other popular JavaScript framework, aimed at warning developers against the most common gotchas. And what do you know? There’s a Jest plugin, too!
You’ll find that linting is an invaluable addition to your TDD toolbelt—one that you’ll continue to use throughout this book. In this section, you’ll learn how to run ESLint, how to configure it, and how to integrate it with VS Code for fast, automatic feedback.
Installing and Configuring ESLint
Let’s add ESLint to our project. First, open the VS Code Terminal. If Jest is running in watch mode, press Q to quit. Then install the eslint package:
| | $ npm install --save-dev [email protected] |
| | + [email protected] |
You can try running ESLint with npx eslint ., but it won’t do anything yet—the project needs an ESLint configuration first. Create a new file and save it as .eslintrc.js:
| | // .eslintrc.js |
| | module.exports = { |
| | extends: ['eslint:recommended'], |
| | }; |
This tells ESLint to use its recommended rule set as the base for our configuration. For a complete list of the included rules, check the ESLint docs.[25] We’ll tweak those rules in the next section. Try linting palindromes.js now using the npm lint script:
| | $ npx eslint palindromes.js |
| | |
| | /Users/tburnham/code/test-driven-palindromes/palindromes.js |
| | 1:25 error Parsing error: Unexpected token > |
| | |
| | ✖ 1 problem (1 error, 0 warnings) |
ESLint refused to parse the arrow function syntax, (expression) => { ... }. By default, ESLint makes the conservative assumption that all code must conform to the ECMAScript 5 standard; arrow functions were added in ECMAScript 6. To change that assumption, add a new entry called parseOptions to the ESLint configuration:
| | // .eslintrc.js |
| | module.exports = { |
| | extends: ['eslint:recommended'], |
| | parserOptions: { |
| | ecmaVersion: 6, |
| | }, |
| | }; |
Run the linter again, and you’ll see a different error:
| | $ npx eslint palindromes.js |
| | |
| | /Users/tburnham/code/test-driven-palindromes/palindromes.js |
| | 1:1 error 'module' is not defined no-undef |
| | |
| | ✖ 1 problem (1 error, 0 warnings) |
Once again, ESLint is erring on the side of caution. The module global isn’t part of any ECMAScript standard, and would indeed be undefined in many environments. We expect it to be defined, however, because this code will run in a Node environment. To let ESLint know that, add an entry called env to its configuration:
| | // .eslintrc.js |
| | module.exports = { |
| | extends: ['eslint:recommended'], |
| | parserOptions: { |
| | ecmaVersion: 6, |
| | }, |
| | env: { |
| | node: true, |
| | }, |
| | }; |
Now give the linter one more try:
| | $ npx eslint palindromes.js |
No output? Great! When it comes to linting, no news is good news.
Commit your work so far, using the recommended gitmoji for configuration changes:
| | :wrench: Initial ESLint setup |
If you’d like more information on anything we’ve done so far, see the docs on configuring ESLint.[26] Next up, we’re going to build a slightly different set of linter rules for our test file.
Extending an ESLint Configuration
ESLint is now perfectly content with palindromes.js, but if you try to run it against palindromes.test.js, it won’t be so happy:
| | $ npx eslint palindromes.test.js |
| | |
| | /Users/tburnham/code/test-driven-palindromes/palindromes.test.js |
| | 3:1 error 'describe' is not defined no-undef |
| | 4:3 error 'it' is not defined no-undef |
| | 5:5 error 'expect' is not defined no-undef |
| | |
| | ✖ 3 problems (3 errors, 0 warnings) |
All of these problems share the same cause as the module kerfuffle earlier: ESLint doesn’t know that palindromes.test.js will be running in an environment (Jest) where describe, it, and expect are defined as globals.
You could fix the problem with another env entry, but there’s a better way. Jest has an official ESLint plugin, eslint-plugin-jest,[27] which comes with several rules for identifying common test code mistakes. Go ahead and add it to the project:
| | $ npm install --save-dev [email protected] |
| | + [email protected] |
To apply the plugin, you need to make two changes to the ESLint configuration: first, register it in a plugins entry; and second, add its recommended configuration to the extends entry:
| | // .eslintrc.js |
| | module.exports = { |
| | plugins: ['jest'], |
| | extends: ['eslint:recommended', 'plugin:jest/recommended'], |
| | parserOptions: { |
| | ecmaVersion: 6, |
| | }, |
| | env: { |
| | node: true, |
| | }, |
| | }; |
Now you should be able to lint palindromes.test.js without complaint:
| | $ npx eslint palindromes.test.js |
However, there is a slight problem with this setup: those Jest-specific configuration settings now apply to every JavaScript file in the project! We want one set of configuration rules for tests, and another set for everything else. The best way to accomplish that is to move the tests into their own subdirectory. There we can define a test-specific ESLint configuration that extends the more general configuration in the project root.
Remove the Jest entries by resetting the root ESLint configuration to its last committed state via VS Code’s “Discard Changes” command, or from the Terminal:
| | $ git checkout -- .eslintrc.js |
Create a new directory called tests and move palindromes.test.js into it. Change the require() path on the file’s first line to correct the relative path (VS Code may have already done this for you):
| | // tests/palindromes.test.js |
| | const palindromes = require('../palindromes'); |
| | ... |
Now remove the Jest-specific settings from the root .eslintrc.js, and add them instead to a new .eslintrc.js in the tests directory:
| | module.exports = { |
| | plugins: ['jest'], |
| | extends: ['plugin:jest/recommended'], |
| | }; |
Every time ESLint runs against a JavaScript file, it looks for the closest configuration. Then it continues looking in all parent directories, merging all of the configurations it finds (with closer configurations given greater precedence). So when ESLint runs against tests/palindromes.test.js, it’ll apply not only the Jest plugin’s rules but also the "eslint: recommended" rules. The parserOptions and env will carry over as well. This inheritance pattern means we only have to make configuration changes to a single file for those rules to apply project wide.
Try it out for yourself:
| | $ npx eslint tests/palindromes.test.js |
Once you get the all-clear, commit the new project structure using the gitmoji for moving files around:
| | :truck: Move tests into their own folder |
Integrating ESLint with VS Code
As useful as ESLint’s command-line reports are, they’re less than ideal ergonomically. First, running the linter manually takes you out of the coding flow. And second, using the line and column numbers in the error report to identify the code in question is a chore. It’d be much handier to see the linter’s feedback directly in your code. Happily, we can do exactly that, by adding the ESLint extension to VS Code.
Open the Extensions sidebar (⌃⇧X) and search for “ESLint.” Several extensions will pop up. At the top of the list, you should see an extension simply named “ESLint” by Dirk Baeumer.[28] Click the green “Install” button.
Try typing something nonsensical in either of the project’s JS files. Within milliseconds, your gibberish will be underlined in bright red. ESLint is linting your code as you type! Hover over the underlined code to see which linter rule you’re breaking. Also notice that the scrollbar area (officially called the “overview ruler”) has red squares marking the lines with red underlining—handy for scrolling directly to linter problems in large files.
VS Code tracks all problems reported by linters and aggregates them in the left corner of the status bar (next to the source control branch indicator), where you can always see the total number of errors and warnings found in all open files. Click these numbers and the Problems pane will open with a complete list, as you can see in the screenshot.
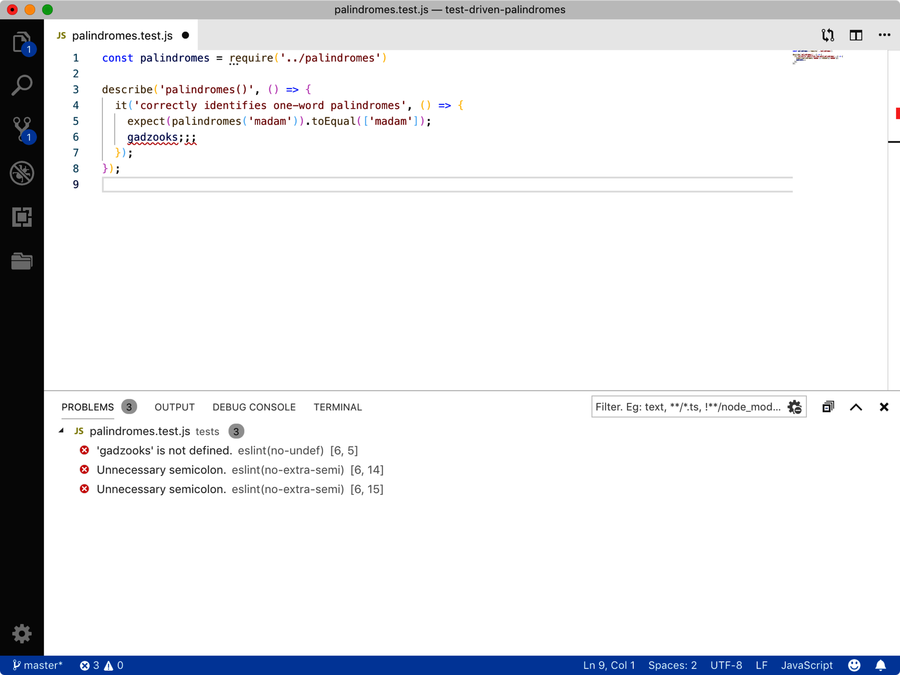
You can click any of the listed problems to jump to the corresponding point in your code. To get a feel for how all of this feedback can help, try adding another assertion to the existing test:
| | // tests/palindromes.test.js |
| | const palindromes = require('../palindromes') |
| | |
| | describe('palindromes()', () => { |
| | it('correctly identifies one-word palindromes', () => { |
| | expect(palindromes('madam')).toEqual(['madam']); |
| | expect(palindromes('racecar')).toEqual(['racecar']); |
| | }) |
| | }); |
Any mistake you make will trigger instant alarm bells. If, for example, you were to misplace the closing parenthesis for the expect() so that it contained the toEqual(), the linter would complain (thanks to the Jest plugin) that No assertion was called on expect().
Having linter feedback as you type is terrific for catching typos, but it also means getting a lot of false positives, as the linter is liable to complain before you’ve finished typing what you’ve intended. Many developers don’t mind this, but if you’d prefer to do without the noise, you can tell the ESLint integration to wait until save via the eslint.run setting:
| | // User Settings |
| | { |
| | ... |
| | "eslint.run": "onSave", |
| | } |
And that’s all you need to get up and running with ESLint. We’ve seen how to add ESLint to a project, how to use nested configurations, and how to run the linter automatically with VS Code. In the next section, we’ll take our quest for better code through better tooling even further with automated formatting.