
Real-Time Testing with Wallaby
Imagine a world where there are no boundaries between your code and your tests. Instead of saving changes to your code and seeing the output from Jest in a separate panel, you would see the results of your tests instantly as you type, right before your eyes. Code with passing tests would be marked with a reassuring green. Code with failing tests would be highlighted in red, with a description of the failure floating next to it. Sounds like magic? It’s real, and it’s called Wallaby.
In addition to working like magic, Wallaby is a commercial product. We JavaScript developers have been blessed (spoiled, some would say) by an abundance of free tools. All of the other amazing software I’ve mentioned in this chapter—VS Code, Jest, ESLint, Prettier—is free and open source. But there is, quite simply, nothing else like Wallaby. There’s a 30-day free trial, so don’t let the price tag deter you from following along with this chapter.
Open up the Extensions sidebar, search for “Wallaby.js,” and install. A notification will pop up in the corner:
Installing wallaby.js dependencies. It may take a minute or two, you will be notified once the install is finished.
While that’s happening, we can configure Wallaby for our project. Create a file called wallaby.js at the root of the project:
| | module.exports = function() { |
| | return { |
| ① | testFramework: 'jest', |
| | |
| | env: { |
| ② | type: 'node', |
| | }, |
| | |
| ③ | tests: ['tests/**/*.test.js'], |
| ④ | files: ['**/*.js', '!node_modules/**/*', '!**/*.test.js', '!**/.*'], |
| | }; |
| | }; |
- ①
-
testFramework: ’jest’ is pretty self-explanatory: It tells Wallaby to use Jest to run our tests, as opposed to another framework like Jasmine or Mocha.
- ②
-
env.type: ’node’ tells Wallaby to run our tests in Node, as opposed to a browser environment.
- ③
-
tests: [’tests/**/*.test.js’] tells Wallaby where to find the test files in this project.
- ④
-
files: [’**/*.js’, ’!node_modules/**/*’, ’!**/*.test.js’, ’!**/.*’] tells Wallaby where to find the project’s source files. The patterns preceded by ! are excluded, preventing Wallaby from trying to treat JS files in node_modules, or ending in .test.js, or starting with . (like .eslintrc.js) as source files.
Why does Wallaby need to know where to find all of the source files in the project? Because Wallaby caches its own copies of these files in memory, allowing it to re-run tests in the blink of an eye.
Once Wallaby’s dependencies are installed and our configuration is saved, run “Wallaby.js: Start” from the Command Palette. You’ll be prompted to select a configuration file; use the one we just created. Wallaby may take a while to initialize for the first time, so go get yourself a cup of coffee. When you get back, your workspace should resemble the screenshot.
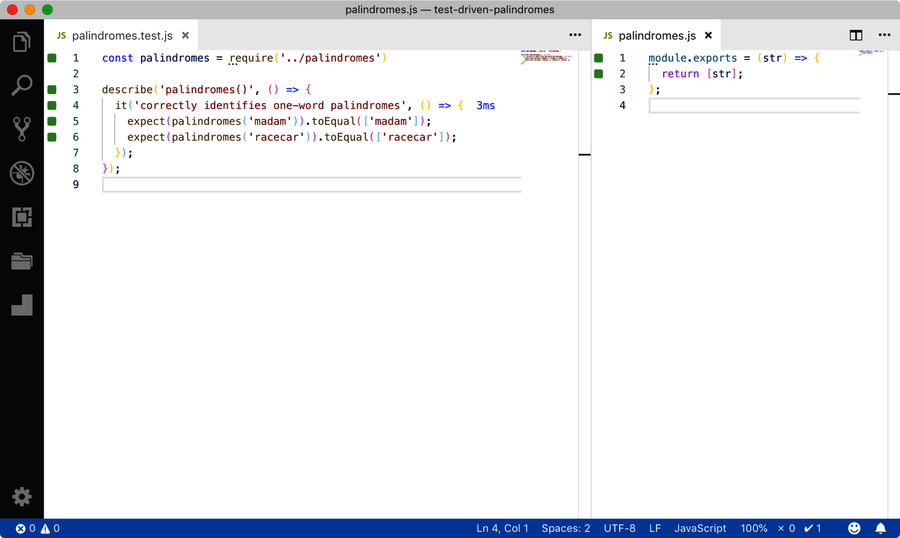
Notice that there’s now an indicator near the lower-right corner of the screen that shows the number of passing and failing tests. More strikingly, there are several green annotations next to lines in both palindromes.js and palindromes.test.js.
The annotations are Wallaby’s magic sauce. When a line has a green annotation, that means that the line is covered by your tests. If every line in your project’s source code has a green annotation, then congrats: you’ve achieved 100% code coverage!
Try changing the second line of the test to make it fail. Within milliseconds, Wallaby reruns the tests. The failing test line now has a red annotation, meaning that it throws an error (as expect() does when it fails). The specific error is shown next to that line. You can see a full readout with Wallaby’s “Show Failing Tests” command, as shown in the screenshot.

Notice that the passing test line has a pink annotation, as does the function body in palindromes.js. The pink annotation means that the line is in the execution path of a failing test. This is an incredibly useful aid for tracking down the cause of test failures, as you can rule out all lines not marked in pink as irrelevant.
Wallaby also has a grey annotation for lines that are not covered by tests, and a yellow annotation for lines that are only partly covered by tests.
Seeing your code so liberally decorated may take some getting used to, but once you do, you’ll find the information Wallaby provides invaluable. Wallaby is both the fastest way to run your tests and the most thorough results reporter.
A Wallaby Challenge
With Wallaby at the ready, have a go at using TDD to implement the palindrome finder features described by these tests:
| | it('returns an empty array when given no palindromes', () => { |
| | expect(palindromes('tic tac toe')).toEqual([]); |
| | }); |
| | |
| | it('ignores casing', () => { |
| | expect(palindromes('WoW')).toEqual(['wow']); |
| | }); |
| | |
| | it('ignores punctuation', () => { |
| | expect(palindromes('yo, banana boy!')).toEqual(['yobananaboy']); |
| | }); |
| | |
| | it('detects multi-word palindromes', () => { |
| | expect(palindromes('A man, a plan, a canal, Panama')).toEqual([ |
| | 'amanaplanacanalpanama', |
| | ]); |
| | }); |
This is intended to be a challenge, so don’t expect it to be as easy as Fizz Buzz. The important thing is that you learn to take advantage of the real-time feedback provided by Wallaby and the other tools introduced earlier as you work. Be sure to add tests for any utility functions you might write along the way. You can find an example solution at the end of the chapter.