POLICIES, RULES, OR GUIDELINES
Policies are rules or guidelines for a specific business process. They are formal corporate-wide instructions that must be followed by everyone within the organization. Violation of policies may result in disciplinary action. New policies must be approved by corporate management. (Figure 3.51.)
Rules are less formal than policies and define acceptable behavior within a particular department or division.
![]() Rules may not impact the entire organization.
Rules may not impact the entire organization.
![]() New rules must be approved by department or division heads.
New rules must be approved by department or division heads.
![]() Violation of rules may result in disciplinary action.
Violation of rules may result in disciplinary action.
Guidelines suggest ways of handling certain situations.
![]() Violating a guideline does not necessarily involve sanctions.
Violating a guideline does not necessarily involve sanctions.
![]() A subject matter expert should approve guidelines.
A subject matter expert should approve guidelines.
Policies address a particular problem or issue and specific groups of employees.
![]() Policies must be formally shared with the group of employees who will be governed by the language.
Policies must be formally shared with the group of employees who will be governed by the language.
![]() Employee handbooks are often published with company policies and distributed to all employees.
Employee handbooks are often published with company policies and distributed to all employees.
To write a policy, rule, or guideline, follow these steps:
![]() Create an outline of the topics that could be covered by the policy, rule, or guideline.
Create an outline of the topics that could be covered by the policy, rule, or guideline.
![]() State the purpose of the policy, rule, or guideline.
State the purpose of the policy, rule, or guideline.
![]() State clearly what the policy, rule, or guideline allows and doesn’t allow.
State clearly what the policy, rule, or guideline allows and doesn’t allow.
![]() Explain to whom the policy, rule, or guideline applies.
Explain to whom the policy, rule, or guideline applies.
![]() Provide any background information that provides context on why the policy, rule, or guideline is needed.
Provide any background information that provides context on why the policy, rule, or guideline is needed.
![]() List any legislation that governs the policy, rule, or guideline.
List any legislation that governs the policy, rule, or guideline.
![]() Describe any specific procedure that must be followed.
Describe any specific procedure that must be followed.
![]() Use short paragraphs or numbered steps.
Use short paragraphs or numbered steps.
![]() Group tasks together under subheadings.
Group tasks together under subheadings.
![]() Explain what to do if violations occur.
Explain what to do if violations occur.
![]() Explain any terminology that may be confusing to a general audience of employees.
Explain any terminology that may be confusing to a general audience of employees.
![]() List any special circumstances when the policy, rule, or guideline does not apply.
List any special circumstances when the policy, rule, or guideline does not apply.
![]() List any time restraints if applicable, including the effective date.
List any time restraints if applicable, including the effective date.
WHO IS ENTITLED TO BENEFITS UNDER COBRA
There are three elements to qualifying for COBRA benefits. COBRA establishes specific criteria for plans, qualified beneficiaries, and qualifying events:
Qualified Beneficiaries— A qualified beneficiary generally is an individual covered by a group health plan on the day before a qualifying event who is either an employee, the employee’s spouse, or an employee’s dependent child. In certain cases, a retired employee, the retired employee’s spouse, and the retired employee’s dependent children may be qualified beneficiaries. In addition, any child born to or placed for adoption with a covered employee during the period of COBRA coverage is considered a qualified beneficiary. Agents, independent contractors, and directors who participate in the group health plan may also be qualified beneficiaries.
Qualifying Events— Qualifying events are certain events that would cause an individual to lose health coverage. The type of qualifying event will determine who the qualified beneficiaries are and the amount of time that the plan must offer the health coverage to them under COBRA.
Qualifying Events for Employees:
![]() Voluntary or involuntary termination of employment for reasons other than gross misconduct
Voluntary or involuntary termination of employment for reasons other than gross misconduct
![]() Reduction in the number of hours of employment
Reduction in the number of hours of employment
Qualifying Events for Spouses:
![]() Voluntary or involuntary termination of the covered employee’s employment for any reason other than gross misconduct
Voluntary or involuntary termination of the covered employee’s employment for any reason other than gross misconduct
![]() Reduction in the hours worked by the covered employee
Reduction in the hours worked by the covered employee
![]() Covered employee’s becoming entitled to Medicare
Covered employee’s becoming entitled to Medicare
![]() Divorce or legal separation of the covered employee
Divorce or legal separation of the covered employee
![]() Death of the covered employee
Death of the covered employee
Qualifying Events for Dependent Children:
![]() Loss of dependent child status under the plan rules
Loss of dependent child status under the plan rules
![]() Voluntary or involuntary termination of the covered employee’s employment for any reason other than gross misconduct
Voluntary or involuntary termination of the covered employee’s employment for any reason other than gross misconduct
![]() Reduction in the hours worked by the covered employee
Reduction in the hours worked by the covered employee
![]() Covered employee’s becoming entitled to Medicare
Covered employee’s becoming entitled to Medicare
![]() Divorce or legal separation of the covered employee
Divorce or legal separation of the covered employee
![]() Death of the covered employee
Death of the covered employee
POWERPOINT PRESENTATIONS
PowerPoint presentations are created to provide visual aids during oral presentations, sales presentations, and as stand-alone computer-based training. (Figures 3.52–3.55.) When creating PowerPoint presentations, consider the following tips:
![]() Slide designs should focus the audience’s attention on a particular aspect of each slide.
Slide designs should focus the audience’s attention on a particular aspect of each slide.
![]() Use contrasting colors, different text sizes, bold, or italics to set apart a particular element on the screen.
Use contrasting colors, different text sizes, bold, or italics to set apart a particular element on the screen.
![]() Highlight individual lines of text that are the focus of the slide.
Highlight individual lines of text that are the focus of the slide.
![]() Bulleted text lines should be aligned to give the page an elegant look.
Bulleted text lines should be aligned to give the page an elegant look.
![]() Keep all bullets on the same level grammatically parallel.
Keep all bullets on the same level grammatically parallel.
![]() Indent text from the bullet symbols by a consistent space for all levels of bullets.
Indent text from the bullet symbols by a consistent space for all levels of bullets.
![]() Avoid big paragraphs of text that fill the slide.
Avoid big paragraphs of text that fill the slide.
![]() Use bullets, headings, and subheadings instead.
Use bullets, headings, and subheadings instead.
![]() Repeat visual elements and text throughout the presentation to focus on key points and to unify the presentation.
Repeat visual elements and text throughout the presentation to focus on key points and to unify the presentation.
![]() Repeat headings from slide to slide when appropriate.
Repeat headings from slide to slide when appropriate.
![]() Repeat text from slide to slide, while highlighting a different line on each slide.
Repeat text from slide to slide, while highlighting a different line on each slide.
![]() Group similar items on the slide to show a relationship.
Group similar items on the slide to show a relationship.
![]() Use subheadings with nested bullets for a list.
Use subheadings with nested bullets for a list.
![]() Use a graphic with associated text to show a visual connection to the text.
Use a graphic with associated text to show a visual connection to the text.
![]() Use sans serif fonts like Helvetica, Swiss, Arial, Avant Garde, and Modern.
Use sans serif fonts like Helvetica, Swiss, Arial, Avant Garde, and Modern.
![]() Avoid mixing serif and sans serif fonts within the same presentation.
Avoid mixing serif and sans serif fonts within the same presentation.
![]() Apply background shading for presentations that will be projected.
Apply background shading for presentations that will be projected.
![]() Use a white background for presentations that will be printed and distributed on paper.
Use a white background for presentations that will be printed and distributed on paper.
![]() If shading is used, use a gradient that gradually changes from light to dark or from one color to another to add visual depth to the presentation.
If shading is used, use a gradient that gradually changes from light to dark or from one color to another to add visual depth to the presentation.
![]() Apply a consistent color scheme to the entire presentation.
Apply a consistent color scheme to the entire presentation.
![]() Do not use differently colored backgrounds for each slide in the presentation.
Do not use differently colored backgrounds for each slide in the presentation.
![]() Create styles for the entire presentation using Slide Master to:
Create styles for the entire presentation using Slide Master to:
![]() Set the text placement as well as font size and color on all slides.
Set the text placement as well as font size and color on all slides.
![]() Keep the presentation consistent.
Keep the presentation consistent.
![]() Use Notes Master to insert speaker notes into the presentation.
Use Notes Master to insert speaker notes into the presentation.
![]() When printed on paper, the slide appears at the top of the page and the notes appear at the bottom.
When printed on paper, the slide appears at the top of the page and the notes appear at the bottom.
![]() Use Handout Master to add text and artwork to audience handouts.
Use Handout Master to add text and artwork to audience handouts.
![]() To save time when designing a presentation, use PowerPoint templates that are prebuilt and professionally designed.
To save time when designing a presentation, use PowerPoint templates that are prebuilt and professionally designed.
![]() Templates are available within the PowerPoint application.
Templates are available within the PowerPoint application.
![]() Additional templates can be downloaded from the Internet.
Additional templates can be downloaded from the Internet.
![]() Use charts, photos, or illustrations that communicate visually.
Use charts, photos, or illustrations that communicate visually.
![]() Free clipart is available within PowerPoint.
Free clipart is available within PowerPoint.
![]() Bar charts and pie charts can be created in PowerPoint.
Bar charts and pie charts can be created in PowerPoint.
![]() Organizational charts can also be created within PowerPoint.
Organizational charts can also be created within PowerPoint.
![]() The Smart Art Graphics feature, available within the PowerPoint program, allows you to insert nice looking diagrams.
The Smart Art Graphics feature, available within the PowerPoint program, allows you to insert nice looking diagrams.
![]() Digital cameras can be used to take photographs that can be imported into PowerPoint and placed on a slide.
Digital cameras can be used to take photographs that can be imported into PowerPoint and placed on a slide.
![]() AutoShapes allows you to create geometric shapes, arrows, and lines to help illustrate your slides.
AutoShapes allows you to create geometric shapes, arrows, and lines to help illustrate your slides.
![]() Videos, animation, and sound can be added to slides to create a multimedia presentation.
Videos, animation, and sound can be added to slides to create a multimedia presentation.
Planning a Presentation
Consider the following guidelines as you plan your presentation.
![]() Determine your goal and objectives.
Determine your goal and objectives.
Example: Do you want to persuade or inform?
![]() Keep the presentation simple and focused.
Keep the presentation simple and focused.
![]() A clear message with more impact is more likely to achieve results than an unfocused one.
A clear message with more impact is more likely to achieve results than an unfocused one.
![]() A complicated message is muddled and will leave the audience confused and frustrated.
A complicated message is muddled and will leave the audience confused and frustrated.
![]() Keep the number of topics covered to a minimum.
Keep the number of topics covered to a minimum.
![]() Design the presentation like creating a story.
Design the presentation like creating a story.
![]() Organize the content with a beginning, middle, and end.
Organize the content with a beginning, middle, and end.
![]() Design for drama.
Design for drama.
![]() Pique your audience’s interest toward the end of the presentation and deliver the central conclusion of your message when you have the full attention of everyone.
Pique your audience’s interest toward the end of the presentation and deliver the central conclusion of your message when you have the full attention of everyone.
![]() Plan your media selection.
Plan your media selection.
![]() Will you use slides and a digital projector, printed handouts, or both?
Will you use slides and a digital projector, printed handouts, or both?
![]() Think and plan ahead.
Think and plan ahead.
![]() If you give the audience handouts before the show, they can follow along and write notes directly on the handouts.
If you give the audience handouts before the show, they can follow along and write notes directly on the handouts.
![]() Handouts also give the audience something to reference if they have trouble seeing the screen.
Handouts also give the audience something to reference if they have trouble seeing the screen.
![]() If you distribute handouts at the end of the presentation, you can avoid giving away any planned surprises.
If you distribute handouts at the end of the presentation, you can avoid giving away any planned surprises.
![]() Consider the subject matter.
Consider the subject matter.
![]() The tone of your presentation depends on the type of presentation: training seminar, presentation to managers or employees, or a sales presentation to customers.
The tone of your presentation depends on the type of presentation: training seminar, presentation to managers or employees, or a sales presentation to customers.
![]() Consider the audience’s:
Consider the audience’s:
![]() Familiarity with the subject matter
Familiarity with the subject matter
![]() Composition (will the audience be exclusively employees, or customers, or mixed?)
Composition (will the audience be exclusively employees, or customers, or mixed?)
![]() Size (large audiences dictate the need for more structure and formality; small audiences may be less formal, giving you more room for improvisation and one-on-one interaction)
Size (large audiences dictate the need for more structure and formality; small audiences may be less formal, giving you more room for improvisation and one-on-one interaction)
![]() Consider the environment for the presentation.
Consider the environment for the presentation.
![]() How visible is the screen from each part of the room?
How visible is the screen from each part of the room?
![]() If visibility is in question, include handouts with printed versions of each slide.
If visibility is in question, include handouts with printed versions of each slide.
![]() If you are not familiar with the equipment, arrange time for setting up and rehearsing your presentation before delivering the real thing.
If you are not familiar with the equipment, arrange time for setting up and rehearsing your presentation before delivering the real thing.
![]() Practice delivering your presentation.
Practice delivering your presentation.
![]() Deliver your presentation to a coworker or friend and ask for a critique.
Deliver your presentation to a coworker or friend and ask for a critique.
Figure 3.52 Slide with Bulleted Lists, a Graphical Background, and Photo
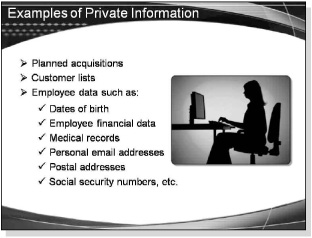
Figure 3.53 Slide with Title, Bulleted Subtitle, and Pie Chart
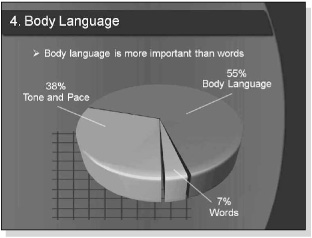
Figure 3.54 Slide with PowerPoint WordArt
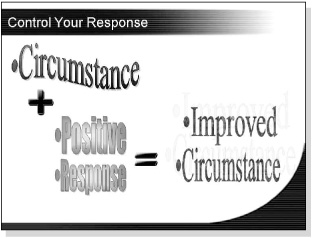
Figure 3.55 Slide with Graphics Rather Than Text

PRESS RELEASES
A press release is a written communication directed at the news media for the purpose of making an announcement. When writing a press release, consider the following guidelines (Figure 3.56):
![]() Lay out your document on an 8½ × 11-inch page.
Lay out your document on an 8½ × 11-inch page.
![]() Provide wide margins and double-space the copy.
Provide wide margins and double-space the copy.
![]() Include a release date at the top of the page.
Include a release date at the top of the page.
![]() Provide a contact name and address. Provide as much contact information as possible, including fax, email, and Web site addresses.
Provide a contact name and address. Provide as much contact information as possible, including fax, email, and Web site addresses.
![]() Include the phrase “For Immediate Release” along with a contact name and phone number. If the release date is in the future, instead say, “For Release on [date].”
Include the phrase “For Immediate Release” along with a contact name and phone number. If the release date is in the future, instead say, “For Release on [date].”
![]() Include a suggested headline.
Include a suggested headline.
![]() Start your first paragraph with the location in all caps, followed by the month and day.
Start your first paragraph with the location in all caps, followed by the month and day.
![]() Summarize your story in the first paragraph, including who, what, why, where, when, and how.
Summarize your story in the first paragraph, including who, what, why, where, when, and how.
![]() Make sure the first 10 words are effective; they are the most important.
Make sure the first 10 words are effective; they are the most important.
![]() Elaborate on the details, including quotes from important sources.
Elaborate on the details, including quotes from important sources.
![]() Make sure the information is newsworthy by suggesting other tie-ins. Pick an angle. Try to make your press release timely by tying it to current events or social issues.
Make sure the information is newsworthy by suggesting other tie-ins. Pick an angle. Try to make your press release timely by tying it to current events or social issues.
![]() Avoid excessive use of adjectives and fancy language. Use only enough words to tell your story.
Avoid excessive use of adjectives and fancy language. Use only enough words to tell your story.
![]() Use the active, not passive, voice. Verbs in the active voice bring your press release to life.
Use the active, not passive, voice. Verbs in the active voice bring your press release to life.
![]() Avoid jargon specific to your organization that might not be recognized by other readers.
Avoid jargon specific to your organization that might not be recognized by other readers.
![]() Answer the question, why should anyone care?
Answer the question, why should anyone care?
![]() Use real-life examples, if possible, that include stories of the people involved.
Use real-life examples, if possible, that include stories of the people involved.
![]() Raise other questions or suggest topics of interest, if you are trying to generate a feature story or radio or TV interview.
Raise other questions or suggest topics of interest, if you are trying to generate a feature story or radio or TV interview.
![]() Suggest in a covering pitch letter an interview with the principal person or organization involved, such as the company CEO or a book author.
Suggest in a covering pitch letter an interview with the principal person or organization involved, such as the company CEO or a book author.
![]() Type the word more at the end of each page.
Type the word more at the end of each page.
![]() At the end of your release, type ### and center it.
At the end of your release, type ### and center it.
October 1, 2011
Contact Name
Address
City, State, Zip
Email
Web Address
For Immediate Release
Contact: Jason Brown—770-555-1234
BRONSON MEDIA SIGNS $8 MILLION CONTRACT WITH VIDEOLOGIES, INC. TO BE EXCLUSIVE PROVIDER OF CIRCULATION SYSTEMS, NETWORK, AND APPLICATIONS.
ATLANTA, Oct 1—Bronson Media, the largest American newspaper owner, signed an $8 million contract making Videologies, Inc. the exclusive provider of circulation systems, network and applications for print media holdings.
Videologies will now provide circulation software for all of Bronson Media’s newspapers, including the Los Angeles Herald, The Seattle Constitution, and the Atlanta Daily. The contract was awarded to Videologies after an extensive product and company review. Bronson Media will take advantage of the entire line of Videologies circulation software. VID 4.2 is a program specially designed for print media to chart production and material costs to optimize productivity. VID Router allows newspapers to make routing decisions and design delivery routes based on scanned maps.
Mark Giddings, vice president of print media operations at Bronson Media, commented, “The contract with Videologies is a big step forward for Bronson’s newspapers. It will allow us to standardize circulation and production systems, making cooperation between our print media holdings more efficient and effective.”
###
PROCEDURES
Procedures are instructions that explain how to perform a particular task (Figure 3.57).
To write a procedure:
![]() State the goal of the procedure.
State the goal of the procedure.
Example: This procedure tells you how to install a cable modem.
![]() The heading for the procedure may also state the goal.
The heading for the procedure may also state the goal.
Example: Installing a Cable Modem
![]() If specific supplies or knowledge are needed for the procedure, provide a list before detailing the steps.
If specific supplies or knowledge are needed for the procedure, provide a list before detailing the steps.
Example: Before you start, you’ll need the following: coaxial cable, pliers, and a screwdriver.
![]() If a certain level of experience is necessary, provide a list for whom the procedures are intended.
If a certain level of experience is necessary, provide a list for whom the procedures are intended.
Example: Before attempting this procedure, you should have a basic understanding of an operating system.
![]() When is it necessary to use specific terminology to describe the procedure, use only what is absolutely necessary.
When is it necessary to use specific terminology to describe the procedure, use only what is absolutely necessary.
![]() Don’t overload the procedure with unnecessary jargon.
Don’t overload the procedure with unnecessary jargon.
![]() Explain any specialized technical terms that are used.
Explain any specialized technical terms that are used.
![]() Provide an estimate of how long it will take to complete the procedure.
Provide an estimate of how long it will take to complete the procedure.
![]() List the steps in the procedure using numbered lists.
List the steps in the procedure using numbered lists.
![]() Break the steps in the overall procedure into smaller sections.
Break the steps in the overall procedure into smaller sections.
![]() Limit the number of steps to 10 in each section.
Limit the number of steps to 10 in each section.
![]() Each section should have its own title.
Each section should have its own title.
![]() If a particular step has substeps, indent a secondary list using letters to designate them.
If a particular step has substeps, indent a secondary list using letters to designate them.
![]() Describe only one step at a time.
Describe only one step at a time.
![]() Each step should describe one task.
Each step should describe one task.
![]() Include illustrations where appropriate.
Include illustrations where appropriate.
![]() If certain conditions apply or if performing a step will cause something to happen, present this information at the beginning of the step.
If certain conditions apply or if performing a step will cause something to happen, present this information at the beginning of the step.
Example: To shut down the computer, click the Start button, then click Turn Off the Computer.
![]() When someone else is supposed to perform a particular step in the procedure, describe who is responsible and what he or she will do.
When someone else is supposed to perform a particular step in the procedure, describe who is responsible and what he or she will do.
Example: The licensing department will accept your serial number, and will email you an activation code.
![]() At the end of the procedure, include a statement that tells users that the procedure is complete and what the result is likely to be.
At the end of the procedure, include a statement that tells users that the procedure is complete and what the result is likely to be.
Example: That completes the steps for installing the cable modem. The power and Internet lights should be solid green.
![]() Provide references to other useful information.
Provide references to other useful information.
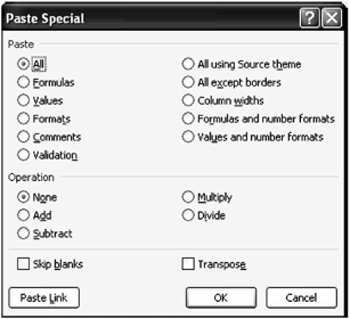
WALKTHROUGH—PASTE SPECIAL > VALUES
In this walkthrough, you will use the Paste Special > Values function to convert the result of a formula to text.
1. Continue with the TTFFP—Daily Activity Exercise.xls file, which should already be open.
2. Select cell I2, the cell your concatenating formula is in.
3. Select Edit > Copy.
4. Select Edit > Paste Special.
5. Select the Values radio button.
6. Click OK.
Note how your formula has been transformed into text.
7. Save your work by clicking File > Save As, and then changing the name of the file to “Daily Activity Exercise A” and then click the Save button.
8. Close the spreadsheet by clicking File > Close.
That completes this walkthrough.
PROGRESS REPORTS
Progress reports are written to inform a supervisor about the status of a project. These reports detail what was completed for the previous period, what percentage of the work has been completed, and what is planned for the next period. Any problems or issues are listed in the report.
Progress reports let management know about the overall health of a project and its team members. Progress reports also let everyone on the team know how the overall project is going.
These reports range from simple memos for small projects, to informal letters, to formal reports.
![]() Memos are often used for internal progress reports.
Memos are often used for internal progress reports.
![]() Progress report letters are sent to outside clients.
Progress report letters are sent to outside clients.
![]() Formal progress reports are also sent to outside clients.
Formal progress reports are also sent to outside clients.
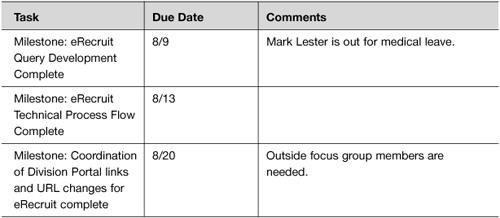
All progress reports include (Figure 3.58):
![]() What work has been completed since the last report
What work has been completed since the last report
![]() What work is currently being performed
What work is currently being performed
![]() What work is planned
What work is planned
![]() Individual tasks, sometimes listed, along with their completion percentages
Individual tasks, sometimes listed, along with their completion percentages
![]() The progress of different stages of development and categories for different departments (may be listed for large projects)
The progress of different stages of development and categories for different departments (may be listed for large projects)
Project reports prepared for outside customers may also include:
![]() The project purpose
The project purpose
![]() Objectives
Objectives
![]() Scope or limitations
Scope or limitations
![]() Start date and completion date
Start date and completion date
![]() Current development phase
Current development phase
![]() Team members
Team members
ERP UPGRADE PROJECT STATUS REPORT
Name of Project: ERP Upgrade
Date: July 27, 2012
Project Manager: Mary Dawson
Sponsor: Allan Cummings
Project Objectives:
Upgrade the existing ERP application to position Acme Industries to maintain vendor support for the application and to consider undertaking projects, after the upgrade, which will implement new functionality offered in the ERP system.
Implementation Date: August 20, 2012
Current Phase: QA Testing/UAT Testing/Implementation Planning
Project Management Summary:
The upgrade project remains on track. 14 business days until we began our upgrade implementation!
ISSUE
Integrated QA test environment was planned for May 7 and is not completely ready.
Update—Stellent configuration issue was resolved and testing for Stellent will start next week.
QA Testing—The formal QA testing period is over; however, QA testing will continue for some items, including:
![]() HR/benefits—75% complete. Outstanding are items associated with HCFA, MSY, Retirees, and FSA.
HR/benefits—75% complete. Outstanding are items associated with HCFA, MSY, Retirees, and FSA.
![]() eApps—95% complete. Outstanding are items associated with integration testing that we delayed/not operating in our integrated test environment.
eApps—95% complete. Outstanding are items associated with integration testing that we delayed/not operating in our integrated test environment.
![]() Security—90% complete. Outstanding items are 4 reports that have been on hold pending resolution to reporting problems in QA. Testing planned for next week is in development.
Security—90% complete. Outstanding items are 4 reports that have been on hold pending resolution to reporting problems in QA. Testing planned for next week is in development.
System testing and UAT have been combined for HRM, HRM Data Prep, Hyperion, and Stellent. Status for these will be reported under user acceptance testing.
Third-party interface testing is in process. The team resolved outstanding issues with the integrated testing environment.
User Acceptance Testing—Continued formal UAT sessions. UAT testing is expected to be complete on August 3.
![]() HR/Benefits—50% complete—sessions scheduled through 8/3
HR/Benefits—50% complete—sessions scheduled through 8/3
![]() Payroll—85% complete—sessions scheduled through 7/27; interface testing will run into next week
Payroll—85% complete—sessions scheduled through 7/27; interface testing will run into next week
![]() Authoria—80% complete—sessions scheduled through 7/30
Authoria—80% complete—sessions scheduled through 7/30
![]() 401(k)—60% complete—sessions scheduled through 8/3
401(k)—60% complete—sessions scheduled through 8/3
![]() Compensation—90% complete—sessions scheduled through 7/27
Compensation—90% complete—sessions scheduled through 7/27
![]() HRM—90% complete—sessions scheduled through 8/3. Outstanding issue with home phone
HRM—90% complete—sessions scheduled through 8/3. Outstanding issue with home phone
![]() HRM Data Prep—50% complete—sessions scheduled through 8/3
HRM Data Prep—50% complete—sessions scheduled through 8/3
![]() eApps—0% complete—session scheduled for 7/30
eApps—0% complete—session scheduled for 7/30
![]() Security—90% complete; retest sessions scheduled for early next week
Security—90% complete; retest sessions scheduled for early next week
![]() eRecruit—50% complete; sessions scheduled through 7/31
eRecruit—50% complete; sessions scheduled through 7/31
![]() Hyperion/EDW—70% complete; sessions scheduled through 7/30
Hyperion/EDW—70% complete; sessions scheduled through 7/30
![]() Stellent—0% complete; sessions scheduled though 8/3
Stellent—0% complete; sessions scheduled though 8/3
![]() Pension—UAT is complete
Pension—UAT is complete
![]() ESPP—UAT is complete
ESPP—UAT is complete
![]() Simple Steps—UAT is complete
Simple Steps—UAT is complete
![]() PDR—UAT is complete
PDR—UAT is complete
![]() LMS—UAT is complete
LMS—UAT is complete
![]() Total Comp—UAT is complete
Total Comp—UAT is complete
Load Testing—Began load testing for eRecruit—expected completion is 7/31. Load testing for the eApps will follow with completion expected on 8/10.
Parallel Testing—Completed parallel #3 with excellent results. 34 of 36 sites have signed off as of 8 a.m. Friday.
Development: Development team is on track with issues and defects. Retrofitting for public and private queries continues. Continued refinement of implementation plan. Planned dress rehearsal—Test Move 7. Completed some pre-implementation tasks in PROD—copied software, set up data files, and added temporary space for backups.
eRecruit: Continued QA testing and UAT testing. Received signoff from subsidiaries. Additional sessions are scheduled for next week.
Training, documentation, and communication tasks are on schedule.
Deliverables completed last week:

Deliverables scheduled for completion in next 2 weeks:
Future Meetings:
![]() Daily UAT testing sessions
Daily UAT testing sessions
![]() Daily Parallel testing sessions and morning meetings
Daily Parallel testing sessions and morning meetings
![]() Full Team Status Meeting 7/31 ** Moved to Tuesday for this week only **
Full Team Status Meeting 7/31 ** Moved to Tuesday for this week only **
![]() Weekly Training, Documentation, and Communications Team Meeting 7/30
Weekly Training, Documentation, and Communications Team Meeting 7/30
![]() Weekly Implementation Meeting 8/1
Weekly Implementation Meeting 8/1
![]() Weekly IT Leads Team Meeting 8/1
Weekly IT Leads Team Meeting 8/1
![]() Weekly HR/Benefits Analyst Team Meeting 8/1
Weekly HR/Benefits Analyst Team Meeting 8/1
![]() Weekly QA Team Meeting 8/2
Weekly QA Team Meeting 8/2
![]() Weekly Payroll Analyst Team Meeting 8/2
Weekly Payroll Analyst Team Meeting 8/2
![]() Weekly Developers Team Meeting 8/2
Weekly Developers Team Meeting 8/2
PROPOSALS
Proposals usually consist of a bid and a description of a project, and they are sent to a customer. Many proposals are sent after a prospective customer makes a request for proposal (RFP).
There are several different types of proposals:
![]() Internal proposals written for someone within the same business
Internal proposals written for someone within the same business
![]() External proposals written to another business or government agency
External proposals written to another business or government agency
![]() Solicited proposals that are written and sent in response to and in accordance with the guidelines described in an RFP
Solicited proposals that are written and sent in response to and in accordance with the guidelines described in an RFP
![]() Unsolicited proposals that are sent to convince a potential customer to do business with you
Unsolicited proposals that are sent to convince a potential customer to do business with you
Most proposals include the following sections (Figure 3.59):
![]() Cover letter—to be sent with a proposal
Cover letter—to be sent with a proposal
![]() Introduction—introducing the proposal, referring to previous contacts with the customer, and providing an overview of the contents of the proposal
Introduction—introducing the proposal, referring to previous contacts with the customer, and providing an overview of the contents of the proposal
![]() Background—information about the need for the project
Background—information about the need for the project
![]() Benefits—describing how the proposed solution will solve the problems discussed in the background section
Benefits—describing how the proposed solution will solve the problems discussed in the background section
![]() Project description—describing what is involved in the project, including specifications for the end product
Project description—describing what is involved in the project, including specifications for the end product
![]() Method—discussing how the project will be completed
Method—discussing how the project will be completed
![]() Schedule—detailing the project timeline
Schedule—detailing the project timeline
![]() Qualifications—discussing the organization’s qualifications for completing the project
Qualifications—discussing the organization’s qualifications for completing the project
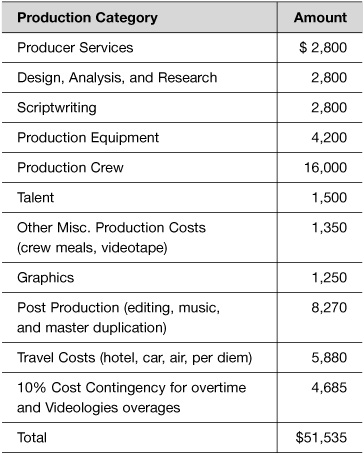
![]() Budget—listing the costs
Budget—listing the costs
![]() Conclusion—final words about why the submitter of the proposal should be awarded the project
Conclusion—final words about why the submitter of the proposal should be awarded the project
When preparing a proposal, consider the following:
![]() Make sure you address everything asked for, if responding to an RFP.
Make sure you address everything asked for, if responding to an RFP.
![]() Identify all the tasks that are necessary to complete the project.
Identify all the tasks that are necessary to complete the project.
![]() Break out the budget into individual line items and include hourly rates if applicable.
Break out the budget into individual line items and include hourly rates if applicable.
Figure 3.59 Proposal for Video Production Services
LPS TRAINING
Video Production Proposal
Submitted to:
Andy Norvell
SAR Office Manager
BSP Energy Products Company
By:
Videologies
Acworth, Georga
(Courtesy of Videologies, Inc.)
This proposal is for the production of an LPS training video for BSP Energy’s SAR Department.
BSP Energy’s request includes the following requirements:
![]() Limit video length to approximately 35 minutes
Limit video length to approximately 35 minutes
![]() Deliver the finished video by November 30, 2012
Deliver the finished video by November 30, 2012
![]() Shoot at two sites in either New Jersey or Los Angeles basin area
Shoot at two sites in either New Jersey or Los Angeles basin area
![]() Create 10 minutes of material on drilling, monitor well installation, and sampling tasks
Create 10 minutes of material on drilling, monitor well installation, and sampling tasks
![]() Create 10 minutes of material on trenching, and SVE installation LPOs
Create 10 minutes of material on trenching, and SVE installation LPOs
![]() Create 6 minutes of material for supervisor feedback sessions
Create 6 minutes of material for supervisor feedback sessions
![]() Create 9 minutes of material featuring a host on camera for introductions and other commentary
Create 9 minutes of material featuring a host on camera for introductions and other commentary
After careful examination of these requirements, Videologies proposes the following:
![]() Research and scriptwriting with access to subject matter experts in the Atlanta area or via telephone or email
Research and scriptwriting with access to subject matter experts in the Atlanta area or via telephone or email
![]() Pre-production location visit by our producer
Pre-production location visit by our producer
![]() Five days of production at two different locations in either New Jersey or Los Angeles
Five days of production at two different locations in either New Jersey or Los Angeles
![]() One day of production in the Atlanta area for shooting an on-camera host
One day of production in the Atlanta area for shooting an on-camera host
![]() Video still graphics to illustrate concepts
Video still graphics to illustrate concepts
![]() Text and graphics
Text and graphics
![]() Optional CD-ROM version
Optional CD-ROM version
![]() Optional Streaming Video version for Web distribution
Optional Streaming Video version for Web distribution
The LPS Training video produced for BSP Energy will include the following specifications:
![]() 35-minute video script
35-minute video script
![]() Producer services to coordinate all aspects of the production
Producer services to coordinate all aspects of the production
![]() Video production using XDCAM HD format
Video production using XDCAM HD format
![]() Video production crew including a director, camera operator, and lighting assistants as appropriate
Video production crew including a director, camera operator, and lighting assistants as appropriate
![]() Use of a professional actor or actress for on-camera and voice-over narration
Use of a professional actor or actress for on-camera and voice-over narration
![]() One pre-production trip to either New Jersey or Los Angeles to scout locations and coordinate activities
One pre-production trip to either New Jersey or Los Angeles to scout locations and coordinate activities
![]() One five-day trip to either New Jersey or Los Angeles for shooting segments A, B, and C as outlined in the LPS Training Video Work Scope provided by Andy Nowell of BSP Energy
One five-day trip to either New Jersey or Los Angeles for shooting segments A, B, and C as outlined in the LPS Training Video Work Scope provided by Andy Nowell of BSP Energy
![]() Nonlinear post production to edit a master tape for duplication
Nonlinear post production to edit a master tape for duplication
![]() Video graphics for illustrating concepts
Video graphics for illustrating concepts
![]() Titles and transitional effects
Titles and transitional effects
![]() Background music
Background music
![]() Two approval copies
Two approval copies
![]() One Blu-Ray DVD master for duplication
One Blu-Ray DVD master for duplication
BSP Energy will provide the following logistical and review requirements:
![]() Script review and approval
Script review and approval
![]() Locations
Locations
![]() All necessary props
All necessary props
![]() Personnel for demonstrations and activities described in the script
Personnel for demonstrations and activities described in the script
![]() Subject matter experts
Subject matter experts
![]() Company logos
Company logos
Based on our June 18, 2012 meeting, we propose a video treatment that utilizes an on-camera host to guide us through the video.
The host will be shot on location in the Atlanta area and will be used to introduce the content on camera and then narrate sequences shot on location.
Since the purpose of the video is to give viewers practice in observing LPO situations, we will divide the video into short two- to three-minute segments. Students will choose segments from a menu. Each segment will have a title screen describing its content. The on-camera host will introduce each segment and explain what viewers are about to see. Instructions will be given for viewers to practice their LPO observations as they watch scenes of various work practices. The narrator will describe the scene but will allow viewers to make and record their own observations. Following this sequence, we will replay the same sequence again, this time with the narrator pointing out all the possible observations. This will allow the viewers to check their answers.
Because students will watch these sequences twice, once with overview narration, and once again with the narrator describing the LPO observations, the finished video will be longer than 35 minutes. However, for purposes of budgeting, we are planning on no more than 35 minutes of original material. Repeating material in the same video will not increase the budget.
It is understood that only a sampling of possible LPO observations that may occur in an activity such as drilling will be featured in the video. We will work with BSP Energy’s subject matter experts to construct scenes that feature as many work practice observations (both good and bad) as possible.
The training will be designed so that it can be self-paced. As part of our deliverables to BSP Energy, we will produce a short student guide (in Adobe Acrobat PDF format) that provides instructions for each video segment activity. We assume that BSP Energy will provide copies of LPO forms, so students can fill out the forms while watching the video.
The following LPO target areas will be featured in the video:
![]() Drilling, monitor well installation, and sampling tasks
Drilling, monitor well installation, and sampling tasks
![]() Trenching and SVE installation LPOs
Trenching and SVE installation LPOs
![]() Supervisor feedback sessions
Supervisor feedback sessions
The production process will consist of the following stages:
![]() Content analysis and design
Content analysis and design
![]() Scriptwriting
Scriptwriting
![]() Video production
Video production
![]() Graphics production
Graphics production
![]() Post production
Post production
![]() Programming
Programming
![]() Study guide production
Study guide production
![]() Revisions
Revisions
![]() Final mastering
Final mastering
Content Analysis and Design
Videologies will meet with subject matter experts and review previously produced materials, such as LPO forms and LPS handbooks. We will work together to plan our work practice scenarios to feature specific LPO opportunities for students. After completing content analysis, Videologies will create a design document that summarizes our plans for the video.
Scriptwriting
After a design is approved by BSP Energy, the scriptwriter will draft a script in a two-column format describing visuals and narration or suggested on-camera audio. This script will be submitted to BSP Energy for review. After this review, any revisions required will be made and a final script will be submitted for approval.
Video Production
After the script is approved, video production will begin. Video production will consist of the following:
![]() Five days of production on location at two sites in either New Jersey or Los Angeles
Five days of production on location at two sites in either New Jersey or Los Angeles
![]() One day of production in Atlanta to shoot the on-camera host
One day of production in Atlanta to shoot the on-camera host
![]() Narration recording
Narration recording
Video graphics will be created to illustrate concepts where appropriate. Title screens will also be created and added where appropriate.
Post Production
During post production, we will edit the raw footage, mix the audio, add music, insert graphics, and incorporate transitional effects where appropriate.
Study Guide Production
A short 10–20 page study guide will be created to facilitate the learning experience for self-paced training.
Final Mastering
After final approval of the video, a Blu-Ray DVD master will be delivered for duplication purposes.
OPTIONS
BSP Energy has requested that Videologies provide quotes on future upgrades of the video to CD-ROM and possible Web site delivery. In addition, we can provide VHS duplications upon request.
CD-ROM
The content created for the LPS Training video and study guide can be upgraded for delivery via CD-ROM. Depending on the design and content requirements, we can create a wide variety of CD-ROM–based programs ranging from a simple AVI video player to a more complex system incorporating additional audio instruction, graphics, simulations, and test questions.
The finished video segments can be converted to a Windows AVI video format at a screen size of 320 × 240 and played on a IBM PC compatible equipped with a CD-ROM drive, soundcard and speakers or headphones. We would recommend a minimum configuration of Pentium II 350 with an 8X CD-ROM drive.
As the least expensive option, we can create a CD that includes an autorun feature so installation is not necessary. Upon inserting the CD, the user will see a 640 × 480 menu screen that gives students access to a downloadable study guide, downloadable LPO forms, and menu choices for viewing the various video sequences (or lessons).
A more expensive alternative can include quiz and test questions, graphic and text screens, audio, and simulations for a more substantial learning experience. The course would require the use of a Web browser such as Internet Explorer to view content pages, access LPO forms, and view video and audio sequences. Test questions will provide feedback and remediation to ensure and document a student’s comprehension.
Web Delivery
Videologies can provide streaming media versions of the finished video sequences in either Windows Media or Real Media formats compressed for playback at 300K speeds. Anything less than 300K compression produces quality that is too reduced for effective training. At least a 300K connection is required to view the files. This speed of connection is usually available with DSL, Cable Modem, or office LAN connections.
BSP Energy will need to provide a streaming media server (by purchasing a streaming media license from either Real Networks or Microsoft) in order to “stream” the videos. Without this server, the users must download each video sequence before playing it.
Videologies can provide services ranging from just supplying the media files to BSP Energy for posting on their own Web site, to creating a complete Web-based course similar to the CD-ROM version, complete with menus, graphics, and testing.
DELIVERABLES
This proposal calls for the following deliverables from Videologies:
![]() Design document
Design document
![]() Script
Script
![]() One 10–20–page study guide in PDF format
One 10–20–page study guide in PDF format
![]() Two approval DVD copies
Two approval DVD copies
![]() One Blu-Ray DVD master
One Blu-Ray DVD master
Optional deliverables include:
![]() CD-ROM version
CD-ROM version
![]() Windows Media or Real Media Web files
Windows Media or Real Media Web files
![]() DVD duplications
DVD duplications
Videologies proposes the following schedule for the video:

Any delay by BSP Energy in reviewing scripts, providing personnel, or locations, may delay delivery of the final video.
The services provided by Videologies will require the following development budget:
Rates are based on the following:
![]() Writing, producing, directing services, and production crew at $50 per hour or $500 per day per person.
Writing, producing, directing services, and production crew at $50 per hour or $500 per day per person.
![]() Video production equipment rentals at $700 per day, includes camera, tripod, lights, monitors, waveform, and grip equipment.
Video production equipment rentals at $700 per day, includes camera, tripod, lights, monitors, waveform, and grip equipment.
![]() Post production services at $125 per hour.
Post production services at $125 per hour.
![]() Graphic services at $50 per hour.
Graphic services at $50 per hour.
![]() Computer programming services at $75 per hour.
Computer programming services at $75 per hour.
![]() AVI and streaming media conversation at $40 per finished minute.
AVI and streaming media conversation at $40 per finished minute.
![]() Professional union actor at $1,500 per day.
Professional union actor at $1,500 per day.
Estimated manpower requirements include:
![]() Writer—14 days
Writer—14 days
![]() Producer—7 days
Producer—7 days
![]() Director—6 days plus 2 travel days
Director—6 days plus 2 travel days
![]() Camera operator—6 days plus 2 travel days
Camera operator—6 days plus 2 travel days
![]() Lighting specialist—6 days plus 2 travel days
Lighting specialist—6 days plus 2 travel days
![]() Production assistant—6 days plus 2 travel days
Production assistant—6 days plus 2 travel days
![]() Editor—60 hours
Editor—60 hours
![]() Graphic artist—25 hours
Graphic artist—25 hours
![]() Professional union actor—1 day
Professional union actor—1 day
Estimated equipment rental days include:
![]() Camera package—6 days
Camera package—6 days
![]() Nonlinear editor—60 hours
Nonlinear editor—60 hours
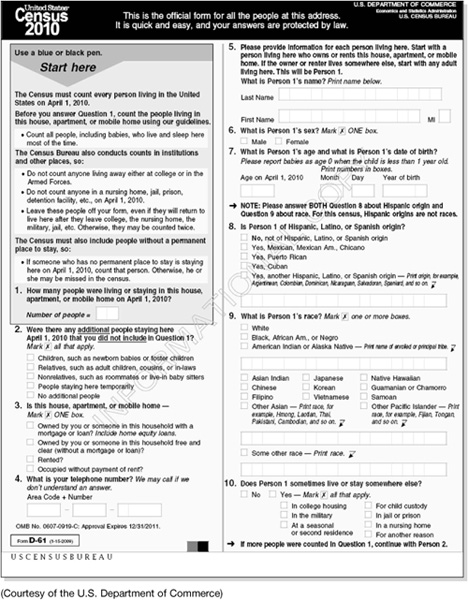
QUESTIONNAIRES AND SURVEYS
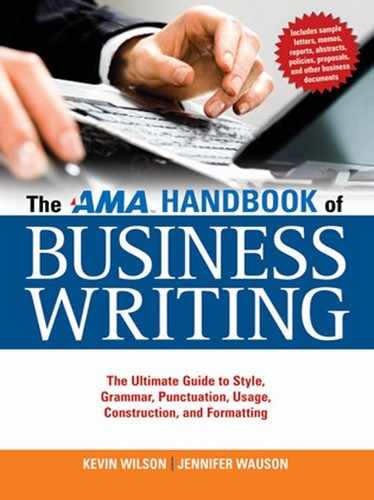
Questionnaires and surveys are used to gather data about customers and employees for use in decision making, marketing, and the development of new products and services. (Figure 3.60.)
Questionnaires can be distributed on paper or online. Online surveys are especially helpful because they can be emailed as links and the results can be automatically tabulated into a database or spreadsheet.
Using a questionnaire is a multistage process involving the design and development of the questions, determining the survey group, conducting the survey, and then interpreting the results.
Questionnaires are usually designed to gather qualitative or quantitative data.
![]() Qualitative surveys ask about opinions and ask respondents to rate the quality of a product or service.
Qualitative surveys ask about opinions and ask respondents to rate the quality of a product or service.
![]() Quantitative surveys measure how many people do a particular thing, such as use a product or watch a particular television channel.
Quantitative surveys measure how many people do a particular thing, such as use a product or watch a particular television channel.
Questionnaires are often used instead of personal interviews because:
![]() They can be inexpensive to create and use.
They can be inexpensive to create and use.
![]() The privacy of the participants can be protected.
The privacy of the participants can be protected.
![]() When used with other data, such as sales trends, they can be useful as a confirmation tool.
When used with other data, such as sales trends, they can be useful as a confirmation tool.
Consider the following steps when creating a questionnaire:
![]() The first step in creating a questionnaire is to define the objectives.
The first step in creating a questionnaire is to define the objectives.
![]() The questions should focus on obtaining specific information.
The questions should focus on obtaining specific information.
![]() To determine qualitative data about a product or service, you must break down the qualities into various aspects that can be isolated and measured.
To determine qualitative data about a product or service, you must break down the qualities into various aspects that can be isolated and measured.
![]() The question order should have a logical flow.
The question order should have a logical flow.
![]() The second step in creating a questionnaire is to write the questions.
The second step in creating a questionnaire is to write the questions.
![]() Write an introduction to the questionnaire that explains its purpose.
Write an introduction to the questionnaire that explains its purpose.
![]() Provide instructions on how to answer the questions.
Provide instructions on how to answer the questions.
![]() Explain the rating scale if one is used.
Explain the rating scale if one is used.
![]() Include demographic questions to gather information about the respondents.
Include demographic questions to gather information about the respondents.
![]() This information is helpful later when you are analyzing the results and comparing responses among different groups of people.
This information is helpful later when you are analyzing the results and comparing responses among different groups of people.
![]() Common demographic questions, including age, sex, level of education, annual earnings, and so forth.
Common demographic questions, including age, sex, level of education, annual earnings, and so forth.
![]() Demographic questions are normally asked at the beginning of the questionnaire.
Demographic questions are normally asked at the beginning of the questionnaire.
![]() There are two general types of survey questions: multiple-choice or fill-in-the-blank.
There are two general types of survey questions: multiple-choice or fill-in-the-blank.
![]() Fill-in-the-blank questions are more time-consuming during the data analysis phase.
Fill-in-the-blank questions are more time-consuming during the data analysis phase.
![]() Multiple choice questions make it easier to tabulate the responses and calculate percentages.
Multiple choice questions make it easier to tabulate the responses and calculate percentages.
![]() Multiple-choice questions also make it easier to track opinions over time to see how the same questionnaire is answered by similar groups of people over a specific period.
Multiple-choice questions also make it easier to track opinions over time to see how the same questionnaire is answered by similar groups of people over a specific period.
![]() For multiple-choice questions involving a rating scale, it is best to have an even number of rating choices.
For multiple-choice questions involving a rating scale, it is best to have an even number of rating choices.
![]() Having an odd number of choices leaves respondents with a middle neutral choice, which is often used by respondents who are bored.
Having an odd number of choices leaves respondents with a middle neutral choice, which is often used by respondents who are bored.
![]() Having an even number of choices eliminates the possibility of neutral answers.
Having an even number of choices eliminates the possibility of neutral answers.
![]() Multiple-choice questions should have clear, distinct answer choices.
Multiple-choice questions should have clear, distinct answer choices.
![]() “Very often,” “Often,” and “Sometimes” answer choices can be interpreted differently by different respondents.
“Very often,” “Often,” and “Sometimes” answer choices can be interpreted differently by different respondents.
![]() “Every day,” “2 to 5 times a week,” and “Once a month” answer choices are easier to interpret.
“Every day,” “2 to 5 times a week,” and “Once a month” answer choices are easier to interpret.
![]() Avoid leading questions that imply a biased answer.
Avoid leading questions that imply a biased answer.
Example: A rating scale with choices like: “Incredible,” “Superb,” “Excellent,” “Great,” “Good”
Incorrect: Is this the best software you’ve ever used?
![]() Avoid adjectives and adverbs in your questions; they imply a biased answer.
Avoid adjectives and adverbs in your questions; they imply a biased answer.
![]() Avoid embarrassing questions that deal with personal or private matters.
Avoid embarrassing questions that deal with personal or private matters.
![]() Avoid hypothetical questions; they are based on fantasy rather than fact.
Avoid hypothetical questions; they are based on fantasy rather than fact.
![]() Avoid using not in your questions; this word can lead to double negatives and already implies a negatively biased answer.
Avoid using not in your questions; this word can lead to double negatives and already implies a negatively biased answer.
After you’ve written the questions for the survey, proofread and test the survey on a small sampling of respondents.
![]() Review the questionnaire with the test audience and work together to resolve any problems.
Review the questionnaire with the test audience and work together to resolve any problems.
![]() Revise the survey after the pilot test.
Revise the survey after the pilot test.
![]() Put a date on the questionnaire, so that you can keep track of versions.
Put a date on the questionnaire, so that you can keep track of versions.
REFERENCE LETTERS
A reference letter states the qualifications for a person seeking employment. It offers an endorsement of the person’s job performance, skills, and character. A reference letter may be accepted in lieu of contacting references on the phone.
A reference letter should include (Figure 3.61):
![]() How and for how long you know the person
How and for how long you know the person
![]() Your qualifications for writing the reference letter
Your qualifications for writing the reference letter
![]() A list of the person’s qualities and skills
A list of the person’s qualities and skills
![]() Key points about the person that the reader should note
Key points about the person that the reader should note
![]() Examples that back up your opinions about the person
Examples that back up your opinions about the person
![]() Your contact information
Your contact information
Reference letters are typically written to:
![]() Recommend someone for a job.
Recommend someone for a job.
![]() Recommend someone who has applied to school.
Recommend someone who has applied to school.
![]() Endorse a political candidate.
Endorse a political candidate.
![]() Provide a credit reference.
Provide a credit reference.
![]() Recommend a service or product.
Recommend a service or product.
![]() Recommend someone for club membership.
Recommend someone for club membership.
John Davidson
Videologies, Inc.
1313 Old Alabama Highway
Atlanta, GA 30121
Hello,
This is a letter of recommendation for Peter Carson.
Peter has worked with me for the past year in the role of training technology manager at Videologies, Inc., a multimedia and training development business.
At Videologies, Peter worked on designing a training course for our Learning Management System. He designed and created a webinar presentation and a student exercise workbook.
Peter also worked on three multiday instructor-led courses on the subject of accounting practices. Peter did analysis, created the design, coordinated with the customer, and created workbooks and PowerPoint presentations.
I highly recommend Peter Carson for instructional design and course development projects.
Sincerely,![]()
John Davidson
Vice President
REFUSAL LETTER
A refusal letter is written to deny a request, decline an invitation, or reply negatively to a suggestion. When writing a refusal letter, consider the following tips (Figure 3.62):
![]() Be as diplomatic as possible to avoid hurt feelings.
Be as diplomatic as possible to avoid hurt feelings.
![]() Open the letter with a sincere statement that explains that you are refusing the request.
Open the letter with a sincere statement that explains that you are refusing the request.
![]() Explain your reasons for the refusal, and include any evidence to back up your decision.
Explain your reasons for the refusal, and include any evidence to back up your decision.
![]() Offer alternatives to the readers that might have a better chance of being accepted.
Offer alternatives to the readers that might have a better chance of being accepted.
![]() Be courteous and wish the reader success elsewhere.
Be courteous and wish the reader success elsewhere.
Refusal letters are typically written to:
![]() Decline an invitation or appointment.
Decline an invitation or appointment.
![]() Decline a claim request from a customer.
Decline a claim request from a customer.
![]() Turn down a request for a donation.
Turn down a request for a donation.
![]() Decline a job offer, promotion, or transfer.
Decline a job offer, promotion, or transfer.
![]() Reject an application for employment.
Reject an application for employment.
![]() Decline to join an organization.
Decline to join an organization.
![]() Terminate a business relationship.
Terminate a business relationship.
![]() Decline a request to write a letter of recommendation.
Decline a request to write a letter of recommendation.
![]() Turn down a suggestion.
Turn down a suggestion.
![]() Decline a request for credit.
Decline a request for credit.
![]() Decline a gift.
Decline a gift.
![]() Decline orders or requests for information.
Decline orders or requests for information.
February 21, 2012
Buffalo Graphics
3133 Highway 9
Roswell, GA 32311
Dylan Wilson
Atlanta Community College
1311 West Northfield
Drive Decatur, GA 30133
Dear Mr. Wilson:
Thank you for invitation to be a guest lecturer in your communications class at Atlanta Community College. I’m sorry, but I’ll have to decline the invitation.
I recently became the president of the Atlanta Communications Association, and these added responsibilities have already required more time than I have available. I would suggest that you contact Al Gordon, the ex-president of ACA. He may be available and with his experience, he should make an excellent guest lecturer.
I am honored to have been invited by you. You are well respected within the communications industry, and I wish you all the best with your class.
Sincerely,![]()
Michael Woodson
President
REPORTS
There are four common report formats:
![]() Memorandum report
Memorandum report
![]() Letter report
Letter report
![]() Short report
Short report
![]() Formal report
Formal report
Memorandum Report
The memorandum report is a routine and informal report that might be prepared on a weekly basis to report the status of projects to upper management. This type of report:
![]() Is objective and impersonal in tone.
Is objective and impersonal in tone.
![]() May contain brief introductory comments.
May contain brief introductory comments.
![]() Contains headings and subheadings, used for quick reference and to highlight certain aspects of the report.
Contains headings and subheadings, used for quick reference and to highlight certain aspects of the report.
![]() Is usually single-spaced and printed on plain paper. (However, in some businesses this report may be sent as an email or email attachment.)
Is usually single-spaced and printed on plain paper. (However, in some businesses this report may be sent as an email or email attachment.)
Letter Report
The letter report is normally a one-page letter that is printed on company letterhead. If the reports contain second sheets, the continuation pages are also printed on letterhead. The letter report:
![]() Is typically sent outside the company to consultants, clients, or the board of directors.
Is typically sent outside the company to consultants, clients, or the board of directors.
![]() Should have headings and subheadings to organize its content.
Should have headings and subheadings to organize its content.
Short Report
The short report has a title page, a preliminary summary with conclusions and recommendations, authorization information, a statement of the problem, findings, conclusions, and recommendations. The short report:
![]() May contain tables and graphs and can be either single- or double-spaced.
May contain tables and graphs and can be either single- or double-spaced.
![]() Contains headings and subheadings to organize the content and to emphasize certain aspects.
Contains headings and subheadings to organize the content and to emphasize certain aspects.
![]() Has a title page with:
Has a title page with:
![]() The report title (long titles are divided and centered)
The report title (long titles are divided and centered)
![]() The name, title, and address of the person or company to whom the report is being submitted
The name, title, and address of the person or company to whom the report is being submitted
![]() The preparer’s name, title, and address
The preparer’s name, title, and address
Formal Report
Included in the formal report are the:
![]() Cover
Cover
![]() Title page
Title page
![]() Flyleaf
Flyleaf
![]() Title fly
Title fly
![]() Letter of authorization
Letter of authorization
![]() Letter of transmittal
Letter of transmittal
![]() Foreword and/or prefaces
Foreword and/or prefaces
![]() Acknowledgments
Acknowledgments
![]() Table of contents
Table of contents
![]() List of tables
List of tables
![]() List of figures
List of figures
![]() Synopsis
Synopsis
![]() Body
Body
![]() Endnotes or footnotes
Endnotes or footnotes
![]() Appendix
Appendix
![]() Glossary
Glossary
![]() Bibliography
Bibliography
![]() Index
Index
When formatting your report, consider the following guidelines:
![]() The margin settings for a formal report are:
The margin settings for a formal report are:
![]() First page’s top margin—2 inches.
First page’s top margin—2 inches.
![]() Subsequent pages’ top margin—1 inch.
Subsequent pages’ top margin—1 inch.
![]() Bottom margins on all pages—1 inch.
Bottom margins on all pages—1 inch.
![]() The left and right margins on all pages—1 inch.
The left and right margins on all pages—1 inch.
![]() For bound reports, the left margin should be 1½ inches to allow extra room for the binding.
For bound reports, the left margin should be 1½ inches to allow extra room for the binding.
![]() The body of the report can be single- or double-spaced.
The body of the report can be single- or double-spaced.
![]() Setoff quotations should be single-spaced, as are footnotes.
Setoff quotations should be single-spaced, as are footnotes.
![]() Paragraph indentions should be five spaces.
Paragraph indentions should be five spaces.
![]() Long quotations should be indented five spaces from the left margin.
Long quotations should be indented five spaces from the left margin.
![]() Numbered and bullet lists should also be indented five spaces.
Numbered and bullet lists should also be indented five spaces.
![]() Footnotes should match paragraph margins.
Footnotes should match paragraph margins.
![]() Primary headings should be centered and bold, with additional space above and below.
Primary headings should be centered and bold, with additional space above and below.
![]() A 20- to 24-point sans serif font, such as Helvetica, should be used.
A 20- to 24-point sans serif font, such as Helvetica, should be used.
![]() Secondary headings should be aligned left justified, bold, with a 16- to 18-point sans serif font.
Secondary headings should be aligned left justified, bold, with a 16- to 18-point sans serif font.
![]() Third-level headings should also be aligned left and bold, with 12- to 14-point sans serif font.
Third-level headings should also be aligned left and bold, with 12- to 14-point sans serif font.
![]() There should be no page number on the title page, although a page number should be assigned for numbering purposes.
There should be no page number on the title page, although a page number should be assigned for numbering purposes.
![]() The front matter should use small Roman numerals (i, ii, iii, etc.) for numbering.
The front matter should use small Roman numerals (i, ii, iii, etc.) for numbering.
![]() The body of the report should use Arabic numerals, starting with 1.
The body of the report should use Arabic numerals, starting with 1.
![]() Page numbers should be either centered or in the right margin, either ½ to 1 inch from the top or ½ inch from the bottom.
Page numbers should be either centered or in the right margin, either ½ to 1 inch from the top or ½ inch from the bottom.
Headings and subheadings should be parallel in structure.
Example of nonparallel structure:
1. Reading the Manual
2. The Instructions
3. How to Install the Software
Example of parallel structure:
1. Reading the Manual.
2 Following the Instructions
3. Installing the Software
You should use a numbering system for headings. You can use numbers or a combination of numbers and letters.
Figure 3.63 shows two alternative heading numbering systems.
Figure 3.63 Heading Numbering Systems
System 1
1. Main Heading
1.1 Subheading
1.2 Subheading
1.2.1 Third-level heading
1.2.2 Third-level heading
System 2
I. Main Heading
a. Subheading
b. Subheading
1. Third-level heading
2. Third-level leading
The cover (Figure 3.64) should have the title and author’s name, with the title printed in all capital letters.
The cover may be printed on card stock paper.
The title page should include:
![]() The title of the report in all capitals and subtitle if there is one
The title of the report in all capitals and subtitle if there is one
![]() The recipient’s name, corporate title, department, company name, and address
The recipient’s name, corporate title, department, company name, and address
![]() The preparer’s name, corporate title, department, company name, and address
The preparer’s name, corporate title, department, company name, and address
![]() The date the report is submitted
The date the report is submitted
The flyleaf is a blank page that is inserted after the cover. It is also sometimes added to the end of the report just before the back cover.
The title fly is a single page with just the report title in all capitals, centered on the upper third of the page.
The letter of authorization should be printed on letterhead and explain who authorized the report and any specific details regarding the authorization.
The letter of transmittal (Figure 3.65) is a cover letter for the report. It explains the purpose of the report, the scope, limitations, reference materials, special comments, and acknowledgments.
The letter of transmittal may take the place of a foreword or preface.
The acknowledgements page should list individuals, companies, or institutions that assisted in creating the report.
The table of contents (Figure 3.66) should include headings, subheadings, and third-level headings with page numbers.
![]() You can use an outline style with a heading numbering system.
You can use an outline style with a heading numbering system.
![]() If you are using a word processor, you can automatically generate a table of contents based on the heading styles.
If you are using a word processor, you can automatically generate a table of contents based on the heading styles.
If tables are used in the report, you should include a list of tables in the front matter. The list should include:
![]() Table numbers
Table numbers
![]() Page numbers
Page numbers
![]() The descriptions used as table titles in the body of the report
The descriptions used as table titles in the body of the report
If illustrations are used in the report, you should include a list of figures (Figure 3.67) in the front matter. The list should include:
![]() Figure numbers
Figure numbers
![]() Page numbers
Page numbers
![]() The captions used with the figures in the body of the report
The captions used with the figures in the body of the report
The body of the report (Figure 3.68) should include:
![]() An introduction to the report.
An introduction to the report.
![]() Introductions to the major sections—headings, subheadings, and third-level headings.
Introductions to the major sections—headings, subheadings, and third-level headings.
![]() A summary at the end of major sections.
A summary at the end of major sections.
![]() Normal paragraph breaks, bullet lists, numbered lists, illustrations, and tables.
Normal paragraph breaks, bullet lists, numbered lists, illustrations, and tables.
![]() Footnotes or endnotes to present content that is not part of the main flow of the body.
Footnotes or endnotes to present content that is not part of the main flow of the body.
![]() Footnotes are short notes set at the bottom of the page.
Footnotes are short notes set at the bottom of the page.
![]() Endnotes are placed at the end of the report.
Endnotes are placed at the end of the report.
Usually, footnotes or endnotes are numbered with a small, raised number (1, 2, etc.) inserted at the end of the text, with the correspondingly numbered note at the bottom of the page or at the end of the report.
Footnotes and endnotes should include:
![]() The author or author’s names
The author or author’s names
![]() The title of the source
The title of the source
![]() The publisher
The publisher
![]() The date
The date
![]() A page reference
A page reference
Example: 1Kevin Wilson and Jennifer Wauson, The AMA Handbook of Business Writing (New York, AMACOM Books, 2010), page 201.
Sometimes a footnote is used for just the first reference to a source. Then, in subsequent references, just the author names and the page number are listed.
Example: Wilson and Wauson, 205.
Other parenthetical references are inserted in the text of the document inside parentheses.
If there are supplementary reference materials or sources of research— perhaps information that might be of interest to only some readers—you can include them at the end of the report in an appendix.
The glossary should include technical terms with definitions along with any abbreviations. In the body of the report, the abbreviations should be spelled out the first time they are used.
The bibliography lists:
![]() All the sources of information used to compile the report
All the sources of information used to compile the report
![]() Research that was not cited as a footnote but used to create the report
Research that was not cited as a footnote but used to create the report
The bibliography listings are ordered alphabetically by the authors’ last names.
![]() If there is no main author, then the book title is used.
If there is no main author, then the book title is used.
![]() The author’s surname comes first.
The author’s surname comes first.
![]() Additional authors are listed first name, last name.
Additional authors are listed first name, last name.
Example: Wilson, Kevin, and Jennifer Wauson. The AMA Handbook of Business Writing (New York, AMACOM Books, 2010).
An index is an option for many reports, and should be an alphabetical listing.
![]() The first word of each entry has an initial capital letter, and the rest of the words are in lower case.
The first word of each entry has an initial capital letter, and the rest of the words are in lower case.
![]() Subentries in the index are like subheadings and are indented one or two spaces.
Subentries in the index are like subheadings and are indented one or two spaces.
![]() Cross-references direct the reader to another location in the index.
Cross-references direct the reader to another location in the index.
ONLINE EMPLOYEE BENEFIT ELECTIONS
By:
Catherine Muncie
Muncie Consulting
Figure 3.65 Report Transmittal Letter
Muncie Consulting
1231 Peachtree Street
Atlanta, GA 30102
May 12, 2012
Mary Ann Cleveland
Vice President
Alstead Communications
3324 Interstate 75 Parkway
Atlanta, GA 30131
Dear Ms. Cleveland:
In accordance to our agreement for conducting research on alternatives to paper-based benefit elections, I am pleased to submit this report with my findings titled “Online Employee Benefit Elections.”
The purpose of this report is provide information to the Alstead Communications Executive Board for the purpose of determining whether online employee self-service is a possibility for annual benefit elections. The report describes the online process and compares it to the current paper-based benefit election process. In addition, the report details various policies and controls that would need to be implemented in order to make online elections secure in order to protect sensitive personal information.
I hope you will find this report to be informative.
Respectfully yours,![]()
Catherine Muncie
Muncie Consulting
Encl: Report on Online Employee Benefit Elections
Figure 3.66 Report Table of Contents
Figure 3.67 Report List of figures
Report on
ONLINE EMPLOYEE BENEFIT ELECTIONS
I. Introduction
During the annual benefits enrollment period, benefits-eligible employees may make changes to their benefits or enroll in flexible spending accounts for the upcoming plan year.
New benefit elections are effective January 1–December 31 of the following year. Once Open Enrollment has concluded, employees may change their benefits during the plan year only if they experience a qualified status change (marriage, divorce, birth/adoption of a child, or death of a dependent).
The human resources department must complete a number of tasks during August and September in order to ensure the online forms are correct. These tasks include the following:
![]() Determining wages for commissioned employees
Determining wages for commissioned employees
![]() Verifying employment status
Verifying employment status
![]() Entering salary increases into the employee database
Entering salary increases into the employee database
![]() Updating employee addresses
Updating employee addresses
1
REQUEST LETTERS
A request letter is written to seek information, permission, or an explanation. This type of letter should (Figure 3.69):
![]() Be courteous, tactful, brief, confident, and persuasive.
Be courteous, tactful, brief, confident, and persuasive.
![]() Be straightforward and include as much detail as possible about the request.
Be straightforward and include as much detail as possible about the request.
![]() Not be overbearing or manipulative in trying to obtain the request.
Not be overbearing or manipulative in trying to obtain the request.
![]() Avoid apologizing for the request.
Avoid apologizing for the request.
![]() Make sure your request is reasonable.
Make sure your request is reasonable.
![]() Make the reader feel complimented to be asked for a favor.
Make the reader feel complimented to be asked for a favor.
![]() Express your willingness to reciprocate.
Express your willingness to reciprocate.
![]() Invite the person to contact you with any questions or concerns.
Invite the person to contact you with any questions or concerns.
Request letters are typically written to:
![]() Request a modification to an agreement.
Request a modification to an agreement.
![]() Request a document or publication.
Request a document or publication.
![]() Seek a raise or promotion.
Seek a raise or promotion.
![]() Request a response to a survey.
Request a response to a survey.
![]() Ask for assistance.
Ask for assistance.
![]() Request a discount.
Request a discount.
![]() Ask for the correction of an error.
Ask for the correction of an error.
![]() Ask for a favor.
Ask for a favor.
![]() Request a refund.
Request a refund.
![]() Extend an invitation.
Extend an invitation.
![]() Ask for more information.
Ask for more information.
![]() Request an estimate or bid.
Request an estimate or bid.
May 8, 2012
Roswell News Weekly
3233 Alpharetta Highway
Roswell, GA 32311
Captain Larry Muncie
United States Air Force
Dobbins Air Force Base
Atlanta, GA 30223
Dear Captain Muncie:
This is a request under the Freedom of Information Act (5 U.S.C § 552). I request that the following documents be provided to me:
1. Photographs of the B-29 airplane in the Dobbins Museum
2. Mission information for the B-29 airplane on display
3. Manufacturing information including when it was completed and what factory built the aircraft
To help you determine my status for the purpose of assessing fees, you should know that I am a representative of the news media affiliated with the Roswell Weekly newspaper, and this request is made as part of news gathering, not for commercial use.
I am willing to pay the appropriate fees for this request up to a maximum of $25. If you estimate that the fees will exceed this limit, please contact me.
I have also included my telephone number and email address at which I can be contacted if necessary to discuss any aspect of my request.
Sincerely,![]()
Shelia Jefferson
Staff Reporter
(770) 555-1234
[email protected]
RESEARCH REPORT
Research reports summarize experimental findings and use additional reference sources to support the findings (Figure 3.70).
Research reports are commonly written in one of two ways:
![]() An argumentative research report makes a statement about a particular subject and then presents research to support the thesis.
An argumentative research report makes a statement about a particular subject and then presents research to support the thesis.
![]() An analytical research report asks a question and then presents research describing various answers to the question.
An analytical research report asks a question and then presents research describing various answers to the question.
A typical research report includes the following sections:
![]() Title page—a short 15-word-or-less description of the report
Title page—a short 15-word-or-less description of the report
![]() Abstract—a short overview of the report that includes:
Abstract—a short overview of the report that includes:
![]() A statement of the problem
A statement of the problem
![]() The study group
The study group
![]() Dependent and independent variables
Dependent and independent variables
![]() Research strategy
Research strategy
![]() Major findings
Major findings
![]() Conclusions
Conclusions
![]() Introduction—a page that presents the investigated problem, explains the importance of the study, and supplies an overview of the research strategy
Introduction—a page that presents the investigated problem, explains the importance of the study, and supplies an overview of the research strategy
![]() Method—describing the sample, materials, and procedures used for the research (including all surveys, tests, questionnaires, interview forms, and laboratory equipment used in the research)
Method—describing the sample, materials, and procedures used for the research (including all surveys, tests, questionnaires, interview forms, and laboratory equipment used in the research)
![]() Results—a summary of the findings from the research
Results—a summary of the findings from the research
![]() Discussion—an interpretation of the findings and the implications
Discussion—an interpretation of the findings and the implications
![]() References—a list of sources used in the research
References—a list of sources used in the research
Figure 3.70 Analytical Research Report


RESIGNATION LETTER
A resignation letter becomes part of your personnel file and may be seen by future employers or if you reapply at the same organization. When writing a resignation letter, consider these tips (Figure 3.71):
![]() Highlight your accomplishments at the organization because your letter may be read by colleagues.
Highlight your accomplishments at the organization because your letter may be read by colleagues.
![]() Avoid emotion and maintain your dignity.
Avoid emotion and maintain your dignity.
![]() Highlight your skills using action verbs.
Highlight your skills using action verbs.
![]() Emphasize the contributions you have made to the organization— be positive.
Emphasize the contributions you have made to the organization— be positive.
![]() Show enthusiasm and appreciation for what you have accomplished at the organization.
Show enthusiasm and appreciation for what you have accomplished at the organization.
![]() The terms of your resignation should attempt to maintain a good relationship with your employer.
The terms of your resignation should attempt to maintain a good relationship with your employer.
Resignation letters are typically written to:
![]() Resign from a job.
Resign from a job.
![]() Announce your retirement.
Announce your retirement.
![]() Resign for health reasons.
Resign for health reasons.
![]() Resign to take another job.
Resign to take another job.
![]() Resign for family reasons.
Resign for family reasons.
![]() Take early retirement
Take early retirement
Figure 3.71 Resignation Letter
Dorothy Speers
7877 Bells Ferry Road
Acworth, GA 30188
(770) 555-1212
[email protected]
September 1, 2012
Sally Duffey
Industrial Lighting Supply
4300 Westfield Highway
Cummings, GA 30134
Dear Ms. Duffey:
This letter is to announce my resignation from Industrial Lighting Supply, effective October 1, 2012.
I have enjoyed working for this company for the past five years, and it was a difficult decision to leave. I have enjoyed working with you and the rest of the sales department team. We accomplished a lot together. I am especially proud of the sales order system that I helped implement and for which I developed the training program.
I have accepted a position as general sales manager at Logan Manufacturing in Douglasville, Georgia. This is a great career opportunity for me, and it will reduce my morning commute substantially.
I wish you and everyone at Industrial Lighting Supply the very best.
Sincerely,![]()
Dorothy Speers
RÉSUMÉS
The purpose of a résumé to get the reader to give you an interview. A résumé should summarize and organize the information so that the reader understands that you are qualified for the job.
All résumés should include:
![]() Your name, address, and telephone number
Your name, address, and telephone number
![]() Educational background (schools attended, degrees, diplomas, special training)
Educational background (schools attended, degrees, diplomas, special training)
![]() A listing of all previous employment:
A listing of all previous employment:
![]() The date, job title, and organization
The date, job title, and organization
![]() A brief description of your job
A brief description of your job
![]() Not salary
Not salary
![]() Information about your current job:
Information about your current job:
![]() Skills you have acquired
Skills you have acquired
![]() Your responsibilities
Your responsibilities
Optionally, a résumé can also contain:
![]() A job objective, which:
A job objective, which:
![]() Should be tailored to each job for which you apply.
Should be tailored to each job for which you apply.
![]() State the reason you are submitting your résumé for a particular job.
State the reason you are submitting your résumé for a particular job.
Example: To obtain a management position in human resources for a large communications firm that utilizes my leadership and organization skills
![]() Special skills, such as:
Special skills, such as:
![]() Software packages you’ve used
Software packages you’ve used
![]() Languages you speak, read, and/or write
Languages you speak, read, and/or write
![]() Professional association memberships
Professional association memberships
![]() Honors and awards
Honors and awards
Do not include references in your résumé. Instead, state that “References are available upon request.” Have a list of references available with name, title, address, and phone number.
Use action verbs to describe your skills.
Example: Designed a new system to catch data entry errors.
Do not explain in your résumé why you are looking for a new job. Create several versions of your résumé, adapting the information to emphasize different skills required for different jobs. Emphasize your experience for various job possibilities.
There are two basic résumé formats:
![]() The history (or chronological) format focuses on where you have worked (Figure 3.72).
The history (or chronological) format focuses on where you have worked (Figure 3.72).
![]() The skills format lists skills you have acquired (Figure 3.73).
The skills format lists skills you have acquired (Figure 3.73).
Figure 3.72 Chronological Format Résumé
Evelyn Flo Boyd
12345 Heartside Drive
Western Branch, GA 31234
404-555-1234
Experience
![]()
Office manager and assistant to business owner
Maintained files and records, accounts receivable, and customer database. Assisted photographer with photo subjects, as well as sales of proofs and prints. Handled scheduling of business activities, all correspondence, and travel arrangements.
![]()
Office assistant
Scheduled clients and facilities for video production and postproduction facility. Scheduled freelance crews and equipment rentals. Arranged for shipping of equipment and travel for crews. Also handled invoicing and correspondence.
Education
1993–1997: B.A. English
University of Texas
Austin, Texas
References furnished upon request.
Figure 3.73 Skills Format Résumé
Evelyn Flo Boyd
12345 Heartside Drive
Western Branch, GA 31234
404-555-1234
Experience
ADMINISTRATION—Maintained files and records, accounts receivable, and customer database. Handled scheduling of business activities, all correspondence, and travel arrangements.
SALES—Worked with customers to set appointments and to sell photography services.
VIDEO PRODUCTION—Coordinated scheduling of crews and facilities. Hired freelance crews and outline equipment rentals.
TECHNICAL SKILLS—Complete understanding of IBM-compatible software including Windows, Word for Windows, Excel, and WordPerfect. Also, some understanding of Apple Macintosh computers including Microsoft Word and Excel. Good typing skills, 50 wpm. Working knowledge of most office equipment, copiers, fax machines, and typewriters.
Work History
2009–Present
Office Manager and Assistant to Business Owner
Lyon’s Still Photography
Acworth, Georgia
1997–2009
Office Assistant
Third Coast Video, Inc.
Austin, Texas
Education
1993-1997: B.A. English
University of Texas
Austin, Texas
References furnished upon request.
SALES LETTERS
Sales letters are written to catch the attention of readers in an attempt to sell them a product or service. When writing a sales letter, consider these tips (Figures 3.74 and 3.75):
A good sales letter focuses on what interests the readers:
![]() The benefits to the customer
The benefits to the customer
![]() How the customer will use the product or service
How the customer will use the product or service
If the letter is not personally addressed to the reader, start the letter with a headline that:
![]() Describes the key benefit to the reader.
Describes the key benefit to the reader.
![]() Uses power words such as free, proven, imagine, how to, fast, cheap, save, enjoy, and introducing.
Uses power words such as free, proven, imagine, how to, fast, cheap, save, enjoy, and introducing.
![]() Gets the reader’s attention, targets the audience, lists a benefit, and makes a promise.
Gets the reader’s attention, targets the audience, lists a benefit, and makes a promise.
Example: How to save 50% or more on office furniture
If the letter is personally addressed, the opening sentence becomes the headline.
Example: Dear Mr. Smith: How would you like to save 50% or more on office furniture for your business?
Keep the letter brief but interesting. Use short sentences, short paragraphs, bullet points, indented paragraphs, and subheadings to design the look of the letter and to make it visually attractive.
Start the letter by identifying the unique selling point of the product or service. Consider the following possibilities:
![]() Tell a story about the product or service and how it was used.
Tell a story about the product or service and how it was used.
![]() Make an announcement of some important news about the product or service.
Make an announcement of some important news about the product or service.
![]() Ask the reader a question that involves the unique selling point.
Ask the reader a question that involves the unique selling point.
![]() Include a quotation from a testimonial.
Include a quotation from a testimonial.
![]() Include a celebrity endorsement.
Include a celebrity endorsement.
![]() Provide surprising statistics to back up your claims.
Provide surprising statistics to back up your claims.
Address the reader directly.
Incorrect: Many of you want …
Correct: You want …
Subheadings within the letter can be used to identify additional selling points.
Let the reader know how much the product or service costs.
The closing of the letter should include a call to action that asks for an order and explains how to order. The closing:
![]() May include a deadline.
May include a deadline.
![]() Always includes a thank-you.
Always includes a thank-you.
Include a P.S. at the end of the letter to offer an incentive, sale, free trial, or gift. People often read a P.S.
Sales letters are typically written to:
![]() Announce a sale or a sales-related contest.
Announce a sale or a sales-related contest.
![]() Contact customers who have been inactive for a while.
Contact customers who have been inactive for a while.
![]() Send a thank-you note to an existing customer.
Send a thank-you note to an existing customer.
![]() Introduce a new catalog or product.
Introduce a new catalog or product.
![]() Offer gifts and incentives to customers.
Offer gifts and incentives to customers.
![]() Invite a customer to request a sample.
Invite a customer to request a sample.
![]() Make an appointment for a sales presentation.
Make an appointment for a sales presentation.
![]() Respond to customer inquiries.
Respond to customer inquiries.
![]() Solicit mail order purchases.
Solicit mail order purchases.
![]() Welcome a new customer.
Welcome a new customer.
![]() Strengthen a relationship with an existing customer.
Strengthen a relationship with an existing customer.
Business Furniture Liquidators
1245 North Main Street
Atlanta, Georgia 30322
December 1, 2012
Martha Sanchez
First Insurance
3211 Lake Tarn Terrace
Acworth, GA 30188
Dear Ms. Sanchez:
How would you like to save up to 75% on name-brand office furniture? Business Furniture Liquidators specializes in preowned Herman Miller and Steelcase desks and chairs. Why pay full price for new office furniture when you can get quality refurbished furniture at up to 75% off?
Are you planning to expand your business or upgrade your existing offices? Business Furniture Liquidators can help you design and furnish offices, reception areas, and conference rooms. We have a network of distributors throughout the southeast that allow us to offer you a wide range of choices at a price you can afford. We’ll personally deliver and install your furniture to ensure your satisfaction.
Visit our Web site at www.bfl.com or call us at 1-800-555-1212 to request a free quote. You’ll find daily specials on our Web site and pictures of our latest offerings.
Sincerely,![]()
Warren Gladson
1-800-555-1212
[email protected]
www.blf.com
P.S. For the month of December we are having a liquidation sale on all Herman Miller office chairs. This is a great opportunity for you to upgrade your office chairs to ergonomically friendly Herman Miller chairs at 80% off the retail price. Call or email me today for an inventory list and a price quote.
Realty Investors
7788 Princeton Avenue
St. Louis, MO 63107
Do you have a house you would like to sell?
Dear Homeowner,
Do you own a home in St. Louis that you would like to sell? If so, we would like to meet with you to discuss some great opportunities.
Realty Investors specializes in helping investors find great opportunities in rental properties. We work with a large network of investors who are interested in purchasing rental properties. If you are interested in selling your property, now is a great time to talk to us and let us help you get the best price possible.
Last year, we helped our investors purchase over $20 million in properties in the St. Louis metro area and this year we will easily exceed that amount.
Here is a list of properties our investors are looking for:
![]() Single-family, 2- or 3-bedroom homes priced under $150,000
Single-family, 2- or 3-bedroom homes priced under $150,000
![]() Duplexes with 2 bedrooms and 1 bath on each side
Duplexes with 2 bedrooms and 1 bath on each side
![]() Mobile homes
Mobile homes
![]() Two-story homes of any size
Two-story homes of any size
If you own a property like one of these, please give me a call and let me conduct a property evaluation. There’s no obligation to sell, and the evaluation is completely free.
Selling your property with Realty Investors is an outstanding opportunity.
I look forward to hearing from you.
Sincerely,![]()
Bill Stovall
(314) 555-1212
SEASONAL CORRESPONDENCE
Seasonal correspondence is a way of greeting customers and employees by writing holiday letters (Figure 3.76). Holiday letters to customers can include special offers and incentives with deadlines related to the holiday.
These letters to customers may also express appreciation for past business. When writing a holiday letter to customers, consider these tips:
![]() Greet the customer.
Greet the customer.
![]() Acknowledge the upcoming holiday.
Acknowledge the upcoming holiday.
![]() Describe the offer.
Describe the offer.
![]() Express appreciation for the customer’s business.
Express appreciation for the customer’s business.
![]() Close by offering warm wishes.
Close by offering warm wishes.
Holiday letters to employees can be used to express thanks for their hard work. When writing holiday letters to employees, consider these tips:
![]() Begin with a personal greeting.
Begin with a personal greeting.
![]() Acknowledge the upcoming holiday.
Acknowledge the upcoming holiday.
![]() Mention it in the letter if it includes a bonus or gift check.
Mention it in the letter if it includes a bonus or gift check.
![]() Announce any holiday parties, and include information about the date, time, location, and whether there is a need to RSVP.
Announce any holiday parties, and include information about the date, time, location, and whether there is a need to RSVP.
![]() Include any messages about company accomplishments for the latest period and any goals for the future.
Include any messages about company accomplishments for the latest period and any goals for the future.
![]() Close by wishing the employee a happy holiday.
Close by wishing the employee a happy holiday.
Holiday letters are most effective when they are personally addressed to the reader. Be sensitive to the fact that the individual may not celebrate the holiday.
Holiday letters are typically written to:
![]() Announce a holiday-related sale.
Announce a holiday-related sale.
![]() Thank customers for their previous business.
Thank customers for their previous business.
![]() Announce a holiday-related open house.
Announce a holiday-related open house.
![]() Announce a party.
Announce a party.
![]() Offer season’s greetings.
Offer season’s greetings.
![]() Announce a holiday schedule.
Announce a holiday schedule.
Figure 3.76 Seasonal Correspondence
Acme Auto Supply
5353 Buffalo Speedway
Houston, TX 77097
December 7, 2012
Jeff Richardson
Jeff’s Auto Repair
3221 Stella Link
Houston, TX 77098
Dear Mr. Richardson,
With the holiday season approaching, there is so much personal and business activity to take care of that it is sometimes easy to forget to thank our great customers who have helped make it a great year for us.
I want to personally thank you for your business and for being a loyal customer of Acme Auto Supply.
May this holiday season bring happiness to you and your family.
Very truly yours,![]()
Sam Henderson
(713) 555-1212
SPECIFICATIONS
Specifications appear in various forms—the design of high-tech products, software development, engineering, and architecture (Figure 3.77). Specifications dictate the design of the project. They describe how the product should appear when completed. They can be included as part of a contract.
There are four major types of specifications:
![]() Requirement specifications (architecture and engineering) describe:
Requirement specifications (architecture and engineering) describe:
![]() A product during the design phase
A product during the design phase
![]() The functions the product will be capable of performing
The functions the product will be capable of performing
![]() The costs involved in making the product
The costs involved in making the product
![]() Functional specifications (manufacturing) describe:
Functional specifications (manufacturing) describe:
![]() The purpose, use, and operation of the product
The purpose, use, and operation of the product
![]() How the components work together
How the components work together
![]() The electronics that will be used
The electronics that will be used
![]() The power requirements
The power requirements
![]() The production and maintenance costs
The production and maintenance costs
![]() Design specifications (software) describe:
Design specifications (software) describe:
![]() The documents that contain information about the product
The documents that contain information about the product
![]() The product’s functions, what it does, and how it does it
The product’s functions, what it does, and how it does it
![]() Any external components that interface with the product
Any external components that interface with the product
![]() The details of all the products’ functions
The details of all the products’ functions
![]() The power requirements
The power requirements
![]() Test specifications (manufacturing and software) describe:
Test specifications (manufacturing and software) describe:
![]() All the tests that will be run on the product during the development phase
All the tests that will be run on the product during the development phase
![]() All the tests that will be run on the production version of the product.
All the tests that will be run on the production version of the product.
When writing specifications, keep the following language usage guidelines in mind:
![]() Keep sentences short and simple.
Keep sentences short and simple.
![]() Edit carefully to avoid mistakes that cause errors in the interpretation of the specifications and that result in manufacturing or development mistakes.
Edit carefully to avoid mistakes that cause errors in the interpretation of the specifications and that result in manufacturing or development mistakes.
![]() Reference other documents and paragraphs rather than repeat content.
Reference other documents and paragraphs rather than repeat content.
![]() Don’t worry about repeating the same words and phrases.
Don’t worry about repeating the same words and phrases.
![]() Use caution with ambiguous words like any, include, and run.
Use caution with ambiguous words like any, include, and run.
![]() Define acronyms the first time they are used.
Define acronyms the first time they are used.
![]() Avoid the use of words that may create logic errors in the specifications.
Avoid the use of words that may create logic errors in the specifications.
Example: all, always, never, every, none
![]() Do not use slash marks in specifications.
Do not use slash marks in specifications.
Incorrect: A/B
Correct: either A or B
![]() Use verbs in the future tense, using the emphatic form such as shall.
Use verbs in the future tense, using the emphatic form such as shall.
![]() Shall expresses a requirement.
Shall expresses a requirement.
![]() Will, should, and may do not express a requirement.
Will, should, and may do not express a requirement.
![]() Describe the person who will be using the product in the specifications.
Describe the person who will be using the product in the specifications.
Example: The operator will be a licensed engineer.
![]() Be specific when using noun modifiers that could be interpreted to apply to two or more nouns.
Be specific when using noun modifiers that could be interpreted to apply to two or more nouns.
Incorrect: The cabin door will be connected to the doorway using metal pins and lock pins made of titanium.
Correct: The cabin door will be connected to the doorway using titanium pins and titanium lock pins.
![]() Use caution when writing essential and nonessential dependent clauses with words like that and which.
Use caution when writing essential and nonessential dependent clauses with words like that and which.
![]() Essential clauses are required to specify a particular item and are often introduced by that.
Essential clauses are required to specify a particular item and are often introduced by that.
![]() Nonessential clauses are not required to specify anything and are often introduced using which.
Nonessential clauses are not required to specify anything and are often introduced using which.
![]() Other introductory words that introduce essential and nonessential clauses are after, as, as if, as though, as soon as, at which, because, before, by which, for which, if, in order that, since, so that, to which, unless, when, where, which, while, who, whom, and whose.
Other introductory words that introduce essential and nonessential clauses are after, as, as if, as though, as soon as, at which, because, before, by which, for which, if, in order that, since, so that, to which, unless, when, where, which, while, who, whom, and whose.
![]() Avoid using multiple conjunctions in the same sentence.
Avoid using multiple conjunctions in the same sentence.
Incorrect: The cabin door will be sealed by gluing and clamping or riveting.
Correct: The cabin door will be sealed either by gluing and clamping or by riveting.
![]() Use the third person.
Use the third person.
Incorrect: You will push the green on-screen Start button to begin the test.
Correct: The operator will push the green on-screen Start button to begin the test.
![]() When including lists in specifications, make sure they are complete and parallel in structure.
When including lists in specifications, make sure they are complete and parallel in structure.
![]() The elements of the list should be the same part of speech.
The elements of the list should be the same part of speech.
STUDENT COMPUTER SPECIFICATIONS
All students are required to have a desktop or laptop computer as well as a printer for use throughout the school year. Computers must also include a three-year on-site warranty for parts and labor, as well as telephone or Internet support.
Operating System
![]() Windows 7
Windows 7
Software Suite
![]() Microsoft Office Professional with Word, Excel, PowerPoint, and Outlook
Microsoft Office Professional with Word, Excel, PowerPoint, and Outlook
![]() Internet Explorer browser
Internet Explorer browser
![]() Norton Antivirus
Norton Antivirus
Computer Hardware
![]() Processor speed of at least 2 GHz
Processor speed of at least 2 GHz
![]() Memory (RAM) of 2 GB or more
Memory (RAM) of 2 GB or more
![]() Hard disk drive of at least 100 GB
Hard disk drive of at least 100 GB
![]() DVD burner CD-RW combo disc drive
DVD burner CD-RW combo disc drive
![]() 19-inch flat panel display
19-inch flat panel display
![]() Inkjet printer and printer cable plus three additional sets of replacement ink cartridges
Inkjet printer and printer cable plus three additional sets of replacement ink cartridges
![]() 10/100Base-T Ethernet card or wireless Ethernet card
10/100Base-T Ethernet card or wireless Ethernet card
![]() USB Flash memory stick with at least 1 GB of capacity
USB Flash memory stick with at least 1 GB of capacity
![]() Multimedia sound capability
Multimedia sound capability
![]() Headphones
Headphones
SPEECHES AND ORAL PRESENTATIONS
Writing a speech involves writing a script that can be memorized or read from a teleprompter, as well as speaker notes that the speaker can refer to during the presentation. (Figure 3.78.)
In planning a speech, keep the following in mind:
![]() Is the purpose of the speech to inform, instruct, or persuade?
Is the purpose of the speech to inform, instruct, or persuade?
![]() An informational speech focuses on facts.
An informational speech focuses on facts.
![]() An instructional speech explains how to do something.
An instructional speech explains how to do something.
![]() A persuasive speech attempts to convince the audience to think and act a certain way.
A persuasive speech attempts to convince the audience to think and act a certain way.
![]() Consider the audience for the speech and the location.
Consider the audience for the speech and the location.
![]() The audience and location will affect the tone of the speech.
The audience and location will affect the tone of the speech.
![]() Consider what the members of the audience have in common, such as age, interests, gender, and ethnicity.
Consider what the members of the audience have in common, such as age, interests, gender, and ethnicity.
![]() Consider how much the audience already knows about the topic.
Consider how much the audience already knows about the topic.
![]() Will they already be familiar with the content, or will you be introducing new ideas?
Will they already be familiar with the content, or will you be introducing new ideas?
![]() What level of detail is appropriate for the audience?
What level of detail is appropriate for the audience?
![]() What might offend the audience?
What might offend the audience?
![]() Plan the presentation to avoid standing behind a podium.
Plan the presentation to avoid standing behind a podium.
![]() Walk around but don’t pace.
Walk around but don’t pace.
![]() Plan on addressing different parts of the audience rather than one or two people in the front row.
Plan on addressing different parts of the audience rather than one or two people in the front row.
![]() Determine whether accompanying visuals are appropriate. They may be appropriate depending on the audience and location.
Determine whether accompanying visuals are appropriate. They may be appropriate depending on the audience and location.
In writing a speech, consider the following:
![]() Write a good introduction that gives a short overview and creates interest.
Write a good introduction that gives a short overview and creates interest.
![]() Create a hook that captures the audience’s attention.
Create a hook that captures the audience’s attention.
![]() Offer shocking statistics.
Offer shocking statistics.
![]() Ask a thought-provoking question.
Ask a thought-provoking question.
![]() Establish the reason you are speaking and why your topic is important.
Establish the reason you are speaking and why your topic is important.
![]() Describe the topic from the audience’s point of view.
Describe the topic from the audience’s point of view.
![]() Divide your speech into sections, and give each section a verbal title.
Divide your speech into sections, and give each section a verbal title.
![]() Use summaries and logical transitions to move from one section to the next.
Use summaries and logical transitions to move from one section to the next.
![]() Repeat crucial points to remind the audience.
Repeat crucial points to remind the audience.
![]() Repeat crucial buzzwords to reinforce their meaning.
Repeat crucial buzzwords to reinforce their meaning.
![]() Use powerful transitions to reinforce or contrast ideas.
Use powerful transitions to reinforce or contrast ideas.
![]() Write the speech with short uncomplicated sentences.
Write the speech with short uncomplicated sentences.
![]() Avoid using too many subordinate clauses.
Avoid using too many subordinate clauses.
![]() Avoid the use of too many pronouns; it is hard for an audience to remember who and what it, they, and this mean.
Avoid the use of too many pronouns; it is hard for an audience to remember who and what it, they, and this mean.
![]() Use the strategies of ethos, pathos, and logos.
Use the strategies of ethos, pathos, and logos.
![]() Ethos builds trust between the speaker and the audience.
Ethos builds trust between the speaker and the audience.
![]() Pathos appeals to the audience’s emotions.
Pathos appeals to the audience’s emotions.
![]() Logos provides facts, statistics, and logic.
Logos provides facts, statistics, and logic.
![]() Conclude the speech by summarizing, stating your own conclusion, and then adding last thoughts as commentary.
Conclude the speech by summarizing, stating your own conclusion, and then adding last thoughts as commentary.
![]() Restate the main points of the speech, but don’t repeat them the same way they were originally delivered.
Restate the main points of the speech, but don’t repeat them the same way they were originally delivered.
![]() End with a call to action that creates a connection with the audience.
End with a call to action that creates a connection with the audience.
Figure 3.78 Speech by John F. Kennedy
ASK NOT WHAT YOUR COUNTRY CAN DO FOR YOU
By John F. Kennedy
Vice President Johnson, Mr. Speaker, Mr. Chief Justice, President Eisenhower, Vice President Nixon, President Truman, reverend clergy, fellow citizens, we observe today not a victory of party, but a celebration of freedom—symbolizing an end, as well as a beginning—signifying renewal, as well as change. For I have sworn before you and Almighty God the same solemn oath our forebears prescribed nearly a century and three quarters ago.
The world is very different now. For man holds in his mortal hands the power to abolish all forms of human poverty and all forms of human life. And yet the same revolutionary beliefs for which our forebears fought are still at issue around the globe—the belief that the rights of man come not from the generosity of the state, but from the hand of God.
We dare not forget today that we are the heirs of that first revolution. Let the word go forth from this time and place, to friend and foe alike, that the torch has been passed to a new generation of Americans—born in this century, tempered by war, disciplined by a hard and bitter peace, proud of our ancient heritage—and unwilling to witness or permit the slow undoing of those human rights to which this Nation has always been committed, and to which we are committed today at home and around the world.
Let every nation know, whether it wishes us well or ill, that we shall pay any price, bear any burden, meet any hardship, support any friend, oppose any foe, in order to assure the survival and the success of liberty.
This much we pledge—and more.
To those old allies whose cultural and spiritual origins we share, we pledge the loyalty of faithful friends. United, there is little we cannot do in a host of cooperative ventures. Divided, there is little we can do— for we dare not meet a powerful challenge at odds and split asunder.
To those new States whom we welcome to the ranks of the free, we pledge our word that one form of colonial control shall not have passed away merely to be replaced by a far more iron tyranny. We shall not always expect to find them supporting our view. But we shall always hope to find them strongly supporting their own freedom—and to remember that, in the past, those who foolishly sought power by riding the back of the tiger ended up inside.
To those peoples in the huts and villages across the globe struggling to break the bonds of mass misery, we pledge our best efforts to help them help themselves, for whatever period is required—not because the Communists may be doing it, not because we seek their votes, but because it is right. If a free society cannot help the many who are poor, it cannot save the few who are rich.
To our sister republics south of our border, we offer a special pledge— to convert our good words into good deeds—in a new alliance for progress—to assist free men and free governments in casting off the chains of poverty. But this peaceful revolution of hope cannot become the prey of hostile powers. Let all our neighbors know that we shall join with them to oppose aggression or subversion anywhere in the Americas. And let every other power know that this Hemisphere intends to remain the master of its own house.
To that world assembly of sovereign states, the United Nations, our last best hope in an age where the instruments of war have far outpaced the instruments of peace, we renew our pledge of support—to prevent it from becoming merely a forum for invective—to strengthen its shield of the new and the weak—and to enlarge the area in which its writ may run.
Finally, to those nations who would make themselves our adversary, we offer not a pledge but a request: that both sides begin anew the quest for peace, before the dark powers of destruction unleashed by science engulf all humanity in planned or accidental self-destruction.
We dare not tempt them with weakness. For only when our arms are sufficient beyond doubt can we be certain beyond doubt that they will never be employed.
But neither can two great and powerful groups of nations take comfort from our present course—both sides overburdened by the cost of modern weapons, both rightly alarmed by the steady spread of the deadly atom, yet both racing to alter that uncertain balance of terror that stays the hand of mankind’s final war.
So let us begin anew—remembering on both sides that civility is not a sign of weakness, and sincerity is always subject to proof. Let us never negotiate out of fear. But let us never fear to negotiate.
Let both sides explore what problems unite us instead of belaboring those problems which divide us.
Let both sides, for the first time, formulate serious and precise proposals for the inspection and control of arms—and bring the absolute power to destroy other nations under the absolute control of all nations.
Let both sides seek to invoke the wonders of science instead of its terrors. Together let us explore the stars, conquer the deserts, eradicate disease, tap the ocean depths, and encourage the arts and commerce.
Let both sides unite to heed in all corners of the earth the command of Isaiah—to “undo the heavy burdens—and to let the oppressed go free.”
And if a beachhead of cooperation may push back the jungle of suspicion, let both sides join in creating a new endeavor, not a new balance of power, but a new world of law, where the strong are just and the weak secure and the peace preserved.
All this will not be finished in the first 100 days. Nor will it be finished in the first 1,000 days, nor in the life of this Administration, nor even perhaps in our lifetime on this planet. But let us begin.
In your hands, my fellow citizens, more than in mine, will rest the final success or failure of our course. Since this country was founded, each generation of Americans has been summoned to give testimony to its national loyalty. The graves of young Americans who answered the call to service surround the globe.
Now the trumpet summons us again—not as a call to bear arms, though arms we need; not as a call to battle, though embattled we are—but a call to bear the burden of a long twilight struggle, year in and year out, “rejoicing in hope, patient in tribulation”—a struggle against the common enemies of man: tyranny, poverty, disease, and war itself.
Can we forge against these enemies a grand and global alliance, North and South, East and West, that can assure a more fruitful life for all mankind? Will you join in that historic effort?
In the long history of the world, only a few generations have been granted the role of defending freedom in its hour of maximum danger. I do not shrink from this responsibility—I welcome it. I do not believe that any of us would exchange places with any other people or any other generation. The energy, the faith, the devotion which we bring to this endeavor will light our country and all who serve it—and the glow from that fire can truly light the world.
And so, my fellow Americans: ask not what your country can do for you— ask what you can do for your country.
My fellow citizens of the world: ask not what America will do for you, but what together we can do for the freedom of man.
Finally, whether you are citizens of America or citizens of the world, ask of us the same high standards of strength and sacrifice which we ask of you. With a good conscience our only sure reward, with history the final judge of our deeds, let us go forth to lead the land we love, asking His blessing and His help, but knowing that here on earth God’s work must truly be our own.
SUMMARIES
Summary writing is a way of organizing and summarizing information that condenses large quantities of information into a shorter version that can be used for easy reference.
In technical writing, summary writing is employed to create abstracts, which provide a brief overview of a document.
To write summaries or abstracts, do the following (Figure 3.79):
![]() Read the longer document thoroughly, and make sure you completely understand the content.
Read the longer document thoroughly, and make sure you completely understand the content.
![]() Review the longer document a second time, and strike out material that you feel isn’t necessary and underline the most important points.
Review the longer document a second time, and strike out material that you feel isn’t necessary and underline the most important points.
![]() Write a summary in your own words, following the organization of the original material.
Write a summary in your own words, following the organization of the original material.
![]() Mention the author, title, and publication date.
Mention the author, title, and publication date.
![]() Avoid unnecessary details and quotes.
Avoid unnecessary details and quotes.
![]() Don’t give your own opinion.
Don’t give your own opinion.
![]() Any material used verbatim from the original should be properly documented.
Any material used verbatim from the original should be properly documented.
![]() Compare your draft summary with the original for accuracy.
Compare your draft summary with the original for accuracy.
![]() The finished summary should be no longer than 20% of the original’s length.
The finished summary should be no longer than 20% of the original’s length.
ENERGY AND ECONOMIC IMPACTS OF IMPLEMENTING BOTH
A 25-PERCENT RPS AND A 25-PERCENT RFS BY 2025
1. Background and Scope of the Analysis
Background
This Service Report was prepared by the Energy Information Administration (EIA) in response to a request from Senator James Inhofe.5 Senator Inhofe requested an analysis of a proposal (referred to as the 25 × 25 Policy Scenario in his letter request) to achieve a 25-percent renewable portfolio standard (RPS) and a 25-percent renewable fuel standard (RFS) by 2025. The combined RPS and RFS policy proposal is referred to as “the Policy” hereafter in the report. Copies of the request letter and a follow-up letter of clarification are provided in Appendix A.
Proposal Summary
The proposal analyzed in this study has two components: (1) an RPS, which requires that the percentage of electricity sales produced from renewable sources, excluding existing hydroelectric generation, must reach 25 percent by 2025; and (2) an RFS, which requires that the volumetric percentage of the transportation gasoline and diesel fuel market supplied from renewable resources, in the form of ethanol and biodiesel, must reach 25 percent by 2025 and then grow proportionately with growth in demand for transportation gasoline and diesel fuel. Each sector (electricity sales and gasoline plus diesel transport fuels) is required to meet its own target by 2025. Twenty-five percent of electricity sales would be from renewable generators and 25 percent of gasoline plus diesel fuel sales would be from either ethanol or biodiesel on a volumetric basis.
A key assumption in both the electricity and transportation sectors is that all tax or other policy incentives for domestic renewable fuels and ethanol import tariffs in current laws and regulations are allowed to sunset without extension.
The RPS target in the electricity sector is implemented using a credit trading system, where the qualifying renewables include:
(Courtesy of the U.S. Department of Energy)
![]() Biomass used in dedicated plants or co-fired with other fuels
Biomass used in dedicated plants or co-fired with other fuels
![]() Geothermal
Geothermal
![]() Municipal solid waste (including landfill gas)
Municipal solid waste (including landfill gas)
![]() Solar thermal
Solar thermal
![]() Photovoltaic (PV)
Photovoltaic (PV)
![]() Wind (both onshore and offshore)
Wind (both onshore and offshore)
![]() Incremental new hydroelectricity above that existing in 2006
Incremental new hydroelectricity above that existing in 2006
Further, existing qualifying generators, except existing hydroelectricity, receive credits under the proposed Policy. The renewable share is expressed as a share of electricity sales in kilowatt hours. The required share is set equal to the share of qualifying renewable generation sales in 2006 and increases to 25 percent in 2025. Thereafter, it is held at 25 percent. All retail electricity sellers are included. RPS credit trading is allowed only within the electricity sector, and there is no cap on the credit price.
The RFS target for the motor transportation sector is also implemented using tradable credits, where the qualifying renewable fuels include:
![]() Corn-based ethanol
Corn-based ethanol
![]() Cellulose-based ethanol
Cellulose-based ethanol
![]() Biodiesel production from all sources, including animal fats and oil-based beans/seeds
Biodiesel production from all sources, including animal fats and oil-based beans/seeds
As with the RPS, existing qualifying sources receive credits. The renewable share is expressed as a share of all liquids sold in the motor transportation sector that displace either gasoline or diesel. The required share is set equal to the share of qualifying renewables sold in 2006 and increases to 25 percent in 2025. Thereafter, it is held at 25 percent. RFS credit trading is allowed only within the transportation sector, and there is no cap on the credit price. The existing import tariff on Brazilian ethanol imports (51 cents per gallon) is allowed to sunset in 2010. Finally, measures that facilitate compliance with the RFS, such as mandates to produce Flex Fuel Vehicles (FFVs) and the availability of E85 pumps at gasoline dispensing stations, are assumed as stipulated in Senate Bill 23 (S.23).
In this study, analyses of the energy sector impacts and energy-related economic impacts of the Policy proposal are based on the Annual Energy Outlook 2007 (AEO2007)6 reference and high price cases, as amended to allow for the additional assumptions and modeling enhancements necessary to evaluate the proposal. As in the preparation of the Annual Energy Outlook and most EIA service reports, the National Energy Modeling System (NEMS) was used to evaluate the impacts of the Policy Case and alternative assumptions.
A number of changes were made in NEMS to address the Policy and to include enhancements relevant to the analysis. They included changes to the macroeconomic module to improve the representation of the impact on the entire economy of price increases for agricultural products, motor fuel, and electricity; changes in the Petroleum Market Module to ensure convergence of NEMS; and changes to the Renewable Fuels and Transportation Modules to incorporate the proposal’s mandates. The changes made to the AEO2007 NEMS are summarized in Appendix B.
Sensitivity Cases
In addition to the four cases requested by Senator Inhofe (Reference, High Price, Policy, and High Price Policy), four additional cases are provided to illustrate the impacts of higher availability of ethanol imports and more optimistic assumptions for the cellulosic ethanol technology: Low-Cost Ethanol Imports, Low-Cost Ethanol Imports Policy, High Renewable Technology, and High Renewable Technology Policy. The cases analyzed for this request are shown in Table 1. High Renewable Technology and High Technology are used interchangeably throughout this text.
TERMINATION OF EMPLOYMENT LETTER
A termination of employment letter is an official announcement regarding a layoff or firing. A termination letter should come at the end of a termination process that involves personnel meetings.
Termination letters are usually written because of redundancy in positions, misconduct by an employee, or poor performance.
A termination of employment letter should (Figure 3.80):
![]() Be courteous and professional.
Be courteous and professional.
![]() Start by announcing the termination and the effective date.
Start by announcing the termination and the effective date.
![]() State the reasons for the termination.
State the reasons for the termination.
![]() Clearly state any individual requirements, such as the return of a company car, credit card, computer, or cell phone.
Clearly state any individual requirements, such as the return of a company car, credit card, computer, or cell phone.
![]() Clearly state any details regarding pay, holiday pay, benefits, pension, and other financial settlement.
Clearly state any details regarding pay, holiday pay, benefits, pension, and other financial settlement.
![]() Describe the appeals process and schedule if an appeals process is required due to state law or union contract.
Describe the appeals process and schedule if an appeals process is required due to state law or union contract.
![]() Include a place for the employee to sign to confirm receipt of the letter.
Include a place for the employee to sign to confirm receipt of the letter.
Figure 3.80 Termination Letter
Credit Corp America
4300 Interstate Parkway
Dallas, TX 75301
September 6, 2012
Mary Sullivan
6426 Lakewood Blvd
Dallas, TX 75214
Dear Mrs. Sullivan:
As we discussed in our meeting on September 5, 2012, I regretfully must inform you that your employment with Credit Corp America will be terminated today, September 6, 2012.
As described in our meeting, the reason for termination of your employment is your failure to meet your sales quotas. You failed to meet your monthly quota three months ago and were given a warning at that time. You have continued to miss your quota for each of the past three months.
As part of the termination process, you must return your sales literature, customer lists, and company laptop.
You will receive two weeks’ pay, which will be sent to your home within the next five days. You will also retain your 401(k) account. Your health insurance benefits will continue through the end of September. At that time, you have the option of continuing your coverage by purchasing it through the COBRA program.
To acknowledge your receipt of this letter, please sign and date below and return it to me.
We are sorry to see you leave and wish you the best for the future.
Yours,![]()
Mary Ann Lemer
Vice President of Sales
I acknowledge receipt of this letter.
![]()
TRAINING MANUAL
Training manuals are designed to instruct the reader on how to do something. There are two main types of training manuals:
![]() Instructor-led manuals may rely on lectures and demonstrations by the instructor (Figure 3.81).
Instructor-led manuals may rely on lectures and demonstrations by the instructor (Figure 3.81).
![]() Self-paced training manuals must provide more instructions than an instructor-led manual (Figure 3.82).
Self-paced training manuals must provide more instructions than an instructor-led manual (Figure 3.82).
A typical training manual includes:
![]() Cover (Figure 3.83)
Cover (Figure 3.83)
![]() Table of contents (Figure 3.84)
Table of contents (Figure 3.84)
![]() How-to-get-started information (Figure 3.85)
How-to-get-started information (Figure 3.85)
![]() Lesson modules
Lesson modules
![]() Appendix items
Appendix items
![]() Glossary
Glossary
![]() End-of-course quiz (Figure 3.86)
End-of-course quiz (Figure 3.86)
![]() Course evaluation form (Figure 3.87)
Course evaluation form (Figure 3.87)
Training manuals are normally divided into lessons or topics. A typical lesson includes:
![]() Lesson overview and objectives (Figure 3.88–3.89)
Lesson overview and objectives (Figure 3.88–3.89)
![]() Explanation in the form of headings, subheadings, paragraphs of text, and lists
Explanation in the form of headings, subheadings, paragraphs of text, and lists
![]() Illustrations, diagrams, charts, screen captures, or photographs.
Illustrations, diagrams, charts, screen captures, or photographs.
![]() Tables (Figure 3.90)
Tables (Figure 3.90)
![]() Step-by-step instructions (Figure 3.91)
Step-by-step instructions (Figure 3.91)
![]() Use of bold, italics, and all caps to highlight actions to be taken by the participant
Use of bold, italics, and all caps to highlight actions to be taken by the participant
![]() Exercises (Figure 3.92)
Exercises (Figure 3.92)
![]() Quizzes
Quizzes
![]() Summaries
Summaries
Instructor-led manuals may include:
![]() Copies of PowerPoint slides used by the instructor as visual aids
Copies of PowerPoint slides used by the instructor as visual aids
![]() Speaker notes that summarize the instructor’s lecture
Speaker notes that summarize the instructor’s lecture
![]() Speaker notes in the participant’s version of the manual Notes and warning messages may be formatted with icons and graphic boxes to focus the student’s attention.
Speaker notes in the participant’s version of the manual Notes and warning messages may be formatted with icons and graphic boxes to focus the student’s attention.
Training manuals may be integrated with other forms of instruction, such as:
![]() Hands-on exercises
Hands-on exercises
![]() Team exercises
Team exercises
![]() Exercises involving online simulations
Exercises involving online simulations
![]() Videos and audio recordings
Videos and audio recordings
![]() Computer-based training
Computer-based training
![]() Webinars
Webinars
![]() Job aids
Job aids
Figure 3.81 Instructor-Led Training Manual
Figure 3.82 Self-Study Training Manual
Figure 3.83 Training Manual Cover
Figure 3.84 Training Manual Table of Contents
Figure 3.85 Training Manual Getting-Started Page
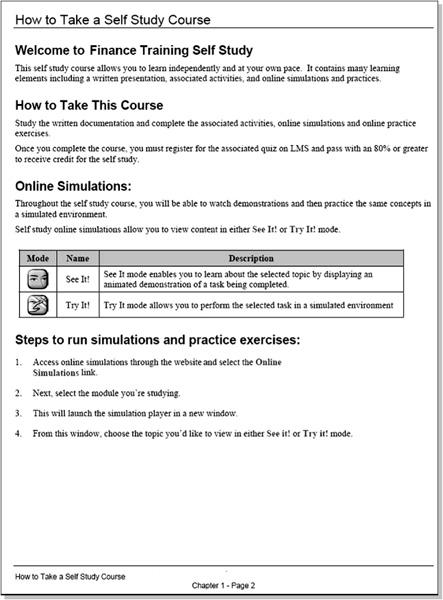
Figure 3.86 Training Manual Quiz
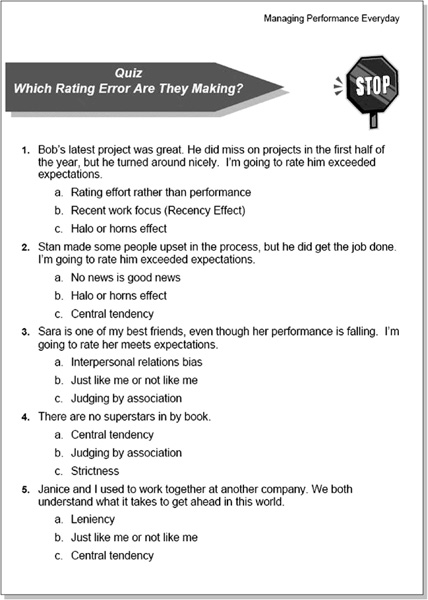
Figure 3.87 Training Manual Course Evaluation

Figure 3.88 Training Manual Course Objectives
Figure 3.89 Training Manual Lesson Contents and Objectives
Figure 3.90 Training Manual Table Reference

Figure 3.91 Training Manual Instructions

Figure 3.92 Training Manual Group Activity
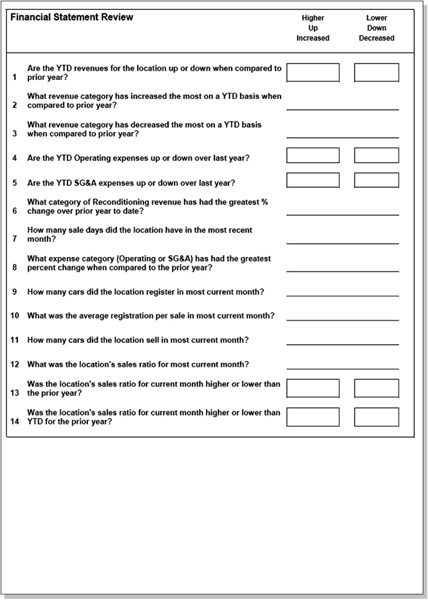
TRIP REPORT
A trip report is usually a simple memo that is sent to a supervisor after an employee returns from a business trip.
A trip report should include (Figure 3.93):
![]() The purpose of the trip
The purpose of the trip
![]() A summary of what happened on the trip
A summary of what happened on the trip
![]() A discussion of any information learned on the trip that needs to be considered, such as customer needs or complaints
A discussion of any information learned on the trip that needs to be considered, such as customer needs or complaints
![]() Recommendations for any action that needs to be taken
Recommendations for any action that needs to be taken
MEMORANDUM

Purpose: This is an update of my sales trip last week to Oklahoma City.
Summary: I called on four of our existing customers and three new potential customers. The existing customers (ABC, Dowd Electric, Pace Supplies, and Jumbo Construction) all seemed pleased with our service. The three new customers (Xecel, Jefferson Bingham, and Winstead) are mainly interested in pricing.
Discussion: Jeff Brown at Xecel showed me our competitor’s price list. Our prices are about 10% more. Jeff expressed interest in doing business with us if our prices were comparable. I believe the same would be true for Jefferson Bingham and Winstead.
Recommendation: I suggest we run some type of special sale or promotion for a specific period of time to get these guys to give us a try. Once they experience our level of service, if our prices increase later, they may not care.
USER GUIDE
User guides are documents about the operation of a product. The types of user guides are:
![]() Large user guides, for complex products
Large user guides, for complex products
![]() Software user guides, published as books, online as Web pages (Figure 3.94), or both ways
Software user guides, published as books, online as Web pages (Figure 3.94), or both ways
![]() Small user guides, written for products ranging from toasters to automobiles
Small user guides, written for products ranging from toasters to automobiles
Some user guides may include tutorials for learning to use the product. Product tutorials are often published as separate documents (Figure 3.95). User guides often include troubleshooting procedures.
User guides often include:
![]() Heading organization with subheadings
Heading organization with subheadings
![]() Numbered and bulleted lists
Numbered and bulleted lists
![]() Step-by-step instructions
Step-by-step instructions
![]() Graphics and illustrations.
Graphics and illustrations.
![]() Tables
Tables
![]() Use of boldface, italics, all caps, and different fonts to highlight content.
Use of boldface, italics, all caps, and different fonts to highlight content.
![]() Special notices with notes, tips, warnings, cautions, and danger messages
Special notices with notes, tips, warnings, cautions, and danger messages
User guides also include covers (Figure 3.96), title pages, list of trademarks, disclaimers, warranties, license agreements, appendix items, glossaries, and an index.
The product-related content included in a user guide is usually presented in one of the following ways:
![]() Step-by-step instructions guide users through operating the product (Figure 3.97). These guides often contain:
Step-by-step instructions guide users through operating the product (Figure 3.97). These guides often contain:
![]() Illustrations as a road map
Illustrations as a road map
![]() Numbered lists or list bullets as formatting
Numbered lists or list bullets as formatting
![]() Reference information provides content about all of the components, settings, controls, and options (Figure 3.98). Reference information is often presented in table form.
Reference information provides content about all of the components, settings, controls, and options (Figure 3.98). Reference information is often presented in table form.
![]() Getting-started information provides users with a tutorial on how to start using the product immediately (Figure 3.99).
Getting-started information provides users with a tutorial on how to start using the product immediately (Figure 3.99).
![]() Technical specifications provide reference information for maintenance and troubleshooting.
Technical specifications provide reference information for maintenance and troubleshooting.
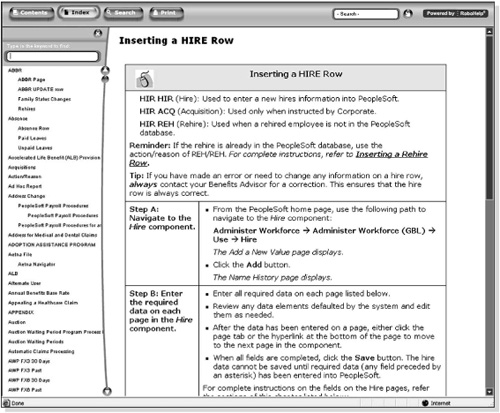
Figure 3.95 User Guide Tutorial

Figure 3.97 User Guide Instructions
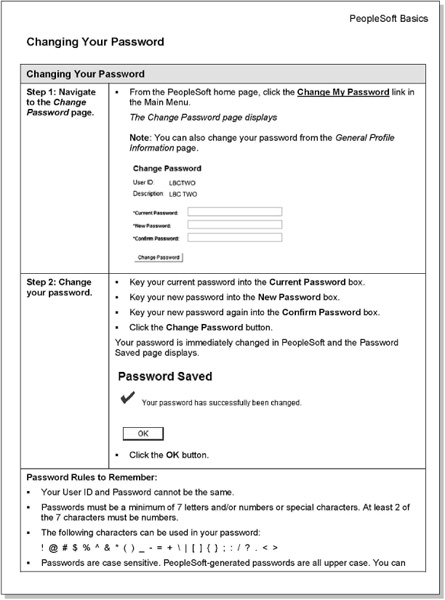
Figure 3.98 User Guide Reference Information
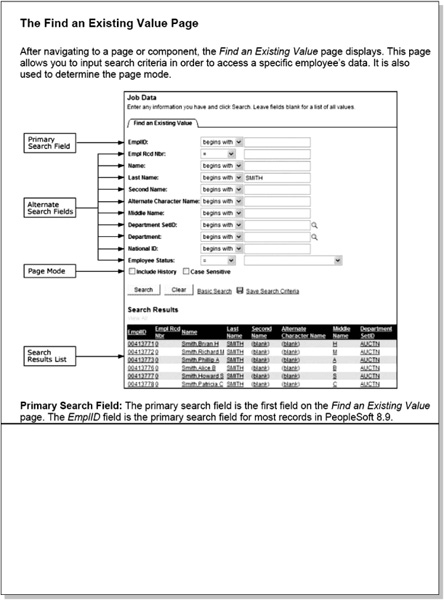
Figure 3.99 User Guide Quick Start
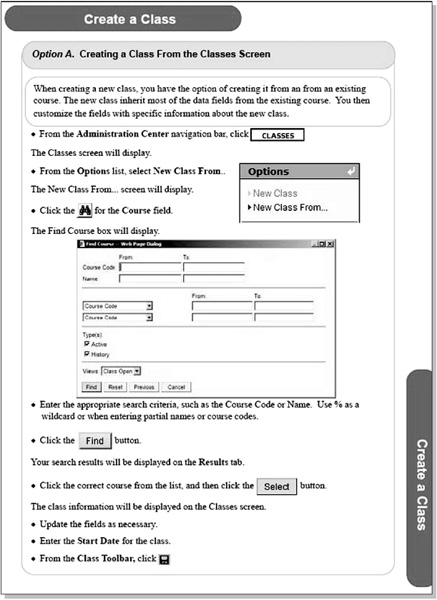
WARNING LETTER
Warning or discipline letters are written to make an employee aware of a problem and to define potential disciplinary action. A warning letter becomes part of an employee’s personnel file and may be used later during the termination process.
When writing a warning letter, consider these tips (Figure 3.100):
![]() Start the letter by stating briefly what events led to the written warning. Include specific situations, dates, and times.
Start the letter by stating briefly what events led to the written warning. Include specific situations, dates, and times.
![]() Identify your expectations for the employee and what behavior the employee needs to change.
Identify your expectations for the employee and what behavior the employee needs to change.
![]() Warn the employee that disciplinary action may have to be taken if the behavior is not corrected.
Warn the employee that disciplinary action may have to be taken if the behavior is not corrected.
![]() Provide details about what the disciplinary action may include.
Provide details about what the disciplinary action may include.
![]() State that failure to correct the situation may result in termination.
State that failure to correct the situation may result in termination.
Warning letters are typically written to:
![]() Document a reprimand.
Document a reprimand.
![]() Warn an employee for breach of policy.
Warn an employee for breach of policy.
![]() Warn an employee for poor performance.
Warn an employee for poor performance.
![]() Reprimand an employee for poor attendance or lateness.
Reprimand an employee for poor attendance or lateness.
![]() Warn tenants in a rental property.
Warn tenants in a rental property.
![]() Warn customers about a credit suspension.
Warn customers about a credit suspension.
Credit Corp America
4300 Interstate Parkway
Dallas, TX 75301
June 2, 2012
Mary Sullivan
6426 Lakewood Blvd
Dallas, TX 75214
Dear Mrs. Sullivan:
As you will recall, the sales quota for our customer representatives is $10,000 per month. I discussed with you at the end of April that it was important for you to achieve this quota each and every month. For the month of May, your sales totaled only $5,500.
Company policy states that any customer representative who fails to achieve his/her sales quota for two consecutive months is subject to termination. As a result of this situation, this letter will serve as a warning, and a copy will be placed in your personnel file. To avoid termination, you will need to achieve your quota for the month of June.
If you know of any problems that will prevent you from reaching these goals, or if you wish to discuss this matter with me in more detail, please arrange for a meeting.
Yours,![]()
Mary Ann Lemer
Vice President of Sales
WEB SITES
Writing for a Web site is different from writing for print.
![]() Writing for print is linear in nature, whereas writing for the Web is nonlinear.
Writing for print is linear in nature, whereas writing for the Web is nonlinear.
![]() Web page content is usually chunked and packaged, so that a reader can quickly scan the page and decide whether to read more. (Readers spend very little time reading text on an individual Web page.)
Web page content is usually chunked and packaged, so that a reader can quickly scan the page and decide whether to read more. (Readers spend very little time reading text on an individual Web page.)
![]() Web pages feature highlighted keywords, extensive use of subheadings, bulleted lists, and normally half the word length of a similar paper document.
Web pages feature highlighted keywords, extensive use of subheadings, bulleted lists, and normally half the word length of a similar paper document.
When writing content for a Web site, consider these tips (Figure 3.101):
![]() Tone down promotional marketing hype and focus instead on reference and helpful information.
Tone down promotional marketing hype and focus instead on reference and helpful information.
![]() Use an objective rather than a subjective tone.
Use an objective rather than a subjective tone.
![]() Use the active voice for Web content.
Use the active voice for Web content.
![]() Show numbers as numerals in all Web content.
Show numbers as numerals in all Web content.
![]() Numerals are easier to scan and take up less room.
Numerals are easier to scan and take up less room.
![]() Spell out large numbers, such as a million, billion, and trillion, because the words are shorter than the numerals.
Spell out large numbers, such as a million, billion, and trillion, because the words are shorter than the numerals.
When writing headlines for Web articles:
![]() Keep headlines short and format them in bold.
Keep headlines short and format them in bold.
![]() Summarize the article so that users will know enough to determine whether they want to read it.
Summarize the article so that users will know enough to determine whether they want to read it.
![]() Include the most important keywords first in the headline because readers often scan only the first few words of a headline.
Include the most important keywords first in the headline because readers often scan only the first few words of a headline.
![]() Use keywords that match common user search criteria in search engines.
Use keywords that match common user search criteria in search engines.
![]() Substitute commonly known words for technical jargon.
Substitute commonly known words for technical jargon.
![]() Use generic names rather than brand names.
Use generic names rather than brand names.
![]() Make the average headline five words.
Make the average headline five words.
When writing a Web article, consider the following:
![]() Use the inverted pyramid approach that is often used by journalists where you begin the article by telling the reader the conclusion, followed by important supporting information, and then end by providing background details.
Use the inverted pyramid approach that is often used by journalists where you begin the article by telling the reader the conclusion, followed by important supporting information, and then end by providing background details.
![]() Use down-to-earth informal language to make the content easy to understand.
Use down-to-earth informal language to make the content easy to understand.
![]() Include hyperlinks to reference sources for added credibility.
Include hyperlinks to reference sources for added credibility.
![]() Use humor with caution because of the wide variety of user preferences.
Use humor with caution because of the wide variety of user preferences.
![]() Use approximately 60% fewer words than you would if you were writing the same content for print.
Use approximately 60% fewer words than you would if you were writing the same content for print.
![]() Chunk the content into sections and move nice-to-know content to other pages, and include hyperlinks to this content in the main article.
Chunk the content into sections and move nice-to-know content to other pages, and include hyperlinks to this content in the main article.
![]() Illustrations should always have a caption and complement the text rather than used just to make the page flashy.
Illustrations should always have a caption and complement the text rather than used just to make the page flashy.
![]() Segment the text to make it easier to scan the document.
Segment the text to make it easier to scan the document.
![]() Break up long paragraphs into smaller segments.
Break up long paragraphs into smaller segments.
![]() Include a heading that describes the subject of each segment, and capitalize the first letter of each word.
Include a heading that describes the subject of each segment, and capitalize the first letter of each word.
![]() Include subheadings where appropriate, and capitalize only the first word.
Include subheadings where appropriate, and capitalize only the first word.
![]() For lists of any kind, use bullet lists.
For lists of any kind, use bullet lists.
![]() Use the three aspects of rhetoric: ethos, pathos, and logos.
Use the three aspects of rhetoric: ethos, pathos, and logos.
![]() Ethos—Establish the credibility of the author by including references and hyperlinks to your sources.
Ethos—Establish the credibility of the author by including references and hyperlinks to your sources.
![]() Pathos—Make an appeal to the reader’s emotions by writing from the reader’s point of view.
Pathos—Make an appeal to the reader’s emotions by writing from the reader’s point of view.
![]() Logos—Appeal to the reader’s logic by providing statistical facts and convincing examples
Logos—Appeal to the reader’s logic by providing statistical facts and convincing examples

WHITE PAPERS
White papers are written to introduce an innovative product or technology to the industry, emphasize the unique qualities and advantages of a product or service, help influence customer buying decisions, and are the beginning steps in the creation of a product marketing strategy.
When preparing to write a white paper, read other white papers available on the Internet and look for successful models. Consider how the white paper will be published: paper-based or on a Web site.
When writing a white paper (Figure 3.102):
![]() Define the audience and understand their concerns.
Define the audience and understand their concerns.
![]() Be aware of the time investment required by the audience to read your white paper.
Be aware of the time investment required by the audience to read your white paper.
![]() Make sure it is engaging and captures the audience’s attention.
Make sure it is engaging and captures the audience’s attention.
![]() Start with a one-paragraph executive summary with the key points the audience needs to know.
Start with a one-paragraph executive summary with the key points the audience needs to know.
![]() State the problem faced by the customer that the product or service can solve.
State the problem faced by the customer that the product or service can solve.
![]() Describe the product and include the following details:
Describe the product and include the following details:
![]() How the product was designed
How the product was designed
![]() What industry standards were used or considered
What industry standards were used or considered
![]() What type of testing was conducted on the product or service
What type of testing was conducted on the product or service
![]() What best practices were learned
What best practices were learned
![]() Keep a positive tone.
Keep a positive tone.
![]() Use the active voice.
Use the active voice.
![]() Avoid jargon and keep the presentation as nontechnical as possible.
Avoid jargon and keep the presentation as nontechnical as possible.
![]() Include diagrams and illustrations.
Include diagrams and illustrations.
![]() Explain how the product resolves the problem stated earlier.
Explain how the product resolves the problem stated earlier.
![]() Tie the product to the problem, and include case study evidence of how the product solved the problem.
Tie the product to the problem, and include case study evidence of how the product solved the problem.
![]() Include testimonials and interview quotes, if available.
Include testimonials and interview quotes, if available.
![]() Conclude by summarizing the benefits and discussing the return on investment for customers.
Conclude by summarizing the benefits and discussing the return on investment for customers.
![]() Mention future product development and timelines for release.
Mention future product development and timelines for release.
PUTTING CITIZENS FIRST:
Transforming Online Governement
A White Paper Written for the Presidential Transition Team by
The Federal Web Managers Council
Current and former members of the Federal Web Managers Council who contributed to this paper: Bev Godwin, General Services Administration/USA.gov (Executive Sponsor); Sheila Campbell, General Services Administration/USA.gov (co-chair); Rachel Flagg, Dept. of Housing and Urban Development (co-chair); Melissa Allen, Dept. of Interior; Andy Bailey, Dept. of Labor; Les Benito, Dept. of Defense; Joyce Bounds, Dept. of Veterans Affairs; Nicole Burton, General Services Administration/USA.gov; Bruce Carter, Social Security Administration (retired); Natalie Davidson, General Services Administration/USA.gov; Kate Donohue, Dept. of Treasury; Brian Dunbar, NASA; Tim Evans, Social Security Administration; Kellie Feeney, Dept. of Transportation; Sam Gallagher, Dept. of Housing and Urban Development; Colleen Hope, Dept. of State; Ron Jones, Dept. of Commerce/NOAA; Tina Kelley; Dept. of Justice; Gwynne Kostin, Dept. of Homeland Security; Jeffrey Levy, EPA; Beth Martin, Dept. of Health and Human Services; Leilani Martinez, GSA/GobiernoUSA.gov; Suzanne Nawrot, Dept. of Energy; Russell O’Neill, General Services Administration/USA.gov; Tom Parisi, Dept. of Treasury/IRS; Vic Powell, USDA; Rezaur Rahman, Advisory Council on Historic Preservation; Eric Ramoth, Dept. of Housing and Urban Development; Rand Ruggieri, Dept. of Commerce; Richard Stapleton, Dept. of Health and Human Services; Kim Taylor, USDA; Kirk Winters, Dept. of Education
We welcome your questions and comments. Please contact the Federal Web Managers Council co-chairs, Sheila Campbell ([email protected]) and Rachel Flagg ([email protected]).
(Courtesy of the Whitehouse.gov)
This White Paper recommends specific strategies for revolutionizing how the U.S. Government delivers online services to the American people. It was developed by the Federal Web Managers Council, comprised of Cabinet agency Web Directors.
The current state of government online communications
The importance of the Internet has grown exponentially over the last decade, but the government’s ability to provide online services to the American people hasn’t grown at the same pace. Building this capacity will present one of the biggest challenges— and most promising opportunities—for President-elect Obama. We need to build on the groundswell of citizen participation in the presidential campaign and make people’s everyday interactions with their government easier and more transparent.
It won’t be an easy task. There are approximately 24,000 U.S. Government websites now online (but no one knows the exact number). Many websites tout organizational achievements instead of effectively delivering basic information and services. Many web managers don’t have access to social media tools because of legal, security, privacy, and internal policy concerns. Many agencies focus more on technology and website infrastructure than improving content and service delivery. Technology should not drive our business decisions, but rather help us serve the needs of the American people. Here’s the result when communication takes a backseat to technology:
“Often I can find the page on a government site that’s supposed to contain the information I need, but I can’t make heads or tails of it. I recently tried to Google a specific requirement for dependent care flex accounts. Although I got to the correct page, it didn’t answer my question. The links took me to the typical, poorly written tax guidance. Where did I get the answer to my question? On Wikipedia.”
We’re working to address these problems. We’ve built a network of over 1,500 federal, state, and local web professionals across the country to share best practices; we created a large-scale training program for web managers; and we’re working to support the use of social media while also addressing important privacy, security, and legal implications.
While our efforts have been very successful, a high-level mandate from the new Administration is needed to quickly and radically transform government websites.
A bold, new vision for the future
President-elect Obama should be able to promise the American people that when they need government information and services online, they will be able to:
![]() Easily find relevant, accurate, and up-to-date information;
Easily find relevant, accurate, and up-to-date information;
![]() Understand information the first time they read it;
Understand information the first time they read it;
![]() Complete common tasks efficiently;
Complete common tasks efficiently;
![]() Get the same answer whether they use the web, phone, email, live chat, read a brochure, or visit in-person;
Get the same answer whether they use the web, phone, email, live chat, read a brochure, or visit in-person;
![]() Provide feedback and ideas and hear what the government will do with them;
Provide feedback and ideas and hear what the government will do with them;
![]() Access critical information if they have a disability or aren’t proficient in English.
Access critical information if they have a disability or aren’t proficient in English.
The recommendations below are designed to help the new Administration increase the efficiency, transparency, accountability, and participation between government and the American people. Some of these changes can be implemented quickly and at minimal cost. Others will require significant changes in how agencies conduct business and may require shifts in how they fund web communications.
Establish Web Communications as a core government business function
One of the biggest problems we face in improving government websites is that many agencies still view their website as an IT project rather than as a core business function. Many government websites lack a dedicated budget. Only a minority of agencies have developed strong web policies and management controls. Some have hundreds of “legacy” websites with outdated or irrelevant content. With limited resources, many find it difficult to solicit regular customer input and take quick action to improve their sites. While there are many effective government websites, most web teams are struggling to manage the amount of online content the government produces every day.
![]() Agencies should be required to fund their “virtual” office space as part of their critical infrastructure, in the same way they fund their “bricks and mortar” office space.
Agencies should be required to fund their “virtual” office space as part of their critical infrastructure, in the same way they fund their “bricks and mortar” office space.
![]() Agencies should be required to appoint an editor-in-chief for every website they maintain, as do the top commercial websites. This person should be given appropriate funding and authority to develop and enforce web policies and publishing standards, including ensuring that prime real estate on government websites is dedicated to helping people find the information they need.
Agencies should be required to appoint an editor-in-chief for every website they maintain, as do the top commercial websites. This person should be given appropriate funding and authority to develop and enforce web policies and publishing standards, including ensuring that prime real estate on government websites is dedicated to helping people find the information they need.
![]() OPM should develop standard job descriptions and core training requirements so agencies can hire and retain highly qualified experts in web content and new media—not just IT specialists.
OPM should develop standard job descriptions and core training requirements so agencies can hire and retain highly qualified experts in web content and new media—not just IT specialists.
Help the public complete common government tasks efficiently
The U.S. economy loses millions of hours of “citizen productivity” every year when people can’t efficiently accomplish basic government tasks online, such as filling out a form, applying for a loan, or checking eligibility for a government program. This adds to people’s dissatisfaction with their government.
![]() Agencies should be required and funded to identify their core online customer tasks, and to develop service standards and performance benchmarks for completing those tasks. If the core customer tasks are not yet online, agencies should determine whether or not those tasks can be made available online, and if so, develop a plan for making them available online within one year.
Agencies should be required and funded to identify their core online customer tasks, and to develop service standards and performance benchmarks for completing those tasks. If the core customer tasks are not yet online, agencies should determine whether or not those tasks can be made available online, and if so, develop a plan for making them available online within one year.
![]() The Government should use social media, not just to create transparency, but also to help people accomplish their core tasks. For example, agencies could post instructional videos on YouTube to explain how to apply for a small business loan or learn about Medicare benefits. To do this, the government must ensure that federal employees who need access to social media tools have them, and that these new ways of delivering content are available to all, including people with disabilities.
The Government should use social media, not just to create transparency, but also to help people accomplish their core tasks. For example, agencies could post instructional videos on YouTube to explain how to apply for a small business loan or learn about Medicare benefits. To do this, the government must ensure that federal employees who need access to social media tools have them, and that these new ways of delivering content are available to all, including people with disabilities.
![]() The new Administration should develop government-wide guidelines for disseminating content in universally accessible formats (data formats, news feeds, mobile, video, podcasts, etc.), and on non-government sites such as YouTube, Wikipedia, and SecondLife. To remain relevant, government needs to take our content to where people already are on the Web, rather than just expecting people will come to government websites. Having guidelines will ensure that we’re part of the larger “online information ecosystem,” without compromising the integrity of government information.
The new Administration should develop government-wide guidelines for disseminating content in universally accessible formats (data formats, news feeds, mobile, video, podcasts, etc.), and on non-government sites such as YouTube, Wikipedia, and SecondLife. To remain relevant, government needs to take our content to where people already are on the Web, rather than just expecting people will come to government websites. Having guidelines will ensure that we’re part of the larger “online information ecosystem,” without compromising the integrity of government information.
Clean up the clutter so people can find what they need online
President-elect Obama will inherit thousands of U.S. government websites. We have too much content to categorize, search, and manage effectively, and there is no comprehensive system for removing or archiving old or underused content. Some agencies have posted competing websites on similar topics, creating duplication of effort and causing confusion for the public. Much government web content is written in “governmentese” instead of plain language.
![]() The Government should set stricter standards for approving new, or renewing existing, government websites. All federally owned, managed, and/or directly funded websites must be hosted on .gov, .mil or fed.us domains. Where agency missions are related, a lead agency should be appointed to coordinate the online “information lane,” and all other agencies should defer to the lead agency for posting comprehensive government information on that topic. This will reduce duplication, save money, and help consumers find accurate information.
The Government should set stricter standards for approving new, or renewing existing, government websites. All federally owned, managed, and/or directly funded websites must be hosted on .gov, .mil or fed.us domains. Where agency missions are related, a lead agency should be appointed to coordinate the online “information lane,” and all other agencies should defer to the lead agency for posting comprehensive government information on that topic. This will reduce duplication, save money, and help consumers find accurate information.
![]() Agencies should be required and funded to conduct regular content reviews, to ensure their online content is accurate, relevant, mission-related, and written in plain language. They should have a process for archiving content that is no longer in frequent use and no longer required on the website.
Agencies should be required and funded to conduct regular content reviews, to ensure their online content is accurate, relevant, mission-related, and written in plain language. They should have a process for archiving content that is no longer in frequent use and no longer required on the website.
![]() Agencies should be funded and required to follow the latest best practices in web search. This will improve the quality and findability of online government information, and help agencies deliver the services most requested by their customers.
Agencies should be funded and required to follow the latest best practices in web search. This will improve the quality and findability of online government information, and help agencies deliver the services most requested by their customers.
Engage the public in a dialogue to improve our customer service
Agencies often don’t have resources to effectively manage customer input. For those that do, they must go through a clearance process before they can survey the public (requirements of the Paperwork Reduction Act, which was enacted before many agencies even had websites). Many web pages are developed without regular feedback or testing with customers. When people do provide feedback or ideas, they often never hear what the government will do with their suggestions.
![]() Agencies should be required and funded to regularly solicit public opinion and analyze customers’ online preferences—just as Amazon, eBay, and other top commercial websites do. This can be done on an “opt-in” basis and without tracking personally identifiable information by using blogs, online surveys, a “Citizens Insight Panel” (such as that used by the Canadian government), or similar tools. Agencies should be required and funded to do user testing before undertaking major improvements to any current website, or launching a new website.
Agencies should be required and funded to regularly solicit public opinion and analyze customers’ online preferences—just as Amazon, eBay, and other top commercial websites do. This can be done on an “opt-in” basis and without tracking personally identifiable information by using blogs, online surveys, a “Citizens Insight Panel” (such as that used by the Canadian government), or similar tools. Agencies should be required and funded to do user testing before undertaking major improvements to any current website, or launching a new website.
![]() Agencies should use their website to publish a summary of common customer comments and explain the actions they are taking in response to the feedback. Doing so will create better transparency and accountability.
Agencies should use their website to publish a summary of common customer comments and explain the actions they are taking in response to the feedback. Doing so will create better transparency and accountability.
Ensure the public gets the same answer whether they use the web, phone, email, print, or visit in-person
Agencies communicate with citizens via many different “delivery channels,” including web, email, publications, live chats, blogs, podcasts, videos, wikis, virtual online worlds, and more. But it’s difficult to ensure timeliness and consistency when various delivery channels are managed by different divisions within an agency.
![]() Agencies should provide multiple ways for people to contact them and ensure that information is consistent across all channels. They should be funded to coordinate all types of content targeted to the general public (web, publications, call center, email, common questions, web chat, etc.). Agencies should be rewarded for delivering consistent information, both within agencies and across government.
Agencies should provide multiple ways for people to contact them and ensure that information is consistent across all channels. They should be funded to coordinate all types of content targeted to the general public (web, publications, call center, email, common questions, web chat, etc.). Agencies should be rewarded for delivering consistent information, both within agencies and across government.
Ensure underserved populations can access critical information online
Agencies are required to provide online information that’s readily accessible by people with disabilities, as well as to people with limited English proficiency. However, few agencies have the funding, training or resources to meet these obligations.
![]() The government should establish standards and guidelines for multilingual websites, and agencies should be funded and staffed with qualified bilingual web content professionals who can create and maintain them. This will help newcomers learn about the rights and responsibilities of living in the U.S.
The government should establish standards and guidelines for multilingual websites, and agencies should be funded and staffed with qualified bilingual web content professionals who can create and maintain them. This will help newcomers learn about the rights and responsibilities of living in the U.S.
![]() Agencies should receive adequate resources to make their websites fully accessible to people with disabilities and meet requirements of the Rehabilitation Act. The new Administration should invest in government-wide solutions, such as captioning software to make videos and webcasts accessible to people with disabilities.
Agencies should receive adequate resources to make their websites fully accessible to people with disabilities and meet requirements of the Rehabilitation Act. The new Administration should invest in government-wide solutions, such as captioning software to make videos and webcasts accessible to people with disabilities.
Conclusion
By harnessing the collaborative nature of the web, the new Administration has the potential to engage the public like never before. The web can foster better communication and allow people to participate in improving the operations of their government. By listening to our customers we can provide better services, focus on their most pressing needs, and spend their tax dollars efficiently. We’re confident that President-elect Obama will appoint leaders who will invest in the web as a strategic asset and make these goals a reality. The millions of Americans who interact with their government online expect and deserve no less.