Depending on the type of film or animation exercise you are making, your puppet may need to be complemented by some kind of background or environment. A stop-motion set, which provides this environment, can be very simple or very elaborate, but most importantly it should enhance the surroundings of your characters and not distract the viewer away from them. Your scene or story may also call for some props for the characters to grab or interact with. Building sets and props is another multifaceted process that requires many different skills that could each make up a book of its own to do it justice: woodworking, sculpting, metalworking, drafting, and the list goes on. Building stop-motion sets professionally is like being a carpenter or interior designer, with all of the same skill sets required. The only difference is that everything is in miniature scale! On a more independent or beginner level, the process of creating sets can sometimes turn out to be a fun experiment in MacGyver-style filmmaking. In this chapter, I will briefly cover some basic things to think about when making sets and props for stop-motion.
On a practical level, the most important element to consider when designing your set is how much physical space you have available. Whether you live in a tiny apartment or have a house with a spacious basement or spare room will ultimately determine the scale in which everything is built (see Figure 11.1).
As always, work in a room without windows to avoid incoming sunlight that will change throughout the day. The size of your puppets will also be a determining factor. You certainly do not want your puppets to look too small or too large in comparison to your background. These considerations should be the first step before any production on your project begins. You also want to think about where the camera and lights will need to be placed. It’s rather pointless to build a huge set and then realize there is no more space left in your room to fit other equipment. If you are making a film that will feature several different camera angles, refer to your storyboard when designing your set so that you can ensure that all of your angles can be achieved without getting unwanted material in the shot, such as lights, the ceiling, or bits of your surrounding studio space. It’s also a good idea to design your set with removable walls or backdrops, so that the set can be modified to accommodate changing camera angles. If you plan on having any close-up shots of your puppet, then parts of your set might require more detail if they too are shown in close-up. Remember, your work may be shown on a huge screen, where everything is more readily noticeable than on a computer or TV monitor. You also must make sure that you will have convenient access to your puppets, and can reach them without disturbing the set. Keep everything at a height and depth that will give the best range for lighting and camera, and avoid extra strain on your back while animating.
As you plan your set in terms of the materials you will use, think about the shots required for your project. Will your characters only be shown from the waist up, or will they be full figure in the frame? Will they be shown walking or jumping? These factors will determine how the ground or floor surface is built and whether you will need any overhead rigging for hanging objects from wires for jumping shots. If the characters’ feet will never be seen, it doesn’t matter how the surface appears. If they are walking full-frame in any shots, you will need tie-downs for your puppet’s feet, and the holes in the floor must be hidden somehow.
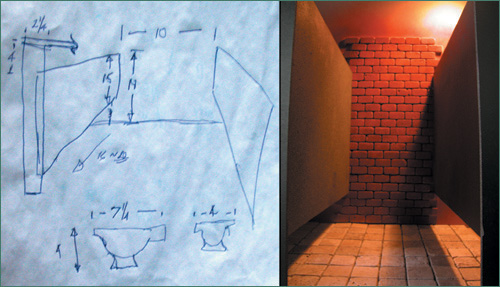
As a good way to test out any issues that might come up during your shoot, a common practice is to build a smaller-scale mock-up of your set first (see Figure 11.2). Use light materials such as balsa wood, cardboard, or Styrofoam to build walls or floor surfaces. Perfection and attention to detail are not important here; you could even just use pieces of junk or household objects to suggest elements of the set. For puppets, you can make smaller clay models or flat cutouts for scale purposes. You can use a still camera or viewfinder to view or take pictures of the various angles you will be shooting to get a sense of how they will look in the final version. In this digital age, another way to plan out your set is to create a virtual version of it using any 3D modeling software such as Maya or 3ds Max.
Figure 11.2. Mock-up of a city set on a 4′ × 8′ table. (Courtesy of Michael Stennick, Space Monster Pictures.)
In addition to making sure that your camera, lights, and yourself can fit in with your space, the most important quality of your actual set is keeping everything secured. The base must be sturdy and heavy enough to avoid sliding around if pushed or leaned against. Most sets are built on a steel or wooden base, which can be glued or screwed down to the floor, or weighted down to prevent movement. The actual surface on top of the base will be partially determined, as I mentioned previously, by whether or not you will need tie-downs for your characters’ feet. A wooden base is still a good option, regardless of this factor of your animation. Make sure that the materials are durable enough that they will not warp over a long period of time. If your shoot takes several weeks or months, any gradual warping of your set will show up on camera as a time-lapse feature. Try to keep the temperature in your studio consistent to avoid this. Any props in your shot such as furniture (in an interior set) or foliage (in an exterior set) must also be secured tightly. Basically, anything that does not move in your scene should be secured with strong glue, putty, or some kind of tie-down from underneath. If they are not secured, it is very common for some props to lose their footing so slowly that you might not notice it while animating. It is only noticed when you play back your animation and see a top-heavy prop gradually slipping or drooping throughout, which can be distracting, not to mention stressful, if your character animation turns out well. Another type of prop to avoid in any kind of set is real plants. If your set has trees, bushes, or house plants in it, use ready-made fake ones or build your own from scratch. Over the span of animating, real plants will gradually either wilt or bloom, especially under hot lights. When I saw Ray Harryhausen speak in 2001, he recounted some incidents on some films he had worked on where the set designers used real plants that blossomed in time-lapse during the shoot. Watch for any elements like this that may show up over a long span of time, including dust and lighting changes.
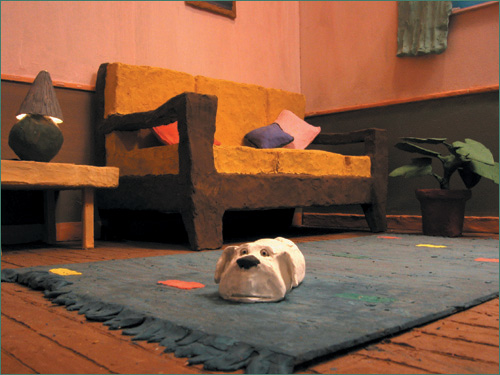
An interior set is for any scene that takes place indoors, whether it be a shop, bedroom, or office building. Typically, an interior set will be created with at least two or three walls, so that corners can be shown in different camera angles to give some depth and variety to the composition. “Flyaway” walls can be designed to be removed if the camera switches position. Good materials to use for building walls are wood, foam core, or Styrofoam sheets. If your room will have windows, these can be cut out and framed with handcrafted balsa wood. Real pieces of glass or Plexiglas can be used for windows, as long as they do not cause unwanted reflections. You might be able to find ready-made windows at any store that sells crafts or model supplies for doll houses. The same applies to furniture, clocks, or other miniature household objects. Let your imagination flow when exploring model shops or craft stores, and look for elements that might look good in your set. The overall design scheme you are going after will ultimately determine whether you can get away with ready-made props or the need to create everything from scratch. Basically, with all stop-motion sets, your job is to create a miniature world. You can create the same things with which you would normally dress up a life-size room, just in a much smaller scale. Wallpaper designs can be scanned into the computer, scaled down and reprinted, as can paintings or portraits to be placed into miniature picture frames. You can even create interior sets and props entirely out of clay (see Figure 11.3) if your characters are made of clay and you want to achieve a unified design style throughout. In going this route, make doubly sure that you don’t nudge parts of the set when you go to animate your puppets; otherwise you may create unwanted smudges and jitters in the background.
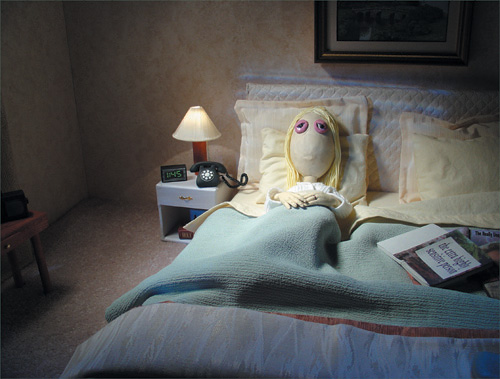
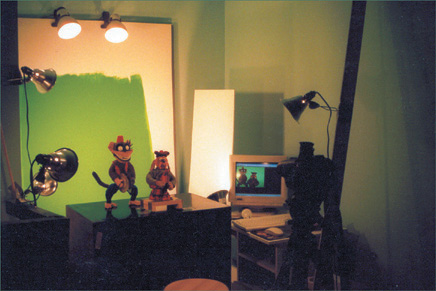
When lighting an interior set, consider where your main light source is, whether it comes from outside the windows or from within the room itself. Any light source that is literally shown in the shot, such as a lamp (see Figure 11.4), is referred to as a practical light. Miniature practical lights can be created with Christmas lights or tiny keychain-sized flashlight bulbs, and any wires leading to them need to be concealed somehow, unless they are battery operated. Battery-powered lights must be watched closely with the frame grabber and replaced if they start to dim or burn out. In many cases, the practical light will not be bright enough to illuminate the set by itself, so additional light must be projected onto the set from outside the frame. The light can be shaped with barn doors or gobo masks to make it appear as if it is coming from the practical light. This technique is common in live-action film and theater and must be synchronized properly for moments when a character turns a practical set light on or off.
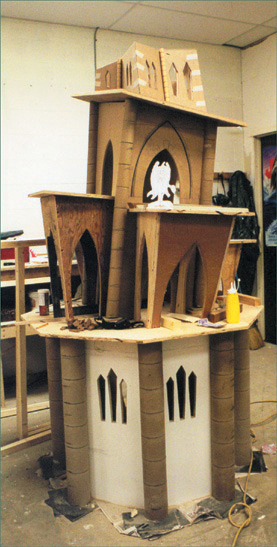
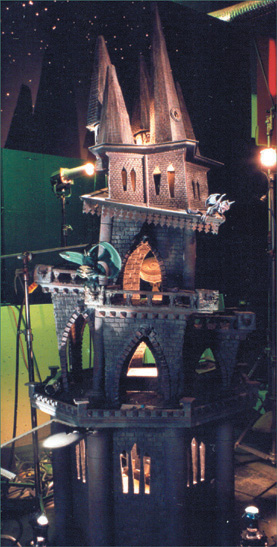
An exterior set is for any scene that takes place outdoors. Common objects that must be created for exterior sets range from buildings and vehicles (for neighborhoods or cityscapes) to trees, rocks, or sand (for forests, deserts, or countrysides). Wood and Styrofoam, again, are useful materials for creating buildings, which can be painted or covered with a thin layer of clay to give them the right texture. Buildings might sometimes be created as an exterior set unto themselves, for close-up shots of a castle tower, for instance. Figures 11.5 and 11.6 show “before and after” shots of the Gargoyle Tower set from Twisteeria.
Miniature trees or foliage can be found ready-made at model shops. Since many people are enthusiasts for building model train sets, that is a good area to look into. They may also have fake grass surfaces or kits for building hills or road signs. If you build trees from scratch, they can be built with armature wire and covered with paper bark and leaves. Or you can make them out of real twigs and branches from outside. When going for a realistic approach, real materials will obviously work best whenever possible, so long as they do not deteriorate when removed from their natural elements. A useful material for making leaves or large fern plants is copper foil or Cinefoil covered with paper, so they can hold their shape if they need to be animated. Rocks and hills can be shaped with chicken wire or a wire mesh and covered with painted papier-mâché or Rigid Wrap for a textured rock appearance. Another material that is easy to find in most art or craft supply stores is Celluclay, a paper pulp that you mix with water, sculpt to any shape, and air dry for a rock-like appearance. Behind your exterior set, you will need a backdrop, particularly for the widest shots in your project. The backdrop may be only a painted sky, or it could also have a horizon or extra background elements painted into it, to give it a sense of depth to blend into the physical set.
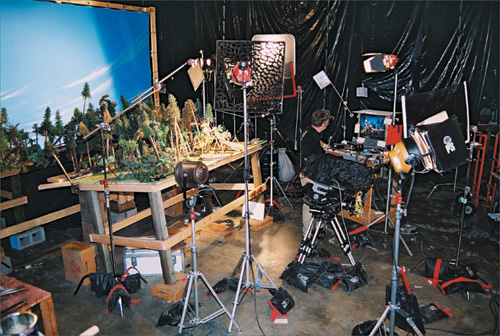
The lighting for an exterior set will depend on the time of day in your scene. The main light source is the sun or the moon, so for a bright sunny day, you want to bathe the set in light to achieve that illusion. An overcast day will require a more diffused lighting overall, with no harsh shadows. Atmospheric lighting for a moonlight shot can be achieved with colored gels and emphasis on rim lighting. Night shots are tricky, in that you usually need a good deal of light to expose the image on camera, but the shot is intended to be dark. If you have extensive means for post-production effects, you could shoot your set as a day shot and color-correct it afterward to make it appear like night. Again, the whole point behind your set is to create a miniature world, so exterior shots tend to require more space to get the right lighting and feel for the great outdoors (see Figure 11.7), as opposed to an interior space, which is more enclosed to begin with.
In some cases, depending on your project, an elaborate set with walls or foliage may not be necessary. Some stop-motion shorts, such as Tim Hittle’s Potato Hunter and Canhead, take place on an abstract or stylized tabletop with very little in the way of props or a recognizable environment. The effect is one of a miniature world that calls attention to the fact that it’s stop-motion on a tabletop, while at the same time creating an alternate universe that we accept the characters interacting in. A film like Aardman’s Pib and Pog simply uses a plain white background, so to the audience it could be interior or exterior, and the focus is just on the animation.
My student film Snot Living involved a clay character that interacted with a live-action character, so my apartment simply acted as the set itself. The funny thing about that film was that I only lived in the apartment where I shot all of the live-action shots with Brandon (my friend who played the main character) for the summer, and when I had to move out, I still had some close-up animation shots to create. I planned ahead so that any wider animation shots that obviously took place in the same apartment were done first. I still had a few close-up shots to do where my puppet was on the floor, and luckily after I moved out, the landlords ripped up the carpet to replace it, so I snatched a piece of it and animated the remaining floor shots at my parents’ house. So although the film was shot in a few different locations, it appears to be shot all in one place. (The magic of guerilla filmmaking!) So basically, in a situation like this for a film that has several different shots, you want to maintain the continuity of the film in any way possible. Films that feature tiny stop-motion puppets on actual-size sets are somewhat of a rarity, but they have a great look to them. Historically, some of the noted animators who have made films this way include Charley Bowers and Jan Svankmeyer (see Chapter 1, “Appeal and History of Stop-Motion Animation”).
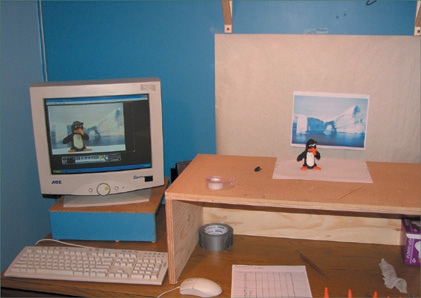
Another simple method for putting your puppets into an actual environment is to just use a backdrop, such as a photograph or painting, by itself (see Figure 11.8). You will not be able to do much in terms of changing camera angles or achieving the same level of depth in the shot, but for some purposes it can be very effective. At the very least your character will have some kind of context to his scene, rather than just a plain background. For a dialogue exercise, which was the purpose behind the penguin scene in Figure 11.8, it’s a good “quick and dirty” option that still looks good on-camera.
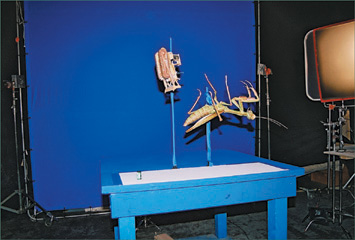
Another very popular option for creating backgrounds in stop-motion is to shoot puppets or partial sets in front of a blue screen (for film) or green screen (for video). By lighting the screen evenly, everything that is blue or green in the frame surrounding the puppet can be replaced with separately shot background footage in a process called chroma-keying. The same process is used for everything from live-action films to television weather reports. The chroma-key process can be used for many different purposes in stop-motion, such as if CG elements such as water or sky are needed to surround part of a set (see Figure 11.9) or if puppets are suspended in midair with rigs for jumping or falling shots (see Figure 11.10). In the falling rig case, the background composited in later would be a moving live-action shot, to give the illusion that the camera is following the puppets as they fall, when in fact the puppets and camera are stationary.
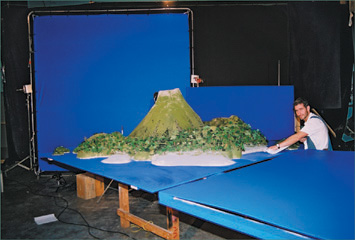
Figure 11.9. Russell Papp on set from MTV/Insight Films’ Monster Island. (Copyright 2004 Bowes Productions.)
For large studio shots like these, a lot of space is required, as you can see, but the process is also rather simple to do yourself for smaller productions. Keep in mind that this method will not allow you to have your puppets throw shadows onto your set, if that is the effect you want. Its use depends on the type of film you are making.
If you are shooting your stop-motion on video with a capture card and software package, you will want a green backdrop to go behind your puppets. The backdrop can be a sheet of fabric, an actual screen, or even a flat piece of foam core. As long as the backdrop is one universal color and lit evenly with no shadows, any green color can be used with a coat of paint or ready-made died cloth. To get the best results, you can look into acquiring a green screen material manufactured specifically with the right color for chroma-key compositing. This might come in a ready-made chroma green screen or sheet, or you can buy a gallon of Rosko video paint and spread an even coat onto a sheet of foam core. An important factor in using the green screen is to make sure your puppets do not have any of the same bright green in them, or else the background will show through in these parts where you may not want it to. Also make sure your background is far enough away behind your puppets so that the green color does not reflect too much onto them. You want the puppets to be as distinct from the green as possible to ensure a crisp composite.
I used this method for my student film Bad News, where my puppets were supposed to be shown “live on location” in a sheep field. The video of the field was shot separately, and the animation was done in front of my homemade green screen (see Figure 11.11). Then I used AfterEffects to composite the two together and adjust the color so that it looked like my puppets were outside on an overcast day (see Figures 11.12–11.16).

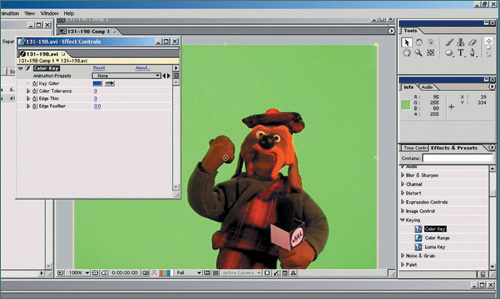
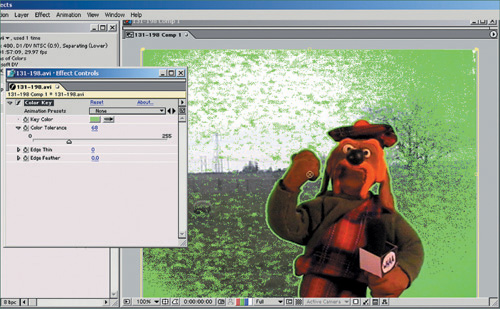
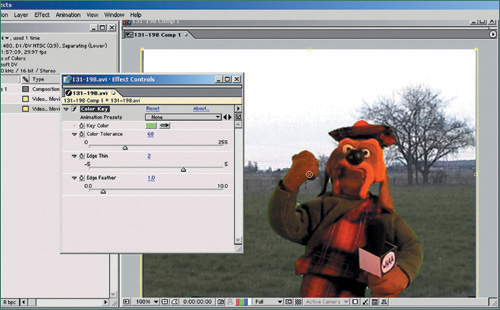
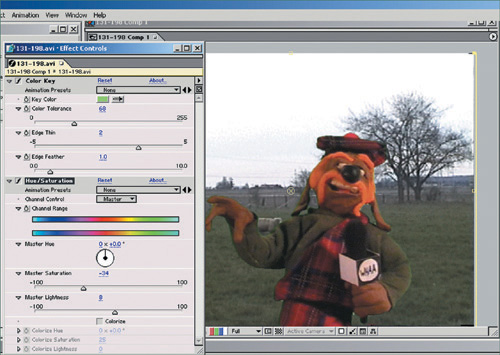
In After Effects, import your animation file into the timeline with your background video file behind it (see Figure 11.12). Under Effects & Presets, select Color Key, drag the icon onto the monitor’s image, and the Effect Controls dialog box will open. Select the Eyedropper tool, and click on the green color in the monitor (see Figure 11.13). In the Effect Controls dialog box, move the slider for Color Tolerance until all of the green color is gone. There may still be a slight rim of green around your puppet if there was any color spill reflected onto it (see Figure 11.14). Use the Edge Thin slider to decrease the green rim around the puppet, and the Edge Feather slider to soften the edges if needed (see Figure 11.15). If you need to adjust the colors of your puppet to match the background better, find the Hue/Saturation Effect controls and use the sliders to adjust the color. In Figure 11.16, the colors are adjusted to make Hamish look more like he is outside on an overcast day.
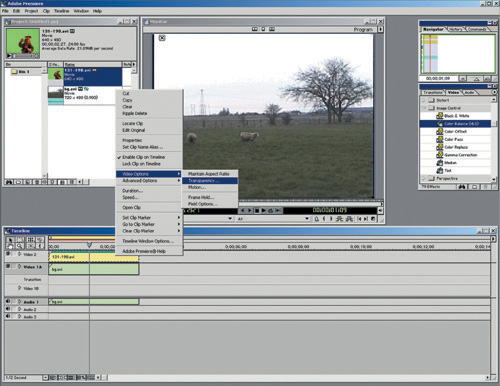
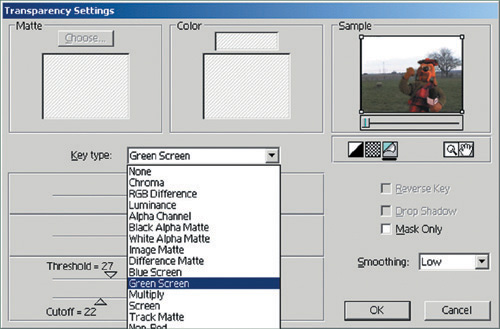
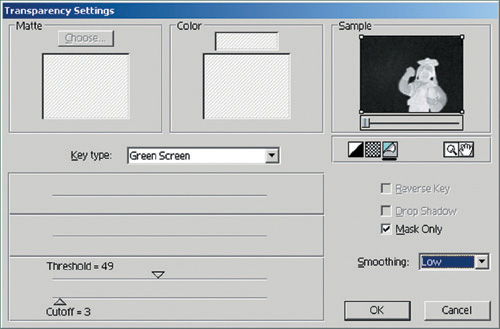
If you are using Adobe Premiere as your editing software, you can also create your final composite within the software. Import your animation and background files and place your background into the Video 1A track. Place your animation file into the Video 2 track, and right-click the file to select Video Options > Transparency (see Figure 11.17). Under Key Type, select Green Screen, and the green color will automatically be keyed out (see Figure 11.18). Select the Mask Only box (see Figure 11.19) so that your sample image appears as a black-and-white matte. Use the Threshold slider to adjust the black outside your puppet, and use the Cutoff slider to adjust the gray inside your puppet, making the matte as straight black-and-white as possible.
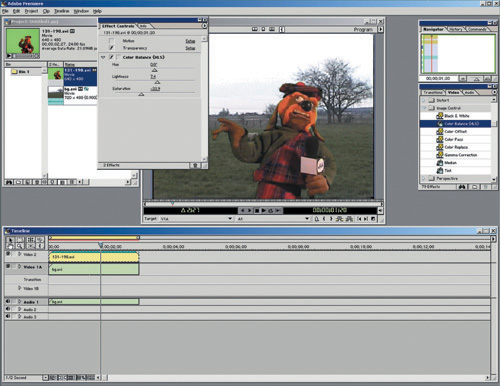
The Smoothing drop-down menu can be used to smooth out the edges of your puppet if necessary. The Color Balance effect controls can be used to adjust the hue, saturation, and lightness of the puppet to match the background (see Figure 11.20).
Once all of these steps for compositing are done, the final version can be edited with sound, etc., and rendered out. For this shot, the animation was created at 24 frames per second and was exported as such, especially so it would sync with the dialogue. The background, however, had been shot with an analog video camera and captured at 29.97 frames per second, which is the standard NTSC video frame rate. Compositing the two together and exporting at 24 (or 23.98) frames per second would cause the background footage to move slightly faster than its original speed. Since the background did not have much movement in it, other than some grazing sheep, the differences in frame rate really didn’t matter to me. It was more important to have the animation at the proper speed. If you are doing a composite where the background and animation must be at the same frame rate—for instance, if the puppets are interacting with the live action in a Ray Harryhausen-type fashion—you should look into shooting your background footage with a DV camera that will shoot at 24 frames per second. These are becoming more readily available and are marketed as 24p cameras. By using compositing software further, you can create more detailed effects in regard to layering foreground elements and developing more elaborate shots. By studying the rear projection and matting methods of the past, used by the likes of Willis O’Brien and Ray Harryhausen, you can get some inspiration for the kinds of effects that are possible with today’s digital technology.
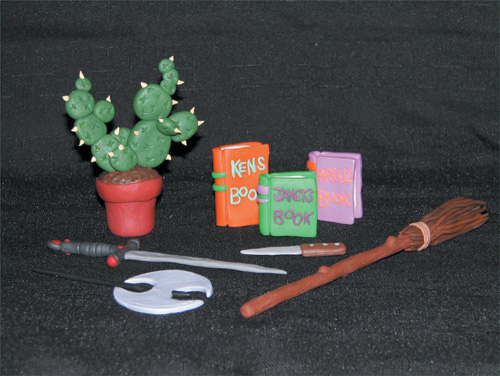
Just like sets, any props that exist in the background or for being handled by your puppets (see Figure 11.21) can either be built from scratch or sometimes found already made. Craft stores and model shops often sell miniature props that can be used for your stop-motion project. Props built from scratch are built based on the design of the overall piece and for the scale to which they relate to the set and puppets. The most important element of any prop used by a character is that it be as lightweight as possible. A prop that is too heavy will put too much weight on your puppet, making it hard to keep the puppet’s arm in position or difficult to fasten the puppet’s grip around the prop. If your puppet’s hand has strong wires inside, everything should be designed so that the fingers themselves can actually keep the prop in place without slipping. If this proves too difficult, you can try applying tiny drops of hot glue or putty where the fingers grip the prop and are hidden from the camera’s view. Most props are built from balsa wood, foam, or a polymer clay (such as Sculpey or Fimo) that can be baked and painted (see Figures 11.22–11.23). Paper items such as magazines or newspapers can be created with actual words and images on the computer and shrunken down for printing. They can then be cut out and glued to copper foil or thin metal Cinefoil, which can be found in photography shops. Oftentimes, the amount of detail put into props such as these may not fully register on camera, but the point is more about authenticity to the miniature world you are creating. Props are the unsung heroes of stop-motion that add that extra bit of realism for the audience. Attention to detail is very important and can make for some fantastic pieces to complement your stop-motion project.
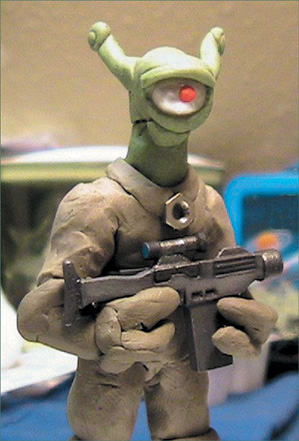
Figure 11.21. “Trooper of Xon” puppet with gun prop. (Courtesy of Michael Stennick, Space Monster Pictures.)

The final point I want to emphasize about sets and props for stop-motion films is how important they can be in helping you tell your story and develop your characters. When a character is shown in his natural habitat, such as his bedroom or kitchen, the surroundings can communicate a lot to the audience about who he is. A messy set with lots of clutter and different kinds of props may indicate to the audience that the character who inhabits it is lazy, disorganized, or perhaps just likes to collect things. The missing pieces will be answered by the movements or dialogue of the character. The kinds of props in the room will say a lot, too, about the character’s interests and activities that span beyond the scope of the tiny window your film opens into his world. The set design for Nick Park’s Wallace & Gromit films is especially brilliant at using props to tell us more about the characters. Their first film, A Grand Day Out, starts out by panning the camera over a pile of books and magazines whose titles give away clues about the characters’ motivation before we even meet them. By reading the titles, you conclude that the characters are looking for someplace to go on vacation. Also, in the case of Gromit, who doesn’t talk, the props he uses throughout the series, such as knitting supplies and books on Electronics for Dogs, tell us something about who he is since he can’t tell us through speech. This is an excellent example of how props can be used to develop the story and characters. Study all kinds of films, animated or otherwise, to see how the backgrounds and surrounding objects are used to communicate to the audience.