Animation is literally defined as “to give life to” or “to breathe life into,” coming from the root word anima, meaning soul, breath, or life. The responsibility of giving anima to something is a serious business. That anima life is completely determined by how much you put into it. It’s more than just “moving stuff around.” Animators express through their craft just how much they really care about how and why things move as they do. The believability of their animation will fail or succeed based on how seriously they take the process of getting it right, and squeezing every last bit of quality out of the final product. Because animators are not perfect, their imperfections will also be inevitably revealed through their work from time to time, yet those imperfections are what will ultimately make the audience relate to their work, because they’re not perfect either! With their trick films and magic acts, early animators were trying to get people to believe in the illusions they were creating. They had the advantage of an audience that was much more naïve to the process of their craft that they could be swayed to believe anything the animator created, even though logic told them it was all an illusion, and there had to be a catch to it. Their logical brains concluded that things must have been done with wires, lighting, or some other very complicated technology, without even fathoming the truth behind the technique. Perhaps some superstitious audience members thought it was all some bizarre form of witchcraft! Remember, this was all something that nobody had even imagined was possible before. If you are new to animation, you are becoming initiated into an ancient craft that is a lot like going to wizardry school, where you get to wield magic before an unsuspecting audience of “non-magic folk.”
Are today’s audiences more sophisticated? Yes...and no. Animation has been around long enough that most people have a pretty good idea of how it works. They just don’t know how much work it really is! They think, “Oh, you just create a few drawings or move a puppet around a few times and it moves,” or my favorite saying, “It’s all done with computers now, isn’t it?” Common folk uninitiated to the animation world practically wet themselves when you tell them for the first time just how many moves or drawings need to be created for each second. Once they learn that, they have a much greater appreciation for the hard work that is animation. This appreciation is multiplied tenfold when they actually try it! Our purpose in the stop-motion medium is to present to our uninitiated audience the illusion of real objects doing things they wouldn’t normally do, to give the illusion of believable movement. Where the challenge and creativity comes in is to realize that your audience probably understands that these are simply objects being manipulated between frames, so you need to do it in a way that they will still be able to say “Wow! How did they do that?” The best stop-motion films do this, in the same way that the trick films in the 1920s amazed audiences of their day.
So this is the ultimate goal, but to achieve this believability, there are principles of creating movement that must be learned. The basic principles of animation are the same for all mediums, whether stop-motion, 2D, or CG. The exercises in this chapter will help you learn these principles, using the stop-motion technique to do so. I would encourage you to use the animation diagrams as a guide at first and then take what you’ve learned and apply it to your own experiments. It is important not to skip over these basic principles if you are a beginner. Many animation students want to rush into creating feature-quality animation right away and ultimately fail because they are not patient enough to spend time learning the basics. After lots of practice, you can reach a more professional level of expertise if you stay focused and learn how to crawl before you run. Now it’s time to learn how to think and talk like an animator.
If a lump of clay or a puppet is your instrument as a stop-motion animator, then your music is found in the elements of time and space. The basic building block of how your animation will be created in time and space is the frame, which is our term for each image that is captured and projected. The standard frame rate for animation is the same as film speed at 24 frames per second. Naturally, one would assume then, that objects in stop-motion must be moved 24 times for each second of screen time. In some cases, this is true. However, it is possible to cut the workload in half by shooting each movement for two frames, thereby needing only to move the object 12 times for each second. The final result is almost the same, since the playback speed has not changed. This method of 12 movements per second is called “shooting on twos,” whereas 24 movements per second is “shooting on ones.” Whether you shoot on ones or twos depends on several factors. Because stop-motion is similar to live action, in that real materials and lights are used, shooting on ones typically enhances the realism of the movement. Ones results in smoother, fluid motion that has a quality all its own if done properly. However, if the animation is not registered well, the jerky quality of the movements will be more noticeable and hard to watch. Shooting on ones is particularly effective for animating fast actions or movements that require a staggering or shivering effect. Any dialogue that is spoken very quickly may need to be done on ones just to get every syllable represented, because it could be that each syllable is only one frame long. Oftentimes, shooting on ones might also be an artistic choice preferred by the director based on the look of the animation. The Nightmare Before Christmas and Corpse Bride were shot entirely on ones, whereas Wallace & Gromit and many TV specials are mostly on twos. Ultimately, it depends on the stylistic choice of the director, and sometimes time and budget are a factor as well.
Shooting on twos is very common for most animation, especially in the 2D medium. Stop-motion looks very good on twos (again, if done properly), so it is a fine method for making the animation effective for a production schedule. Many animators and directors prefer shooting on twos because of the way it looks, still giving the right level of smoothness and taking half as much time as ones. For beginners in animation, I always recommend shooting everything on twos until you really master your own sense of timing. As you become more comfortable with the animation, you can start experimenting with shooting on ones. Most complex character animation is generally a combination of ones and twos, using twos mostly and throwing in some single “ones” where they are needed, depending on the timing and spacing.
When an object on screen remains static for more than one or two frames, we refer to this as a hold. A hold should never be any less than six frames. A four-frame hold will most often look more like a camera mistake when played back at speed. The general rule in animation is that it takes 6 frames to feel something, 8 frames to see it, and 12 frames for it to really register in the mind. Remember, 12 frames is only half of one second. The time it takes you to say “one-one-thousand” is roughly one second of time. (Some animators prefer saying “one-thousand-one,” or “one-elephant,” as Nick Hilligoss explains in Chapter 12.) You can plan the timing of your animation by saying these words to yourself as you visualize the movement or act it out.
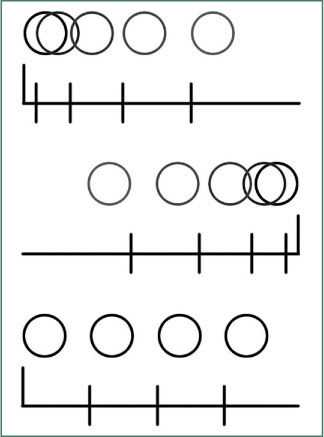
So, if 12 to 24 separate movements are shot for each second of film, and the playback rate is constant, it makes sense that the speed at which objects move will depend on the distance between movements. The basic rule of thumb is that when the movements are spaced close together, the speed of the object slows down. When the movements are spaced farther apart, the speed of the object is faster. When movements are spaced in equal distance from each other, the speed of the object will simply move at a consistent speed. This is the most basic principle of time and space in animation (see Figure 5.1).
When an object is stationary and then starts to move, the first few movements should be slower, with the spacing close together. As the movement gradually accelerates, the movements get incrementally farther apart. This is called “slowing out” or “cushioning” out of a hold. Adding a slow-out to your animation gets the eye used to the fact that your object is changing from a static state to a moving state, and it prevents any unexpected jarring movement without preparing the brain for it. On the other end of the scale, if your object is moving and then comes to a halt, the distance between movements should get incrementally closer together, until it stops completely and holds.
This is called “slowing in” or “cushioning” into a hold. Slowing in is also vital for communicating to the brain that the object has stopped moving. Without a few frames to cushion into the hold, the object will simply seem to “freeze” and be very jarring to the eye and the brain. It’s a very similar concept to crescendos and decrescendos in music, where there is a soft, gradual fade in or fade out in volume. I have always felt that musicians who become animators have an advantage, in that many of these concepts of timing are easier to pick up. Having come from a strong musical background myself before learning to animate, I believe it helped me embed many of the animation principles into my subconscious mind and made the process feel very natural. Just as music is about a relationship between different audible intonations and how they work together in sequence to create a melody, animation is basically a relationship between sequential images to create the illusion of movement. Each pose, or note, leads to the next one to contribute to a whole.
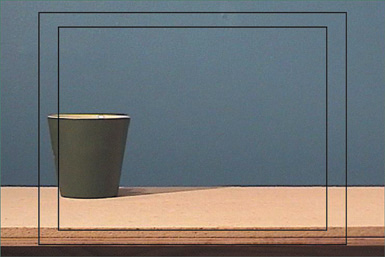
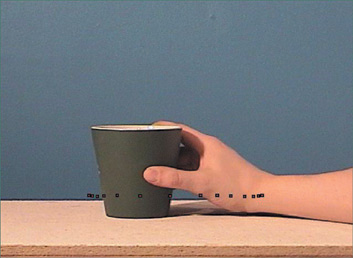
As your first animation exercise to learn how to slow in and slow out of holds, take an object and place it on a table in front of your camera. (Use the camera setup tips described in Chapter 4, “What You Need,” to ensure that everything pertaining to manual settings and a secure camera is set.) You will simply be moving the object from one side of the screen to the other, left to right and then right to left. The best kind of object to use is anything that is flat on the bottom with a good sense of weight to it. A chess piece would work well, as would a glass or a tiny sculpture. Round objects will tend to roll away on you, and objects that are too light will risk falling over. Place your object on the left side of the viewfinder’s image, not too close to the edge, but about an inch inward. (Traditionally, the field of vision for film is larger than that of television. Since the early television screens were dome-shaped or rounded on the edges, anything on the far edges of the screen would be cut off when displayed on television. Today, most television monitors have moved toward flat screens, so the cropping around the edges is not as severe as it used to be. Nevertheless, there is still a “TV cut-off” area where the action should take place, as anything outside of that area may be cropped and not seen by the audience. Some stop-motion programs should have an option for displaying a TV cut-off grid, as in Figure 5.2.)
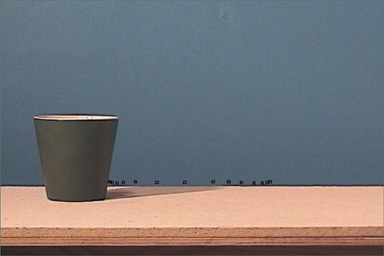
From the starting point of your object, determine where its end point will be and create a spacing guide for a slow-out and slow-in (see Figure 5.3). If you are not zoomed in too close to your object, you should have a considerable distance between the two points, which will make it easier to animate. You can create this spacing guide by either drawing directly on the monitor with a dry-erase marker or using marker points in the software if they are available. If you do not want to damage your monitor by drawing on it, firmly attach a blank sheet of acetate over it and draw on that. Plan out your spacing guide as best you can, based on the speed you want your object to move.
Before you start animating, here are a few other tips to think about first. The two major software program features used most regularly while animating are frame grabbing/toggling and onion skinning. We are lucky to have these tools today, so we should not take them for granted, since many of us started out shooting blind on film. Remember that in Chapter 4 I compared toggling to flipping 2D drawings and onion skinning to having a light table. When I teach 2D animation to students, I encourage them to flip the drawings as much as possible and try to avoid using the light table too much at first. The light table can become a stumbling block for the fledgling animator, because it takes focus away from the most important factor of the animation, which is movement. A 2D animator needs to get into the habit of flipping constantly as he draws, so that he can see the movement start to happen gradually in front of him. If an animator relies on the light table too much without flipping, he will often miss discrepancies in the animation that are not as easily noticeable when seeing the drawings merely superimposed over each other. The same principle applies to this modern way of shooting stop-motion. The onion skin will become too much of a crutch if relied on too exclusively without toggling to see the actual animation happen. The onion skin is still important and is extremely helpful for ensuring that movements are properly registered in comparison with the last stored frame. You can also use it for completely removing an object from the stage to manipulate it and then put it back exactly where it needs to be. But relying on the onion skin alone is a nasty habit to get into. It simply keeps you too far from studying the flow of your animation as it progresses forward. I have found that the best way to take full advantage of the onion skin is to use it as a guide for registering your movement if necessary, and then turn it off and toggle your frames before committing to capturing that frame. This way, you can ensure that your animation is lined up very accurately with your markers and also ensure that the animation itself looks dynamic and free of errors. Little mishaps such as changes in lighting, little lumps of clay left behind on the stage, or improper flow of the path of action will be seen by toggling but will most often be missed by the onion skin. Remember, animation is about the relationship between all of these various frames and how they relate to each other to create a whole piece of movement. There will be many times when you will not need the onion skin at all, especially if you get used to toggling as much as possible from the very beginning.
Once you have onion skinned and toggled as much as possible, and you know that your frame is perfect, also make sure that you and your shadow are completely clear of the frame. If you click the Capture button too quickly while animating, your head, hand, or shadow may end up in random frames and flash into your shot. It’s a good habit to count anywhere from 5 to 10 seconds after moving out of frame before you capture. When you move into the frame to manipulate your object, you will block most of the light, so when you move away, the camera will need a few seconds to adjust itself back to the proper exposure and lighting conditions.
Stay focused on those two frames you are working on, with a good idea of where you are headed in context of the whole animation. You can play back your stored frames as often as you like to ensure that everything is moving along correctly. This is also something to watch out for, however, in terms of becoming a crutch when you are a beginner. Partly out of habit, I do not usually like to watch my animation play back until I have worked through it frame by frame to the end. Everyone has different preferences for working, and for me it depends on the complexity of the shot. I often go backward and forward frame-by-frame to check my path of action, but mostly I just take one step back and another step forward, like digging a tunnel to the end of the shot. Once I reach that point, I run it through the preview player or export the animation as an Mpeg so that I can watch it in real time and see if it worked or not. This could be because I started out by using film and didn’t have the luxury of instant feedback like I do now. But I also think it’s a valuable learning process, getting into the habit of just immersing yourself in the straight-ahead animation and then hoping that you got it right at the end. You may play it back and see things you wish you had been able to change, but you simply move on and apply your lesson to the next shot. Part of the thrill of stop-motion is that sense of suspense where you put a great deal of faith and effort into the process and just pray that it works.
When it does work, Oh, the joy! It feels like Christmas. Just remember to pace yourself, and don’t rush! I know you are itching to get it over with so that you can sit back and watch your masterpiece, but rushing through and getting punchy with the buttons will only hurt your animation. If you find yourself getting tired, impatient, or bleary-eyed, take a short break. Drink some water, take a walk, stretch your legs, gather your thoughts, and come back to it. Review the frames you have already shot, and get back in there. Athletes need to pace themselves during a game, fight, or run so they don’t burn out, and so do animators...sometimes! So now, with these important points in mind, let’s get back to the exercise.
Start your scene with an eight-frame hold before you start animating. This will give the eye a fraction of a second to recognize that there is an object on-screen before it starts moving. Then start carefully moving your object by lining up its edge with each successive marker on your spacing guide (see Figure 5.4).
Your first and last new movements as you cushion in and out should be so minute that you are barely moving your object at all, just lightly nudging it. Keep animating through to the other side, hold for another eight frames, and then work backward using the same markers to move the object back to where you started. End your scene with another eight-frame hold at the end. Then you can watch your first animation play back! When you watch it, you may notice a difference in the way it moves left to right versus right to left, even though you have used the same spacing guide. This is due to the direction in which we read. In Western culture, we read left to right, so any movement on-screen in this direction will have a psychological effect of appearing to move faster or smoother. When objects move across the screen in the opposite direction to how we read, the effect is one of resistance and slowing down. There may be no actual difference in the animation, but your brain’s conditioned tendencies will still have an effect on how you see it. Weird, eh?
The next exercise, the bouncing ball, will involve not only further exploration of timing and spacing, but also the illusion of seeing the ball float through the air. The neat thing about doing this exercise in stop-motion is that it’s one of those moments when you can really play with audiences’ heads the way I was describing at the beginning of this chapter. The ball will be bouncing across the screen and seeming to defy gravity, and if someone watches your animation knowing a basic idea of how it’s done, he will logically conclude that the ball cannot float in midair on its own, so he will become puzzled and wonder, “How did you do that?” The question of how to make things fly through the air in stop-motion is asked of a lot of people who work in it. Through the years, there have been several different methods for achieving this illusion. One way is to use very thin monofilament wires or fishing line to hang objects from above.
Any glare given from the lights reflecting can be reduced by going over the wire with a Sharpie marker or painting the wire the same color as the background. This method can be extremely time-consuming, in that it’s difficult to have much control over the position of the object, and you must wait for it to stop swinging before you shoot it. (Although, for some frames, a motion blur effect could be achieved by capturing the frame before it has stopped moving.) The wires can also break easily, which is frustrating. Despite these complications, it works very well if done effectively. Other animators through the years have come up with other solutions. National Film Board animator Co Hoedeman sometimes made his characters jump by placing them on a glass cube, which would be invisible on camera if positioned exactly perpendicular to the camera’s field of vision.
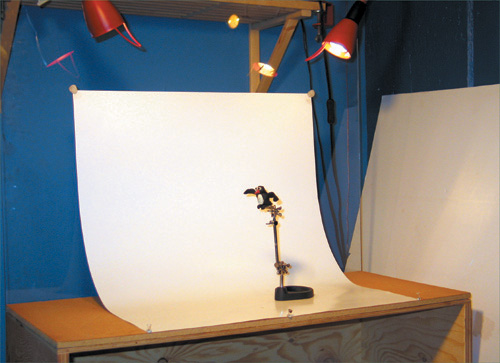
Another method becoming standard in this digital age is to actually place a rig or wire holding up your object into the shot and then remove it with the computer as a post-production procedure. This can be done by exporting individual frames from the stop-motion software and importing them into a program like Photoshop to do the actual removal in each frame. The removal of the rig is most easily done if the animation is shot against an evenly lit background with one universal color, such as black, white, or a chroma-key green. (More on chroma-key in Chapter 11, “Sets and Props.”) A plain white background can be achieved by using a large white sheet of paper or poster board curved inward so that there is no distinction between the ground plane and the horizon (see Figure 5.5).
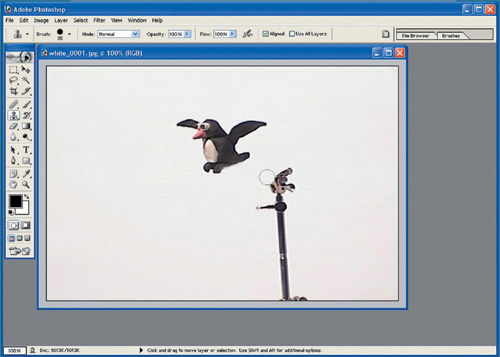
You then must light the background as evenly as possible so that everything is stark white with no gradient or variation. The rig holding up your object can be placed into the shot and captured as such, and then in each frame you can select the white value and paint out the rig (see Figure 5.6). Your rig will obviously create a shadow, but that can also be painted out so that only the object and its shadow remain. The same procedure can be applied with another universal color other than white.
You can also remove rigs digitally if you actually want to have a real background, like an environmental backdrop or a physical set. The way to do this is to shoot a “clean plate” of your background without your object or puppet in the frame, and then go on with your animation. The empty background plate can be exported separately or edited out of your animation. Export the animation as an image sequence, and open up the individual frames in Photoshop. Paste the clean plate into the individual frames as a separate layer so that it lies beneath the layer with your object and the rig. With the top layer selected, you can erase the rig and its shadow, and the clean plate background will show through. After performing this procedure for each frame, you can flatten and import the frames back into your stop-motion program, or just straight into an editing program to play back the animation without the rig.
Yet another method is to use a plate of glass to adhere the object to. The glass will be transparent, and the object will appear to be suspended in the air. This method works particularly well for simple clay animation, as the clay is typically tacky enough to stick to the glass. Suction cups can also be hidden behind to stick puppets to the glass. The challenges involved with using glass are keeping it clean from the oily residue left behind by clay and avoiding reflections, which can mostly be solved by the way the glass is lit (see “Lighting” in Chapter 4). I tend to use Plexiglas because it’s more durable and less dangerous (in the event it falls over), and it’s also important to keep it clean using white vinegar instead of Windex, which will scratch it. While animating, you can wipe off the clay residue with a soft cotton cloth as you move it into different positions, and toggle your frames to make sure it’s all clean. If the lighting is done right, you won’t see any smudging, but it’s important to watch for it, as it will give away the fact that your clay is on a plate of glass.
In the context of teaching my stop-motion course, I have typically adopted the glass method as the standard way to achieve the flying illusion because it is the simplest and quickest way to do it. Oftentimes, the most effective stop-motion effects shots are the ones you can do on set without too much digital tampering. For beginners, I also find that the best methods for doing this are the ones that help you learn the animation principle in the most straightforward way. In this case, where we are learning about timing and spacing, I think using the glass helps you focus on the animation rather than too many technical issues. So I would recommend it as a good way to get started, setting up a plate of glass similar to the pictures in Chapter 4 (or a simpler version thereof), and you can then experiment with other methods as well. The other thing to consider, in terms of which method works best for more advanced projects, is the direction that your object or puppet is flying in relation to the camera. If you want to move a puppet in a diagonal path away from or toward the camera, then using wires or digital rig removal might be the better way to go. Ultimately, it depends on the animation and the most cost-effective way to do it.
This exercise is one of the most basic building blocks for learning animation, because it emphasizes the principle of timing and spacing in terms of how it depicts believable weight. It also introduces the principle of “squash and stretch,” which is not always possible with some forms of puppet animation but completely relevant if your object is a lump of clay. A real rubber ball would not literally squash and stretch that much, but this is animation, where anything is possible, and for it to be believable, you need to inject some exaggeration into the movement. The basic goal is to animate a rubbery ball entering the frame, bouncing twice, and exiting. The ball is an inanimate object in that it has no soul or anima of its own; it is simply reacting to the forces of gravity and physics that cause it to move the way it does, in relation to its weight and mass. Whatever happens outside the camera’s view will not be seen, but we can imagine that the ball is being tossed forward by someone off camera, and continues to bounce away.
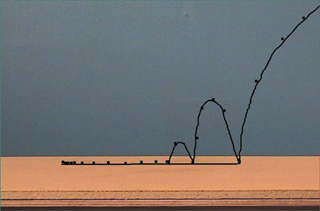
Once you have set up your camera, set, and glass, the first thing to do is to chart out a path of action for the ball to follow, keeping in mind the TV cut-off. The most important part of this action is the arc of the first bounce, so start by determining where the ball will hit the ground and draw the connecting arc on the monitor. From there, you can draw the arcs where the ball will enter and exit the screen. The arc as it enters will obviously be higher, and the exiting arc lower, because the ball is losing energy with each successive bounce. The path of action, most often moving in arcs, is the most vital key to achieving smooth animation. The jerky quality that is often seen in early stop-motion attempts comes from objects not staying registered to an arched path of action. I will elaborate more on this with each exercise, as it is very important. In each frame, the ball should be positioned in such a way that the path of action goes straight through its center. If your stop-motion program allows, once the path of action has been drawn onto the monitor, you can actually trace it with a poly line within the software (see Figure 5.7). It requires a steady hand and is more easily accomplished by drawing with a Wacom tablet (and staying away from coffee, which is a hard task for some of us).
When the path of action that the ball will follow has been established, the next step is to figure out the spacing. Here, by studying Figures 5.8 through 5.15, you need to understand what is going to happen to the ball as it moves. (Most of the pictures shown to illustrate these exercises have an onion-skin image of the previous frame or frames so that you can see the spacing.)
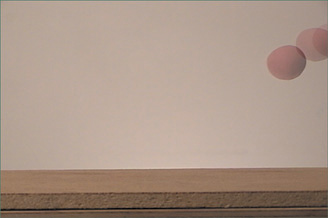
Figure 5.8. As the ball starts entering the frame, the spacing is relatively close together but gets farther apart as it falls.
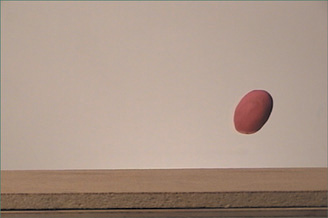
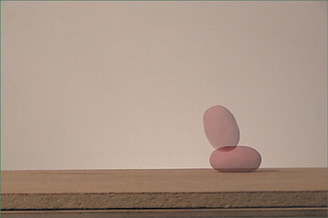
Figure 5.10. When the ball hits the ground, it squashes, and then stretches again in the next frame as it bounces upward.

Figure 5.11. The ball returns to its original shape and slows down at the top of the arc, which means the spacing gets closer together.
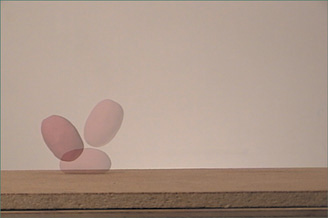
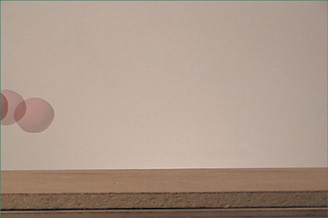

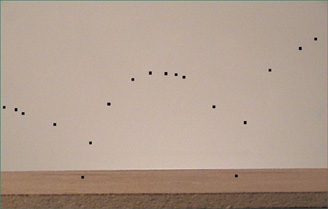
Figure 5.15. On your monitor, or in the software program, you can make marks for where the edge of the ball will be in each frame.
With your spacing guide, it’s important to make sure your spacing does not get too even. You should have some variation in your spacing at the top of each arc, and as the ball moves down, the spacing gradually becomes farther apart. If your spacing is too even, the ball will appear as if it has a life of its own, moving by its own anima, which it doesn’t have. The movement should be as though the ball is just reacting to the laws of physics. With your spacing guide in place, you are ready to animate, shooting on twos. Start your scene with an eight-frame hold of an empty stage, and then roll a lump of clay into a ball and stick it to the glass, lining it up with your first marker. The ball should be coming into the frame, so part of it will be cut off. Capture your frame and move it into the next position. If you have trouble getting the clay to stick to the glass, give it a little twist and press firmly, being careful not to squish it. This is one exercise where the onion skin comes in handy, especially when you get to the part where the ball stretches. You will have to remove the ball from the glass, change its shape, and then stick it into the next position. Having the onion skin on while you do this gives you a reference point for where the ball was in the last frame. Remember to turn the onion skin off and toggle your frames once the ball is back on the glass, and then capture. You can then turn the onion skin back on, remove the ball, and change its shape for the squash. When placing the squashed ball onto the stage, place it an inch or so away from the glass so that it doesn’t look like the ball is just hitting the edge of the horizon. Perspective-wise, the ball is indeed more forward than it was on the glass, but for some reason the camera does not notice this. The depth of field is such that when the animation plays back, you will not notice a difference in size. When the ball stretches upward, place it back on the glass and carry on from there. Check out the CD for a more visual demonstration of how the animation should look when it’s finished. If your ball appears to hang too much at the top of its arc, or if it appears to float too much, you can experiment with the timing by hiding or cutting out certain frames, and see if it makes a difference. Enjoy watching your animation play back, and perhaps even import your movie into editing software and add bouncy sound effects to it! The neat thing about this animation is that you are taking the clay material and making it appear like rubber. It’s one of those illusions of matter that makes stop-motion so unique!
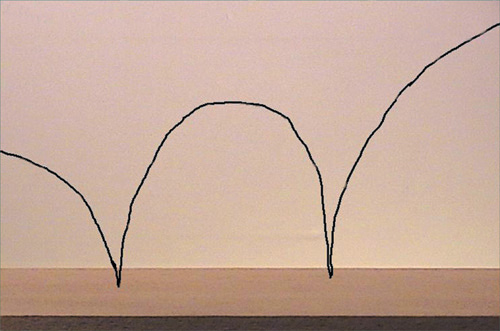
Once you have mastered the art of the rubber ball, try some different variations on it. Place a box or wall into your shot and have the ball enter in and bounce off of it. Or, you can create a different ball out of several colors of clay to make it look like a beach ball, and as it bounces it could rotate as well. You can also try animating a heavier ball, like a bowling ball. This will have some significant differences. For one thing, the path of action is completely different for a bowling ball. It would not sail across the screen in long arcs, because it is too heavy to do so. Instead, it would make one large steep bounce, and a little hop, and then roll to a stop (see Figure 5.16). A bowling ball would not stretch or squash at all, because it has a different mass and texture from a rubber ball. With these differences in mind, use the same procedures for charting a path of action and a spacing guide and try animating a bouncing bowling ball. See the CD for an example to study. Have fun!
Now it’s time to learn another two animation principles that often go hand-in-hand: overlapping action and follow-through. Overlapping action means that when an object moves, not every part of that object will move at the same time. There will be overlapping and staggering of actions, with each part of that object one step behind another part. This principle is very common in character animation, so I will emphasize it again in Chapter 9, “Puppet Animation.” One such example would be if a character turns from left to right: His head would start to move, then his shoulders, then his hips. Rather than turn the whole character around at the same time, there is overlap between parts of that action. In a quick action, it is not always something that is noticed by the audience, but it’s much more subtle and gives a natural feeling to the animation. Without the overlapping action, the movement would feel very stiff and robotic. Computer animators who have not learned this principle will always have stiff, lifeless animation, because the computer only understands “move point A to point B” and will not overlap parts of a model unless the animator makes it do so.
Follow-through is when an object causes another part of that object to trail along behind it, with an overlap to the timing. A character animation example would be if a character with long hair moves from left to right: The hair would stay in the same position when the head starts to move, and follow through with its movement behind it, and then stop moving a few frames after the head stops. The rhythmic action of the hair would have an overlapping movement like a wave, often referred to as the “wave principle.”
Thumbnailing is a common practice for animators in all mediums, named as such because the sketches are no bigger than your thumbnail. Thumbnail sketches take only seconds to draw and are designed to help you analyze the steps of an animated movement (see Figure 5.17). You can study them or create your own to understand the concept.

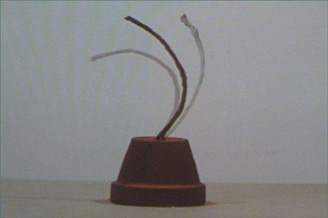
The next exercise is for getting used to the idea of overlapping action and follow-through with the wave principle. This movement is seen often in animation for the action of a character’s tail following through as it walks, or for the tail of a dinosaur, or any other Harryhausen-type tentacled creature. To learn this principle and animate it, use a piece of wire that will bend easily for fluid movement. For other materials (see Figure 5.18), there are many options, such as gluing the wire into a piece of wood perhaps, but the important thing is that the wire needs to have a solid base that will not come loose or slide around. The wire must be rooted down tight and be the only moving object in the shot.
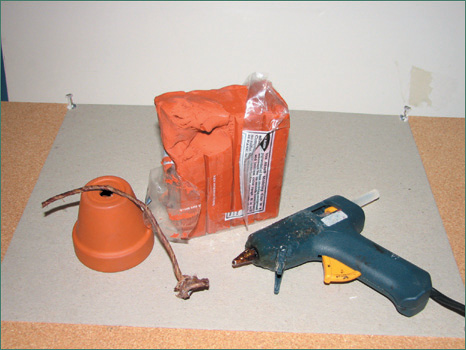
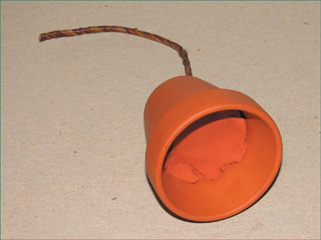
To accomplish this, my solution (with some help from my ever-so-creative wife) was to use a miniature terra cotta flower pot (easy to find in craft or plant stores) and stick the wire through the hole in the base. I used craft wire (typically used for making wreaths) because it has great flexibility and is wrapped in twine to give it the appearance of a vine coming out of the bottom of the flower pot. Then I tied a knot in the piece of wire, put some hot glue on it, stuck it through the hole, and filled the pot with clay to hold it in (see Figure 5.19).
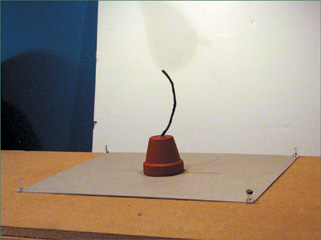
Then I hot glued the flower pot to a piece of cardboard tacked down to my cork board stage surface (see Figure 5.20). The cardboard solution is a handy way to make a quick and dirty floor when you don’t want to damage another surface. Making simple sets like this is part of the problem-solving aspect of stop-motion, and it’s where a lot of the creativity comes in.
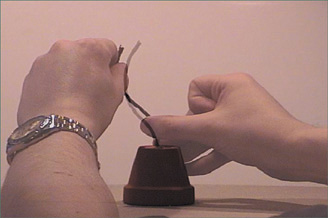
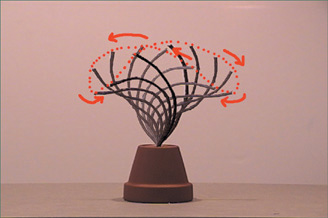
This animation exercise, which consists of the wire or “vine” swaying back and forth with overlapping action and follow-through, is also a cycle, which means that the last frame of the animation must hook up smoothly with the first frame. It’s not the same kind of scene as the bouncing ball, which has a beginning, middle, and end. An animation cycle can be put on a loop so that the drawings will repeat themselves infinitely. Cycles are not something very common to stop-motion animation, since for most of its predigital history, it would have been impossible to achieve without a reference point for the first frame or without being able to play it on a loop. To help you make sure your animation will be able to cycle back into the beginning, trace over the position of the vine in the first frame on your monitor to give yourself a reference point as you reach the end (see Figures 5.21–5.36). The best way to animate the vine is to grip it with both hands and push against the base with your thumb, while moving the tip in the opposite direction with your fingers (as illustrated more specifically in Figure 5.29).
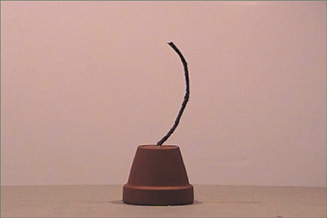
Figure 5.21. Start with your “vine” in a smooth curved position, and trace this position on your monitor.
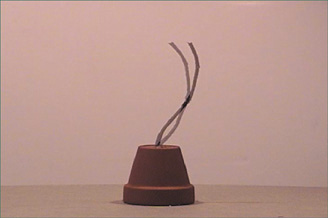
Figure 5.22. The base of the vine starts curving in the opposite direction, which causes the tip to move over.
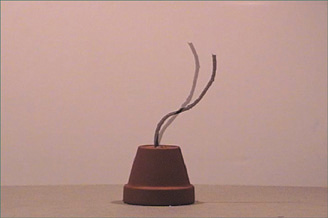
Figure 5.23. As the base continues to curve to the left, the tip moves to the right, following a curved path of action.
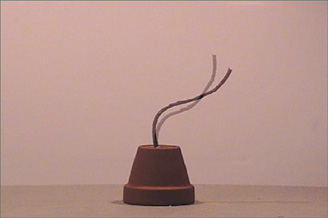
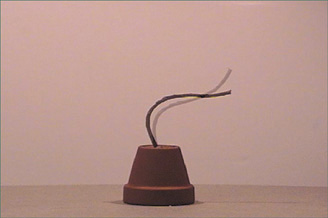
Figure 5.25. The curve that started in the base is starting to take over the whole vine, as the tip starts moving down and to the left as well.
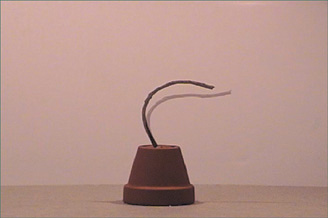
Figure 5.26. Now the entire vine is moving the same way, as the tip of the weed catches up with the base.
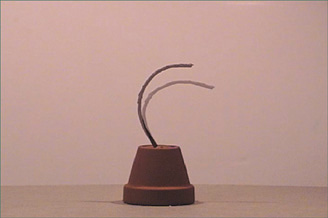
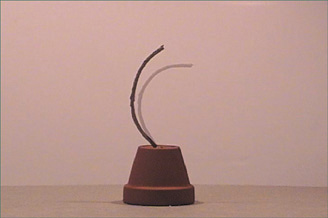
Figure 5.28. The weed is now in the exact opposite position it started in, as if it is a mirror image.
The path of action on the tip of the weed is like a figure-eight pattern, so keep this in mind while animating to ensure that your arcs are smooth. If you follow this many positions as a guide, then shooting on twos should give you 28 frames of animation. In your stop-motion program, copy and paste your frames so that they will cycle through twice. This way, if you want to look at your animation frame-by-frame in playback, the “hook-up” between the last and first frame will be in the middle of your scene. Once you learn this basic wave principle at this speed, experiment by shooting it on ones or animating it with more frames to slow it down. The results are fun to watch when played back in a loop, and they’re rather hypnotic, too. (Watch your animation if you have trouble sleeping.)
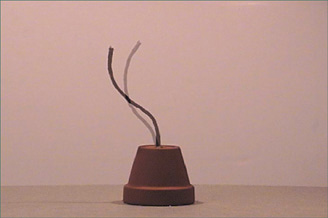
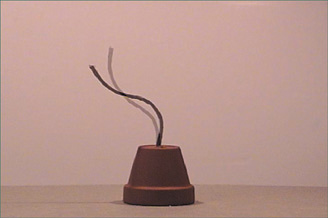
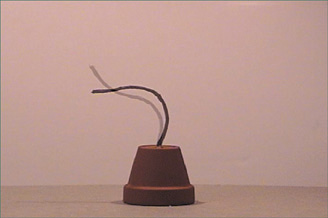
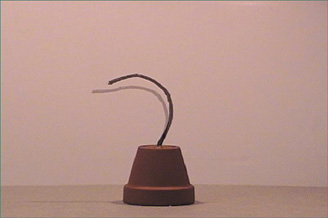
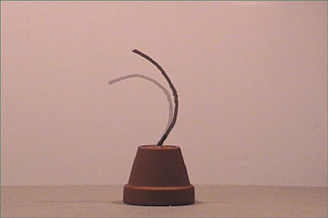
Figure 5.34. It continues moving closer to the mark made on the monitor to reference the first frame.
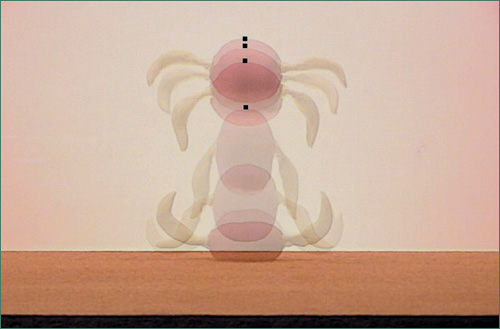
Here is another cycle exercise that illustrates how follow-through can be applied to a moving object. You will have to break out your clay and glass again for this one. The animation will be a rubbery clay ball, bouncing straight up and down, with some “pigtails” attached to it. The pigtails will move a step behind the movement of the ball for some smooth follow-through using the wave principle, overlapping the action of the ball. The ball will squash and stretch as it jumps, slowing in and out at the top of its path. You can create markers to give yourself a spacing guide as the ball slows down at the top of its jump. Make sure you are moving the ball in a straight line as it bounces up and down to avoid unwanted jittering. To build the pigtails, sculpt them around a small piece of twisted aluminum wire to stick into the ball. It works best to take the pigtails off to reshape them, and the ball when it changes shape, for each frame, as there will be holes left behind on the ball to keep them rooted in the same place. See Figures 5.37–5.47 for an illustration, and use the CD to watch the finished animation. (Note that the animation was shot on twos, but the frame in Figure 5.39 was only captured for one frame, for a snappier action.)
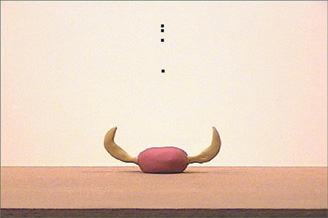
Figure 5.37. Start with the ball in its “squashed” position as it makes contact with the ground. The pigtails are pointing upward because the ball has fallen downward and dragged them along behind them.
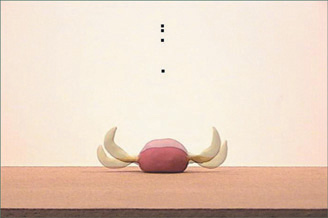
Figure 5.38. The ball starts to transition into its stretched shape before it bounces back up, and the pigtails fall to catch up with the landing.
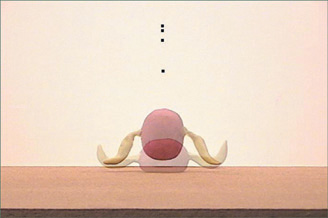
Figure 5.39. Now the ball is on the glass, stretching as it bounces into the air. Notice how the pigtails are lined up with the path of action in the previous frame.
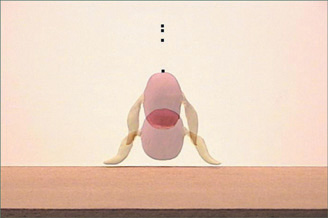
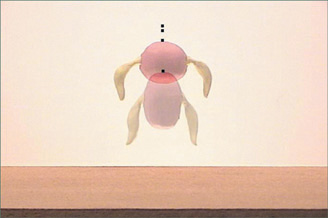
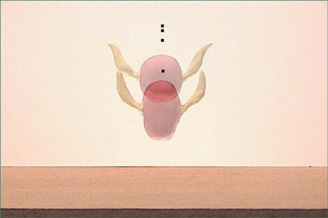
Figure 5.41. The ball changes to its original roundness, and the pigtails slowly start to catch up to it.
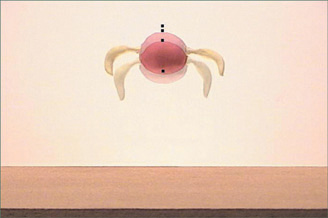
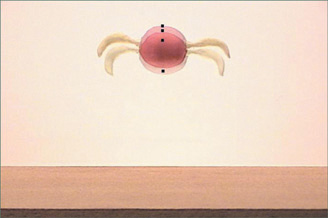
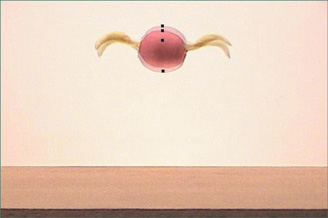
Figure 5.44. Now the ball is moving down, so it is slowing out from the top of its jump, and the pigtails have caught up with it.
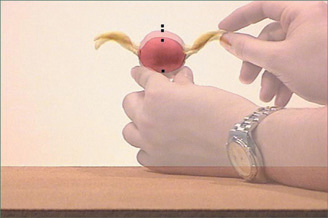
Figure 5.45. Here are my hands making a cameo appearance, to show sliding the ball down the glass into the next position.
Many of the principles I am introducing in this chapter were primarily discovered and used to great effect by the Disney Studio in the golden age of the 1930s. It is through these discoveries, as they were displayed through their groundbreaking cartoon films, that the same principles began to be demonstrated with stop-motion animation. Another such animation principle was that of anticipation and reaction. Anticipation grew from the idea in theater that all actions needed to be extremely clear to the audience, since they couldn’t very well ask the actors on stage to repeat an action if they were not prepared for it. In the same way, a film moves ahead through time with no intention of going back, so every action must communicate clearly the first time. To prepare the audience for an action, a character would anticipate the action before going into it. For example, a character throwing a ball would move it back in the opposite direction before throwing it forward. After throwing the ball, there would then need to be a reaction to the throw, which might be the body gaining its balance by recovering and settling into a final neutral pose.
To demonstrate the principle of anticipation–action–reaction, one of the most useful exercises is the jumping sack. The idea here is that the sack has an anima of its own, not that there is something inside it. The sack will start on one side of the screen, anticipate its jump by squashing down, jump across the screen and land on the other side, reacting with a recovery and a settle. The recovery and settle is kind of like a little inhale/exhale at the end, moving upward slightly as a bounce reaction to the landing, and settling down into its final pose. Stretch and squash should be put into the poses so that the sack feels flexible and not stiff.
In any animation pose, no matter which medium you are using, there must be a clear line of action. The line of action acts as the spine of your pose, capturing the essence of the position your character or object is in. The thumbnail sketches in Figure 5.48 demonstrate the basic key positions of the anticipation, action, and reaction of the sack.
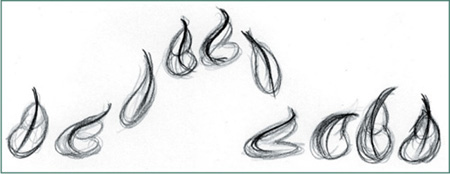
Figure 5.48. Notice how the line of action changes in each pose, starting with a simple curved line, going into an S-curved anticipation, and changing as it stretches and squashes.
Obviously, since the sack is jumping through the air, you will need to set up your glass plate to stick it to. Start by sculpting a sack out of solid clay, giving it a little knot on the top. Any color will work fine, but a dark gray or green will make it look like a garbage bag. A white color would look like a flour or sugar sack. The imagined contents are not important, but it should look like whatever is inside is heavy. Because the sack is heavy, it will need to exert itself with a lot of force to propel into the air. Try jumping yourself, and pay attention to the forces of gravity on your body. You must anticipate your jump by crouching down to give yourself leverage, and then when you land, your body must recover upward before settling back into position.
Place the sack on the left side of the screen and hold its first pose for at least eight frames at the beginning of your scene (see Figures 5.49 and 5.50). The number of poses it will take to move into its anticipation I leave up to your own experimentation, depending on how fast or slow you want it to move. Remember to slow out of the zero pose and slow in to the anticipation, and have the sack move downward in an arc (see Figures 5.51 and 5.52). If you have lots of frames cushioning into it, you can hold this pose for six or eight frames if you wish. Another common term used in animation lingo for having many in-betweens cushioning into a pose is favoring the pose. Any pose you really want the audience to notice and have linger in the brain needs some cushion positions favoring it so that it creates a kind of moving hold. When the sack takes off into the air, it should stretch and feel like it is pushing itself into the air with all its strength. If you had too many frames, the action would slow down too much, and it would feel like the sack is floating rather than jumping (see Figures 5.53 and 5.54). At the top of the arc, the sack will slow down. The more positions you create at this point, the slower the sack will move. It is often better to create more frames than you think you need, especially in stop-motion, since it’s much harder to add them in later. If you want to change the timing, you simply remove frames. The sack squashes at the top of its arc, because its bottom has caught up with its top, causing the action to overlap. Like the bouncing ball, the sack stretches as it comes down, and the spacing increases to make it land hard (see Figures 5.55–5.59). After landing, the sack recovers from the impact of its landing by pulling itself up against the force of gravity and settles into a more relaxed pose. For the recovery and settle, Figures 5.60–5.62 show only the main key positions, so you can experiment with how many in-betweens you think you need based on the timing. You can also study the animation frame by frame on the CD, if it helps you. To make sure the sack returns to a pose close to its original volume and shape, you can go back to frame 1 and line it up with the onion skin to compare.
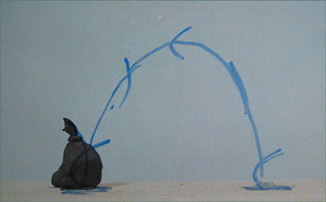
Figure 5.49. Plan out your animation by drawing a layout on your monitor and referencing the line of action for each main key position.
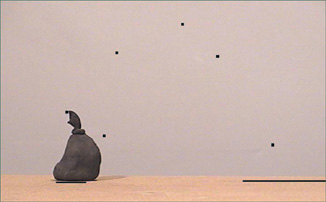
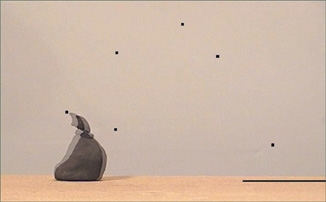
Figure 5.51. This is one of many in-between poses that will carry the sack from its zero pose into the anticipation.
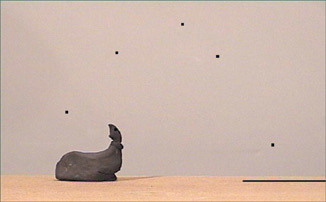
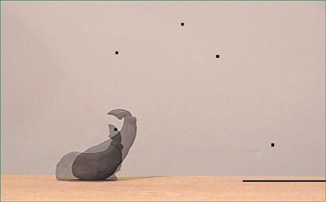
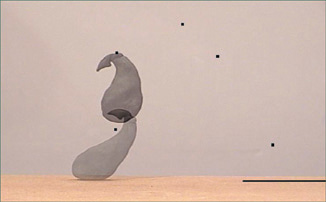
Figure 5.54. Now the sack is in the air and stuck to the glass, continuing in an arc and overlapping on the knot.
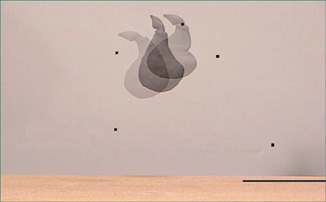
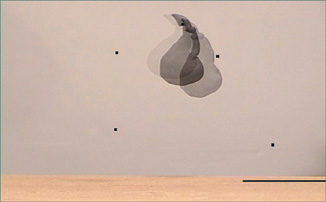
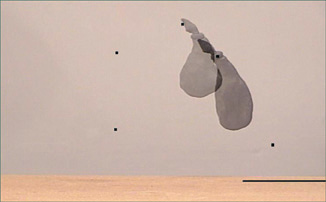
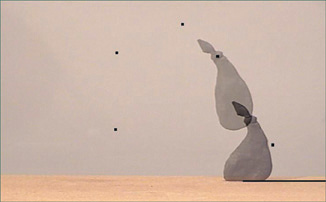
Figure 5.58. The sack is off the glass now and is resting on the surface (captured for one frame only).
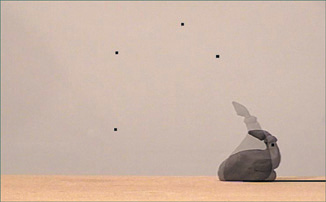
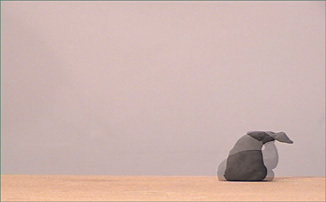
Figure 5.60. The recovery and settle is the trickiest part of this exercise. Think back to the movement of the weed, and use that as the basis for your line of action.
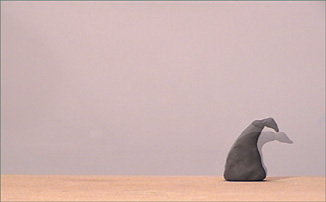
Figure 5.61. This is the recovery pose, which is like a mini-stretch or an inhale performed by the sack.
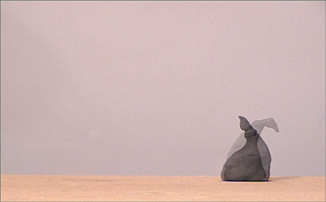
Figure 5.62. After the recovery, the sack settles into a final pose, with a little bounce at the end.
This exercise will likely require a fair bit of experimentation and trial and error to perfect, but treat it all as part of the learning process, and once you learn it you will find it useful for more advanced stuff down the road. You can try variations on it, such as animating on ones or trying a different shaped sack. You can even try applying the same principles to making a small clay figure jump. Thumbnail the basic movements and think of the overlapping action in the arms and legs. You will undoubtedly need to resculpt your character often, and you will probably have to reinforce the clay with little wires in some areas. One trick for getting a clay figure to stick to a plate of glass is to tear off its arm on the far side, stick its torso to the glass, and line up the arm with the body on the opposite side of the glass. The separation should not be noticeable if lit and positioned properly. A certain toy that is very popular with stop-motion animators is Stikfas, which are little posable action figures that have a wide variety of joints. You could use one of these for a character jump as well, using any method you want for holding it in the air. One way that combines a few different methods is to attach the Stikfa to a tiny suction cup sticking to a plate of glass, and any part of the cup that shows up behind it can be removed digitally. Just keep experimenting!
This is a fun exercise designed to take full advantage of the fluid quality of clay, but also to teach you how to plan ahead your animation within a specific limit of frames. Often in an animated film, there may be only a tight space to fit the actions for the animation in a specific shot. Pretend you have been given an assignment by a director to make an object change or morph into another object, and you have only 80 frames (or 3 1/3 seconds) in which to accomplish it. To make the transition smooth, you should plan out your timing on an exposure sheet.
An exposure sheet is like a road map for the animator to plan out the frames and actions in a scene. It is also referred to as an X-sheet or a dope sheet, which is what I like to call it. The “dope” sheet name has nothing to do with stupidity or substances, but rather comes from an old slang term common in the golden age of animation, when people would often ask “What’s the dope on that scene you’re working on?,” meaning “How is it going, and when will it be finished?” On the CD, there is a sample dope sheet for the morph exercise (in .pdf format). Note the numbers from 1 to 0 down the side column. These are your frame numbers, so you can pencil in numbers by 10s. Each sheet has 80 frames, so if you are working on a scene with more than one sheet, you can continue on page 2 with 81 and continue on to 90, 100, and so on. Each little square in the columns alongside these numbers represents a frame, and they are divided into sections of eight, so three of these sections equals one second (24 frames).
The additional columns represent different layers or levels, which are mostly relevant to 2D animation but can be used for some stop-motion, too. A 2D animator might have two or three different characters or part of one character on separate levels as a way to economize the animation. In stop-motion, these different levels can come in handy when animating a group scene or two characters at once, and keeping track of their various movements. There is also a dialogue column that I will show you how to use in Chapter 9. In addition, there is also a blank dope sheet (courtesy of VanArts) on the CD for you to print out for use in your own future projects. (It will print out at standard 8 1/2″ × 11″ size or can be sized to print larger.)
On the sample dope sheet for the morph, notice that I have placed a frame number in every other frame, since this animation will be shot on twos. In this case, I am animating a man morphing into a bunny. (I was originally going to morph him into a fish, but while I worked on it, the clay shapes started looking more like a bunny, so I changed my mind rather spontaneously. Weird things like that happen often in stop-motion. I can’t explain it.) I would suggest using your own idea for your morph, using this dope sheet as your conceptual timing chart. Perhaps a cat into a dog, or an animal into a piece of furniture...whatever you want. Remember, the rule is that you cannot go beyond 80 frames!
Start out, as we do with every scene, with an eight-frame hold. On the dope sheet, this is indicated by drawing an arrow straight through eight frames. Now, the frames from 9 to 25 are your “slow-out” frames. Use this region of frames at your discretion to plan a slow-out of the hold, making your first few movements very small and gradually becoming more extreme. By the time you reach frame 25, your original object should have changed position but still be in the form of whatever it is. Some of the details may be squished or may have deliberately lost their definition, but it hasn’t really changed its overall shape yet. The purpose of the slow-out, as always, is to give the eye a chance to notice that the object has started moving before going directly into the drastic changes about to occur.
The frames from 27 to 55 are where the morph takes place. Anything goes in this region, so long as the movements flow nicely from each frame to the next, with a smooth path of action. Starting with frame 27, you can make your movements more extreme than in your slow-out phase. This part is fun because you literally get to destroy the beautiful sculpture you spent much tender loving care in creating. Twist, squash, and mash your clay and give it texture. By themselves, these frames will not be noticed by the naked eye, but rather will flow into each other. By the time you reach frame 55, your morph needs to have reached the point where it has taken on the shape of the object it will become. It should not be clean, polished, or final by any standard, but you should be able to recognize its shape. This is where the planning part takes effect, and you must refer to your dope sheet often as you work through it to make sure you plan your movements to see how many frames you have left until frame 55, and make sure your morph does not complete itself too early.
Frames 57 to 73 are your “slow-in” frames, so use these frames to gradually smooth out the clay, add details, and polish it into a final sculpture. Throughout the cushion frames, end certain parts of your puppet’s body earlier than others in terms of when all the detail is finalized, so that the animation overlaps and doesn’t all come to a stop at once. The final results should be a fluid and beautiful transformation between two completely different objects or characters. Then hold the object or character for eight frames, watch the animation play back a few times, and go to bed.
Figures 5.63–5.73 show how I used the timing I just described to create stages of my 80-frame morph of man into a bunny. The final animation with all of its frames can be watched and studied on the CD.
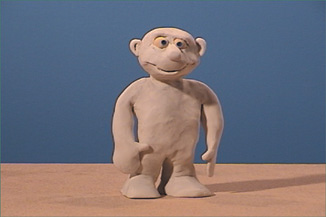
Figure 5.63. Frame 1 (holding for eight frames). Here is the human subject at the start of his morph.
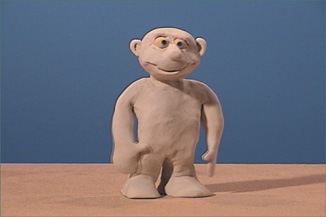
Figure 5.64. Frame 9. There is only a very slight difference on this frame, as the subject is just starting to cushion out of his hold.
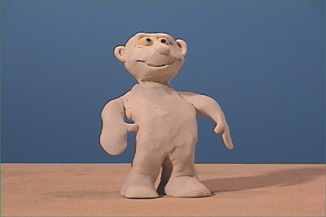
Figure 5.65. Frame 25. Up to this frame, the man has moved slowly backward, as if anticipating the transformation he is about to undergo.
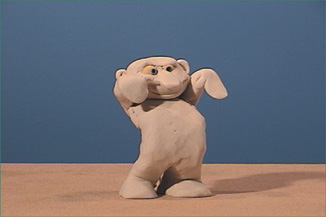
Figure 5.66. Frame 29. Now he is coming more extremely out of his cushion, still in “man-form” but decidedly starting to be deformed.
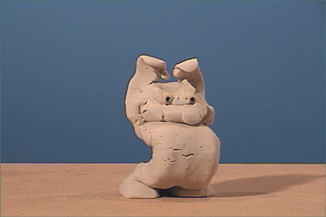
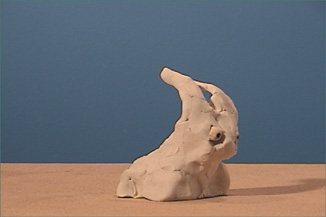
Figure 5.68. Frame 41. We are starting to get glimpses of a bunny shape, but it’s still undefined and messy.
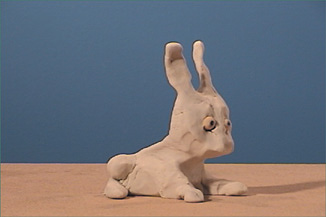
Figure 5.69. Frame 47. Almost there! It’s starting to look more like a bunny now, but there’s still some room for further refinement in the next few frames.
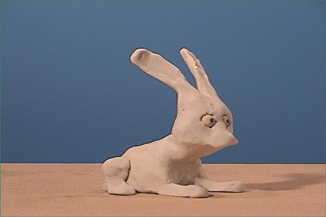
Figure 5.70. Frame 51. This is the tricky part of the animation, where decisions have to be made on the final appearance of the bunny.
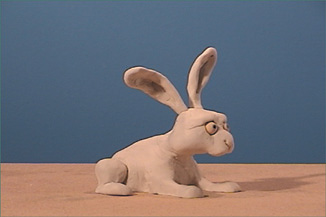
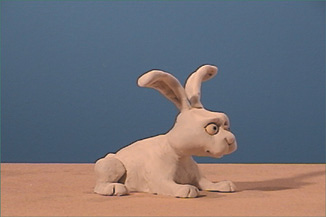
Figure 5.72. Frame 63. Now I am smoothing out details, polishing the clay, giving the bunny more of a facial expression, and starting to grow his tail.
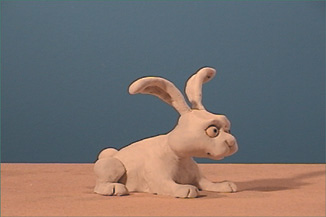
The man’s eyes were made of wooden beads, and the rest of his body solid clay, although I did stick some pieces of wire behind and inside him here and there to keep him from falling over. His feet were sculpted around two thumbtacks sticking into the cork board surface to give him extra stability as well. By the point he reached his bunny stage, I had removed most of the wires that held him up when he was a man, except for inside the ears where I have thin pieces of aluminum wire inside to hold them up. I made up the bunny’s design as I animated, and I literally made the bunny decision in the middle of the shot as well. I even removed his head completely a few times so that I would have an easier time resculpting it, and then smoothed it back into place.
Have fun with this exercise, as it truly is one of the most amazing ones to sit back and enjoy. There’s no reason why this should end with only one morph, so continue with as many transformations as you want! I would suggest keeping the 80-frame rule consistent with each one, to maintain a rhythm to your animation. (This means each successive thing the object morphs into will hold for 16 frames in total.) Make enough morphs, and you’ll almost have yourself a little film. Or, take a blank dope sheet and change the timing to see if you can fit three morphs into 80 frames! What really makes it work is the timing with the cushions and proper planning, with enough room for spontaneous ideas along the way.
Keep in mind all of the other principles from the other exercises: squash and stretch, line of action, path of action, anticipation and reaction, overlapping action, and follow-through. These lessons will make your animation not just about “moving stuff around” aimlessly, but about real natural movement. You should start looking for these principles while watching animation and live-action films, and study them frame by frame to see how they are used. If you see something that grabs your attention and you think, “Wow! What a great action that was!,” go back and figure out how the animator did it. See how long a character will hold for different reactions and expressions. After you study any action frame by frame, always go back and watch it play at real speed. You will notice how everything you just analyzed plays back and see how it all ties together. Another really useful method for studying movement is watching TV with the sound off. When you are not distracted by the sound, you will be amazed at how many subtle movements you notice, particularly if you watch something you have already seen. This can apply to stop-motion animation films, plus any other medium, including live-action. Watching sitcoms with the sound off is a fascinating study in character animation (and in some cases, it’s more entertaining that way).
Once you get used to the idea of animating with holds, cushions, and anticipation, you can start experimenting with using these principles to “act” using common household objects. One of the great things about stop-motion animation is that you can animate ANYTHING! Every piece of furniture, kitchen utensil, toiletry, tool, toy, or food item in your house can be made to move on its own, and with a little creativity, not just move but move the audience. To accomplish this, you need good animation combined with a good story, which gets you into the realm of making a short film. I will cover the subject of storytelling and filmmaking in more detail in Chapter 13, “Making a Film,” where you can learn some tips for using objects or puppets to entertain and enlighten your audience.
As a final exercise for experimenting with basic animation, one household item you can play with is a desk lamp with a posable goose-neck (see Figure 5.74). It may be a stand-up one with a base, or a clip-on lamp attached to a table or shelf.
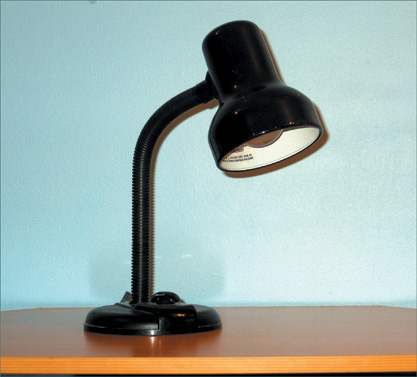
These lamps work great for stop-motion animation because of their flexibility and capability to hold their position in very intricate measurements. The challenge is to think of the lamp as a character, with a head but no facial expression to tell us how it is feeling. Its attitude must be expressed entirely through the way it moves. By posing the lamp in tiny increments, its movement will be slower, which may indicate that it is sad, dim-witted, or sleepy. Posing it with movements that are farther apart will result in faster, snappier movement, which will make it look alert, happy, or shocked. (A good film to study for reference is Pixar’s short Luxo Jr.)
If your lamp has a base, use hot glue or poster putty to firmly attach it to your set, so it doesn’t slide around and cause unwanted jerks in your animation. Remember the importance of arcs and holds while animating. All objects move in arcs, so chart out an arced path of action on your monitor if you have trouble visualizing it in your head. If your lamp is moving from side to side, it must stay along a curved path of action to avoid jitters. The personality of your lamp will also come through largely by how long it holds. If the lamp is sleepy and slowly turns its head to react to something, it might hold for at least one or two full seconds before going into a shocked “take” or surprised reaction. Oftentimes in animation, less is more, meaning that a good pose without movement can still say a lot to your audience. Try experimenting with just some basic animation of the lamp to see if you can get across the idea that it’s thinking. Perhaps animate another object moving into the shot to give it something to react to. Keep it short and simple; the possibilities are endless!