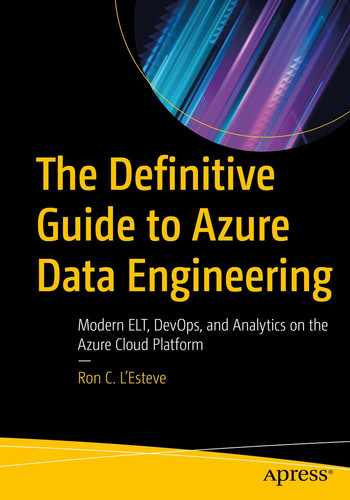
The desire to get near-real-time insights on data stored in a transactional system such as Cosmos DB has been a long-standing goal and need for many organizations. Azure Synapse Link for Azure Cosmos DB is a cloud-native hybrid transactional and analytical processing (HTAP) capability that allows users to run near-real-time analytics over operational data in Azure Cosmos DB. Data engineers, business analysts, and data scientists now have the ability to use Spark or SQL pools to get near-real-time insights into their data without impacting the performance of their transactional workloads in Cosmos DB.
There are numerous advantages to Azure Synapse Link for Azure Cosmos DB including reduced complexity since a near-real-time analytical store either reduces or eliminates the need for complex ETL or change feed job processes. Additionally, there will be little to no impact on operational workloads since the analytical workloads are rendered independently of the transactional workloads and do not consume the provisioned operational throughput. Additionally, it is optimized for large-scale analytics workloads by leveraging the power of Spark and SQL on-demand pools, which makes it cost effective due to the highly elastic Azure Synapse Analytics compute engines. With a column-oriented analytical store for workloads on operational data including aggregations and more, along with decoupled performance for analytical workloads, Azure Synapse Link for Azure Cosmos DB enables and empowers self-service, near-real-time insights on transactional data, as shown in Figure 18-1.
Figure 18-1
Architecture diagram of Azure Synapse Link
In this chapter, you will learn how to achieve the following through a practical end-to-end exercise:
1.
Create a basic Azure Cosmos DB account enabled for analytical storage.
2.
Create a Cosmos DB linked service in Azure Synapse Analytics.
3.
Aggregate and query Cosmos DB data with Spark from a Synapse Workspace notebook.
Create an Azure Cosmos DB Account
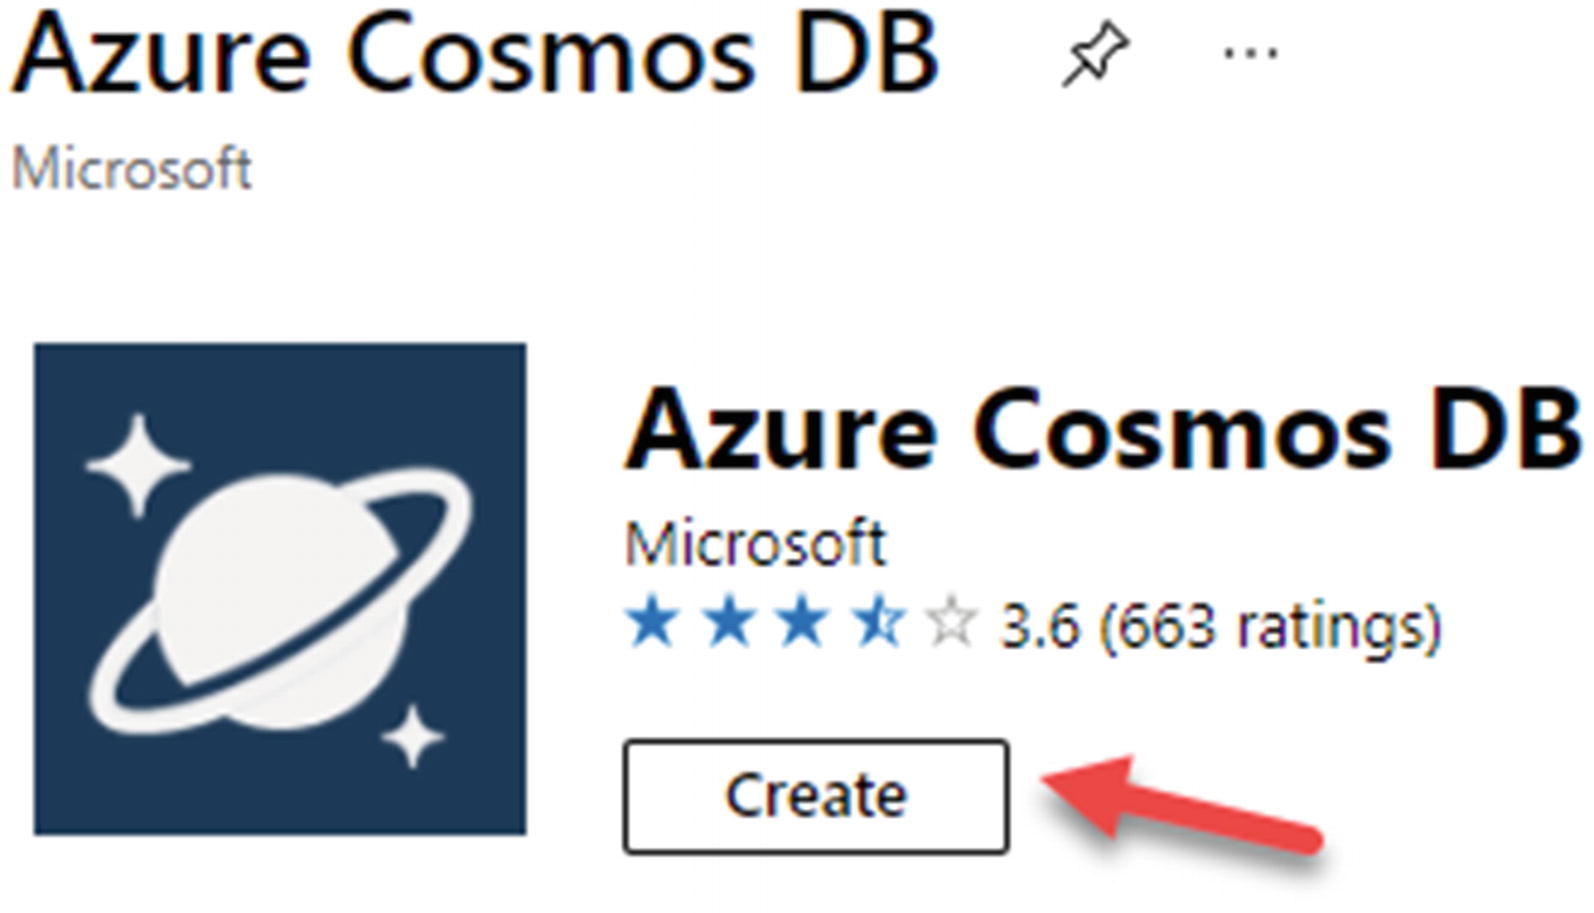
Azure Cosmos DB is a fully managed NoSQL database service for modern app development. You will need to create an Azure Cosmos DB account from Azure Portal, as shown in Figure 18-2.
Figure 18-2
Creating a Cosmos DB
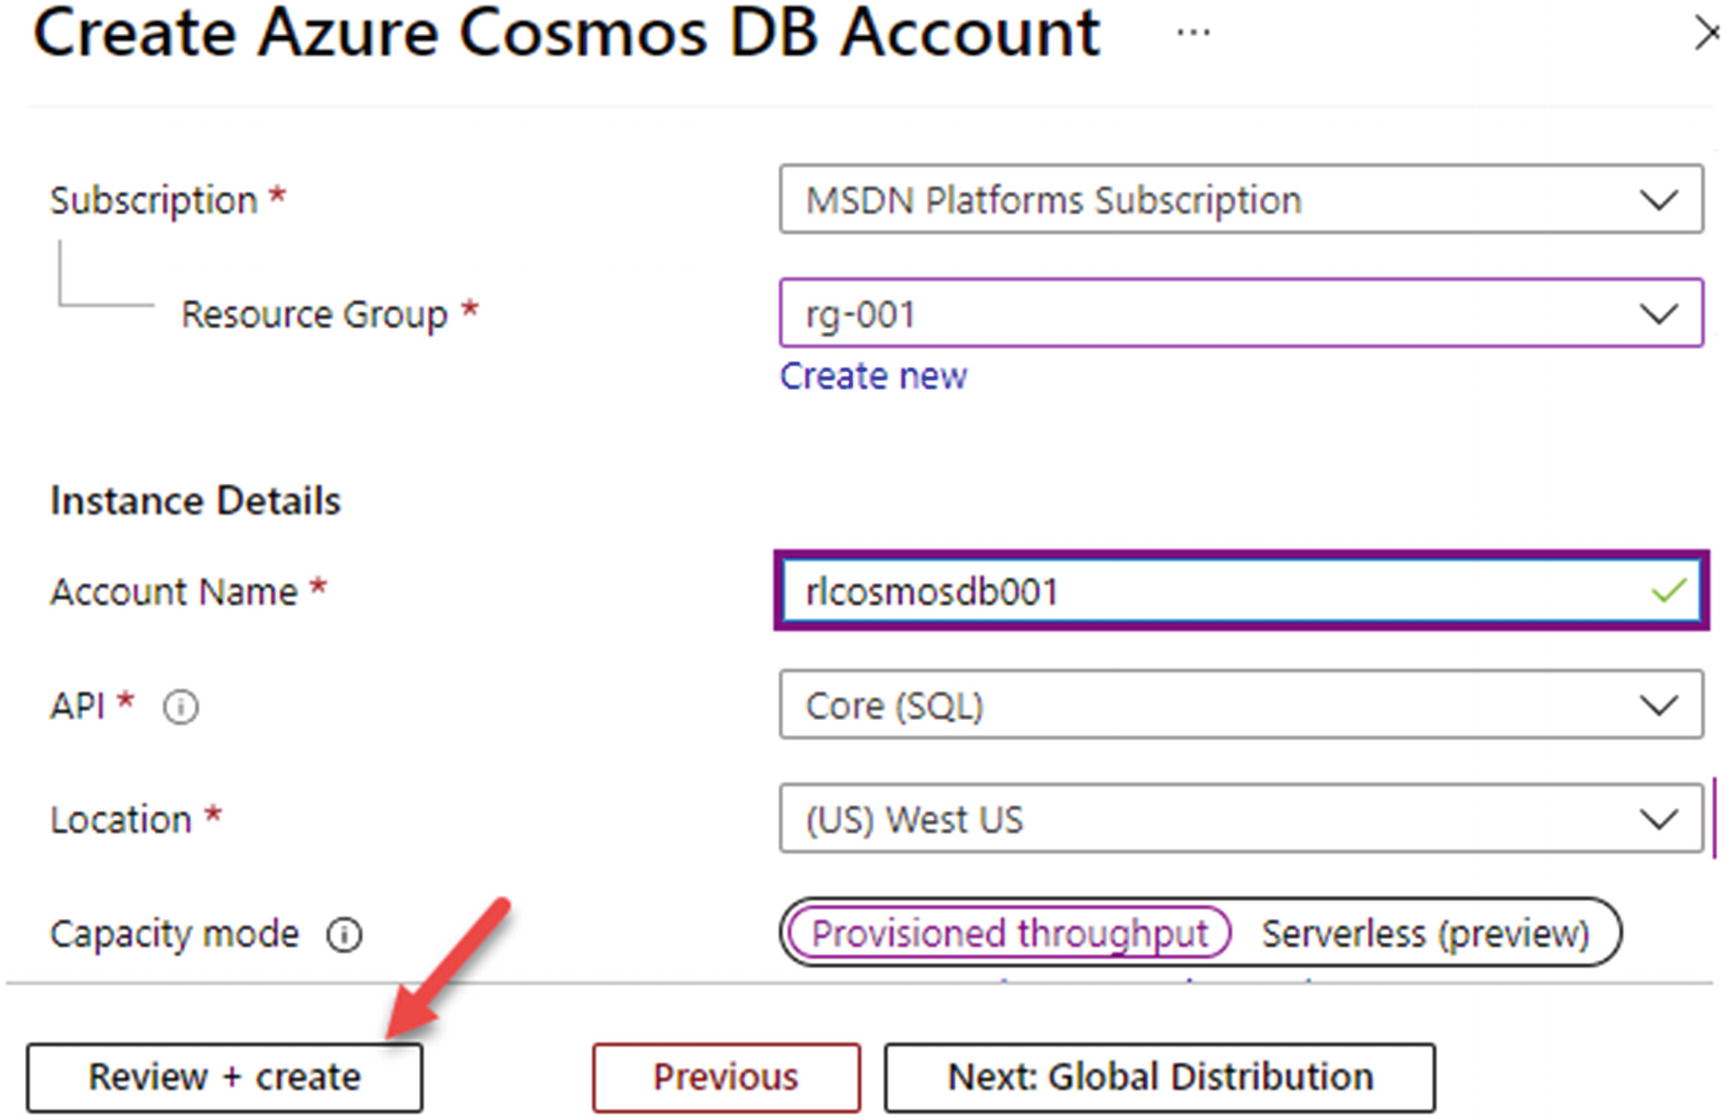
Ensure that the account details are configured as desired, shown in Figure 18-3, and create the Azure Cosmos DB account.
Figure 18-3
Configure the Cosmos DB account details
To recap, in this section, you created an Azure Cosmos DB account using the Core (SQL) API. There are many APIs to choose from including the native Core (SQL) API, API for MongoDB, Cassandra API, Gremlin API, and Table API. Also, choose Provisioned throughput as the capacity mode as it is best suited for workloads with sustained traffic requiring predictable performance, while Serverless is best suited for workloads with intermittent or unpredictable traffic and low average-to-peak traffic ratio. For more details on capacity modes, please see https://docs.microsoft.com/en-us/azure/cosmos-db/throughput-serverless.
Enable Azure Synapse Link
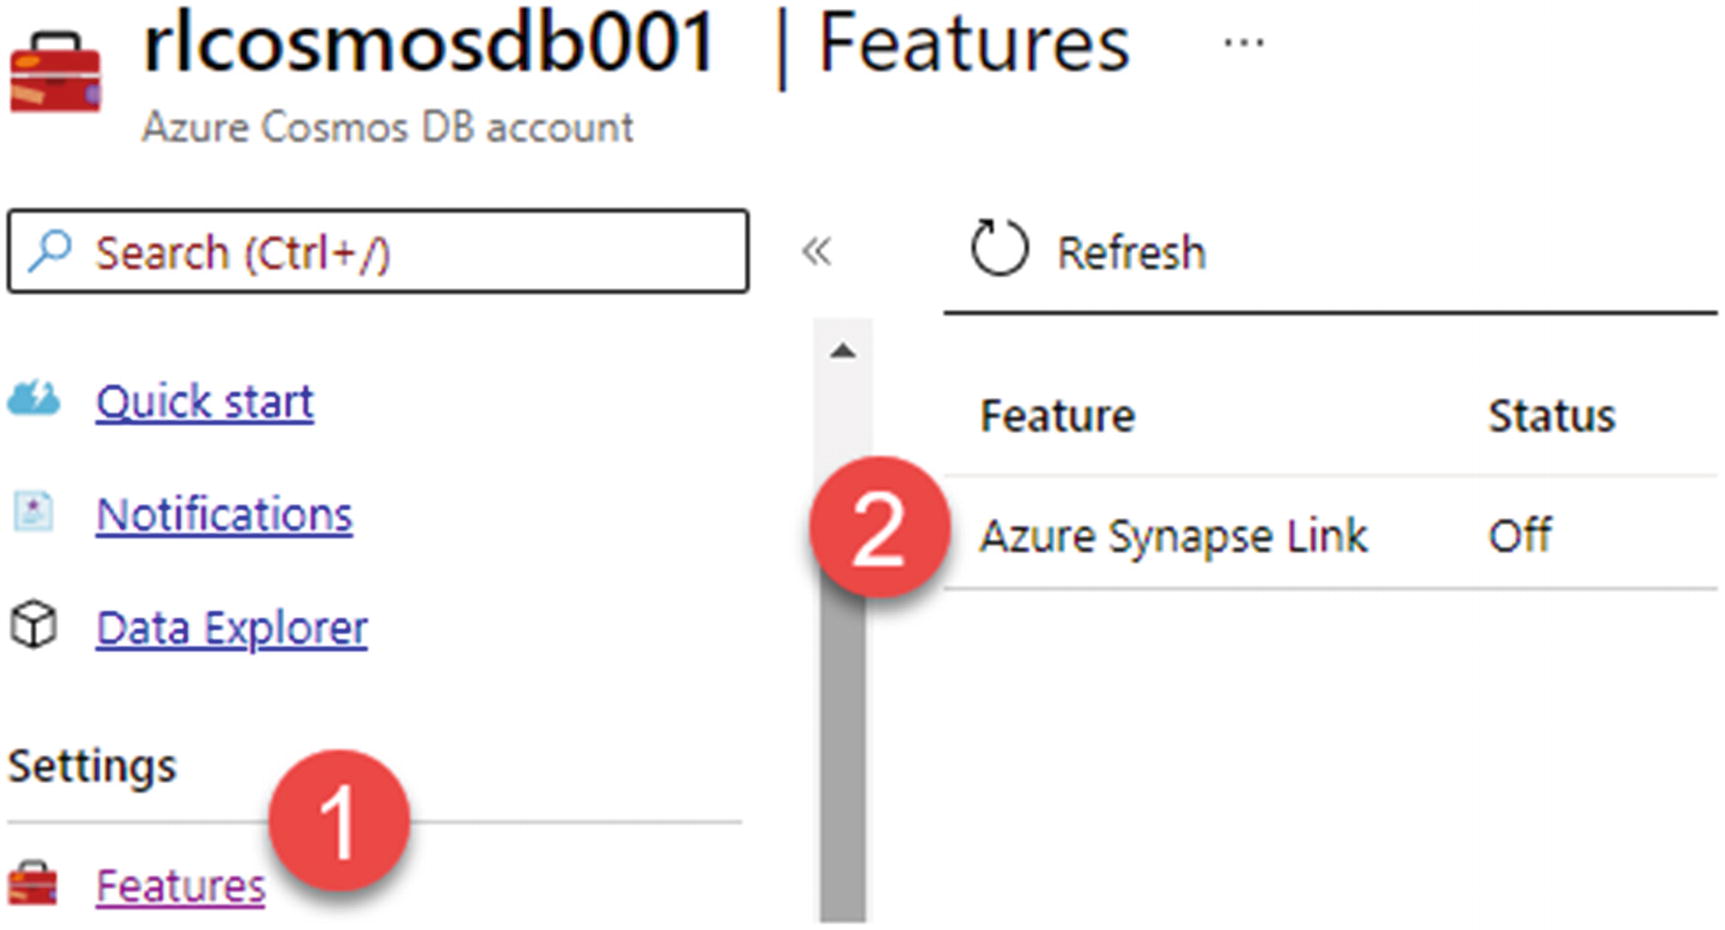
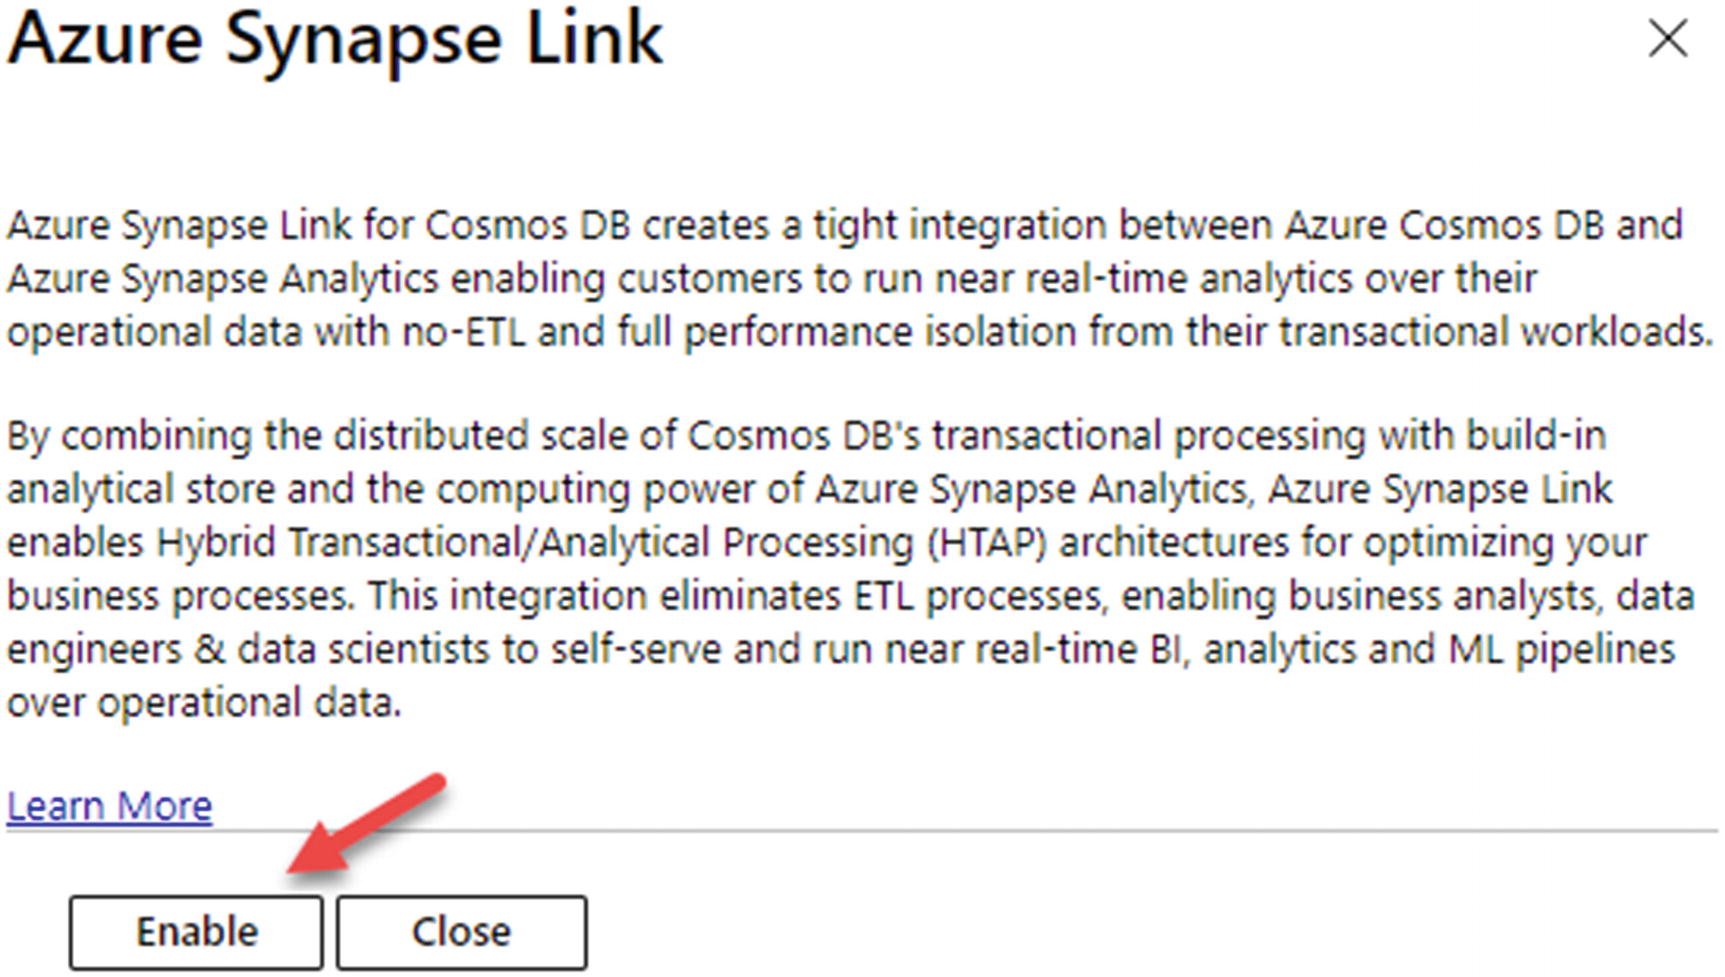
Once the Cosmos DB account is created, you will need to enable the Azure Synapse Link, which by default is set to “Off.” This can be achieved by first clicking the Azure Synapse Link feature shown in Figure 18-4.
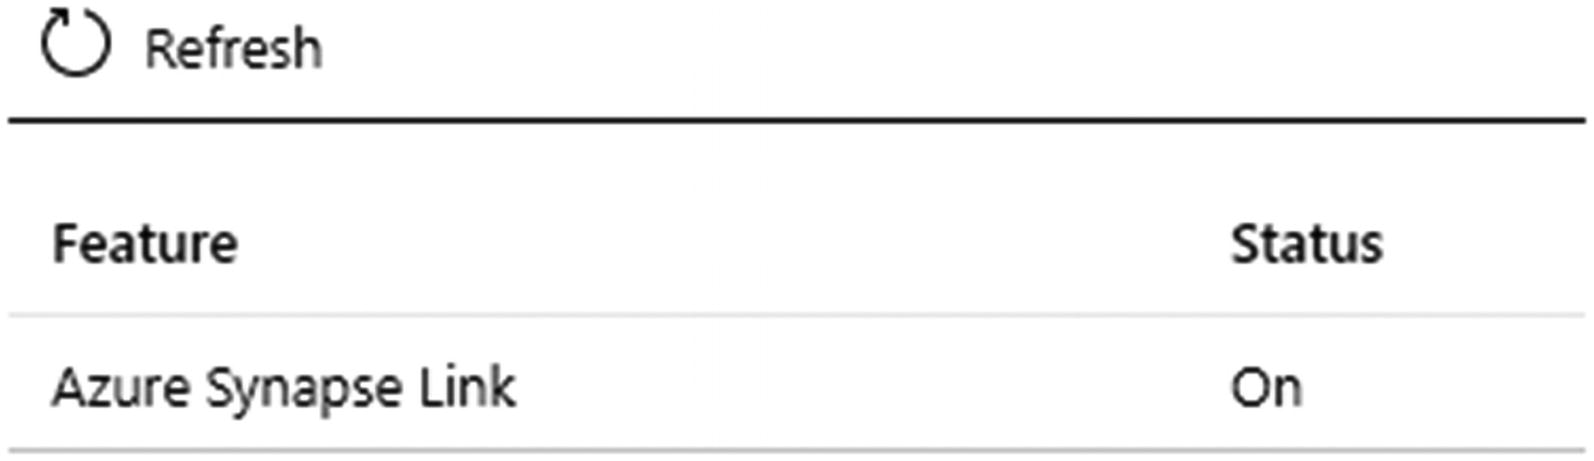
Figure 18-6 shows that once Azure Synapse Link is enabled, the status will be changed to “On.”
Figure 18-6
Synapse Link is On
Create a Cosmos DB Container and Database
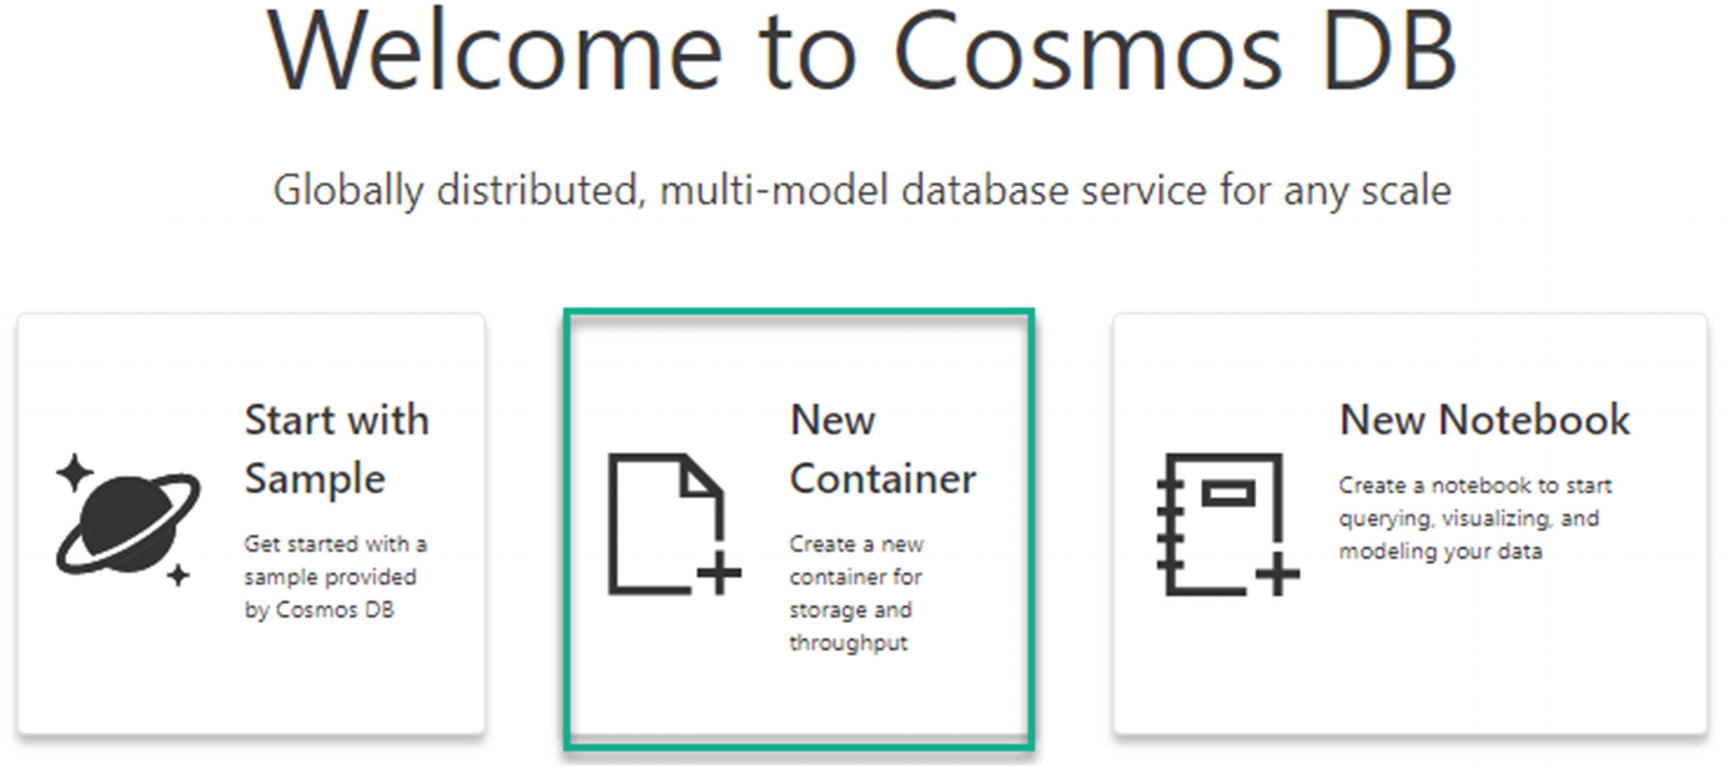
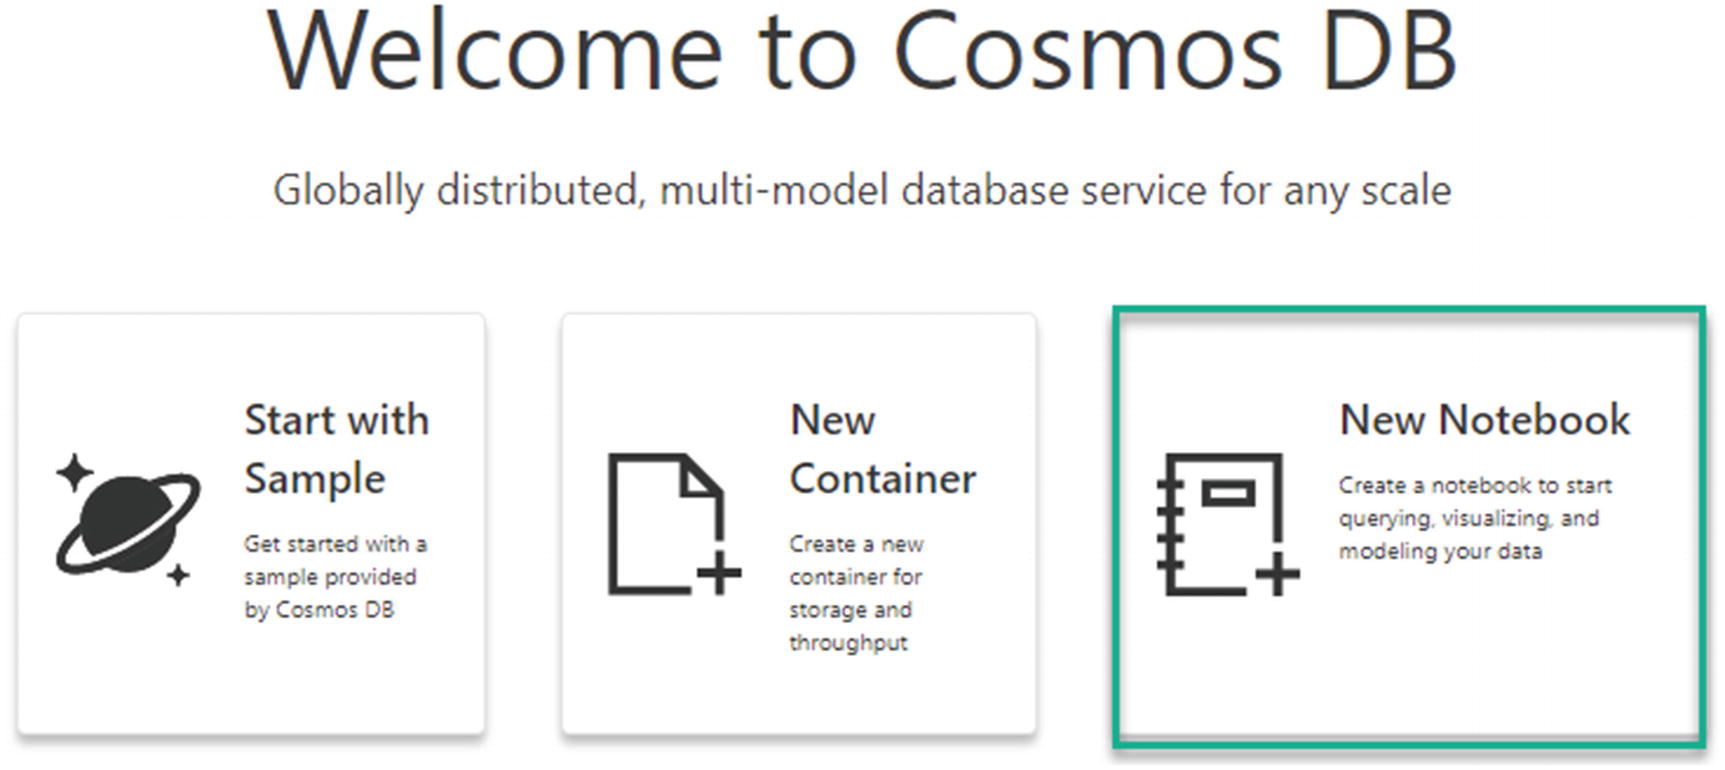
Now that the Azure Cosmos DB account is enabled for Azure Synapse Link, create a database and container. To get started, the Quick start section within Cosmos DB allows for an easier experience of choosing a platform, creating a database and container, and then getting started with a Cosmos DB notebook to run the code to import data.
For the purposes of this exercise, use the Python platform. However, notice the additional wide range of platform options to choose from, which is shown in Figure 18-7.
Figure 18-7
Create a new notebook in Python
Figure 18-8 shows how to begin by creating a database and container through the UI. There are also options available to start with a new notebook or a sample notebook with predefined code.
Figure 18-8
Create a new Cosmos DB container
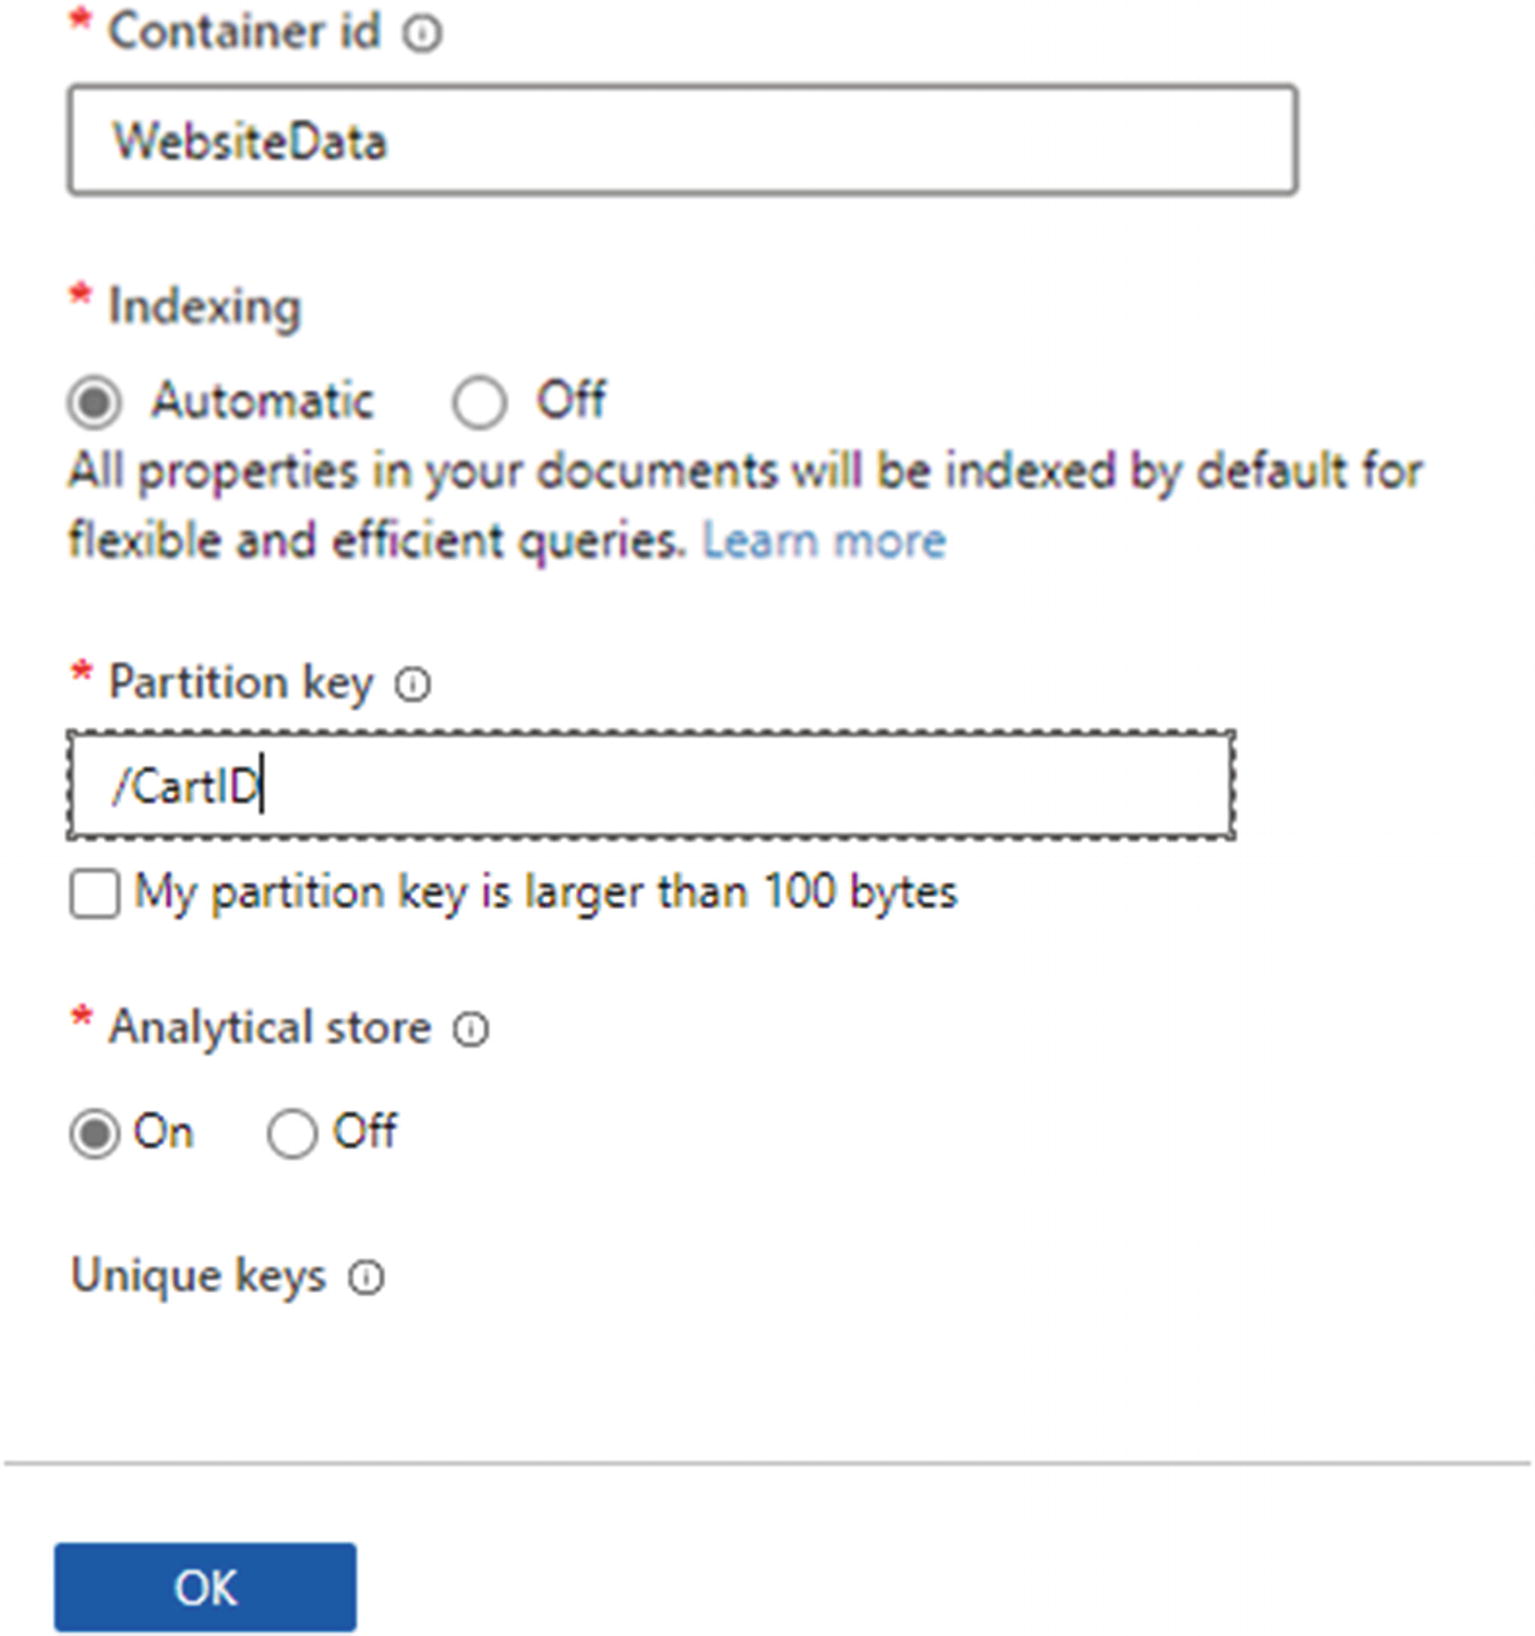
You will need to configure the database name, throughput, container name, and partition key, as shown in Figure 18-9. You could always start with the free tier containing 400 RU/s and 5 GB of storage and then scale up accordingly.
Figure 18-9
Configure the container Database id and Throughput details
Finally, it is important to remember to set your partition key and switch on the analytical store, as shown in Figure 18-10. The partition key is used to automatically partition data across multiple servers for scalability. It is the analytical store that will allow you to perform real-time analytics on your data.
Figure 18-10
Configure the remaining container details
Import Data into Azure Cosmos DB
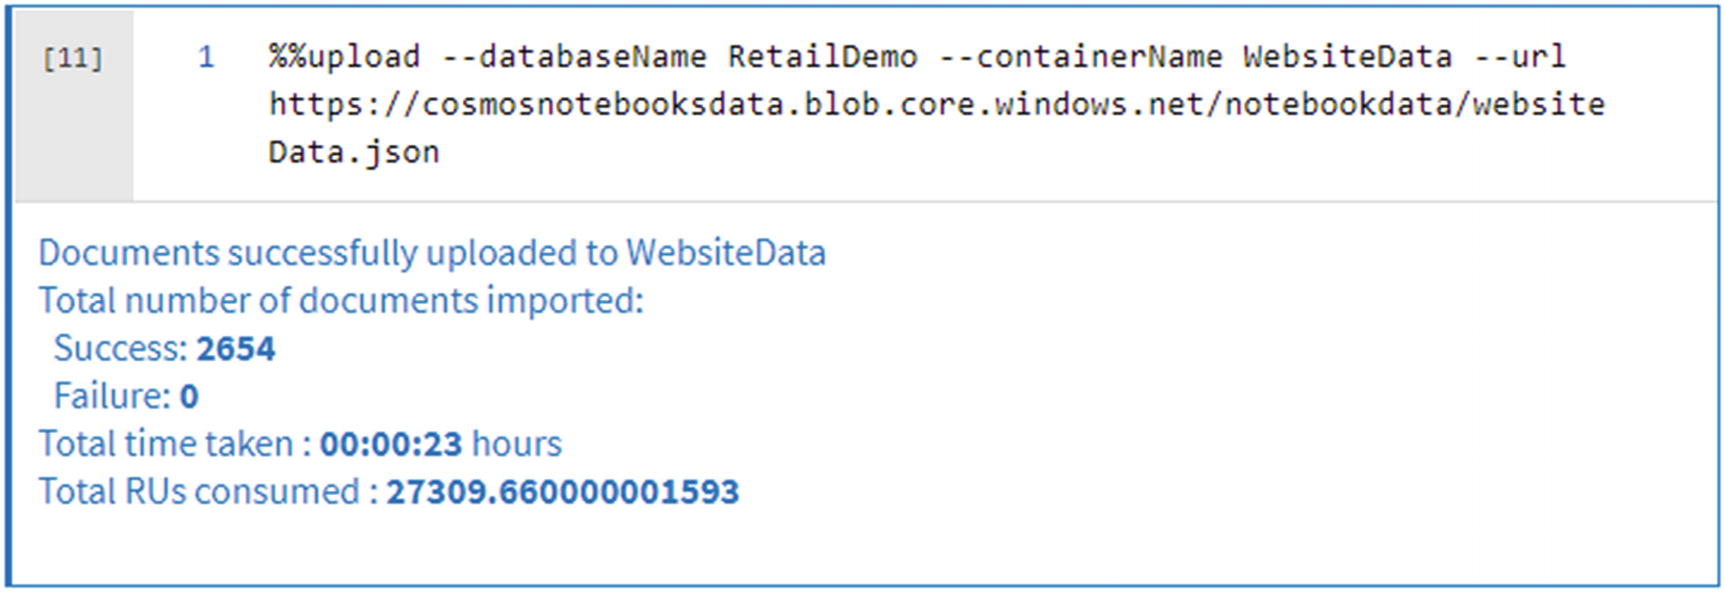
Now that you have created and configured the details for the database and container, create a new notebook to import data into the Cosmos database container, as shown in Figure 18-11.
Figure 18-11
Add a new notebook in Cosmos DB
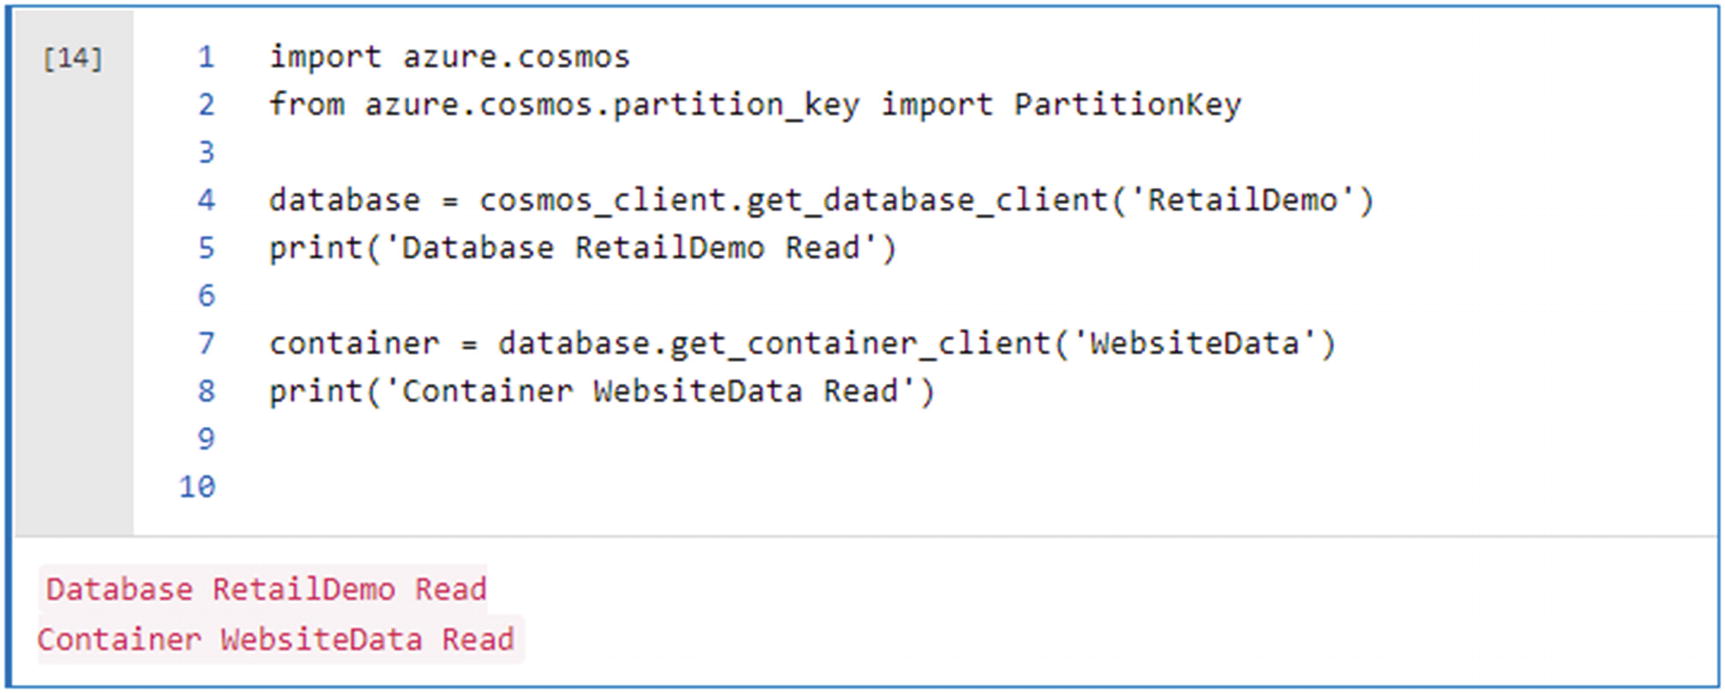
Begin by reading the database and container that you had created in the previous step, as shown in Figure 18-12. Azure Cosmos DB Python examples (https://docs.microsoft.com/en-us/azure/cosmos-db/sql-api-python-samples) have additional API reference commands that could be used within the notebook code. Visit the preceding URL to learn more about configuring and using Azure Synapse Link for Azure Cosmos DB and to see additional code snippets including how to define and update the analytical store time to live with the analytical_storage_ttl command.
Figure 18-12
Create or read the new DB and container
Here is the code that is shown in Figure 18-12 to read the database and container name that you created in the previous section:
import azure.cosmos
from azure.cosmos.partition_key import PartitionKey
print("Container WebsiteData's throughput lowered from {} RU/s to {} RU/s".format(new_throughput, lowered_throughput))
Create a Cosmos DB Linked Service in Azure Synapse Analytics
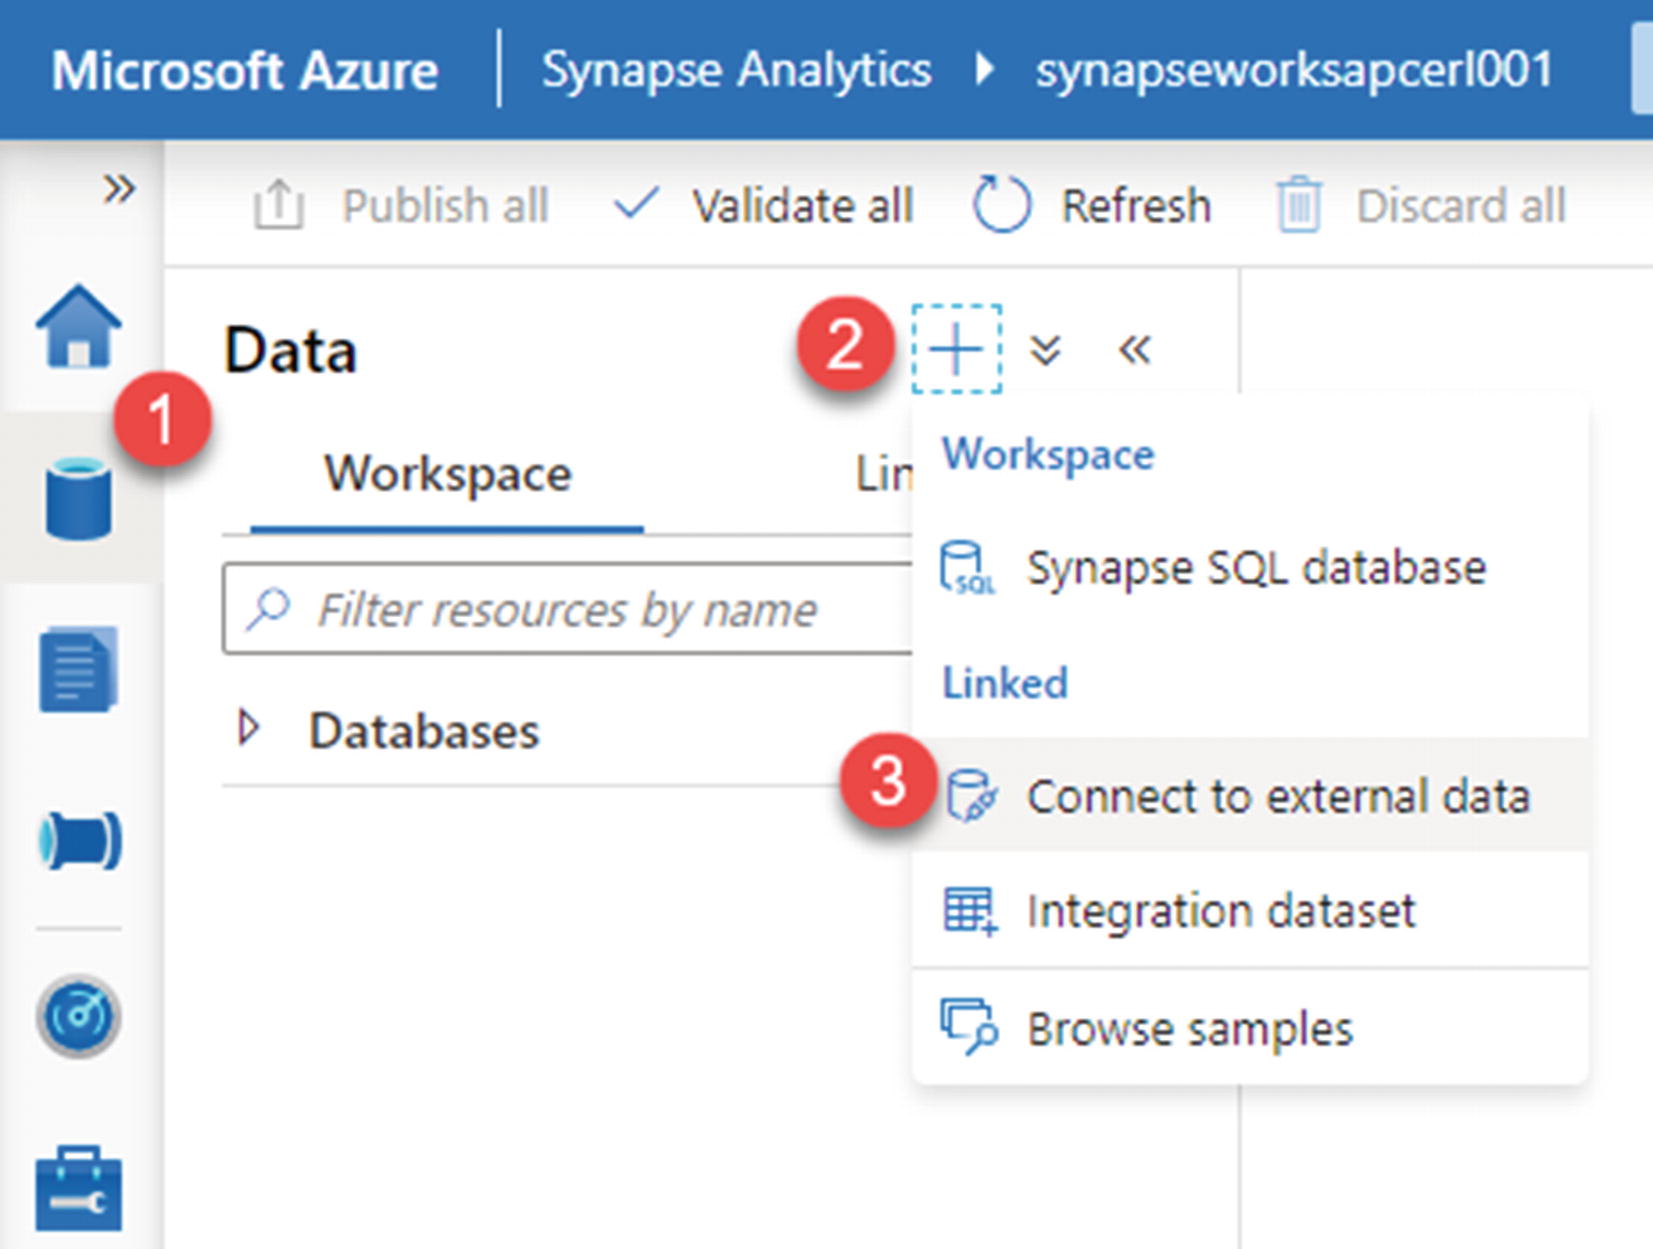
After data is available in the Cosmos DB database container, create a linked service within the Azure Synapse Analytics workspace by following the steps illustrated in Figure 18-16.
Figure 18-16
Create Cosmos DB link in Synapse Analytics
Remember to select Azure Cosmos DB (SQL API) shown in Figure 18-17 since that is the configuration of the Azure Cosmos DB API. Note that there is also an option for a MongoDB API.
Figure 18-17
Step to create linked connection to Cosmos DB
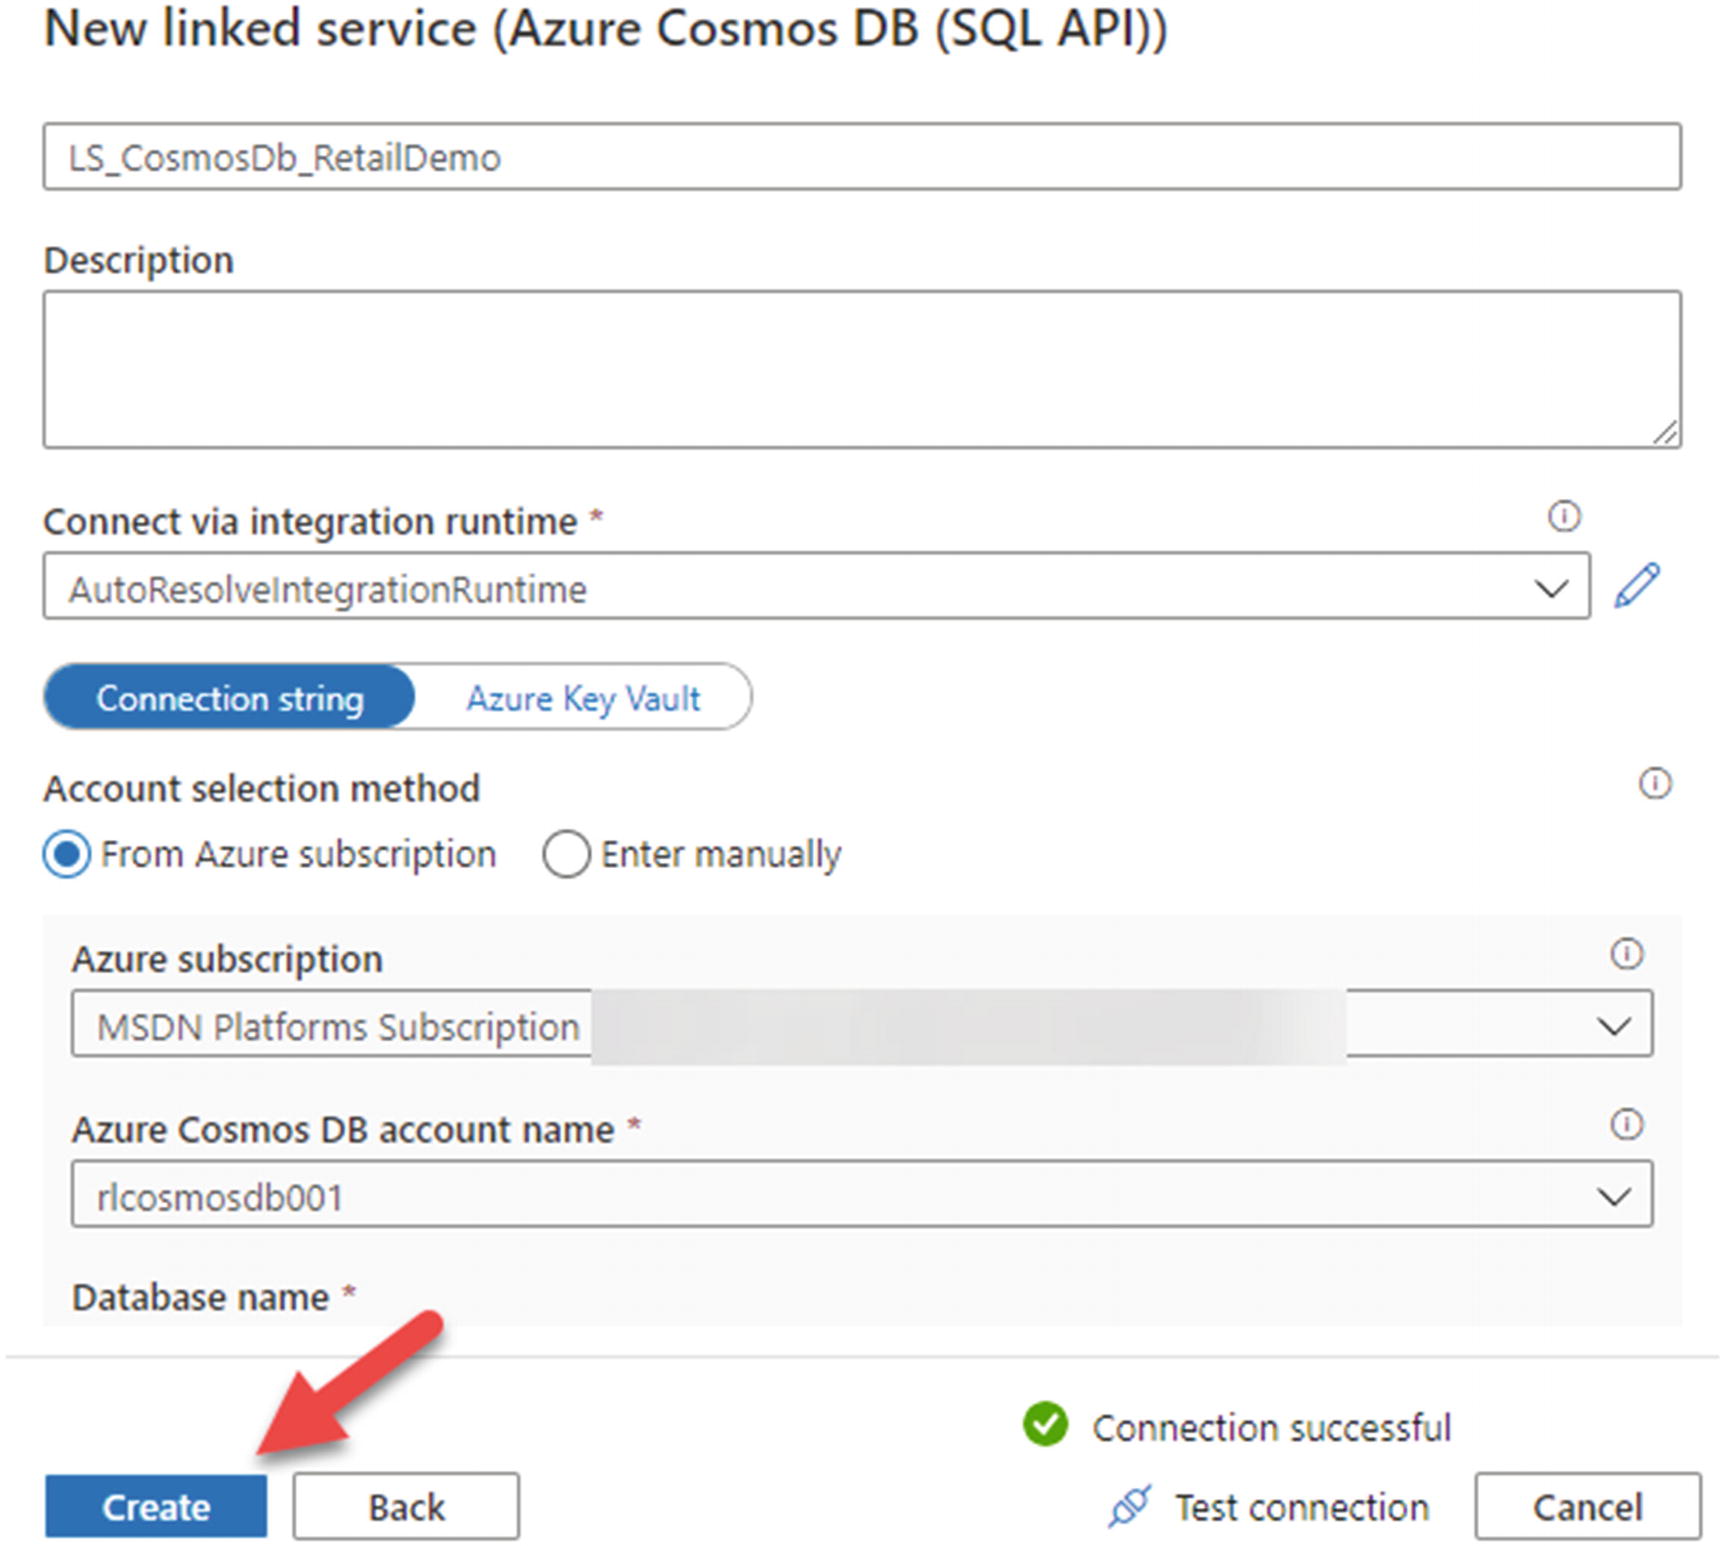
Fill in the required connection configuration details shown in Figure 18-18 and create the new linked service.
Figure 18-18
Create the new linked service
Load and Query the Data Using Synapse Spark
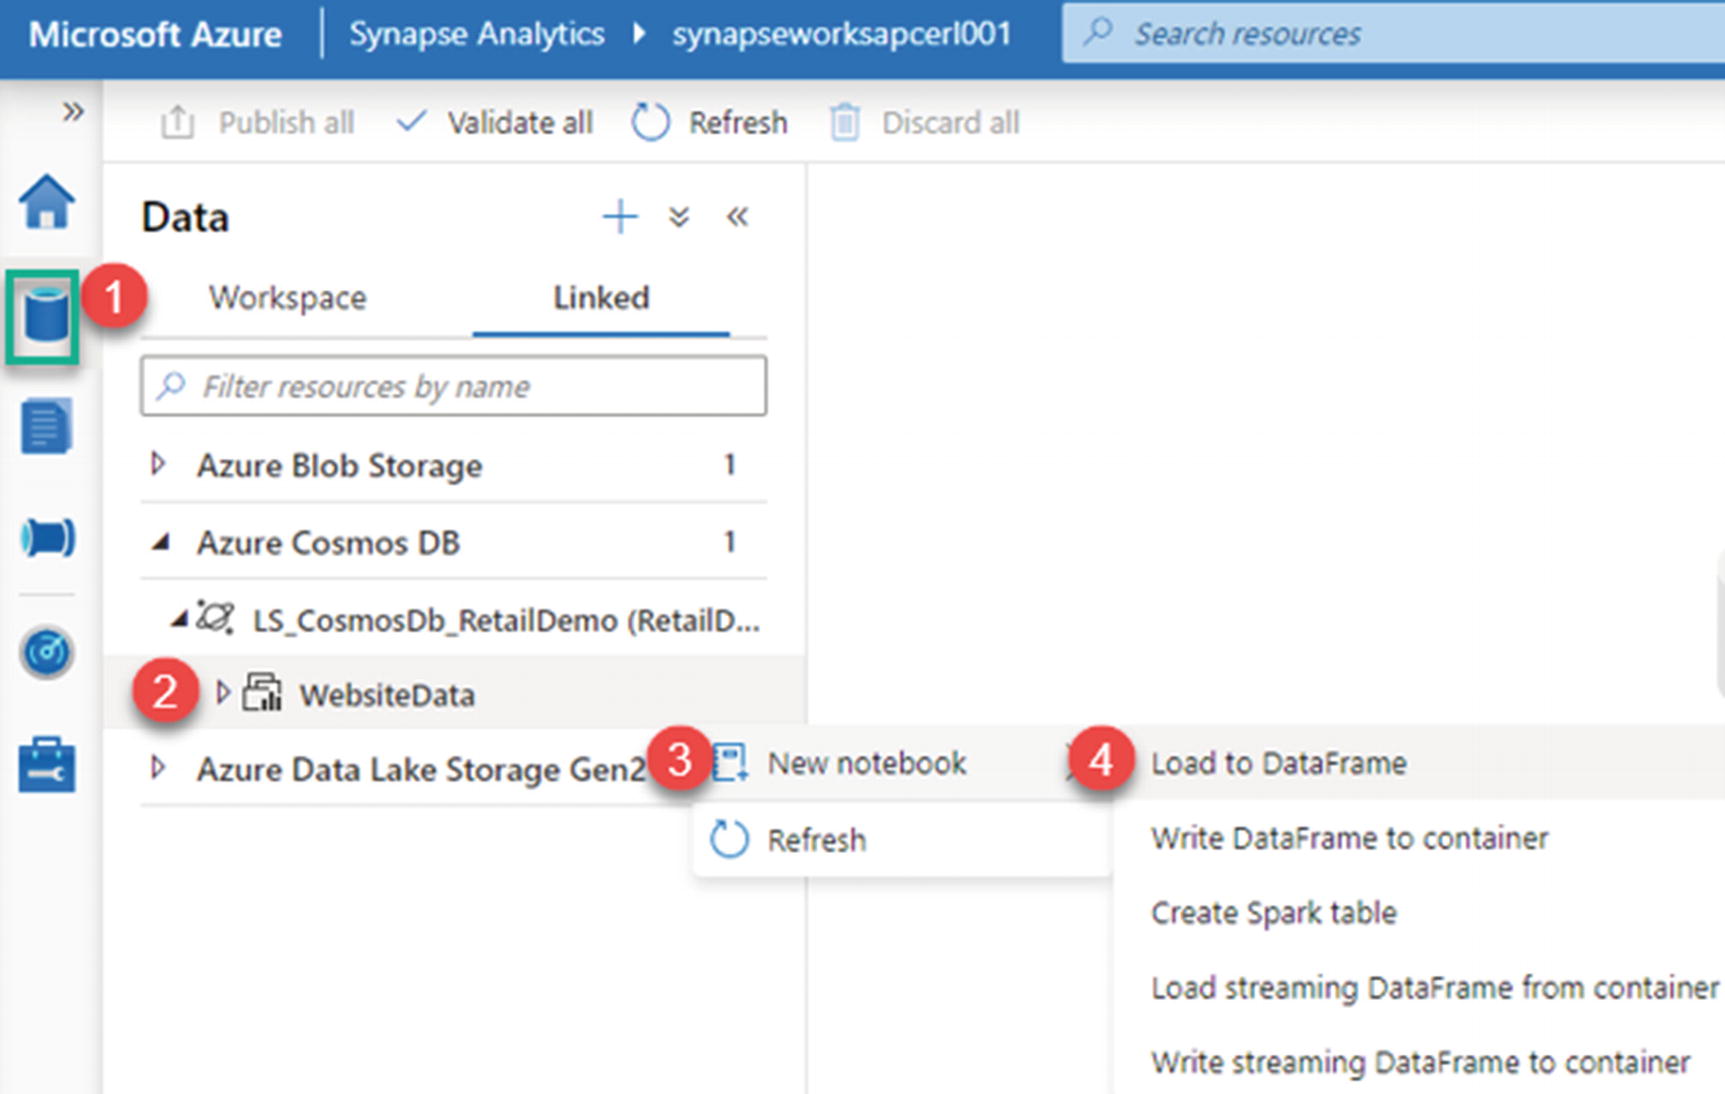
After creating a new linked service to Cosmos DB from Azure Synapse Analytics, follow the steps illustrated in Figure 18-19 to create a new notebook and load the data to a data frame.
Figure 18-19
Load the data to a data frame for analytics
I wanted to illustrate the visual differences between an analytical storage–enabled container and one that isn’t enabled for analytical storage. Basically, the container that is enabled for analytical storage will have an additional three lines that represent the columnar storage of the analytical workloads, as shown in Figure 18-20.
Figure 18-20
Non–analytical storage enabled
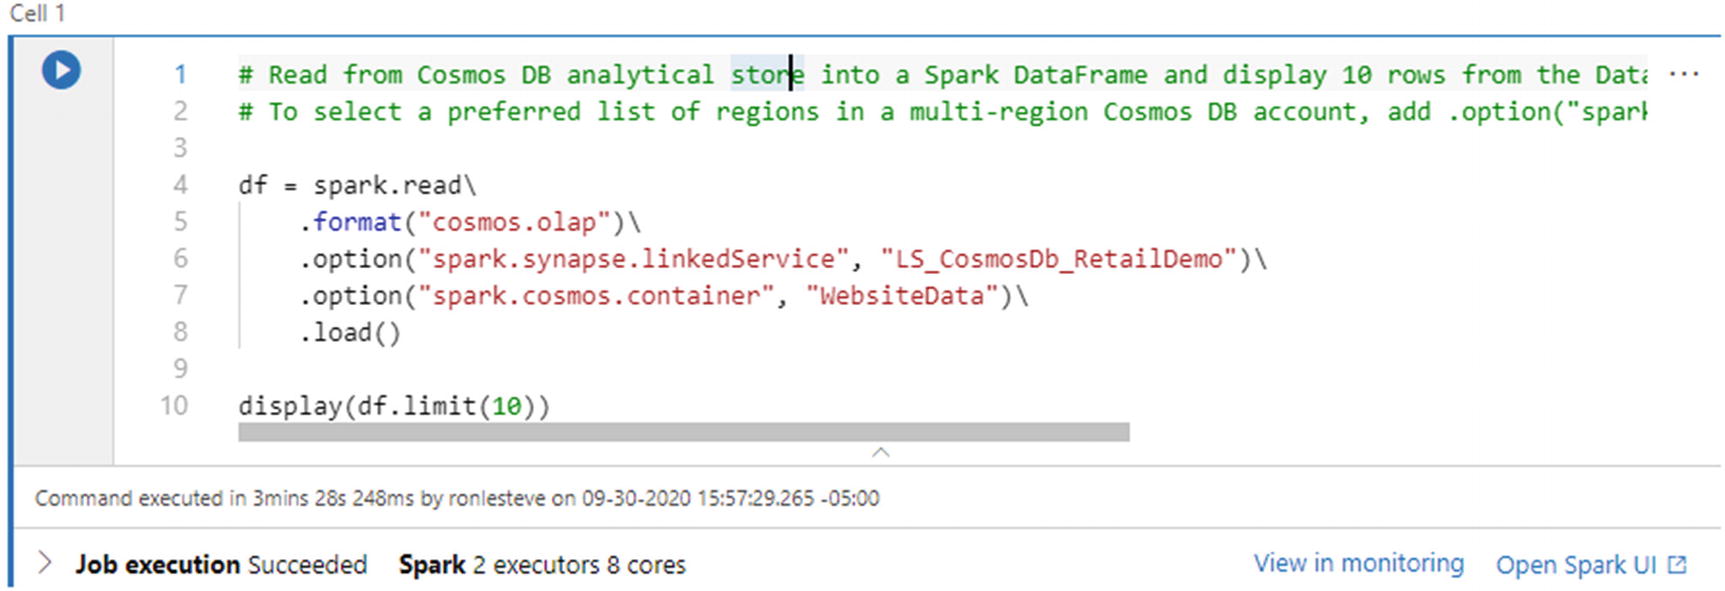
After the linked service has been created, run the following code that will be auto-created when the data is loaded to a data frame from the previous step. Prior to running the code, remember to create a Synapse Spark pool and attach it to the notebook:
# Read from Cosmos DB analytical store into a Spark DataFrame and display 10 rows from the DataFrame
# To select a preferred list of regions in a multi-region Cosmos DB account, add .option("spark.cosmos.preferredRegions", "<Region1>,<Region2>")
Notice from the illustration in Figure 18-21 that the code ran successfully and used two executors and eight cores for the job. Note that this can be customized to fit your desired workloads. Additionally, the job details can be viewed in the Spark UI.
Figure 18-21
Code to load to data frame
Figure 18-22 shows a preview of the top ten records from the data frame, which confirms that the real-time querying capability is active.
Figure 18-22
Image of sample data returned
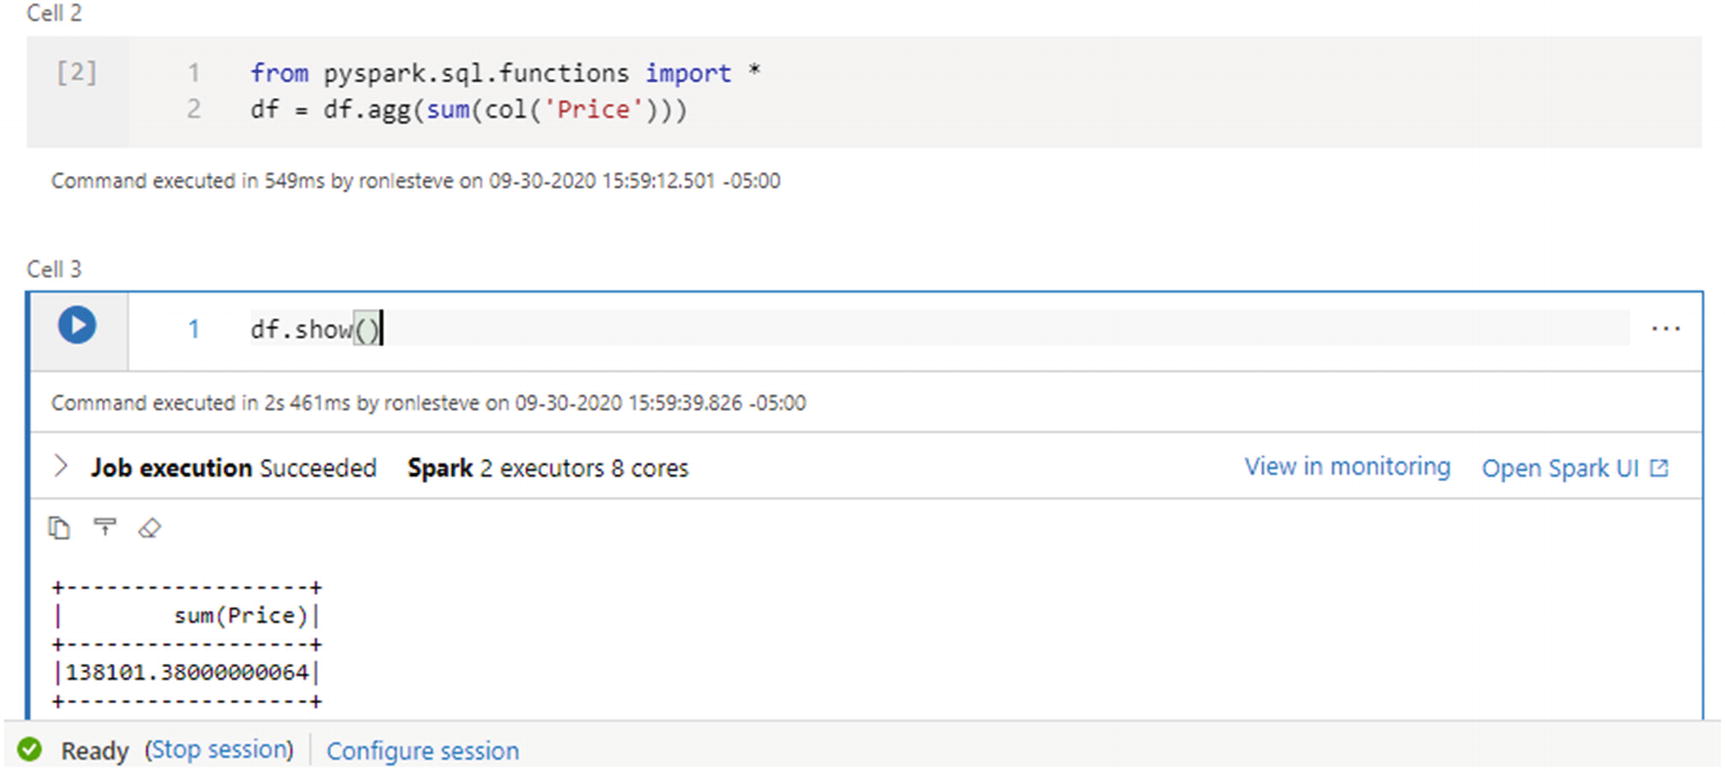
Next, use the following code to aggregate the dataset to get a sum of the Price column and then display the data frame:
from pyspark.sql.functions import *
df = df.agg(sum(col('Price')))
df.show()
After the job completes running, Figure 18-23 shows the successfully aggregated Price column on the operational Cosmos DB data without having to leverage any custom-built ETL processes. This demonstrates the capability of leveraging this Azure Synapse Link for Cosmos DB feature for a futuristic approach to empowering self-service data users to have the power to gain insights into their data at near-real-time speeds.
Figure 18-23
Aggregate the price data
Summary
In this chapter, I have shown you how to create a basic Azure Cosmos DB account enabled for analytical storage, create a Cosmos DB linked service in Azure Synapse Analytics, and aggregate and query Cosmos DB data with Spark from a Synapse Workspace notebook.
By setting up this process, your organization has the power to gain valuable insights from real-time analytics on your transactional data, which allows business analysts, data scientists, data engineers, and other citizen developers to analyze large datasets without impacting the performance of transactional workloads. Among the various other benefits, this process reduces the need to build and manage complex ETL jobs.