
In Chapter 7 you should have learned that Facelet templates as in <ui:composition>, <ui:include>, and <ui:decorate> are useful when you want to split main page layout fragments into reusable templates, such as header, menu, main content, and footer. And that Facelet tag files such as <t:field> are useful when you want to have a reusable group of components in order to minimize code duplication. And that composite components such as <t:inputLocalTime> are useful when you want to create a custom component with a single responsibility based on existing components and, if necessary, a bunch of HTML.
However, there may be cases in which no single component exists for the purpose you had in mind, even not when composed of existing components and a bunch of HTML. Or, perhaps the component does exist, but its renderer is not doing things you had in mind. At this point, you would need to create a custom component or a custom renderer.
JSF (JavaServer Faces) has since the beginning offered a high degree of abstraction around the UIComponent API (application programming interface ). You can customize components by creating a brand-new custom UIComponent, or by extending an existing component from the standard HTML component set, or by plugging a custom Renderer for an existing component.
Component Type, Family, and Renderer Type
Each UIComponent instance has “component type,” “component family,” and “renderer type” associated with it. The component type basically represents the unique component identifier associated with the component tag. It can be registered into JSF via either the @FacesComponent annotation or the <component> entry in faces-config.xml. The following example demonstrates the usage of the annotation on a minimal component class:
@FacesComponent(SomeComponent.COMPONENT_TYPE)public class SomeComponent extends UIComponentBase {public static final String COMPONENT_TYPE = "project.SomeComponent";public static final String COMPONENT_FAMILY = "project.SomeFamily";public SomeComponent() {setRendererType(SomeRenderer.RENDERER_TYPE);}@Overridepublic String getFamily() {return COMPONENT_FAMILY;}}
And the following example demonstrates the usage with the entry in faces-config.xml:
<component><component-type>project.SomeComponent</component-type><component-class>com.example.project.component.SomeComponent</component-class></component>
Note that when you register a Java EE artifact via both the annotation and the XML ways using the same identifier, then the XML declaration will always get precedence over the annotation declaration. The same holds true for all JSF annotations.
The public constants COMPONENT_ TYPE and COMPONENT_FAMILY in the component class are not mandatory, but they follow the same convention as the standard JSF component set does and therefore give more consistency in developing with JSF. The public constant COMPONENT_TYPE allows the developer to programmatically create the component without needing to hard-code the component type.
UIComponent component = FacesContext.getCurrentInstance().getApplication().createComponent(SomeComponent.COMPONENT_TYPE);
Note that programmatically creating UIComponent instances this way is generally not the normal practice in an average JSF web application. Instead, you normally define the components in the view and leave the job of creating UIComponent instances up to JSF or any pluggable component library. In the case of Facelets view technology, the component tags can be registered into JSF via either @FacesComponent(createTag=true) or a <tag> entry in a *.taglib.xml file along with the component type as follows:
<tag><tag-name>someComponent</tag-name><component><component-type>project.SomeComponent</component-type></component></tag>
As said, the standard JSF component set has the component type also defined in the concrete UIComponent classes behind the component tags. Those UIComponent classes are all located in the javax.faces.component.html package. The UIComponent class name can be derived from the component tag name by prefixing it with “Html”. So is the component tag <h:outputText> backed by the HtmlOutputText component. JSF can, via either the @FacesComponent annotation or the <component> entry in faces-config.xml, figure out which component class exactly is associated with the component tag, so JSF knows that, for the <h:outputText> tag, it should create a concrete HtmlOutputText instance .
Once JSF has the concrete UIComponent instance at hand, it can figure out the component family as well as the renderer type by invoking the methods UIComponent#getFamily() and UIComponent#getRendererType(), respectively. This information is mandatory in order to create a concrete Renderer instance for the given UIComponent instance, as you can see in the following snippet:
Renderer renderer = FacesContext.getCurrentInstance().getRenderKit().getRenderer(component.getFamily(), component.getRendererType());
The component family is basically a “hard-coded” constant which can be shared across multiple component types. It’s “hard-coded” in such way that there’s no setter for it. This is needed in order to get the concrete Renderer instances as they are not registered into JSF by component type but rather by component family. This allows the developer of the pluggable render kit to register the renderer type just once instead of multiple times for each known standard component type and unknown custom component type. Normally, the component family and renderer type are registered into JSF via either the @FacesRenderer annotation or the <renderer> entry in faces-config.xml. The following example demonstrates the usage with the annotation on a minimal renderer class.
@FacesRenderer(componentFamily=SomeComponent.COMPONENT_FAMILY,rendererType=SomeRenderer.RENDERER_TYPE)public class SomeRenderer extends Renderer {public static final String RENDERER_TYPE = "project.SomeRenderer";}
And the following example demonstrates the usage with the entry in faces-config.xml:
<render-kit><renderer><component-family>project.SomeFamily</component-family><renderer-type>project.SomeRenderer</renderer-type><renderer-class>com.example.project.renderer.SomeRenderer</renderer-class></renderer></render-kit>
The renderer type is by default defined in the constructor of the concrete component class , as you might already have noticed in the code snippet of the SomeComponent class as shown previously. In case it’s needed, the component subclass developer or even yourself as component end user can always override the default renderer instance of a component with the desired renderer instance. This can be done in various ways, all via XML. The first way is via the <tag> entry associated with the component tag in the *.taglib.xml file.
<tag><tag-name>someComponent</tag-name><component><component-type>project.SomeComponent</component-type><renderer-type>custom.OtherRenderer</renderer-type></component></tag>
This affects application-wide and targets only the specific component tag. The second way is via a new <renderer> entry in faces-config.xml which targets exactly the desired component family and its default renderer type.
<render-kit><renderer><component-family>project.SomeFamily</component-family><renderer-type>project.SomeRenderer</renderer-type><renderer-class>com.example.custom.renderers.OtherRenderer</renderer-class></renderer></render-kit>
This affects application-wide and targets every component tag associated with the given component family currently associated with the given renderer type. The third way is via the rendererType attribute of the component tag.
<x:someComponent ... rendererType="custom.OtherRenderer" />This affects only the declared component tag and not others. Table 11-1 provides an overview of all component types, families, and renderer types of the standard JSF component set.
Table 11-1 Component class, component type, component family and renderer type of standard JSF HTML component set
Component tag | Component class | Component type | Component family | Renderer type |
|---|---|---|---|---|
<h:body> | HtmlBody | javax.faces.OutputBody | javax.faces.Output | javax.faces.Body |
<h:button> | HtmlOutcomeTargetButton | javax.faces.HtmlOutcomeTargetButton | javax.faces.OutcomeTarget | javax.faces.Button |
<h:column> | HtmlColumn | javax.faces.HtmlColumn | javax.faces.Column | null |
<h:commandButton> | HtmlCommandButton | javax.faces.HtmlCommandButton | javax.faces.Command | javax.faces.Button |
<h:commandLink> | HtmlCommandLink | javax.faces.HtmlCommandLink | javax.faces.Command | javax.faces.Link |
<h:commandScript> | HtmlCommandScript | javax.faces.HtmlCommandScript | javax.faces.Command | javax.faces.Script |
<h:dataTable> | HtmlDataTable | javax.faces.HtmlDataTable | javax.faces.Data | javax.faces.Table |
<h:doctype> | HtmlDoctype | javax.faces.OutputDoctype | javax.faces.Output | javax.faces.Doctype |
<h:form> | HtmlForm | javax.faces.HtmlForm | javax.faces.Form | javax.faces.Form |
<h:graphicImage> | HtmlGraphicImage | javax.faces.HtmlGraphicImage | javax.faces.Graphic | javax.faces.Image |
<h:head> | HtmlHead | javax.faces.OutputHead | javax.faces.Output | javax.faces.Head |
<h:inputFile> | HtmlInputFile | javax.faces.HtmlInputFile | javax.faces.Input | javax.faces.File |
<h:inputHidden> | HtmlInputHidden | javax.faces.HtmlInputHidden | javax.faces.Input | javax.faces.Hidden |
<h:inputSecret> | HtmlInputSecret | javax.faces.HtmlInputSecret | javax.faces.Input | javax.faces.Secret |
<h:inputText> | HtmlInputText | javax.faces.HtmlInputText | javax.faces.Input | javax.faces.Text |
<h:inputTextarea> | HtmlInputTextarea | javax.faces.HtmlInputTextarea | javax.faces.Input | javax.faces.Textarea |
<h:link> | HtmlOutcomeTargetLink | javax.faces.HtmlOutcomeTargetLink | javax.faces.OutcomeTarget | javax.faces.Link |
<h:message> | HtmlMessage | javax.faces.HtmlMessage | javax.faces.Message | javax.faces.Message |
<h:messages> | HtmlMessages | javax.faces.HtmlMessages | javax.faces.Messages | javax.faces.Messages |
<h:outputFormat> | HtmlOutputFormat | javax.faces.HtmlOutputFormat | javax.faces.Output | javax.faces.Format |
<h:outputLabel> | HtmlOutputLabel | javax.faces.HtmlOutputLabel | javax.faces.Output | javax.faces.Label |
<h:outputText> | HtmlOutputText | javax.faces.HtmlOutputText | javax.faces.Output | javax.faces.Text |
<h:outputScript> | UIOutput | javax.faces.Output | javax.faces.Output | javax.faces.Script |
<h:outputStylesheet> | UIOutput | javax.faces.Output | javax.faces.Output | javax.faces.resource.Stylesheet |
<h:panelGrid> | HtmlPanelGrid | javax.faces.HtmlPanelGrid | javax.faces.Panel | javax.faces.Grid |
<h:panelGroup> | HtmlPanelGroup | javax.faces.HtmlPanelGroup | javax.faces.Panel | javax.faces.Group |
<h:selectBooleanCheckbox> | HtmlSelectBooleanCheckbox | javax.faces.HtmlSelectBooleanCheckbox | javax.faces.SelectBoolean | javax.faces.Checkbox |
<h:selectManyCheckbox> | HtmlSelectManyCheckbox | javax.faces.HtmlSelectManyCheckbox | javax.faces.SelectMany | javax.faces.Checkbox |
<h:selectManyListbox> | HtmlSelectManyListbox | javax.faces.HtmlSelectManyListbox | javax.faces.SelectMany | javax.faces.Listbox |
<h:selectManyMenu> | HtmlSelectManyMenu | javax.faces.HtmlSelectManyMenu | javax.faces.SelectMany | javax.faces.Menu |
<h:selectOneListbox> | HtmlSelectOneListbox | javax.faces.HtmlSelectOneListbox | javax.faces.SelectOne | javax.faces.Listbox |
<h:selectOneMenu> | HtmlSelectOneMenu | javax.faces.HtmlSelectOneMenu | javax.faces.SelectOne | javax.faces.Menu |
<h:selectOneRadio> | HtmlSelectOneRadio | javax.faces.HtmlSelectOneRadio
| javax.faces.SelectOne | javax.faces.Radio |
If you carefully inspect the table, you’ll see a certain pattern in the component family and renderer type, particularly with input, select, and command components. You’ll notice that a renderer type can be shared across multiple components, even of a different family.
You’ll also notice that there’s one HTML component without a renderer type , <h:column>. This is a special component which cannot be used stand-alone but can only be used when nested in a specific parent component. From the standard JSF component set, that’s so far only <h:dataTable>. Its renderer recognizes children of the type UIColumn and can act on them accordingly.
Creating New Component and Renderer
If you paid closer attention to Table 3-1 in Chapter 3, you might have noticed that JSF doesn’t provide any component to render a dynamic <ul> or <ol> or even <dl> element based on a provided array or collection value. It only supports that for the <table> element. True, the same could be achieved with Facelets <ui:repeat> and a bit of custom HTML code, but we’ll take this as an opportunity to create a new custom component which renders an <ul> or <ol>.
The first step is to check which UIComponent subclass is suitable for the task we have in mind, so that we can reduce the custom code logic to a minimum. In the javax.faces.component package you can find a bunch of UIXxx component subclasses. If you want to create a new form component, extend from UIForm. If you want to create a new input component, extend from UIInput. If you want to create a new output component, extend from UIOutput. If you want to create a new data iterator component, extend from UIData. There is rarely any need to extend from UIComponent directly. We’d like to be able to iterate over a collection in order to generate <li> elements inside the <ul>, so we’ll pick UIData. It has a lot of iteration and state saving logic already implemented. Following is the custom component class com.example.project.component.DataList:
@FacesComponent(createTag=true)public class DataList extends UIData {public DataList() {setRendererType(DataListRenderer.RENDERER_TYPE);}}
Is that really all? Yes, the UIData superclass already hsd everything we need and all the HTML producing code just goes into the DataListRenderer which will be shown shortly. You’ll notice that the @FacesComponent annotation declares a createTag=true attribute. This basically instructs JSF that it should automatically create a component tag the predefined XML namespace http://xmlns.jcp.org/jsf/component . In other words, the above tag is available in the Facelets file as follows:
< ... xmlns:my="http://xmlns.jcp.org/jsf/component">...<my:dataList ...>...</my:dataList>
The XML namespace prefix “my” is of course your choice. Generally, you’d like to pick some sort of abbreviation of your company name here. You can also override the predefined XML namespace with the namespace attribute.
@FacesComponent(createTag=true, namespace="http://example.com/ui")This will then be available as follows:
< ... xmlns:ex="http://example.com/ui">...<ex:dataList ...>...</ex:dataList>
This namespace is unfortunately not unifiable with the <namespace> of a custom *.taglib.xml file. If you use the same namespace for both, then JSF will prefer the *.taglib.xml one over the @FacesComponent one and hence be unable to find the custom component tag. That is, in practically anything Java EE related, any XML-based registration of a thing has higher precedence than Java annotation-based registration of the very same thing.
You’d basically need to explicitly register the custom component over there in the *.taglib.xml file as well. Here’s how the /WEB-INF/example.taglib.xml as created in the section “Tag Files” in Chapter 7 could be extended with the registration of the custom component, which is essentially the same as what the @FacesComponent is doing for you.
<?xml version="1.0" encoding="UTF-8"?><facelet-taglibxmlns:="http://xmlns.jcp.org/xml/ns/javaee"xmlns:xsi="http://www.w3.org/2001/XMLSchema-instance"xsi:schemaLocation="http://xmlns.jcp.org/xml/ns/javaeehttp://xmlns.jcp.org/xml/ns/javaee/web-facelettaglibrary_2_3.xsd"version="2.3"><namespace>http://example.com/tags</namespace><short-name>t</short-name><!-- Other tags here --><tag><description>Renders a HTML list.</description><tag-name>dataList</tag-name><component><component-type>dataList</component-type></component></tag></facelet-taglib>
This way the custom component is available in the same namespace as the other tags.
< ... xmlns:t="http://example.com/tags">...<t:dataList ...>...</t:dataList>
Now, you can essentially remove all attributes of the @FacesComponent so that it becomes just @FacesComponent. Yes, as you have seen in the example.taglib.xml, the component type defaults to the class name with the first character lowercased. You can always override it by explicitly specifying it as the value of the @FacesComponent annotation. Generally, you’d like to prefix it with the name of the company. It’s a good practice to define it as a public constant so that others could, if necessary, look it up in the Javadoc and/or use it for Application#createComponent().
@FacesComponent(DataList.COMPONENT_TYPE)public class DataList extends UIData {public static final String COMPONENT_TYPE = "example.DataList";public DataList() {setRendererType(DataListRenderer.RENDERER_TYPE);}}
Now adjust the component type in the example.taglib.xml accordingly.
<component><component-type>example.DataList</component-type></component>
The *.taglib.xml also gives you room to register the attributes via <attribute> entries, although that may end up in some verbose code. You should already have seen that in the section “Tag files” in Chapter 7. Unfortunately, the current JSF version doesn’t offer an annotation to declaratively declare an “official” component attribute . There’s no such thing as @FacesAttribute private Iterable value. Yet. This may come in a JSF.next. The non-official way, without any <attribute>, also works just fine. You can declare any attribute you want on the component tag in the view.
<t:dataList foo="bar" bar="foo" />That’s just the freedom of XML. Whether the actual component or renderer implementation actually does something with it is another story. You could even declare a custom attribute on an existing component and just plug an extended Renderer in order to process that attribute. More later in the section “Extending Existing Renderer.” Talking about renderers, our <t:dataList> still needs its renderer as registered in its constructor. Here’s what the com.example.project.renderer.DataListRenderer looks like.
@FacesRenderer(componentFamily=UIData.COMPONENT_FAMILY,rendererType=DataListRenderer.RENDERER_TYPE)public class DataListRenderer extends Renderer {public static final String RENDERER_TYPE = "example.List";@Overridepublic void encodeBegin(FacesContext context, UIComponent component)throws IOException{ResponseWriter writer = context.getResponseWriter();UIData data = (UIData) component;if (data.getRowCount() > 0) {writer.startElement("ul", component);}}@Overridepublic void encodeChildren(FacesContext context, UIComponent component)throws IOException{ResponseWriter writer = context.getResponseWriter();UIData data = (UIData) component;for (int i = 0; i < data.getRowCount(); i++) {data.setRowIndex(i);writer.startElement("li", component);if (component.getChildCount() > 0) {for (UIComponent child : component.getChildren()) {child.encodeAll(context);}}writer.endElement("li");}data.setRowIndex(-1);}@Overridepublic void encodeEnd(FacesContext context, UIComponent component)throws IOException{ResponseWriter writer = context.getResponseWriter();UIData data = (UIData) component;if (data.getRowCount() > 0) {writer.endElement("ul");}}}
In hindsight, it’s relatively simple. We’re delegating as much as possible of the hard work to the JSF-provided UIData superclass. In the encodeBegin() you start the <ul> element when the data model is not empty. This is to be checked by examining the result of UIData#getRowCount(). Its Javadoc1 basically says:
Return the number of rows in the underlying data model. If the number of available rows is unknown, return -1.
The term “rows” is indeed strongly related to tables. This is also what this superclass is originally designed for: <h:dataTable>. The term “item” would have been more general, but it is what it is.
Then, in the encodeChildren() method , we set the current row index via the UIData#setRowIndex() method, start the <li> element, encode all children as is via UIComponent#encodeAll() on each of them, and finally end the <li> element. Once the loop is done, we explicitly make it clear to the UIData superclass by invoking UIData#setRowIndex() with a value of -1. Its Javadoc2 says:
If the new rowIndex value is -1: If the var property is not null, remove the corresponding request scope attribute (if any). Reset the state information for all descendant components.
It thus clears out any state related to the iteration. This is very important;z otherwise it might cause side effects further down in the component tree or even cause a corrupted view state when it by itself needs to traverse the data model. Finally, in the encodeEnd() method , it will end the <ul> element based on same conditions as in encodeBegin().
The UIData#setRowIndex() call in the encodeChildren() method will under the hood extract the data model from the value attribute and wrap it in a suitable implementation of the javax.faces.model.DataModel abstract class.3 So far, as per the Javadoc of UIData#getValue(),4 the following types of the object behind the value attribute are supported, in this scanning order:
java.util.List (since 1.0)
Arrays (since 1.0)
java.sql.ResultSet (since 1.0)
javax.servlet.jsp.jstl.sql.Result (since 1.0)
java.util.Collection (since 2.2)
java.lang.Iterable (since 2.3)
java.util.Map (since 2.3)
Types for which a suitable DataModel has been registered via @FacesDataModel (since 2.3)
All other types will be adapted using the ScalarDataModel class, which will treat the object as a single row of data (since 1.0)
You would indeed not expect to see anyone passing around a plain java.sql.ResultSet in a modern Java EE application, let alone see JSP pages with JSTL <sql:xxx> tags. But this all is for backward compatibility . Remember, JSF was introduced in 2004. Backward compatibility was one of its strongest keys in surviving up to today. They’re certainly candidates to be removed, but not now.
And, there’s indeed an overlap between some types; List and Collection could easily be covered by Iterable as they both implement this interface. But this has a performance reason. For a List, the items are accessed directly by index by the ListDataModel; for a Collection, the items are extracted first via Collection#toArray() and then accessed by index by the CollectionDataModel; and for an Iterable, the items are simply iterated and collected into a new List first by the IterableDataModel. It may make a difference.
You’ll also see that JSF 2.3 has not only added two new data models but even introduces a new annotation to register a custom one. Previously, you’d need to manually wrap the custom collection in the custom data model every time before passing to a UIData component. The DataModel abstract class has the disadvantage of not being Serializable itself which more or less forces you to make a @ViewScoped bean holding such a data model to have a lazy loading getter on a transient data model property as follows:
private YourCollection yourCollection;private transient YourDataModel dataModel;public DataModel getDataModel() {if (dataModel == null) {dataModel = new YourDataModel(yourCollection);}return dataModel;}
Ideally, the UIData should by itself recognize YourCollection type and automatically wrap it in a YourDataModel. The new @FacesDataModel annotation does exactly that.
@FacesDataModel(forClass=YourCollection.class)public class YourDataModel<E> extends DataModel<E> {}
Coming back to the custom renderer, there’s one method left unexplained: the getRendersChildren(). It’s been overridden to explicitly return true. You’ll probably ask yourself, why was it initially false? Why not just let it be the default behavior of encodeChildren() and rely on any overridden encodeChildren() method whether it wants to invoke encodeAll() on the children? This was actually an historic oversight in the specification. Originally, the encodeAll() method didn’t exist. It was only added in JSF 1.2 and it basically made the getRendersChildren() obsolete. But for backward compatibility this complexity was introduced.
In a nutshell, always let getRendersChildren() return true if you have overridden the encodeChildren() method. Otherwise the children won’t be encoded at all.
Last but not least, you’ll probably also wonder why we don’t “simply” override the encodeBegin(), encodeChildren(), (and getRendersChildren()), and encodeEnd() of the DataList component but instead create a “whole” renderer implementation. The main reason is: simplicity and extensibility. Those methods are on UIComponent specified to do more than only rendering. They also check if the UIComponent#isRendered() returns true. encodeBegin() also fires PreRenderComponentEvent and pushes the current component into the EL (Expression Language ) scope as #{component}. encodeEnd() pops #{component} out of the EL scope. And they also check if there’s a renderer attached and, if so, delegate to it. That’s all specified in their Javadoc. You’d need to manually take care of them yourself when you override those methods. That’s unnecessarily repeated work. And, when someone in the future wants to adjust the rendering of the component, they won’t be able to plug a custom renderer if your component doesn’t check for it.
Extending Existing Component
Imagine that there’s an existing component whose behavior you’d like to adjust, usually by adding one or more new custom attributes. If those attributes are purely output-only, then you could just make use of the pass-through attributes feature which was introduced in JSF 2.2. Previously, any custom attribute which wasn’t officially supported by the component was simply ignored during view render time. For example, when you’d like to add the missing accept attribute5 to the existing <h:inputFile> component,6 simply adding the attribute as follows won’t work.
<h:inputFile id="photo" value="#{editProfile.photo}" accept="image/*" />With the pass-through attributes feature you could explicitly instruct JSF to render the custom attribute anyway. This can be done in two ways. The first way is registering it via the http://xmlns.jcp.org/jsf/passthrough XML namespace.
< ... xmlns:h="http://xmlns.jcp.org/jsf/html"xmlns:a="http://xmlns.jcp.org/jsf/passthrough">...<h:form enctype="multipart/form-data"><h:inputFile ... a:accept="image/*" /></h:form>
Another way is declaring it via the <f:passThroughAttribute> tag.
< ... xmlns:f="http://xmlns.jcp.org/jsf/core"xmlns:h="http://xmlns.jcp.org/jsf/html">...<h:form enctype="multipart/form-data"><h:inputFile ...><f:passThroughAttribute name="accept" value="image/*" /></h:inputFile></h:form>
It’ll just work fine on the client side either way. On the browsers supporting this attribute, the file browse dialog will only show the files matching the comma separated IANA (Internet Assigned Numbers Authority ) media types7 specified in the accept attribute. However, this won’t work in browsers not supporting this attribute,8 nor will it validate anything on the server side. Even if the browser supports it, any malicious-minded end user can easily manipulate the retrieved HTML document and remove the accept attribute and hence be able to upload a different file type.
For exactly that server-side work, you’d like to extend the <h:inputFile> component to perform validation based on the accept attribute. The first step is looking at which UIComponent class exactly is represented by <h:inputFile>. As you can see in Table 11-1, that’s javax.faces.component.html.HtmlInputFile. Let’s start by extending it and adding the new accept attribute.
@FacesComponent(createTag=true)public class InputFile extends HtmlInputFile {@Overridepublic void encodeBegin(FacesContext context) throws IOException {String accept = getAccept();if (accept != null) {getPassThroughAttributes().put("accept", accept);}super.encodeBegin(context);}public String getAccept() {return (String) getStateHelper().eval("accept");}public void setAccept(String accept) {getStateHelper().put("accept", accept);}}
Note that there’s no property for the accept attribute. Any public component attribute must be represented by a getter/setter pair which delegates further to UIComponent#getStateHelper(). Basically, you must delegate all view-scoped component attributes to the StateHelper. This will in turn take care that the right deltas end up in the JSF view state. This is of course optional, but not doing so will make the component instance not programmatically manipulatable. Any changes performed during a previous HTTP request would get lost during the subsequent HTTP postback request for the very simple reason that the UIComponent instance is recreated from scratch.
Also note that the new accept attribute is simply added as a pass-through attribute in the encodeBegin() method before delegating to the superclass method where the actual rendering job takes place. This removes the need to create a whole custom renderer for the particular purpose of rendering a new attribute. Let’s test it now.
< ... xmlns:h="http://xmlns.jcp.org/jsf/html"xmlns:my="http://xmlns.jcp.org/jsf/component">...<h:form enctype="multipart/form-data"><my:inputFile id="photo" value="#{editProfile.photo}"accept="image/*" required="true"><f:ajax listener="#{editProfile.upload}" render="photo_m" /></my:inputFile><h:message id="photo_m" for="photo" /></h:form>
For the sake of completeness, here’s what the backing bean looks like.
@Named @RequestScopedpublic class EditProfile {private Part photo;public void upload() {String fileName = photo.getSubmittedFileName();String fileType = photo.getContentType();long fileSize = photo.getSize();System.out.println("File name: " + fileName);System.out.println("File type: " + fileType);System.out.println("File size: " + fileSize);}// Add/generate getter and setter.}
Now we have basically created the UIComponent equivalent of <h:inputFile> with a pass-through accept attribute. The next step is implementing server-side validation of whether the media type of the uploaded file matches the specified accept attribute. For this, we’d like to override UIInput#validateValue() in our InputFile class as below. This runs during the process validations phase (third phase).
@Overrideprotected void validateValue(FacesContext context, Object newValue) {String accept = getAccept();if (accept != null && newValue instanceof Part) {Part part = (Part) newValue;String contentType = context.getExternalContext().getMimeType(part.getSubmittedFileName());String acceptPattern = accept.trim().replace("*", ".*").replaceAll("\s*,\s*", "|");if (contentType == null || !contentType.matches(acceptPattern)) {String message = "Unacceptable file type";context.addMessage(getClientId(context), new FacesMessage(FacesMessage.SEVERITY_ERROR, message, null));setValid(false);}}if (isValid()) {super.validateValue(context, newValue);}}
As you see, it will basically check if the accept attribute is specified and if there’s a submitted file, and if so then convert the accept attribute to a regular expression pattern and match the content type of the submitted file against it. The accept attribute represents a comma separated string of IANA media types wherein the asterisk is used as a wildcard and the comma is used as a disjunction operator. An example accept value of "image/*,application/pdf" is this way converted to a regular expression of "image/.*|application/pdf". If it doesn’t match, then it will add a faces message associated with the component to the faces context and mark the component as invalid by calling UIInput#setValid() with false. In the end, if the component is valid, it will continue the validation call to the superclass.
Further there’s another thing to mention: the content type is not obtained from Part#getContentType() but from ExternalContext#getMimeType() based on the submitted file name. This is just to cover the corner case that the client doesn’t send a content type along, or even sends one which is not understood by the server. ExternalContext#getMimeType() basically obtains the list of known content types from <mime-mapping> entries in web.xml. The server itself has some default values and you can override or extend them in the web application’s own web.xml.
Now the file’s content type attribute is filtered on the client side and validated on the server side. All good and well, but this of course only validates the file’s content type based on the file name and not the file’s actual content. Imagine that one creates a ZIP file and simply renames the file extension to become an image file, or even an executable file with malware. It would still pass through the file type validation on both the client and server side. Frankly, this responsibility is not up to the component itself, but to you, the JSF developer. The correct solution would be to create a custom validator and attach it to the component. Here’s what such an image file validator can look like, with a little help from the Java2D API which is capable of parsing image files. If it throws an exception or returns null, then it’s very definitely not an image file.
@FacesValidator("project.ImageFileValidator")public class ImageFileValidator implements Validator<Part> {@Overridepublic void validate(FacesContext context, UIComponent component, Part value)throws ValidatorException{if (value == null) {return; // Let @NotNull or required="true" handle.}try {ImageIO.read(value.getInputStream()).toString();}catch (Exception e) {String message = "Not an image file";throw new ValidatorException(new FacesMessage(message), e);}}}
In order to get it to run, declare it as validator attribute of the component tag.
<my:inputFile ... validator="project.ImageFileValidator" />It works beautifully. Now, when validation passes as well, the backing bean action method is invoked wherein you can save the uploaded file to the desired location . This could be implemented as follows:
public void upload() {Path folder = Paths.get("/path/to/uploads");String fileName = Paths.get(photo.getSubmittedFileName()).getFileName().toString();int indexOfLastDot = fileName.lastIndexOf('.');String name = fileName.substring(0, indexOfLastDot);String extension = fileName.substring(indexOfLastDot);FacesMessage message = new FacesMessage();try (InputStream contents = photo.getInputStream()) {Path file = Files.createTempFile(folder, name + "-", extension);Files.copy(contents, file, StandardCopyOption.REPLACE_EXISTING);message.setSummary("Uploaded file successfully saved.");}catch (IOException e) {message.setSummary("Could not save uploaded file, try again.");message.setSeverity(FacesMessage.SEVERITY_ERROR);e.printStackTrace();}FacesContext.getCurrentInstance().addMessage(null, message);}
You might wonder why it seems to save the uploaded file as a temporary file. This is actually not true. We’re just utilizing the Files#createTempFile() facility in order to guarantee the uniqueness of the file name of the saved file. It will automatically include a unique random string between the file name and the file extension. Otherwise, when multiple people upload different files with coincidentally the same name, they may overwrite each other and we’d lose information.
Extending Existing Renderer
Imagine that there’s an existing renderer which has logic bugs or shortcomings and you’d like to quickly patch it by extending it instead of rewriting from scratch. Unfortunately, it sounds far easier than it actually is. That is, standard renderer implementations are not part of the standard JSF API, contrary to standard HTML component implementations which are available in the javax.faces.component.html package. The actual standard HTML renderer implementations are provided by the JSF implementation itself. Mojarra has them in the com.sun.faces.renderkit.html_basic package and MyFaces has them in the org.apache.myfaces.renderkit.html package.
Another problem with those standard HTML renderers is relatively poor abstraction of the code. Basically all those standard HTML renderers don’t have abstracted-out pieces of code which solely emit HTML markup in such way that it’s fully separated from the logic. In other words, when you need to fix some logic, you’d almost always also have to write or copy/paste all the code responsible for emitting HTML.
A common real-world example is the desire to let <h:message> or <h:messages> render the faces message unescaped, so that you can embed some HTML code in a faces message, more than often to provide a link to the desired target page (e.g., “Unknown user, perhaps you want to <a href="login">Log in</a>?”). The standard <h:message> component doesn’t support such facility and the HTML-escaping is controlled by its renderer which in turn is thus JSF implementation dependent. This JSF built-in HTML escaping is found over all place and is a very important guard against possible XSS attack holes when you’re about to embed user-controlled data in the web page. There are a handful of components which have an explicit attribute to turn off this HTML-escaping, such as <h:outputText> with its escape attribute , <f:selectItem> with its itemEscaped attribute, and <f:selectItems> with its itemLabelEscaped attributes. Such an attribute is, however, absent in <h:message> and <h:messages>. See also JSF spec issue 634.9 Perhaps it will be added in JSF.next, but for now you can’t go around a third-party component library or extending the existing standard HTML renderer.
We’ll take that as an example to extend an existing standard HTML renderer for <h:message>. The first step is looking at which renderer exactly is currently used by the <h:message> component. In Table 11-1 you will see that this component is backed by the HtmlMessage class. The currently used renderer implementation is programmatically as follows:
String componentFamily = HtmlMessage.COMPONENT_FAMILY;String rendererType = new HtmlMessage().getRendererType();Renderer renderer = FacesContext.getCurrentInstance().getRenderKit().getRenderer(componentFamily, rendererType);System.out.println(renderer.getClass());
In case you’re using Mojarra as JSF implementation, it’ll print as follows:
class com.sun.faces.renderkit.html_basic.MessageRendererThat’s thus exactly the renderer class we’d like to extend. Mojarra is open source and its source code is currently available at https://github.com/javaserverfaces/mojarra . Once you’ve gotten the MessageRenderer source code at hands, the next step is to figure out where exactly the summary and detail of the FacesMessage is being rendered and how exactly we can override it with a minimum of code . We can see in the source code that it takes place in the encodeEnd() method which, in the current Mojarra 2.3.3 version, is already 182 lines of code. It’s using ResponseWriter#writeText() 10 to render the summary and detail. We’d like to replace this by ResponseWriter#write() so that it doesn’t perform any escaping.
We can of course extend the class, copy/paste all the 182 lines of the encodeEnd() method, and adjust the writeText() calls for the summary as well as detail variables as follows:
Object escape = component.getAttributes().get("escape");if (escape == null || Boolean.parseBoolean(escape.toString())) {writer.writeText(summary, component, null);}else {writer.write(summary);}
However, this is not terribly elegant. What if we were to capture all writeText() calls during the encodeEnd() method and transparently delegate to write()? That would look much better. You can achieve this by wrapping the ResponseWriter, setting it on the faces context, and passing it through the superclass. Almost any public JSF API artifact has an equivalent XxxWrapper class as well in the API. You can find them all in the “All known implementing classes” section of the javax.faces.FacesWrapper Javadoc.11 All those wrapper classes make JSF very easily customizable and extensible. All of them have a constructor taking the to-be-wrapped class and you basically just need to pick one or more of the methods you’d like to decorate.
All in all, here’s how we could extend the MessageRenderer to delegate all writeText() calls during the encodeEnd() method to write().
public class EscapableMessageRenderer extends MessageRenderer {@Overridepublic void encodeEnd(FacesContext context, UIComponent component)throws IOException{ResponseWriter writer = context.getResponseWriter();try {context.setResponseWriter(new ResponseWriterWrapper(writer) {@Overridepublic void writeText(Object text, UIComponent component, String property)throws IOException{String string = text.toString();Object escape = component.getAttributes().get("escape");if (escape == null|| Boolean.parseBoolean(escape.toString())){super.writeText(string, component, property);}else {super.write(string);}}});super.encodeEnd(context, component);}finally {context.setResponseWriter(writer);}}}
Do note that it’s very important to restore the original response writer in the finally of the try block wherein the wrapped response writer is being used. In order to get it to run, register it as follows in faces-config.xml on the component family and renderer type as associated with the <h:message> component:
<render-kit><renderer><component-family>javax.faces.Message</component-family><renderer-type>javax.faces.Message</renderer-type><renderer-class>com.example.project.renderer.EscapableMessageRenderer</renderer-class></renderer></render-kit>
No, you cannot use the @FacesRenderer annotation for this. This won’t work when extending an existing renderer. The original renderers are by themselves already registered on the very same component family and renderer type, somewhere in an XML file. And you know, an XML-based configuration always gets higher precedence over an annotation-based configuration when both are discovered.
Now you can just set the escape attribute of the existing <h:message> component to false in order to get the extended renderer to do its job.
<h:message ... escape="false" />Beware that you don’t embed user-controlled input in any faces message which gets displayed in there, or you’ll open up a potential XSS attack hole.
Custom Tag Handlers
In Chapter 3, you learned about the difference between the view build time and the view render time, and that tag handlers such as JSTL run while building the JSF component tree while JSF components run while processing the HTTP request and response through the JSF life cycle. Not only can JSF components be customized but also tag handlers. This is particularly useful when you want to control the building of the JSF component tree instead of processing the HTTP request and response.
<f:viewParam> is useful on master-detail pages. From the master page, you can link to the detail page with the entity ID as the parameter. In the detail page, you can load the entity by ID via <f:viewParam>. It goes as follows:
<f:metadata><f:viewParam name="id" value="#{editItem.item}"converter="project.ItemConverter" converterMessage="Unknown item"required="true" requiredMessage="Bad request"></f:viewParam></f:metadata>
When conversion or validation fails, a faces message will be added to the faces context of the current page. However, more often you’d just like to directly redirect the user back to the master page. This is relatively trivial to implement with <f:event> on PostValidateEvent. No, <f:viewAction> won’t work as that wouldn’t be invoked in first place when there’s a conversion or validation error .
<f:metadata>...<f:event type="postValidate" listener="#{editItem.onload()}" /></f:metadata>
Wherein the onload() method looks as follows:
public void onload() throws IOException {FacesContext context = FacesContext.getCurrentInstance();if (context.isValidationFailed()) {ExternalContext ec = context.getExternalContext();ec.redirect(ec.getRequestContextPath() + "/items.xhtml");}}
Okay, that works, but this will end up in boilerplate code when you have more of such pages. Ideally, you’d like to be able to declaratively register an event listener on <f:viewParam> itself in a self-documenting way like below so that you can keep the backing bean code free of manual request-response processing clutter.
<f:metadata><f:viewParam ...><t:viewParamValidationFailed redirect="/items.xhtml" /></f:viewParam></f:metadata>
This can be achieved with a tag handler which basically registers a new system event listener on the UIViewParameter component represented by the <f:viewParam> tag. The tag handler class must extend from javax.faces.view.facelets.TagHandler.
public class ViewParamValidationFailed extends TagHandlerimplements ComponentSystemEventListener{private String redirect;public ViewParamValidationFailed(TagConfig config) {super(config);redirect = getRequiredAttribute("redirect").getValue();}@Overridepublic void apply(FaceletContext context, UIComponent parent)throws IOException{if (parent instanceof UIViewParameter&& !context.getFacesContext().isPostback()){parent.subscribeToEvent(PostValidateEvent.class, this);}}@Overridepublic void processEvent(ComponentSystemEvent event)throws AbortProcessingException{UIComponent parent = event.getComponent();parent.unsubscribeFromEvent(PostValidateEvent.class, this);FacesContext context = event.getFacesContext();if (context.isValidationFailed()) {try {ExternalContext ec = context.getExternalContext();ec.redirect(ec.getRequestContextPath() + redirect);}catch (IOException e) {throw new AbortProcessingException(e);}}}}
Indeed, this also implements javax.faces.event.ComponentSystemEventListener. This is not strictly required for a tag handler; it’s just done for code convenience in this specific example. The overridden apply() method is for TagHandler and the overridden processEvent() method is for ComponentSystemEventListener. In the apply() method we have the opportunity to programmatically manipulate the parent component, before it’s being added to the component tree.
We can programmatically achieve the same behavior as <f:event> by calling UIComponent#subscribeToEvent(), passing the component system event type and listener instance of interest. The listener instance of interest happens to be just the current tag handler instance. When the component system event of interest has been published by the application, then the processEvent() method of the listener instance will be invoked.
The first thing we do in processEvent() is to unsubscribe the listener instance. This is done on purpose because component system event listeners are considered stateful and therefore are inherently saved in the JSF view state. An easy way to observe this is to reconfigure JSF to save the view state on the client side by explicitly setting the javax.faces.STATE_SAVING_METHOD context parameter to client in web.xml and inspecting the size of the javax.faces.ViewState hidden input field in the generated HTML output of any JSF form. Every time you add <f:event>, or don’t unsubscribe ComponentSystemEventListener after it has done its job, the size of the JSF view state grows with the serialized form of the listener instance. In this specific use case of a listener which should only run during a non-postback, that’s just unnecessary; hence the explicit unsubscribe.
Now, in order to get it to run, register it in /WEB-INF/example.taglib.xml as follows:
<tag><tag-name>viewParamValidationFailed</tag-name><handler-class>com.example.project.taghandler.ViewParamValidationFailed</handler-class></tag>
Packaging in a Distributable JAR
In case you have developed a bunch of reusable components, renderers, tag handlers, tag files, composite components, and what not, and you’d like to package it in a JAR file for inclusion in /WEB-INF/lib of a web application, then you need to create a so-called web fragment project . Basically all JSF-oriented components and utility libraries such as OmniFaces, PrimeFaces, OptimusFaces, BootsFaces, ButterFaces, and DeltaSpike are built like this. In Maven perspective, it’s merely a JAR project. The key is to put files which you normally put in the src/main/webapp folder of a Maven WAR project in the src/main/resources/META-INF/resources/[libraryName] folder of the Maven JAR project. There is one main exception, all deployment descriptor files which you normally put in src/main/webapp/WEB-INF, such as web.xml, faces-config.xml, *.taglib.xml, and beans.xml go directly in the src/main/resources/META-INF folder. Another exception is that the web.xml file is to be replaced by web-fragment.xml.
The [libraryName] subfolder in the resources folder represents the “library name” which is generally the URL-friendly form of the project name. For example, “omnifaces”, “primefaces”, “optimusfaces”, “bsf”, “butterfaces”, etc. Exactly this library name is then usable in the library attribute of resource components such as <h:outputScript>, <h:outputStylesheet>, and <h:graphicImage>. Below is what such a Maven JAR project looks like in Eclipse when organized to conform to the “web fragment” rules . Note particularly the structure of the src/main/resources folder. Of course, any Java classes can go inside the src/main/java folder in the usual way.
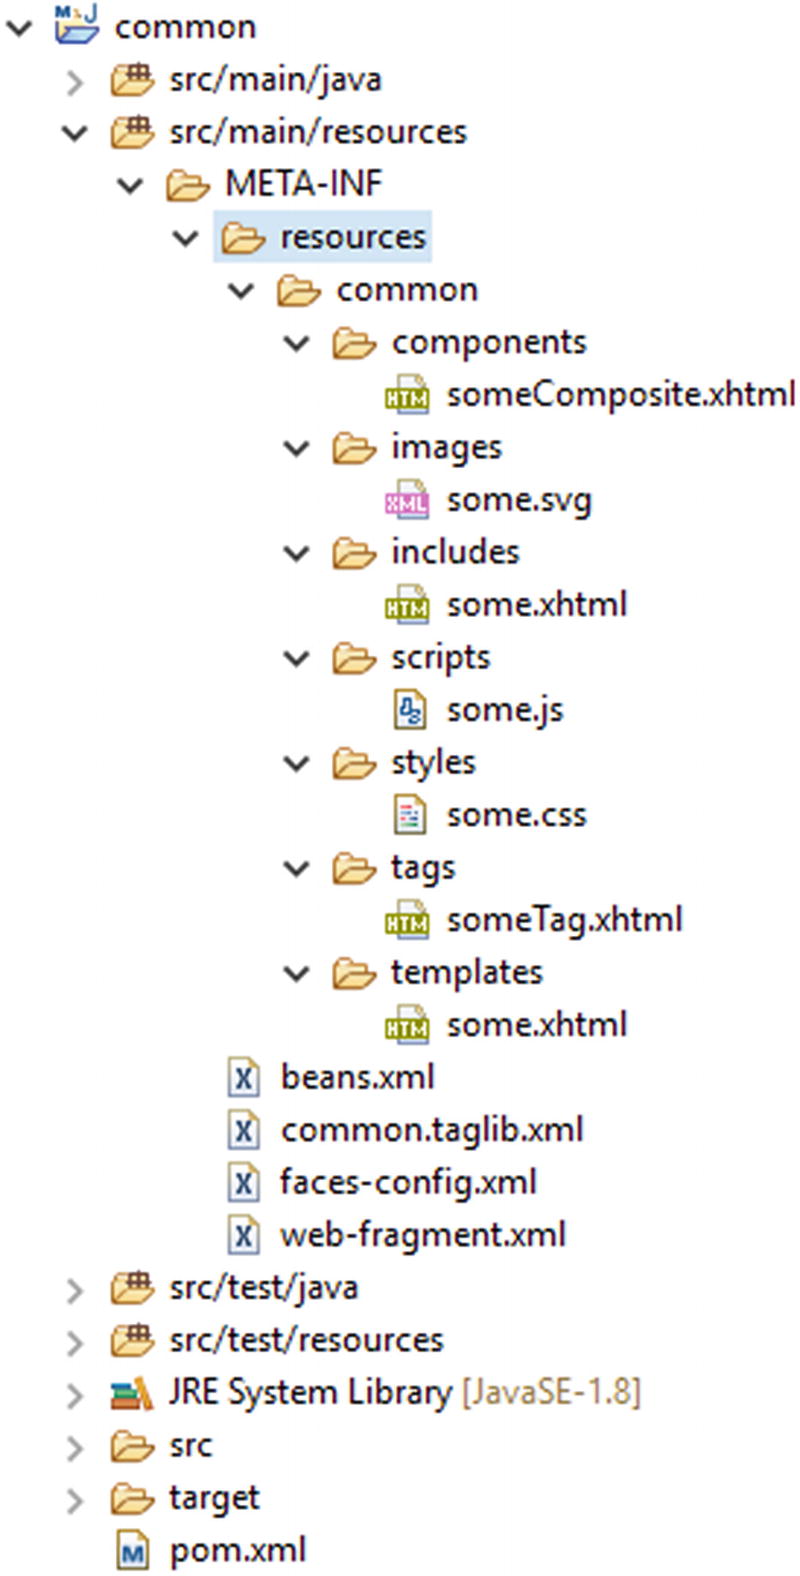
Whereby the common.taglib.xml looks like the following, with the composite library name set to a path relative to src/main/resources/META-INF/resources and the tag file source set to a path relative to the location of the *.taglib.xml file itself.
<?xml version="1.0" encoding="UTF-8"?><facelet-taglibxmlns:="http://xmlns.jcp.org/xml/ns/javaee"xmlns:xsi="http://www.w3.org/2001/XMLSchema-instance"xsi:schemaLocation="http://xmlns.jcp.org/xml/ns/javaeehttp://xmlns.jcp.org/xml/ns/javaee/web-facelettaglibrary_2_3.xsd"version="2.3"><namespace>http://example.com/common</namespace><short-name>common</short-name><composite-library-name>common/components</composite-library-name><tag><tag-name>someTag</tag-name><source>resources/common/tags/someTag.xhtml</source></tag></facelet-taglib>
And whereby the web-fragment.xml looks as follows, nearly identical to web.xml, only with a different root element, <web-fragment> instead of <web-app>.
<?xml version="1.0" encoding="UTF-8"?><web-fragmentxmlns:="http://xmlns.jcp.org/xml/ns/javaee"xmlns:xsi="http://www.w3.org/2001/XMLSchema-instance"xsi:schemaLocation="http://xmlns.jcp.org/xml/ns/javaeehttp://xmlns.jcp.org/xml/ns/javaee/web-fragment_4_0.xsd"version="4.0"><name>common</name></web-fragment>
Once such a web fragment project is built as a JAR file and included in /WEB-INF/lib of the main web application project, then the resources of the JAR are available in the Facelets files of the main web application project via the library name “common” as follows:
<ui:composition template="/common/templates/some.xhtml"xmlns:="http://www.w3.org/1999/xhtml"xmlns:h="http://xmlns.jcp.org/jsf/html"xmlns:ui="http://xmlns.jcp.org/jsf/facelets"xmlns:common="http://example.com/common"><ui:define name="content"><common:someComposite /><h:graphicImage library="common" name="js/some.svg" /><ui:include src="/common/includes/some.xhtml" /><h:outputScript library="common" name="scripts/some.js" /><h:outputStylesheet library="common" name="styles/some.css" /><common:someTag /></ui:define></ui:composition>
Resource Dependencies
There may be cases whereby your custom component or renderer depends on a specific JavaScript or Stylesheet resource, for which you would like to avoid the end user having to manually include it via <h:outputScript> or <h:outputStylesheet>. In such cases, you may find the @javax.faces.application.ResourceDependency annotation12 useful. Imagine that you would like to automatically include common:scripts/some.js and common:styles/some.css along with a particular custom component; then you can do so as follows:
@ResourceDependency(library="common", name="some.css", target="head")@ResourceDependency(library="common", name="some.js", target="head")public class SomeCustomComponent extends UIComponent {// ...}
You can of course also include JSF’s own javax.faces:jsf.js when necessary, i.e., when your custom component happens to rely on, for example, the jsf.ajax.request() or other functions provided by the standard JSF JavaScript API. javax.faces:jsf.js can be included as follows, with the script library and name available as constants of ResourceHandler.
@ResourceDependency(library=ResourceHandler.JSF_SCRIPT_LIBRARY_NAME,name=ResourceHandler.JSF_SCRIPT_RESOURCE_NAME,target="head")public class SomeCustomComponent extends UIComponent {// ...}