
JSF (JavaServer Faces) is a component-based MVC (Model-View-Controller) framework. In essence, JSF parses the view definition into a “component tree.” The root of this tree is represented by the “view root” instance associated with the current instance of the faces context.
UIComponent tree = FacesContext.getCurrentInstance().getViewRoot();The view is usually defined using XHTML+XML markup in a Facelets file. XML is a markup language which is very suitable for defining a tree hierarchy using a minimum of code. The component tree can also be created and manipulated using Java code in a Java class, but this generally ends up in very verbose code in order to declare value or method expressions and to correlate parents and children with each other. Frequently, developers who do so aren’t aware of how tag handlers such as JSTL (JavaServer Pages Standard Tag Library) can be used to manipulate the component tree using just XML .
The component tree basically defines how JSF should consume the HTTP request in order to apply request values coming from input components, convert and validate them, update the managed bean model values, and invoke the managed bean action. It also defines how JSF should produce the HTTP response by generating the necessary HTML output using renderers tied to the components whose attributes can in turn reference managed bean properties. In other words, the component tree defines how the phases of the JSF life cycle should be processed. The diagram in Figure 3-1 shows how a HTTP postback request is usually being processed by JSF.
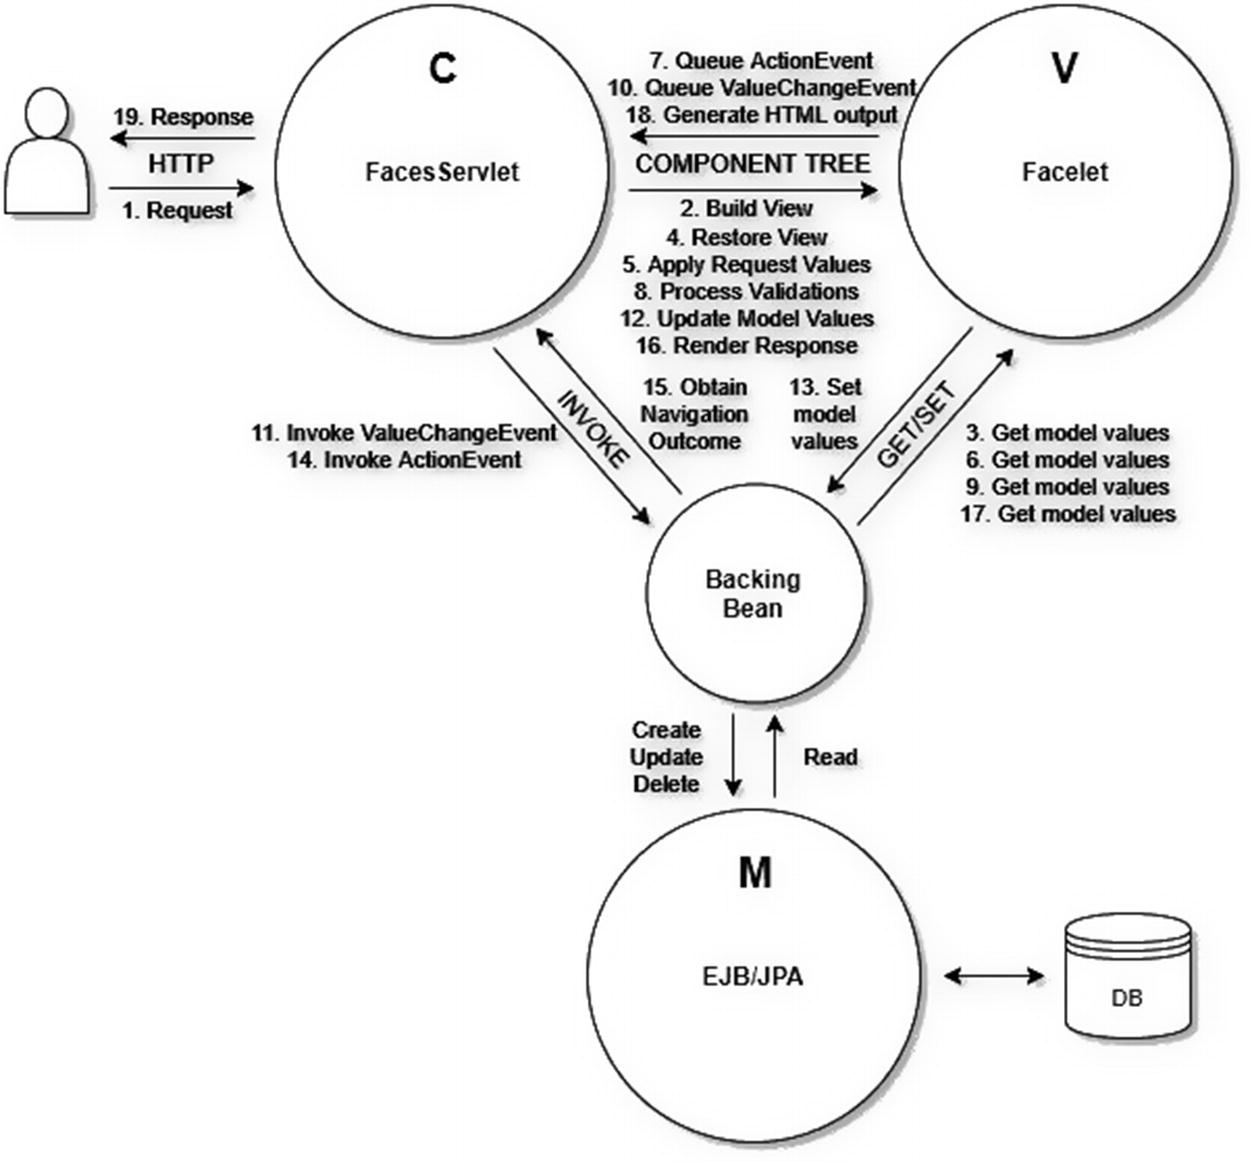
Figure 3-1 How JSF processes the HTTP postback request within the MVC architecture (the numbers represent the ordering)
Following is a brief description of each step :
End user sends a HTTP request which matches the mapping of the FacesServlet and thus invokes it.
The FacesServlet will build the component tree based on the Facelet file identified by the HTTP request path.
The component tree will if necessary get the current model values from the backing bean during building the view. Any attribute of a Facelets template tag and a JSTL core tag and only the "id" and "binding" attributes of a JSF component will get executed.
The FacesServlet will restore the JSF view state on the component tree.
The FacesServlet will let the component tree apply the HTTP request parameters and input components will store them as “submitted value.”
The input and command components will if necessary get the current model values from the backing bean during consulting the "rendered", "disabled", and "readonly" attributes in order to check whether they are allowed to apply the request parameters.
The command components will queue the ActionEvent when it detects, based on HTTP request parameters, that it was being invoked in the client side.
The FacesServlet will let the component tree process all registered converters and validators on the submitted values and input components will store the newly converted and validated value as “local value.”
The input components will get the old model value from the backing bean and compare them with the new value.
If the new value is different from the old model value, then the input component will queue the ValueChangeEvent.
When all conversion and validation are finished, the FacesServlet will invoke the listener methods of any queued ValueChangeEvent on the backing bean.
The FacesServlet will let the component tree update all model values.
The input components will set the new model values in the backing bean.
The FacesServlet will invoke the listener methods of any queued ActionEvent on the backing bean.
The final action method of the backing bean will if necessary return a non-null String outcome referring the target view.
The FacesServlet will let the component tree render the response.
The component tree will if necessary get the current model values from the backing bean during generating the HTML output. Practically any attribute of a Facelet component and a JSF component which is involved in generating the HTML output will get executed.
The component tree will write the HTML output to the HTTP response.
The FacesServlet will return the HTTP response to the end user.
This is different from a request-based MVC framework wherein the developer needs to write more boilerplate code in the “controller” class associated with the view in order to define which request parameters need to be applied, and/or how they should be converted and validated before populating the entity. The developer also often needs to manually populate the entity by manually invoking a bunch of getters and setters before passing the entity to the service layer while invoking the action. This all is unnecessary in JSF.
It should be noted that the backing bean has a rather unique position in the MVC paradigm. It can act as a Model, a View, and the Controller, depending on the point of view. This is detailed in Chapter 8.
Standard HTML Components
The default JSF implementation already provides an extensive set of components for authoring HTML pages with the help of Facelets view technology. Those HTML components are available under the http://xmlns.jcp.org/jsf/html XML namespace URI (Uniform Resource Identifier) which should be assigned to the "h" XML namespace prefix.
xmlns:h="http://xmlns.jcp.org/jsf/html"The most important HTML components which should always be present in your JSF page are the <h:head> and <h:body>. Without them, JSF won’t be able to auto-include any script or stylesheet resources associated with a particular component. For example, the <h:commandButton>, which generates a HTML submit button, requires for its Ajax functionality the jsf.js script file to be included in the HTML document.
<h:commandButton>, generates a HTML submit button.
<h:commandButton>, can optionally contain Ajax functionality.
The Ajax functionality requires a jsf.js script file in the HTML document.
The renderer of that component will automatically take care of that, but that would only work if <h:head> is present. The <h:body> is slightly less important here, but there may exist components which need to add a script to the end of the HTML body, such as the <f:websocket>. In other words, the most minimal and HTML5-valid JSF page would look as follows:
<!DOCTYPE html><html lang="en"xmlns:="http://www.w3.org/1999/xhtml"xmlns:h="http://xmlns.jcp.org/jsf/html"><h:head><title>Title</title></h:head><h:body>...</h:body></html>
The generated HTML response, as you can inspect by right- clicking View page source in the average web browser , should look as follows:
<!DOCTYPE html><html lang="en" xmlns:="http://www.w3.org/1999/xhtml"><head><title>Title</title></head><body>...</body></html>
You see, JSF basically replaces all components in the page by their generated HTML output. As discussed previously, JSF provides an extensive set of standard HTML components . Table 3-1 provides an overview.
Table 3-1 Standard HTML Components Provided by JSF
Component tag | Component superclass | Value type | HTML output | Since |
|---|---|---|---|---|
<h:body> | UIOutput | - | <body> | 2.0 |
<h:button> | UIOutcomeTarget | String | <button onclick=window.location> | 2.0 |
<h:column> | UIColumn | - | <td> (for h:dataTable) | 1.0 |
<h:commandButton> | UICommand | String | <input type=submit> | 1.0 |
<h:commandLink> | UICommand | String | <a onclick=form.submit()> | 1.0 |
<h:commandScript> | UICommand | - | <script> (function to submit a form) | 2.3 |
<h:dataTable> | UIData | Object[] | <table> (dynamic) | 1.0 |
<h:doctype> | UIOutput | - | <!DOCTYPE> | 2.0 |
<h:form> | UIForm | - | <form method=post> | 1.0 |
<h:graphicImage> | UIGraphic | - | <img src> | 1.0 |
<h:head> | UIOutput | - | <head> | 2.0 |
<h:inputFile> | UIInput | Part | <input type=file> | 2.2 |
<h:inputHidden> | UIInput | Object | <input type=hidden> | 1.0 |
<h:inputSecret> | UIInput | Object | <input type=password> | 1.0 |
<h:inputText> | UIInput | Object | <input type=text> | 1.0 |
<h:inputTextarea> | UIInput | Object | <textarea> | 1.0 |
<h:link> | UIOutcomeTarget | String | <a href> | 2.0 |
<h:message> | UIMessage | - | <span> (if necessary) | 1.0 |
<h:messages> | UIMessages | - | <ul> | 1.0 |
<h:messages layout=table> | UIMessages | - | <table> | 1.0 |
<h:outputFormat> | UIOutput | Object | <span> (if necessary) | 1.0 |
<h:outputLabel> | UIOutput | String | <label> | 1.0 |
<h:outputText> | UIOutput | Object | <span> (if necessary) | 1.0 |
<h:outputScript> | UIOutput | - | <script> | 2.0 |
<h:outputStylesheet> | UIOutput | - | <link rel=stylesheet> | 2.0 |
<h:panelGrid> | UIPanel | - | <table> (static) | 1.0 |
<h:panelGroup> | UIPanel | - | <span> | 1.0 |
<h:panelGroup layout=block> | UIPanel | - | <div> | 1.2 |
<h:selectBooleanCheckbox> | UIInput | Boolean | <input type=checkbox> | 1.0 |
<h:selectManyCheckbox> | UIInput | Object[] | <table><input type=checkbox>* | 1.0 |
<h:selectManyListbox> | UIInput | Object[] | <select multiple size=n><option>* | 1.0 |
<h:selectManyMenu> | UIInput | Object[] | <select multiple size=1><option>* | 1.0 |
<h:selectOneListbox> | UIInput | Object | <select size=n><option>* | 1.0 |
<h:selectOneMenu> | UIInput | Object | <select size=1><option>* | 1.0 |
<h:selectOneRadio> | UIInput | Object | <table><input type=radio>* | 1.0 |
<h:selectOneRadio group> | UIInput | Object | <input type=radio name=group> | 2.3 |
The “Component superclass” column specifies the most important UIComponent superclass the component extends from. You must interpret the specified class to be from the javax.faces.component package.
The “Value type” column specifies the supported type of the model value behind the component’s value attribute, if it has any. If the value type is String, it means that only the model value’s toString() outcome will be used as value of the component, generally in components which would render it as some sort of label. If it’s Object, it means that it supports any kind of value, generally in components which would render it as text or parse it as input value, if necessary with help of an implicit or explicit Converter. If the value type is Object[],it means that it requires an array or collection of objects as model value, generally in data and multi-selection input components, if necessary with an implicit or explicit Converter.
There are two specialized input components . The <h:inputFile> binds the uploaded file to a javax.servlet.http.Part property and doesn’t support outputting it—for security reasons—and the <h:selectBooleanCheckbox> which binds the checked value to a boolean property. Those two input components don’t support a Converter and therefore don’t support any other model value type.
The “HTML output” column specifies the minimum generated HTML output. If the HTML output says “if necessary,” then it means that the specified HTML element is only emitted when the component has any attribute specified that requires being outputted as a HTML element attribute, such as id, styleClass, onclick, etc. That is, a component can have attributes that don’t end up in the generated HTML output at all, such as binding, rendered, converter, etc. If a component can have multiple HTML element representations, then that’s usually controlled by the layout attribute as you can see with <h:messages> and <h:panelGroup>. If the HTML output contains “*” (an asterisk), then it means that the component may emit zero or more of the specified nested HTML elements.
The “Since” column indicates the first JSF version the HTML component was available in. At the time this book was written, the following JSF versions were available: 1.0 (March 2004), 1.1 (May 2004), 1.2 (May 2006), 2.0 (July 2009), 2.1 (November 2010), 2.2 (March 2013), and 2.3 (March 2017).
The individual HTML components are detailed in Chapters 4 and 6.
Standard Core Tags
Next to the standard HTML components , JSF also provides a set of “core” tags. Those are essentially “helper” tags which allow you to declaratively configure one or more target HTML components by either nesting in them or wrapping around them. Those core tags are available under the http://xmlns.jcp.org/jsf/core XML namespace URI which should be assigned to the "f" XML namespace prefix.
xmlns:f="http://xmlns.jcp.org/jsf/core"Technically, those tags are intended to be reusable on non-HTML components. JSF offers the possibility of attaching a different render kit to the component tree which doesn’t generate HTML output but a different markup—hence the different XML namespace. Table 3-2 provides an overview.
Table 3-2 Standard Core Tags Provided by JSF
Core tag | Creates/handles | Target component | Since |
|---|---|---|---|
<f:actionListener> | javax.faces.event.ActionListener | ActionSource | 1.0 |
<f:ajax> | javax.faces.component.behavior.AjaxBehavior | ClientBehaviorHolder(s) | 2.0 |
<f:attribute> | UIComponent#getAttributes() | UIComponent | 1.0 |
<f:attributes> | UIComponent#getAttributes() | UIComponent | 2.2 |
<f:convertDateTime> | javax.faces.convert.DateTimeConverter | (Editable)ValueHolder | 1.0 |
<f:convertNumber> | javax.faces.convert.NumberConverter | (Editable)ValueHolder | 1.0 |
<f:converter> | javax.faces.convert.Converter | (Editable)ValueHolder | 1.0 |
<f:event> | javax.faces.event.ComponentSystemEvent | UIComponent | 2.0 |
<f:facet> | UIComponent#getFacets() | UIComponent | 1.0 |
<f:importConstants> | javax.faces.component.UIImportConstants | UIViewRoot (metadata) | 2.3 |
<f:loadBundle> | java.util.ResourceBundle | UIViewRoot | 1.0 |
<f:metadata> | javax.faces.view.ViewMetadata | UIViewRoot | 2.0 |
<f:param> | javax.faces.component.UIParameter | UIComponent | 1.0 |
<f:passthroughAttribute> | UIComponent#getPassthroughAttributes() | UIComponent | 2.2 |
<f:passthroughAttributes> | UIComponent#getPassthroughAttributes() | UIComponent | 2.2 |
<f:phaseListener> | javax.faces.event.PhaseListener | UIViewRoot | 1.0 |
<f:selectItem> | javax.faces.component.UISelectItem | UISelectOne/UISelectMany | 1.0 |
<f:selectItems> | javax.faces.component.UISelectItems | UISelectOne/UISelectMany | 1.0 |
<f:setPropertyActionListener> | javax.faces.event.ActionListener | ActionSource | 1.0 |
<f:subview> | javax.faces.component.NamingContainer | UIComponents | 1.0 |
<f:validateBean> | javax.faces.validator.BeanValidator | UIForm | 2.0 |
<f:validateDoubleRange> | javax.faces.validator.DoubleRangeValidator | EditableValueHolder | 1.0 |
<f:validateLength> | javax.faces.validator.LengthValidator | EditableValueHolder | 1.0 |
<f:validateLongRange> | javax.faces.validator.LongRangeValidator | EditableValueHolder | 1.0 |
<f:validateRegex> | javax.faces.validator.RegexValidator | EditableValueHolder | 2.0 |
<f:validateRequired> | javax.faces.validator.RequiredValidator | EditableValueHolder | 2.0 |
<f:validateWholeBean> | javax.faces.validator.BeanValidator | UIForm | 2.3 |
<f:validator> | javax.faces.validator.Validator | EditableValueHolder | 1.0 |
<f:valueChangeListener> | javax.faces.event.ValueChangeListener | EditableValueHolder | 1.0 |
<f:view> | javax.faces.component.UIViewRoot | UIComponents | 1.0 |
<f:viewAction> | javax.faces.component.UIViewAction | UIViewRoot (metadata) | 2.2 |
<f:viewParam> | javax.faces.component.UIViewParameter | UIViewRoot (metadata) | 2.0 |
<f:websocket> | javax.faces.component.UIWebsocket | UIViewRoot (body resource) | 2.3 |
Historically, there’s one more, the <f:verbatim>, but this was targeted to the since JSF 2.0 deprecated JSP (Java Server Pages) view technology and is hence also deprecated since JSF 2.0.
The “Creates/handles” column specifies the thing which the core tag creates or handles on the specified target component.
The “Target component” column specifies the target component superclass or interface supported by the core tag. You must interpret the specified class or interface to be from the javax.faces.component package. If the target component is optionally pluralized as in UIComponent(s), then it means that the core tag can either be nested in the target component or wrapped in one or more target components. If the target component is explicitly pluralized as in UIComponents, then it means that the core tag can only wrap one or more target components and thus not be nested.
As to target component interfaces, the ActionSource interface is implemented by UICommand components. The ClientBehaviorHolder interface is implemented by UIForm, UIInput, UICommand, UIData, UIOutput, UIPanel, and UIOutcomeTarget components. The ValueHolder interface is implemented by UIOutput and UIInput components. The EditableValueHolder interface is implemented by UIInput components. Based on Table 3-1 you should be able to derive the actual HTML components from them.
The “Since” column indicates the first JSF version the core tag was available in. At the time this book was written, the following JSF versions were available: 1.0 (March 2004), 1.1 (May 2004), 1.2 (May 2006), 2.0 (July 2009), 2.1 (November 2010), 2.2 (March 2013), and 2.3 (March 2017).
Most of the individual core tags are detailed in separate chapters.
Life Cycle
JSF has a very well defined life cycle. It is broken down into six phases. Each of those phases runs the HTTP request through the component tree, performs operations on it, and fires component system events. A brief description was already given in the introduction of this chapter, along with a diagram (Figure 3-1). The following sections describe each of the phases of the life cycle.
Restore View Phase (First Phase)
First create the UIViewRoot instance and set its properties such as locale from any <f:view> tag. The component tree is at that moment still empty. Only when the current request is a postback request, or when the view has a <f:metadata> with children, then build the full component tree based on the view definition. Basically, a specific UIComponent subclass will be instantiated based on the component tag defined in the view and populated with all attributes defined in the view and then UIComponent#setParent() will be invoked, passing the actual parent component.
The UIComponent#setParent() method will first check if there isn’t already an existing parent, and if so, it will fire the PreRemoveFromViewEvent on the old parent. Then, when the new parent has been set, and thus the current component has become part of the component tree, it will fire the PostAddToViewEvent with the current component.
If the current request is a postback request, then it will restore the “view state” identified by the javax.faces.ViewState request parameter into the freshly built component tree. After that, the PostRestoreStateEvent is explicitly fired for each component in the tree, even when the component tree has actually not been built or restored. In other words, even when it’s not a postback request, that event is fired. You’d better reinterpret that event as “PostRestoreViewPhase”. In case, during the PostRestoreStateEvent, you’re actually interested in whether it’s a postback request, you should consult the FacesContext#isPostback() as well.
By the end of the phase, if the full component tree has actually not been built, then immediately advance to the render response phase (sixth phase), thereby skipping any phase in between.
Apply Request Values Phase (Second Phase)
The UIComponent#processDecodes() will be invoked on UIViewRoot. The processDecodes() method will first invoke processDecodes() on each child and facet and then invoke UIComponent#decode() on itself. Finally, invoke UIViewRoot#broadCastEvents() to fire any FacesEvent queued for the current phase. The default JSF API (application programming interface) doesn’t offer such events, but developers can create and queue their own.
The default implementation of the decode() method will delegate to the Renderer#decode() method. In the decode() method of either the component or the renderer, the implementation has the opportunity to extract the submitted value from the request parameter and set it as an internal property. From the standard HTML component set, the only components that do that are the HTML form-based components deriving from UIForm, UIInput, and UICommand. The UIForm component will invoke UIForm#setSubmitted() with true. The UIInput component will invoke UIInput#setSubmittedValue() with the request parameter value. The UICommand component will queue the ActionEvent for the invoke application phase (fifth phase).
Process Validations Phase (Third Phase)
The UIComponent#processValidators() will be invoked on UIViewRoot . The processValidators() method will basically first fire PreValidateEvent for the current component, then invoke processValidators() on each child and facet, and then invoke PostValidateEvent for the current component. Finally, it will invoke UIViewRoot#broadCastEvents() to fire any FacesEvent queued for the current phase, which is usually an instance of ValueChangeEvent.
From the standard HTML component set, only UIInput components behave differently here. Right before calling processValidators() on each child and facet, they will first invoke UIInput#validate() on itself. If there’s a submitted value set during the apply request values phase (second phase), then they will first invoke Converter#getAsObject() on any attached Converter. When it doesn’t throw ConverterException, then they will invoke Validator#validate() on all attached Validator instances, regardless of whether any of them has thrown ValidatorException.
When no ConverterException or ValidatorException was thrown, then UIInput#setValue() will be invoked with the converted and validated value and the UIInput#isLocalValueSet() flag will return true and UIInput#setSubmittedValue() will be invoked with null.
When any ConverterException or ValidatorException was thrown, then UIInput#setValid() will be invoked with false and the message of the exception will be added to the faces context via FacesContext#addMessage(). Finally, when UIInput#isValid() returns false, then FacesContext#setValidationFailed() will be invoked with true.
By the end of the phase , when FacesContext#isValidationFailed() returns true, immediately advance to the render response phase (sixth phase), thereby skipping any phase in between.
Update Model Values Phase (Fourth Phase)
UIComponent#processUpdates() will be invoked on UIViewRoot. The processUpdates() method will in turn invoke the processUpdates() method on each child and facet. Finally, it will invoke UIViewRoot#broadCastEvents() to fire any FacesEvent queued for the current phase. The default JSF API doesn’t offer such events, but developers can create and queue their own.
Also during this phase, from the standard HTML component set, only UIInput components have a hook here. After calling processUpdates() on each child and facet, they will invoke UIInput#updateModel() on itself. When both the UIInput#isValid() and UIInput#isLocalValueSet() return true, they will invoke the setter method behind the value attribute with getLocalValue() as argument and immediately invoke UIInput#setValue() with null and clear out the UIInput#isLocalValueSet() flag.
When a RuntimeException is thrown here, usually caused by a bug in the setter method itself, it will invoke UIInput#setValid() with false and queue the UpdateModelException and immediately advance to the render response phase (sixth phase), thereby skipping any phase in between.
Invoke Application Phase (Fifth Phase)
The UIViewRoot#processApplication() will be invoked. This method will in turn invoke the UIViewRoot#broadCastEvents() to fire any FacesEvent queued for the current phase, which is usually an instance of AjaxBehaviorEvent or ActionEvent. Note that the processApplication() method is only defined on the UIViewRoot class and does not traverse the component tree .
Render Response Phase (Sixth Phase)
When the component tree is still empty, i.e., when the request is not a postback request, or when the view has no <f:metadata> with children, or when the developer has in the meanwhile explicitly invoked FacesContext#setViewRoot() with its own instance, then build the full component tree based on the view definition. When the component tree is present, first fire the PreRenderViewEvent for the UIViewRoot, then invoke UIComponent#encodeAll() on the UIViewRoot, and then invoke PostRenderViewEvent for the UIViewRoot.
The UIComponent#encodeAll() method will basically first invoke encodeBegin() on itself, then if UIComponent#getRendersChildren() returns true, it will invoke encodeChildren() on itself, or else invoke UIComponent#encodeAll() on each child, and then invoke encodeEnd() on itself. This all happens only if UIComponent#isRendered() returns true—that is, when the rendered attribute of the component tag doesn’t evaluate to false.
The default implementation of the encodeBegin() method will first fire the PreRenderComponentEvent for the current component and then delegate to Renderer#encodeBegin(). The default implementation of the encodeChildren() method will delegate to Renderer#encodeChildren(). The default implementation of the encodeEnd() method will delegate to Renderer#encodeEnd(). If the component has no renderer attached, that is, when UIComponent#getRendererType() returns null, then no HTML output will be rendered to the response.
In the encodeBegin() method, the component or the renderer implementation has the opportunity to write the opening HTML element and all of its attributes to the response. In the encodeChildren() method the component or the renderer implementation has the opportunity to decorate or override the rendering of the children if necessary. In the encodeEnd() method the component or the renderer implementation has the opportunity to write the closing HTML tag. Writing to the response happens with the response writer as available by FacesContext#getResponseWriter().
For any mentioned XxxEvent class which has been fired in any phase, if any listener method throws javax.faces.event.AbortProcessingException,1 then the currently running phase will be immediately aborted and the life cycle will immediately advance to the render response phase (sixth phase), thereby skipping any phase in between.
Ajax Life Cycle
The life cycle is almost identical during Ajax requests. Only the second, third, fourth, and sixth phases are slightly different. The processDecodes(), processValidators(), and processUpdates() methods will only be invoked on the UIViewRoot itself and any component covered by the component search expression specified in <f:ajax execute>. And, the encodeAll() method will only be invoked on the UIViewRoot itself and any component covered by the component search expression specified in <f:ajax render>. Read more on search expressions in Chapter 12.
Note thus that there would be no difference in the Ajax life cycle when the component search expression contains the "@all" keyword. In other words, use "@all" with care. There are no sensible real-world use cases for <f:ajax execute="@all">. On the HTML side, it’s not possible to submit multiple forms at once. Only the enclosing form is submitted. The biggest value is thus <f:ajax execute="@form">. However, there is one sensible real-world use case for <f:ajax render="@all">, namely, rendering a full error page in case an exception is thrown during an Ajax request . Even then, this can only be programmatically triggered via PartialViewContext#setRenderAll(). For more detail, see Chapter 9.
View Build Time
The “view build time ” is not tied to a particular phase of the JSF life cycle. The view build time is that moment when the physical UIViewRoot instance is populated with all of its children based on the view definition.
When JSF is about to create an UIComponent instance based on the view definition, it will first check whether the binding attribute of the component representation returns a concrete UIComponent instance and, if so, then continue using it instead, or else create the UIComponent instance based on the “component type” associated with it and then invoke the setter behind the binding attribute, if any, with it. If the id attribute of the component representation in the view definition is specified, then UIComponent#setId() will be invoked with it. Finally, UIComponent#setParent() will be invoked with the parent component and then the component instance becomes physically part of the component tree. This tree will exist until the end of the render response phase (sixth phase). Then it becomes eligible for the garbage collector, along with the released faces context instance.
Effectively, UIComponent instances are thus request scoped. The binding attribute can refer a managed bean property, but as UIComponent instances are inherently request scoped, the target managed bean must be request scoped and may not be in a broader scope. This won’t be checked by the JSF API, so you as the developer should make absolutely sure that you don’t reference a broader scoped managed bean in the binding attribute of any component .
However, when the binding attribute references a managed bean in a broader scope than the request scope, then you’re not only basically saving the entire component tree in the HTTP session in case the bean is view or session scoped, but you’re also essentially sharing the entire component tree across multiple HTTP requests which are concurrently accessing the very same managed bean instance—very inefficient and thus dangerous.
The view build time can technically happen during any JSF life cycle phase. Generally, that’s the restore view phase (first phase), particularly during a postback request, or when the view has <f:metadata> with children. It can also happen during the render response phase (sixth phase), particularly during a GET request when the view has no <f:metadata> with children, or when a non-redirect navigation has taken place during a postback. It will also happen when the developer programmatically invokes ViewDeclarationLanguage#buildView(), which can be implicitly done via, among others, ViewHandler#createView() as shown in the following action method code example which forces us to fully rebuild the current view from scratch:
public void rebuildCurrentView() {FacesContext context = FacesContext.getCurrentInstance();UIViewRoot currentView = context.getViewRoot();String viewId = currentView.getViewId();ViewHandler viewHandler = context.getApplication.getViewHandler();UIViewRoot newView = viewHandler.createView(context, viewId);context.setViewRoot(newView);}
Do note that the view state is not per definition during the view build time restored into the component tree. The view state is only restored into the component tree during the restore view phase (first phase), and that happens after it has executed the view build time by itself. In other words, the above shown rebuildCurrentView() method does not restore the current view state into the newly created component tree. Programmatically restoring the view state is generally not recommended when programmatically rebuilding the view as above, as in a real-world JSF application the sole reason to rebuild the current view is usually to get rid of any changes caused by the persistent view state, and/or to re-execute any JSTL tags based on the freshly changed values in the managed bean.
View Render Time
The “view render time ” is also not tied to a particular phase of the JSF life cycle. The view render time is that moment when UIComponent#encodeAll() of a particular component is invoked.
True, it’s by default always executed on the UIViewRoot during the render response phase (sixth phase), but this doesn’t stop you from programmatically invoking it during a different phase, such as the invoke application phase (fifth phase), for example, in order to obtain the generated HTML output of an arbitrary component as a String variable.
View State
As explained in the section “View Build Time,” the UIComponent instances resembling the component tree are inherently request scoped. They are created during the view build time and they are destroyed right after the render response phase (sixth phase). Any changes to properties of the UIComponent instances, which are not referenced by an EL (Expression Language) expression, and are different from the default values, will be saved as “view state .” In other words, the “view state” is very definitely not the same as the “component tree.” Moreover, if the entire component tree itself would be saved in the view state, then this would result in not only an unnecessarily bloated view state but also bad application behavior as UIComponent instances are inherently not thread safe and may therefore absolutely not be shared across multiple HTTP requests.
Saving the view state happens during the view render time. Therein JSF will write out the view state to a javax.faces.ViewState hidden input field of the generated HTML representation of every JSF form. When the JSF state saving method has the default setting “server,” then the hidden input value represents a unique identifier referring the serialized view state object which is stored in the HTTP session. When the JSF state saving method is explicitly set to “client” using the following web.xml context parameter, then the hidden input value itself represents the encrypted form of the serialized view state object.
<context-param><param-name>javax.faces.STATE_SAVING_METHOD</param-name><param-value>client</param-value></context-param><env-entry><env-entry-name>jsf/ClientSideSecretKey</env-entry-name><env-entry-type>java.lang.String</env-entry-type><env-entry-value>[AES key in Base64 format]</env-entry-value></env-entry>
Note that explicitly specifying the jsf/ClientSideSecretKey environment entry with a fixed AES (Advanced Encryption Standard) key is mandatory in case you’re running the JSF application on a cluster of servers (“cloud”), or when you’d like the view state still to be valid after a server restart. You can generate a Base64-encoded AES key yourself using the following plain Java snippet:
KeyGenerator keyGen = KeyGenerator.getInstance("AES");keyGen.init(256); // Or 128 in case you don't have JCE.byte[] rawKey = keyGen.generateKey().getEncoded();String key = Base64.getEncoder().encodeToString(rawKey);System.out.println(key); // Prints AES key in Base64 format.
The standard JSF form, as represented by <h:form>, submits by default using the POST method to the very same requested URI as where the JSF page containing the form is being requested. In other words, when you request a JSF page by http://example.com/project/page.xhtml , then it will submit to the very same http://example.com/project/page.xhtml URI. This is in web development terms known as “postback.” When JSF needs to process an incoming postback request, then the restore view phase (first phase) will, after the view build time, extract the view state from the javax.faces.ViewState parameter and restore all changed properties into the newly created UIComponent instances of the current request so that the component tree ultimately reflects exactly the same state as it had during the view render time of the previous request.
On an average JSF web application, the majority of the saved view state is represented by internal properties of UIComponent instances implementing the javax.faces.component.EditableValueHolder interface,2 which covers all UIInput components such as <h:inputText>. When submitting a JSF form fails with a conversion or validation error, then all changed “is valid?” states and “local value” states, which can be either the submitted string value or the already converted and validated value, will for all involved UIInput components be saved in the view state. This has the major advantage that that the developer doesn’t need to worry about manually keeping track of them in order to re-present the submitted form with all valid and invalid values preserved to the web site user while keeping the model (the managed bean properties) completely free of those values. This is a major usability advantage for both the JSF developer and the web site user.
The minority of the saved view state is represented by programmatic changes to the component tree hierarchy, or to component attributes. Among others, any programmatic changes to readonly, disabled, and rendered attributes are tracked in the view state so that a hacker doesn’t have any chance to spoof the request in such way that those attributes flip to the wrong side so that the hacker could do potentially hazardous things. This is a major security advantage.
View Scope
The Servlet API, which JSF, among others, is built on top of, offers three well-defined scopes: the request scope, the session scope, and the application scope. Basically, the request scope is established by storing the object of interest as an attribute of the HttpServletRequest. Equivalently, the session scope is established by storing the object of interest as an attribute of the HttpSession and the application scope is established by storing the object of interest as an attribute of the ServletContext.
JSF adds one more scope to this, the view scope . This must not be confused with the component tree itself. The component tree (the physical UIViewRoot instance) is created and destroyed during the very same HTTP request and is therefore clearly request scoped. This must also not be confused with the view state, although they are closely related.
When the end user fires a postback request on a JSF form, and the application doesn’t perform any kind of navigation (i.e., the action method returns null or void), then the view state identifier will stay the same and the view scope will be prolonged to the next postback request, until the application performs an explicit navigation, or when the HTTP session expires. You can establish the view scope by storing the object of interest as an entry of UIViewRoot#getViewMap(). This is exactly where JSF stores its @ViewScoped managed beans. No, this map is not in turn stored in the view state, not even when the JSF state saving method is explicitly set to “client.” The view scope is stored in the HTTP session, separate from the view state. Only the view scope identifier is stored in the view state. Only the changed attributes of the UIViewRoot instance are stored in the view state.
Phase Events
The javax.faces.event. PhaseListener interface3 can be used to listen on any phase of the JSF life cycle. This interface defines three methods: getPhaseId(), which should return the phase you’re interested in; beforePhase(), which will be invoked right before the specified phase is executed; and afterPhase(), which will be invoked right after the specified phase is executed. In the beforePhase() and afterPhase() methods you thus have the opportunity to run some code before or after the phase specified by getPhaseId().
The javax.faces.event.PhaseId class4 defines a set of public constants. It still dates from JSF 1.0 which was released only a few months before Java 1.5 and hence was too late in the game in order to become a real enum. The constants are listed below with their ordinal values.
PhaseId.ANY_PHASE (0)
PhaseId.RESTORE_VIEW (1)
PhaseId.APPLY_REQUEST_VALUES (2)
PhaseId.PROCESS_VALIDATIONS (3)
PhaseId.UPDATE_MODEL_VALUES (4)
PhaseId.INVOKE_APPLICATION (5)
PhaseId.RENDER_RESPONSE (6)
Phase listener instances can be registered in various ways. Declaratively, they can be registered application-wide via faces-config.xml.
<lifecycle><phase-listener>com.example.project.YourListener</phase-listener></lifecycle>
Or view-wide via <f:phaseListener> tag enclosed in <f:view>.
<f:view><f:phaseListener type="com.example.project.YourListener" />...</f:view>
Programmatically, they can be added and removed application-wide via the addPhaseListener() and removePhaseListener() methods of javax.faces.lifecycle.Lifecycle instance.5 However, obtaining the current Lifecycle instance is slightly convoluted as there’s no direct getter method for that in the public JSF API (yet).
FacesContext context = FacesContext.getCurrentInstance();String lifecycleId = context.getExternalContext().getInitParameter(FacesServlet.LIFECYCLE_ID_ATTR);if (lifecycleId == null) {lifecycleId = LifecycleFactory.DEFAULT_LIFECYCLE;}LifecycleFactory lifecycleFactory = (LifecycleFactory)FactoryFinder.getFactory(FactoryFinder.LIFECYCLE_FACTORY);Lifecycle lifecycle = lifecycleFactory.getLifecycle(lifecycleId);
And they can be added and removed view-wide via the addPhaseListener() and removePhaseListener() methods of UIViewRoot. A concrete example of a PhaseListener is given in the section “Custom Component System Events.”
Component System Events
As noted in the section “Life Cycle,” a bunch of component system events are fired during the life cycle. They extend from the javax.faces.event.ComponentSystemEvent abstract class .6 In summary, those are
PreRemoveFromViewEvent: fired when a component is about to be removed from the component tree.
PostAddToViewEvent: fired when a component has been added to the component tree.
PostRestoreStateEvent (read: "PostRestoreViewEvent"): fired for each component when the restore view phase ends. Note that this event is only fired for UIViewRoot when the view build time hasn’t yet taken place during this phase. If the view build time has taken place during this phase, then this event is fired for any component in the tree.
PreValidateEvent: fired when a component is about to process its converter and validators, and also when there are actually none.
PostValidateEvent: fired when a component is finished processing its converter and validators, and also when there are actually none.
PreRenderViewEvent: fired when the UIViewRoot is about to write HTML output to the HTTP response. Note that this is the latest possible safe moment to change the destination of the HTTP response, or to programmatically manipulate the component tree. When doing so after this moment, there’s no guarantee that any programmatic changes to the response or the component tree will take place as intended, because by then the response may already be committed, or the view state may already be saved.
PreRenderComponentEvent: fired when a component is about to write its HTML output to the HTTP response.
PostRenderViewEvent: fired when the UIViewRoot is finished writing the HTML output to the HTTP response. Note that this event is new since JSF 2.3. All others are from JSF 2.0.
There are two more component system events that were left unmentioned in the section “Life Cycle.”
PostConstructViewMapEvent: fired when the UIViewRoot has just started the view scope.
PreDestroyViewMapEvent: fired when the UIViewRoot is about to destroy the view scope.
These two are not strictly tied to the six-phase component-based life cycle and can happen basically any time during the life cycle. The PostConstructViewMapEvent is fired when the application invokes UIViewRoot#getViewMap() for the first time. By default, this happens only when the first @ViewScoped managed bean of the current view state has been created. The PreDestroyViewMapEvent is fired when the application invokes Map#clear() on the UIViewRoot#getViewMap(), which usually only happens when FacesContext#setViewRoot() is invoked while there is already an existing instance set. This will end the view scope and destroy any active @ViewScoped managed bean. Normally, this happens only when the action method has returned a non-null navigation outcome.
You can listen on any of those component system events using the javax.faces.event.ComponentSystemEventListener interface .7 In the JSF API, the UIComponent class itself already implements ComponentSystemEventListener. This interface provides a processEvent() method with a ComponentSystemEvent argument which in turn has among others a getComponent() method returning the concrete UIComponent instance the event was fired on. The default implementation of UIComponent#processEvent() basically checks if the current event is an instance of PostRestoreStateEvent and if the binding attribute is specified, and if so, then invokes the setter method with the component instance itself as argument.
There are three ways to subscribe listeners to those component system events . The first is to declaratively use the <f:event> tag in the view. This can be attached to any component tag. One example you’ll see in relatively a lot of JSF 2.0/2.1 targeted resources is the following:
<f:metadata><f:viewParam name="id" value="#{bean.id}" /><f:event type="preRenderView" listener="#{bean.onload()}" /></f:metadata>
where in the onload() method is often implemented as follows:
public void onload() {FacesContext context = FacesContext.getCurrentInstance();if (!context.isPostback() && !context.isValidationFailed()) {// ...}}
Note that the <f:event listener="#{bean.onload}"> by default expects a method with ComponentSystemEvent argument, but if you don’t need it, it can be omitted for brevity and the method expression should be parenthesized, although the EL implementation may be forgiving in this.
The <f:event type="preRenderView"> is in essence a work-around in order to be able to perform the invoke application phase upon a GET request based on model values set by the <f:viewParam>. This was needed because the @PostConstruct was unsuitable as it was invoked directly after bean’s construction but far before the model values were updated. Since JSF 2.2 with its new <f:viewAction>, this <f:event> trick is not needed any more:
<f:metadata><f:viewParam name="id" value="#{bean.id}" /><f:viewAction action="#{bean.onload}" /></f:metadata>
where in the onload() method is just implemented as follows:
public void onload() {// ...}
Another real-world example of <f:event> is to have a @PostConstruct-like behavior in the backing component of a composite component wherein you can safely perform any necessary initialization based on its attributes.
<cc:interface componentType="someComposite">...</cc:interface><cc:implementation><f:event type="postAddToView" listener="#{cc.init()}" />...#{cc.someInitializedValue}</cc:implementation>
and wherein the init() method of the SomeComposite class looks as follows:
private Object someInitializedValue; // +getterpublic void init() {Map<String, Object> attributes = getAttributes();someInitializedValue = initializeItBasedOn(attributes);}
The second way is to programmatically use UIComponent#subscribeToEvent() in Java code . This allows you to conditionally subscribe a component system event listener on an existing component. It is important to keep in mind that a component system event listener is saved in the view state. In other words, it’s restored in the component instance during the restore view phase of the subsequent postback request. Keep this in mind when using UIComponent#ubscribeToEvent(); otherwise you may end up subscribing the very same listener multiple times. The JSF implementation Mojarra has an internal guard against it, provided that the equals() method of the listener implementation is correctly implemented, but MyFaces doesn’t have a guard here because the JSF specification doesn’t say so (yet).
This all makes it a little complicated to correctly register a component system event listener programmatically for a specific component. If it’s an existing component, you’d better use <f:event> instead, or if it’s a custom component, you’d better use @ListenerFor annotation, which is actually the third way. Below is a kickoff example of correctly registering a component system event listener programmatically, provided that YourListener class has its equals() and hashCode() methods correctly implemented, and that it implements Serializable or Externalizable or javax.faces.component.StateHolder so that it can be saved correctly in view state.
Class<PreRenderViewEvent> event = PreRenderViewEvent.class;ComponentSystemEventListener listener = new YourListener();List<SystemEventListener> existingListeners =component.getListenersForEventClass(event);if (existingListeners != null && !existingListeners.contains(listener)) {component.subscribeToEvent(event, listener);}
Yes, that null check is necessary. The UIComponent#getListenersForEventClass() isn’t specified to return an empty list instead. All in all, this is clearly not a carefully thought out API. You’d better use <f:event> or @ListenerFor instead to avoid dirty code and confusion.
As previously stated, the third way is declaratively to use the @ListenerFor annotation. You can put this annotation only on a UIComponent or Renderer class . You can’t put this annotation on a backing bean class. For that, you should use <f:event> instead. The @ListenerFor annotation takes the target event(s) as value. The concrete ComponentSystemEventListener instance is the UIComponent instance itself. If the annotation is declared on a Renderer class , then the target component is the UIComponent instance whose UIComponent#getRendererType() refers the particular Renderer class. The following example shows it for a custom component YourComponent:
@FacesComponent("project.YourComponent")@ListenerFor(systemEventClass=PostAddToViewEvent.class)public class YourComponent extends UIComponentBase {@Overridepublic void processEvent(ComponentSystemEvent event) {if (event instanceof PostAddToViewEvent) {// ...}else {super.processEvent(event);}}// ...}
Yes, that instanceof check is necessary. As noted in the section “Life Cycle,” the PostRestoreStateEvent is by default explicitly fired for any component in the tree. The super.processEvent(event) call is necessary in case this component has the binding attribute specified; that is, the default UIComponent#processEvent() implementation calls during PostRestoreStateEvent the setter method behind the binding attribute.
Custom Component System Events
You can create your own ComponentSystemEvent types. Basically all you need to do is to extend from the ComponentSystemEvent abstract class and declare the @NamedEvent annotation on it and finally invoke Application#publishEvent() at the desired moment.
Imagine that you want to create a custom component system event which is fired before the invoke application phase (fifth phase), a PreInvokeApplicationEvent. The custom event looks as follows:
@NamedEvent(shortName="preInvokeApplication")public class PreInvokeApplicationEvent extends ComponentSystemEvent {public PreInvokeApplicationEvent(UIComponent component) {super(component);}}
And here’s how you can use a PhaseListener to publish it.
public class PreInvokeApplicationListener implements PhaseListener {@Overridepublic PhaseId getPhaseId() {return PhaseId.INVOKE_APPLICATION;}@Overridepublic void beforePhase(PhaseEvent event) {FacesContext context = FacesContext.getCurrentInstance();context.getApplication().publishEvent(context,PreInvokeApplicationEvent.class, context.getViewRoot());}@Overridepublic void afterPhase(PhaseEvent event) {// NOOP.}}
After registering this phase listener in faces-config.xml, you can use <f:event> or @ListenerFor to listen on this event. One real-world example would be nested in the <f:view> or a master template, or in a particular <h:form>, so that you don’t need to copy/paste the very same <f:actionListener> over multiple UICommand components in template clients or forms.
<f:event type="preInvokeApplication"listener="#{bean.prepareInvokeApplication}" />
JSTL Core Tags
If you have ever developed with JSP , then you’ll most likely have stumbled upon JSTL tags. In Facelets , however, only a limited subset of JSTL tags is reincarnated. They are <c:if>, <c:choose><c:when><c:otherwise>, <c:forEach>, <c:set>, and <c:catch>. Essentially, the XML namespace and tag names are identical to those from JSP, but they are completely rewritten for Facelets.
This group of tags is formally called “JSTL core Facelets tag library” instead of “JSTL core JSP tag library” and is also documented separately from JSP.8 Those JSTL tags are available under the http://xmlns.jcp.org/jsp/jstl/core XML namespace URI which should be assigned to the "c" XML namespace prefix.
xmlns:c="http://xmlns.jcp.org/jsp/jstl/core"Yes, astonishingly with "/jsp" path in the URI. Historically, the predecessor of Facelets in JSF 2.0 had those JSTL tags also implemented, but it didn’t use the namespace URI as in the more recent JSTL 1.1 specification. Instead, it used the namespace URI as in the JSTL 1.0 specification : http://java.sun.com/jstl/core . However, this was “rectified” for Facelets in JSF 2.0. In my humble opinion, this is outright confusing as the JSTL 1.1 XML namespace URI suggests that those are actually JSP tags and not Facelets tags. But it is what it is.
The technical reason behind the original change of the JSTL namespace URI is the migration of EL from JSTL to JSP. It was introduced in JSTL 1.0 and worked only in JSTL tags and thus not outside JSTL tags. JSP 2.0 wanted to make use of the potential of EL as well and so it was migrated from JSTL to JSP. JSTL 1.1 thus shipped without EL and wasn’t backward- compatible with JSTL 1.0 any more—hence the namespace URI change to distinguish this.
JSTL tags have a different life cycle than JSF’s standard HTML components. JSTL tags already run directly during the view build time while JSF is busy building the component tree based on the view definition. JSTL tags don’t end up in the JSF component tree. In other words, you can use JSTL tags to control the flow of building of the JSF component tree.
Note that using JSTL to control the component tree building isn’t as easily possible as using JSF on JSP instead of Facelets. That is, JSTL tags for JSP can only recognize JSP-specific ${} expressions and not JSF-specific #{} expressions. This means that JSTL tags in JSP can’t recognize JSF managed beans if they aren’t yet created by JSF at that moment, and that JSF components can’t access the var attribute of a <c:forEach>. In Facelets , the JSTL tags are thus retrofitted so that they support the #{} expressions. This makes them very powerful.
When developing JSF pages with JSTL tags the most important thing that you need to keep in mind is that they run during the view build time and that they don’t participate in the JSF life cycle. Below I have demonstrated the most important differences between a JSTL tag and its JSF/Facelets counterpart.
<c:forEach> versus <ui:repeat>Following is a <c:forEach> example iterating over a List<Item> with three instances of an example Item entity having id and value properties:
<c:forEach items="#{bean.items}" var="item"><h:outputText id="item_#{item.id}" value="#{item.value}" /></c:forEach>
During the view build time , this creates three separate <h:outputText> components in the component tree, roughly represented as follows:
<h:outputText id="item_1" value="#{bean.items[0].value}" /><h:outputText id="item_2" value="#{bean.items[1].value}" /><h:outputText id="item_3" value="#{bean.items[2].value}" />
In turn, they individually generate their HTML output during view render time , as follows:
<span id="item_1">one</span><span id="item_2">two</span><span id="item_3">three</span>
Do note that the id attribute of a JSF component is also evaluated during the view build time and thus you need to manually ensure the uniqueness of the resulting component ID. Otherwise JSF will throw an IllegalStateException with a message which goes like this: “Duplicate component ID found in view.” The only other JSF component attribute which is also evaluated during the view build time is the binding attribute. If you absolutely need to bind a JSTL-generated component to a backing bean property , which is rare, then you should be specifying a unique array index, collection index, or map key. Following is an example provided that #{bean.components} refers an already prepared UIComponent[], List<UIComponent>, or Map<Long, UIComponent> property.
<c:forEach items="#{bean.items}" var="item"><h:outputText binding="#{bean.components[item.id]}"id="item_#{item.id}" value="#{item.value}" /></c:forEach>
The Facelets counterpart of the <c:forEach> is the <ui:repeat>. This is in essence a UIComponent which doesn’t generate any HTML output by itself. In other words, the <ui:repeat> itself also ends up in the JSF component tree during the view build time, and only runs during the view render time. It basically re-renders its children during every iteration round against the currently iterated item as var attribute.
<ui:repeat id="items" value="#{bean.items}" var="item"><h:outputText id="item" value="#{item.value}" /></ui:repeat>
During the view build time the above ends up exactly as is in the JSF component tree: a single UIRepeat instance with one nested HtmlOutputText instance whereas the <c:forEach> creates here three HtmlOutputText instances. Then, during the view render time, the very same <h:outputText> component is being reused to generate its HTML output based on current iteration round.
<span id="items:0:item">one</span><span id="items:1:item">two</span><span id="items:2:item">three</span>
Do note that the <ui:repeat> as a NamingContainer component already ensured the uniqueness of the client ID based on the iteration index. It's technically also not possible to reference its var attribute in the id attribute of any child component as the var attribute is only set during view render time while the id attribute is already set during view build time .
<c:if>/<c:choose> versus rendered Imagine that we have a custom tag file which can be used as follows:
<t:input type="email" id="email" label="Email" value="#{bean.email}" />And the input.xhtml tag file contains the following Facelets markup conditionally adding different tags using a <c:choose> (you can also use <c:if> for this):
<c:choose><c:when test="#{type eq 'password'}"><h:inputSecret id="#{id}" label="#{label}" value="#{value}" /></c:when><c:when test="#{type eq 'textarea'}"><h:inputTextarea id="#{id}" label="#{label}" value="#{value}" /></c:when><c:otherwise><h:inputText id="#{id}" label="#{label}" value="#{value}"a:type="#{type}"></h:inputText></c:otherwise></c:choose>
Note that a more elaborate example can be found in the section “Tag Files” in Chapter 7. This construct will then only create the <h:inputText> component in the component tree , roughly represented as follows:
<h:inputText id="email" label="Email" value="#{bean.email}"a:type="email"></h:inputText>
and when using the rendered attribute instead of <c:choose> as follows:
<h:inputSecret id="#{id}_password" rendered="#{type eq 'password'}"label="#{label}" value="#{value}"></h:inputSecret><h:inputTextarea id="#{id}_textarea" rendered="#{type eq 'textarea'}"label="#{label}" value="#{value}"></h:inputTextarea><h:inputText id="#{id}_text"rendered="#{type ne 'password' and type ne 'textarea'}"label="#{label}" value="#{value}"></h:inputText>
Then they will all end up in the component tree roughly as follows:
<h:inputSecret id="email_password" rendered="#{type eq 'password'}"label="Email" value="#{bean.email}"></h:inputSecret><h:inputTextarea id="email_textarea" rendered="#{type eq 'textarea'}"label="Email" value="#{bean.email}"></h:inputTextarea><h:inputText id="email_text"rendered="#{type ne 'password' and type ne 'textarea'}"label="Email" value="#{bean.email}"></h:inputText>
You see, this will thus end up in an unnecessarily bloated component tree with a lot of unused components when you have many of them, particularly when the type attribute is actually static (i.e., it does not ever change, at least during the view scope). Also note that the id attribute of each component has a static suffix so that you don’t end up with “Duplicate component ID found in view” exceptions.
<c:set> versus <ui:param> They are not interchangeable. The <c:set> sets a variable in the EL scope , which is accessible only after the tag location during the view build time, but anywhere else in the view during the view render time. The <ui:param> should only be nested in <ui:include>, <ui:decorate template>, or <ui:composition template> and sets a variable in the EL scope of the Facelets template, which is accessible only in the template itself. Older JSF versions had bugs whereby the <ui:param> variable was also available outside the Facelets template in question. This should never be relied upon.
The <c:set> without a scope attribute will behave like an alias. It does not cache the result of the EL expression in any scope. Its primary purpose is to be able to have a shortcut to a relatively long EL expression which is repeated several times in the same Facelets file. It can thus be used perfectly well inside, for example, iterating JSF components.
<ui:repeat value="#{bean.products}" var="product"><c:set var="price" value="#{product.price}" />#{price}</ui:repeat>
It's only not suitable, for example, for calculating the sum in a loop . The following construct will never work:
<c:set var="total" value="#{0}" /><ui:repeat value="#{bean.products}" var="product"><c:set var="total" value="#{total = total + product.price}" />#{product.price}</ui:repeat>Total price: #{total}
For that, use EL 3.0 stream API instead.
<ui:repeat value="#{bean.products}" var="product">#{product.price}</ui:repeat>Total price: #{bean.products.stream().map(product->product.price).sum()}
However, when you set the scope attribute with one of allowable values request, view, session, or application, then it will be evaluated immediately during the view build time and stored in the specified scope.
<c:set var="DEV"value="#{facesContext.application.projectStage eq 'Development'}"scope="application" />
This will be evaluated only once during the first time this view is being built and available as an EL variable #{DEV} throughout the entire application. You’d best declare such <c:set> in the master template file which is used by every single Facelets file in the entire application. Note that the EL variable is capitalized to conform to Java naming conventions for constants.
Manipulating the Component Tree
This can be done declaratively using JSTL tags as well as programmatically using Java code. The JSTL approach has already been elaborated in the previous section. It’s also possible to use Java code instead. As a precaution, this generally ends up in very verbose and hard-to-maintain code. Tree-based hierarchies in code are best readable and maintainable when using a hierarchical markup language such as XML. Facelets itself is already XML based. JSTL is also XML based and therefore seamlessly integrates in a Facelets file. JSTL is therefore the recommended approach to dynamically manipulate the component tree, rather than Java code.
The Javadoc of javax.faces.component.UIComponent 9 specifies when you could safely manipulate the component tree:
Dynamically modifying the component tree can happen at any time, during and after restoring the view, but not during state saving and needs to function properly with respect to rendering and state saving.
In other words, the earliest moment when you can guarantee safely modifying the component tree is during the PostAddToViewEvent and the latest moment when you can guarantee safely modifying the component tree is during the PreRenderViewEvent. Any moment in between is thus also possible. Before the PostAddToViewEvent there’s not necessarily a means of a concrete UIViewRoot instance. After the PreRenderViewEvent there’s a risk that the state is already saved and you’d rather not get trapped here. In other words, manipulating the component tree during the render response phase (sixth phase) is a bad idea.
When you intend to manipulate the component tree by means of adding new components based on a Java model which is at least view scoped, then listen on the PostAddToViewEvent of the parent component of interest. When you intend to manipulate the component tree based on the fully built component tree by means of adding/moving/removing components, then listen on the PreRenderViewEvent of the UIViewRoot.
The following example programmatically populates a dynamic form based on a Java model during the PostAddToViewEvent:
<h:form id="dynamicFormId"><f:event type="postAddToView" listener="#{dynamicForm.populate}" /></h:form>
wherein the #{dynamicForm} looks something like the following:
@Named @RequestScopedpublic class DynamicForm {private transient UIForm form;private Map<String, Object> values = new HashMap<>();@Injectprivate FieldService fieldService;public void populate(ComponentSystemEvent event) {form = (UIForm) event.getComponent();List<Field> fields = fieldService.list(form.getId());fields.forEach(field -> field.populate(this));}public void createOutputLabel(Field field) {HtmlOutputLabel label = new HtmlOutputLabel();label.setId(field.getName() + "_l");label.setFor(field.getName());label.setValue(field.getLabel());form.getChildren().add(label);}public void createInputText(Field field) {HtmlInputText text = new HtmlInputText();text.setId(field.getName()); // Explicit ID is required!text.setLabel(field.getLabel());text.setValueExpression("value", createValueExpression(field));form.getChildren().add(text);}public void createMessage(Field field) {HtmlMessage message = new HtmlMessage();message.setId(field.getName() + "_m");message.setFor(field.getName());form.getChildren().add(message);}public static ValueExpression createValueExpression(Field field) {String el = "#{dynamicForm.values['" + field.getName() + "']}"FacesContext context = FacesContext.getCurrentInstance();ELContext elContext = context.getELContext();return context.getApplication().getExpressionFactory().createValueExpression(elContext, el, Object.class);}public Map<String, Object> getValues() {return values;}}
and wherein the abstract class Field represents your custom model of a form field with at least type, name, and label properties and the concrete implementation of a TextField#populate() looks something like the following:
public void populate(DynamicFormBean form) {form.createOutputLabel(this);form.createInputText(this);form.createMessage(this);}
Note the naming pattern of concrete UIComponent classes. For HTML components they follow exactly the convention “Html[TagName]”. For the <h:inputText> that’s thus HtmlInputText, and so on. The above Java example will basically create the following XML representation:
<h:outputLabel id="name_l" for="name" value="Label" /><h:inputText id="name" value="#{dynamicForm.values['name']}" /><h:message id="name_m" for="name" />
It only does that quite verbosely. Essentially, you’re here reinventing the job of Facelets. There’s really nothing which is impossible using XML and only possible in Java. As long as you understand how you can use JSTL for this:
<h:form id="dynamicFormId"><c:forEach items="#{dynamicForm.fields}" var="field"><t:field type="#{field.type}"id="#{field.name}" label="#{field.label}"value="#{dynamicForm.values[field.name]}"></t:field></c:forEach></h:form>
wherein the #{dynamicForm} instead looks something like the following:
@Named @RequestScopedpublic class DynamicForm {private List<Field> fields;private Map<String, Object> values = new HashMap<>();@Injectpublic FieldService fieldService;public List<Field> getFields() {if (fields = null) {FacesContext context = FacesContext.getCurrentInstance();UIComponent form = UIComponent.getCurrentComponent(context);fields = fieldService.list(form.getId());}return fields;}public Map<String, Object> getValues() {return values;}}
You see, there is no need to mess with manually creating and populating UIComponent instances. Facelets does that all for you based on simple XML. The <t:field> can be found in the section “Tag Files” in Chapter 7.