In this chapter you will learn how to set up a JSF (JavaServer Faces) development environment with the Eclipse IDE (integrated development environment), the Payara application server, and H2 database from scratch.
Installing Java SE JDK
You probably already know that Java SE is available as JRE for end users and as JDK for software developers. Eclipse itself does not strictly require a JDK as it has its own compiler. JSF being a software library does not require a JDK to run either. Payara, however, does require a JDK to run, primarily in order to be able to compile JSP files, even though JSP has been deprecated as JSF view technology since JSF 2.0.
Therefore, you need to make sure that you already have a JDK installed as per Oracle’s instructions. The current Java SE version is 9, but as Java EE 8 was designed for Java SE 8 which is currently more mature, JDK 8 is recommended: https://docs.oracle.com/javase/8/docs/technotes/guides/install/install_overview.html .
The most important parts are that the PATH environment variable covers the /bin folder containing the Java executables (e.g., "/path/to/jdk/bin"), and that the JAVA_HOME environment variable is set to the JDK root folder (e.g., "/path/to/jdk"). This is not strictly required by JSF, but Eclipse and Payara need this. Eclipse will need the PATH in order to find the Java executables. Payara will need the JAVA_HOME in order to find the JDK tools.
What About Java EE?
Note that you do not need to download and install Java EE from Oracle.com even though JSF itself is part of Java EE . Java EE is basically an abstract specification of which the so-called application servers represent the concrete implementations. Examples of those application servers are Payara, WildFly, TomEE, GlassFish, and Liberty. It is exactly those application servers that actually provide among others JSF (JavaServer Faces), EL (Expression Language), CDI (Contexts and Dependency Injection), EJB (Enterprise JavaBeans), JPA (Java Persistence API), Servlet, WebSocket, and JSON-P (JavaScript Object Notation Processing), APIs (application programming interfaces) out of the box.
There also exist so-called servlet containers which provide basically only the Servlet, JASPIC (Java Authentication Service Provider Interface for Containers), JSP (JavaServer Pages), EL, and WebSocket APIs out of the box, such as Tomcat and Jetty. However, it would require some work to manually install and configure, among others, JSF, JSTL (JSP Standard Tag Library), CDI, EJB, and JPA on such a servlet container. It is not even trivial in the case of EJB as it requires modifying the servlet container’s internals. That is, by the way, exactly why TomEE exists. It’s a Java EE application server built on top of the barebones Tomcat servlet container engine.
Coming back to the Java EE download at Oracle.com, it would give you basically the GlassFish server, along with a bunch of documentation and optionally the Netbeans IDE. We do not need it as we are already using Payara as the Java EE application server, and are targeting Eclipse as IDE. Therefore, the Java SE JDK is sufficient.
Installing Payara
Payara is an open source Java EE application server which is in 2014 forked from GlassFish . It is basically a response to Oracle’s announcement to stop its commercial support for GlassFish, so companies previously using GlassFish commercially could effortlessly switch to Payara and continue enjoying commercial support. Thanks to commercial support for business customers previously using GlassFish , the Payara application server software can continuously be bug-fixed and improved.
The first Payara version with JSF 2.3 integrated is 5. You can download it from https://payara.fish . Make sure you choose either the “Payara Server Full” or “Payara Server Web Profile” download and not, for example, the “Payara Micro” or “Payara Embedded,” as they have other purposes. Installing is basically a matter of unzipping the downloaded file and putting it somewhere in your home folder. We’ll leave it there until we have Eclipse up and running, so that we can then integrate Payara in Eclipse and let it manage the server.
How About Other Servers?
The choice for Payara in this book is primarily because it is at time of this writing one of the very few available Java EE application servers with JSF 2.3 integrated. The other one is GlassFish, but we would rather not advocate it as it would basically offer no commercial support or bug fixes. GlassFish must be seen as a true reference implementation for other application server vendors so they can, if necessary, build their application server implementation by example.
WildFly, TomEE, and Liberty did not, at the time of writing, have a version available with JSF 2.3 integrated.
Installing Eclipse
Eclipse is an open source IDE written in Java. It is basically like notepad but with thousands if not millions of extra features, such as automatically compiling class files, building a WAR file with them, and deploying it to an application server without the need to manually fiddle around with javac in a command console.
Eclipse is available in a lot of flavors. As we’re going to develop with Java EE, we need the one saying “Eclipse IDE for Java EE developers.” It’s usually the top-ranked download link at http://eclipse.org/downloads/eclipse-packages/. Also here, installing is basically a matter of unzipping the downloaded file and putting it somewhere in your home folder.
In Windows and Linux you’ll find the eclipse.ini configuration file in the unzipped folder. In Mac OS this configuration file is located in Eclipse.app/Contents/Eclipse. Open this file for editing. We want to increase the allocated memory for Eclipse. At the bottom of eclipse.ini, you’ll find the following lines:
-Xms256m-Xmx1024m
This sets, respectively, the initial and maximum memory size pool which Eclipse may use. This is a bit too low when you want to develop a bit of a decent Java EE application. Let’s at least double both the values.
-Xms512m-Xmx2g
Watch out that you don’t declare more than the available physical memory. When the actual memory usage exceeds the available physical memory, it will continue into virtual memory, usually in a swap file on disk. This will greatly decrease performance and result in major hiccups and slowdowns.
Now you can start Eclipse by executing the eclipse executable in the unzipped folder. You will be asked to select a directory as workspace. This is the directory where Eclipse will save all workspace projects and metadata.
After that, Eclipse will show a welcome screen. This is not interesting for now. You can click the Workbench button on the right top to close the welcome screen. Untick if necessary “Always show Welcome at start up” on the bottom right. After that, you will enter the workbench. By default, it looks like the screenshot in Figure 2-1.
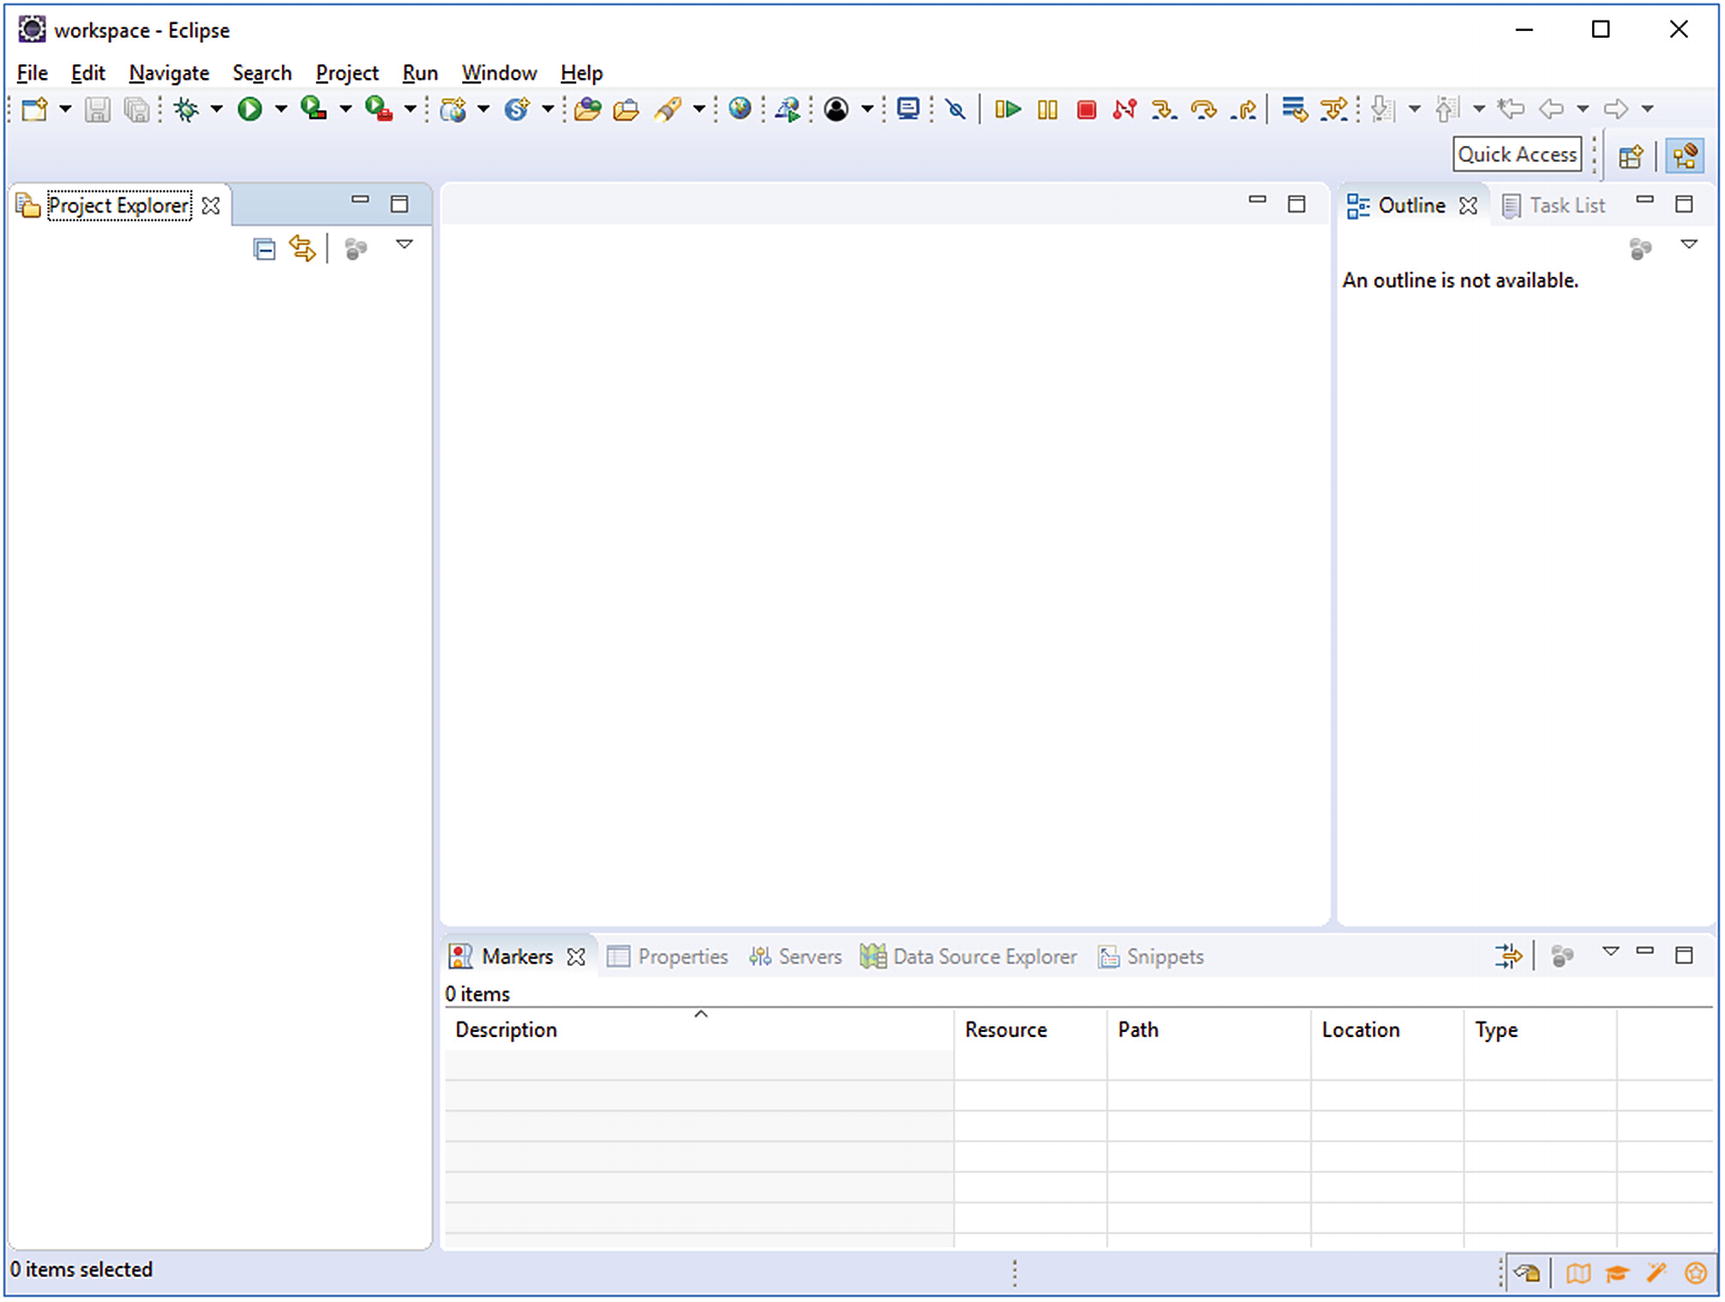
Figure 2-1 Eclipse workbench
Configuring Eclipse
Before we can start writing code, we would like to fine-tune Eclipse a bit so that we don’t eventually end up in trouble or with annoyances. Eclipse has an enormous amount of settings, and some of its default values should not have been the default values. You can verify and configure the settings via Window ➤ Preferences.
General ➤ Workspace ➤ Text file encoding must be set to UTF-8. Particularly in Windows this might otherwise default to the proprietary encoding CP-1252 which does not support any characters beyond the Latin range. When reading and saving Unicode files with CP-1252, you risk seeing unintelligible sequences of characters. This is also called “mojibake.”.1
General ➤ Workspace ➤ New text file line delimiter must be set to Unix. It works just fine on Windows as well. This will particularly keep version control systems happy. Otherwise, developers pulling code on different operating systems might face confusing conflicts or diffs caused by different line endings.
General ➤ Editors ➤ Text editors ➤ Spelling should preferably be disabled. This will save you from a potentially big annoyance, because it unnecessarily also spellchecks XML configuration files such as faces-config.xml and web.xml, causing confusing errors and warnings in those files.
Java ➤ Compiler ➤ Compiler compliance level must be set to 1.8. This is the minimum required Java version for Java EE 8.
Java ➤ Installed JREs must be set to the JDK, not to the JRE. This setting will normally also be used to execute the integrated application server which usually requires the JDK.
Installing JBoss Tools Plug-in
Standard Eclipse for Java EE in its current version does not support any CDI tools. It has no wizards to create CDI managed beans, or autocompletion and hyperlinking for CDI managed beans in JSF pages. The JBoss Tools plug-in is an extensive plug-in which offers among others the CDI tools.2 This is very useful when developing a Java EE web application.
In order to install it, go to Help ➤ Eclipse Marketplace. Enter in the search field “JBoss Tools” and click Go. Scroll a bit through the results until you see JBoss Tools Final and then click Install (see Figure 2-2).
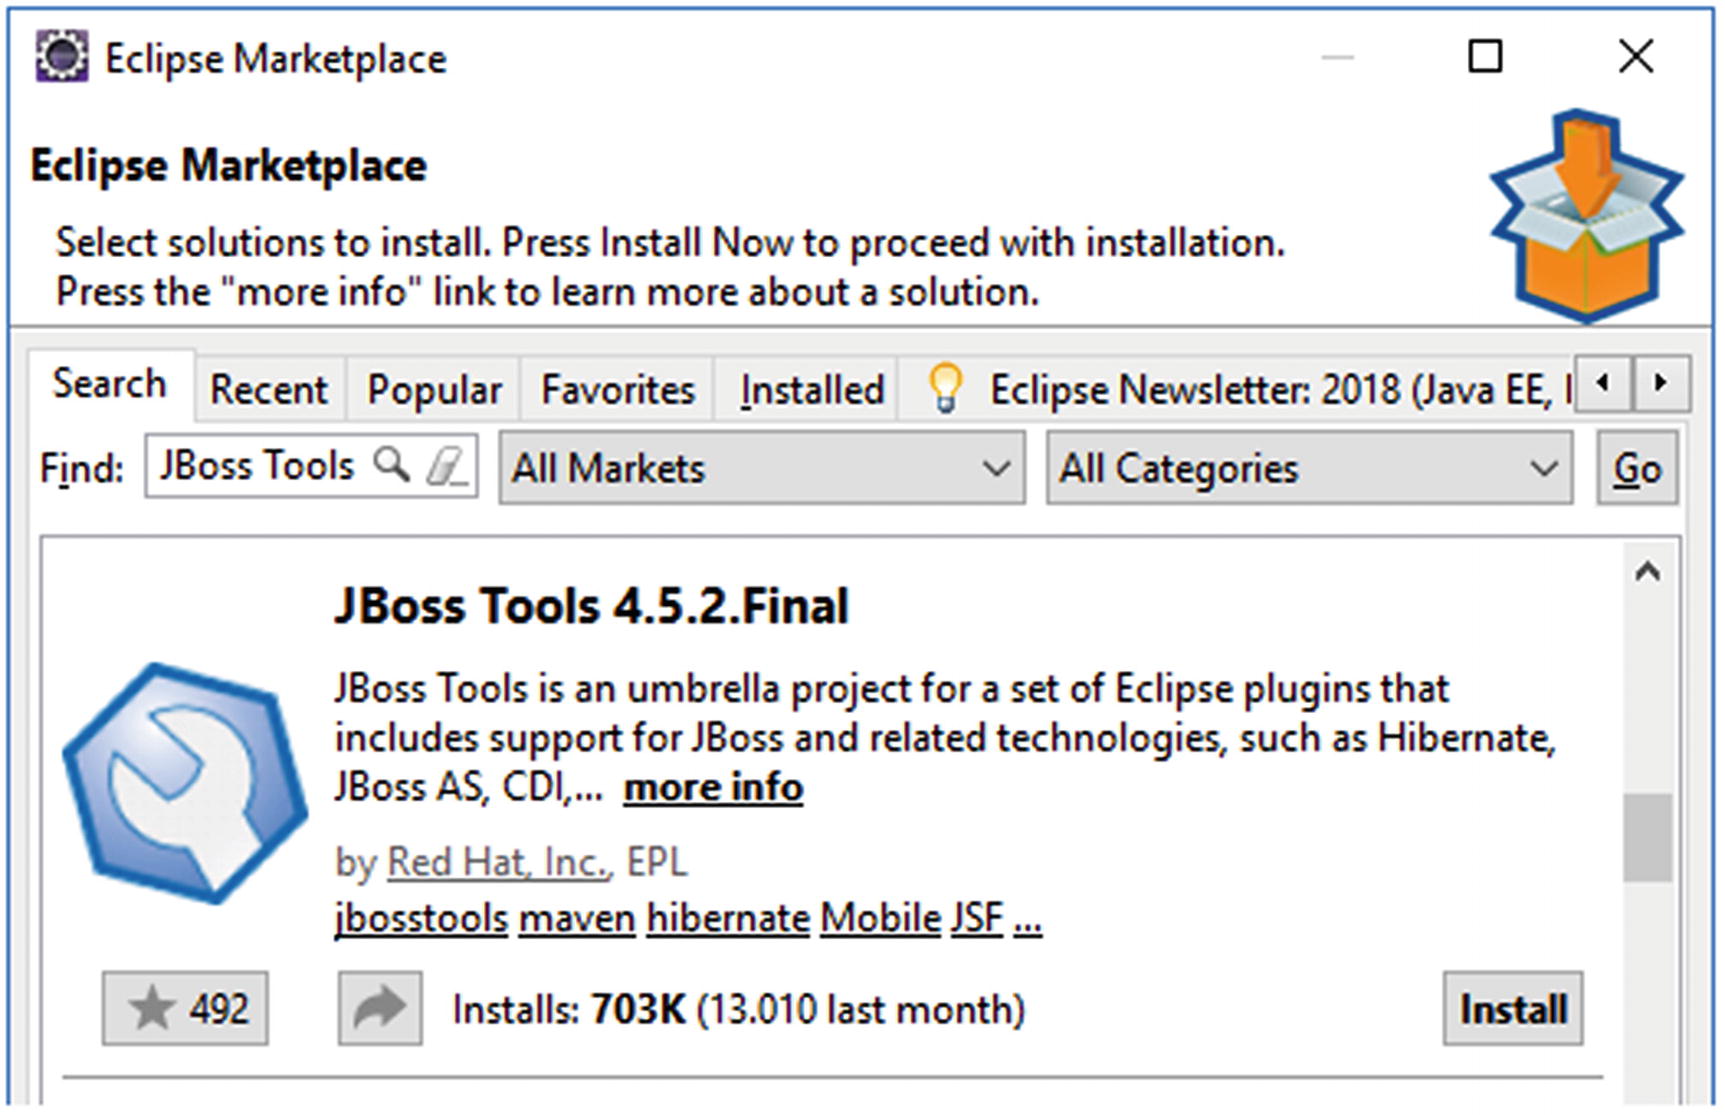
Figure 2-2 JBoss Tools in the Eclipse Marketplace
In the next step, you’ll see a fairly large list of all JBoss Tools’ offerings. We don’t need all of them. The list indeed also includes some JSF-related tools, but they are not terribly useful. The Visual Page Editor is not at all useful. Dragging and dropping together a JSF page doesn’t make you a good JSF developer. That can only be achieved by just writing code yourself. Moreover, having too many unused features installed and even implicitly enabled may make Eclipse terribly slow. The fewer features you select, the less chance that you will be surprised about changes in the IDE behavior. So, untick the top check box and then tick only the check box which says “Context and Dependency Injection Tools” (see Figure 2-3).
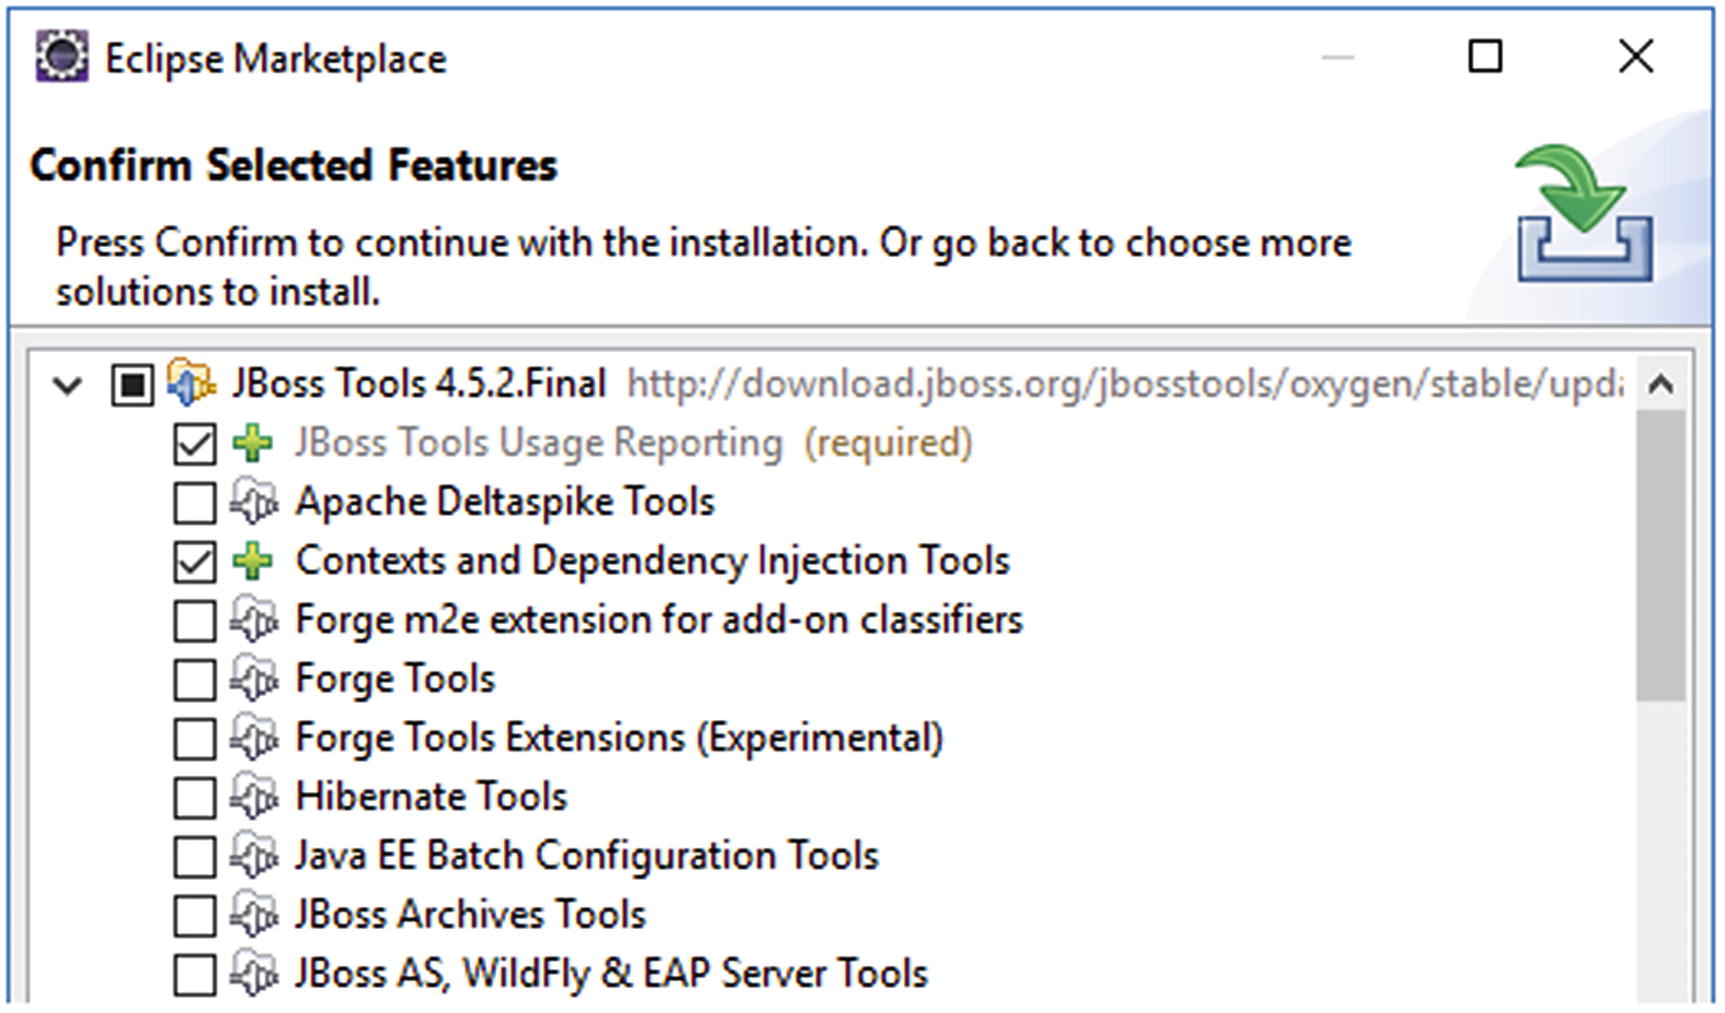
Figure 2-3 Select only the CDI tools for now
Next, accept the terms of the license agreement and complete the wizard until Eclipse is restarted.
Integrating New Server in Eclipse
We need to familarize Eclipse with any installed application servers so that Eclipse can seamlessly link its Java EE API libraries in the project’s build path (read: the compile time classpath of the project). This is mandatory in order to be able to import classes from the Java EE API in your project. You know, the application server itself represents the concrete implementation of the abstract Java EE API.
In order to integrate a new application server in Eclipse, first check the bottom section of the workbench with several tabs representing several Views (you can add new ones via Window ➤ Show View). Click the Servers tab to open the servers view (see Figure 2-4). Click the link which says “No servers are available. Click this link to create a new server. . . .”
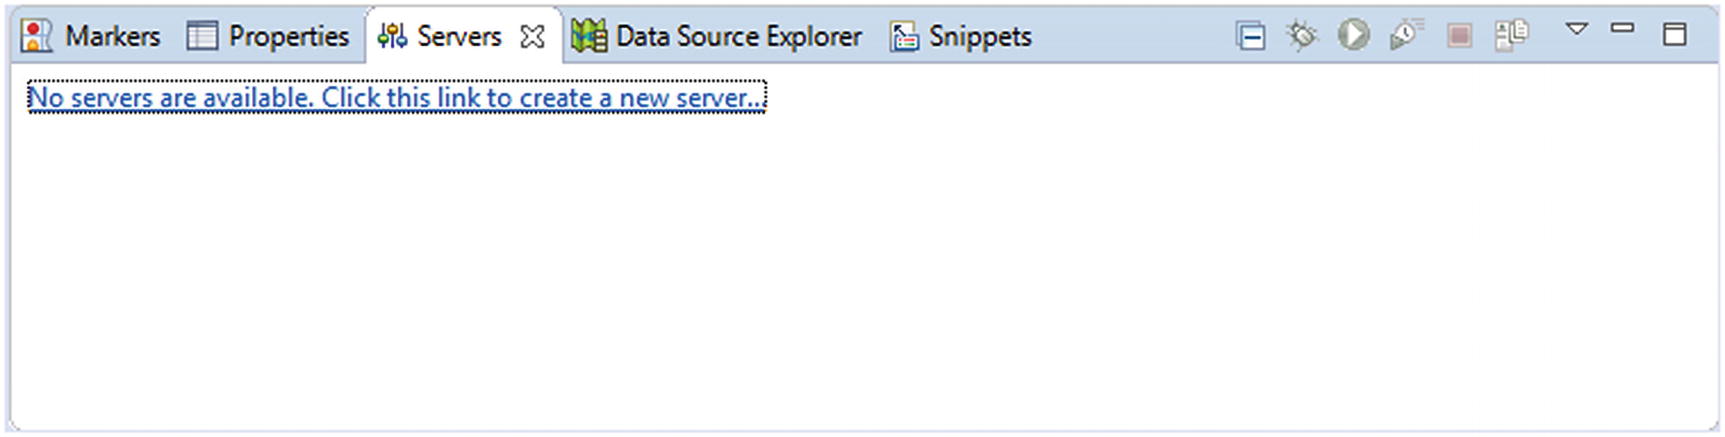
Figure 2-4 Servers view of Eclipse Workbench
From the list of available server tools, select Oracle ➤ GlassFish Tools (see Figure 2-5).
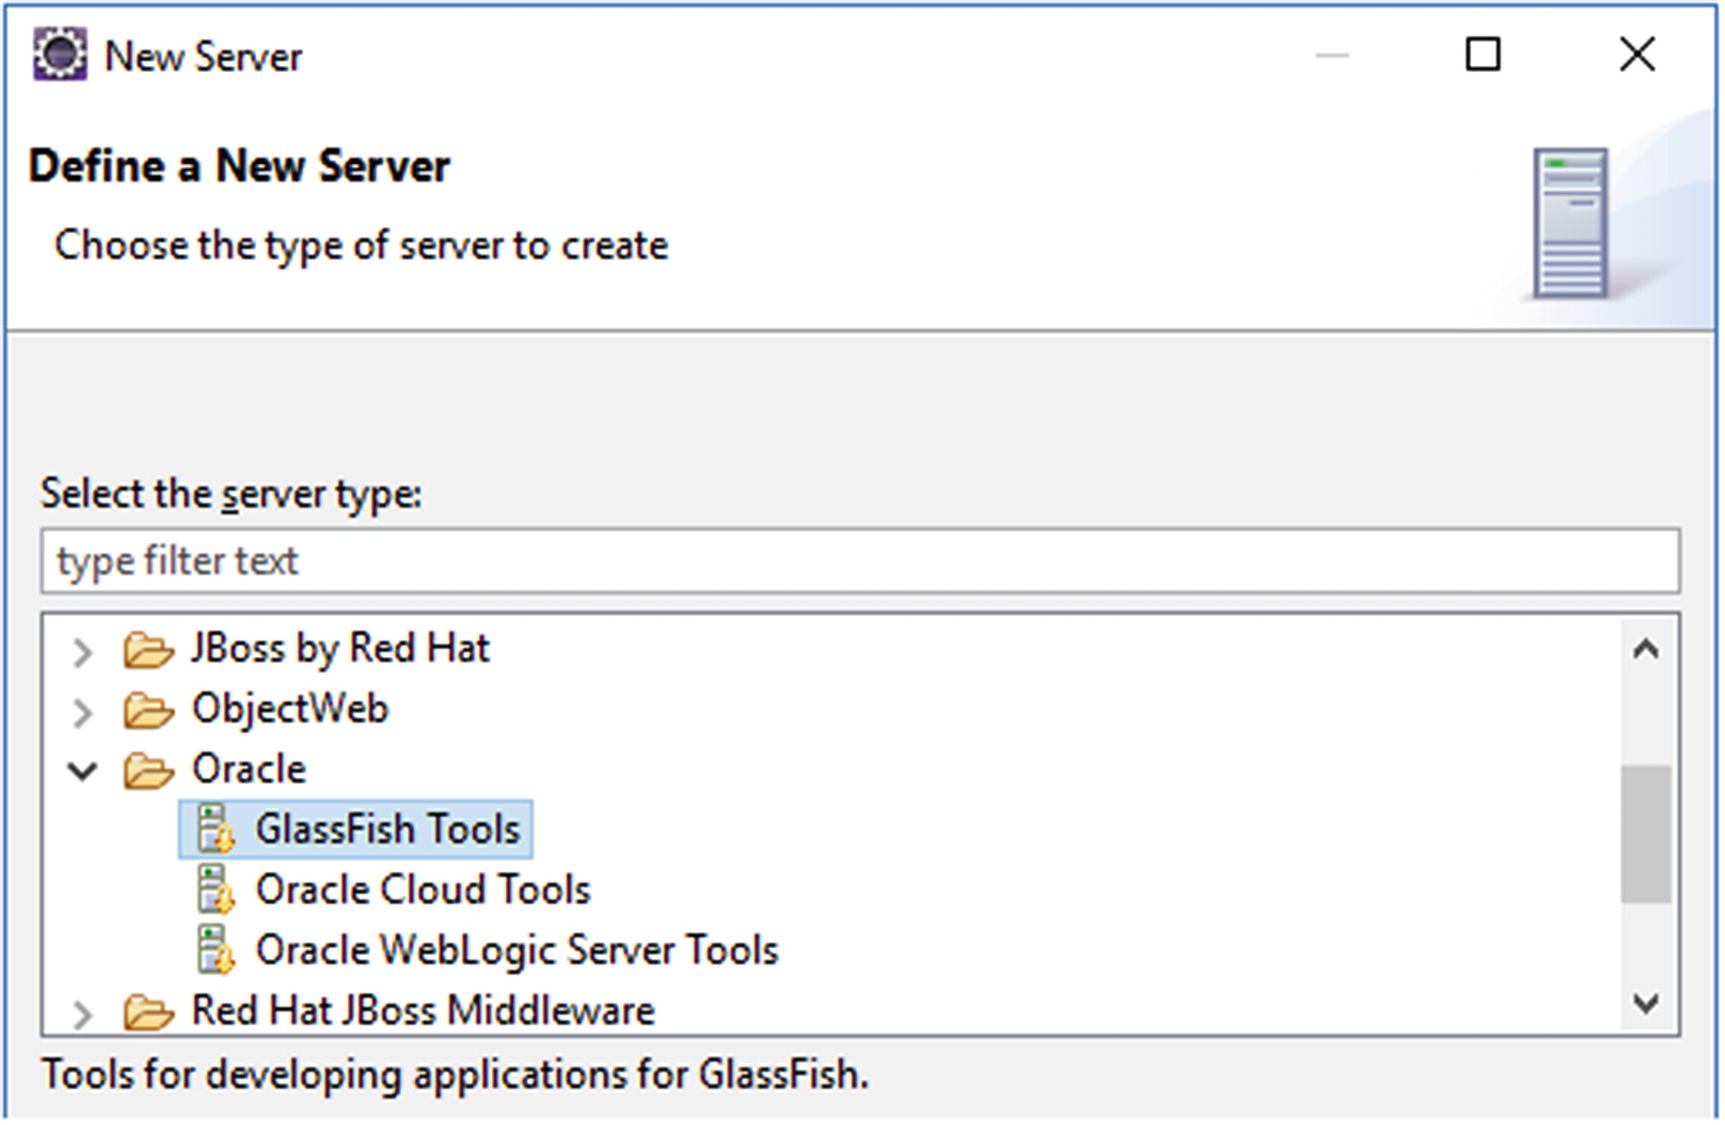
Figure 2-5 Selecting GlassFish Tools in New Server wizard
After clicking Next for the first time , it will download the plug-in in the background and request you to accept the license agreement before installing the plug-in. This plug-in is mandatory in order to manage any GlassFish-based server from inside the workbench—among others, adding and removing Eclipse projects to the deployments folder, starting and stopping the server, and running the server in debug mode. Once it’s finished installing, it will request you to restart Eclipse. Take action accordingly.
Once returned into the workspace, click the same link in the Servers view again. You’ll now see a GlassFish ➤ GlassFish option . Select this and set the Server name field to “Payara” (see Figure 2-6).
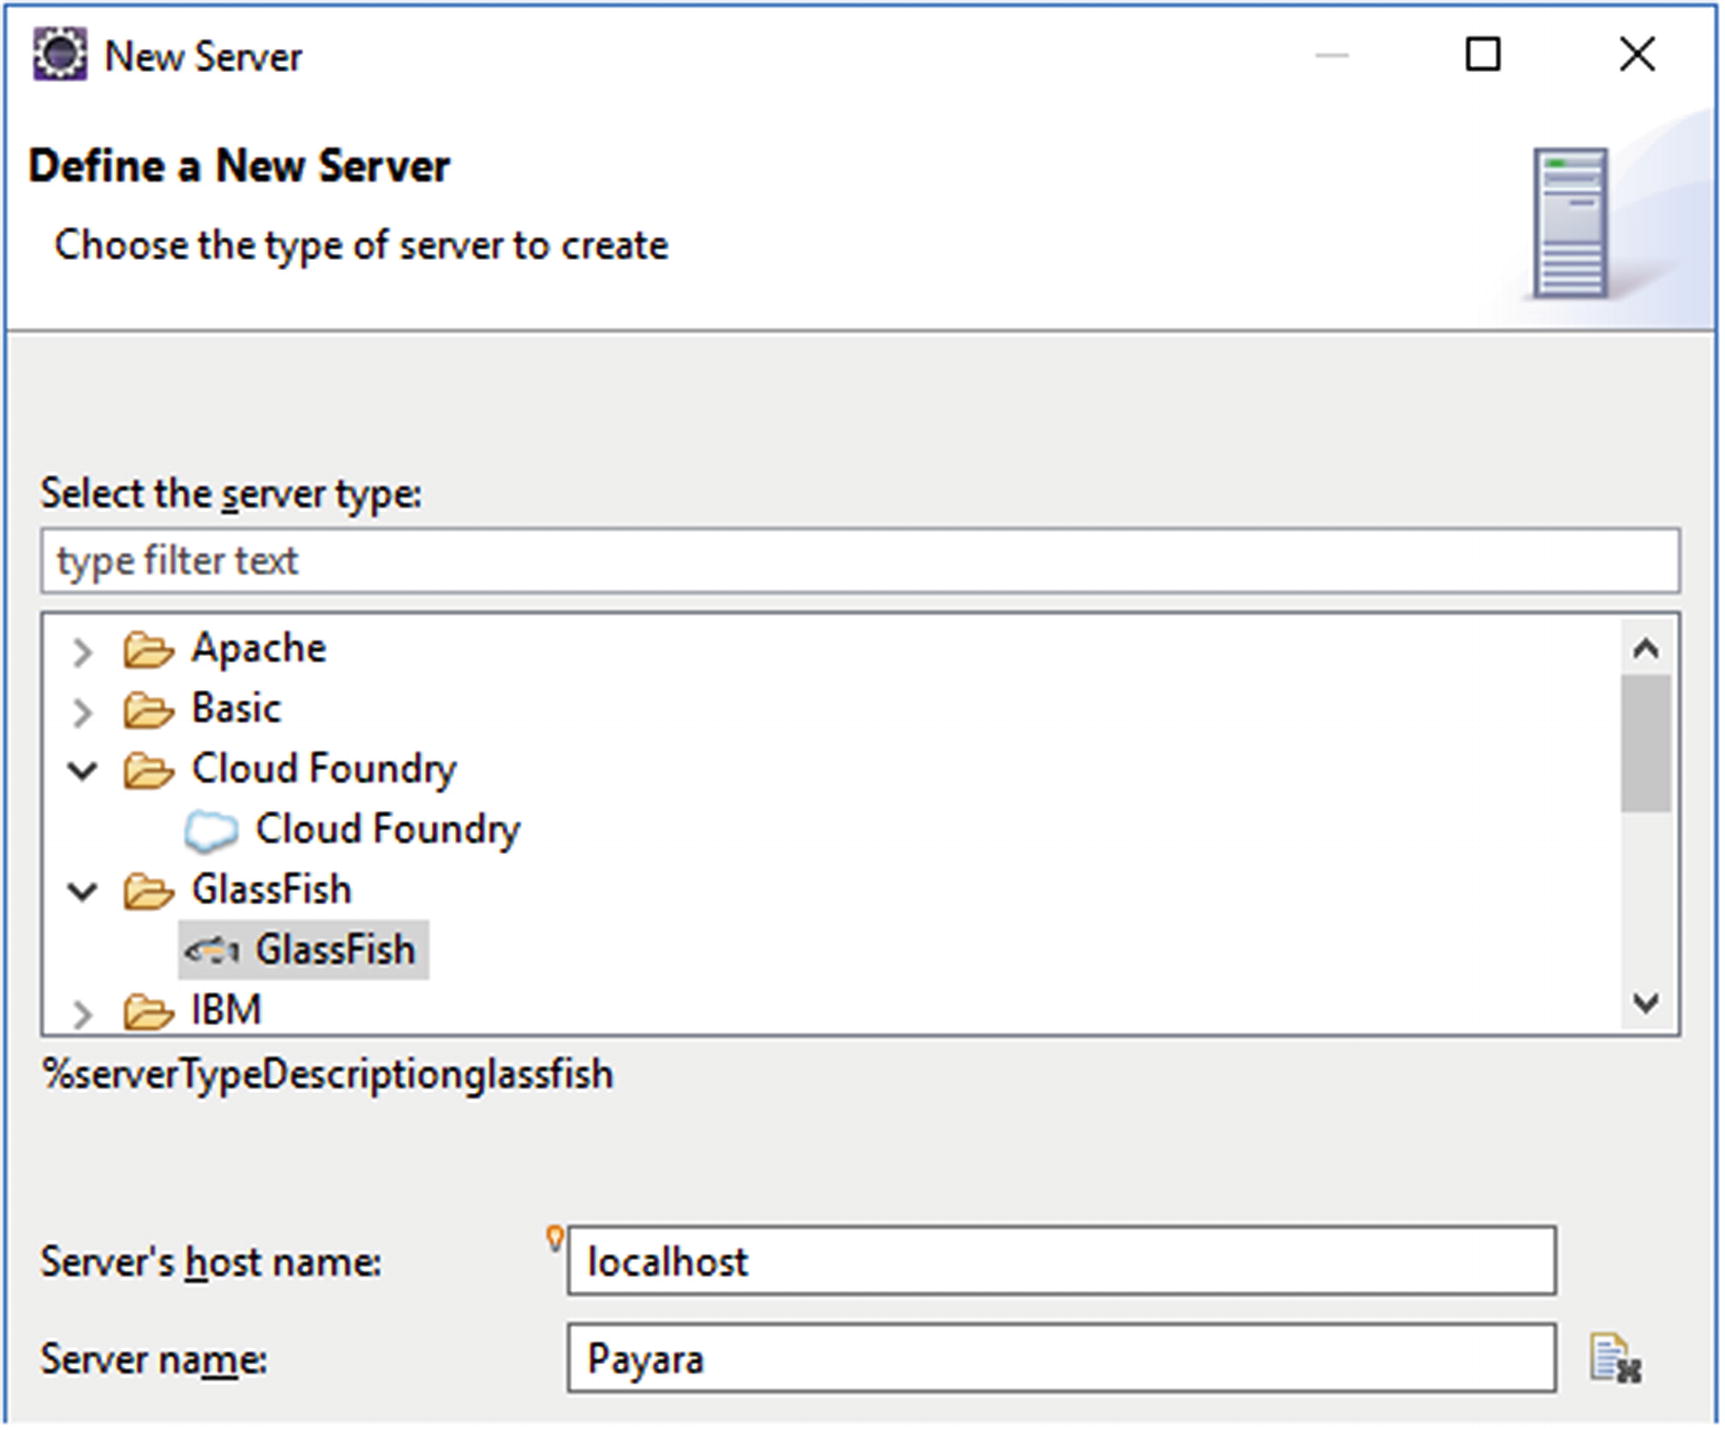
Figure 2-6 Selecting GlassFish server in New Server wizard and naming it Payara
Advance to the next step. Here, you should point the GlassFish location field to the glassfish subfolder of the Payara installation, there where you have unzipped it after downloading (see Figure 2-7).
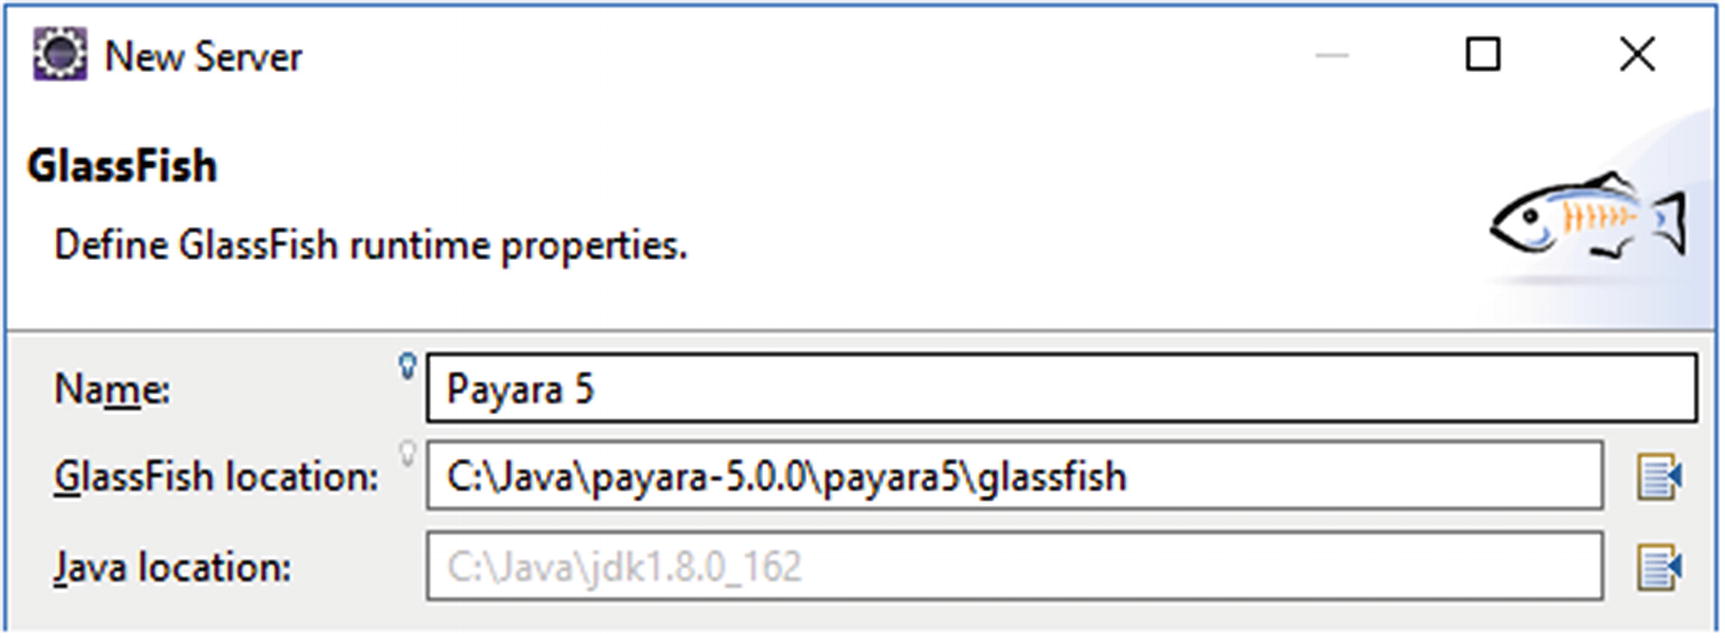
Figure 2-7 Specifying GlassFish location in New Server wizard
Complete the remainder of the New Server wizard with default settings. You don’t need to edit any other fields. The newly added server will now appear in the Servers view (see Figure 2-8).
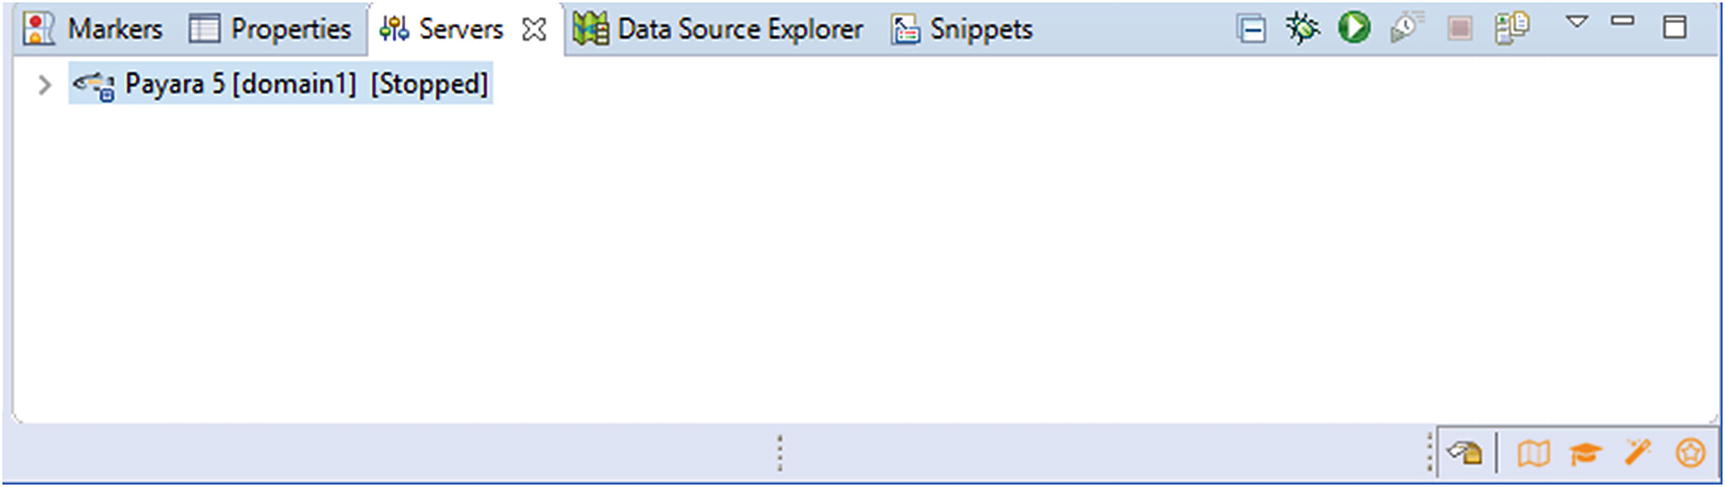
Figure 2-8 The Payara server in Servers view
Creating New Project in Eclipse
We're now ready to create a new project for our JSF application in Eclipse. This can be done via the left section of the workbench which by default shows only one tab representing the Project Explorer view (also here, you can add new views via Window ➤ Show View). Right-click anywhere in this view and select New ➤ Project. It’ll show the New Project wizard which may have a bit too many options.
Eclipse, being an IDE for many different project tasks, offers a bewildering amount of different project types from which to choose. For a Java EE-based application which is going to be deployed as a simple WAR file, there are basically two project types that we could choose from: Web ➤ Dynamic Web Project and Maven ➤ Maven Project.
The difference is that the first is an Eclipse native project that really only works on Eclipse, while the latter is a universal type of project that can be built by any IDE, as well as easily on the command line and by various CI servers such as Travis and Jenkins. For this reason, the Maven project type is really the only viable choice (see Figure 2-9).
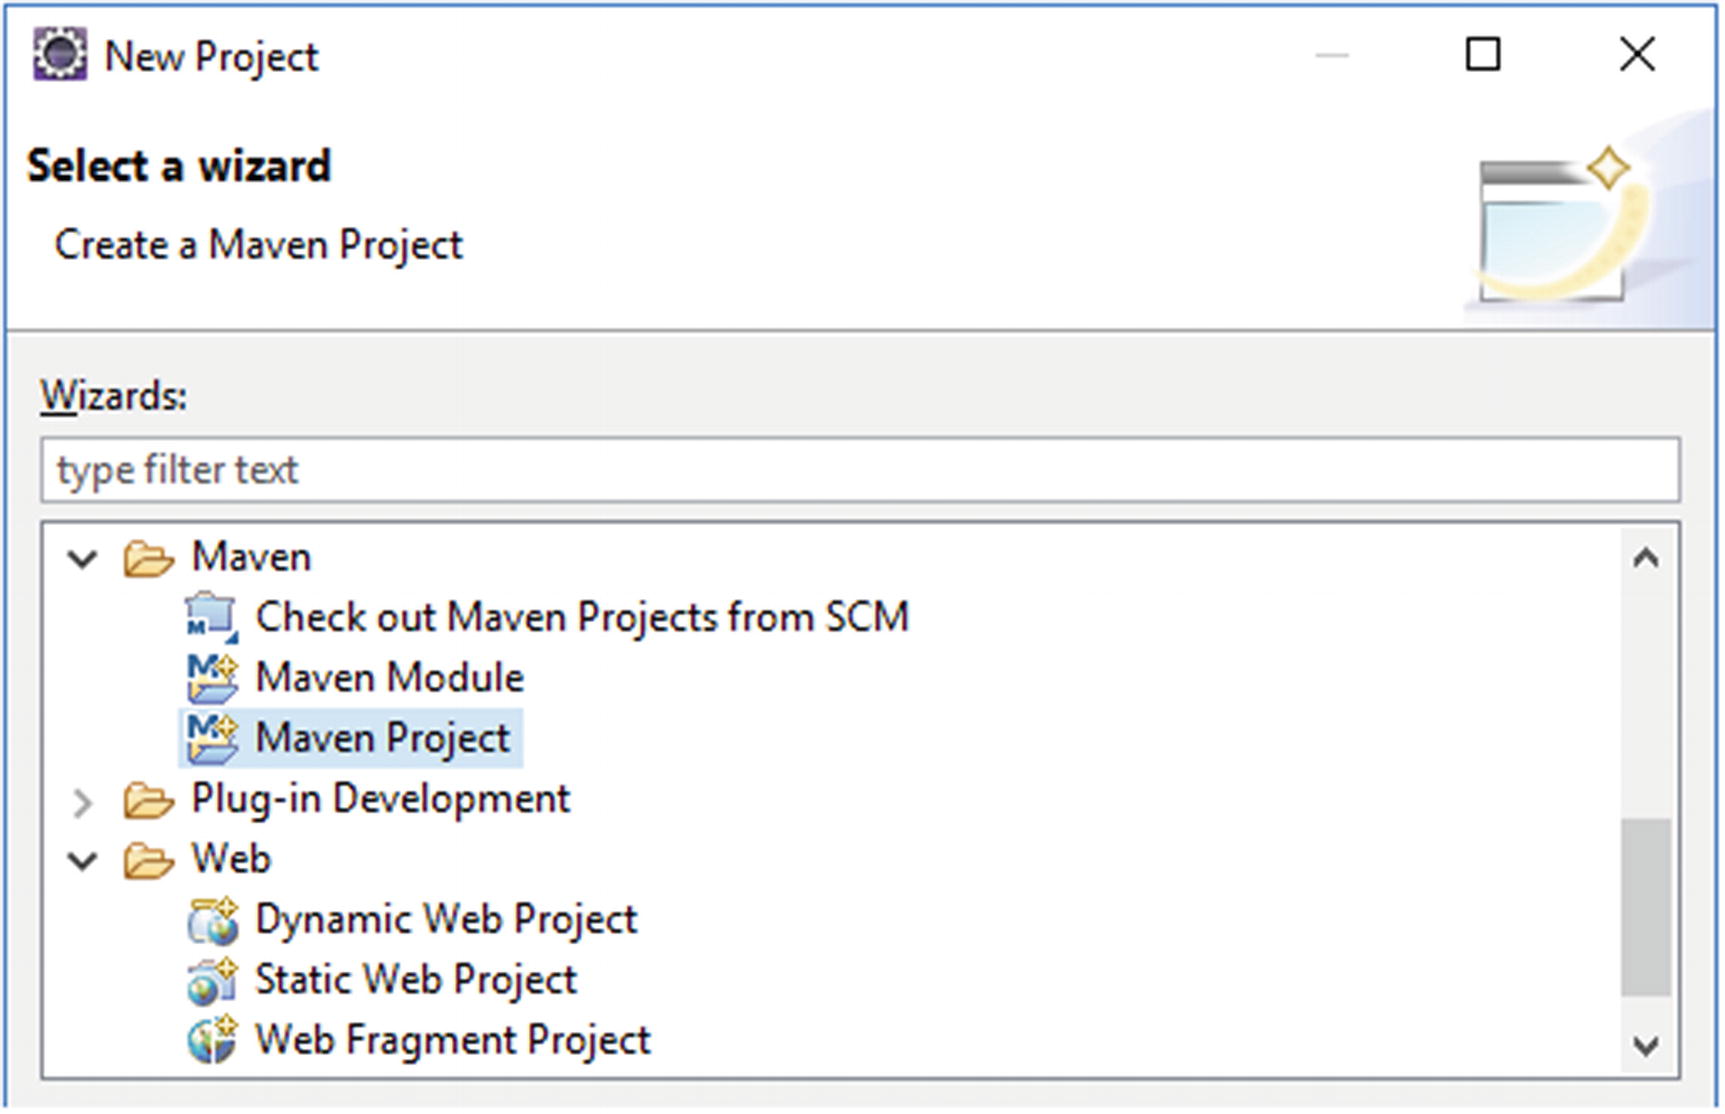
Figure 2-9 Selecting Maven Project in New Project wizard (note the Dynamic Web Project as another but non-viable option)
In the next step, make sure that the option Create a simple project (skip archetype selection) is checked (see Figure 2-10). This will let us start with a really empty Maven project so that we can configure and populate it ourselves. Of course, you could also choose from an archetype, which is basically a template project with several already prepared files and configurations. But we don’t need any for now.
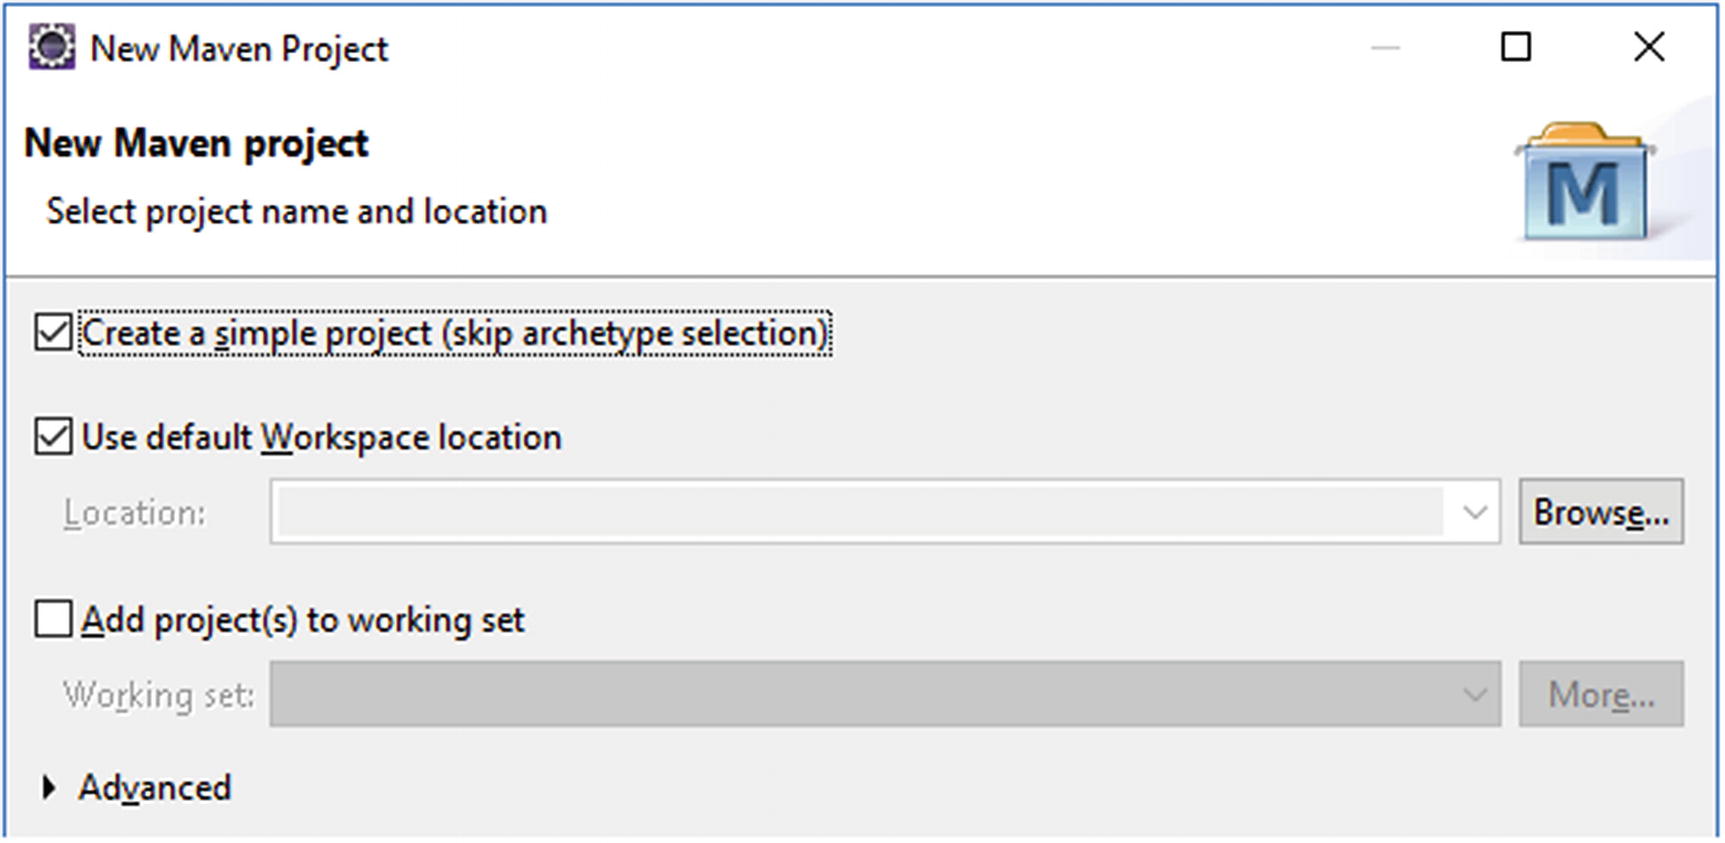
Figure 2-10 Checking “Create a simple project” in New Maven Project wizard
In the next step, we can specify our own Maven coordinates of the project. The Maven coordinates consist of, among others, Group Id, Artifact Id, and Version, also known as GAV in the Maven world. The Group Id usually matches the root package name you’re going to use, such as com.example. The Artifact Id usually represents the project name you’re going to use. For simplicity and in order to be consistent in the rest of the book, we’ll use project. The Version can be kept default at 0.0.1-SNAPSHOT. Finally the Packaging should be set to war.
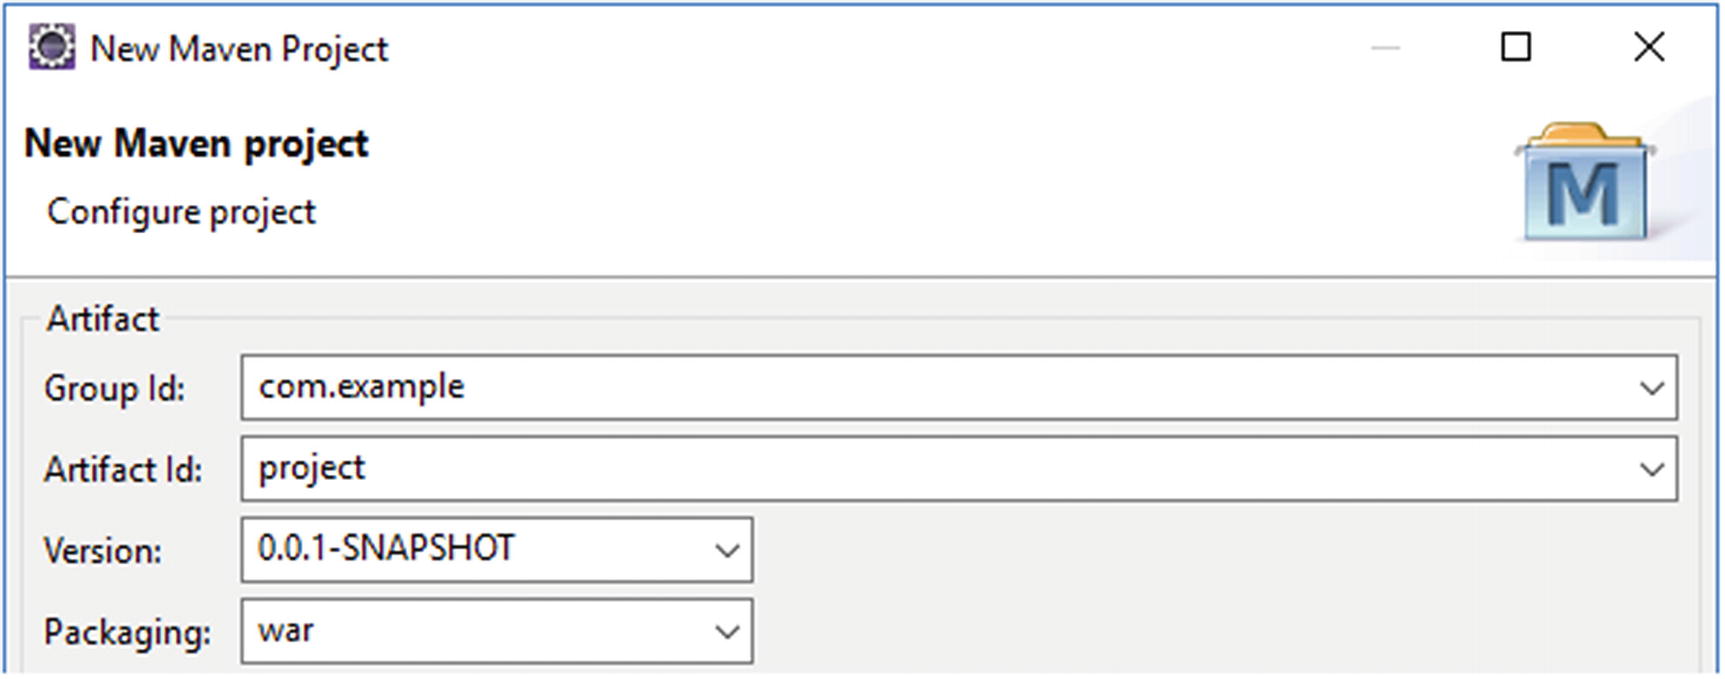
Figure 2-11 Filling out the Maven GAV in new Maven Project wizard
Complete the remainder of the New Maven Project wizard (see Figure 2-11). You don’t need to edit any other fields . Once you’ve finished the wizard, you’ll get to see the project structure in the Project Explorer view (see Figure 2-12).
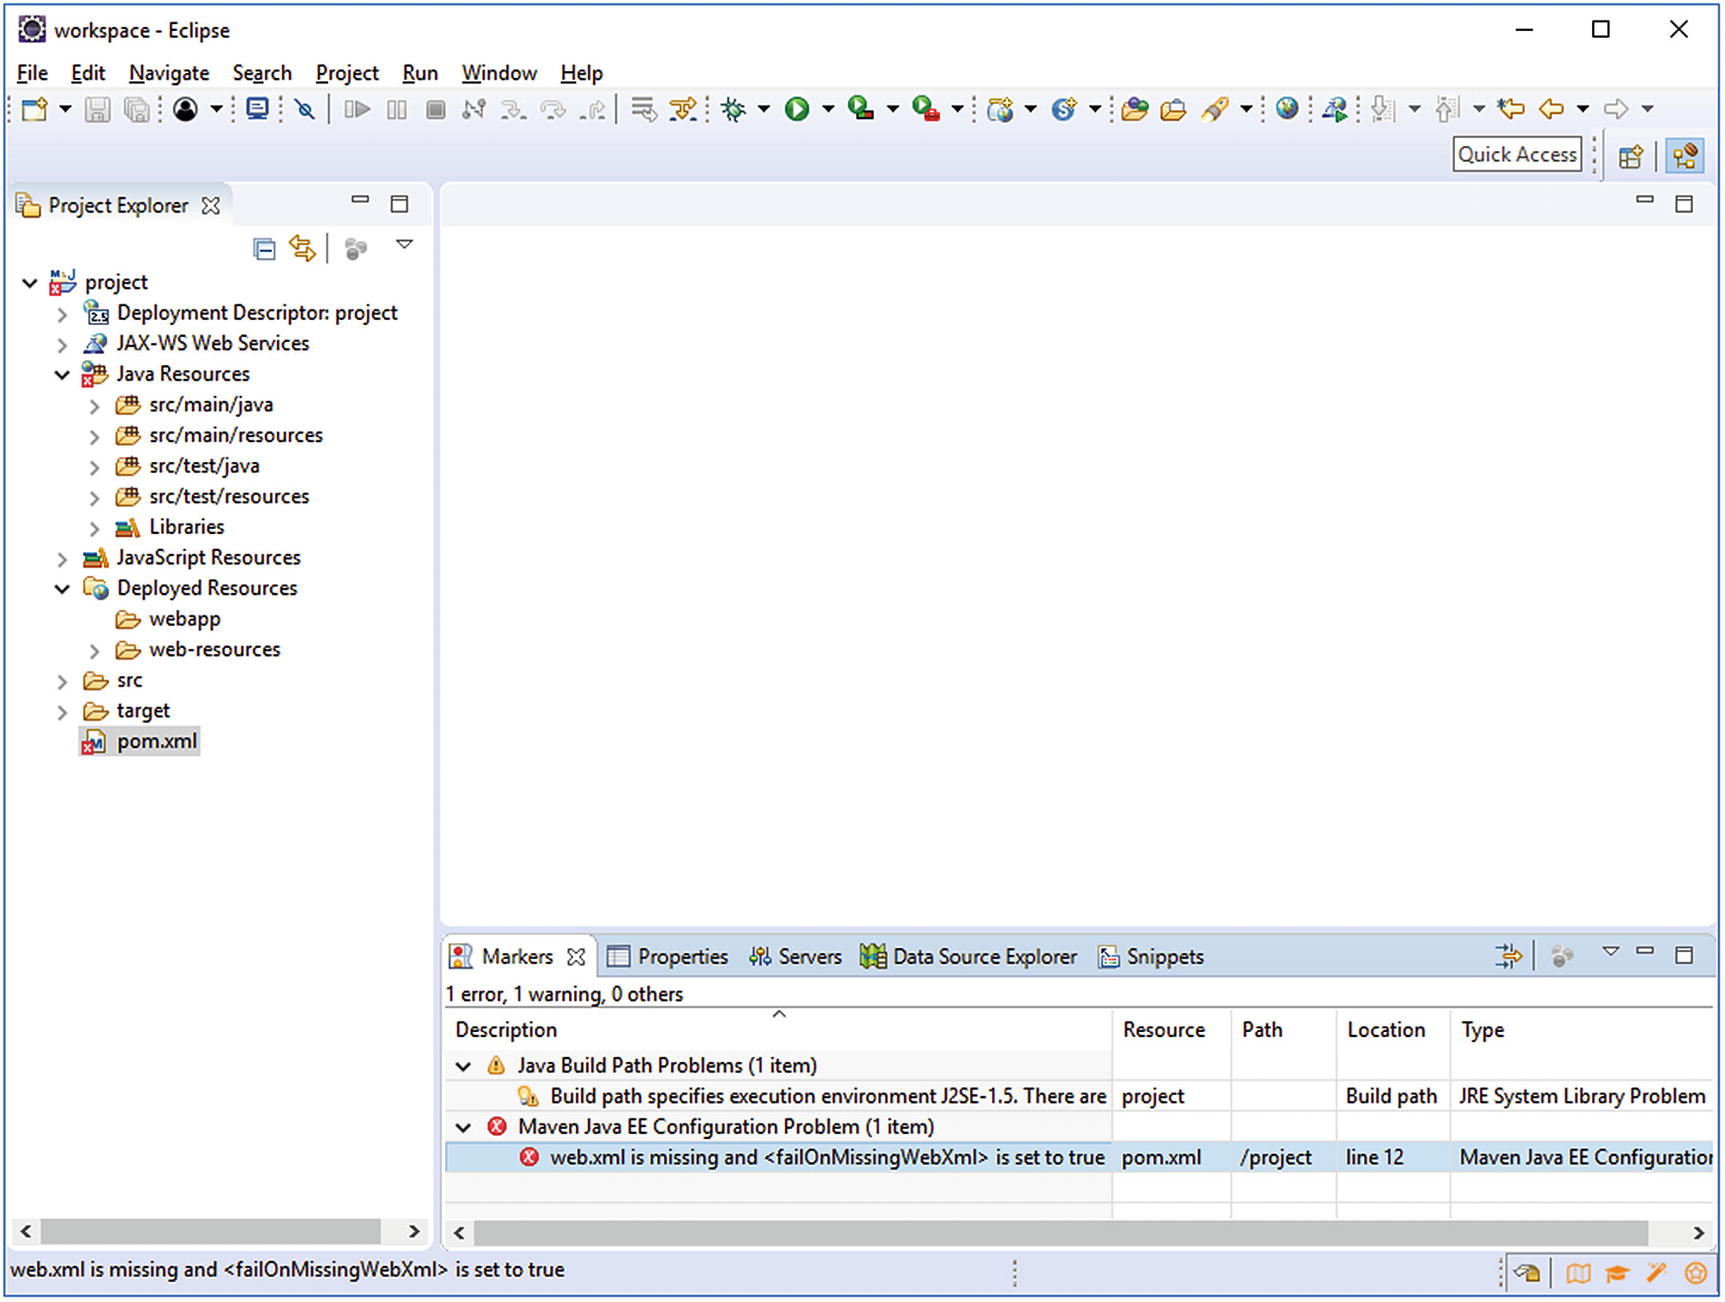
Figure 2-12 The newly created Maven project in Eclipse
Unfortunately, the Eclipse-generated pom. xml, which is the main indicator of the project being a Maven project and containing its configuration, is less than ideal. It’s not current any more, even when generated by the latest Eclipse, the Oxygen 2 (December 2017). You can already see that by the pom.xml file which is marked with an alarming red cross and an error message in the Markers view. Any project that has at least one such red cross cannot be built and won’t be deployable. The error message literally says “web.xml is missing and <failOnMissingWebXml> is set to true.” In other words, Maven somehow thinks that it’s still a pre-Java EE 6 project, when this was indeed disallowed.
In order to solve this problem and to catch up the Eclipse-generated pom.xml with the current standards, we need to open pom. xml for editing and adjust it as shown in the following code:
<projectxmlns:="http://maven.apache.org/POM/4.0.0"xmlns:xsi="http://www.w3.org/2001/XMLSchema-instance"xsi:schemaLocation="http://maven.apache.org/POM/4.0.0http://maven.apache.org/xsd/maven-4.0.0.xsd"><modelVersion>4.0.0</modelVersion><groupId>com.example</groupId><artifactId>project</artifactId><version>0.0.1-SNAPSHOT</version><packaging>war</packaging><properties><project.build.sourceEncoding>UTF-8</project.build.sourceEncoding><project.reporting.outputEncoding>UTF-8</project.reporting.outputEncoding><maven.compiler.source>1.8</maven.compiler.source><maven.compiler.target>1.8</maven.compiler.target><failOnMissingWebXml>false</failOnMissingWebXml></properties><dependencies><dependency><groupId>javax</groupId><artifactId>javaee-api</artifactId><version>8.0</version><scope>provided</scope></dependency></dependencies></project>
Once you save this file, Eclipse will automatically sort it out by itself and clear out the alarming red cross. Now that looks much better. We'll briefly go through the most important settings here.
Packaging war—indicates the project is a “web” project, and that the project’s contents will be assembled into a web archive.
Encoding UTF-8—sets the encoding that the source files are in and with which the (reporting) output files should be generated. This makes the build repeatable, as it otherwise would default to the system default encoding (again, a rather bad default).
Compiler 1.8—sets both the version of Java used in the .java source files as well as the byte code output in the .class files. Without setting this, Maven defaults to the oldest version possible, and sometimes even a lower version than that.
failOnMissingWebXml false—older versions of Java EE required the /WEB-INF/web.xml to be present. Even though this has not been required any more since Java EE 6, which was released in 2009, Maven still checks for this file to be present. Setting this to false prevents this unnecessary check.
Dependency javax:javaee-api:8.0 provided—this declares a dependency on the Java EE 8 API, and makes sure all the Java EE types like @Named are known to the compiler . This dependency is set to provided" since those types are already provided by the target runtime, which is in our case Payara. They will then only be used to compile the source code against and won’t be included in the generated .war. You need to make absolutely sure that any compile time dependency which is already provided by the target runtime is set to provided; otherwise it will eventually end up in the generated .war and you may run into class loading trouble wherein duplicate different versioned libraries are conflicting with each other. In case you’re actually not targeting a full-fledged Java EE server but a barebones servlet container, you would need to adjust the dependencies as instructed in the README of Mojarra,3 one of the available JSF implementations and actually the one used under the cover of Payara.
Now, in Eclipse’s Markers view , there’s only one warning left which says “Build path specifies execution environment J2SE-1.5. There are no JREs installed in the workspace that are strictly compatible with this environment.” Well, that basically means that Eclipse recognizes this Maven project as a Java 1.5-only project while we don’t actually have Java SE 5 installed, and in spite of the compiler version in pom.xml being set to 1.8.
In order to tell Eclipse that this is really a Java 1.8 project, we need to right-click the project in Project Explorer view and choose Properties. In the Project Facets section you should change the version of the Java facet from 1.5 to 1.8 (or 9 if you have JDK 9 installed) (see Figure 2-13). While at it, we also need to update the Servlet API version and add the CDI, JSF, and JPA facets. The Servlet API is represented by the “Dynamic Web Module” entry. This needs to be set to version 4.0, which matches Java EE 8. Further the “CDI,” “JavaServer Faces,” and “JPA” entries need to be selected. The “CDI” facet is, by the way, only available after having installed the JBoss Tools as instructed in the section “Installing JBoss Tools Plug-in.”
Unfortunately, in the latest available Eclipse version, Oxygen 2 from December 2017, there isn’t a JSF 2.3 or JPA 2.2 version available yet in the dropdown. The highest available versions are JSF 2.2 and JPA 2.1. This is not a big problem. Its only influence is on the available code generators and wizards. We can always adjust the Eclipse-generated faces-config.xml and persistence.xml files afterward to match the Java EE 8 compatible versions.
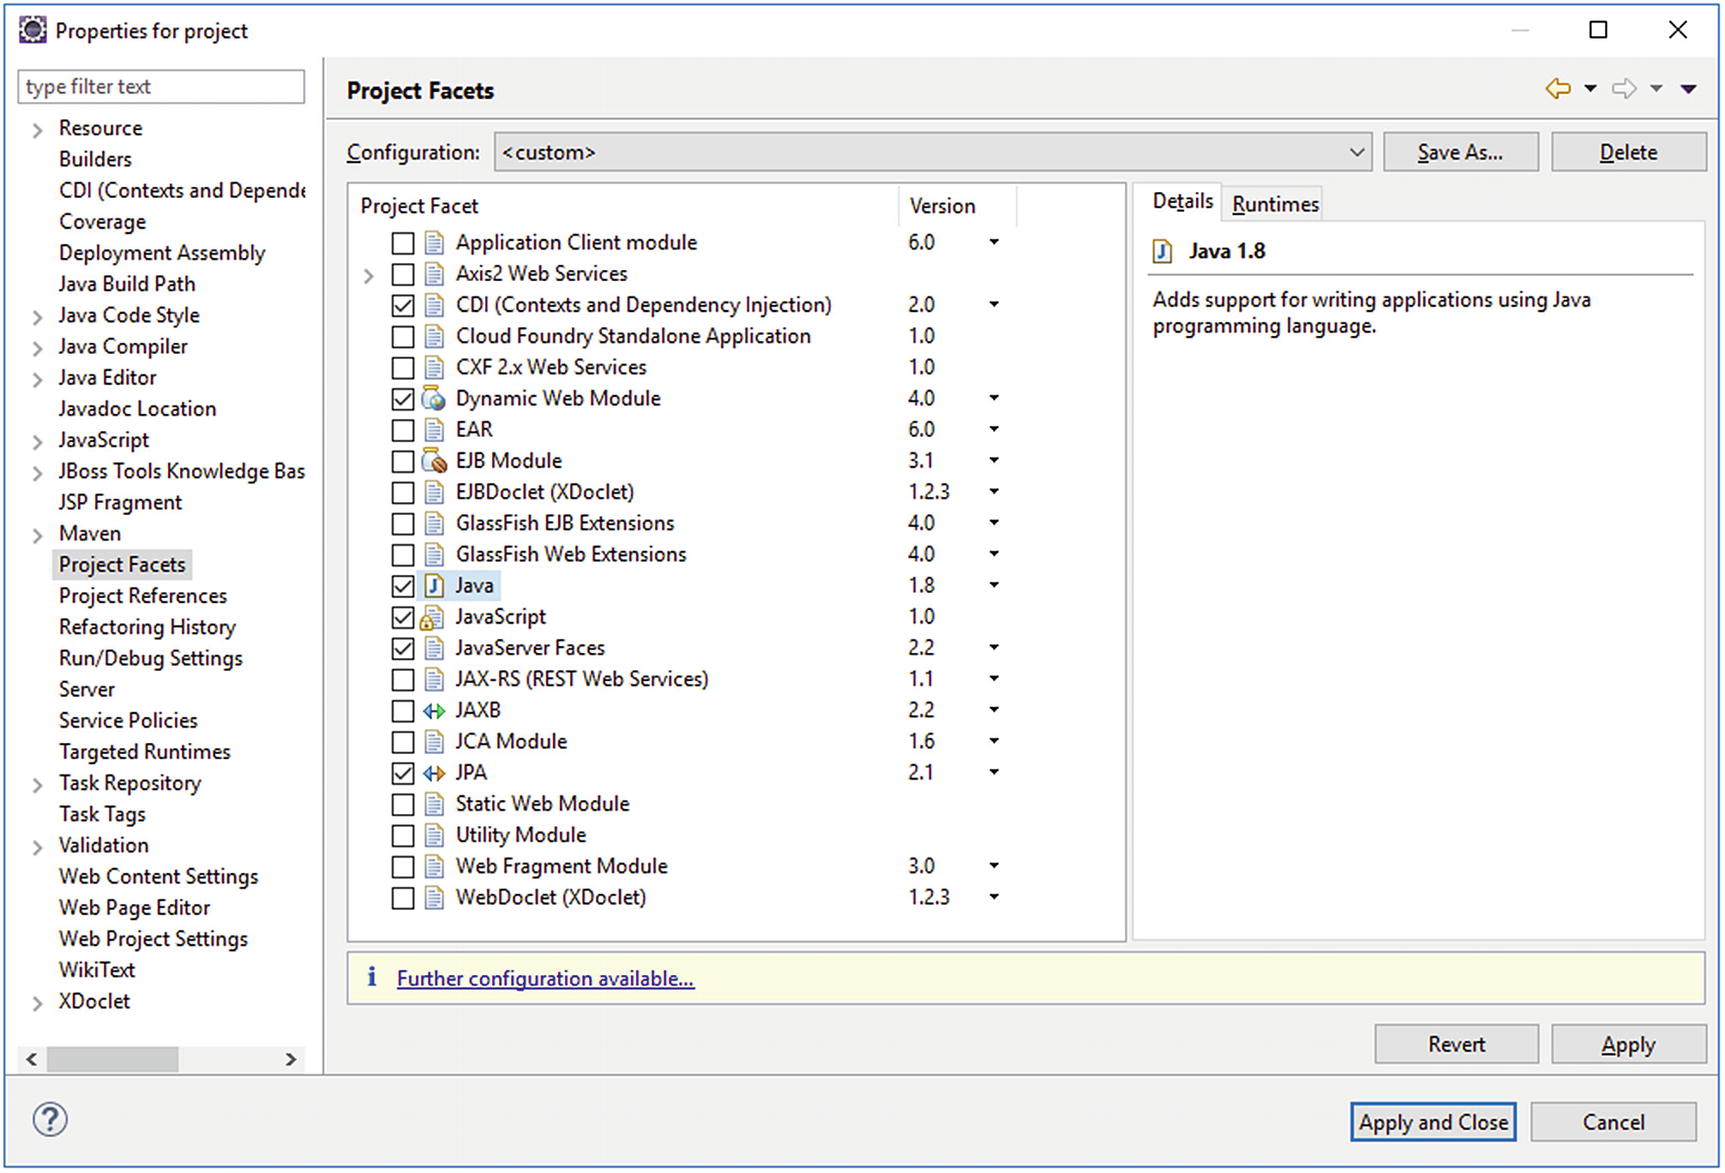
Figure 2-13 The Project Facets section of the project properties (note that the Servlet API version is represented by “Dynamic Web Module”)
As you can see in the yellow warning bar , only Eclipse requires further configuration. This concerns the newly selected JSF and JPA facets. When clicking the link, we get to see the Modify Faceted Project wizard (see Figure 2-14).
The first step of the Modify Faceted Project wizard allows us to configure the JPA facet. We need to make sure that Eclipse is being instructed that the JPA implementation is already provided by the target runtime and thus Eclipse doesn’t need to include any libraries. This can be achieved by choosing the “Disable Library Configuration” option in the JPA implementation field . As we’re going to use the Payara-provided Hibernate as the actual JPA implementation, which automatically supports discovering of @Entity annotated classes, we’d like to instruct Eclipse to do the same; otherwise it would automatically add entities to the persistence.xml when going through the entity code generation wizard , or show warnings when we create one manually and don’t add it to the persistence.xml.
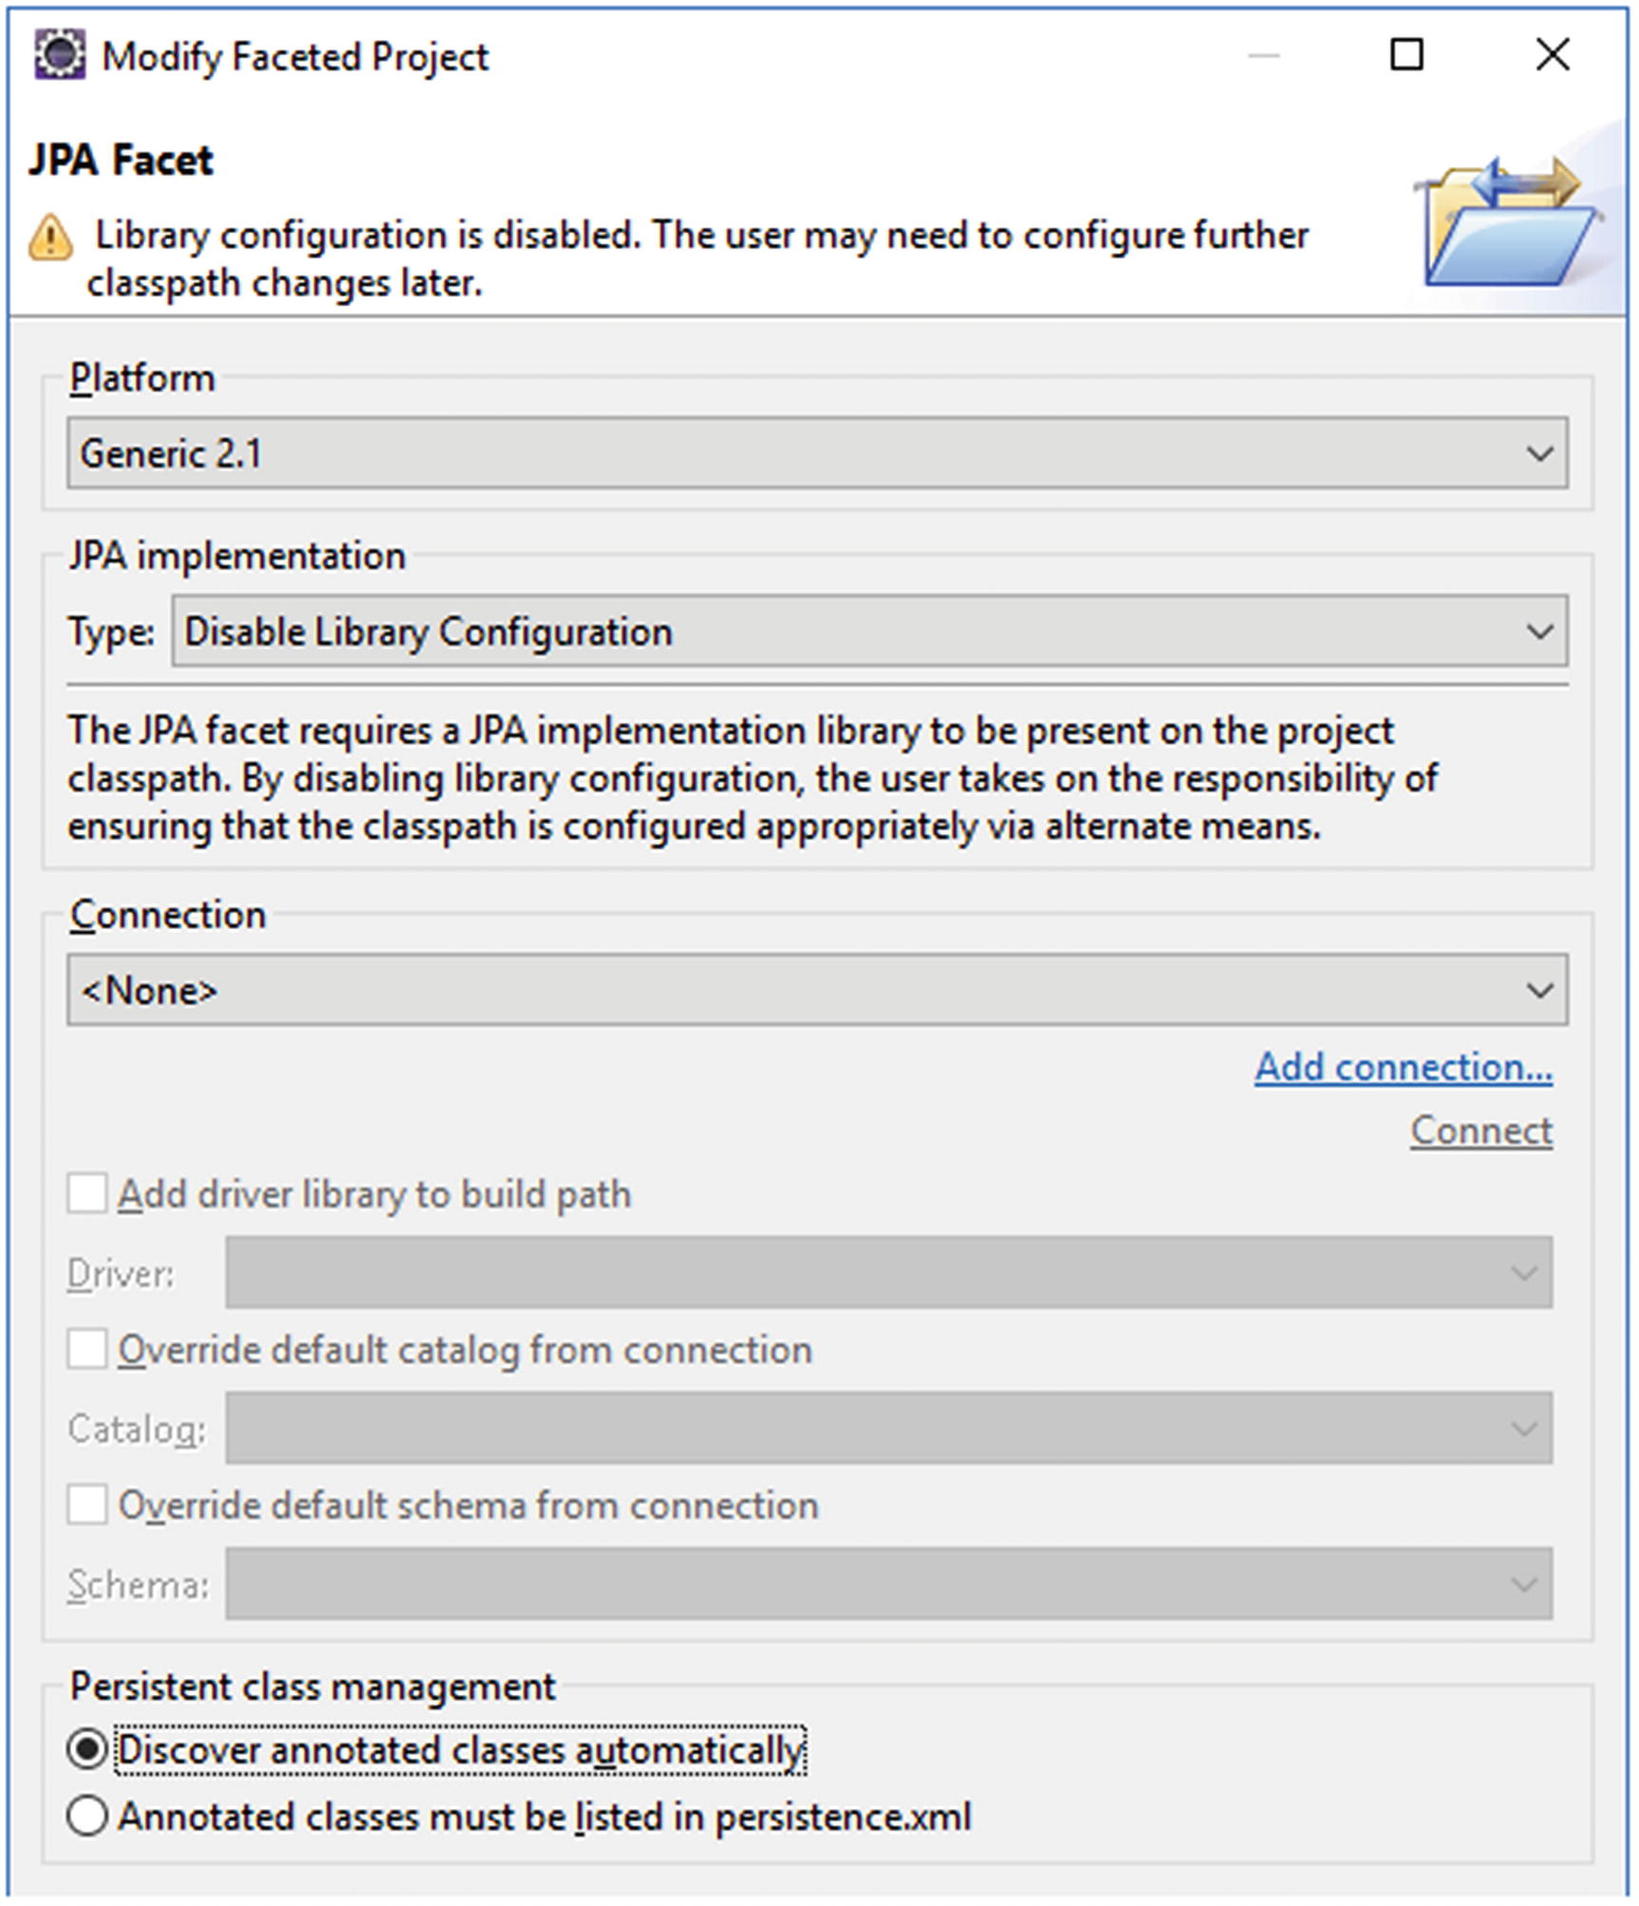
Figure 2-14 The JPA Facet configuration
Note that configuring a database connection is not necessary for now as we’re going to use an embedded database.
In the next step of the Modify Faceted Project wizard, we can configure the JSF capabilities (see Figure 2-15). Also here, we need to make sure that Eclipse is being instructed that the JSF implementation is already provided by the target runtime and thus Eclipse doesn’t need to include any libraries. This can be achieved by choosing the “Disable Library Configuration” option in the JSF Implementation Library field. Further, we need to rename the servlet name of the FacesServlet to match the fictive instance variable name: facesServlet. Last but not least, we need to change the URL mapping pattern from the Jurassic /faces/* to the modern *.xhtml.
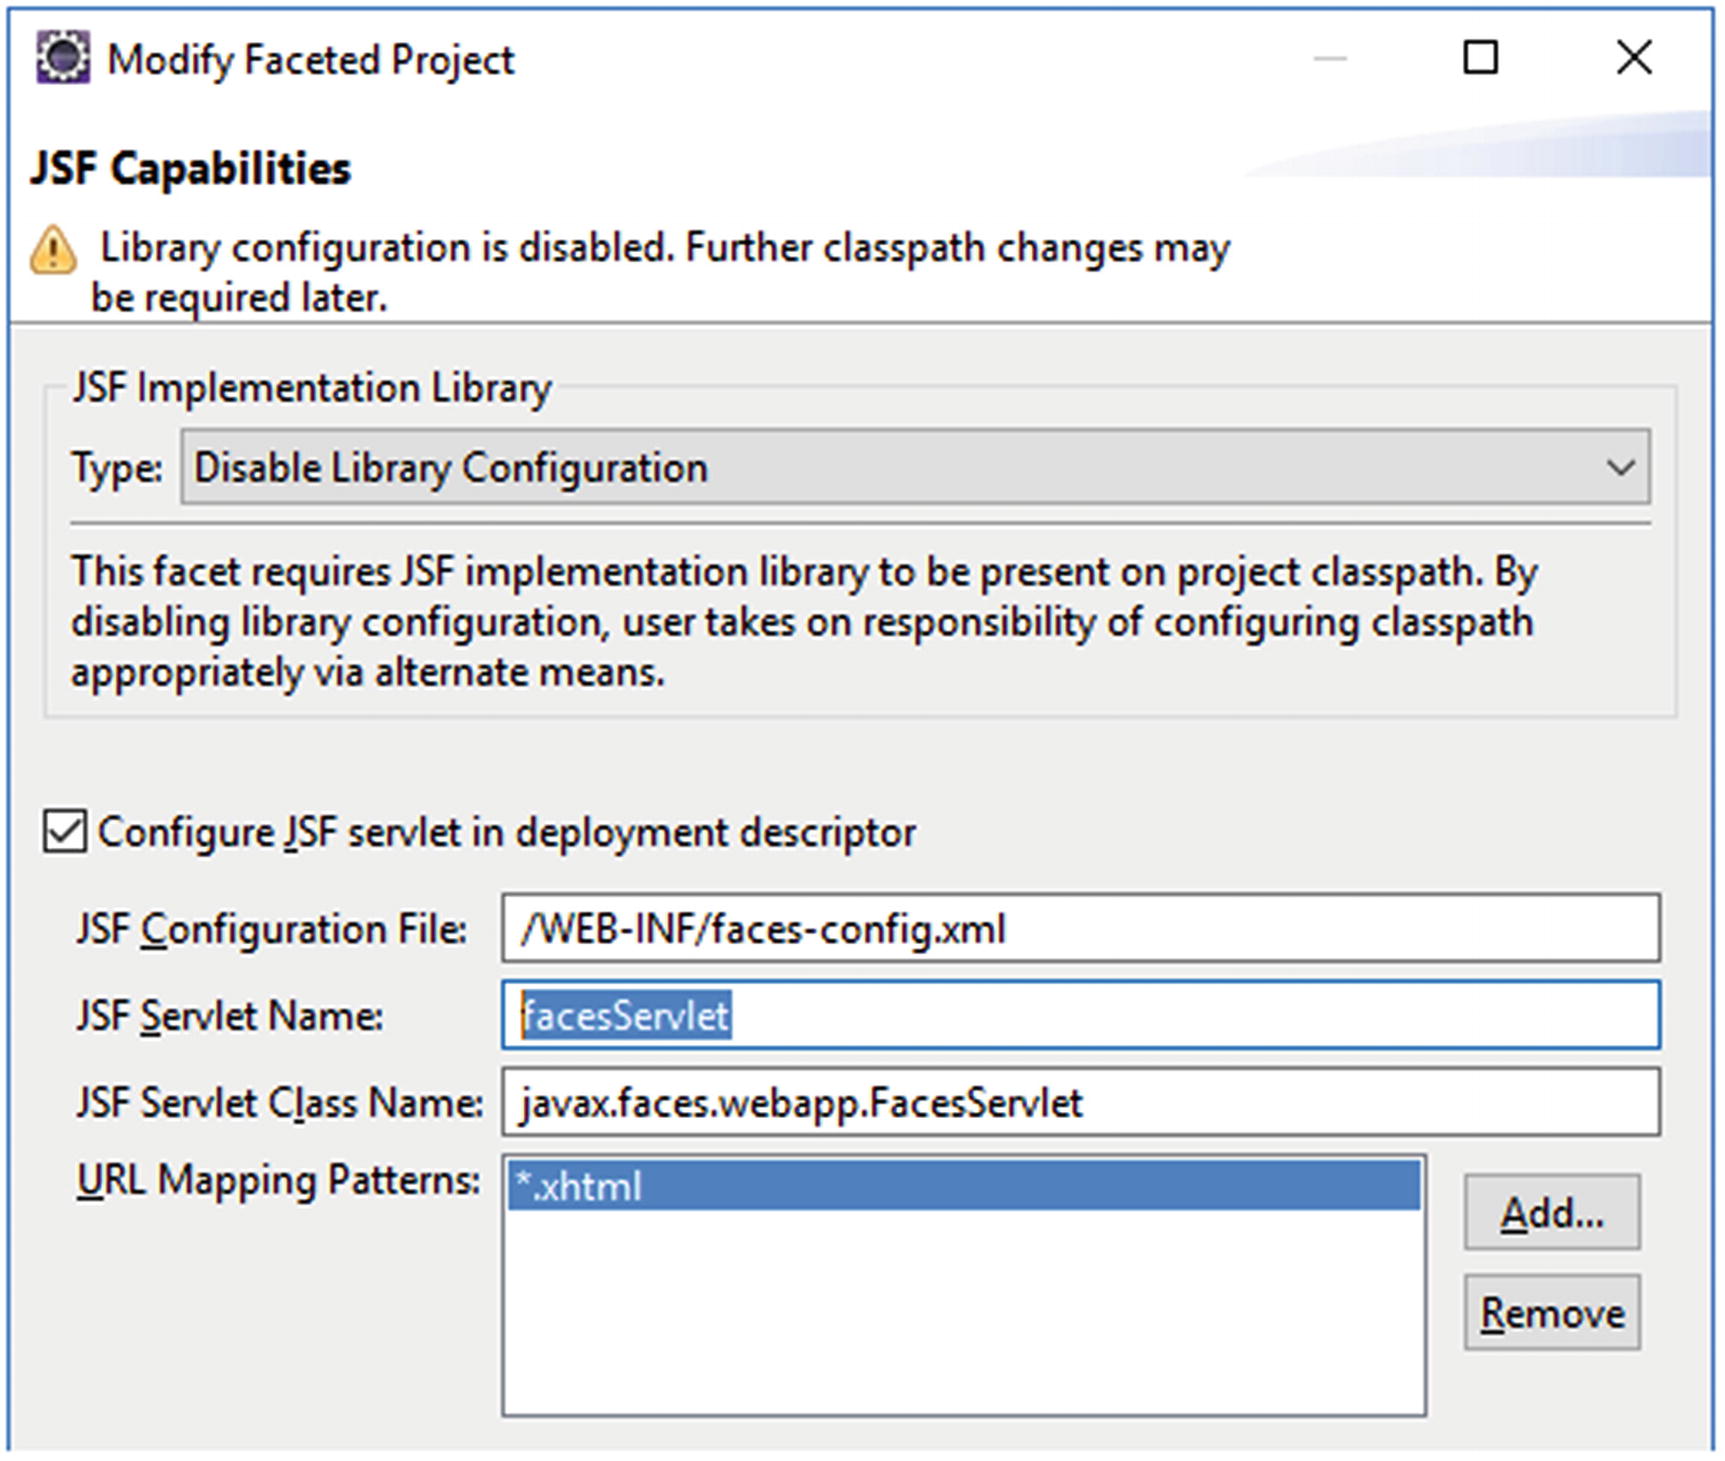
Figure 2-15 The JSF Capabilities configuration
Actually, the entire registration of the FacesServlet in web.xml is, since JSF 2.2, not strictly necessary any more; you could even uncheck the Configure JSF servlet in deployment descriptor option and rely on the default auto-registered mappings of /faces/*, *.faces, *.jsf and *.xhtml. However, as this allows end users and even search bots to open the very same JSF page by different URLs, and thus causes confusion among end users and duplicate content penalties among search bots, we’d better restrict to only one explicitly configured URL pattern.
Now, finish and apply all the wizards and dialogs. The JPA plug-in only puts the generated persistence. xml at the wrong place. You need to manually move it into src/main/resources/META-INF. Figure 2-16 shows us how the workbench looks now.
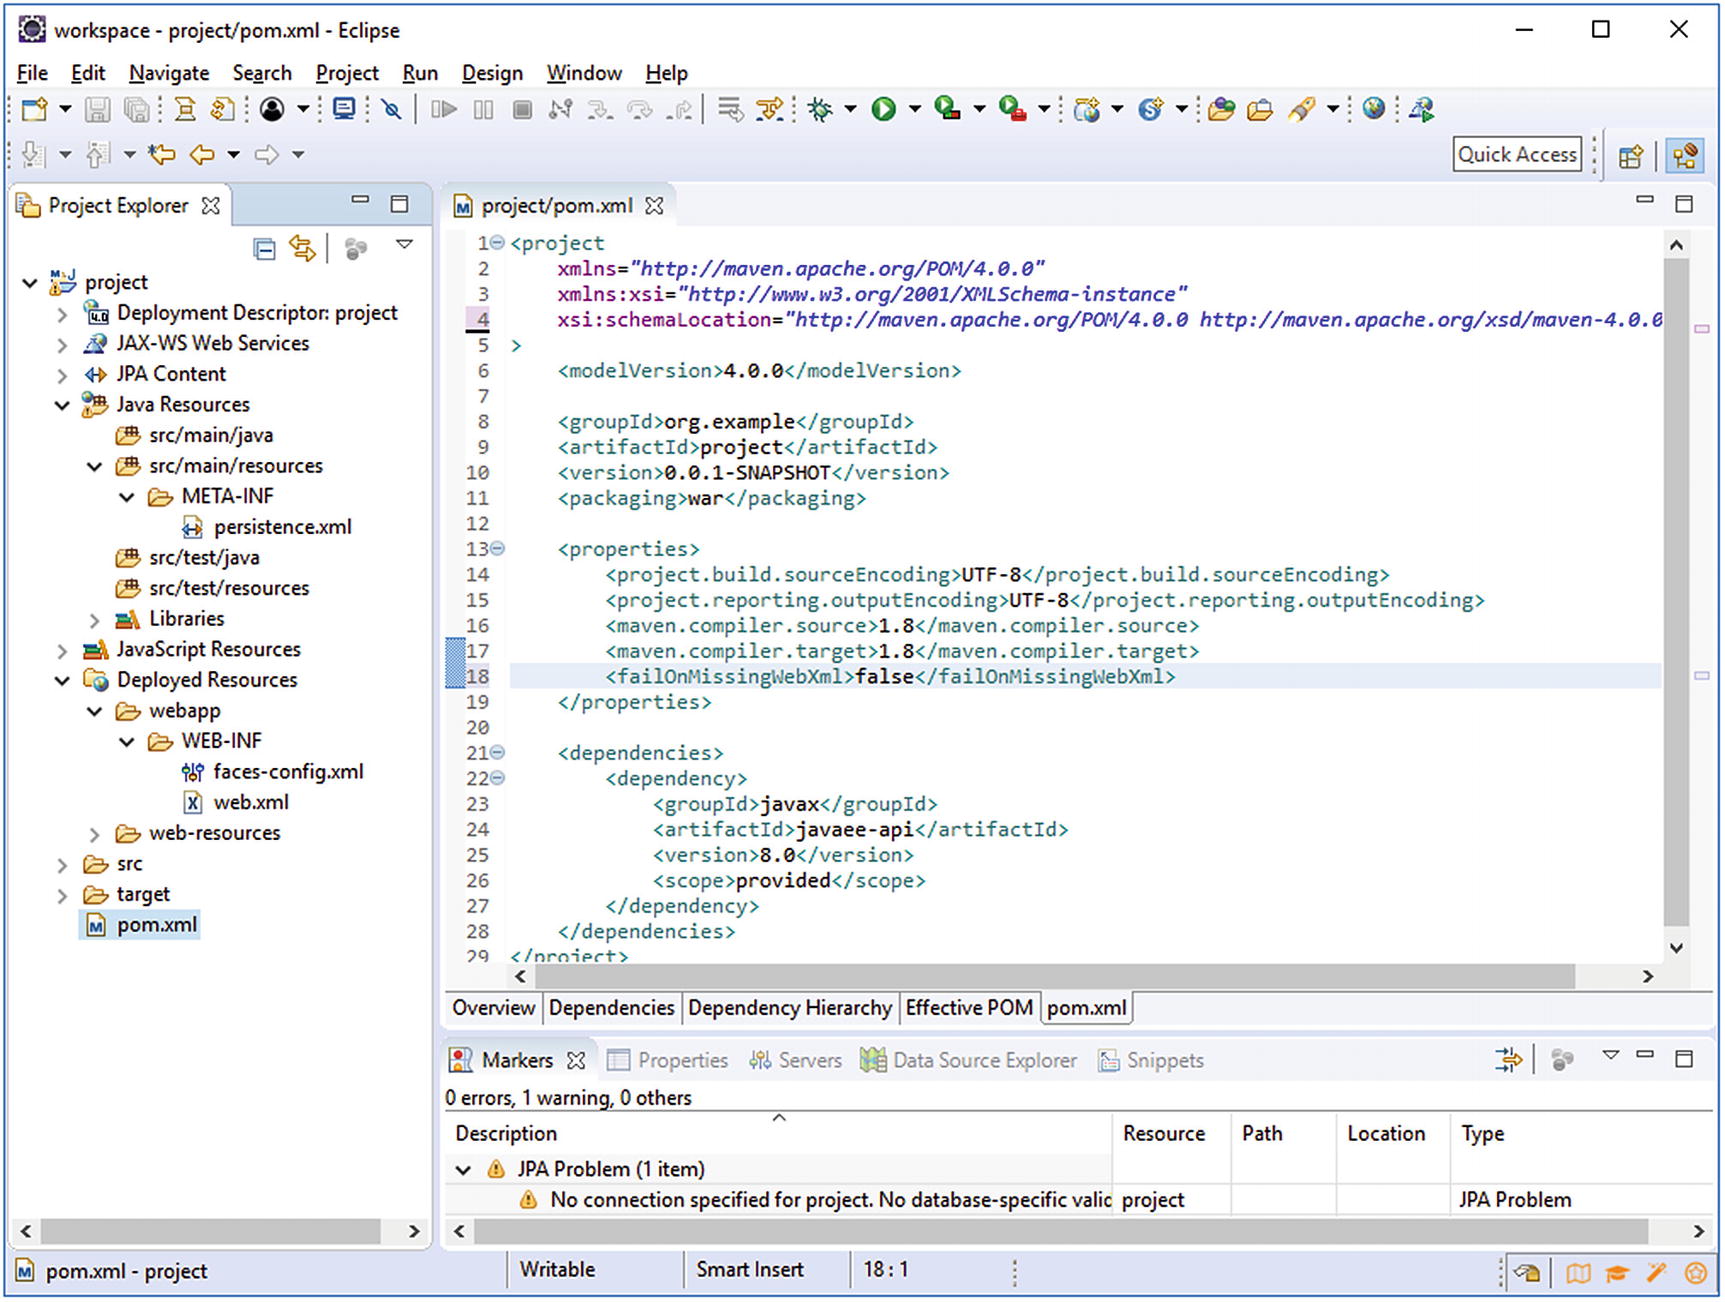
Figure 2-16 Correctly configured Java EE 8 Maven project in Eclipse
We only need to adjust all the deployment descriptors to catch up to the actually used Servlet, JSF, JPA, and CDI versions. This is normally done by adjusting the root element of the deployment descriptor XML file to set the desired XML schemas and the version.
You can find all Java EE 8 schemas at http://xmlns.jcp.org/xml/ns/javaee , which is an actual web page which currently redirects to some landing page at Oracle.com. This may change in the future given that Java EE 8 is currently in the process of being transferred from Oracle to Eclipse. You can open the deployment descriptor XML file for editing by double-clicking it and then selecting the Source tab in the editor. The correct root element declarations for Java EE 8 compatible deployment descriptors are thus as follows:
src/main/webapp/WEB-INF/web.xml for Servlet 4.0:<?xml version="1.0" encoding="UTF-8"?><web-appxmlns:="http://xmlns.jcp.org/xml/ns/javaee"xmlns:xsi="http://www.w3.org/2001/XMLSchema-instance"xsi:schemaLocation="http://xmlns.jcp.org/xml/ns/javaeehttp://xmlns.jcp.org/xml/ns/javaee/web-app_4_0.xsd"version="4.0"><!-- Servlet configuration here. --></web-app>src/main/webapp/WEB-INF/faces-config.xml for JSF 2.3:<?xml version="1.0" encoding="UTF-8"?><faces-configxmlns:="http://xmlns.jcp.org/xml/ns/javaee"xmlns:xsi="http://www.w3.org/2001/XMLSchema-instance"xsi:schemaLocation="http://xmlns.jcp.org/xml/ns/javaeehttp://xmlns.jcp.org/xml/ns/javaee/web-facesconfig_2_3.xsd"version="2.3"><!-- JSF configuration here. --></faces-config>src/main/resources/META-INF/persistence.xml for JPA 2.2:<?xml version="1.0" encoding="UTF-8"?><persistencexmlns:="http://xmlns.jcp.org/xml/ns/persistence"xmlns:xsi="http://www.w3.org/2001/XMLSchema-instance"xsi:schemaLocation="http://xmlns.jcp.org/xml/ns/persistencehttp://xmlns.jcp.org/xml/ns/persistence/persistence_2_2.xsd"version="2.2"><!-- JPA configuration here. --></persistence>
Only the currently available JPA plug-in of Eclipse will show an error on this. You could ignore this by disabling the JPA validator in the project’s properties, but you can also just step back to a JPA 2.1 compatible persistence.xml for the time being.
Finally, for sake of completeness we need to create one more deployment descriptor file, the one for CDI 2.0. This isn’t automatically generated as it’s not required. CDI is by default always enabled in any Java EE 8 compatible web application . It’s even mandatory for the functioning of JSF. Among others the new <f:websocket> relies fully on CDI. Right-click the /WEB-INF folder of the project and choose New ➤ beans.xml File. The New beans.xml File wizard which appears now is part of the JBoss Tools plug-in . Just keep all options default and finish the wizard. It’ll generate the file as follows:
src/main/webapp/WEB-INF/beans.xml for CDI 2.0:<?xml version="1.0" encoding="UTF-8"?><beansxmlns:="http://xmlns.jcp.org/xml/ns/javaee"xmlns:xsi="http://www.w3.org/2001/XMLSchema-instance"xsi:schemaLocation="http://xmlns.jcp.org/xml/ns/javaeehttp://xmlns.jcp.org/xml/ns/javaee/beans_2_0.xsd"version="2.0" bean-discovery-mode="annotated"><!-- CDI configuration here. --></beans>
Creating the Backing Bean Class
With the project now correctly configured we can start with developing the actual MVC application . The Controller part of MVC is already configured as FacesServlet in web.xml. The Model part of MVC is what we’re going to create now. It’s basically just a simple Java class which is by JSF convention called a Backing Bean since it “backs” a View.
Right-click the src/main/java folder of the project and choose New ➤ Bean. The New CDI Bean wizard which appears now is also part of the JBoss Tools plug-in (see Figure 2-17). In this wizard, set the Package to com.example.project.view, set the Name to HelloWorld, tick the Add @Named chec kbox, and finally set the Scope to @RequestScoped. The rest of the fields can be kept default or empty.
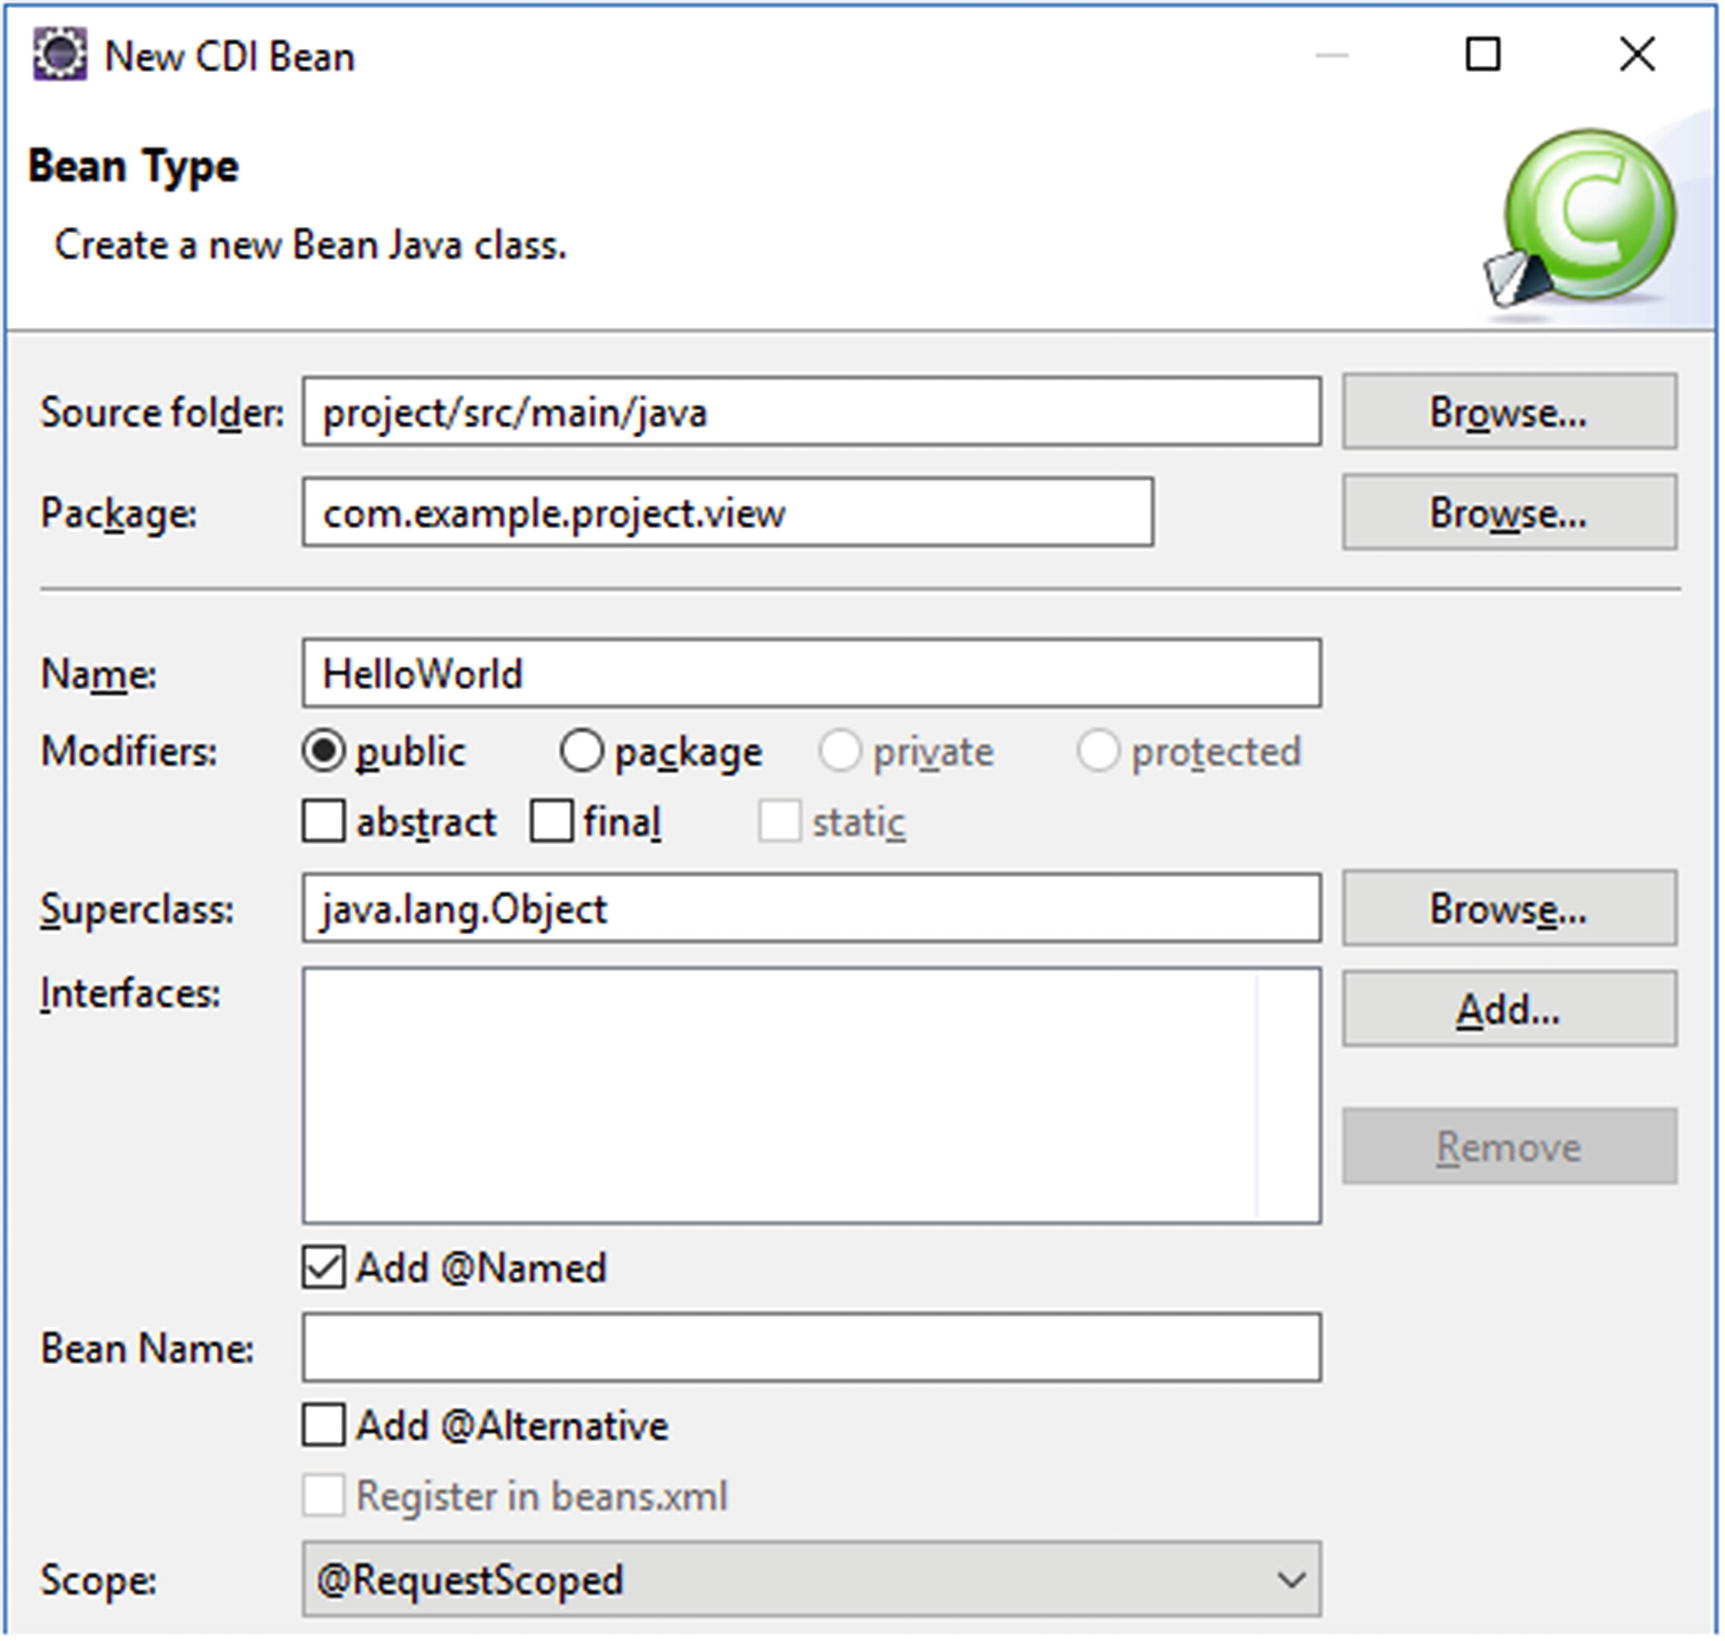
Figure 2-17 The JBoss Tools-provided New CDI Bean wizard in Eclipse
The class editor will now open with the newly created backing bean class . We’ll modify it to get rid of the useless constructor; add two properties, input and output; and accompany the input property with a getter and setter pair, the output property with only a getter, and a submit() action method which prepares the output property based on the input property. As a hint, in Eclipse after entering the properties, you can right-click anywhere in the class editor and choose Source ➤ Generate Getters and Setters to have the IDE to generate them. In its entirety, the edited backing bean class should look as follows:
package com.example.project.view;import javax.enterprise.context.RequestScoped;import javax.inject.Named;@Named @RequestScopedpublic class HelloWorld {private String input;private String output;public void submit() {output = "Hello World! You have typed: " + input;}public String getInput() {return input;}public void setInput(String input) {this.input = input;}public String getOutput() {return output;}}
We'll briefly go through the annotations that are used here.
@Named—gives the bean a name, which is primarily used to reference it via EL. Without any attributes this name defaults to the simple class name with the first letter in lowercase, thus "helloWorld" here. It will be available by #{helloWorld} in EL . This can be used in JSF pages.
@RequestScoped—gives the bean a scope, which means the same instance of the bean is used within a given lifespan. In this case that lifespan is the duration of an HTTP request. When the scope ends, the bean is automatically destroyed. You can read more about scopes in Chapter 8.
Creating the Facelets File
Next, we'll create the View part of MVC. It’s basically just a XHTML file which is by JSF interpreted as a Facelets file or just Facelet. This Facelets file will ultimately generate the HTML markup that is sent to the browser in response to a request. With help of EL, it can reference a bean property and invoke a bean action.
Right-click the webapp folder of the project and choose New ➤ XHTML Page (see Figure 2-18). The New XHTML Page wizard which appears now is also part of the JBoss Tools plug-in. In this wizard, set the File name to hello.xhtml and finish the wizard.
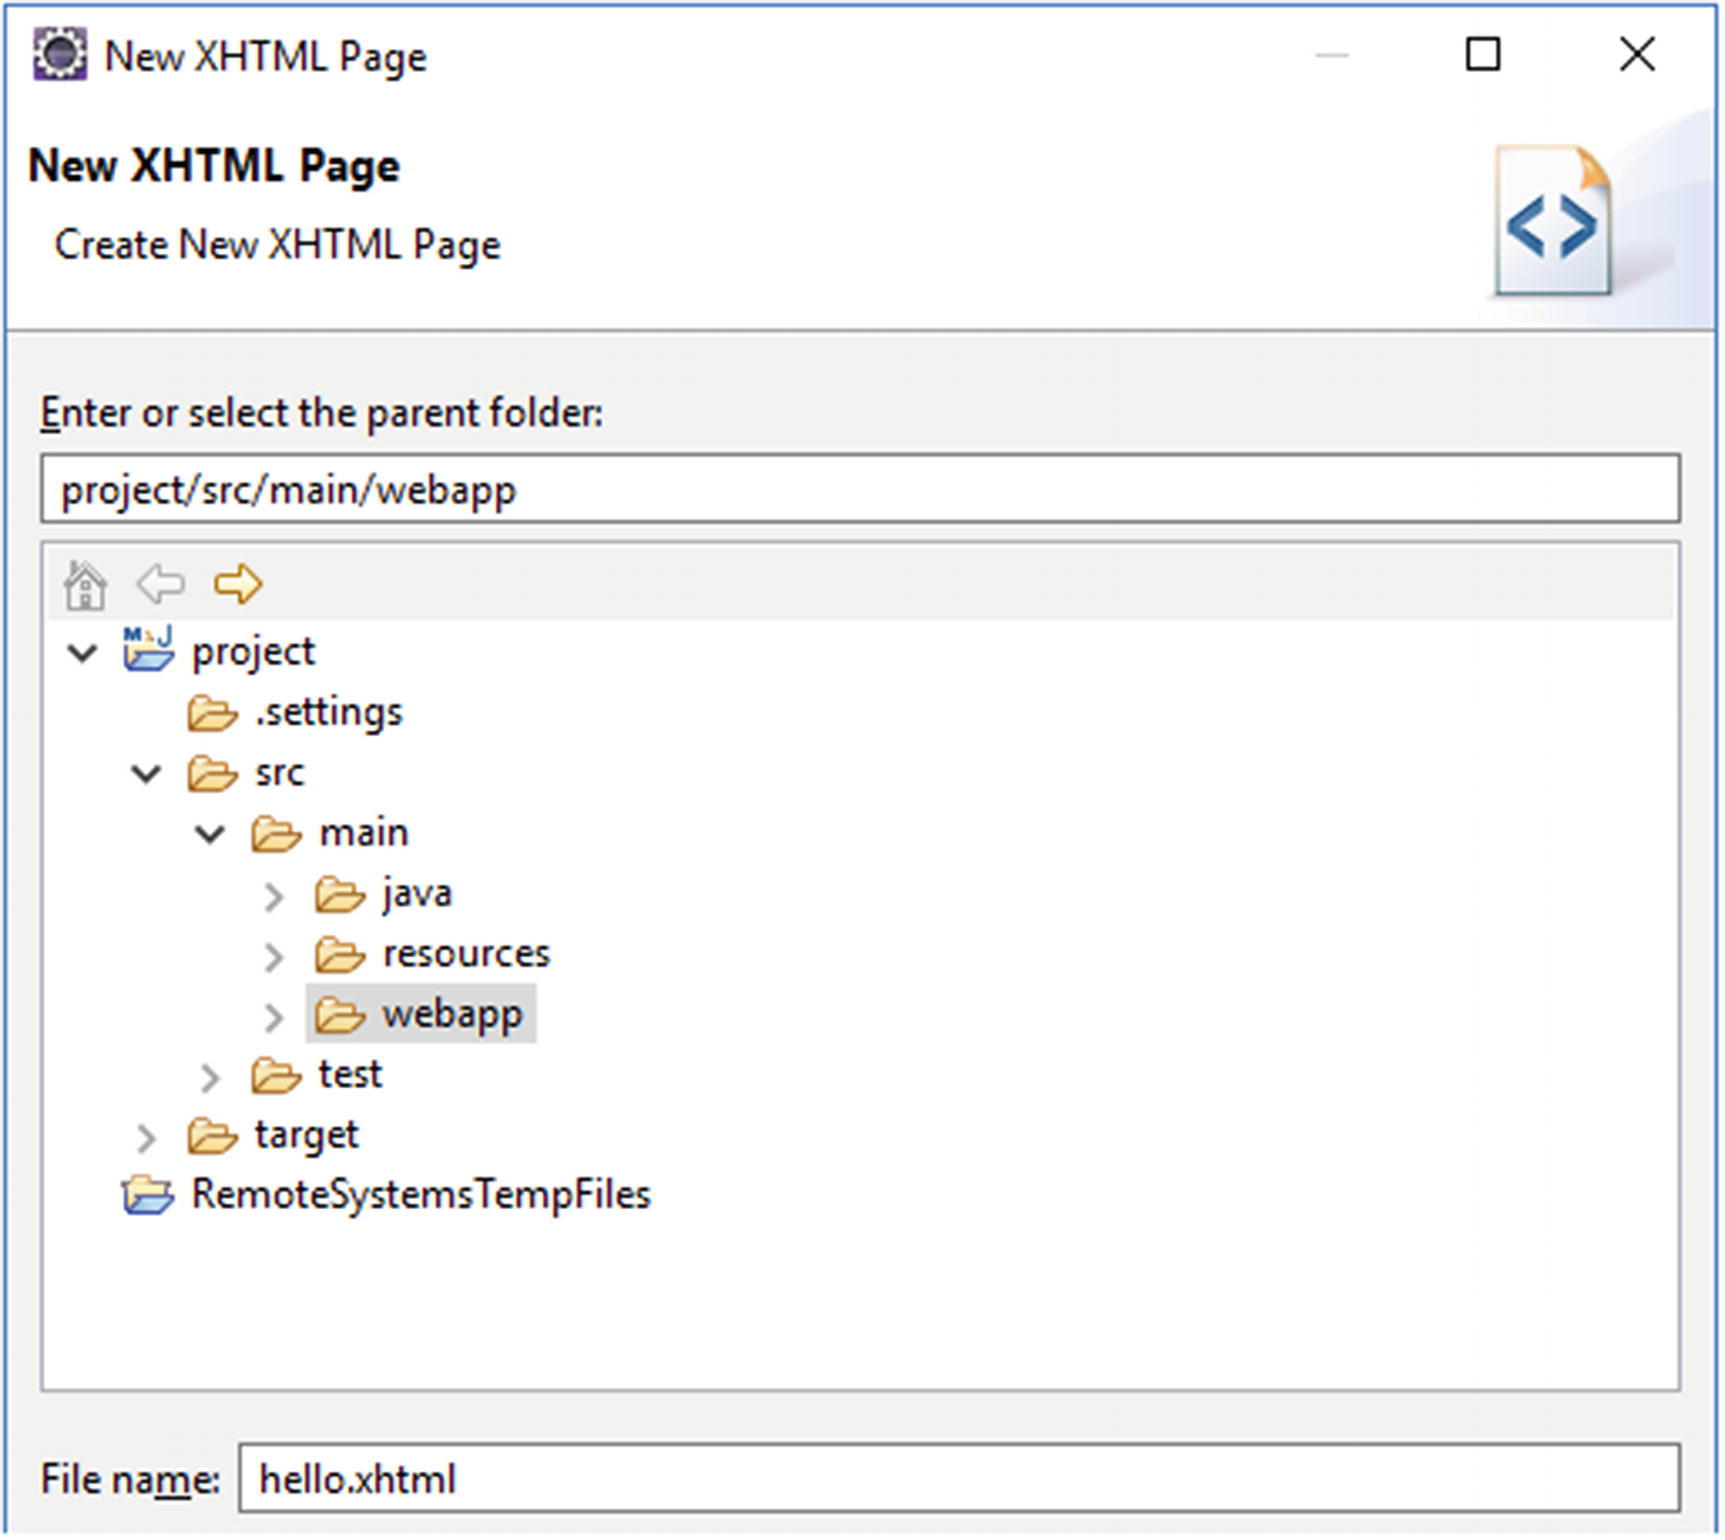
Figure 2-18 The JBoss Tools-provided New XHTML Page wizard in Eclipse
The XHTML editor will now open with the newly created Facelets file. You’ll also notice that the Palette view shows up in bottom box . This is essentially not useful for JSF-based web development. So let’s close it. Coming back to the newly created Facelets file, it’s initially empty. Fill it with the following content:
<!DOCTYPE html><html lang="en"xmlns:="http://www.w3.org/1999/xhtml"xmlns:f="http://xmlns.jcp.org/jsf/core"xmlns:h="http://xmlns.jcp.org/jsf/html"><h:head><title>Hello World</title></h:head><h:body><h1>Hello World</h1><h:form><h:outputLabel for="input" value="Input" /><h:inputText id="input" value="#{helloWorld.input}" /><h:commandButton value="Submit"action="#{helloWorld.submit}"><f:ajax execute="@form" render=":output" /></h:commandButton></h:form><h:outputText id="output" value="#{helloWorld.output}" /></h:body></html>
We'll briefly go through the JSF-specific XHTML tags that are used here.
<h:head>—generates the HTML <head>. It gives JSF the opportunity to automatically include any necessary JavaScript files, such as the one containing the necessary logic for <f:ajax>.
<h:body>—generates the HTML <body>. You can also use a plain HTML <body> in this specific Facelet, but then it doesn’t give any other JSF tag the opportunity to automatically include any necessary JavaScript in the end of the HTML <body>.
<h:form>—generates the HTML <form>. JSF will automatically include the view state in a hidden input field.
<h:outputLabel>—generates the HTML <label>. You can also use a plain HTML <label> in this specific Facelet, but then you’d have to manually take care of figuring out the actual ID of the target input element.
<h:inputText>—generates the HTML <input type="text">. JSF will automatically get and set the value in the bean property specified in the value attribute.
<h:commandButton>—generates the HTML <input type="submit">. JSF will automatically invoke the bean method specified in the action attribute.
<f:ajax>—generates the necessary JavaScript code for Ajax behavior. You can also do as well without it, but then the form submit won’t be performed asynchronously. The execute attribute indicates that the entire <h:form> must be processed on submit and the render attribute indicates that the tag identified by id="output" must be updated on complete of the Ajax submit.
<h:outputText>—generates the HTML <span>. This is the one being updated on completion of the Ajax submit. It will merely print the bean property specified in the value attribute.
Those JSF-specific XHTML tags are also called JSF Components. There will be more on Facelets files and JSF components in the upcoming chapters. Note that you can also perfectly embed plain vanilla HTML in a Facelets file. JSF components should only be used when the functionality requires so, or is easily achievable with them.
Deploying the Project
In the Servers view, first start the Payara server. You can do so by selecting it and then clicking the green arrow icon whose tool tip says “Start the server.” You can, of course, also use the bug icon whose tool tip says “Start the server in debug mode.” The Console view will briefly show the server startup log. Wait until the server starts up and has, in the Servers view, gained the status Started (see Figure 2-19).
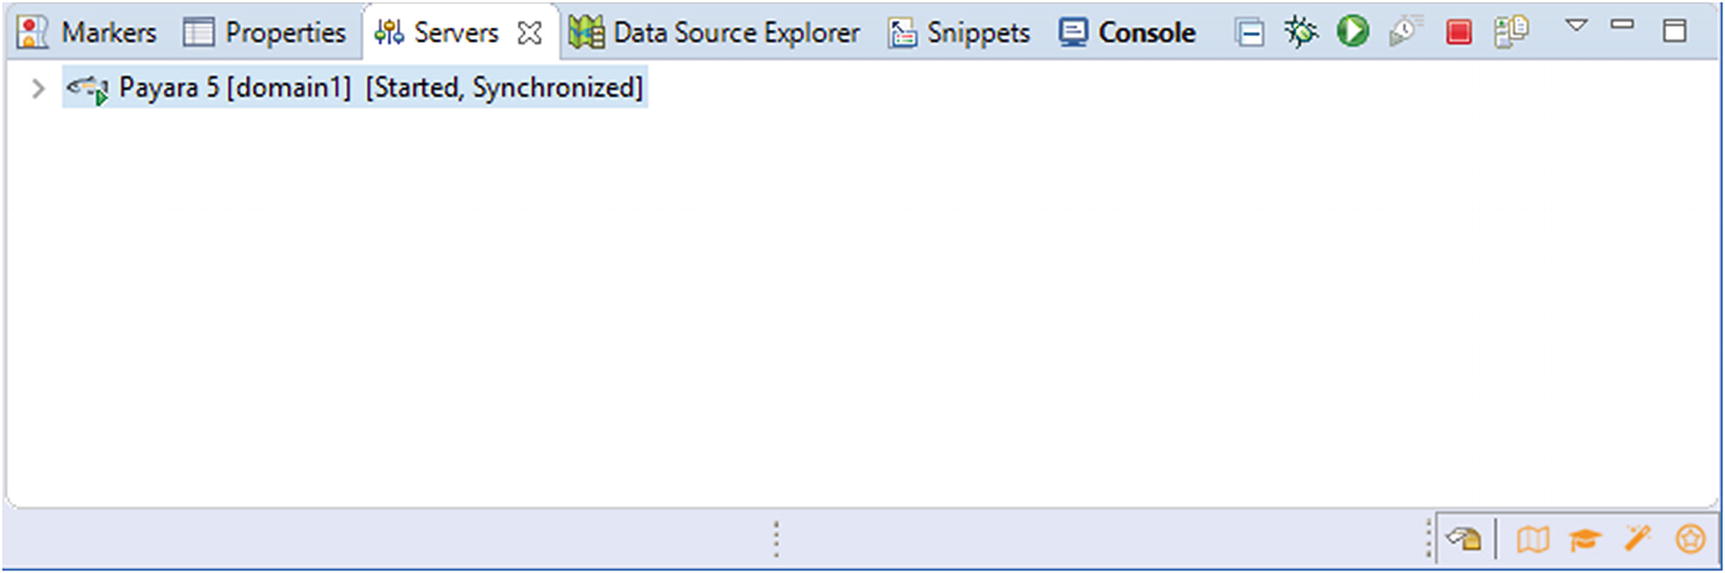
Figure 2-19 The Payara server in Servers view with the status Started (note that the Console view is highlighted as it has unread server logs)
Now right-click the Payara server entry and choose Add and Remove. It will show the Add and Remove wizard (see Figure 2-20) which gives you the opportunity to add and remove WAR projects to the server. Do so for our newly created project and finish the wizard.
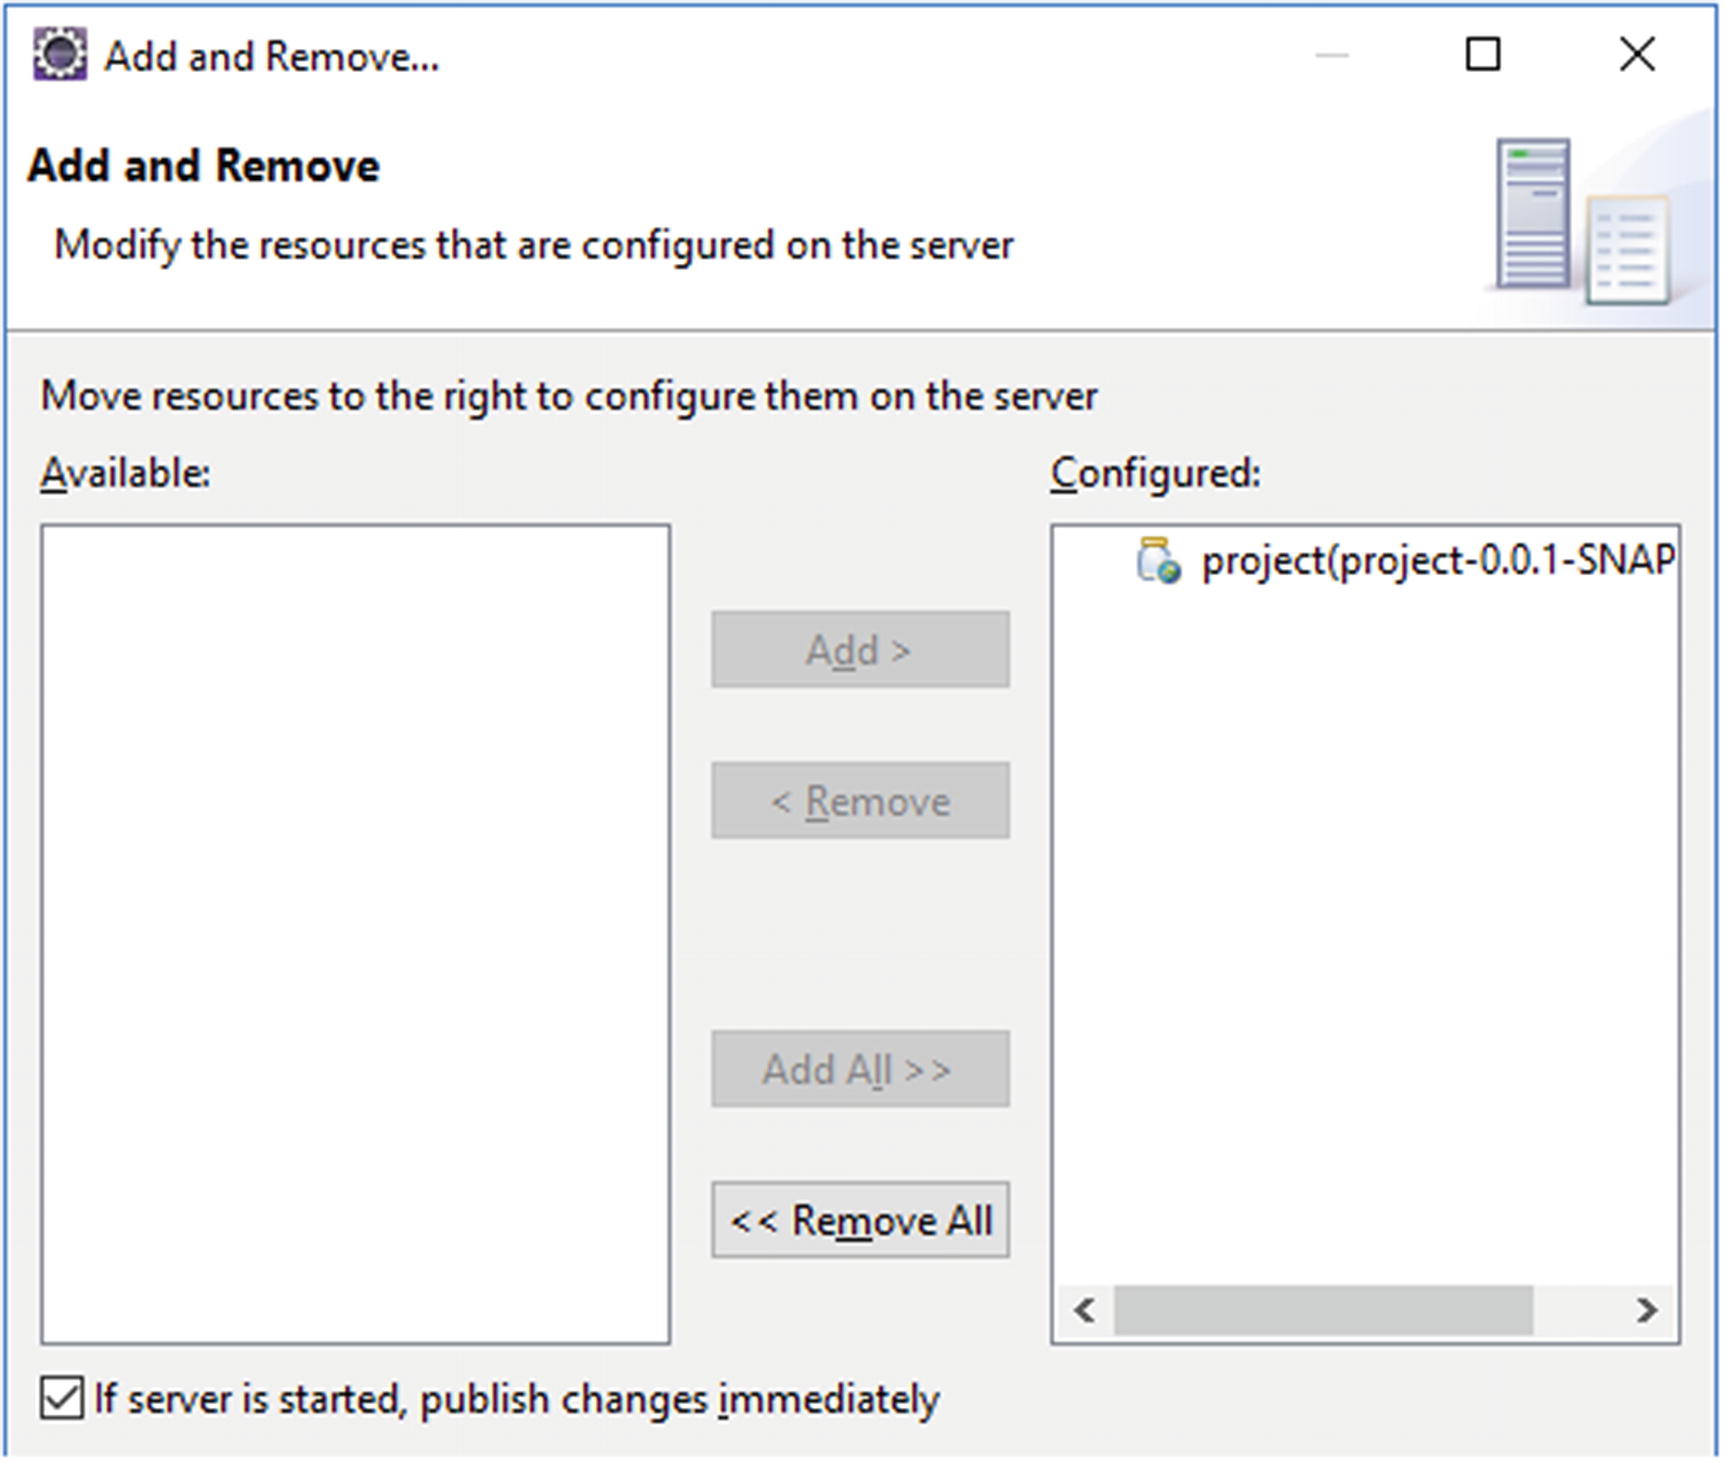
Figure 2-20 The Add and Remove wizard wherein the project has been deployed to the server by moving it to the right
It must be explicitly mentioned that in case of Payara and GlassFish servers this is best to be done while the server is already started. When removing a project while the server is shut down, it may still linger around in the server’s deployment folder. That’s just GlassFish’s own quirk. For example, in the case of WildFly and Tomcat servers, this is not necessary.
Now, open a tab in your favorite web browser (see Figure 2-21) and enter the address http://localhost:8080/project/hello.xhtml in order to open the newly created JSF page.

Figure 2-21 The Hello World page in Chrome browser wherein the input field is filled with the text “some message” and the submit button has been pressed
Coming back to the URL , the "localhost:8080" part is by convention the default domain of any Java EE server which is running in development mode. The same address is also used by, among others, WildFly and TomEE. The "/project" part is by convention the name of the Eclipse project. This is in Servlet terms called the “context path” and obtainable by HttpServletRequest#getContextPath() and in JSF delegated by ExternalContext#getRequestContextPath().
The context path part can also be set to an empty string; the deployed web application will then end up in the domain root. In Eclipse, this can be set in the project’s properties as well. First remove the project from the deployment using the Add and Remove wizard. Then right-click the project, choose Properties, and select Web Project Settings. Then set the Context root field to a forward slash “/” and close the properties. Finally, add the project back to the deployment using Add and Remove wizard. Now it will be deployed to the domain root and you can access the JSF page by http://localhost:8080/hello.xhtml. We can even get a step further by making hello.xhtml the default landing file so that this also doesn’t need to be specified in the URL. This can be achieved by adding the following entry to the web.xml:
<welcome-file-list><welcome-file>hello.xhtml</welcome-file></welcome-file-list>
Note that Payara can be configured to automatically publish changes to the deployment whenever a resource is changed in the project. Before saving the edited web.xml, double-click the Payara server in Servers view, unfold the Publishing section, and select Automatically publish when resource change along with a low interval of like 0 seconds (see Figure 2-22).
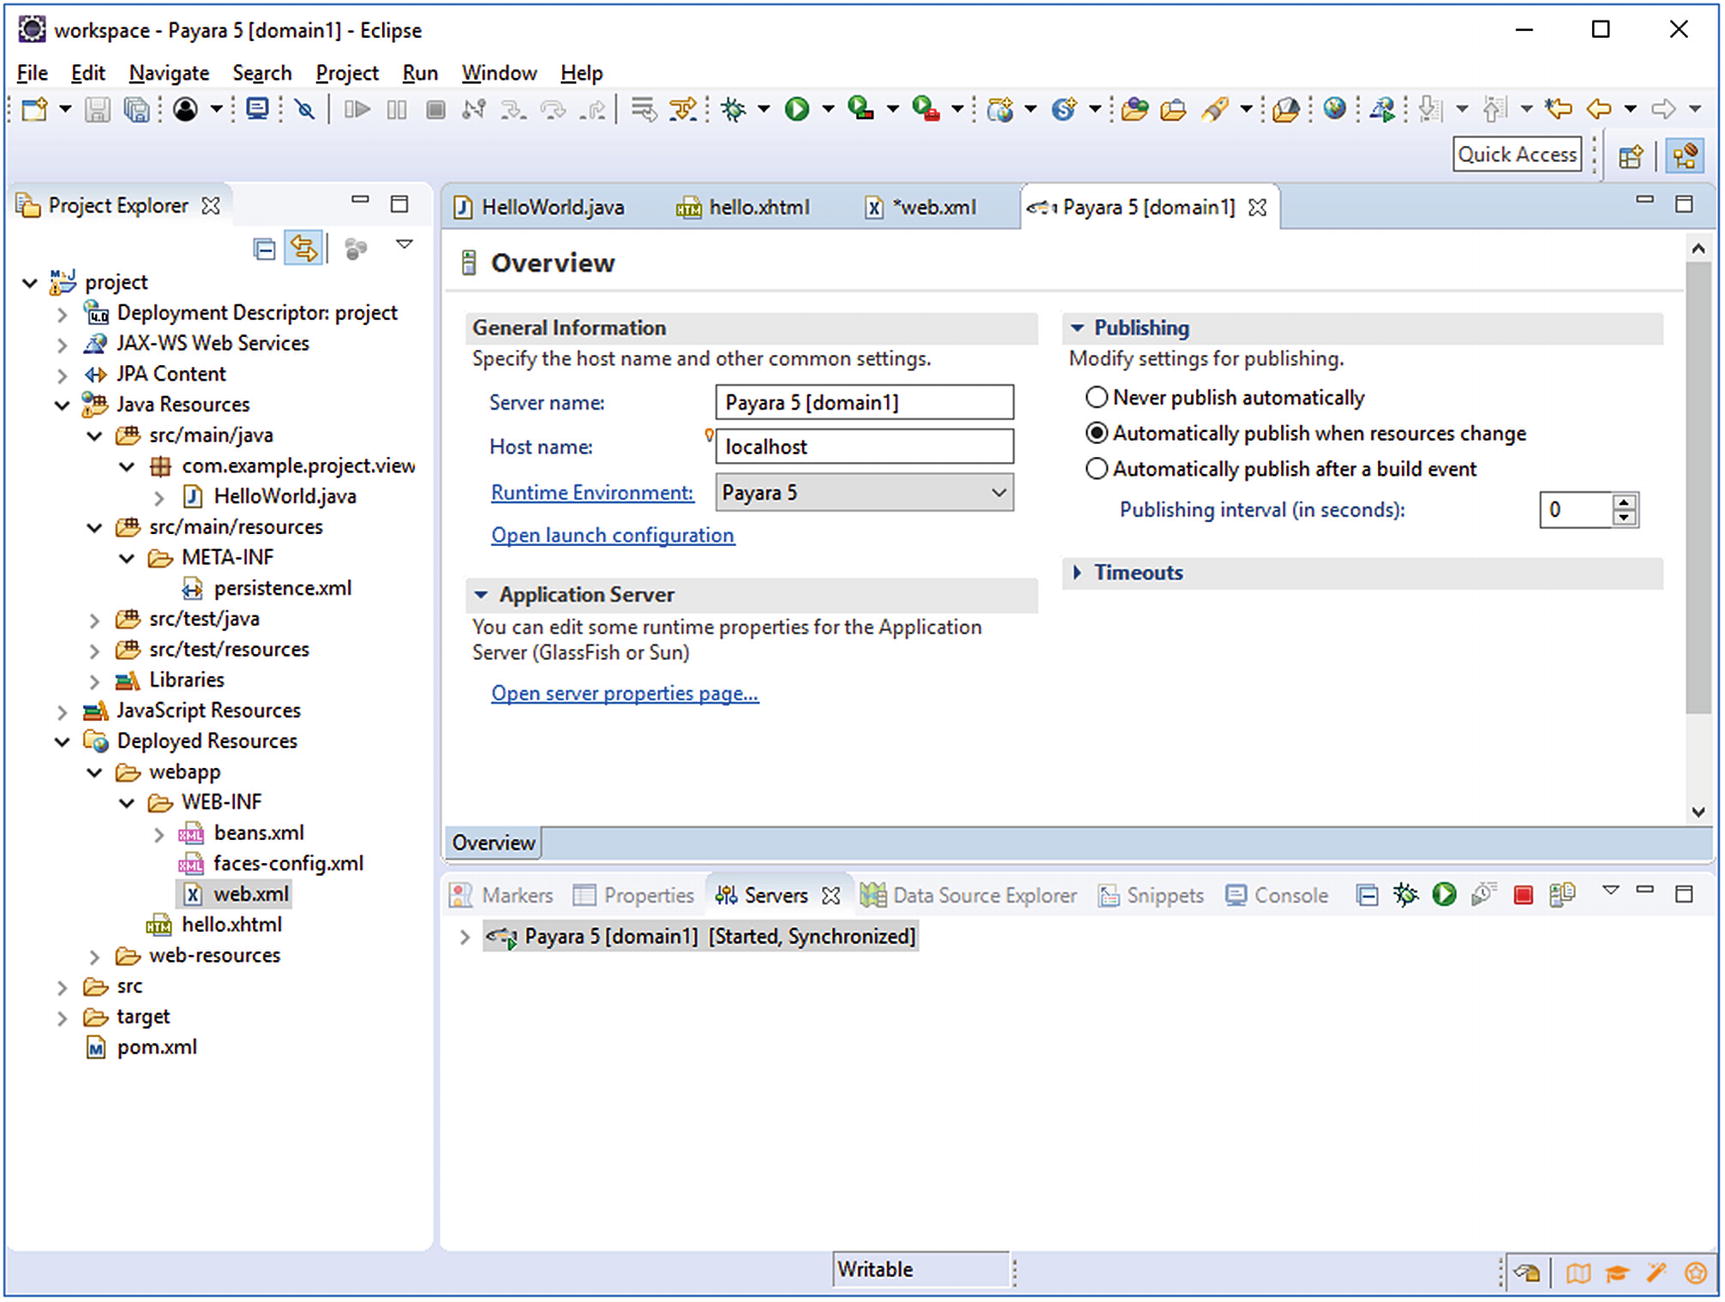
Figure 2-22 Payara server configuration in Eclipse with automatic publishing enabled and interval set to 0 seconds
Now, save the web. xml and you’ll notice that Eclipse will immediately trigger Payara to publish the changes while still running. Coming back to the web browser, you’ll notice that the JSF page is now also accessible by just http://localhost:8080 (see Figure 2-23).
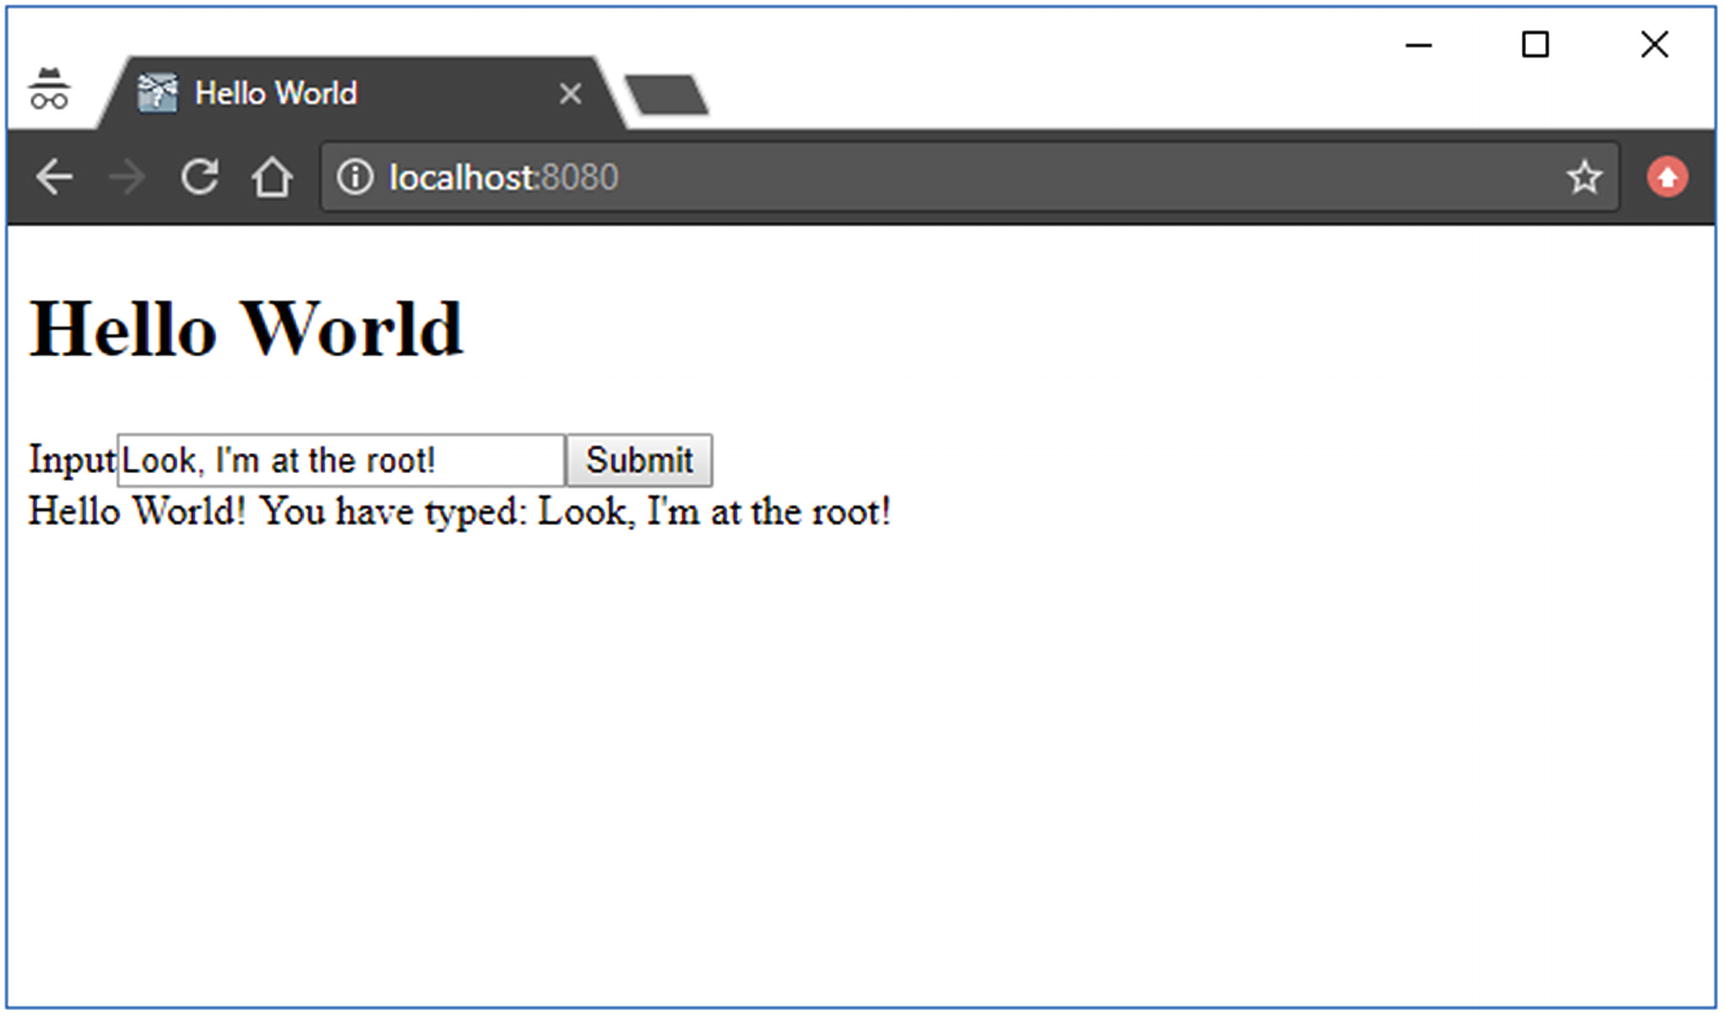
Figure 2-23 The Hello World page is now at the root
Installing H2
H24 is an in-memory SQL database . It’s an embedded database useful for quickly modeling and testing JPA entities, certainly in combination with autogenerated SQL tables based on JPA entities. Adding H2 to your web application project is a matter of adding the following dependency to the <dependencies> section of the pom.xml:
<dependency><groupId>com.h2database</groupId><artifactId>h2</artifactId><version>1.4.196</version></dependency>
That’s basically it. The JDBC (Java Database Connectivity) driver is already built in.
Configuring DataSource
In order to be able to interact with a SQL database, we need to configure a so-called data source in the web application project. This can be done by adding the following section to the web.xml:
<data-source><name>java:global/DataSourceName</name><class-name>org.h2.jdbcx.JdbcDataSource</class-name><url>jdbc:h2:mem:test;DB_CLOSE_DELAY=-1</url></data-source>
The data source name represents the JNDI (Java Naming and Directory Interface ) name. The class name represents the fully qualified name of the javax.sql.DataSource implementation of the JDBC driver being used. The URL represents the JDBC driver-specific URL format. The syntax is dependent on the JDBC driver being used. For an in-memory H2 database with a database name of “test,” that’s thus jdbc:h2:mem:test. The H2-specific DB_CLOSE_DELAY=-1 path parameter basically instructs its JDBC driver not to automatically shut down the database when it hasn’t been accessed for some time, even though the application server is still running.
A concrete instance of the DataSource can now be injected in any servlet container managed artifact such as a servlet or filter as follows:
@Resourceprivate DataSource dataSource;
You could get a SQL connection from it via DataSource#getConnection() for the plain old JDBC work. However, as we’re going to use Java EE, it’s better to use Java EE’s own JPA for this instead.
Configuring JPA
In order to familiarize JPA with the newly added data source, we need to add a new persistence unit to the persistence.xml which uses the data source as a JTA data source.
<persistence-unit name="PersistenceUnitName" transaction-type="JTA"><jta-data-source>java:global/DataSourceName</jta-data-source><properties><propertyname="javax.persistence.schema-generation.database.action"value="drop-and-create" /></properties></persistence-unit>
You see, the data source is identified by its JNDI name. You’ll also notice a JPA-specific javax.persistence.schema-generation.database.action property with a value of “drop-and-create” which basically means that the web application should automatically drop and create all SQL tables based on JPA entities. This is, of course, only useful for prototyping purposes, as we’re going to do with this project in the rest of the book. For real-world applications, you’d better pick either “create” or “none” (which is the default). The transaction type being set to “JTA” basically means that the application server should automatically manage database transactions. This way every method invocation on an EJB from its client (usually, a JSF backing bean) transparently starts a new transaction and when the EJB method returns to the client (usually, the calling backing bean), the transaction is automatically committed and flushed. And, any runtime exception from an EJB method automatically rolls back the transaction.
Creating the JPA Entity
Now we’re going to create a JPA entityc. Basically, it’s a JavaBean class which represents a single record of a database table. Each bean property is mapped to a particular column of the database table. Normally, JPA entities are modeled against existing database tables. But, as you’ve read in the previous section, “Configuring JPA,” about the persistence.xml, it’s also possible to do it the other way round: database tables are generated based on JPA entities.
Right-click the src/main/java folder of the project and choose New ➤ JPA Entity. In the wizard, set the Package to com.example.project.model and set the Name to Message. The rest of the fields can be kept default or empty (see Figure 2-24).
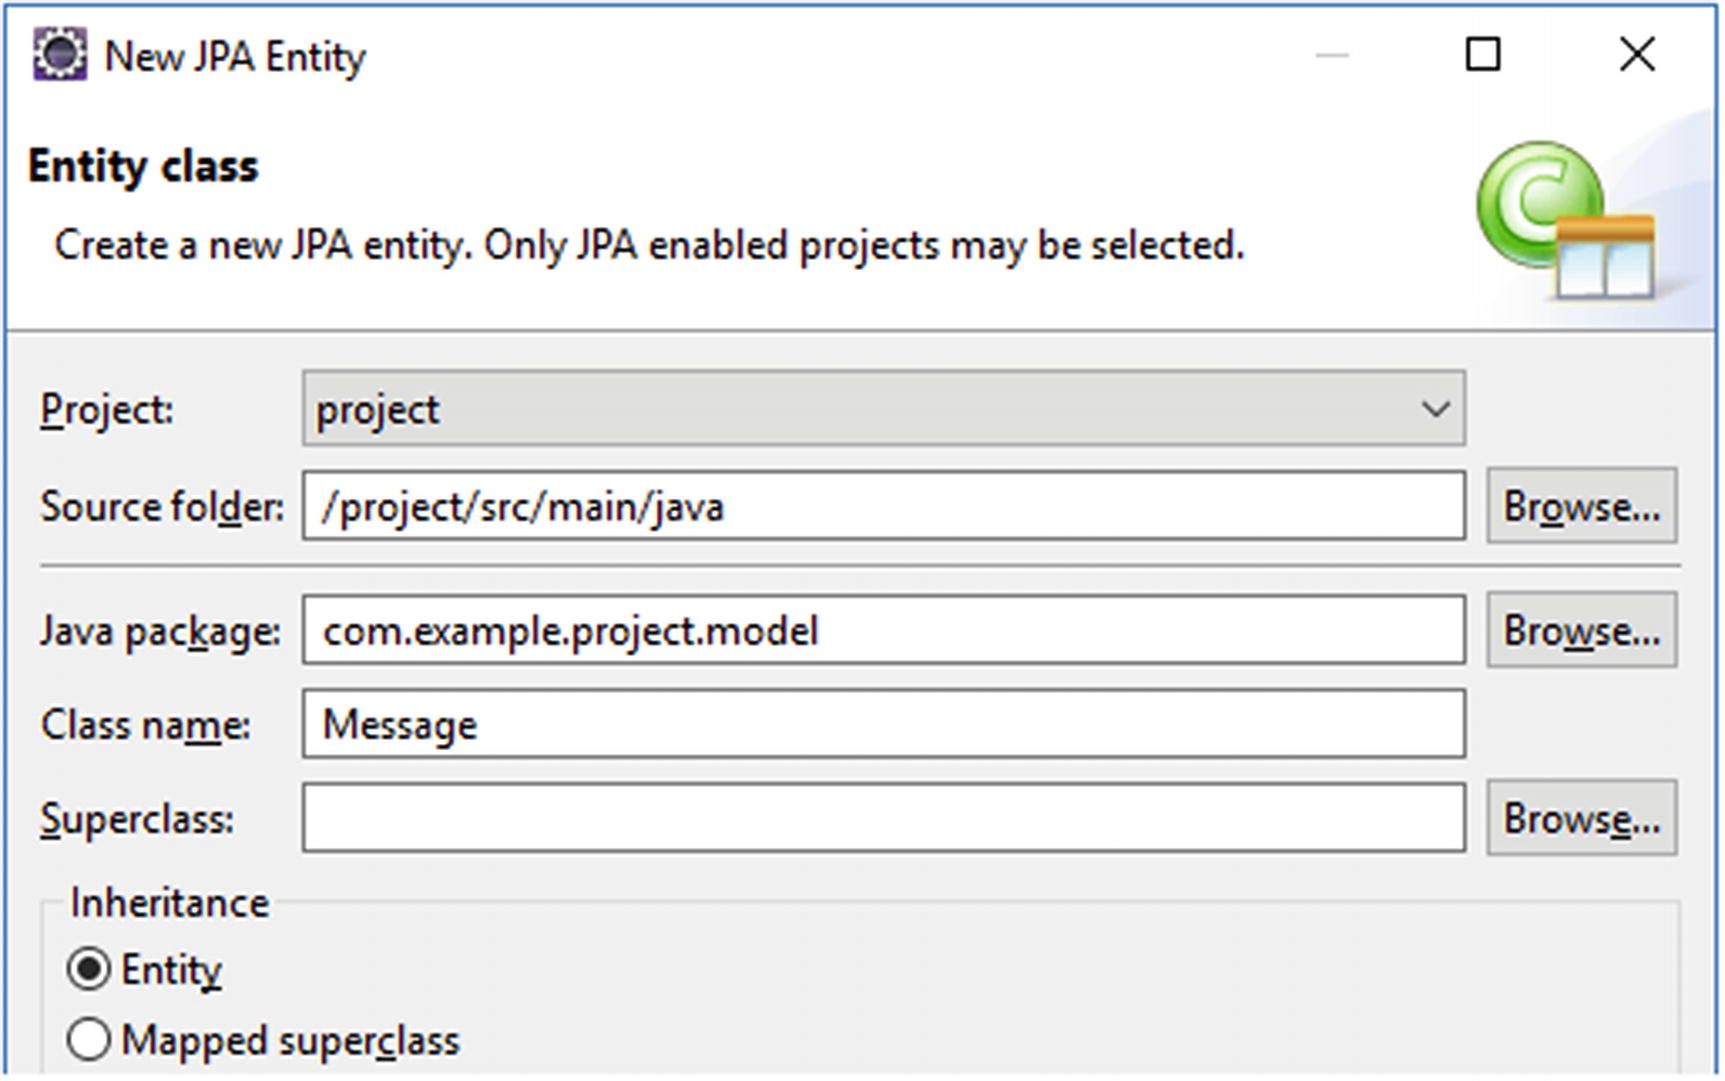
Figure 2-24 The New JPA Entity wizard in Eclipse
Modify the new entity class as follows:
package com.example.project.model;import java.io.Serializable;import javax.persistence.Column;import javax.persistence.Entity;import javax.persistence.GeneratedValue;import javax.persistence.GenerationType;import javax.persistence.Id;import javax.persistence.Lob;import javax.validation.constraints.NotNull;@Entitypublic class Message implements Serializable {private static final long serialVersionUID = 1L;@Id @GeneratedValue(strategy=GenerationType.IDENTITY)private Long id;@Column(nullable = false) @Lobprivate @NotNull String text;// Add/generate getters and setters.}
As a reminder, you can let Eclipse generate getters and setters by right-clicking anywhere in the class editor and choosing Source ➤ Generate Getters and Setters.
We'll briefly go through the annotations that are used here.
@Entity—marks the bean as a JPA entity, so that the JPA implementation will automatically collect database-related metadata based on all its properties.
@Id @GeneratedValue(strategy=IDENTITY)—marks a property to be mapped to a database column of SQL “IDENTITY” type. In MySQL terms, that’s the equivalent of “AUTO_INCREMENT”. In PostgreSQL terms, that’s the equivalent of “BIGSERIAL”.
@Column—marks a property to be mapped to a regular database column. The actual database column type depends on the Java type being used. Without the additional @Lob annotation, that’s a VARCHAR(255) whose length can be manipulated by @Column(length=n). With the @Lob annotation, however, the column type becomes TEXT.
@Lob—marks a String property to be mapped to a database column of type TEXT instead of a limited VARCHAR.
@NotNull—this is actually not part of JPA but of “Bean Validation.” To the point, it ensures that the bean property is being validated never to be null when submitting a JSF form and when persisting the JPA entity. (See Chapter 5.) Also note that this basically replicates the @Column(nullable=false), but that’s only because JPA doesn’t consider any Bean Validation annotations as valid database metadata in order to generate appropriate SQL tables.
Creating the EJB Service
Next, we need to create an EJB in order to be able to save an instance of the aforementioned JPA entity in the database, and to obtain a list of JPA entities.
Right-click the src/main/java folder of the project and choose New ➤ Class. In the wizard, set the Package to com.example.project.service and set the Name to MessageService (see Figure 2-25). The rest of the fields can be kept default or empty.
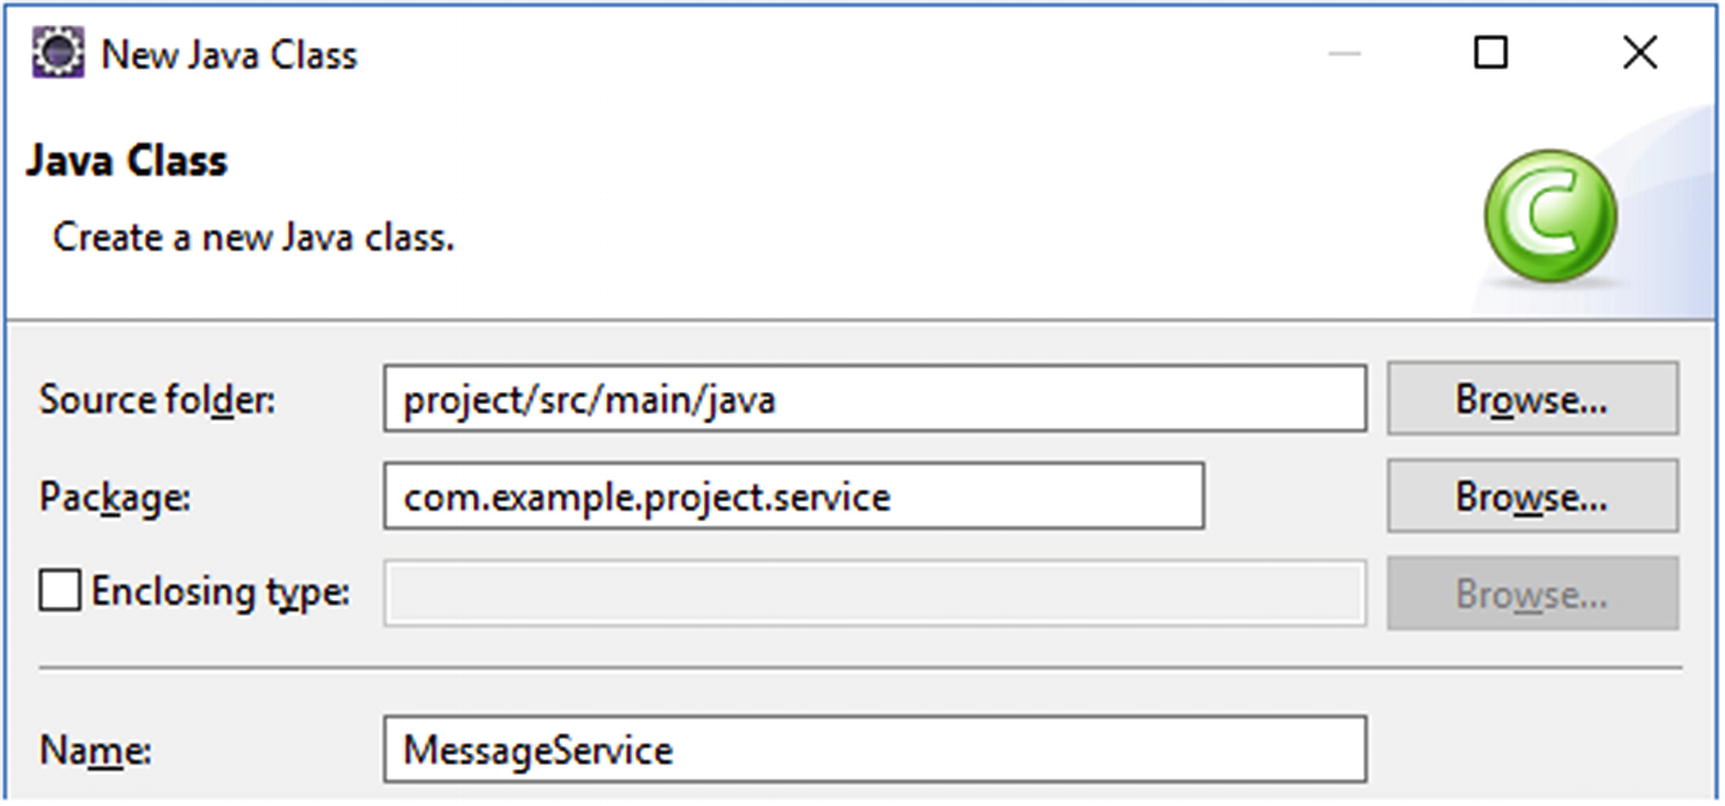
Figure 2-25 The New Java Class wizard in Eclipse
Modify the new service class as follows:
package com.example.project.service;import java.util.List;import javax.ejb.Stateless;import javax.persistence.EntityManager;import javax.persistence.PersistenceContext;@Statelesspublic class MessageService {@PersistenceContextprivate EntityManager entityManager;public void create(Message message) {entityManager.persist(message);}public List<Message> list() {return entityManager.createQuery("FROM Message m", Message.class).getResultList();}}
That’s basically it. Let’s briefly go through the annotations .
@Stateless—marks the bean as a stateless EJB service, so that the application server knows whether it should pool them and when to start and stop database transactions. The alternative annotations are @Stateful and @Singleton. Note that a @Stateless does not mean that the container will make sure that the class itself is stateless. You as developer are still responsible to ensure that the class doesn’t contain any shared and mutable instance variables. Otherwise, you’d better mark it as either @Stateful or @Singleton, depending on its purpose.
@PersistenceContext—basically injects the JPA entity manager from the persistence unit as configured in the project’s persistence.xml. The entity manager is, in turn, responsible for mapping all JPA entities against a SQL database. It will, under cover, do all the hard JDBC work.
Adjusting the Hello World
Now we’re going to adjust the earlier created HelloWorld backing bean in order to save the messages in the database and display all of them in a table.
@Named @RequestScopedpublic class HelloWorld {private Message message = new Message();private List<Message> messages;@Injectprivate MessageService messageService;@PostConstructpublic void init() {messages = messageService.list();}public void submit() {messageService.create(message);messages.add(message);}public Message getMessage() {return message;}public List<Message> getMessages() {return messages;}}
Note that you don’t need setters for message and messages. We’re going to use the getters and setters of the Message entity itself.
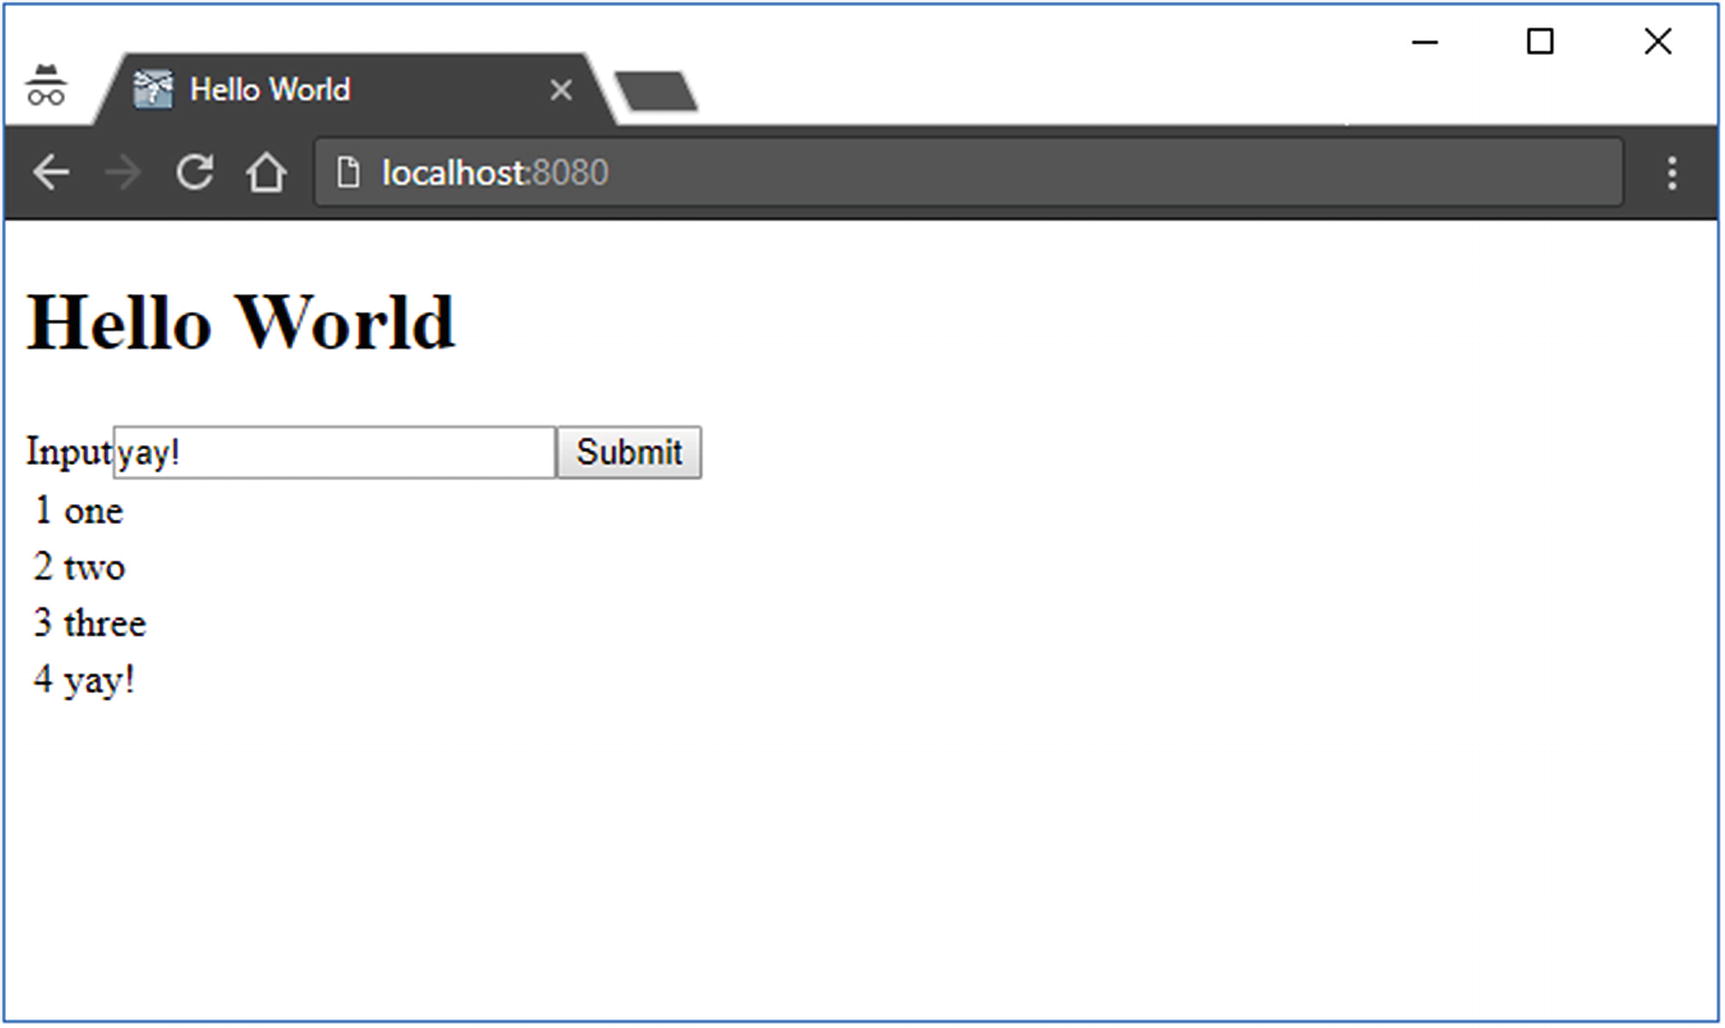
Finally, adjust the <h:body> of hello.xhtml as follows:
<h1>Hello World</h1><h:form><h:outputLabel for="input" value="Input" /><h:inputText id="input" value="#{helloWorld.message.text}" /><h:commandButton value="Submit"action="#{helloWorld.submit}"><f:ajax execute="@form" render=":table" /></h:commandButton></h:form><h:dataTable id="table" value="#{helloWorld.messages}" var="message"><h:column>#{message.id}</h:column><h:column>#{message.text}</h:column></h:dataTable>
Now reload the page in your favorite web browser and create some messages (see Figure 2-26).