
Security for web applications is a broad field and includes a number of topics such as protecting access to resources, shielding against injection attacks of various kinds, and preventing users from being tricked into doing malicious actions on behalf of an attacker.
JSF (JavaServer Faces) supports these topics in various ways, either by providing native solutions or by integrating with the Java EE platform’s facilities. For access to resources, which includes both authentication (the caller proving its identity) and authorization (the system determining to which resources the caller has access) JSF (JavaServer Faces) integrates with the Java EE Security machinery, which in turn is defined by, among others, the Servlet spec and the Java EE Security spec.
Java EE Security (JSR 375) is supported by both the Web- and Full profile in Java EE 8. Additionally, the reference implementation Soteria works on Java EE 7 servers, and because it’s built on JASPIC (Java EE authentication SPI) (JSR 196), it also works on Servlet containers that support JASPIC (such as Tomcat since 8.5 and Jetty since 7.0).
Java EE Security Overview and History
In Java EE, security is not specified in a single specification but is in fact spread over multiple specifications that integrate with each other in various ways. While this allows for different aspects of security to be evolved at their own pace, and practically speaking even allows some to be replaced by non-spec implementations, it does muddy the waters of what spec is responsible for what.
In this introductory section we'll start off with providing a somewhat broad overview of what some of the pieces are and how they fit together. We'll focus on the web aspects of security. Security is also present in things like EJB (Enterprise JavaBeans) and JCA (Java Connector Architecture) connectors, but these are outside the scope of this book.
Historically, security in Java EE is mostly based on the security model introduced by the Servlet spec . That is, a model where the core elements are an "authentication mechanism" (FORM, BASIC, ...), a set of security constraints in web.xml where a specific pattern (the URL pattern) is combined with a collection of roles (including the empty collection), and a few ways to programmatically test the caller's details, such as HttpServletRequest.isUserInRole.
While effective, many details were left out in the early days. The Servlet spec did ask for implementations (Servlet containers) to be extendible with respect to the authentication mechanisms but did not specify how exactly this should be done. Likewise, the Servlet spec implicitly requires an "identity store " (File, Database, LDAP, …) that holds the caller details such as credentials, name, and roles but left all details about how to configure these to the Servlet container.
The Servlet spec did not define any way to access the security constraints defined in web.xml in a programmatic way, or to programmatically influence their execution (e.g., to make certain constraints time based). Furthermore, the very early versions of the Servlet spec did not specify the constraint resolution in the strictest way, which allowed for some small differences in interpretation between various Servlet containers.
The first additional spec to address these concerns was JACC (JSR 115), which, simply stated, deals with authorization concerns. JACC specifies how the web.xml security constraints should be represented in code, namely, as a collection of Permission instances. JACC also specifies how these can be accessed (queried) by code, and finally allows for custom authorization modules that can replace or augment the logic that the container executes to determine its access decision. A perhaps somewhat difficult thing to understand about JACC is that it's not so much something that can be implemented on its own and then added to a Servlet container (as we can do with JSF), but it standardizes and more concisely specifies what all Servlet containers internally are already doing.
The second additional spec to address the above-mentioned concerns was JASPIC (JSR 196), which deals with authentication concerns. JASPIC specifies at what moments the Servlet container should call the authentication mechanism and defines an explicit interface type for these authentication mechanisms, so custom authentication mechanisms can use this interface instead of the Servlet container's proprietary one and thus be portable. JASPIC says a few things about the identity store, but too little to be really usable in practice. Like JACC, JASPIC isn't something that can be implemented independently, but it standardizes something that all Servlet containers are already doing.
Both JACC and JASPIC define low-level SPIs (server provider interfaces ) that are mainly intended to be implemented and used by vendors to provide extension products. They are quite bare and fairly abstract. As such they are not (rich) APIs (application programming interfaces ) that are targeted at application developers. Here is where the Java EE Security API (JSR 375) comes in. Java EE Security offers a higher-level and easier-to-register (just implement the interface) and easier-to-use (CDI based) version of the JASPIC authentication module. The Java EE Security API also fully defines the identity store artifact, but perhaps most important it provides a number of concrete implementations of all of these, among which is a FORM-based authentication mechanism optimized for use with JSF and several identity stores such as a JDBC (Java Database Connectivify) store and an LDAP (Lightweight Directory Access Protocol) store.
The RI (reference implementation) of the Java EE Security API is called Soteria . This implementation is of course provided by the Java EE 8 RI GlassFish and its derivative Payara. Soteria, like Mojarra and MyFaces, has been designed to run independently on basically every Servlet container provided that it adheres to the JASPIC specs (which both Tomcat and Jetty do as mentioned in the chapter's introduction). Its dependencies (at the time of writing, for Soteria 1.0) are CDI 1.2 and Expression Language 3.0. These two dependencies are provided by all Java EE 7 implementations. Servlet containers typically provide EL (Expression Language) support while CDI can be added separately, for instance, using the RI Weld. For a few optional features Soteria takes advantage of Servlet containers that adhere to the JACC spec.
Protect Access to Resources
In JSF the main resources to protect are views, which are accessed via URL patterns. It's therefore these URL patterns we need to define security constraints. These constraints are primarily defined in web.xml. In fact, as of Java EE 8, web.xml is pretty much the only viable place to define security constraints for JSF views.
Java EE has three kinds of security constraints:
Excluded
Unchecked
By role
Excluded
“Excluded,” aka “deny all,” means that no external caller will be granted access to the resources covered by this constraint. One might ask what the purpose of such a constraint is. If the resources can never be accessed, why are those resources there in the first place?
The answer is twofold. For one, a single application may be configured for different purposes. An excluded security constraint is an easy way then to quickly disable a number of resources that are not applicable to a certain configuration of the application. A more important use case is to be able to make a distinction between external use and internal use of a resource. The key insight here is that security constraints are only applied to external requests for that resource, i.e., to a caller requesting https://example.com/resources/template.xhtml , but not to internal requests such as includes, forwards, and any of the methods to load a resource from the classpath or file system.
This is specifically important for JSF because of a somewhat unfortunate design choice regarding composite components. Composite components are components that are implemented via a Facelet instead of a Java class. By convention, they have to be placed in a directory inside a directory named /resources that resides in the web root. For instance, /resources/bar/foo.xhtml. This will make a composite component “foo” available in the namespace http://xmlns.jcp.org/jsf/composite/bar .
Components are of course not views and the caller should not be able to request those directly. Unfortunately, /resources is not in any way a special directory to Java EE. JSF assigns a special meaning to it by convention, but to the Servlet container it’s a directory like any other. This specifically means there’s no protection applied to it and any caller can directly request resources from it. In other words, this directory is “unchecked,” aka “world readable.” Even with an *.xhtml mapping, this not only allows the user to guess which components we have but lets the user attempt to execute those as well. Clearly this is not what we want. There are two solutions for this:
Configure another directory to be the JSF resources directory
Add the mentioned security constraint to web.xml
Via the javax.faces.WEBAPP_RESOURCES_DIRECTORY context parameter another directory can be configured to be the JSF resources directory instead of /resources. For example,
<context-param><param-name>javax.faces.WEBAPP_RESOURCES_DIRECTORY</param-name><param-value>WEB-INF/resources</param-value></context-param>
Note that the path is relative to the web root and must not begin with a “/.”
While this is a good default for our own applications, it still doesn’t totally protect us. Namely, third-party jars can still provide their resources via /resources and aren’t affected by that context parameter. For that reason, the aforementioned “Excluded” constraint is needed. It looks as follows:
<security-constraint><web-resource-collection><web-resource-name>The /resources folder</web-resource-name><url-pattern>/resources/*</url-pattern></web-resource-collection></security-constraint>
As can be seen, defining an excluded constraint boils down to defining the URL pattern that we wish to constrain, without defining any specific constraints.
Unchecked
“Unchecked,” aka “permit all,” “public,” and “world readable,” means that all callers , independent of whether or not they are authenticated, have access to the resources covered by the “constraint.” Internally an explicit constraint may exist for this, but in web.xml this “constraint” is defined simply by not defining any constraint at all for a URL pattern. In other words, every URL that’s not covered explicitly by any other pattern is “unchecked.”
By Role
“By role ” means a so-called role is associated with a URL pattern, and the authenticated caller must have that role in order to access the resource. A role itself is frequently seen as a concept with strict semantics, but it’s essentially little more than just an opaque string that needs to match from the set of such strings associated with an authenticated caller, and the set of strings associated with a URL pattern. The content of that string is completely up to the application, meaning it could be a “type of caller,” like “admin”, “user”, etc., but also something fine-grained as “may_add_item”, or even tokens such as “AYUDE-OPWR-BM1OP”.
The following gives an example:
<security-constraint><web-resource-collection><web-resource-name>User pages</web-resource-name><url-pattern>/user/*</url-pattern></web-resource-collection><auth-constraint><role-name>VIEW_USER_PAGES</role-name></auth-constraint></security-constraint><security-constraint><web-resource-collection><web-resource-name>Admin pages</web-resource-name><url-pattern>/admin/*</url-pattern></web-resource-collection><auth-constraint><role-name>VIEW_ADMIN_PAGES</role-name></auth-constraint></security-constraint><security-role><role-name>VIEW_USER_PAGES</role-name></security-role><security-role><role-name>VIEW_ADMIN_PAGES</role-name></security-role>
In the above fragment we define two security constraints—one for the /user/* pattern, for which the caller needs to have the role “VIEW_USER_PAGES”, and one for the /admin/* pattern, for which the caller needs the role “VIEW_ADMIN_PAGES”. With the above constraints in place, a caller accessing, say, /user/account.xhtml has to be authenticated and has to have the mentioned role.
An auth-constraint can contain multiple roles, for which OR semantics are applied. This means the authenticated caller only needs to have one of the roles in that constraint in order to be granted access. Constraints can additionally be restricted to a specific HTTP method (such as GET or POST). This does come with a caveat, since by default all methods that are not specified will be unchecked (public). This can be countered by using the top-level <deny-uncovered-http-methods/> tag. The following gives an example of this:
<deny-uncovered-http-methods /><security-constraint><web-resource-collection><web-resource-name>User pages</web-resource-name><url-pattern>/user/*</url-pattern><http-method>GET</http-method><http-method>POST</http-method></web-resource-collection><auth-constraint><role-name>VIEW_USER_PAGES</role-name></auth-constraint></security-constraint>
Setting the Authentication Mechanism
After the security constraints have been defined, we need to set how the caller will authenticate. The artifact that handles the interaction with the caller (i.e., asks the caller for credentials in a certain way) is called an “authentication mechanism.” Java EE provides a number of these out of the box. The Servlet spec provides four, namely, FORM, BASIC, DIGEST, and CERT, while Java EE Security provides FORM and BASIC as well (with the difference that these correspond to CDI beans), but also a variant of FORM called “Custom FORM”.
FORM and Custom FORM are both suitable for interactive web applications, such as the ones we would build primarily with JSF. Contrary to, say, BASIC, the FORM authentication mechanisms call back into the application and let it render the form that asks the caller for credentials, hence, the name of these mechanisms.
The difference between the two is mainly in how the mechanism requires the application to continue the so-called authentication dialog after it has rendered the form. In FORM this is done by letting the caller post the filled-out form to the virtual URL j_security_check, while in Custom FORM this is done programmatically via a call to the injected SecurityContext. This small difference makes all the difference for JSF though. In JSF, a form view by default submits to the same URL it was requested from, so posting back to a single mechanism mandated URL is not at all natural. In addition to that, in JSF we often need to have server-side code running after a postback; just think about converters and validators and the ability to emit a faces message. We can’t really do any of this if we have to post back to the virtual non-faces j_security_check URL, but it’s quite doable when we can continue the authentication dialog programmatically from the backing bean’s action method.
We’ll first show you how to configure a web application to use the Custom FORM authentication mechanism. Later on, we’ll explain how to actually use JSF to fulfill the requirements this mechanism imposes on the application.
All of the authentication mechanisms provided by Java EE Security are installed and configured via its own AuthenticationMechanismDefinition annotation . This annotation tells the container which type of authentication mechanism to install, and with which configuration. The annotation can be placed on pretty much every class on the classpath. Logically it fits in quite well with the @FacesConfig annotation . The following shows an example:
@CustomFormAuthenticationMechanismDefinition(loginToContinue = @LoginToContinue(loginPage = "/login.xhtml",errorPage = ""))@FacesConfig @ApplicationScopedpublic class ApplicationConfig {// ...}
A perhaps somewhat unfortunate requirement here is that the errorPage attribute has to be specified and set to the empty string. This is needed since the @LoginToContinue element has a default value for an actual error page. In JSF we rarely use an explicit error page to display errors but instead redisplay the original page with the error messages rendered on it via faces messages.
Do note that the current version of Java EE Security only allows one authentication mechanism to be active at the same time. Technically what happens when the container encounters the @CustomFormAuthenticationMechanismDefinition annotation is that it adds an enabled CDI bean to the system of type HttpAuthenticationMechanism. This is important to know, since its being a regular CDI bean means we can inject it, decorate it, intercept it, and basically do everything with it that we can normally do with CDI beans.
The loginToContinue attribute is used to configure the view that the container forwards to whenever the caller tries to access a protected view. This is called “container initiated authentication”; the container starts the authentication dialog as opposed to the application.
Note that the default is to forward to the login page, meaning that if the caller tries to access https://example.com/foo.xhtml , and /foo.xhtml is protected, the caller will still see /foo.xhtml in the address bar and not /login.xhtml. However, the postback is to /login.xhtml, so after entering credentials the caller would get to see this in the address bar. Alternatively we can configure the loginToContinue attribute to use a redirect instead.
@CustomFormAuthenticationMechanismDefinition(loginToContinue = @LoginToContinue(loginPage = "/login.xhtml",useForwardToLogin = false,errorPage = ""))@FacesConfig @ApplicationScopedpublic class ApplicationConfig {// ...}
Setting the Identity Store
After having declared the security constraints and setting the mechanism that we’d like to use to authenticate, there’s one final piece of the puzzle remaining: setting the artifact that contains the caller’s data, such as credentials, name, and roles. In Java EE Security this artifact is called an identity store .
Java EE provides two of these out of the box; one to connect to a database and one to connect to LDAP (Lightweight Directory Access Protocol). The Java EE Security RI (Soteria) additionally ships with an embedded identity store. Most application servers provide additional ones of their own, which are often configured outside the application (e.g., via an admin console, CLI, or XML configuration file that’s stored inside the server).
Setting and configuring the Java EE Security-provided identity stores and the one provided by the RI happens in a similar fashion as the authentication mechanisms: via an IdentityStoreAnnotation. Just like the authentication mechanism version, this will cause the container to add an enabled CDI bean to the system, this time one implementing the IdentityStore interface.
The following shows an example together with our earlier definition of the authentication mechanism :
@CustomFormAuthenticationMechanismDefinition(loginToContinue = @LoginToContinue(loginPage = "/login.xhtml",useForwardToLogin = false,errorPage = ""))@EmbeddedIdentityStoreDefinition({@Credentials(callerName = "[email protected]",password = "secret1",groups = { "VIEW_USER_PAGES", "VIEW_ADMIN_PAGES" }),@Credentials(callerName = "[email protected]",password = "secret2",groups = { "VIEW_USER_PAGES" }))})@FacesConfig @ApplicationScopedpublic class ApplicationConfig {// ...}
The above causes an embedded (in-memory) store to be created, with two callers (users), the first one being in the groups “VIEW_USER_PAGES” and “VIEW_ADMIN_PAGES” and the second one only in the group “VIEW_USER_PAGES”. The authentication mechanism will use this identity store to validate that the credentials (caller name and password) match and, if they do, to get the correct groups from the identity store.
The observant reader may notice that the terminology has changed. Before we were talking about “roles,” while all of a sudden this has changed to “groups.” Is this a mistake? Well, not really. Groups and roles are subtly different. Both are just opaque strings to the container, but groups can be optionally mapped to roles. We won’t elaborate on this process further here, but suffice it to say that by default, Java EE mandates a so-called 1:1 group-to-role mapping, which simply means groups and roles are the same.
To better understand identity stores we’ll give two more examples here. For the first example we’ll look at one of the identity stores that’s provided by the Java EE Security API—the database identity store . This store is activated and configured using the @DatabaseIdentityStoreDefinition annotation. The three most important attributes to configure are the data source (which represents the SQL data base), the SQL query to obtain the (hashed!) password given a caller name, and the SQL query to identify which groups a caller is in given the caller name. The following gives an example:
@CustomFormAuthenticationMechanismDefinition(loginToContinue = @LoginToContinue(loginPage = "/login.xhtml",errorPage = ""))@DatabaseIdentityStoreDefinition(dataSourceLookup = "java:app/MyDataSource",callerQuery = "SELECT password FROM caller WHERE name = ?",groupsQuery = "SELECT name FROM groups WHERE caller_name = ?")@DataSourceDefinition(name = "java:app/MyDataSource",className = "org.h2.jdbcx.JdbcDataSource",url="jdbc:h2:~/test;DB_CLOSE_ON_EXIT=FALSE")@FacesConfig @ApplicationScopedpublic class ApplicationConfig {// ...}
In this example, a data source is defined for the H2 database using the org.h2.jdbcx.JdbcDataSource driver. Naturally this can be done in a similar way for any other database that has a JDBC driver. Alternatively, the data source can be defined externally to the application. The caller query that we used is “select password from caller where name = ?”, which means we assume a table with at least two columns—one holding the caller name, and the other the hashed password. Such table could be created by, for example, the following SQL statement:
CREATE TABLE caller(name VARCHAR(32) PRIMARY KEY,password VARCHAR(255))
The query that we used for the groups is “select name from groups where caller_name = ?”, which assumes a table with at least two columns—the caller name, and the group name, with one row for each group the caller is in. Such a table could be created by, for example, the following SQL statement :
CREATE TABLE caller_groups(caller_name VARCHAR(32),name VARCHAR(32))
When populating the caller table, it must be noted that a default hash algorithm is assumed for the password column, namely, PBKDF2WithHmacSHA256. This algorithm can (should) be customized by setting the number of iterations, the key size, and the salt size.
Instead of using an identity store that's provided by the Java EE Security API we also have the option of providing our own custom one. A common use case for that is using the application's own services to load the application-specific user data .
The following shows an example of such an identity store:
@ApplicationScopedpublic class UserServiceIdentityStore implements IdentityStore {@Injectprivate UserService userService;@Overridepublic CredentialValidationResult validate(Credential credential) {UsernamePasswordCredential login =(UserNamePasswordCredential) credential;String email = login.getCaller();String password = login.getPasswordAsString();Optional<User> optionalUser =userService.findByEmailAndPassword(email, password);if (optionalUser.isPresent()) {User user = optionalUser.get();return new CredentialValidationResult(user.getEmail(),user.getRolesAsStrings());}else {return CredentialValidationResult.INVALID_RESULT;}}}
There is no specific registration needed; the above given class simply needs to be present in the application (be on its classpath). With such custom identity store present the ApplicationConfig class therefore doesn’t need any config for the identity store.
@CustomFormAuthenticationMechanismDefinition(loginToContinue = @LoginToContinue(loginPage = "/login.xhtml",errorPage = ""))@FacesConfig @ApplicationScopedpublic class ApplicationConfig {// ...}
The UserServiceIdentityStore as given above delegates most of the work to a UserService, which would be responsible for handling User entities in the application. Fully discussing such service is outside the scope of this book, but we can imagine it could use, for example, JPA to persist and load User entities. Our custom identity store uses the service to try to find a User based on the user name and the password that's being passed in via the credentials. If a User instance is returned, it means the name referred to an existing user, and the password was the correct one. In that case the identity store in turn returns CredentialValidationResult which does two things: it indicates that authentication was successful, and it provides the container with the data that will eventually be used to set the authenticated identity for the current request. If the service couldn’t find the user, then either the name or the password was wrong. In that case the store returns INVALID_RESULT to indicate that authentication was not successful.
Providing Our Custom JSF Code
In the sections above, we first defined our security constraints (which views are protected), then we set up the authentication mechanism (how do our callers interact with our application in order to authenticate), and finally we set up the identity store (where the caller data resides).
It’s now time to plug our own custom code into the authentication process. This primarily happens by providing the view that the authentication mechanism directs to when it needs to collect the caller’s credentials (e-mail and password in this case).
The login page can be kept relative simple—a standard form page, with two inputs bound to our backing bean, and a button to submit.
<!DOCTYPE html><html lang="en"xmlns:="http://www.w3.org/1999/xhtml"xmlns:h="http://xmlns.jcp.org/jsf/html"><h:head><title>Log In</title></h:head><h:body><h1>Log In</h1><h:form><h:outputLabel for="email" value="Email" /><h:inputText id="email" value="#{login.email}" /><br /><h:outputLabel for="password" value="Password" /><h:inputSecret id="password" value="#{login.password}" /><br /><h:commandButton value="Login" action="#{login.submit}" /><h:messages /></h:form></h:body></html>
The page above is a totally normal JSF view. This specifically means that contrary to classical HTML <form method="post" action="j_security_check"> of FORM authentication the authentication mechanism does not monitor the postback URL in any way and therefore there aren’t any constraints being placed on the input elements that collect the credentials.
Instead, the JSF backing bean has to collect these credentials and then programmatically pass these along and signal the authentication mechanism to continue the dialog. Before passing the credentials along, JSF is free to do its own validation and engage in its own dialog with the caller without the authentication mechanism having to be involved with this. Note that the command button explicitly doesn’t use Ajax to submit. You can do so, but then the average web browser won’t suggest the end user to remember the login credentials on its behalf.
The following shows a full example of the backing bean handling the login call. We’ll discuss the parts individually below.
@Named @RequestScopedpublic class Login {@NotNullprivate String email;@NotNull@Size(min = 8, message = "Password must be at least 8 characters")private String password;@Injectprivate SecurityContext securityContext;@Injectprivate ExternalContext externalContext;@Injectprivate FacesContext facesContext;public void submit() {switch (continueAuthentication()) {case SEND_CONTINUE:facesContext.responseComplete();break;case SEND_FAILURE:facesContext.addMessage(null, new FacesMessage(FacesMessage.SEVERITY_ERROR, "Login failed", null));break;case SUCCESS:facesContext.addMessage(null, new FacesMessage(FacesMessage.SEVERITY_INFO, "Login succeed", null));break;case NOT_DONE:// Doesn’t happen here}}private AuthenticationStatus continueAuthentication() {return securityContext.authenticate((HttpServletRequest) externalContext.getRequest(),(HttpServletResponse) externalContext.getResponse(),AuthenticationParameters.withParams().credential(new UsernamePasswordCredential(email, password)));}public String getEmail() {return email;}public void setEmail(String email) {this.email = email;}public String getPassword() {return password;}public void setPassword(String password) {this.password = password;}}
We start the backing bean with two instance variables corresponding with the credentials we collect.
@NotNullprivate String email;@NotNull@Size(min = 8, message = "Password must be at least 8 characters")private String password;
This clearly shows the advantage over the FORM authentication mechanism in that we can easily pre-validate the user’s input using bean validation. Because of JSF’s built-in integration with bean validation a standard faces message will be made available for rendering should the input not pass validation.
Next, we defined injecting the contextual objects it needs. These are
@Injectprivate SecurityContext securityContext;@Injectprivate ExternalContext externalContext;@Injectprivate FacesContext facesContext;
The observant reader will recognize ExternalContext and FacesContext as being two well-known native JSF classes, with the SecurityContext being the odd one out. This class is from Java EE Security and we’ll use that here to communicate with the authentication mechanism.
Continuing the dialog happens in the continueAuthentication() method as follows:
private AuthenticationStatus continueAuthentication() {return securityContext.authenticate((HttpServletRequest) externalContext.getRequest(),(HttpServletResponse) externalContext.getResponse(),AuthenticationParameters.withParams().credential(new UsernamePasswordCredential(email, password)));}
The call to SecurityContext#authenticate() will trigger the authentication mechanism again. Since that mechanism will be a state where it waits for credentials to be passed, it will indeed look for the credentials we pass in, and use those to continue. As we’ll later see, we can also request that any potentially existing state is discarded and a new dialog is started. Note that we have to cast the request and response objects to HttpServletRequest and HttpServletResponse. Unfortunately, this is needed since ExternalContext abstracts over Servlet and Portlet requests and only returns Object for those two.
The SecurityContext#authenticate() method returns a status that indicates in broad lines what the authentication mechanism did. The action method of our JSF backing bean has to handle the following:
switch (continueAuthentication()) {case SEND_CONTINUE:facesContext.responseComplete();break;case SEND_FAILURE:facesContext.addMessage(null, new FacesMessage(FacesMessage.SEVERITY_ERROR, "Login failed", null));break;case SUCCESS:facesContext.addMessage(null, new FacesMessage(FacesMessage.SEVERITY_INFO, "Login succeed", null));break;case NOT_DONE:// Doesn't happen here}
As can be seen, there are four possible outcomes.
The first one is SEND_ CONTINUE, which basically means “authentication in progress.” The authentication mechanism returned that status when it took over the dialog again (e.g., by rendering its own response or, more likely, by redirecting the caller to a new location). A JSF backing bean should make sure the JSF life cycle is ended by calling FacesContext#responseComplete() and furthermore refrain from interacting with the response itself in any way.
The second one is SEND_FAILURE, which basically means “authentication failed.” This status is returned when the authentication mechanism wasn’t able to validate the credentials that were provided. In most cases this is when the caller provided the wrong credentials. A JSF backing bean can respond to this by setting a faces message and re-display the login form.
The third status is SUCCESS, which means “authentication succeeded.” This is returned when the authentication mechanism successfully validated the credentials provided. It’s only after this status is returned that HttpServletRequest#getUserPrincipal(), SecurityContext#getCallerPrincipal(), etc., return non-null values to indicate the current caller is authenticated. A JSF backing bean can respond to this in various ways (e.g., by setting a faces message and continuing to render the view, or issuing a redirect of itself).
The fourth and final status is NOT_DONE, which is returned when the authentication mechanism chooses to not authenticate at all. This happens, for instance, when the authentication mechanism is pre-emptively called but authentication appeared not to be necessary. Typically, a JSF backing bean would not need to take any special action here.
Caller-Initiated Authentication
The previous code discussed the situation where an unauthenticated caller tries to access a protected resource (URL/page) and the authentication dialog is automatically started. Since this authentication dialog is started by the container, we call this “container-initiated authentication .”
Another case is where a caller explicitly starts the authentication dialog (e.g., by clicking on a “login” button). Because the caller starts this dialog we call it “caller-initiated authentication.”
In case of caller-initiated authentication, the core authentication mechanism is effectively directly invoked and the platform-provided login-to-continue functionality is skipped. This means that if an authentication mechanism depends on login-to-continue to redirect to a login page and after authentication to redirect back to the protected resource, neither of these two actions will happen when the application programmatically triggers authentication.
The CustomFormAuthenticationMechanism that we defined earlier via an annotation is indeed a mechanism that uses the platform’s login-to-continue service , so we’ll start the authentication dialog by directing to the same login view we used before. To indicate this is a new login, an extra request parameter is provided. The view from which we start looks as follows:
<!DOCTYPE html><html lang="en"xmlns:="http://www.w3.org/1999/xhtml"xmlns:f="http://xmlns.jcp.org/jsf/core"xmlns:h="http://xmlns.jcp.org/jsf/html"xmlns:c="http://xmlns.jcp.org/jsp/jstl/core"><h:head><title>Welcome</title><h:head><h:body><c:if test="#{not empty request.userPrincipal}"><p>Logged-in as #{request.userPrincipal}</p></c:if><c:if test="#{empty request.userPrincipal}"><h:form><h:button value="Login" outcome="/login"><f:param name="new" value="true" /></h:button></h:form></c:if></h:body></html>
In the backing bean we’ll inject two additional objects: an instance to obtain and store the mentioned request parameter and a reference to the Flash, which we’ll use later.
@Injectprivate Flash flash;@Inject @ManagedProperty("#{param.new}")private boolean isNew;
The managed bean’s scope needs to be changed to @ViewScoped, so we can retain the value of the isNew instance variable after the login form’s postback.
An important addition is to the SecurityContext#authenticate() method where we’ll now provide an extra parameter: newAuthentication. The authentication mechanism does not strictly need this though, and it’s just smart enough to distinguish between an initial new authentication and continuing an authentication dialog that’s in progress. However, things get more difficult when a caller is in the midst of an authentication dialog and then navigates away, only to explicitly click a login button later. If the state associated with said dialog hasn’t expired at that point, the authentication mechanism doesn’t know a new authentication is required and will likely continue the aborted but still valid dialog .
To prevent this, we can force a new authentication by setting newAuthentication to true. This will discard all existing states. The modified continueAuthentication() method looks as follows:
private AuthenticationStatus continueAuthentication() {return securityContext.authenticate((HttpServletRequest) externalContext.getRequest(),(HttpServletResponse) externalContext.getResponse(),AuthenticationParameters.withParams().newAuthentication(isNew).credential(new UsernamePasswordCredential(email, password)));}
Note that this version can be used for the case where we continue the dialog as well as to start a new one. When we continue the dialog, isNew will simply be false, which also happens to be the default when the parameter is not specified at all.
When using the CustomFormAuthenticationMechanism we know there will not be any redirects or other writes to the response after we provide the credentials in caller-initiated authentication, so that gives us a convenient location to handle the redirect to a landing page after the caller authenticates: the SUCCESS case .
case SUCCESS:flash.setKeepMessages(true);facesContext.addMessage(null, new FacesMessage(FacesMessage.SEVERITY_INFO, "Login succeed", null));externalContext.redirect(externalContext.getRequestContextPath() + "/index.xhtml");break;
We’re redirecting the caller here to the index.xhtml landing page . Note that this is also the view where the caller initiated the authentication dialog, but that’s just a coincidence in this example. In general, the view or even URL where we redirect the caller to is completely free for the application developer to choose. Typically, a landing page of some sort is chosen, which could be the index of the application or a dashboard corresponding to the main role the caller is in. As we mentioned above, when SUCCESS is returned the caller is fully authenticated. This means we can query the caller’s roles and use these in our decision where to redirect to.
Outlook: a future version of Java EE Security may introduce a hybrid option where caller-initiated authentication can still start with the same redirect as container-initiated authentication and allows for the redirect-back URL to be provided by the application.
Remember Me
Once a caller has been authenticated for a JSF (web) application, we naturally don’t want to ask the caller to re-authenticate with every request. To prevent this, the result of a successful authentication is typically coupled in some way to the caller’s HTTP session. In fact, the CustomFormAuthenticationMechanism internally uses the Java EE Security’s provided “auto-apply-session” service to do just this. This service stores the data associated with said successful authentication (at least the caller name plus any groups the caller is in). Although implementation ultimately depends on where this data exactly lives and with what lifetime, in practice it’s typically in a special section of the server’s memory associated with the HTTP session. This section is special in the way that it’s typically session scoped, but the data is not accessible via HttpSession#getAttribute().
In order to not exhaust the server’s memory, an HTTP session expires after a certain amount of time. Typical expiration times are between 10 minutes and an hour. If the caller accesses the application after this time, authentication is required to be performed again.
Often though even re-authenticating after a period of inactivity as long as an hour is undesirable. But extending the HTTP session to a longer period is undoable for the aforementioned reasons of server resource exhaustion.
Here’s where “Remember Me” (remember-me) comes in. Remember-me is a somewhat playful term for a process where the caller’s credentials are exchanged for a token, and where this token is typically stored in a cookie that’s distinct from the HTTP session cookie and has a longer time to live.
A remember-me token effectively functions as a new credential for the caller, without exposing the caller’s original password. A remember-me token can basically be vended multiple times, for instance, once per device or IP (Internet protocol) that the caller uses to connect to the application. Care must be taken that while the token does not expose the caller’s original credentials, it still functions as the key to a caller’s account and therefore should be treated with the same precautions as one would apply to any other type of credential. Specifically, cookies containing the remember-me token should be sent over HTTPS/SSL only, and applications should not store the actual token verbatim but a strong hash of it.
As the primary reason for having remember-me is to not exhaust server memory and to be long-lived, the remember-me token is almost always stored in stable storage (e.g., a database). As such, a lookup from such storage is costlier than a lookup from the server’s memory, and this could seriously affect performance when required to be done for every request, especially when many Ajax requests are being done all the time.
For this reason, remember-me is almost always used in combination with some kind of cache. The modular nature of the services that the CustomFormAuthenticationMechanism uses makes it possible for remember-me to be inserted between the auto-apply-session service mentioned above and the actual authentication mechanism. That way we effectively get a kind of memory hierarchy; the authentication data is first attempted to be found in the HTTP session storage, if it’s not there the remember-me service is attempted, and if that one doesn’t contain the data then finally the authentication mechanism is tried.
To make use of remember-me, two things have to be done.
Activating the remember-me service for the installed authentication mechanism
Providing a special identity store that’s capable of vending and validating the remember-me token
Activating Remember-Me Service
The remember-me service in Java EE Security is represented by an Interceptor. Via the interceptor binding annotation @ RememberMe [the remember-me service] is easily applied to our own custom authentication mechanism, one for which we have the source code. Unfortunately, it isn’t as easy when these have to be applied to a bean for which we don’t have the source code and in fact for which we don’t even know the exact implementation type.
As the CustomFormAuthenticationMechanism that we’ve been using for the examples above is indeed of the latter type, there’s a bit more work to do. Essentially, we need to obtain a reference of the actual CustomFormAuthenticationMechanism implementation that the container makes available and then use the CDI 2.0 InterceptionFactory to programmatically add the @RememberMe annotation. The result is then to be returned from an alternative producer method.
This is demonstrated in the following code via the new method produceAuthenticationMechanism() in the ApplicationConfig bean which we showed before:
@CustomFormAuthenticationMechanismDefinition(loginToContinue = @LoginToContinue(loginPage = "/login.xhtml",useForwardToLogin = false,errorPage = ""))@FacesConfig @ApplicationScoped@Alternative @Priority(500)public class ApplicationConfig {@Producespublic HttpAuthenticationMechanism produceAuthenticationMechanism(InterceptionFactory<HttpAuthenticationMechanismWrapper>interceptionFactory, BeanManager beanManager) {@RememberMeclass RememberMeClass {};interceptionFactory.configure().add(RememberMeClass.class.getAnnotation(RememberMe.class));return interceptionFactory.createInterceptedInstance(new HttpAuthenticationMechanismWrapper((HttpAuthenticationMechanism) beanManager.getReference(beanManager.resolve(beanManager.getBeans((HttpAuthenticationMechanism.class).stream().filter(b -> b.getBeanClass() != ApplicationConfig.class).collect(Collectors.toSet())),HttpAuthenticationMechanism.class,beanManager.createCreationalContext(null))));}}
The ApplicationConfig bean is annotated with the @Alternative and @Priority annotations. @Alternative is used here to indicate that the producer is not just any regular producer but one that should be called instead of any existing producer or bean. That is, the bean we are producing here is an alternative for the bean with the same type that would otherwise be selected by CDI for injection. @Priority is used to enable (activate) our alternative producer. Without this annotation the producer is present but not enabled, meaning that CDI won’t call it. Another way of enabling an alternative is using beans.xml. The number 500 here is used to select between various alternatives if multiple alternatives are enabled. In that case the one with the highest number is selected.
The code shown above uses the somewhat well-known CDI pattern BeanManager#getBeans()/resolve()/getReference() to obtain the CustomFormAuthenticationMechanism that the container makes available. This pattern is more verbose than the simpler CDI.current().select(...) variant, but it allows us to filter out the Bean<T> that represents the producer method. Getting a reference from that Bean<T> from within the producer method would invoke that same producer method again, and thus would cause a recursive series of calls eventually leading to a stack overflow. It goes without saying this is unwanted, hence the reason we filter that particular Bean<T> out.
The bean instance that is returned from the BeanManager#getReference() is almost certainly a proxy; CustomFormAuthenticationMechanism is specified to be application scoped, and it implicitly makes use of an interceptor. Due to the technical difficulty of proxying an existing proxy (think of generated proxies often being final and proxy caches being used) CDI 2.0 imposes a limitation on what types of objects it can create an intercepted instance from. To work around this limitation, we have little choice but to insert an extra manually created “pass-through wrapper” HttpAuthenticationMechanismWrapper instance as shown in the code above. The code of this wrapper is as follows:
public class HttpAuthenticationMechanismWrapperimplements HttpAuthenticationMechanism{private HttpAuthenticationMechanism wrapped;public HttpAuthenticationMechanismWrapper() {//}public HttpAuthenticationMechanismWrapper(HttpAuthenticationMechanism httpAuthenticationMechanism){this.wrapped = httpAuthenticationMechanism;}public HttpAuthenticationMechanism getWrapped() {return wrapped;}@Overridepublic AuthenticationStatus validateRequest(HttpServletRequest request,HttpServletResponse response,HttpMessageContext context) throws AuthenticationException{return getWrapped().validateRequest(request, response, context);}@Overridepublic AuthenticationStatus secureResponse(HttpServletRequest request,HttpServletResponse response,HttpMessageContext context) throws AuthenticationException{return getWrapped().secureResponse(request, response, context);}@Overridepublic void cleanSubject(HttpServletRequest request,HttpServletResponse response,HttpMessageContext context){getWrapped().cleanSubject(request, response, context);}}
Outlook: it’s expected that a convenience method for the above task will be added to a future version of Java EE Security, thereby greatly simplifying this task.
Logging Out
Regardless of which method to login has been used, at some point the caller may wish to explicitly log out. A normal login (authentication) in Java EE is always primarily valid per request only, but various authentication mechanisms or the services they’re using (such as @AutoApplySession and @RememberMe) may keep the state beyond a single request and automatically re-authenticate the caller at every next request.
This state may be kept at various places: in cookies, in the HTTP session, in client storage, etc. In order to log out we have to make sure all this state is cleared. In JSF we can do this simply by calling the HttpServletRequest#logout() method. This will immediately remove the authenticated identity from the current request and call the cleanSubject() method of the authentication mechanism, which in turn will remove any session data, cookies, etc., that it used.
The following gives an example:
@Named @RequestScopedpublic class Logout {@Injectprivate HttpServletRequest request;public void submit() throws ServletException {request.logout();request.getSession().invalidate();}}
Note that for a full logout it's typically good practice to invalidate the session as well. The call to HttpServletRequest#logout() should only remove the session state used by the authentication mechanism (if any), while after a full logout we often don’t want any other session state lingering around either. Depending on the application design it's typical to redirect the caller to the home page of the application after a logout as well.
Custom Principals
The default principal that we can obtain from the security context contains very little other than just the name or, more exactly, the caller principal name (also known as the user principal name). This is typically a unique name and often, but not necessarily, the name the caller used to authenticate with.
In practice, a web application almost always needs more information than just this name, and a richer application-specific model object representing the user is often desired. The lifetime of this model object does need to be very tightly coupled to that of the principal. For example, if the caller is logged out mid-request, the associated model object must disappear right away, and if the caller is logged in again right after (possibly still in the same request) a new model object must become available.
There are various patterns to realize this, some of them including Servlet filters and others containing CDI producers. The pattern we're going to show here, though, involves a custom principal.
A custom principal means that a specific Principal type is returned from the identity store, instead of just providing a String and letting the container decide the type. This specific Principal type can then either contain our model object (aggregation) or be the model object (inheritance). We'll give an example of the aggregation approach here.
First consider the following custom Principal:
public class UserPrincipal extends CallerPrincipal {private final User user;public UserPrincipal(User user) {super(user.getEmail());this.user = user;}public User getUser() {return user;}}
This principal extends from javax.security.enterprise.CallerPrincipal which is the Java EE Security API-specific caller principal representation.
With this Principal implementation we can now adjust the identity store that we presented earlier to return our custom principal instead.
@ApplicationScopedpublic class UserServiceIdentityStore implements IdentityStore {@Injectprivate UserService userService;@Overridepublic CredentialValidationResult validate(Credential credential) {UsernamePasswordCredential login =(UserNamePasswordCredential) credential;String email = login.getCaller();String password = login.getPasswordAsString();Optional<User> optionalUser =userService.findByEmailAndPassword(email, password);if (optionalUser.isPresent()) {User user = optionalUser.get();return new CredentialValidationResult(new UserPrincipal(user), // Principal instead of String.user.getRolesAsStrings());}else {return CredentialValidationResult.INVALID_RESULT;}}}
Subsequently, we can access our model object again from an injected security context .
@Injectprivate SecurityContext securityContext;[...]Optional<User> OptionalUser =securityContext.getPrincipalsByType(UserPrincipal.class).stream().map(e -> e.getUser()).findAny();
Conditionally Rendering Based on Access
In web applications one often wants to render parts of a view differently based on whether a caller is authenticated or not, and if so based on what roles this caller is in.
JSF component tags don’t really need special attributes for this, as the existing implicit objects combined with expression language are powerful enough to do most of the checks needed for this.
One of the most common checks is determining whether the user is authenticated. This was briefly shown in the index.xhtml view above:
<c:if test="#{not empty request.userPrincipal}"><p>Logged-in as #{request.userPrincipal}</p></c:if>
You can, of course, also use the rendered attribute of any JSF component here.
<ui:fragment rendered="#{not empty request.userPrincipal}"><p>Logged-in as #{request.userPrincipal}</p></ui:fragment>
However, as you learned in the section “JSTL Core Tags” in Chapter 3, this will only end up in a slightly more verbose component tree. Moreover, the rendered attribute checks will be done throughout the JSF life cycle over and over while JSTL tags are executed only once during view build time.
Note that we’re using the implicit object #{request} here instead of the more general SecurityContext. This is because in Java EE 8 there’s no implicit EL object available corresponding to this SecurityContext. In Java EE Security, as well as in the Servlet API (from which the request, which is of type HttpServletRequest originates) it’s defined that a null return from getUserPrincipal() means the user is not authenticated. A better alignment between Java EE Security and Expression Language is planned for a future version of Java EE.
Another common check as mentioned is to test for the caller being in a specific role. Here too we can use the implicit object #{request} , as shown in the following:
<c:if test="#{request.isUserInRole('foo')}"><!-- foo specific things here --></c:if>
It’s good to remember that as explained in the beginning of this chapter, the role “foo” doesn’t have to be something that we would call a role in our normal usage of the word. That its, it doesn’t have to be something like “admin”, or “manager”. In fact, for such very local usage as in a fragment on a view it’s often preferred to use a finer-grained name (e.g., “CAN_UPDATE_SALARY”). A common technique is to map fine-grained roles to more coarse-grained roles, such as, indeed, “ADMIN”. Via this technique a user is given these more coarse-grained roles, and the data store that stores the authentication data then only contains these coarse-grained roles as well. When an identity store such as we saw above retrieves this authentication data for a certain caller and sees “ADMIN” it would return a collection of roles to which “ADMIN” is mapped (e.g., {"CAN_UPDATE_SALARY", "CAN_ADJUST_MARGINS", ...}).
A special role that we can test for is the “**” role which is an alternative for the #{not empty request.userPrincipal} check. This role is implicitly assigned to any authenticated caller, but with the caveat that the application has not declared this in any way. If it has done so, “**” loses its special meaning and is just another opaque string for which the security system explicitly tests. Using the “**” check, the first fragment that we showed in this section looks as follows:
<c:if test="#{request.isUserInRole('**')}"><p>Logged-in as #{request.userPrincipal}</p></c:if>
In the standard Java EE programmatic APIs there are no methods available to test whether the caller is in any of two or more roles, or in all of two or more roles. If this is required, utility methods such as shown in the following code can be used:
public static boolean isInAnyRole(HttpServletRequest request, String... roles) {for (String roles : roles) {if (request.isUserInRole(role)) {return true;}}return false;}public static boolean isInAllRoles(HttpServletRequest request, String... roles) {for (String roles : roles) {if (!request.isUserInRole(role)) {return false;}}return true;}
Sometimes it’s necessary not only to render content on a view differently, depending on what roles a caller is in, but also to take into account what other views (web resources) a caller is allowed to access. This comes into play, for instance, when rendering navigation menus (omitting the entries for views a caller does not have access to), or rendering links or buttons that navigate to views to which the caller does not have access in a special way (e.g., in red or with a lock icon next to it).
A traditional way to implement this is to test for the roles that the programmer knows give access to the given view. While this may seem to work well, it’s often brittle in practice as it lets the code work under the assumption of a specific role/view relationship without any strong guarantees that this relationship actually holds.
A more stable way to test whether a caller has access to a given view is quite simply to test directly for exactly that; does the caller have access to this view (web resource). The SecurityContext has a method that can be used for almost exactly this: SecurityContext#hasAccessToWebResource(). Since the SecurityContext is not a named bean or implicit object, we have to create a small helper bean in order to use this in EL. This is shown as follows:
@Named @ApplicationScopedpublic class Security {@Injectprivate SecurityContext securityContext;public boolean hasAccessToWebResource(String resource) {return securityContext.hasAccessToWebResource(resource, "GET");}}
There are two things to be aware of here.
First, the hasAccessToWebResource() method takes a web resource pattern, which is the same pattern as used for the url-pattern in the web.xml fragment we looked at earlier. This is close to, but not exactly the same as, the JSF view. The JSF view is often specified in a mapping independent way (e.g., /foo instead of /faces/foo or /foo.xhtml). The web resource pattern, however, has to be the URL itself, with the mapping included.
Second, hasAccessToWebResource() requires us to specify the HTTP method for which we test the access . This is required since in Java EE Security constraints actually apply per URL and per HTTP method. For instance, a caller can have access to POST to /foo.xhtml but not to GET /foo.xhtml. As we’re going to use our utility method for navigation tests, GET is typically the right HTTP method to use, but we should be aware that sometimes we may need to test for another HTTP method.
With the helper bean in place, we can now easily check for access to a target resource on a view and alter the rendering based on that. To demonstrate this, we’ll first define three new web resource constraints in web.xml .
<security-constraint><web-resource-collection><web-resource-name>Bar</web-resource-name><url-pattern>/bar.xhtml</url-pattern></web-resource-collection><auth-constraint><role-name>bar</role-name></auth-constraint></security-constraint><security-constraint><web-resource-collection><web-resource-name>Foo</web-resource-name><url-pattern>/foo.xhtml</url-pattern></web-resource-collection><auth-constraint><role-name>foo</role-name></auth-constraint></security-constraint><security-constraint><web-resource-collection><web-resource-name>Baz</web-resource-name><url-pattern>/baz.xhtml</url-pattern></web-resource-collection><auth-constraint><role-name>baz</role-name></auth-constraint></security-constraint>
After these constraints have been defined we can render links to them with access checks on the enabled attribute.
<h:link value="Go to Bar" outcome="/bar"disabled="#{not security.hasAccessToWebResource('/bar.xhtml')}" /><h:link value="Go to Foo" outcome="/foo"disabled="#{not security.hasAccessToWebResource('/foo.xhtml')}" /><h:link value="Go to Baz" outcome="/baz"disabled="#{not security.hasAccessToWebResource('/baz.xhtml')}" />
Authenticating with a caller having, for instance, the roles “bar” and “foo”, but not “baz”, will result in the link to /baz being rendered as disabled.
Cross-Site Request Forgery Protection
Cross-site request forgery (CSRF) is an attack that lets users without their consent or even knowledge do a request to a site where they may possibly be logged in. Such request then has some side effect that in some particular way may be beneficial to the attacker.
For instance, suppose your bank has a URL of the form https:/example.com/transferAmount=4000&targetAccount=7836 which means “transfer 4000 euros from my account to the account with ID 7836.” In this statement the “my account” is being determined via the logged-in session (typically a cookie) that you have with your bank. Now an attacker might not be able to capture your session cookie, but that’s not necessary in this example if only your browser can be tricked into sending the https:/example.com/transferAmount=4000&targetAccount=7836 request from any other web site that you visit while you’re logged in to your bank in another tab or window, with the targetAccount parameter set to an ID of an account that the attacker controls. Note that in practice a GET request and request parameters would not likely be used, but POST and POST parameters would be used instead. However, for both the same basic vulnerability holds.
If we want to protect our application against receiving such malicious requests , then one of the ways to do so is including “something” (i.e., a token) in the request that is
Specific to a certain caller.
Expires after some time.
Can’t be easily guessed.
As it happens JSF already has something that fulfills all these three requirements, and that’s the javax.faces.ViewState hidden parameter that one finds within JSF forms.
Caution
There’s a caveat though, and that’s that this parameter only fully fulfills those requirements when using postbacks, state saving on server is used, and the view in question is not stateless. Only in that case is the value of javax.faces.ViewState effectively a token. Since this is the default, JSF is relatively safe out of the box here, but this protection is compromised as soon as we deviate from these defaults, for instance, by using stateless views. See also the section “Stateless Forms” in Chapter 4.
Next to this implicit CSRF protection , JSF also has explicit CSRF protection. This explicit CSRF protection adds a token for all cases, and additionally adds checks for the “referer” and “origin” HTTP headers . Note that HTTP headers should normally not be trusted for incoming requests, as they can be very easily spoofed. However, for this particular attack we’re not trying to defend against just any random HTTP request but specifically against requests sent from a trusted browser. The header checks are also in addition to the token check, and the token check must always pass first.
Defining which views should be protected by a CSRF token and the additional header checks happens in a way that’s somewhat similar to how we defined roles for views—a collection of URL patterns in a deployment descriptor. This time the deployment descriptor is faces-config.xml instead of web.xml though. The following gives an example for these entries in faces-config.xml:
<protected-views><url-pattern>/bar.xhtml</url-pattern><url-pattern>/foo.xhtml</url-pattern><url-pattern>/baz.xhtml</url-pattern></protected-views>
Note that the url-pattern here is the exact same pattern that is used in web.xml. One thing to be aware of here is that despite faces-config.xml being a JSF-specific deployment descriptor, the url-pattern here is again for the full URL relative to the application root which means it has to include all mappings used such as /faces/ and .xhtml.
Adding a faces-config.xml with the above shown protected-views fragment to the example application code we’ve been working on in this chapter will render the link on index.xhtml to, for example, /bar. xhtml in the following way:
/bar.xhtml?javax.faces.Token=gdMoNbfOycv2v80grAs can be seen, the javax.faces.Token request parameter has been added by JSF. The token is tied to the user’s HTTP session, so if the HTTP session expires, the token also expires. The token is cryptographically strong, meaning that it fulfills all three requirements for a CSRF protection token as stated above.
If the token is tampered (e.g., we use xxMoNbfOycv2v80gr instead of gdMoNbfOycv2v80gr), or is missing altogether (i.e., we request /bar.xhtml) JSF will throw a javax.faces.application.ProtectedViewException. In case the link originated from a stateless page, JSF applications can handle this exception by notifying the user and allowing to re-render the original page again. In the example above that would mean re-rendering index.xhtml. The genuine user would get a new CSRF protection token then, while an attacker will not get the expected side effect from the original request.
As mentioned, there’s a referer and origin header check as well. For this check, JSF checks whether the referer header, if available, is set to a URL that originates from the same application. To demonstrate this, consider a second JSF application with only an empty faces-config.xml and the following view:
<!DOCTYPE html><html lang="en"xmlns:="http://www.w3.org/1999/xhtml"xmlns:h="http://xmlns.jcp.org/jsf/html"><h:head /><h:body><h:outputLink value="http://localhost:8080/project/bar.xhtml?javax.faces.Token=gdMhNbfOycv2v80gr">test</h:outputLink></h:body></html>
Assuming our first application with the CSRF-protected bar. xhtml is deployed to http://localhost:8080/project, clicking the output link from this second application will cause the javax.faces.application.ProtectedViewException to be thrown again in the first application. Note that the referer is an optional check that’s only done when the referer header is actually present, as is the case with the link in the second application.
If we enter http://localhost:8080/project/bar.xhtml?javax.faces.Token=gdMhNbfOycv2v80gr directly into the address bar of a browser, or request it directly via a command-line utility such as wget or curl, there won’t be a referer and the request will be accepted.
In practice, a GET request has less value of being protected against CSRF attacks since these actually should be idempotent (should not have side effects and should only display data). Instead of shielding GET requests with CSRF protection tokens, it’s probably a far better idea to refactor an application to not have non-idempotent GET requests.
For postbacks the CSRF protection token works in much the same way though. To demonstrate, consider changing the /bar.xhtml view into the following:
<!DOCTYPE html><html lang="en"xmlns:="http://www.w3.org/1999/xhtml"xmlns:h="http://xmlns.jcp.org/jsf/html"><h:head /><h:body><h:form><h:commandButton value="Test" action="#{bar.submit}" /></h:form></h:body></html>
Rendering this page will result in the form target URL having the CSRF protection token applied to it in the same way as we saw for the GET requests—for example,
<form method="post"action="/project/bar.xhtml?javax.faces.Token=gdMhNbfOycv2v80gr" ...>
This is thus another difference with the implicit javax.faces.ViewState token, which is always a POST parameter.
Web Parameter Tampering Protection
Web parameter tampering is an attack against an application where an attacker modifies parameter values that are sent (back) to the server hosting the application. If the application doesn’t validate those values correctly, an attacker could gain more benefits than entitled to, or may get the opportunity to carry out additional attacks.
For example, suppose a web application renders a list of roles that can be assigned to another user, say “user,” “manager,” and “sales.” An attacker could attempt to modify the data posted back and change the selection of “user” into “admin.” If the server blindly accepts the input and “admin” is an existing value, this allows the attacker to give another user the “admin” role, even when the attacker is not privileged to do that.
JSF has an implicit protection against a subset of this attack; namely, against values being posted back from a selection (specifically, from UISelectOne- and UISelectMany-based components). This works by JSF either restoring the view from javax.faces.ViewState after a postback (when full state saving is used) or re-creating it (when partial state saving is used). Only values that were also rendered are accepted. The usual caveat applies though, and that’s that with partial state saving, the data bound to the component needs to be identical before and after the postback. This, however, can easily be accomplished by using the view scope.
To demonstrate, consider the following view:
<!DOCTYPE html><html lang="en"xmlns:="http://www.w3.org/1999/xhtml"xmlns:h="http://xmlns.jcp.org/jsf/html"xmlns:f="http://xmlns.jcp.org/jsf/core"><h:head /><h:body><h:form><h:selectOneMenu value="#{bean.selected}"><f:selectItems value="#{bean.available}" /></h:selectOneMenu><h:commandButton value="Select" /></h:form><p>Chosen value: #{bean.selected}</p></h:body></html>
And the following backing bean:
@Named @RequestScopedpublic class Bean {private List<String> available = Arrays.asList("foo", "bar", "kaz");private String selected;public List<String> getAvailable() {return available;}public String getSelected() {return selected;}public void setSelected (String selected) {this.selected = selected;}}
Choosing, for example, “bar” and clicking “select” will render “Chosen value: bar,” as expected. Changing the value being sent can be done in various ways, for instance via an intercepting proxy like Burp Proxy or by editing the live source via the developer tools from a browser such as Chrome.
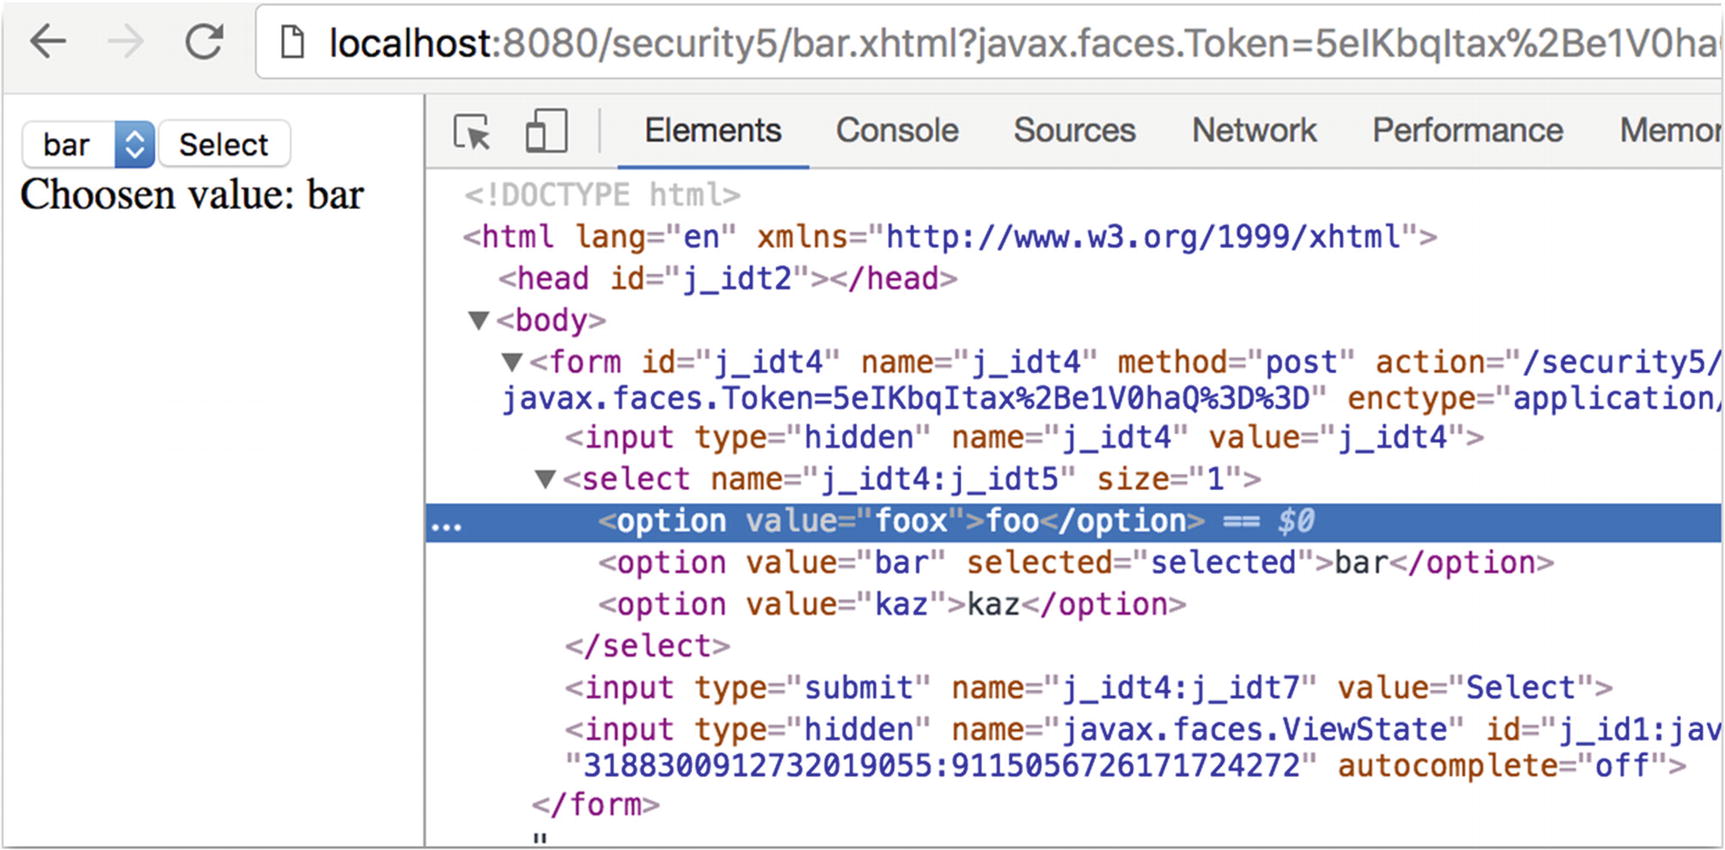
Figure 13-1 Tampering the selected value in HTML source code
Selecting the “foo” entry after the change as shown in Figure 13-1 and clicking the select button again will cause the “foox” value to be sent to the application. This value will be rejected by JSF and as a result “Chosen value:” will be rendered, indicating that our tampered value indeed has not been accepted.
Cross-Site Scripting Protection
Cross-site scripting or XSS is an attack that has a couple of variations, but practically it boils down to a web application rendering data that it got from (other) users directly as part of the markup sent to the client. If this data itself contains scripting code (typically JavaScript), the browser may execute it blindly, allowing the attacker to read, for example, cookie data and to send that over to a server controlled by the attacker.
JSF provides protection against this type of attack by having contextual output escaping enabled for many common contexts. The most common context is writing out HTML, where all JSF’s output writers by default XML escape their output.
To demonstrate, consider the following backing bean :
@Named @RequestScopedpublic class Bean {private String value = "<script>alert('hi')</script>";public String getValue() {return value;}}
The value instance variable contains a script that we don’t want the browser to execute. In this example it’s hard-coded, but in practice it could come from stored data in, for example, a database.
Now we’ll render this value using two simple default constructs of JSF: a direct expression language expression on a Facelet and the <h: outputText> component .
<!DOCTYPE html><html lang="en"xmlns:="http://www.w3.org/1999/xhtml"xmlns:h="http://xmlns.jcp.org/jsf/html"xmlns:f="http://xmlns.jcp.org/jsf/core"><h:head /><h:body><p>#{bean.value}</p><p><h:outputText value="#{bean.value}" /></p></h:body></html>
When requesting this view and looking at the HTML source, we’ll see that both times the value has been rendered as “<script>alert('hi')</script>” (i.e., in an escaped form that the browser won’t execute).
In case we explicitly don’t want this escaping to be done, the escape attribute of <h:outputText> can be set to false. For example,
<h:outputText value="#{bean.value}" escape="false" />Requesting the view again with the above component on it will cause a JavaScript alert to appear to be saying “hi.” Had this been malicious code being input by an attacker, the security of the client’s system would have been compromised. The escape attribute should therefore only be used with the utmost care.
Output for usage in URLs is escaped as well, but there it’s escaped differently, since it’s a different context. To demonstrate, consider adding the following component to the view:
<h:link outcome="/foo">Go to foo<f:param name="param" value="#{bean.value}" /></h:link>
After requesting this view, we’ll see the link has been rendered as
<a href="/project/foo.xhtml?param=%3Cscript%3Ealert%28%27hi%27%29%3C%2Fscript%3E">Go to foo</a>
What has happened here is that our original value has been escaped for usage as a URL parameter using URL encoding, which as can be seen is different from XML escaping, hence the term "contextual output escaping."
Related to XSS protection, sensitive cookies that the application uses should be set to HttpOnly, meaning they’ll be sent to the server with each request but can’t be read by scripts on the client. For the session ID cookie this can be done in web.xml as follows:
<session-config><cookie-config><http-only>true</http-only><secure>true</secure></cookie-config></session-config>
Note that the cookie is set to "secure" as well here. This is not related to XSS, but sets that the cookie is to be sent only when HTTPS/SSL is used. This protects the cookie from being eavesdropped (e.g., on a shared WiFi network). Since development often happens over HTTP using localhost, such a setting may be problematic for development purposes. If this is the case, then alternatively the cookie can be set to secure or not using ServletContext#getSessionCookieConfig() in a ServletContextListener
@WebListenerpublic class ApplicationConfig implements ServletContextListener {@Overridepublic void contextInitialized(ServletContextEvent event) {if (...) {event.getServletContext().getSessionCookieConfig().setSecure(false);}}}
where “...” is an application-specific check to see if it’s running in “dev mode.” You could even use JSF’s own Application#getProjectStage() for this.
Source Exposure Protection
Source exposure in the context of server-side web applications refers to the unwanted disclosure of parts of the web application’s source. This is a security risk, not only because of the exposure of the source itself (which may be a trade secret) but also because it may give an attacker insight on which to base follow-up attacks (the source may contain references to other systems, beans, or even comments with passwords, although those kinds of comments should of course not be there to begin with).
Due to a number of somewhat perhaps unfortunate design choices in the past, JSF has some specific vulnerabilities here, which mostly concern how URL mapping is done but also concern the location of resource files. To understand this vulnerability we first explain how JSF mapping and the FacesServlet work.
The main entry into every JSF application is the FacesServlet. This is a Servlet provided by the JSF framework that acts as a so-called front controller through which all JSF requests are routed.
A request to a JSF view such as foo.jsf will thus first need to go through this Servlet, which will then in some way locate the definition of the tree of components that represent the view foo.jsf. We’ll call this actual definition the “physical resource.” Out of the box, JSF supports two types of physical resources: Facelets and JSP files with the extension .xhtml, .view.xml, and .jsp. Note that JSP files are largely deprecated.
In order for the FacesServlet to be able to handle all these requests it has to be mapped to one or more URL patterns that capture them. To be able to do this, JSF supports prefix, suffix, and exact mapping.
If no explicit mapping in web.xml is specified and a recognized JSF artifact is found in the application (such as an empty faces-config,xml or the @FacesConfig annotation) then the FacesServlet is automatically mapped. Since JSF 2.1 and Servlet 3.0 this automatic mapping is to the following patterns:
/faces/* (prefix mapping)
*.jsf (suffix mapping)
*.faces (suffix mapping)
Since JSF 2.3 this also includes:
*.xhtml (suffix mapping)
Especially older (existing) JSF applications still explicitly map the FacesServlet in web.xml, which then looks for example as follows:
<servlet><servlet-name>facesServlet</servlet-name><servlet-class>javax.faces.webapp.FacesServlet</servlet-class></servlet><servlet-mapping><servlet-name>facesServlet</servlet-name><url-pattern>/faces/*</url-pattern><url-pattern>*.jsf</url-pattern></servlet-mapping>
In suffix mapping and when using Facelets, the FacesServlet will first try to locate the physical resource with the same path and name as the requested resource, but with the suffix replaced by .xhtml. For example, a request for /path/foo.jsf will result in a lookup for the file /path/foo.xhtml.
With prefix mapping, the FacesServlet will try to locate the physical resource with the same name and path as the requested resource, but minus the prefix path. For example, a request for /faces/path/foo.xhtml will result in a lookup for the file /path/foo.xhtml.
This, however, may introduce a security issue that will result in exposure of the Facelet source code. Namely, the lookup for /path/foo.xhtml is done in the web root of the WAR in which the FacesServlet resides. Unless otherwise (implicitly) mapped, every file in the web root is directly accessible for download. In this case, if /path/foo.xhtml is directly requested instead of /path/foo.jsf or /faces/path/foo.xhtml this request will not go through the FacesServlet and returns the bare Facelets source code of that page instead of the rendered markup.
There are two ways to prevent this exposure of source code .
Map the FacesServlet directly to *.xhtml
Add a security constraint to web.xml
Mapping the FacesServlet directly to *.xhtml may be the most natural solution. With this mapping, the requested resource is identical to the physical resource. If /path/foo.xhtml is requested, then the FacesServlet will try to locate /path/foo.xhtml. Via this mapping, there is no second path to reach the Facelets source and hence no risk of exposing it.
Side note: being able to use *.xhtml mapping was a new feature in JSF 2.0. Doing this in JSF 1.x resulted in an infinite loop.
To map the FacesServlet to *.xhtml, the easiest way is to rely on the default mapping of JSF 2.3 as explained above. If this is not possible for some reason, add the mapping to the FacesServlet mapping in web.xml as shown in the following code:
<servlet-mapping><servlet-name>facesServlet</servlet-name><url-pattern>/faces/*</url-pattern<url-pattern>*.jsf</url-pattern><url-pattern>*.xhtml</url-pattern></servlet-mapping>
As an alternative, a security constraint can be defined that prevents access to *.xhtml resources. There is rarely a good reason to prefer this over the simpler *.xhtml to *.xhtml mapping, but for completeness, this can be done as follows:
<security-constraint><display-name>No access to Facelets source</display-name><web-resource-collection><web-resource-name>XHTML</web-resource-name><url-pattern>*.xhtml</url-pattern></web-resource-collection><auth-constraint /></security-constraint>
A special case of exposing Facelets source code happens with composite components. Composite components are components that are implemented via a Facelet instead of a Java class. By convention, they have to be placed in a directory inside a directory named /resources that resides in the web root—for instance, /resources/bar/foo.xhtml. This will make a component “foo” available in the namespace “ http://xmlns.jcp.org/jsf/composite/bar ”.
Components are of course not views and the user should not be able to request those directly. Unfortunately, /resources is not in any way a special directory to Java EE. JSF assigns a special meaning to it by convention, but to the Servlet container it’s a directory like any other. This specifically means there’s no protection applied to this and any user can directly request resources from it. In other words, this directory is “world readable.” Even with an *.xhtml mapping, this not only allows the user to guess which components we have but lets the user attempt to execute those as well. Clearly this is not what we want.
There are again two solutions for this:
Configure another directory to be the JSF resources directory
Add a security constraint to web.xml
In JSF 2.2 a method was introduced to address this security vulnerability. Namely, via the javax.faces.WEBAPP_RESOURCES_DIRECTORY context parameter another directory can be configured to be the JSF resources directory instead of /resources. For example,
<context-param><param-name>javax.faces.WEBAPP_RESOURCES_DIRECTORY</param-name><param-value>WEB-INF/resources</param-value></context-param>
Note that the path is relative to the web root and may not begin with a “/”.
Alternatively, or for JSF 2.0/2.1, a security constraint can be configured in web.xml again that prohibits caller access to /resources. This can be done in a similar way as protecting for *.xhtml access.
<security-constraint><web-resource-collection><web-resource-name>resources</web-resource-name><description>The resources directory</description><url-pattern>/resources/*</url-pattern></web-resource-collection><auth-constraint /></security-constraint>