6. Vector Brushes
In addition to the other amazing drawing tools (shapes, pen, pencil, lines), Illustrator provides lots of different brush tools.
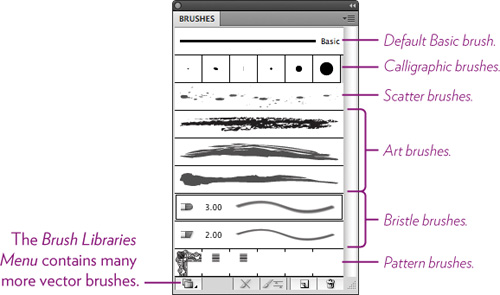
Most of Illustrator’s brushes are what we describe as path brushes; they draw vector paths to which you can assign different brush effects. These include Calligraphic Brushes, Scatter Brushes, Art Brushes, Bristle Brushes, and Pattern Brushes. If you want to change a brush effect, just select the path and choose another effect. This chapter discusses the most commonly used ones.
The Blob brush, however, doesn’t create a path like the other brushes; it draws brush shapes that are filled with color. This brush has some unique characteristics that make it a particularly powerful and fun tool to use.
Vector brushes
Most of the brushes in Illustrator are brush effects that are assigned to paths. You can apply brush effects to existing paths, or select a brush effect and then create a path for it. The Brushes panel shows you a sampling of the different types of path-based brushes (which doesn’t include the Blob brush).
Task 1 Add brushes to the Brushes panel
Add different brush effects to the Brushes panel before you start playing so you have lots to choose from.
1 To open the Brushes panel, choose Window > Brushes.
2 Click the Brush Libraries Menu in the bottom-left corner of the panel, then choose a library. It opens in its own floating panel.
3 Click a brush in the chosen library panel to make it appear in the Brushes panel.
Once a brush is in the Brushes panel, you can double-click its thumbnail to open its “Brush Options” where you can adjust its specific settings, such as diameter (size), roundness, and angle.
Task 2 Apply artistic brush strokes to paths 
You can apply brush effects from different libraries to existing paths. Or you can first select a brush effect from a library, and then draw a path with that effect using the Paintbrush tool.
Apply a brush effect to an existing stroke
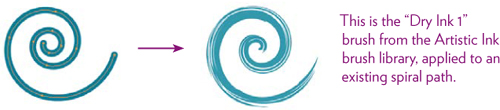
1 Select an existing stroke that you created in a previous task (below, left), or draw one now (the spiral brush, as used in the example below, is explained on pages 46–47) and make sure it is selected.
2 Open the Brushes panel (Window > Brushes).
3 Open a brush library: Click the Brush Libraries menu in the bottom-left corner of the Brushes panel, then choose a library.
4 In the floating panel of the library that you chose, select one of the brush thumbnails.
The effect is applied to the selected path, shown below-right.
Tip
If you selected a brush effect and nothing happened to your path, that’s because the path wasn’t selected. Make sure to select it, then try again.
Choose a brush effect first, and then draw a path
1 Follow Steps 2–4, above (except the effect will not be applied yet).
2 Choose the Paintbrush tool. Make sure nothing on the page is selected.
3 From the Control panel, choose a stroke weight of at least 6 points, and choose a stroke color. If there is a color fill chosen, change it to None.
4 Drag to create paths, such as the handlettering shown below.
Task 3 Explore the Calligraphic brushes
Calligraphic brushes are styled after the brushes used in calligraphy, the art of decorative handwriting. Calligraphy brushes and pens are usually flat and held at an angle to produce strokes with pronounced variations in the thicks and thins of the letterforms.
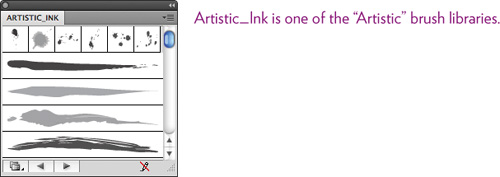
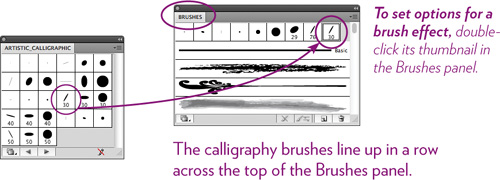
1 In the bottom-left corner of the Brushes panel, click the Brush Libraries icon, choose “Artistic,” then choose “Artistic_Calligraphic.”
2 Choose one of the brush tip thumbnails in the “Artistic_Calligraphic” panel, as shown below. When you choose a calligraphy brush from a library, its icon is added to the top of the Brushes panel.
3 Choose the Paintbrush tool, then draw the numerals 1, 2, and 3, as shown below. Depending on the brush tip you chose, the settings you gave it, and how you draw the numbers, your calligraphy surely looks very different from this example (yours probably looks better, darn it).
4 If your drawn numbers aren’t as smooth as you would like, change their smoothness settings (the Paintbrush or the Pencil tool). This doesn’t smooth the existing stroke—it only affects the strokes you are going to draw.
To smooth the settings, double-click the tool in the Tools panel to open its “Tool Options” dialog box. Change the “Tolerance” settings to larger values (larger equals smoother).
Task 4 Edit existing brush effects
The brush effects act as style sheets in that you can edit the effect at any time and the results are automatically applied to all strokes in the document that use that effect. You can choose to have the edits apply only to new strokes if you don’t want to affect the ones on the page, but it’s important to understand this powerful feature so it doesn’t surprise you!
Apply new brush settings to all existing strokes
1 Apply a brush effect to several strokes, as explained in previous tasks.
2 In the Brushes panel, double-click the thumbnail of the effect you used in Step 1. This opens a “Brush Options” dialog box, as shown below. Experiment with the options; click the “Preview” button to see the effects on the page. Be sure to give it a name so you can find it again.
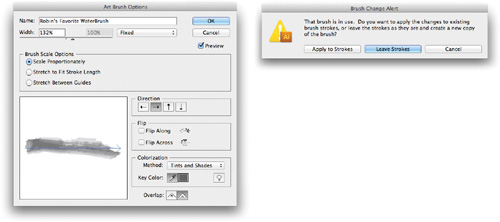
3 When you click OK, you are asked if you want to apply these changes to existing brush strokes. This does not mean to existing brush strokes that are selected, but to every stroke in the document that uses this effect. If you don’t want that to happen, choose “Leave Strokes,” and the changes you made are added to the Brushes panel as a new effect, but nothing on the page, even if it was selected, is changed.
Edit just one object that has a brush effect applied
• Select a path or paths, then click the Options of Selected Object button at the bottom of the Brushes panel (shown below).
A limited version of the “Brush Options” dialog box opens. Change any settings you like, click OK, and the changes are applied only to that path (or paths) that were selected.

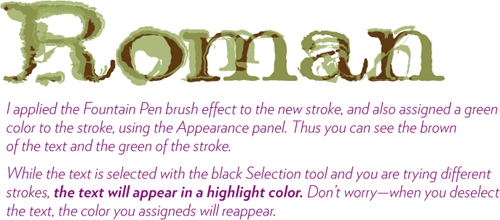
Task 5 Apply a brush effect to text
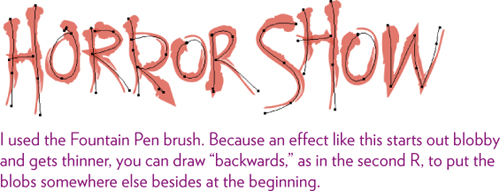
For a unique text effect, apply brush effects to text. This works best on large text, such as headlines and display type.
1 With the Type tool, create and format a line of text, such as your name (see Chapter 10 to learn all about creating text).

2 With the black Selection tool, select the text.
3 Open the Appearance panel (Window > Appearance).
4 In the Appearance panel, click the Add New Stroke button in the bottom-left corner of the panel (shown below).
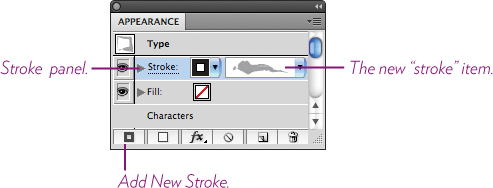
5 Open the Brushes panel and choose a brush effect.
If you don’t like the effect, try other brushes until you like the results. You can choose brushes from the Brushes panel, or from any open brush library panel, or from the Stroke pop-up menu in the Appearance panel (above).
You can also change the text at any time, its point size, color, font, etc. Use the Type tool to make those changes.
6 To change settings for that stroke, double-click a stroke thumbnail in the Brushes panel (but see the previous page to understand what it will do). Click the “Preview” checkbox to see live updates of the effect as you experiment with different settings.
7 You may need to change the fill or stroke color to get results you like.
The fill color affects the text: To change the fill color, you must select the text with the Type tool, and then change its color. (Experiment with a fill color of None so all you see is the stroke.)
The stroke color affects the brush effect that’s applied to the text: To change the stroke color, select the text with the black Selection tool, then choose a different effect or double-click on the brush effect in the Brushes panel.
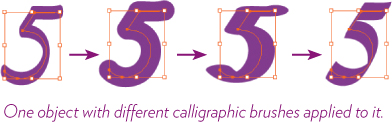
Task 6 Preview various brush effects
1 Draw a path with any tool. I used the Paintbrush tool to draw the numeral 5 in the example below.
2 Select the path with either the white or black Selection tool.
3 Choose a brush from a brush library panel or from the Brushes panel. The path updates immediately to show the applied brush effect.
4 Click again on another brush effect. The selected object discards the previous brush effect and displays the current one. You can preview as many effects as you like in this way.
5 To remove a brush effect from a stroke, select the stroke, then click the “Remove Brush Stroke” icon at the bottom of the Brushes menu.

6 Every time you click a brush to see how it looks when applied to the selected object, the brush is automatically added to the Brushes panel. After you spend a while previewing effects, you’ll have more brushes in your Brushes panel than you want.
To remove unwanted brushes from the Brushes panel, select them, then click the Trash button in the bottom-right corner of the panel.
To remove all brush effects you haven’t used, go to the Brushes panel menu and choose, “Select All Unused.” Now click on the Trash icon.
Tip
When you add a brush stroke effect to text, the text is still editable. When you add effects to paths, the path is still editable, and you can change the effect at any time.
Task 7 Take arrows to a new level
How long do you think it takes to create an arrow/spaghetti illustration like the one below? The correct answer is thirty seconds or less, because the Brushes Library Menu includes an Arrows Library collection. But seriously, unique and beautiful arrows can be useful design tools.
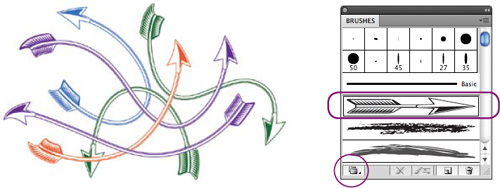
1 In the Brushes panel, click the Brush Libraries Menu button in the bottom-left corner. Choose “Arrows,” then choose “Arrows_Special”; a floating panel of arrows appears.
2 Click the arrow style you want to use. It appears in the Brushes panel (shown above, right).
3 Select the Paintbrush tool in the Tools panel, then drag to draw a path of any shape. When you release the mouse, the arrow style you selected stretches the length of the path.
You can also apply an arrow stroke to paths drawn with the Pen tool, the Pencil tool, the Line Segment tool, and even the shape tools.
If the arrow curves aren’t as smooth as you’d like, double-click the Paintbrush tool or the Pencil tool in the Tools panel and change the “Tolerances” settings to larger values. Then draw again.
4 To add color to selected arrow paths, click the Stroke Color pop-up panel in the Control panel and choose a color swatch.
Task 8 Create your own arrow brush
1 Create a long, narrow, artsy arrow.
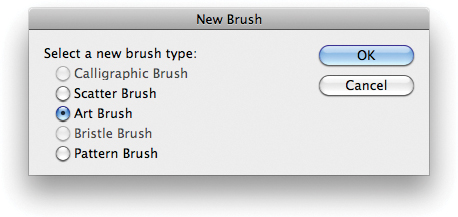
2 Drag the art into the Brushes panel. In the dialog box that opens, choose “Art Brush.”
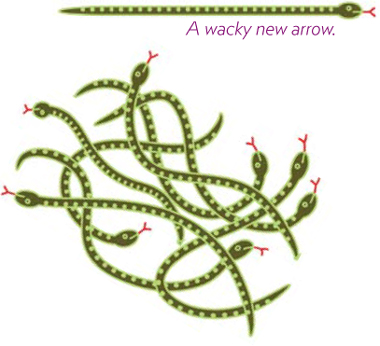
3 With the new custom art brush selected in the Brushes panel, choose the Paintbrush tool in the Tools panel, then drag to draw arrows.
Task 9 Throw paint on the screen with your custom brush
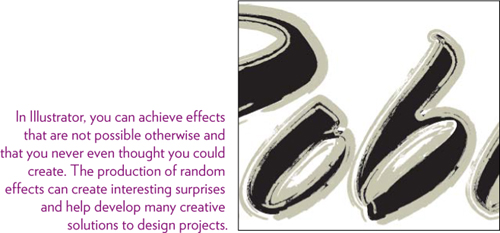
As if the built-in options weren’t enough, you can make a brush out of anything and then use it to throw paint around. Here’s one example, and then take yourself on a Discovery Tour to uncover more possibilities!
1 Select the Pencil tool in the Tools panel and draw a horizontal, scribbly shape. Use the default black stroke and no fill color (below, left).
2 Swap the Fill and Stroke colors: Press Shift X (below, right).

3 Drag the black shape into the Brushes panel.
4 In the “New Brush” dialog box that opens (below), select “Art Brush,” then click OK.
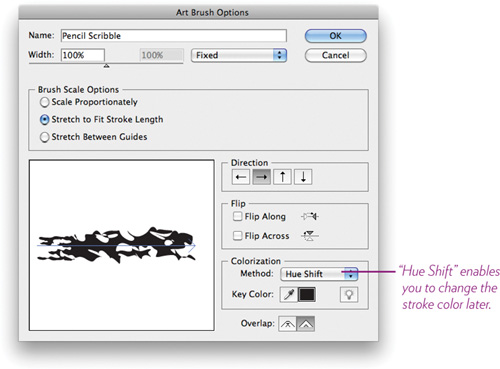
5 In the “Art Brush Options” dialog box that opens, name the brush stroke and experiment with the various settings (below).
The preview pane shows how the settings affect the stroke.
To enable you to recolor the stroke later, make this change: In the “Colorization” section, click the “Method” pop-up menu and choose “Hue Shift.”
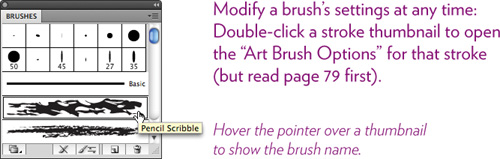
6 Click OK. A thumbnail for the new brush stroke is added to the Brushes panel (shown below).
7 With the new brush stroke selected in the Brushes panel, choose the Paintbrush tool.
Draw a curvy path (or any kind of path). The new brush stroke effect is applied to the path.

8 Draw a star with the Star tool (hidden under the Rectangle tool), then while it is still selected, choose the new brush effect.
Draw a shape with the Ellipse tool (also hidden under the Rectangle tool). Select it (if it isn’t already) and choose the new brush effect.
You can always (even next week or next year) select the path and change the stroke, color, brush options, etc.
Note
Calligraphy (and just about any drawing task) is approximately one gazillion times easier if you use a pressure-sensitive tablet. The difference is dramatic. Drawing with a mouse (or even with your finger on a trackpad) is extremely challenging, so do not judge your ability to draw in Illustrator based on how well you draw with a mouse.
Task 10 Splatter art shapes with the Scatter brush
Scatter brushes use vector artwork objects as paint and splatter multiples of them on a path. You control the effect with your settings in the “Scatter Brush Options” dialog box.
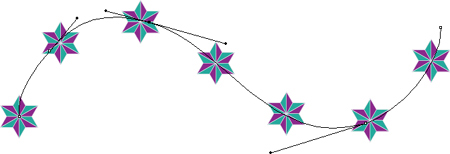
1 In the Brushes panel, click the Brush Libraries Menu button in the bottom-left corner, then choose Decorative > Decorative_Scatter.
Single-click the “Star 3” preset in the Decorative_Scatter panel (below, left) to place that selection in the Brushes panel (below, right).
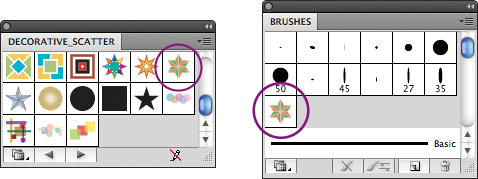
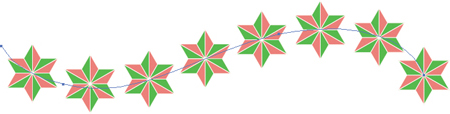
2 Choose the Paintbrush tool and draw a path. The “Star 3” brush effect is applied to the path (below).
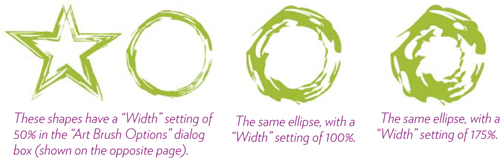
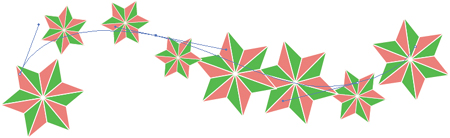
The default settings for the “Star 3” brush are set to “Fixed,” meaning there is no variation in the star sizes, spacing, scatter, or rotations, as you can see in the example. But you can change that.
3 To change the “Star 3” brush settings, double-click the brush thumbnail in the Brushes panel to open the “Scatter Brush Options.”
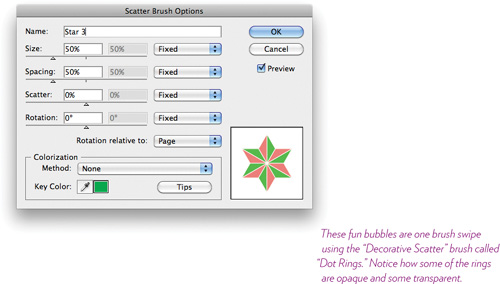
4 Click the “Preview” checkbox so you can see the effect of the changes as you make them. Change any of the “Fixed” options to “Random.” This gives each slider two control knobs instead of just one.
Experiment and adjust the attribute sliders until you like the results, then click OK. Draw again with the Paintbrush.
Task 11 Create your own Scatter brush
In addition to the many preset brushes available, you can create your own brush with your own artwork.
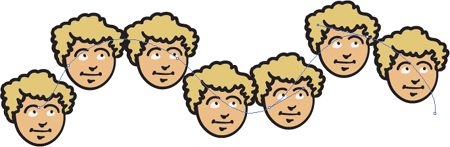
1 Select an art object (below I used the face that you’ll create with the Blob brush later in this chapter). Marquee around the object to make sure all paths are selected, then drag the object into the Brushes panel.
2 Select the Paintbrush tool and draw a path. Your object fills the path. To modify how the Scatter Brush renders the artwork on a path, follow the instructions in the previous Task 10, Steps 3 and 4.
Task 12 Modify an existing art brush
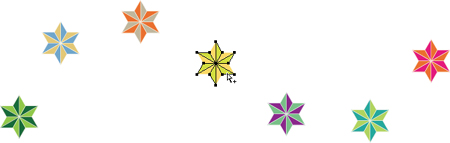
1 Choose the Star 3 brush (from Task 10) and drag it out of the Brushes panel, into your document.
2 Assign different colors to the shapes in the star, then drag the artwork back into the Brushes panel.

3 Select the Paintbrush tool, then draw a path. The modified brush shape is applied to new paths as you draw them.
Task 13 Expand a brush path to customize the art
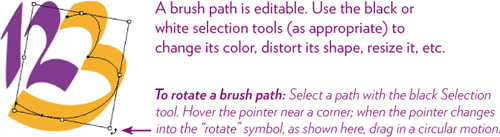
After you create a brush stroke along a path, you might want to modify just part of the path. But the artwork that’s assigned to a path is not editable until you expand the path.
When you expand a path, the artwork on the path is converted to outlines and the path itself is removed and can no longer be manipulated. The shape (or shapes) that populate the path, however, are now fully editable.
1 Use the black Selection tool to select a brush path, such as one of the star Scatter Brush paths you made on page 86.
2 Choose Object > Expand Appearance.
The editable path itself disappears, and the shape (or shapes) assigned to the former path are now editable.
3 Use the white Direct Selection tool to select individual shapes. You can change the colors, select specific anchor points or direction handles to alter a shape’s appearance, enlarge or reduce their individual sizes, move them around, etc.
The Blob brush 
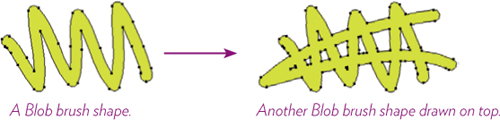
Indescribable . . . indestructible! Once you start using it you can’t stop! Actually, this brush is kinda freaky. It draws blobby shapes (not paths) that have a fill and no stroke. If you draw on top of another shape that has the same fill color (and no stroke), the top brush stroke is merged with the existing, underlying shape.
The Blob brush works great with a pressure-sensitive tablet—you can apply pressure to vary the stroke widths, which creates a nice calligraphic effect.
Task 14 Draw blobby shapes
Draw with the Blob brush as you would a real brush. Play with the brush for a few minutes, and then (on the opposite page) check the options you can set.
Important Note
Make sure the Stroke Color box is None, otherwise the blob will draw with the Stroke Color, then switch that color to the Fill Color box, and you will go crazy trying to figure out what color it plans to use. So just always make sure the stroke is None.
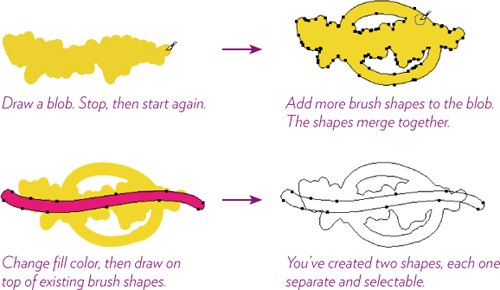
1 Select the Blob brush, then drag to draw a funny shape.
2 Drag again, using the same color, and cross the first blob you did.
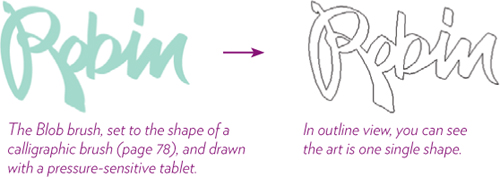
If you look at the Outline view (from the View menu), you see the two blobs are actually one shape.
3 So now choose a different fill color (make sure the stroke color is None), then drag across the other blobs. Notice that the new strokes do not merge with Blob brush shapes that have different colors.
Tip
To deselect a shape you just created, hold down the Command key (PC: Control key) and click in a blank spot. After you click, you still have the Blob brush.
Task 15 Customize the Blob brush options
As with many of the drawing tools, much of the brush behavior is determined in its options dialog box, so let’s look at that.
1 Double-click the Blob brush tool in the Tools panel to open the “Blob brush Tool Options” dialog box, shown below.
2 Choose or adjust the following options:
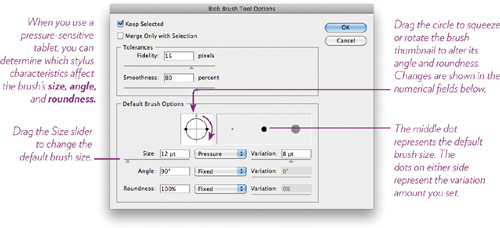
Keep Selected: This option makes all shapes stay selected and you can see their points, even as you add to them by drawing on top (see the yellow example on the opposite page). This makes it easy to see all parts of a merged path.
Merge Only with Selection: Blob shapes will merge only with selected blob shapes of the same color. This includes the previous shape if you’ve chosen the “Keep selected” option, or other blob shapes of the same color that you manually select. This option gives you more control of what gets merged into one shape.
Fidelity: This determines how far your mouse/stylus moves before new anchor points are created. A higher value creates smoother, less complex shapes.
Smoothness: Controls how much automatic smoothness is applied to brush strokes. A higher number adds more smoothness, but adds more distortion to the original shape.
Default Brush Options: These controls let you change the shape of the brush and set a brush size, angle, and roundness.
Task 16 Draw a blobby face
Select the Blob brush and draw a simple face, vaguely similar to the one below.
1 If you select the hair shape (below, center), you can see that it is merged with the face outline shape. The two shapes are merged because the Blob brush touched the face shape as you drew the hair. The eyes, nose, and mouth are not merged with the hair, or with each other, because they didn’t touch each other as they were being drawn.
2 To make minor changes to the drawing, you can select a shape with the white Direct Selection tool, then drag anchor points around.
3 But for major changes, it’s easier to erase part of the drawing and redraw it: Select the Eraser tool in the Tools panel, then drag across the parts of the drawing you want to revise (below, right).
4 Select the Blob brush again and draw the missing parts back in. As long as the fill color is the same, the new brush stroke shapes will merge with the existing shape.
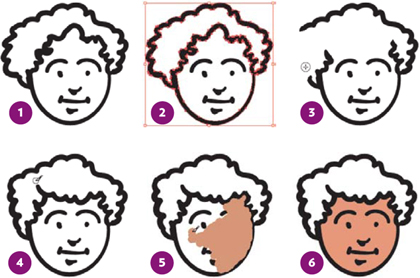
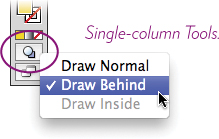
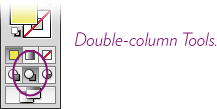
5 To paint the inside of the face, switch to “Draw Behind” mode: At the bottom of a single-column Tools panel, click the Drawing Mode icon, then choose “Draw Behind.” At the bottom of a double-column Tools panel, click the “Draw Behind” icon.
Select a color for the face, then use the Blob brush to paint the area. It appears as if you’re covering up the other shapes!
6 When you let go, the color snaps behind the black shapes. Make sure the black shapes overlap the color shape.
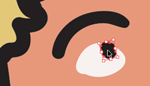
7 With the “Draw Behind” mode still selected, choose a light color and paint the whites of the eyes.
Aha—the white went all the way behind, right? While the eye shape is still selected, bring it forward until it’s in the right place: Use the keyboard shortcut Command ] (PC: Control ]). That is, hold down the Command/Control key and tap the ] key until the white of the eye is beneath the black pupil (to send it back, use the Command/Control key and the left bracket, [ ).
If you lost a shape under another shape, hold down the Command key (PC: Control key) and click where you know the object is hiding. Each time you Command/Control click, you reach down through another layer.
8 Now paint inside the hair: Make sure everything is deselected, and choose a fill color (stroke should still be None). You should still be in “Draw Behind” mode. If you brush into an inappropriate area accidentally, erase it with the Eraser tool.
9 Your artwork should now look similar to the example below, right. Each of the color shapes can still be selected independently, since separate colors aren’t allowed to merge.
Tip
Resize your brush on the fly: Press the [ to reduce the brush or ] to enlarge the brush.
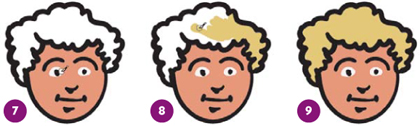
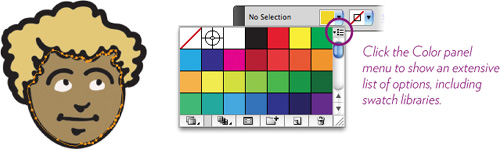
9 Change the color of the face: Use either the white or the black Selection tool to select the face color shape (below, left), then choose a color from the Fill Color pop-up panel in the Control panel.
The exact color you want to use is probably not in the pop-up Color panel. You can create a custom color (see Chapter 11). Or double-click on the color fill box in the Toolbar; this opens the Color Picker, from which you can choose a color (also see Chapter 11).
10 Remember, Blob brush shapes are selectable and editable, like any shape. You can move or scale entire shapes, and you can select individual anchor points to edit the shape. I used the black Selection tool, below, to reposition the pupils of the eyes.
Tip
You can merge Blob brush shapes with paths created by other tools. Just make sure the other artwork has no stroke, and choose exactly the same fill color for the Blob brush (the Eyedropper tool is handy for that; see Chapter 11).
Tip
Actually, you can put a stroke on a blob, if you like, after you draw it. Experiment with the brush for a while, using the following pages as a guide, and then try adding some of the brush effects you learned about on pages 79–82.
Task 17 Try this!
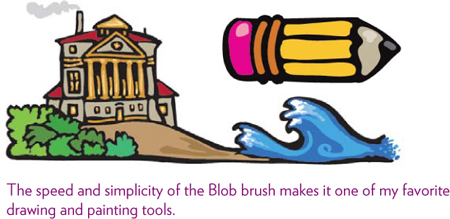
A simple Blob brush technique I often use is shown below. Try it with any subject matter, such as an apple, a ball, or a pencil (yeah, good idea . . . a pencil!). The looseness that’s achieved (and unavoidable) with this technique has an appeal that a more controlled drawing technique might not have. Let’s title this painting UFO Sighted Near Art Institute.
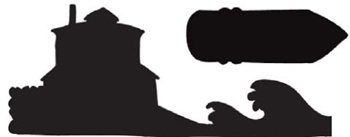
1 Start by painting a black silhouette with the Blob brush. If you want to change the shape at any point, use the Eraser tool, erase the part that doesn’t work, then redraw where necessary (see page 92, Steps 2 and 3). As long as you use the same fill color, the brush shapes will merge together.
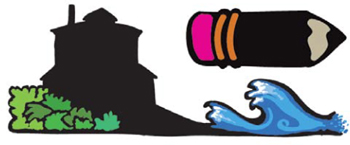
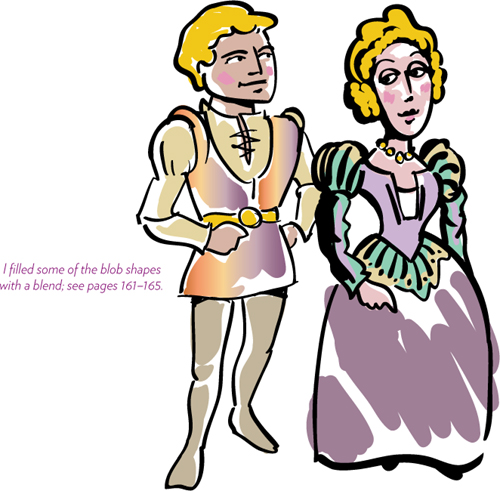
2 Next, choose different fill colors and paint primitive shapes on top of the black. At any time you can select shapes to change their fill color, or delete shapes and re-paint them. These examples use flat colors to fill the shapes, but you can also use gradients (see Chapter 11).
Try this!
Create a poster of the alphabet in your language, each letter using a different brush technique (as well as other things you’ve learned in this book). Spend some time to explore the possibilities beyond the basics in this chapter—multiply effects, create crazy strokes, etc. Don’t skip any letters—it is in the process of pushing yourself that you will go beyond the easy solutions and truly explore the possibilities. If you’re in a class, share what you learned with your classmates. Even if your letterforms are not award-winning, you will learn so much about working in Illustrator in the process of creating them.