11. Color and Gradients
How amazing it is to have unlimited colors just a click away. And control such as has never before been seen on Earth. Illustrator provides you with an amazing amount of control over accessing, creating, organizing, and managing color groups, color libraries, global colors, CMYK and RGB, custom gradients, color harmonies, and more.
Ways to apply color
When you select a color, it is applied to the active attribute of the selected object—either the fill or stroke attribute, whichever is the foremost icon in the Tools panel, below (or Color panel, shown opposite). This is really important to understand and hard to remember. We’ve been selecting colors for many years and still forget to choose the attribute first—we constantly end up surprised at what changed color. Sheesh.

Task 1 Use the Color Picker to apply a color
1 Open the Color Picker: Double-click the fill or stroke color box in the Tools panel or in the Color panel.
2 To change the hue (the color) in the color field on the left, drag the sliders or click inside the vertical color spectrum bar.
Drag the circular marker in the color field to change the hue’s saturation (more or less color, drag left and right) and brightness (more or less white, drag up or down).
3 Click OK to place the new color in both the Tools panel and the Color panel.
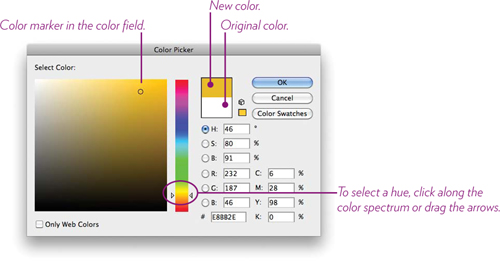
If you know the numerical values of the color you want to use, type them into the appropriate color model fields. The color models are HSB (Hue, Saturation, Brightness, useful for adjusting colors, as above), RGB (Red, Green, Blue, for screen graphics), and CMYK (Cyan, Magenta, Yellow, Black, for print graphics).
Task 2 Use the Swatches panel to apply color
The Swatches panel is where you choose most colors, because it’s where you also collect colors to use in a project. See pages 152–156 for lots more about the Swatches panel.
• Select an object, then click a color swatch in the Swatches panel. The swatch color is applied to the object’s active attribute (either the fill or the stroke, as explained on the opposite page).
• Or drag a color from the Swatches panel and drop it on top of an object, even if it’s unselected. The color is applied to the object’s active attribute.
Task 3 Use the Color panel to apply color
The Color panel provides sliders to edit a color. This panel allows you to choose an attribute (the fill or stroke) to make it active.
1 Open the Color panel: Choose Window > Color.
2 Drag the color sliders to edit the current color.
Or click in the spectrum bar to select a general hue, then modify the color with the sliders.

3 To add a color to the current Swatch collection, drag the fill or stroke color box from the Color panel and drop it in the Swatches panel.
Or click the Color panel menu in the top-right corner of the panel; choose “Create New Swatch.” In the “New Swatch” dialog box (below), you can edit the color, name it, and choose a color model.

Note
“White” is opaque. “None” is not white—it’s transparent.
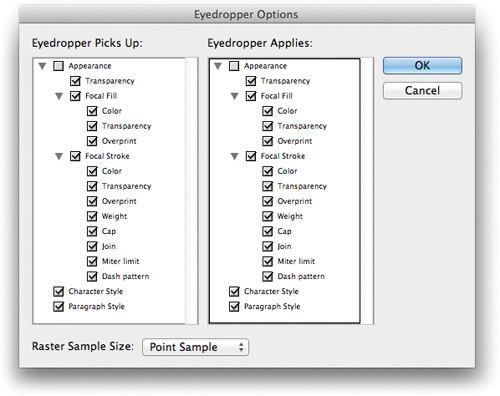
Select and apply color with the Eyedropper tool 
You can “load” the eyedropper with color (and formatting) from one object (or text) and apply that to another object (or text). What exactly gets loaded is determined by the “Eyedropper Options”—double-click the Eyedropper tool to view and change those options.
There are two ways to use the Eyedropper, and if you don’t understand this about the tool, it will make you crazy. Repeat these tasks until you feel comfortable and can predict what will happen when you click.
Task 4 Apply color or formatting to a selected object
If an object is selected and you click on another object with the Eyedropper tool, the attributes that you click on are applied to the selected object.
1 Create two shapes; give them different stroke colors and weights and different fill colors.
2 With the black Selection tool, select one shape.
3 With the Eyedropper tool, click on the second shape. The attributes from the second shape are applied to the first shape.
![]()
Repeat that a few times until you feel you’ve got it down.
Task 5 Pick up formatting and drop it somewhere else
If nothing is selected, you can click on an object with the Eyedropper tool to pick up the attributes from that object, then apply those attributes to another object.
1 Create two shapes; give them different stroke colors and weights and different fill colors.
2 Choose the Eyedropper tool.
3 With the Eyedropper tool, click an object.
The object’s fill and stroke colors appear in the fill and stroke color boxes in the Tools panel (and in the Color panel). Also, these attributes are loaded into the Eyedropper tool itself; it now looks like it’s filled with something.

4 Apply those attributes to another object: Hold down the Option key (PC: Alt key) and single-click on another object. The Eyedropper unloads the attributes into the object you click.
Repeat the two methods until you understand what the Eyedropper tool is doing and how to control it.
Task 6 Use the Eyedropper tool on type
1 Create two separate lines of point type (see page 123). Format them differently—different colors, fonts, styles, alignments, etc.
2 Use the methods in both Tasks 4 and 5 to match the attributes.
Tip
You’re not limited to picking up attributes from similar objects; that is, you can pick up the color of text and apply it to an object, and vice versa. Experiment with this!
The Swatches panel
The Swatches panel is where you can keep colors you might want to use again. You can add new colors, delete colors, create color groups, save swatch collections, access many color libraries, and more.
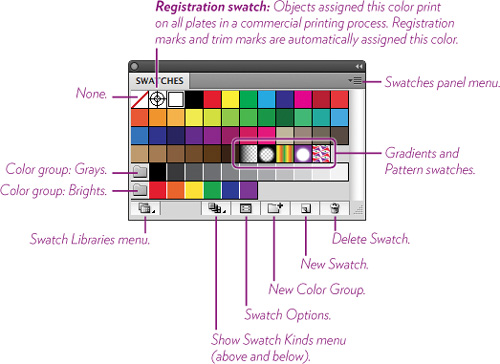
Swatches panel overview
When you open a new document, the Swatches panel contains the default color swatches shown below: a rainbow assortment of solid color swatches, four gradient swatches, a pattern swatch, and two color groups (folders). These are meant to act as a starting point. You can customize the Swatches panel as much as you want, including how large the swatches appear in the panel (click the Swatches panel menu, then choose a small, medium, or large “Thumbnail View”).
Task 7 Create new swatches
1 Open the Swatches panel: Choose Window > Swatches.
2 Click the New Swatch icon at the bottom of the panel; this opens the “New Swatch” dialog box.
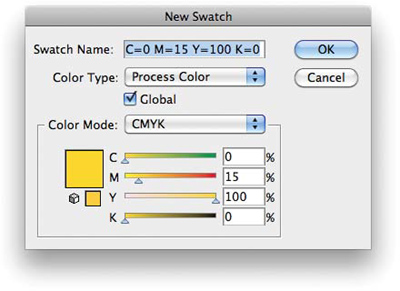
3 The “Swatch Name” is shown as ink color values. Rename the swatch color something like “Star Gold” or whatever makes sense to you (the ink values are still visible in the “Color Mode” section).
4 Choose a “Color Type” of “Process Color” (because this book is print-oriented; if you are creating work for a screen, use RGB).
5 Click the “Global” checkbox if you want the color to be global.
If a color is global, that means if you make changes to it (such as make it darker or lighter), all instances of that color are changed automatically. For instance, let’s say you made a sage green color and used it in seventeen objects throughout a poster. If you edit that sage green global color and make it lime green, each of those seventeen objects changes to lime green automatically. Try it—global colors act like style sheets. This is hugely useful, but you must be aware of the potential for changing the colors of objects that you didn’t mean to.
![]()
If a color is nonglobal, or local, only selected objects will be affected when you edit the color. This is great because you can change an individual object without having to worry about other objects.
6 Click OK.
Tip
You can use the Color panel to edit a color in a selected object, even if that color is a global one. Once you edit the color inside the object, however, it is no longer attached to the global swatch. This is not necessarily a bad thing—you can take advantage of it.
Task 8 Edit a swatch color
1 Double-click a swatch in the Swatches panel.
Or select a swatch, then click the “Swatch Options’ icon at the bottom of the panel (see page 152).
2 In the “Swatch Options” dialog box that opens (it’s identical to the “New Swatch” dialog box on the previous page), adjust the color or make changes to any of the other options provided.
3 Click OK.
Tip
When editing an existing color swatch, you might want to duplicate the swatch first, then edit the duplicate: Choose “Duplicate Swatch” from the Swatches panel. This way you don’t lose the original color, in case it has been applied to an object.
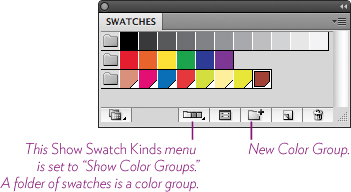
Task 9 Create color groups
Organizing colors into groups helps manage large swatch collections and makes it easier to find the color you want.
1 Open the Swatches panel.
2 To open the “New Color Group” dialog box, click the New Color Group icon at the bottom of the panel.
3 Name the new group, then click OK.
4 A new color group folder appears in the Swatches panel. Drag swatches into the folder.
5 To remove a swatch from the color group, drag it out of the color group folder and drop it in the main swatches area or into another group folder.
Tip
To automatically create a new color group with swatches of your choice, select the swatches first, then click the New Color Group button.
Task 10 Add colors from artwork to the Swatches panel
To add colors from existing artwork to the Swatches panel, do one of the following:
• Copy one or more objects from another document and paste them into the current document. The colors of the pasted objects automatically appear in the Swatches panel.
• To add all document colors that are not already in the Swatches panel (nonglobal, or local colors; see page 153), first deselect everything. From the Swatches panel menu, choose “Add Used Colors.”
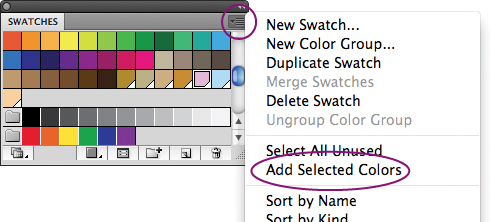
• To add color from a selected object, go to the Swatches panel menu and choose “Add Selected Colors.”
Task 11 Open swatch libraries
Instead of spending time to create a lot of custom colors, explore the many swatch libraries provided.
1 Click the “Swatch Libraries” icon in the bottom left-corner of the Swatches panel.
2 Select one of the libraries, such as Art History > Russian Poster Art or Patterns > Nature > Animal Skins.
3 Click a color swatch in the new library panel that opens to add it to the Swatches panel.

Task 12 Delete swatches you don’t need
As you experiment with colors and gradients, your Swatches panel may fill up with unused swatches. To remove swatches from the panel, do one of the following:
• Select one or more swatches, then click the Trash icon in the lower-right corner of the panel.
• Select one or more swatches, then choose “Delete Swatch” from the Swatches panel menu.
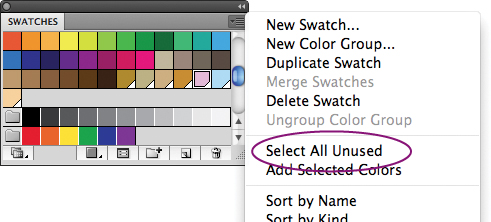
• From the Swatches panel menu, choose “Select All Unused,” then click the Trash icon.
Task 13 Share swatches with other applications
Once you’ve customized the Swatches panel to include just the swatches you need for a project, you can share that swatch collection with other Illustrator documents or with InDesign and Photoshop.
1 Make sure the Swatches panel includes the swatches you want, and delete the swatches you don’t want to include.
2 From the Swatches panel menu, choose “Save Swatch Library as ASE...” (Adobe Swatch Exchange format), then name the swatch library. Save the file in Adobe Illustrator’s Swatches folder.
3 To open the saved library, choose “Open Swatch Library > User Defined > name-of-library. The saved swatch library opens as a swatch library panel (it does not replace the current Swatches panel).
Recolor your artwork with a click
What a fabulous feature the “Recolor Artwork” dialog box is—you can create color variations of your artwork without spending more than five or ten seconds of your valuable time doing it.
Task 14 Recolor artwork in the Edit pane
1 Use the black Selection tool to select some artwork.
2 Click the Recolor Artwork button in the Control panel.
![]()
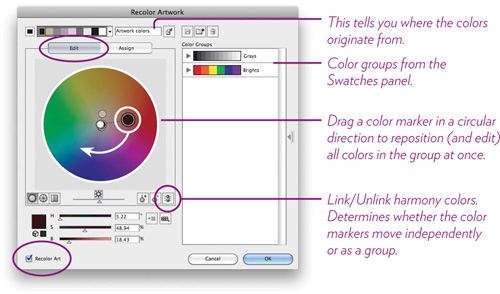
3 In the “Recolor Artwork” dialog box that opens, click the “Edit” tab.
4 Make sure the “Recolor Art” box is checked (bottom-left corner of the dialog box).
5 To make all colors in the document (represented by circular markers) move in harmonic unison with each other, click the Link harmony colors button in the lower-right corner of the color wheel.
To edit colors individually, click again to Unlink harmony colors.
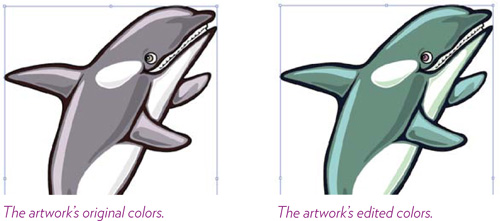
6 Drag the large, black, circular marker to move all markers, and be amazed as the artwork is recolored.
Task 15 Recolor artwork in the Assign pane
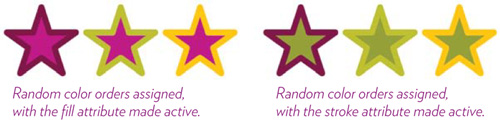
Before you start this task, select the Star tool and draw three stars. Assign a thick stroke weight, then assign various fill and stroke colors, as shown. Or create any simple, multicolored art.
1 Select the artwork.

2 Click the Recolor Artwork button in the Control panel.
![]()
3 In the “Recolor Artwork” dialog box, click the “Assign” tab.
4 Click the Get colors from selected art button. The colors in the selected art appear in the active colors field.
5 Click the Random color order button: The same colors are used, but swapped with other colors in the artwork. When you stumble upon a combination you like, click OK.

6 To put another group of colors in the Active Colors field, choose a color group from the “Color Groups” list.
Tip
If you don’t see the “Assign” tab, it’s because no artwork was selected when you opened this dialog box.
7 Create a new color group from the active colors: Click the New Color Group button. The colors are added to the Colors Group list.
Try the Color Guide panel
Create harmonious color variations and save them to the Swatches panel.
Task 16 Create color variations with the Color Guide panel
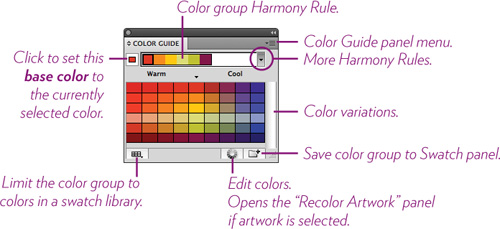
1 Open the Color Guide panel: Choose Window > Color Guide.
The group of colors in the top field represents a color harmony rule based on the color currently selected in the document.
2 Choose another harmony rule: Click the triangle on the right side of the Harmony Rules field to open a list of other harmony rules based on the existing colors. Choose a rule from the list.
3 Create variations of the colors in the harmony rule: Open the Color Guide panel menu, then choose the type of color variations to show (Tints/Shades, Warm/Cool, or Vivid/Muted).
The base colors are in the middle column, under the triangle, with variations on the left and right sides. To see a new harmony rule based on a color in the pane, click a color swatch in that pane, then click the tiny swatch to the left of the Harmony Rules field.
4 To add the harmonized color group to your Swatches panel, click the Save color group button in the bottom-right corner of the panel.
5 To apply any color in the panel to a selected object, click the color.
The Kuler panel
The Kuler panel is another powerful solution to quickly create color groups for your Swatches panel. When you open the Kuler panel (below), it connects automatically (if you have an Internet connection) to an online resource of ready-to-use color harmony groups created by an online community of designers.
Task 17 Add Kuler colors to the Swatches panel
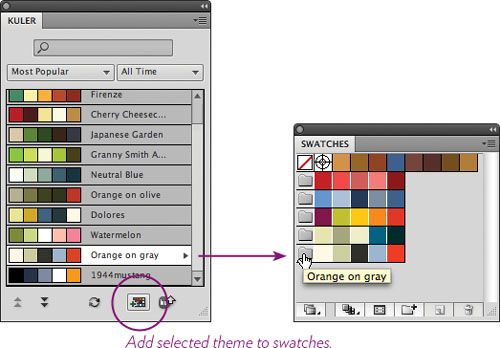
1 Open the Kuler panel: Choose Window > Extensions > Kuler (the “Extensions” option is toward the top of the menu).
2 Click the left pop-up menu to choose which themes to display, based on criteria such as “highest rated” and “most popular.”
3 Click the right pop-up menu to limit themes by their creation date.
4 Select a theme.
5 Save the theme to the Swatches panel: Click the Add selected theme to swatches button at the bottom of the Kuler panel.
Color gradients
Color gradients can make plain graphics (shapes, illustrations, or type) appear more sophisticated and visually more interesting. Add to that the ease with which you can create great-looking gradients and you’re in a transcendent state of gradient nirvana. Ommmmm (cue the background sitar music).
Task 18 Create a color gradient
1 Select the Star tool and draw a star shape, such as the one below, left. I assigned this shape an orange fill and a 12-point stroke.
2 Open the Gradient panel: Choose Window > Gradient.
Click the gradient thumbnail to fill the star shape with that gradient.
If you don’t see a color stop (as shown below) on the left side, just below the gradient bar, click in that position to create one.
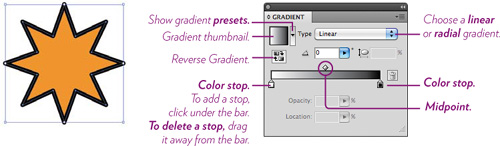
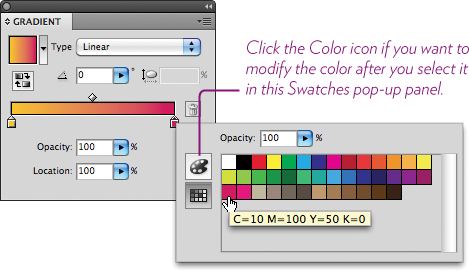
3 Create a new gradient starting color: Double-click the starting color stop (under the left side of the gradient bar). In the color pop-up panel that opens (below, left), click the Swatches panel icon, then select a color for the color stop. To modify the color, click the Color panel icon (below, right).
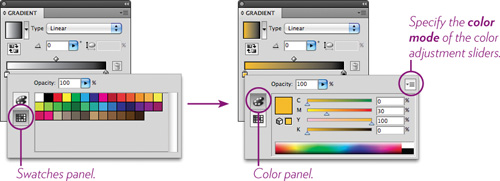
To dismiss the panels shown above, click anywhere except the Gradient panel, or press the Escape key.
4 Create a new gradient ending color: Double-click the color stop located under the right side of the gradient bar.
In the panel that pops up, click the Swatches icon, then select an ending color for the gradient. When chosen, press Esc to close the pop-up panel, or click on any blank spot on the page.
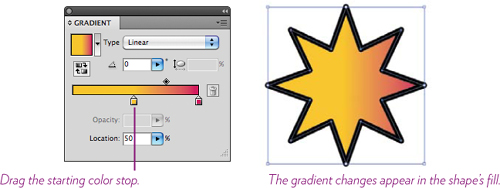
5 Change the proportions of the gradient colors: With the star shape still selected, drag the right color stop to the left to increase the amount of that color in the gradient before it starts blending into the color on the right.
As you drag the slider, the midpoint automatically moves to maintain its position halfway between the two color stops, creating a smooth, even blend between the two stops—to change that behavior, drag the midpoint.
6 Make sure the gradient type is Linear: If your gradient is already Linear, skip to Step 7. If it’s Radial, go to the Gradient panel “Type” menu and choose “Linear.” This is just to ensure that the next step shows off its potential (it looks better in a linear gradient).
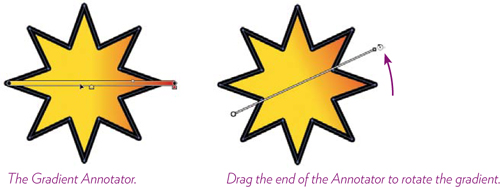
7 Change the gradient angle: Click the Gradient tool in the Tools panel. ![]()
The Gradient Annotator (or gradient slider) appears on top of the selected shape. When you hover the pointer over the Annotator, the same color stops and midway markers appear that you saw in the Gradient panel. You can drag to adjust them, right on top of the selected object, instead of using the Gradient panel. That’s cool.
Hover the pointer just barely past the right end (the end with a diamond on it) of the Gradient Annotator line. When the pointer changes to a rotate icon (below, right—not the square icon), drag in a circular motion to rotate the Annotator. The gradient blend updates when you release the Annotator.
8 Create a more dramatic radial gradient: Change the gradient to “Radial” in the “Type” pop-up menu (Step 6).
Choose the Gradient tool (if it’s not already chosen) to show the Gradient Annotator on top of the shape.
To add a new color stop: Hover the pointer along the bottom edge of the Annotator until the cursor adds a plus sign (below, left); click to add a new color stop (add it toward the left edge).
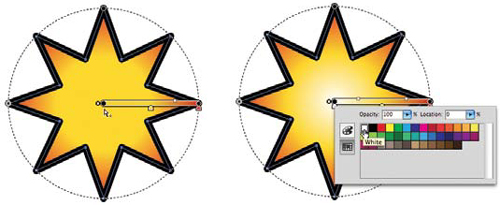
Double-click the new color stop. In the panel that pops up, select the white swatch (above, right).
Drag the ending color stop toward the left, to move the ending color closer to the middle of the shape (below, left).
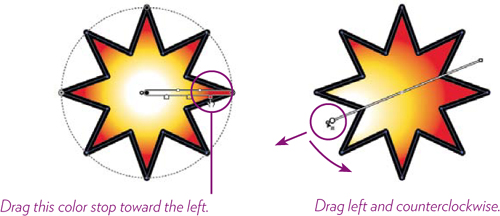
9 To stretch the Annotator and move the gradient center away from the shape’s center (above, right), drag the left end of the gradient bar (the center of the radial gradient). At the same time, drag in a clockwise or counterclockwise direction to rotate the gradient to the lower-left section of the star shape.
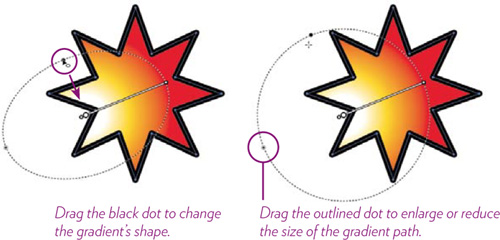
10 To change the radial gradient’s circular shape to an ellipse, hover the pointer over the boundary area of the radial shape to display its path (below). Drag the solid black dot inward or outward; drag the outlined dot to enlarge or reduce the size of the path. Notice how this affects the gradient.
11 Add the gradient to the Swatches panel so you can use it again: Open the Swatches panel. Drag the gradient thumbnail from the Gradient panel into the Swatches panel.
Or click the triangle button next to the gradient thumbnail in the Gradient panel. At the bottom of the panel that pops up, click the Add to Swatches button (the icon looks like a floppy disk from the previous century—kinda weird).
12 Reverse the gradient: Select the object, then click the Reverse Gradient button in the Gradient panel.

13 Change the opacity in the gradient: First, get the Rectangle tool and draw a rectangle filled with blue. Place the rectangle behind the star, as shown below (select the rectangle, then choose Object > Arrange > Send to Back).

With the black Selection tool, select the star shape. In the Gradient panel, click the white color stop (circled, above-right). Set the “Opacity” slider to 75%. The result is shown below, left.

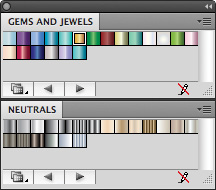
You can load a library of preset gradients: Click the Swatch Libraries button in the bottom-left corner of the Swatches panel. Choose “Gradients,” then choose from a sizeable list of preset gradients, a couple of which are shown to the right.
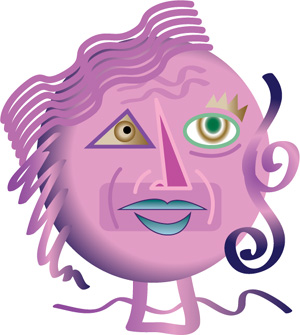
Try this!
Use shape tools, line tools, the Pen tool, and the Blob brush to draw a Picasso-inspired face. Goofy and ugly scores higher than photorealistic.
Assign different fill and stroke colors, including gradients (I used gradients from the Swatches Library menu; see Step 11 on page 164).
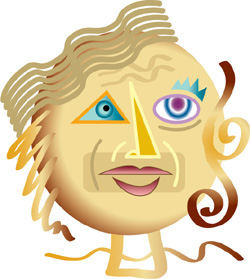
After you create a big mess (of strokes, shapes, fills, and gradients), adjust the colors using the “Recolor Artwork” dialog box (pages 157–159).