7. The Width Tool
The Width tool enables you to turn ordinary, single-weight paths into variable-width strokes. You can adjust the stroke width, slide the thick or thin part of a stroke along its path to reposition it, and you can create subtle or sudden changes in a stroke’s width.
To summarize, it’s easier than ever before to create flowing, variable width curves, and easier than ever to modify them.

Go wild with the Width tool
The following tasks introduce the Width tool basics that enable you to create almost any variable weight stroke. As you learn how to control stroke weights with the Width tool, try not to think about the advanced alien life forms that must be working as engineers at Adobe.
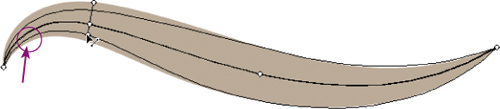
Task 1 Modify a basic Pen tool stroke
1 Select the Pen tool and draw a simple curve with a minimal amount of anchor points. Our example has a 20-point stroke applied.
2 Select the Width tool in the Tools panel.
![]()
When the Width tool is over the path, a small diamond appears on the path. As you move the tool, the diamond moves along the path.
Press-and-drag outward from the stroke to widen it; this creates a width point at that spot.
3 The first time you create a width point on a path, it also creates width points and handles at both end points of the stroke; you won’t see these end point width handles until you mouse over them.

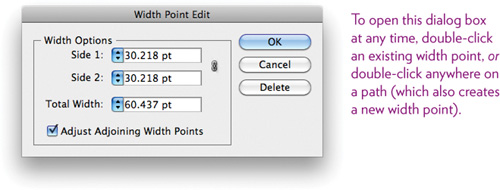
4 Again, slide the Width tool along the path, but this time, double-click where you want to add a width point, which opens the dialog box below.
Check the box to “Adjust Adjoining Width Points.” This forces that particular width point to affect its adjacent width points, which helps smooth out the transitions between the thick and thin parts of the stroke. Click OK.
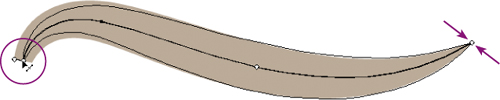
5 Press-and-drag a handle of the width control and drag away from the path to make the stroke wider.

6 Move the Width tool over an end point and drag the width point handles toward the path to taper the stroke to a point. Repeat at the other end point.
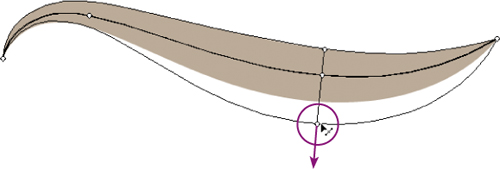
7 Move the Width tool to another position on the path where you want to make the stroke thinner.
Press-and-drag on the path to create another width point; drag the handles inward to make the stroke thinner.
8 Reposition a width point: Drag one of the width points along the path to see how it affects the stroke.
9 Make just one side of the path thicker or thinner: Option-drag (PC: Alt-drag) a width point handle.
Task 2 Create a variable width profile preset
After you use the Width tool to convert a uniform path into a variable width path, you may want to save the width profile as a preset that you can use again.
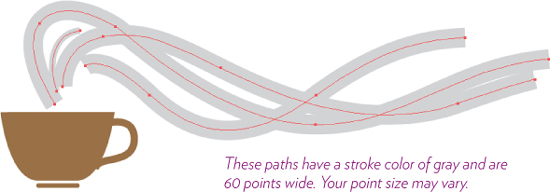
1 Select the Pen tool and draw several curved lines that could represent (hmmm) coffee steam (you don’t need to bother drawing the cup). Notice that each path in the example has a minimal number of anchor points to keep the path simple and smooth.
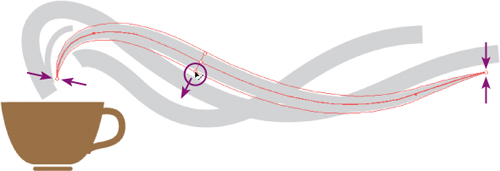
2 Select the Width tool, then press-and-drag a width point and handles out of the path to make the middle part of the stroke wider.
Move the Width tool to one of the end points; press-and-drag the handles in toward the path to create a pointy end. Repeat for the other end point.
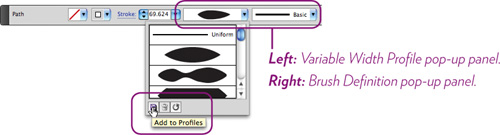
3 With the modified path selected, open the Variable Width Profile menu of presets, located in the Control panel (shown below).
Click the “Add to Profiles” icon in the pop-up panel’s bottom-left corner. In the “Variable Width Profile” dialog box that opens, name the profile “Coffee steam,” then click OK.
4 Select the remaining steam paths (hold down the Shift key to select multiple objects), then go back to the Variable Width Profile pop-up menu and choose the “Coffee steam” profile from the list.
The remaining steam paths are converted to the custom width profile.

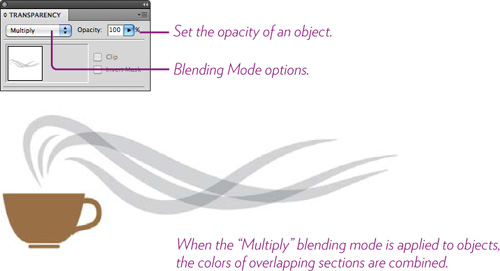
5 Now try this: Select all of the steam paths, then open the “Transparency” panel (Window > Transparency).
Click the “Blending Mode” pop-up menu and choose “Multiply.” Also experiment with the other blending modes. These different modes can dramatically affect how colors and shades of different objects interact with each other.
6 Also try this: Select all of the steam paths. From the Brush Definition pop-up panel in the Control panel (shown at the bottom of the opposite page), choose “Chalk – Scribble.” Select each path individually, then use the Transparency panel to assign varying “Opacity” values (shown above).

Task 3 Create a discontinuous width point
Most width points create a gradual transition between width settings on a path and are called continuous width points. Occasionally you might want to create a stroke that has an instant change in width. In this case you need to create a discontinuous width point.
1 Use the Pen tool to draw a simple path similar to the one shown below, left.
2 Select the Width tool, position the tool over the hump section of the path, then press-and-drag outward, away from the path, to make the stroke wider (below, right).

3 Position the Width tool near the right end point, then press-and-drag on the path, but drag inward, toward the path, to make the stroke thinner (below, left).
Drag the second width point to the left. You can see the transition between the two width points becomes less gradual (below, right).


4 Keep dragging the width point to the left until it’s on top of the first width point (below, left). This intersection of two stroke widths is called a discontinuous width point.

5 Now try this: Drag the second width point back to the right side, almost all the way to the end point on the right. Then drag the first width point to the right, near the second width point. How close you get determines the shape of the path.

Try this!
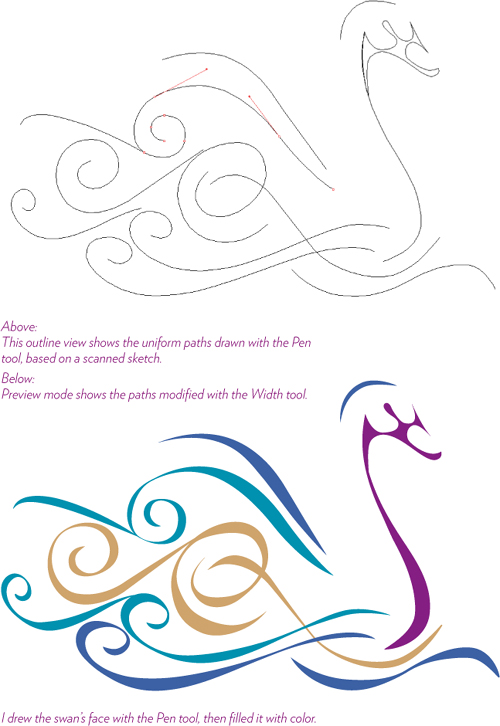
This project will give you great practice using the Pen tool to create smooth lines, and then using the Width tool to make elegant shapes of those lines. If you don’t feel confident enough yet to draw these curves by eye, scan this image and use the tracing-layer technique we explained on pages 67–69.