
3. Learn to be Selective
It may seem premature to talk about paths and segments and shapes and points and how to select individual parts of each, but what you learn in this short chapter applies to everything you will ever do in Illustrator. You will select paths and shapes to assign color and fill attributes, as well as to modify objects in various ways to create your amazing art. All subsequent chapters in this book build upon what you learn about vector artwork here.
We advise you to read through this chapter so you know what the possibilities are and so you know where you can find the information when you need it. Trying to select exactly the paths you need when you’ve got a complex illustration can be hugely frustrating if you don’t know the precise techniques.

Selecting objects
At least half of what you do in Illustrator is select the vector objects you’ve created so you can modify them in some way. In the next chapter, we’ll start drawing some objects, but first it’s really important to understand the parts of a vector path and how to select its different parts.
Open and closed paths
Every vector object, simple or complex, is composed of paths which are defined in the file mathematically. Every path is either a closed path or an open path. You can usually tell the difference by looking at them, as shown below. Selection techniques are the same for both kinds of objects.

The anatomy of a path
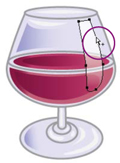
All paths are made of path segments, which can be straight or curved, and anchor points. Anchor points can be corner points (to create sudden changes in the path direction), smooth points (to create smooth changes in the path direction), or cusp points (to combine a corner point and smooth point).
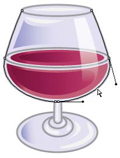
An unselected path is actually invisible; what you see is the stroke that has been applied to the path. The path below has a 5-point gold stroke applied to it.
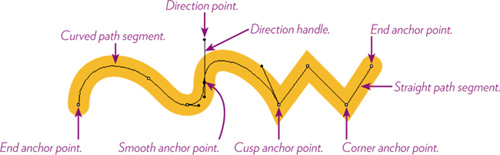
• Smooth points, when selected, have direction handles on both sides of the point. Drag handles to adjust the adjacent curved segments.
• Cusp points connect a curved segment and a straight segment and have one direction handle coming out on the curved side. Drag the handle to adjust the curved segment only.
• Corner points connect path segments that change direction; they have no direction handles.
• Drag anchor points to reposition them.
• Drag a path segment to alter adjacent segments.
• Selected anchor points are black, unselected anchor points are white.
Using the Selection tools
When a path is not selected, all you see is its stroke (and its fill, if it has one). To see the actual path (shown below, right), select it with one of the selection tools—the black Selection tool or the white Direct Selection tool.
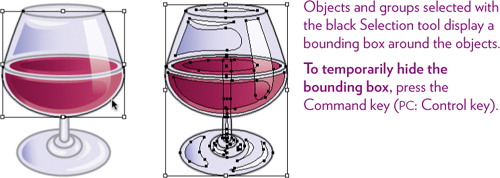
![]() The black Selection tool (the black arrow) selects entire paths. Use this tool when you want to select an entire path or shape as an object.
The black Selection tool (the black arrow) selects entire paths. Use this tool when you want to select an entire path or shape as an object.
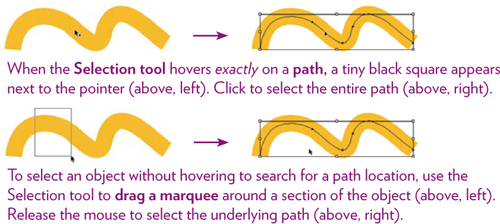
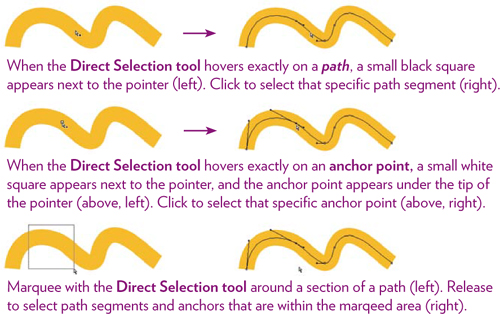
![]() The white Direct Selection tool (the white arrow) selects path segments or individual anchor points.
The white Direct Selection tool (the white arrow) selects path segments or individual anchor points.
Tip
You can select an entire path with the white Direct Selection tool: Hold down the Option key [PC: Alt key] and click the path.
Select an entire shape
To select an entire shape, do one of the following:
• With either of the Selection arrows (black or white), marquee around the entire shape to select all anchor points and path segments.

• With the black Selection tool, click any part of the shape’s path.

• With the white Direct Selection tool, Option-click (PC: Alt-click) any part of the shape’s path.

• With either of the Selection tools, click the shape’s fill color. (If this doesn’t work, it’s because the option called “Object Selection by Path Only” is checked in Illustrator’s Preferences > Selection & Anchor Display. When this preference is selected, the only way to select an object is to click or marquee its path—not its fill color.)
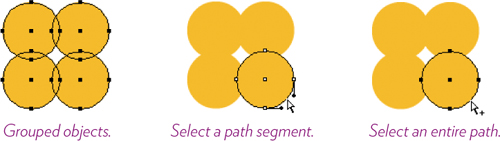
Select part of a group
Illustrations are usually made up of a huge number of shapes. You will often group shapes (page 33) so they are easier to select, modify, or move. When you click on a group with the black Selection tool, the entire group is selected, as shown below-left.
But then you discover that you need to select a specific path or shape within a group—use the trusty white Direct Selection tool. To select one path segment, use the white Direct Selection tool and click the path of one of the grouped shapes (below, center). To select the entire path of one of the grouped shapes, Option-click (PC: Alt-click) the path, as shown below-right.
What did you just select?
Just to be clear, let’s review what exactly you’ve selected when you use these different selection techniques.
The black Selection tool
To select all of a shape’s paths and anchor points, use the black Selection tool and click a shape’s path (below, left). If multiple shapes have been grouped (below, right), the Selection tool selects everything in the group.
The white Direct Selection tool
To select a specific object, use the white Direct Selection tool and click a shape’s path, even if it’s part of a group (left).
With the path selected, you can change the object’s fill or stroke attributes. However, if you try to move the object, it will distort because this is really only a partial selection—a single segment or anchor point is selected, not the entire shape.
To make a complete selection of an object, in which all path segments and anchors are selected, use the white Direct Selection tool, press the Option key (PC: Alt key), and click the path (left). With the Option/Alt key held down, a small plus symbol appears next to the Direct Selection tool pointer. This indicates that all path segments and anchors will be selected in addition to the path segment or anchor you click.
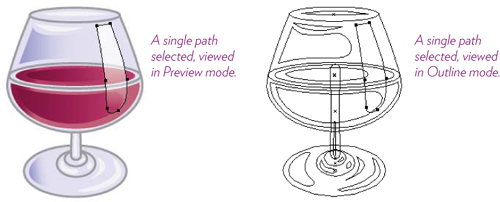
The Outline mode for easier selecting
You’ll typically work on your art in Preview mode, in color, just as it will appear when printed, exported, or saved for a web page, mobile device, or InDesign layout. But it’s often easier to select paths if you view artwork in Outline mode.
To switch the view to Outline mode, choose View > Outline. The outline view displays the paths that make up the illustration, without showing any fills or strokes. This view can be helpful when you need to select paths that are covered by other shapes and hidden in Preview mode, especially in highly complex art. You can work in Outline mode, which might make it easier to align anchor points or paths when necessary.
To return to Preview mode, choose View > Preview.
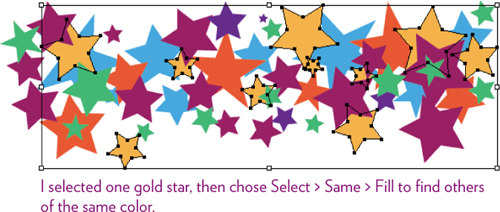
Select similar objects
To easily select similar objects in complex artwork, first select an object, then choose Select > Same > Fill (or choose one of the other attribute options in the submenu). Illustrator automatically finds and selects all objects that have the same fill attributes as the selected object.
Create groups
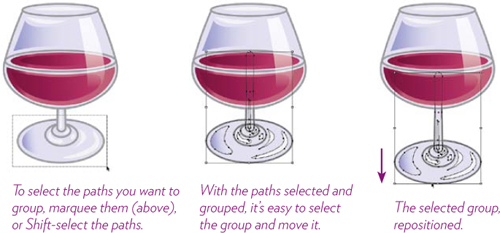
When artwork gets complex with lots of paths, it’s best to group related paths together so they’re easier to select.
To create a group: With the black Selection tool, select all the paths you want to include in the group (Shift-click multiple paths or marquee around them). Choose Object > Group.
To release a group: Select the group (click anywhere on it with the Selection tool), then choose Object > Ungroup.
The Group Selection tool 
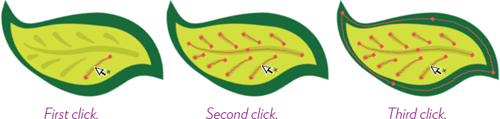
The Group Selection tool makes it easy to select groups within other groups. In the example below, the veins of the leaf are a group, and that group is grouped with the leaf shape, making it easier to select the entire leaf with a single click of the Selection tool.
Task 1 Select a group within a group
1 Choose the Group Selection tool (it’s hidden under the white Direct Selection tool in the Tools panel).
2 Click one of the paths in a group; that path is selected (below, left).
3 Click the same place a second time. The parent group is selected (below, center). Click the same place a third time to add the leaf shape that’s grouped with the leaf veins (below, right).
The Select menu
Spend some time to become familiar with the Select menu and its selection options, so when you get to a point where you need to select a particular item, you’ll know what your options are.
• All selects everything on all artboards.
• All on Active Artboard selects everything on just the active artboard (the one that is currently selected).
• Deselect does just that, deselects anything selected.
• Reselect applies the same selection options (options found in the “Same” submenu, shown below) of a previous selection to the next selection you make.
For example, suppose you use the “Same” command (see below) to select all objects with a certain fill color, such as red. If, later, you again want to select all objects filled with red, you can choose Select > Reselect and all objects with a red fill are selected.
• Inverse deselects all selections and selects everything else (on all artboards). This is handy, for instance, when you have an object that you do not want to apply a transformation to: Select that object, and then choose Inverse to deselect it and select everything else.
• Next Object Above selects the next object in the stacking order above the selected object. This is really tricky because in a complex piece of art, it is almost impossible to tell what the stacking order is.
• Next Object Below selects the next object in the stacking order below the selected object. See the note, above.
• Same selects objects that have the same attributes as an object you’ve selected. Choose “Same,” then select one of the attributes listed in the flyout menu (shown below). This applies to all artboards.
• Object provides a submenu of different kinds of objects you can choose to select (Brush Strokes, Text Objects, etc.).

Save a selection to use again
In a complex illustration, it can be tedious selecting a number of individual paths (or even finding one particular path) that you want to change. If you suspect that you might want to select the same path (or paths) at some time in the future, you can add the selection to the Select menu.
Task 2 Save a selection
1 Select one or more paths or objects.
2 Choose Select > Save Selection....
3 In the “Save Selection” dialog box that opens, name the selection, then click OK.
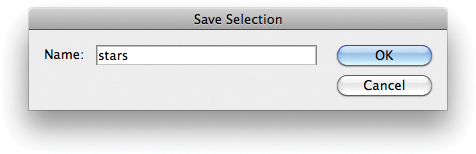
The name of the saved selection now appears at the bottom of the Select menu. The next time you want to select that particular path (or paths), go to the Select menu, and click the name of your saved selection at the bottom of the menu.
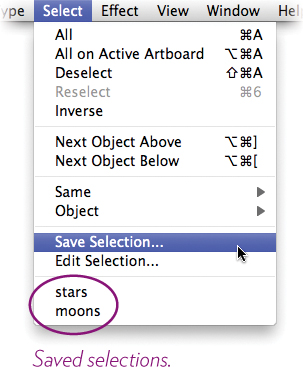

Tip
To remove a saved option from the Select menu, go to the Select menu and choose, “Edit Selection....” Click the name of the selection you want to remove, click “Delete,” then click OK.
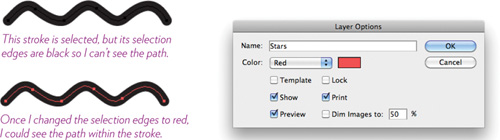
Change the color of selection edges
Each layer in the Layers panel (see Chapter 9 for details on Layers) is automatically assigned a color to highlight selection edges and anchor points, but sometimes the assigned color doesn’t show up against the stroke or fill color of your artwork. For example, if you’re working with a thick black stroke and the selection edges color is black, it’s hard to see paths and anchor points; in that case, you might want to change the colors (or switch to Outline preview mode; see page 32).
Task 3 Change the color used to show selection edges
1 In the Layers panel, double-click the layer that contains the art you’re working with.
2 In the “Layers Options” dialog box that opens, choose a contrasting color from the “Color” pop-up menu. Click OK.
Hide or show selection edges
When an object is selected, its edges and anchor points are highlighted in a color, as shown above-right. But sometimes the highlighted edges can get in the way, visually speaking, especially when you’re experimenting with different fills or stroke colors to apply to the selection. To see the artwork without distractions, you can hide the selection edges: Go to the View menu and choose “Hide Edges.” Learn the keyboard shortcut to hide or show the edges because it will come in handy: Command H (PC: Control H).
Bring to Front and Send to Back
Last, but certainly not least, you will discover that you regularly need to select an object and send it behind another object or bring it in front, so get to know the Arrange options in the Object menu. “Bring Forward” or “Send Backward” move the selected object in front of or behind just one item in the stack; to bring the object all the way to the front or send it all the way to the back, choose “Bring to Front” or “Send to Back.”