9. Working with Layers
Every Illustrator document is created with one layer, or level, on which to create art, and or many projects, that’s all you need. But for a lot of work, multiple layers are a necessity and a lifesaver—or at least a project-saver.
As you create artwork, Illustrator puts each shape and path on its own layer or sublayer. You can manually create new layers and arrange their stacking arrangement in whatever order you need. Layers give you the ability to keep complex (or simple) artwork organized, and make it easy to manage, select, and modify the various items in a project.
Layers can also be used to create variations of artwork, or specific elements of the artwork, then can be hidden or revealed to preview different versions of a project.
The Layers panel
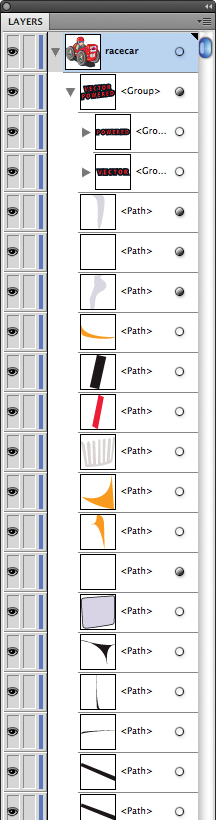
The Layers panel shows every shape, path, guide, and piece of text that’s included in your artwork so you can manage, select, and modify any object separately and easily.
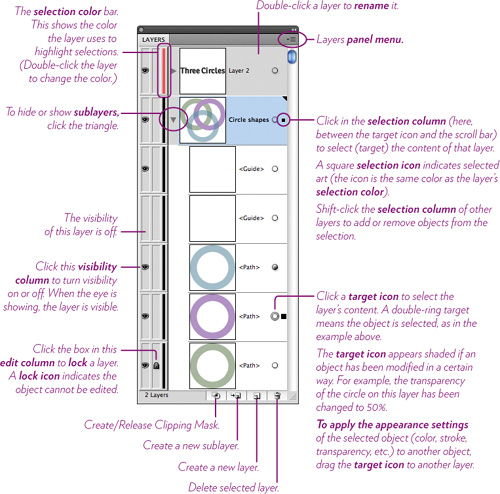
The characteristics of the Layers panel
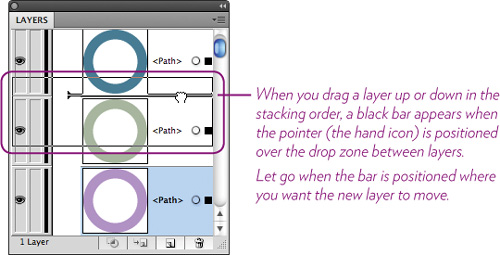
You can drag layers to change the stacking order, turn a layer’s visibility on or off, lock layers so they can’t be changed or selected accidently, and much more.
Inspect the Layers panel below and its callouts on the following page for an overview of the visual clues that this panel provides, then use Task 2 as practice for becoming comfortable with layers.
Task 1 Customize the appearance of the Layers panel
1 Open the Layers panel: Choose Window > Layers.
2 Open the Layers panel menu (in the top-right corner of the panel), and choose “Panel Options....”
3 In the “Layers Panel Options” dialog box that opens, set a size in the “Row Size” section. I chose “Other” and entered a value of 75 pixels so I can see everything clearly.
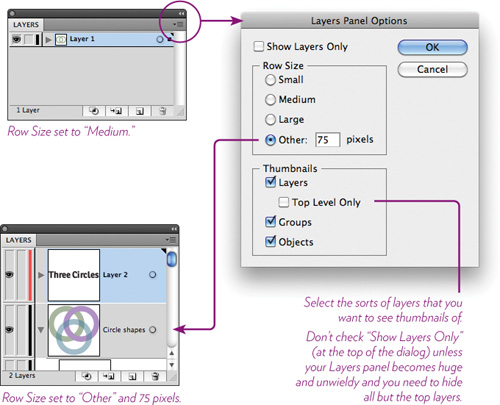
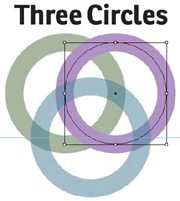
The Layers panel below contains the layers for the “Three Circles” art and text, shown on the right. Notice that the purple path is selected and its layer (below) displays a small, square selection icon in the selection column of the Layers panel. Notice also that one blue horizontal guide is visible on the right, although there are two Guide layers in the Layers panel; that’s because I clicked the eyeball icon in the visibility column of the other Guide layer to hide its content.
Manage a document with multiple layers
This is an example of how you might work with layers in a project. Walk through this task to become familiar with the process because you will use it often.
Task 2 Manage a document with multiple layers
1 Create a new document.
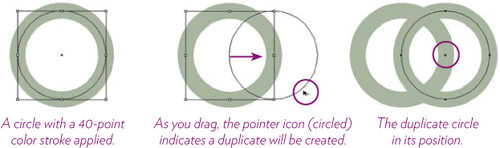
2 Draw an ellipse: Select the Ellipse tool, then drag to draw an ellipse. To constrain the ellipse to a perfect circle, hold down the Shift key as you drag.
3 Adjust the object’s appearance: In the Control panel, set the Stroke Weight to 40 points; choose a color swatch from the Stroke Color pop-up menu; set a Color Fill of None.
4 Duplicate the circle: With the black Selection tool, hold down the Option key (PC: Alt key) and drag the circle to the right; also hold down the Shift key to constrain the movement to a perfectly horizontal path. The result of the drag is shown below, right.
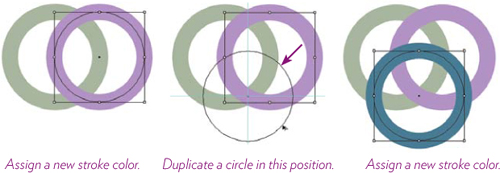
5 With the black Selection tool, select the duplicate circle. From the Control panel, choose a different color (below, left).
6 Make another circle: With the black Selection tool, hold down the Option key (PC: Alt key) and drag a circle to the position shown below (center).
7 Assign a different stroke color to the newest circle (below, right).
8 Open the Layers panel: Choose Window > Layers.
9 Rename the layer: Double-click the layer, then in the “Layer Options” dialog box, type “Circle shapes” in the “Name” field.
10 Show the sublayers: Click the disclosure triangle on the left side of the layer thumbnail to reveal three sublayers, one for each shape.
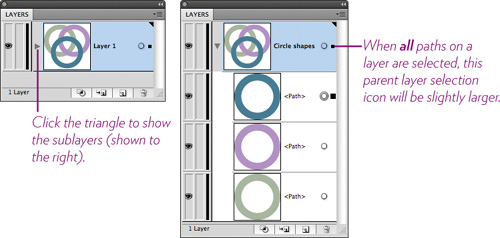
11 Select different objects: Click the target icon (the tiny circle on the right) of different sublayers. This is an alternative way to select paths when the artwork is too complex to easily make a selection by clicking directly on the artwork.
12 Hide or show layers: Click the visibility icon next to different layers to hide the layer content of the artwork. Click the icon again to show the object.
13 Lock layers: Click the edit column next to a layer to place a lock icon in it. This is most useful when you’re drawing on top of other paths and don’t want to accidently select or modify underlying objects.
14 Move layers and see the effects: Select a layer and drag it up or down in the stacking order. The arrangement of layers makes a big difference in the appearance of the artwork—try it.
A few other features of layers
There are a number of ways to do several common actions. Experiment with these options so they will be familiar to you when you need them.
Task 3 Create a new parent layer
When you create a new, blank, parent layer, it is always placed just above the currently selected layer, so first select the existing layer appropriately.
• Click the Create New Layer button at the bottom of the Layers panel.
![]()
• Or open the Layers panel menu (from the top-right corner of the Layers panel), then choose “New Layer....”
Task 4 Create a sublayer for a parent layer
• Select the parent layer, then click the Create New Sublayer button at the bottom of the Layers panel.
![]()
• Or select the parent layer, open the Layers panel menu, then choose “New Sublayer....”
Task 5 Duplicate an existing layer
• Drag a layer on top of the Create New Layer button at the bottom of the Layers panel.
• Or select a layer, then from the Layers panel menu, choose “Duplicate ‘name of layer.’”
• Or hold down the Option key (PC: Alt key) as you drag a layer to another position in the stacking order.
Task 6 Delete a layer
• Select one (or more) layers, then click the Trash icon in the bottom-right corner of the Layers panel.
• Select one (or more) layers, then drag the layers to the Trash.
• Select one (or more) layers, then from the Layers panel menu, choose “Delete Selection.”
Task 7 Collect the art on individual layers into one layer
You can select various parent layers or a group of sublayers from the same parent and combine them into one collection, which creates a new parent layer with sublayers.
1 Hold down the Command key (PC: Control key) and select the layers that contain artwork you want to collect into one layer.
2 From the Layers panel menu, choose “Collect in New Layer.”