4. Drawing with Shape and Line Tools
Illustrator provides tools for easily creating lines and shapes. Drawing with shapes (rectangles, ellipses, stars, etc.) can be a surprisingly creative and satisfying solution, especially if you don’t think you can draw. It can be even more effective than drawing with felt-tip pens in a style that won somebody [that would be John] a potted plant in a fifth-grade poster contest.
If you feel that you’re drawing-challenged, follow the tasks in this chapter and then play with the tools—you’ll discover that you’re able to create all sorts of amazingly creative and useful images.
Tip
Some drawing techniques are so much easier if you use a pressure-sensitive tablet, such as a Wacom tablet. When drawing paths with the Pen tool, we prefer a mouse, but for the tools that require brush-like strokes, a tablet makes a gigantic difference in the results.
Drawing with shape tools
Let’s start by using some of the shape tools from the Tools panel. As you do the tasks in this chapter, you’ll be introduced to lots of panels and settings that you’ll use in every project.
These exercises start your vector drawing career. The simple steps included here are used to some degree in every vector drawing.
Task 1 Draw a rectangle 
1 Select the Rectangle tool from the Tools panel.
2 Drag diagonally in any direction.
Release the mouse after you create a horizontal rectangle.

Task 2 Apply fill and stroke attributes to the rectangle
1 With the black Selection tool, single-click the rectangle to select it.
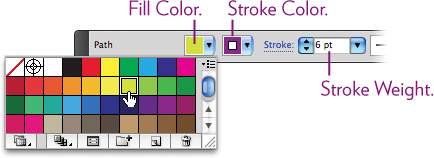
2 Click the Fill Color pop-up menu in the Control panel (shown below), then choose a color from the swatches panel that opens.
3 While the rectangle is still selected, click the Stroke Color pop-up menu in the Control panel, then choose a color from the swatches panel that opens.
4 From the “Stroke” weight pop-up menu, choose 6 pt.
Or tap the Up/Down arrows to the left of the stroke weight.
Or type 6 in the value field (you don’t have to type the “pt.”

Task 3 Draw a perfect square 
1 With the Rectangle tool, hold down the Shift key as you drag a shape.
2 Add the Option key (PC: Alt key) as you drag to change the origin point from a corner to the center of the square.
Tip
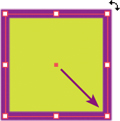
When the tip of the black Selection tool is near a corner of a selected object, the cursor turns into a curved double arrow, as shown to the left. Press-and-drag with that cursor to rotate the object.
Task 4 Draw a perfect circle 
1 Select the Ellipse tool (it’s hidden under the Rectangle tool).
2 Drag diagonally in any direction.
To constrain the ellipse to a perfect circle, hold down the Shift key as you drag.
To make the center of the circle the origin point as you drag, hold down the Option key (PC: Alt key) as well.
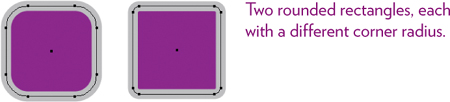
Task 5 Draw a rounded rectangle 
1 Select the Rounded Rectangle tool (it’s under the Rectangle tool).
2 Drag diagonally to create a rectangle.
To constrain the shape to a rounded square, hold down the Shift key as you drag. To make the center of the shape the origin point of the drag, hold down the Option key (PC: Alt key).
3 To change the radius of the corners as you drag, tap the up or down arrows on the keyboard before you let go of the mouse/trackpad.
Tip
If you change the fill and stroke colors before you create a shape (make sure nothing is selected), all new shapes will be drawn with those chosen attributes.
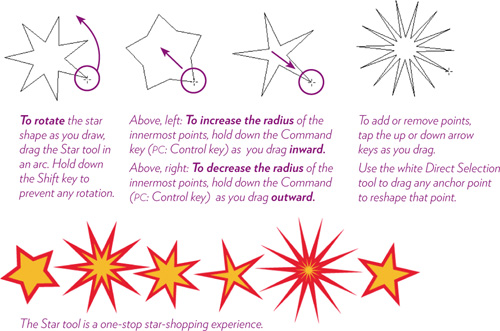
Task 6 Draw star shapes 
1 Select the Star tool (it’s under the Rectangle tool in the Tools panel).
2 Drag diagonally in any direction.
Tip for drawing shapes
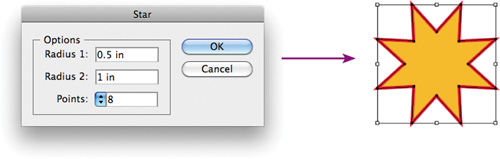
Using visual judgment to draw shapes works most of the time, but if you need to create a shape with precise numerical control, it’s good to know that each of the shape drawing tools provides a dialog box of numerical options.
Select a shape tool from the Tools panel, then single-click in your document window. A dialog box opens with numerical fields. Enter the values you want, then click OK.
The new shape appears in your document.
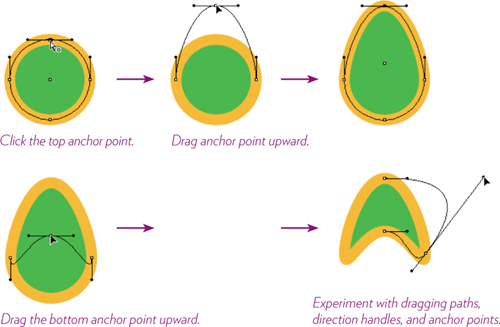
Task 7 Modify shapes
Once you’ve created a shape, you can modify it whenever and however you want. When creating artwork, it’s often best to start with basic shapes, then make changes to the shapes.
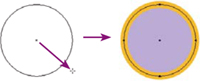
1 Draw a perfect circle (see Task 4 on page 41), then apply any fill and stroke color you want (Task 2, page 40). Set the stroke size thick enough that you can easily see the path within the stroke.
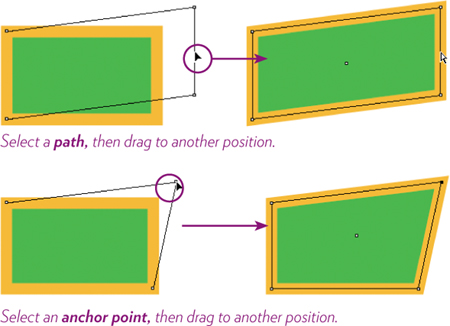
With the white Direct Selection tool, select the circle’s path (as explained in Chapter 3). Then practice the manipulations shown below.
2 Draw a rectangle (see Task 1, page 40). With the white Direct Selection tool, modify the shape as shown below.
Drawing with line tools
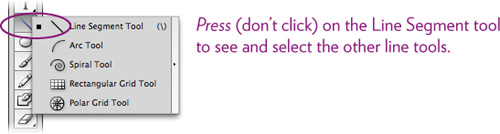
A collection of line tools are grouped together in the Tools panel, hidden under the Line Segment tool. Even though you won’t use all of these tools very often, you’ll find some of them to be powerful and useful.
The Line Segment tool 
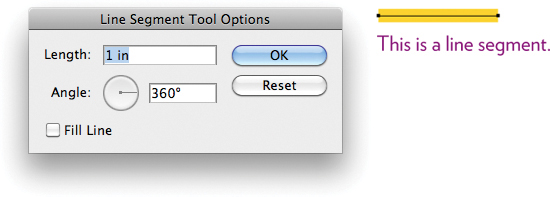
The Line Segment tool draws a straight line. You can drag to create lines, as instructed below, or use the “Line Segment Tool Options” dialog box.
Task 8 Draw straight lines
a. Use the “Line Segment Tool Options” dialog box to create straight lines:
1 Choose the Line Segment tool in the Tools panel, then single-click in a document to open the “Line Segment Tool Options” dialog box.
2 Enter a line length and choose an angle, then click OK. The specified line appears in your document.
3 While the line segment is selected (you can see the end points), practice giving it different stroke colors and widths.
b. Or simply drag to quickly create straight lines:
4 With the Line Segment tool, position the pointer where you want the line to begin, then press-and-drag to the point where you want the line to end.
Shift-drag to constrain the drawing of the line segment to a horizontal, 45° diagonal, or vertical line.
5 Change the stroke color or size: Make sure the line is still selected, then use the Control panel stroke controls (see Task 2, page 40).
Task 9 Add arrowheads to a straight line segment
You can turn straight lines created with the Line Segment tool into directional arrows.
1 Draw a straight line (see Task 8 on the opposite page).
2 Click the word “Stroke” in the Control panel to open the Stroke panel.
![]()
3 In the Stroke flyout panel (below), choose styles from the “Arrowheads” pop-up menus. Choose a style for both the start and end of the path.
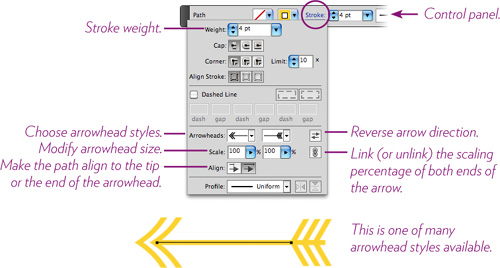
4 To remove an arrowhead from a path: Select an arrow in your document, click “Stroke” in the Control panel, then choose “None” from the “Arrowheads” pop-up menus in the Stroke panel (above).
The Spiral tool 
The Spiral tool makes drawing spirals easy, and a little confusing. You’ll need some practice to be able to predict the results of using this tool, but perhaps its organic unpredictability is part of the magic and ancient symbolism of the spiral shape.
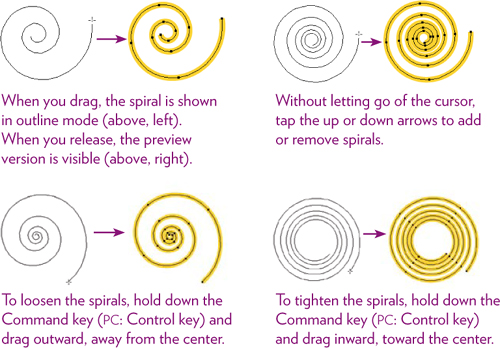
Task 10 Draw spirals
1 Choose the Spiral tool (see page 44).
2 Drag in the document to create a spiral; move the tool around to tilt the spiral. Keep holding the tool down while you do this:
To add rings to a spiral, tap the UpArrow.
To remove rings from a spiral, tap the DownArrow.
To tighten the spiral, hold down the Command key (PC: Control key) and drag in toward the center of the spiral.
To loosen the spiral, hold down the Command key (PC: Control key) and drag outward, away from the center.
You’ll see the changes happen live in outline view mode. Use the Stroke settings in the Control panel to color and stroke the path.
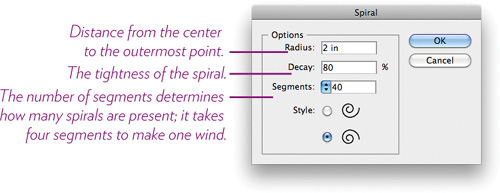
Task 11 Control the spiral shapes
The Spiral tool draws with the settings in the “Spiral” dialog box, so it’s a good idea to play with those settings and see if you can control the results.
1 With the Spiral tool, click on the page to open the “Spiral” dialog box.
2 Since there’s no preview pane to show what kind of spiral your settings will create, start with the settings shown below.
3 Click OK. The spiral immediately appears in your document. To change the color or size of the spiral stroke, use the Stroke options in the Control bar.
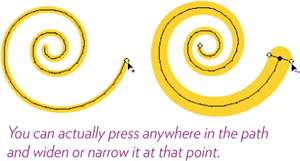
Task 12 Modify a spiral with the Width tool 
This is a quick introduction to the Width tool (more in Chapter 7), a special tool that makes part of a path thinner or thicker wherever you choose.
1 Use the black Selection tool to select one of the spirals you created.
2 Select the Width tool from the Tools panel, then hover the tool over the spiral path. When the tool is over a path, the end point becomes a white square and the cursor gets a little plus mark (below, left).
3 Press on the white square and drag the Width tool handles away from the path to make the stroke at that location thicker (below, right). The stroke automatically tapers gradually to its original width.
Tip
When drawing with any of the Shape or Line tools, you can reposition the object you’re drawing—on the fly: As you drag, hold down the Spacebar (continue to press the mouse), then move the object to any position. When you release the Spacebar (still pressing the mouse), you can continue modifying the shape.
The Arc tool 
The Arc tool draws arcs of all sorts. You can draw an arc as an open path or as a closed path (open and closed paths are explained on page 28).
Task 13 Draw convex and concave arcs
• To draw an arc, get the Arc tool (see page 44), then press-and-drag with it, from one end of the arc to the other. Where you begin and end will be the beginning and end of the arc.
Now, the Arc tool draws according to the settings in the “Arc Segment Tool Options,” so if you really need arcs in your project, learn to use this dialog box (okay, you need to be a mathematician to really know what the settings are doing, but you can get the gist of it):
1 You can open the “Arc Segment Tool Options” dialog box by simply clicking in a document window with the Arc tool, but you don’t get the dynamic preview this way.
So instead, first choose the Arc tool so it is visible in the Tools panel (instead of hidden beneath the other tools); now double-click the tool icon in the Tools panel.
2 In the dialog box that appears (shown below), experiment with the settings. When you see the results you want in the live preview pane, click OK.

3 Hold down the Shift key and drag with the Arc tool to constrain the arc to the settings you entered in this dialog box.
You’ll notice that if you drag with the Arc tool without the Shift key held down, some of the settings hold, but you can easily distort the shape.
The Rectangular Grid tool 
The Rectangular Grid tool creates a grid drawn to your specifications. Grids can be used for visual organization or as a decorative design element.
Task 14 Create a rectangular grid
1 Select the Rectangular Grid tool (it’s one of the line tools; see page 44).
2 Click in a document; this opens the “Rectangular Grid Tool Options.”
3 To start, use the settings shown below, then click OK.
The grid appears in your document.
4 To change the fill and stroke attributes, use the fill and stroke controls in the Control bar (see page 40, Task 2).

• Alternate method: Instead of using the “Rectangular Grid Tool Options” dialog box, as described in Steps 1–4, you can select the Rectangular Grid tool and just drag a grid shape on the artboard.
The grid is drawn using the settings in the dialog box above. You can add or remove rows on the fly as you drag a grid.
To add or remove rows as you drag, tap the up or down arrow keys.
To add or remove columns as you drag, tap the left or right arrow keys.
To constrain the grid to a square, hold down the Shift key as you drag.
Tip
If you try to change fill and stroke colors but nothing gets applied—it all just looks like paths—that’s because you are in Outline mode. Go to the View menu and choose “Preview.”
The Polar Grid tool 
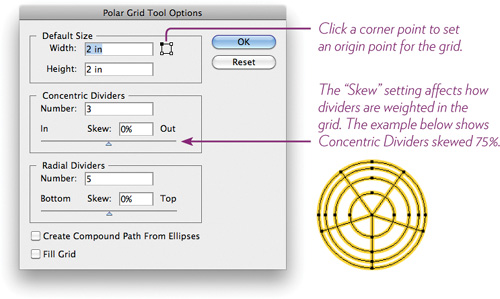
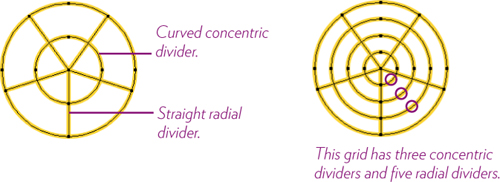
The Polar Grid tool draws circular grids, as you can see below, useful for drawing globes, targets for your backyard archery tournament, logos, and even stove burners. Truly, a polar grid really can come in handy. As with all of the Line tools, you can use a Tool Options dialog box to create artwork, or go straight to dragging a shape and using keyboard controls to modify it.
Task 15 Draw different kinds of polar grids
1 Select the Polar Grid tool (see page 44).
2 Click in a document, which opens the “Polar Grid Tool Options.”
3 For now, use the settings shown below, then click OK.
The specified circular grid appears in your document.
4 Now try it without going through the dialog box: Select the Polar Grid tool and drag in the document window.
Constrain the grid to a circle: Hold down the Shift key as you drag.
Add or remove concentric dividers: Tap the up or down arrow keys as you drag.
Add or remove radial dividers: Tap the left or right arrow keys as you drag.
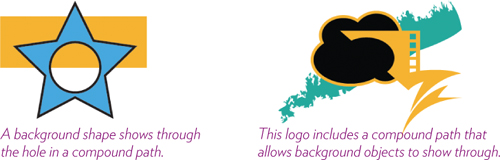
Compound paths
We talked about drawing open paths (lines) and closed paths (shapes of all sorts) on page 28. There’s another path type that you’ll often run across when drawing shapes—a compound path.
A compound path is made of two (or more) overlapping paths, and where they overlap a hole is created in the bottom fill by the shape of the top path. That may sound confusing, but it’s easy to do.
Task 16 Draw a compound path
1 Draw a star shape: Select the Star tool from the Tools panel, then drag a star shape on an artboard (see page 42 if you need more details). Fill it with a color if it isn’t already.
2 Now select the Ellipse tool and drag a circle shape (page 41) on top of the star shape.
3 Choose the Selection tool and marquee around both shapes (below).
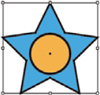
4 With both shapes selected, choose Object > Compound Path > Make.
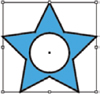
A circle-shaped hole is cut out of the star shape (left). A compound path takes on the fill and stroke attributes of the backmost object (the star), and it behaves like a grouped object. When other shapes are behind the compound path, they show through the hole in the compound path. Use the white Direct Selection tool to select individual parts of the compound path.
5 To release a selected compound path, choose Object > Compound Path > Release.
Try this!
Using the tools you played with in this chapter and the selection methods you read about in Chapter 3, create a silly face such as the one below. Make an artboard 4 × 6 inches, and use as many tools as you can. In the process of creating even a silly face, you will learn a great deal about the tools, selecting items appropriately, sending objects to the back and bringing others to the front (page 36), and other features of actually producing a product.
Also spend some time in your own discovery mode—check out the options for line strokes and play with some of the color swatches that aren’t just flat color (such as the inside of the hole in the letter O, below). Share with others what you discovered.