12. Transform and Modify
Once you’ve created an object of some sort, there are many ways to transform and modify it, and, as usual, there are multiple ways to do most things. As you carry out the tasks in this chapter, experiment with options and settings that are not specifically called for in the task. Working with Illustrator is an ongoing journey of exploration and discovery!
Transform objects
When you transform an object, it means you rotate, reflect, scale, shear, or distort it in some way.
The following tasks show you how to use the transform tools from the Tools panel and take advantage of the possibilities. You’ll find yourself transforming objects constantly while you create art in Illustrator.
Rotate objects
Rotating an object is a task that is useful in almost every project.
Task 1 Rotate an object using the Rotate tool 
1 With the black Selection tool, select an object (or draw a new one). I used the Pen tool to draw the swash shape shown below.
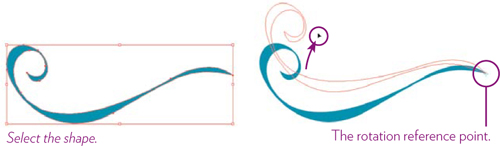
2 With the shape selected (above, left), choose the Rotate tool in the Tools panel; single-click where you want to place the center point of the rotation, the reference point (above, right).
3 Move the pointer away from the reference point, then press-and-drag in a circular direction (as shown by the arrow, above-right).
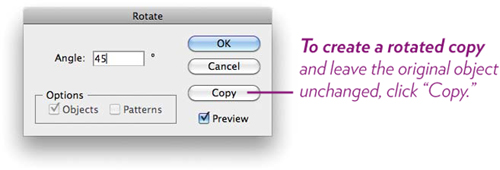
Task 2 Rotate an object using the “Rotate” dialog box
1 Double-click the Rotate tool in the Tools panel.
2 Click the “Preview” box, enter a value in the “Angle” field, then click OK.
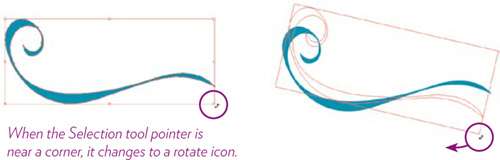
Task 3 Rotate an object using the bounding box
1 With the black Selection tool, click the shape you created in Task 1.
2 Hover the pointer near a corner point of the bounding box until you see the pointer change to a rotate icon (double curved arrow, below, left).
3 Drag to rotate the object (below, right).
To make a duplicate, hold down the Option key (PC: Alt key) as you drag.
Task 4 Rotate an object using the Transform panel
1 Select the shape you created in Task 1.
2 Open the Transform panel: Choose Window > Transform.
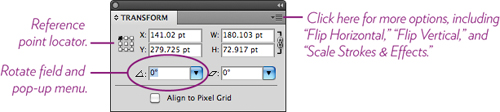
3 Set the rotation reference point: Click one of the squares in the reference point locator to determine the center point of rotation.
4 Click the “Rotate” pop-up menu and choose a preset rotation angle.
Or enter a value in the Rotate field.
Or with the value in the Rotate field selected (click the angle icon to select the field), tap the up and down arrow keys to rotate the object one degree with each tap. Hold down the Shift key as you tap an arrow key to rotate the object ten degrees with each tap.
Tip
To keep things tidy, you can reset the bounding box after you rotate an object: Choose Object > Transform > Reset Bounding Box.

Reflect objects
When you reflect an object, you flip it across an axis. There are, as usual, several ways to do this.
Task 5 Flip an object using the Reflect tool 
Reflected objects are flipped across an invisible axis, usually horizontal or vertical. You can determine the axis, the origin point and angle of the reflection, and whether to reflect the original or a copy.
1 With the black Selection tool, select an object to reflect.
2 Choose the Reflect tool.
3 With the Reflect tool, click to set one point of the axis; for instance, click at the intersection of an invisible horizontal and vertical axis, as shown below. The location of the first click determines the point across which the object will flip. This first click also changes the pointer to an arrowhead icon.
4 The second click determines whether the object will be flipped across a horizontal or vertical axis. Click (your second click) directly below the first click to define a vertical axis—the object flips across the invisible vertical axis.
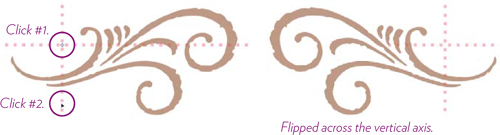
Or click to the left or right of your first click to define a horizontal axis. The object flips across the invisible horizontal axis.
5 Create a copy as you reflect the object: Repeat Steps 1–3, then hold down the Option key (PC: Alt key) when you repeat Step 4.

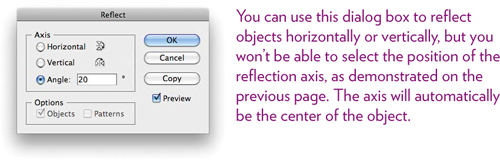
6 Reflect the object at an angle, using the dialog box: Double-click the Reflect tool to open the “Reflect” dialog box.
Enter “20” (or any value you want) in the “Angle” text field. Click the “Preview” checkbox to see the result of your setting.
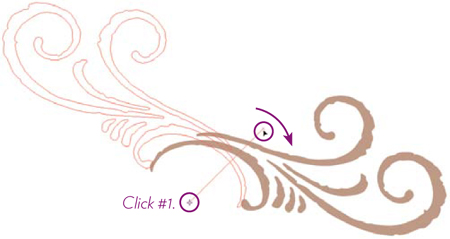
7 Reflect the object visually: Repeat Steps 1–3 on the previous page.
In Step 4, drag (don’t click) the axis left or right to change its angle and the angle of the reflected object. The reflected version appears in outline mode as you drag (shown below).
To make a copy of the reflected object and leave the original unchanged, Option-drag (PC: Alt-drag) the axis.
Discovery
Experiment with the “Transform Effect” dialog box (Effect > Distort & Transform > Transform...) to reflect, move, and scale an object all at once. Effects do not alter the original object, and they can be changed or removed at any time—any effects you apply to an object appear in the Appearance panel (see page 186), where they can be modified.

Shear objects 
The Shear tool slants an object along a horizontal or vertical axis, or along an angle you specify.
Task 6 Slant an object using the Shear tool
1 Select an object or a grouped object.
2 Choose the Shear tool in the Tools panel.
3 Drag anywhere in the document to slant the object (below, left). Although you can drag anywhere in the document, it’s easier to control the amount of slant if, before you drag, you position the pointer so it is not horizontally or vertically aligned with the Shear center point (the middle of the object, marked by crosshairs).
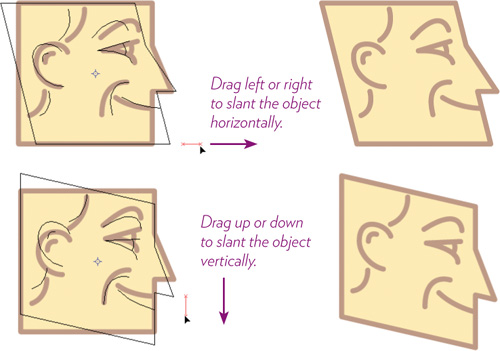
Task 7 Shear a line of type
1 Type a word or two of large, bold text, then select it with the black Selection tool.
2 With the Reflect tool, drag in the document.
3 Drag left or right to skew the type horizontally (below, left).
Or drag up or down to skew the type vertically (below, right).
As you drag, the transformed object appears in the color for that layer.

Scale (resize) and distort objects 
You can scale objects manually by dragging; when you need more precise positioning, you can enter measurements into the “Scale” dialog box.
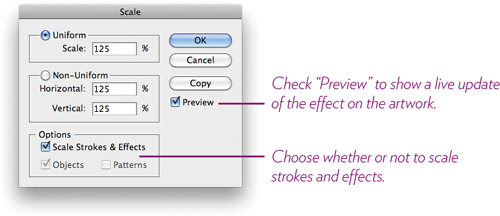
By default, strokes and effects applied to an object are not scaled along with the object. To change that default setting, on a Mac choose Illustrator > Preferences > General (PC choose Edit > Preferences > General), then select “Scale Strokes & Effects.”
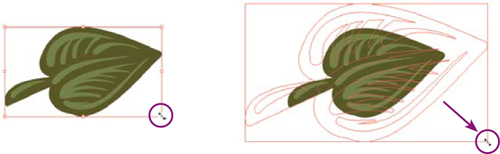
Task 8 Scale an object using its bounding box
1 Select an object (the leaf object below was drawn with the Blob brush).
2 Hide the individual paths and points, as shown here, to make it easier to see the selection: Choose View > Hide Edges.
3 With the black Selection tool, hover the pointer over one of the handles on the bounding box. When the pointer changes to a double arrow, drag away from the center; to maintain the proportions, hold down the Shift key as you drag.
To enlarge or reduce the object from the center, add the Option key (PC: Alt key) as you drag.
Task 9 Scale an object using the Scale dialog box
1 Select an object, then double-click the Scale tool in the Tools panel.
2 Enter values in either the “Uniform” or “Non-Uniform” sections.
3 Click OK.
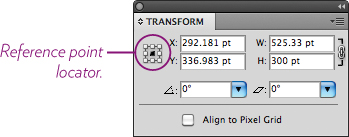
Task 10 Transform an object using the Transform panel
1 Select an object with the black Selection tool.
2 Open the Transform panel: Choose Window > Transform.
3 Click one of the squares in the reference point locator to determine the origin point of the transformation (shear, rotate, resize, move).
4 Enter values in the value fields.
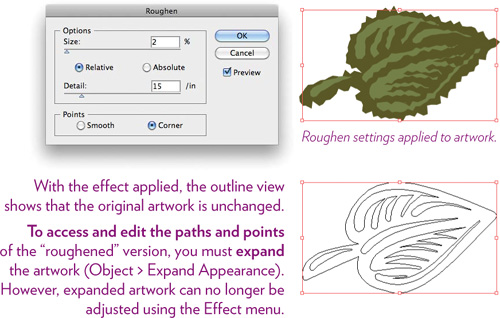
Task 11 Use the Effect menu to distort artwork
The Effect menu contains some interesting distortions that you should explore. Meanwhile, as a sample, apply the “Roughen” effect to an object.
1 With the black Selection tool, select an object.
2 Choose Effect > Distort & Transform > Roughen....
3 Click “Preview” to see how your settings affect the artwork.
4 Experiment with the various settings in the “Roughen” dialog box.
5 When you’re happy with the effect, click OK.
Tip
Effects don’t change the original artwork, so you can modify or remove an effect at any time.
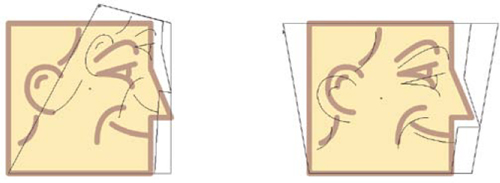
Task 12 Transform an object using the Free Transform tool 
1 With the black Selection tool, select an object.
2 Choose the Free Transform tool in the Tools panel.
3 To create a freeform distortion, start dragging a corner handle of the bounding box, then hold down the Command key (PC: Control key) as you drag in any direction (below, left).
4 To create a perspective distortion (below, right), first undo the freeform distortion: Choose Edit > Undo Perspective (Illustrator calls the freeform distortion “perspective” in the menu).
With the object selected, start dragging a corner handle, then hold down the Shift Option Command keys (PC: Shift Alt Control keys). Drag in various directions until you achieve the perspective you want.
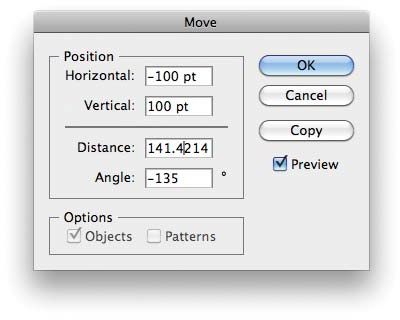
Task 13 Move an object using the Move dialog box
Most of the time when you want to move an object, you just select it and drag it. But in some situations, you may need to move one or more objects using very precise measurements. The Move dialog box enables you to do that.
1 Select an object, then double-click the black Selection tool (also known as the Move tool).
2 Click “Preview” so you can watch the results, then enter values into the “Horizontal” and “Vertical” value fields. Click OK.
Slice and cut objects
The Eraser, Scissors, and Knife tool are bundled together in the Tools panel. They’re extremely useful for modifying existing shapes and paths.
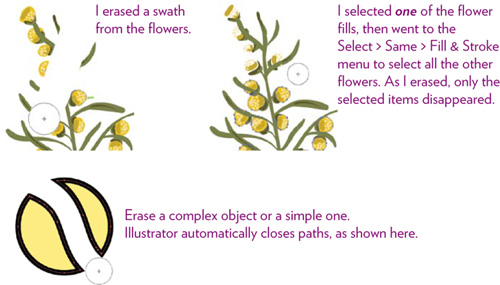
Task 14 Use the Eraser tool to erase part of an object 
The Eraser tool erases anything you drag it over.
1 Choose the Eraser tool.
2 Adjust the size of the Eraser tool to determine the size of an area to erase: Tap the right bracket to enlarge, tap the left bracket to reduce the size.
3 Drag across the object. Whatever you drag across is erased (below, left).
To erase certain paths or shapes and nothing else, select those objects, then drag across them (below, right).
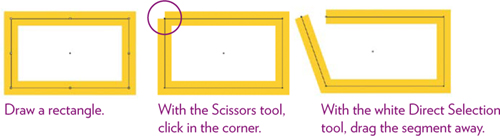
Task 15 Use the Scissors tool to modify a path 
The Scissors tool splits a path or a shape.
1 Draw an open path and assign a thick stroke to it.
2 Choose the Scissors tool, then click anywhere on the path.

3 Get the black Selection tool, then select the highlighted path segment and drag it to another position.
4 As another example, this time draw a closed path, such as a rectangle, and assign a thick stroke to it.
5 Get the Scissors tool and click on a corner point.
The notch that appears is a visual clue that the corner is now made of two separate, unjoined end points. With the white Direct Selection tool, click on the end point to select it, then drag the point to the left (or use the arrow keys to nudge the end point to the left).
Task 16 Use the Knife tool to modify a shape 
The Knife tool cuts through objects and paths to create separate objects.
1 With the Ellipse tool, draw a circle. Fill it with a color.
2 With the Knife tool, drag a wavy path across the top section of the circle (below, left). Drag another wavy path across the bottom section of the circle.
3 With the black Selection tool, select each section in turn and assign a different fill color to each (below, center).
4 Create a color variation by filling each section with a gradient from the Swatches panel.

Use an envelope to warp objects
An envelope is a grid that fits around a selected object (including type) and warps the shape of the object, according to your settings. You can apply preset warp shapes, or customize the warp using the points and handles of the envelope grid.
Task 17 Warp a type object using a preset warp
1 With the Type tool, type something like “SnakeByte.”

2 Select the type, then choose Object > Envelope Distort > Make with Warp....
3 In the “Warp Options” dialog box that opens, click “Preview,” then choose “Flag” from the “Style” pop-up menu.
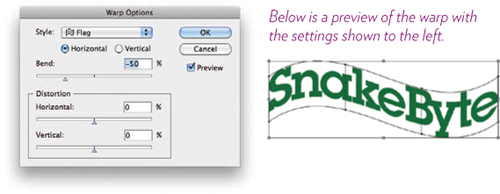
4 Drag the “Bend” slider to set the amount of warp applied to the type.
The “Distortion” sliders create horizontal and vertical distortion that might (or might not) enhance the effect you want. Try it.
5 Click OK.
Task 18 Warp a type object into a “top object”
1 Draw an ellipse and position it on top of the “SnakeByte” type.
2 Marquee around both objects to select them.
3 Choose Object > Envelope Distort > Make with Top Object.

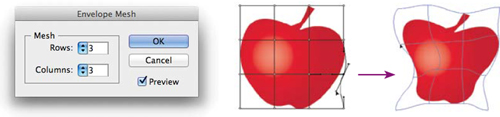
Task 19 Warp an object using a mesh
1 Select an object. I drew the simple shape below with the Pen tool, then filled it with a preset radial gradient (see pages 161–165).
2 With the object selected, choose Object > Envelope Distort > Make with Mesh....
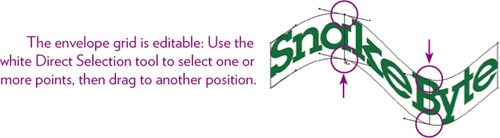
3 In the “Envelope Mesh” dialog that opens (shown below), set how many rows and columns to include in the mesh. Fewer rows and columns create smoother warping. Click OK.
4 With the white Direct Selection tool, first click off to the side, then click on the object to get editable points. Drag mesh points, handles, or mesh path segments to warp the object. You can also drag anywhere within the mesh, not just on paths and anchor points.
5 To add rows and columns to the mesh, get the Mesh tool (left) from the Tools panel and click in the grid.
![]()
To delete an anchor point on the grid, select it with the white Direct Selection tool (or the Mesh tool), then press Delete (PC: Backspace).
6 To modify the envelope mesh, use the black Selection tool to select the mesh, then use the options in the Control panel (shown below).
To edit the envelope contents, click the “Edit Contents” button.
To edit the envelope, click the “Edit Envelope” button.

Expand an envelope so you can work with the new shape: Choose Object > Envelope Distort > Expand. The envelope is deleted, but the warped object has the new control points on it.
To release the envelope and get the original shape back: Choose Object > Envelope Distort > Release. Two objects are created: the envelope shape and the original, unaltered artwork. Click outside the object, then select the envelope with the black Selection tool and delete it.
Pathfinder effects to transform objects
Pathfinder effects let you combine overlapping objects into new shapes, using ten different interaction shape modes.
The Pathfinder panel
To open the Pathfinder panel, choose Window > Pathfinder.
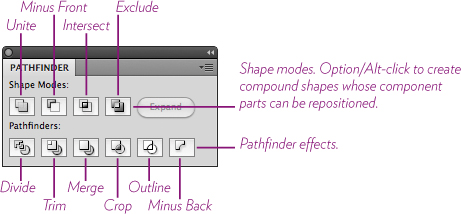
The Shape Mode tools on the top row convert selected overlapping objects into paths or compound paths. The new shape that’s created is one shape; you cannot reposition any former parts because the individual pieces are gone.
To create Shape Mode shapes that you can reposition, hold down the Option key (PC: Alt key) when you click one of the Shape Mode buttons. This lets you select one of the component shapes with the Direct Selection tool and reposition it, while still retaining the Pathfinder effect.
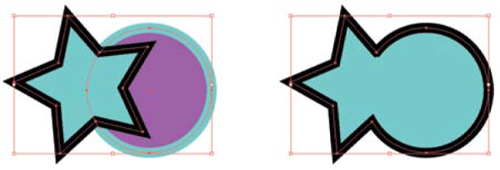
Task 20 Unite two shapes into one shape
1 Draw two shapes that are similar to the ones below-left; overlap them. Make a copy so you can do all of the following tasks without having to redraw the original shapes each time!
2 Marquee around the two shapes to select them both.
3 In the Pathfinder panel, click the Unite button. The two objects are combined into one (below, right), and the fill and stroke of the top object take over.
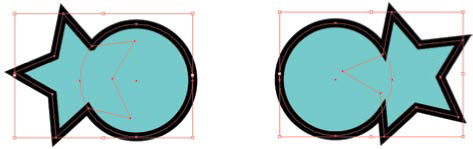
Task 21 Unite two shapes as compound shapes
1 Select the original two shapes again.
2 Option-click (PC: Alt-click) the Unite button in the Pathfinder panel.
The two shapes are joined into one, but the original components are still intact. The fill and stroke attributes from the top object take over.
3 With the white Direct Selection tool, drag the star-shaped component to the opposite side of the circle (or anywhere nearby). You can separate them completely, and then when you touch them together again, they remember they are united. Freaky.
This flexible method of combining shapes is a great way to experiment with shape interactions. Try it with all of the Shape Mode options on the top row of the Pathfinder panel.
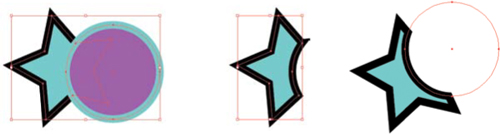
Task 22 Subtract one shape from another
1 Select the original two shapes again. Select the circle and bring it to the front: Choose Object > Arrange > Bring to Front (below, left).
2 Click the Minus Front button in the Pathfinder panel. The star shape is now minus the circle shape that was in front (below, center).
3 Now try a variation of this: Undo Step 2 (choose Edit > Undo Subtract). Make sure both shapes are selected, then Option-click (PC: Alt-click) the Minus Front button. The appearance is the same, except now the circle path is still present and you can reposition it, as shown below-right.
Task 23 Experiment with the other Pathfinder options
Select the original two shapes. Click the other Pathfinder buttons to see what effects they have on multiple, overlapping objects.
Align and distribute objects
The Align panel lines up and evenly distributes objects horizontally or vertically. Experiment with all of the options so you know what is possible.
Task 24 Align and distribute objects by selection
1 Draw four objects, and space them unevenly, like the ones below.

2 Use the black Selection tool to select all the objects.
3 Open the Align panel: Choose Window > Align.
4 Click the “Align To” button (shown below), and choose the option to “Align to Selection.”
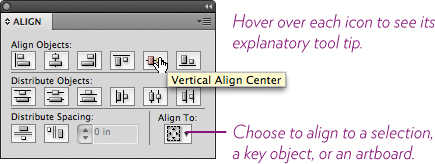
5 Click the Vertical Align Center button in the “Align Objects” row (shown above). The objects move so their centers are aligned vertically.

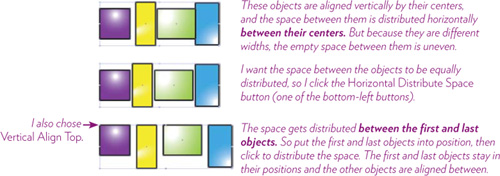
6 Now click the Horizontal Distribute Center button in the “Distribute Objects” row (use the tool tips to find it). The objects’ centers are evenly distributed, as shown below. See the captions below for other options.
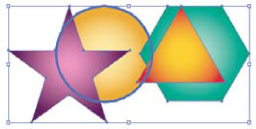
Task 25 Distribute space around a key object
For more control over the distribution of spacing, align to a key object, which is an object in the collection that you choose to arrange the others around.
1 Arrange four objects in a random order, then select all four objects.
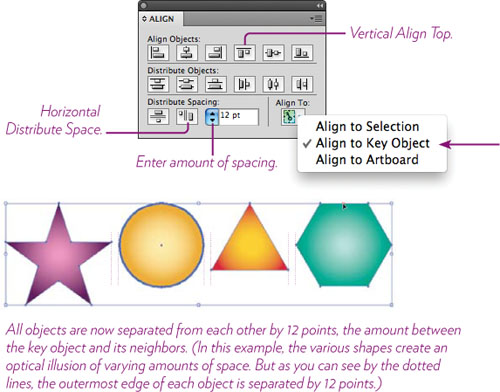
2 In the Align panel (shown below), click the Vertical Align Top button.

3 Now you need to select the key object. First, in the Align panel, click the “Align To” button; choose “Align to Key Object.”
4 Now click to select the object around which you want to distribute the space (the circle, for example, as shown below). A bold outline appears around the selected key object.
5 In the “Distribute Spacing” field, enter the amount of space you want between all objects, such as 12 pt.
6 Click the Horizontal Distribute Space button.
The Appearance Panel
Working in the Appearance panel is the same as jumping back and forth between the Color, Swatches, Stroke, and Transparency panels—the controls in all those panels are accessible here. Appearance attributes are those characteristics (such as fills, strokes, graphic styles, and effects) that affect the appearance of an object without changing its underlying structure.
When an object is selected, its appearance attributes show up in the Appearance panel, enabling you to edit, remove, or add attributes.
To open the Appearance panel (below), choose Window > Appearance.
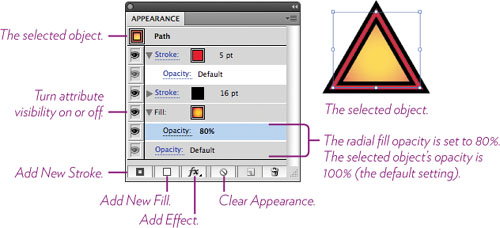
Task 26 Change the fill and stroke of an object
1 With the Star tool, draw a star with a black color fill and no stroke.
2 In the Appearance panel, click the Fill color swatch (shown below). In the Swatches panel that pops up, choose a fill color or a gradient.
3 Click the Stroke swatch to select a stroke color. A stroke weight field also appears; enter an amount, such as 6 pt.

Tip
To make the thumbnails larger, go to the panel menu and choose “Large Thumbnail View.”
4 Change the stroke again, in preparation for Task 27: Click the Stroke swatch in the panel; assign a 14-point purple stroke.
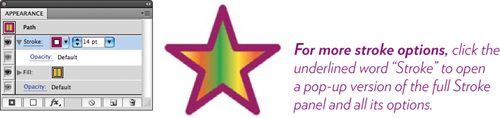
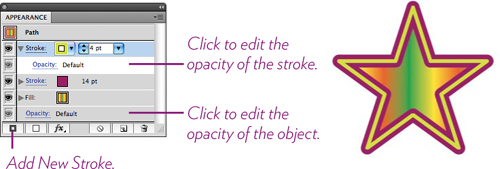
Task 27 Add a stroke on top of another stroke
You can add a second stroke to an object; the second stroke is on top of the existing stroke, centered within it, which makes it look like three strokes.
1 Select the star you created in the previous step, the one with a heavy stroke. Click the Add New Stroke button at the bottom of the panel.
2 Assign a green color and a stroke weight of 4 points to the new stroke.
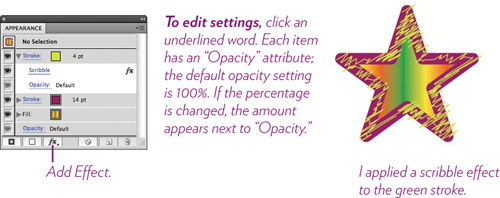
Task 28 Add an effect
1 Make sure the star is still selected; click the Add Effect button at the bottom of the panel.
2 From the pop-up menu that opens, choose Stylize > Scribble.
In the “Scribble Options” dialog box that opens, check “Preview,” then experiment with the various settings.
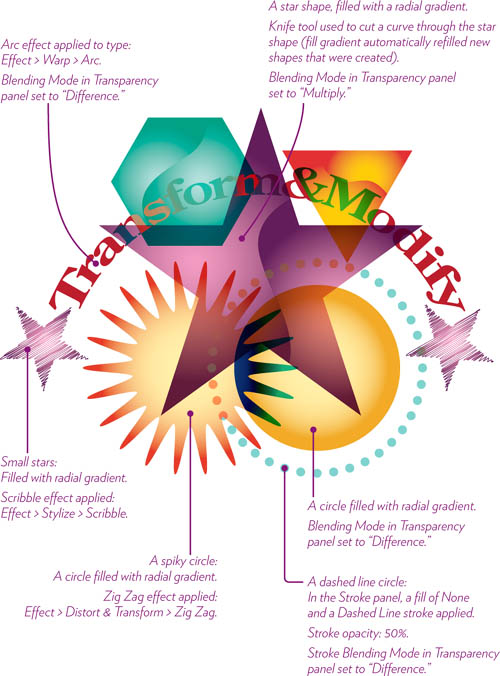
Try this!
Use the techniques you learned in this chapter to create a colorful montage of shapes and type. Explore options and settings in the various panels that weren’t covered in this chapter. Rotate, reflect, shear, warp, mesh, align, and distribute to your heart’s content.