Organized Chaos: Managing Photos Using the Organizer
Photographer David Cuerdon
Organized Chaos is the perfect name for this chapter because not only is it a song title (by the band Benediction), it’s also apparently a marketing directive put forth by a super-secret department at Adobe who, from what I gather, is charged with making simple things more complex. For example, let’s take a look at the File Browser (for sorting images). Of course, in Elements there is no menu item for File Browser; instead it says “Browse for Files.” By changing both the order of the words, and the spelling, they secured a hefty annual bonus, and because they were able to add an additional word (“for”) they get an extra commission on the back end. Now, when they introduced the Organizer (also for sorting images), the super-secret department members all got brand new company cars, because having two completely separate tools that do seemingly the same thing is a home run. But where they really cashed in was with their addition of a button called the “Photo Browser.” It’s the perfect scam, because there actually is no Photo Browser. When you click it—believe it or not—it brings up the Organizer. That should be worth some extra stock options.
Importing Photos from Your Scanner
Because this is a book for digital photographers, I imagine most of your photos will come from a digital camera (if so, see “Saving Your Digital Negatives” in Chapter 1), but if you’ve been a photographer for a while now, you probably have some traditional prints lying around that you’d like to scan in, so here we’ll look at importing scanned images into the Organizer.
Step One:
To scan images and have them appear in your Organizer, click the Photo Browser button in the Elements Editor’s Options Bar to launch the Organizer. Then go under the Organizer’s File menu, under Get Photos, and choose From Scanner. By the way, once the Organizer is open, you can use the shortcut Control-U to import photos from your scanner.

Step Two:
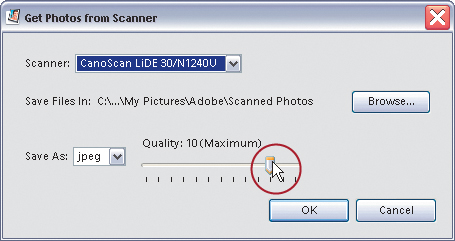
Once the Get Photos from Scanner dialog is open, choose your scanner from the Scanner pop-up menu. Choose a high Quality setting (I generally choose the highest quality unless the photo is for an email to my insurance company for a claim—then I’m not as concerned). Then click OK to bring in the scanned photo. See, pretty straightforward stuff.
Automating the Importing of Photos by Using Watched Folders
This new feature added in Elements 3 is a huge timesaver because it lets you choose a folder that is “watched” by the Organizer. When you drag photos into this folder, they will automatically be added to your Organizer. Here’s how to set it up:
Step One:
Go under the Organizer’s File menu and choose Watch Folders.

Step Two:
When the Watch Folders dialog appears, make sure the Watch Folders and their Sub-Folders for New Files checkbox is turned on. In the Folders to Watch section, click the Add button, and then in the resulting dialog, navigate to any folders you want the Organizer to “watch” for the addition of new photos. Select the folder you want to watch, and then click OK. Continue to click the Add button and select more folders to watch. When you’ve selected all your folders, they will appear in the Folders to Watch section of the Watch Folders dialog, where you have the choice of having the Organizer alert you when new photos are found in the watched folders (meaning you can choose to add them) or you can have them added automatically, which is what this feature is really all about. But if you’re fussy about what gets added when (i.e., you’re a control freak), at least you get an option.

Changing the Size of Your Photo Thumbnails
Thumbnails of your photos are displayed in the Organizer’s Photo Browser, and luckily you have great control over what size they’re displayed at.
Step One:
The size of your thumbnails is controlled by a slider at the bottom-right corner of the Photo Browser window. Drag the slider to the right to make them bigger—to the left to make them smaller. To jump to the largest possible view, just click on the Single Photo View button to the right of the slider. To jump to the smallest size, click on the Small Thumbnail Size button to the left of the slider. To jump up one size at a time, hold the Control key and press the Plus (+) sign. To jump down press Control-Minus (−) sign.


Step Two:
Another shortcut to jump to the largest view is to just double-click on your thumbnail. At this large view, you can enter a caption directly below the photo by clicking on the placeholder text (which reads “Click here to add caption”) and typing in your caption.

Seeing Full-Screen Previews
How about this for a view? Elements 3 lets you see a full-screen preview of a selected thumbnail—all without leaving the Organizer. It’s like an onscreen slide show of your thumbnails. Here’s how it works:
Step One:
To see a full-screen preview of your currently selected photo, click on the Photo Review button (it looks like a stack of tiny slides) in the bottom left-hand corner of the window (or just press F11).

Step Two:
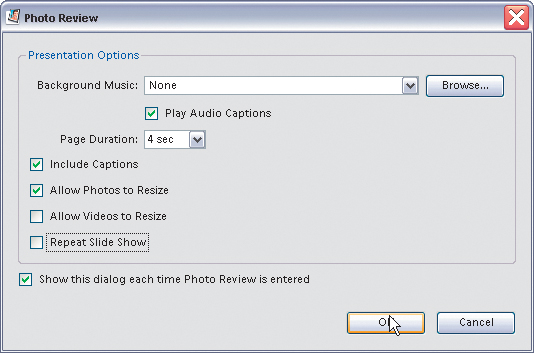
This brings up the Photo Review dialog with a number of presentation options, which look like the options for a slide show. Basically, that’s usually what you’ll use this Photo Review feature for, but if you just select one photo, it shows just that one photo at full screen. So when this dialog appears, click OK and your photo will be displayed full screen. If you want to return to the Photo Browser, press the Escape key on your keyboard. By the way, once your photo appears full screen, you’ll see thumbnails of other photos along the right side of the screen. If you want to see any of those full screen, just click on them. There’s also a floating palette at the top of the screen in case you want to see a slide show of those photos on the right—press the green Play button to start it, and click the X button to stop it and return to the Photo Browser.

Sorting Photos by Date
When photos are imported into the Organizer, the Organizer automatically sorts them by date. How does it know on which dates the photos were taken? The time and date are embedded into the photo by your digital camera at the moment the photo was taken (this info is called EXIF data). The Organizer reads this info and then sorts your photos automatically by date, but finding the photos by dates takes a little doing on your part.
Step One:
By default, the newest photos are displayed first, so basically, the last photo you shot will be the first photo in the Organizer. Also, by default, the exact date each photograph was taken is shown directly below each thumbnail photo. (Note: If you don’t want this extra detail about each photo to be visible, just uncheck the Details checkbox at the bottom-left side of the Browser window.)

Step Two:
If you’d prefer to see your photos in reverse order (the oldest photos up top), then choose Date (Oldest First) from the pop-up menu in the bottom-left corner of the Browser window. There you have it!

Adding Scanned Photos? Enter the Right Time and Date
I know, I know—this is a book for “digital” photographers, but you know, and I know, that you’ve got a scanner. At some point you’re going to scan some photos (then they’ll become “digital images”), and then you’ll want these images to be automatically organized in your catalog. All the scanned photos will have their “creation” date as the day you scanned them, unless you add your own date. This way, you can set the approximate date to when they were shot so they’ll appear in your catalog when they were taken, rather than when they were imported.
Step One:
First, get the photos from your scanner (see the “Importing Photos from Your Scanner” tutorial earlier in this chapter). Select all the photos you want to set the date for by Control-clicking each image (or Shift-clicking the first and last image if the images are contiguous) in the Photo Browser window. Then, go under the Organizer’s Edit menu and choose Adjust Date and Time of Selected Items (or press Control-J).

Step Two:
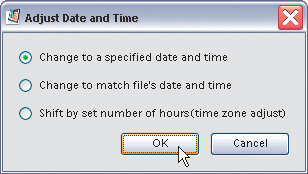
This brings up a dialog asking how you want to handle the date and time for these photos. For this example, select Change to a Specified Date and Time, and click OK.
Step Three:
This brings up the Set Date and Time dialog, where you can use the pop-up menus to set your selected photos’ date and time. Now these photos will appear sorted by the date you entered, rather than the date you imported them.

Finding Photos Fast by Their Month and Year
The method that the Organizer uses to help you find the photos you’re looking for is month and year. It figures you might not know exactly when you took a group of photos, but let’s say, for example, you’re trying to find the photos from last year’s vacation. If you know you went sometime last summer—even if you can’t remember whether it was June, July, or August—you can get mighty close mighty fast using the Month/Year Timeline. Here’s how it works:
Step One:
We’re going to assume you’re trying to find last year’s vacation photos (as outlined above). You see those little bars along the Timeline that look like the little bar charts from Microsoft Excel? Well, the higher the bar, the more photos that appear in that month. So click on any month in 2004 and only the photos taken in that month will appear in the Browser window. As you slide your cursor to the left (or right), you’ll see each month’s name appear. When you get to July, only photos taken in July 2004 will appear. Take a quick look and see if any of those photos are your vacation photos. If they’re not in July, scroll over on the Timeline to August, and only those photos will be visible.

BRAND X PICTURES
Tagging Your Photos (Tags are Keywords)
Although finding your photos by month and year is fairly handy, the real power of the Organizer appears when you assign tags (keywords) to your photos. This simple step makes finding the exact photos you want very fast and very easy. The first step is to decide whether you can use the pre-made tags that Adobe puts there for you or whether you need to create your own. In this situation you’re going to create your own custom tags.
Step One:
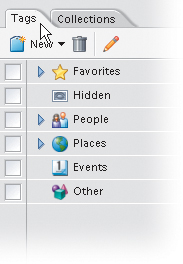
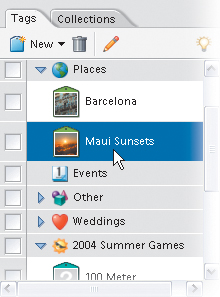
Start by clicking on the Tags tab on the right side of the Organizer. Adobe’s default set of tags will appear in a vertical list. (By the way, if you don’t see the Tags and Collections tabs on the right side of the Organizer, click on the words “Organize Bin” at the bottom-right corner of the Organizer window.)
Step Two:
You’ll start by creating your own custom category (in this case, we’re going to create a category of all of wedding shots taken for your clients). Click on the New pop-up menu that appears just below the Tags tab itself, and from the drop-down menu that appears, choose New Category. This brings up the Create Category dialog. Type in “Weddings.” Now choose an icon from the Category Icon list and then click OK. (The icon choices are all pretty lame, so I chose the Heart icon because it was the least offensive for weddings.)

Step Three:
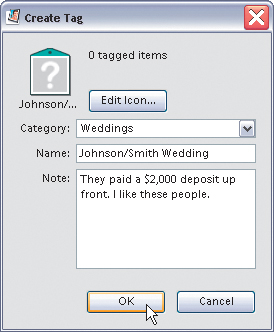
To create your own custom tag, click on the New pop-up menu again and choose New Tag. This brings up the Create Tag dialog. Choose Weddings from the Category pop-up menu (if it’s not already chosen), then in the Name field, type in “Johnson/Smith Wedding.” If you want to add additional notes about their wedding, you can add it in the Note field (or you can choose a photo as an icon by clicking the Edit Icon button). Now click OK to create your tag.
Step Four:
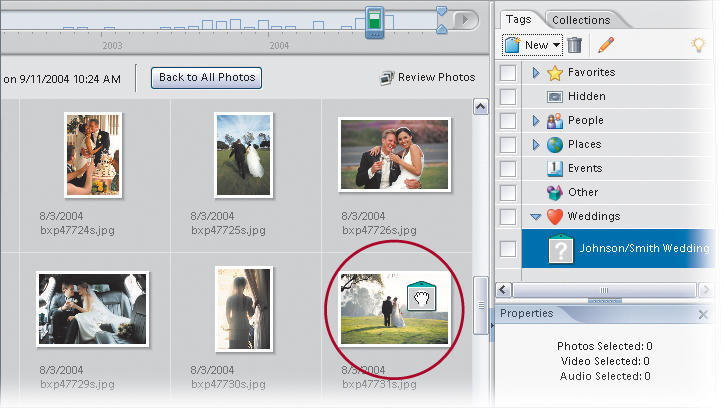
Now you’ll assign this tag to all the photos from the Johnson/Smith wedding. In the Photo Browser window, scroll to the photos from that wedding. We’ll start by tagging just one photo, so click on the Johnson/Smith tag that appears at the bottom of your Tags list and drag-and-drop that tag on any one of the photos. That photo is now “tagged.” If you have the photo’s Details visible (if not, turn on the Details checkbox at the bottom-left corner of the Browser window), you’ll see a small tag icon appear below the photo’s thumbnail (in this case, the Heart icon).
BRAND X PICTURES
Step Five:
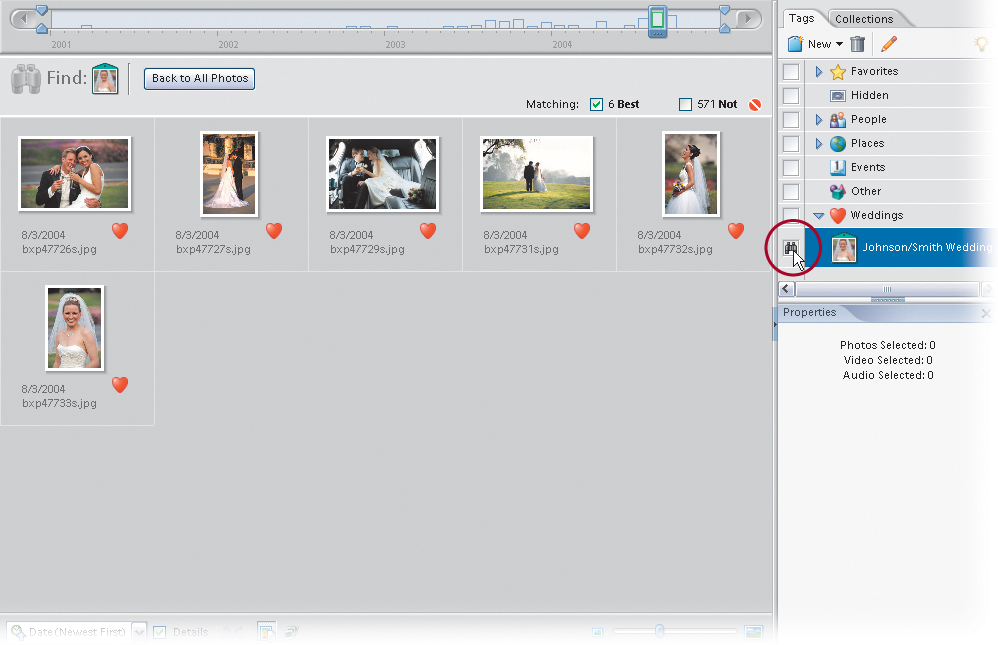
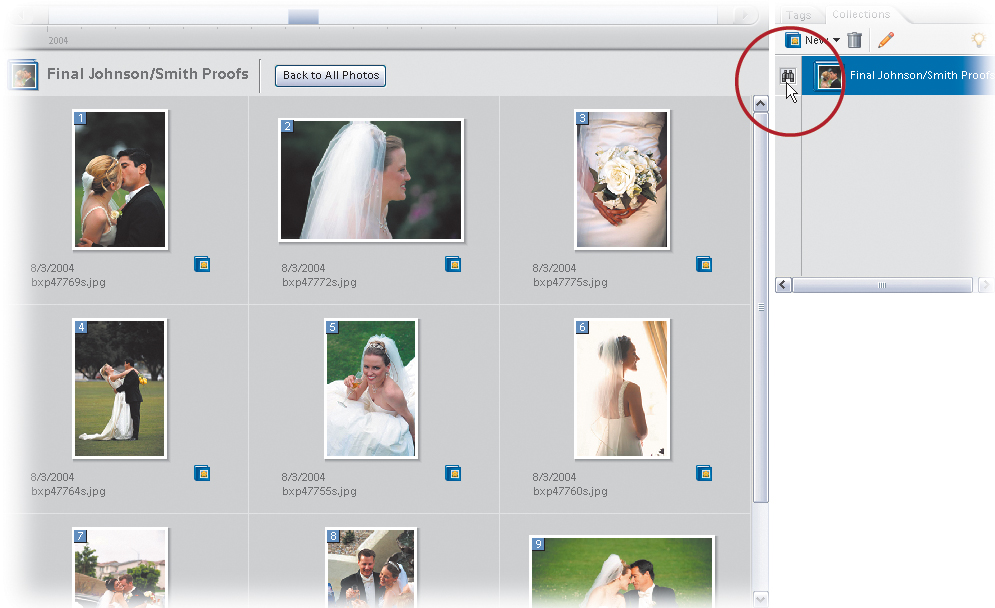
So at this point, we’ve only tagged one photo from the wedding. Drag-and-drop that same tag onto five more photos from the wedding so a total of six photos are tagged. Now, in the list of Tags on the right side of the Organizer, click in the small box in the column to the left of your Johnson/Smith tag (a tiny binoculars icon will appear in that box), and instantly, only the photos with that tag will appear in the Photo Browser window. To see all your photos again, click on the Back to All Photos button that appears at the top left of the Browser window.
BRAND X PICTURES
Tagging Multiple Photos
Okay, you’ve learned how to create your own custom category (Weddings), then a custom tag so you can sort one wedding from the other (Johnson/Smith), but you’re dragging-and-dropping that tag onto one photo at a time (which takes too much time for an entire wedding). There are faster ways than this one-tag-at-a-time method. For example...
Step One:
To tag all the photos from the wedding at the same time, try this: First, click on any untagged photo from the wedding. Then hold the Control key and click on other photos from that particular wedding. As you click on them, they’ll become selected (you’ll see a thin blue line around all the selected photos). Or, if all the photos are contiguous, click the first image in the wedding series, press-and-hold the Shift key, then click on the last image in the series to select them all.

BRAND X PICTURES
Step Two:
Now drag-and-drop your Johnson/Smith tag on any one of those selected photos, and all of the selected photos will have that tag. Now if you want to see just the photos from that wedding, you can click in the left column beside the Johnson/Smith tag and only photos with that tag will appear. By the way, if you decide you want to remove a tag from a photo, just Right-click on the photo and from the contextual menu that appears, choose Remove Tag. If you have more than one tag applied, you can choose which tag you want removed.

BRAND X PICTURES
Assigning Multiple Tags to One Photo
Okay, what if you want to assign the Johnson/Smith tag to a photo, but you also want to assign other tags (perhaps a “Client Work” tag and a “Make Prints” tag), as well? Here’s how:
Step One:
To assign multiple tags at once, first, of course, you have to create the tags you need, so go ahead and create two new tags by clicking on the New pop-up menu just below the Tags tab—naming one “Client Work” and another “Make Prints.” Now you have three tags you can assign. To assign all three tags at once, just hold the Control key, then in the Tags list, click on each tag you want to assign (Johnson/Smith, Client Work, and Make Prints).
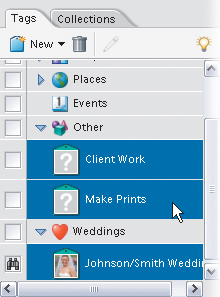
Step Two:
Now click-and-drag those selected tags, and as you drag, you’ll see you’re dragging three tag icons as one group. Drop them onto a photo, and all three tags will be applied at once. If you want to apply the tags to more than one photo at a time, first hold the Control key and click on all the photos you want to have all three tags. Then, go to the Tags list, hold the Control key again, and click on all the tags you want to apply. Drag those tags onto any one of the selected photos, and all the tags will be applied at once. Cool.

BRAND X PICTURES
Combining (Merging) Tags
It’s easy to go “tag crazy,” and if that happens (and you’ve got dozens of different tags applied to your photos), you may want to simplify by merging some of your tags together. For example, if you shot the 2004 Olympics, and you have tags for 100-meter dash, 400-meter dash, 600-meter dash, and a half dozen more dashes, you may want to combine all those separate tags into just one tag. Here’s how:
Step One:
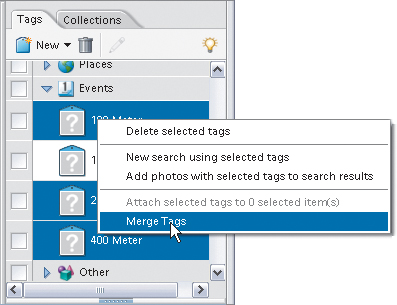
To combine (merge) multiple tags into just one convenient tag, start by holding the Control key and clicking on all the tags that you want to combine in the Tags list on the right side of the Organizer. Then Right-click on any of your selected tags, and from the contextual menu that appears, choose Merge Tags.
Step Two:
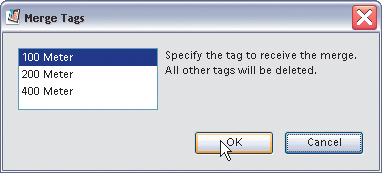
This brings up a dialog that asks you which of the selected tags will be the surviving tag (in other words, which tag will remain after the rest are merged into this one). Choose the tag that will remain from the list of tags, then click OK. The tags will be merged into that one. Every photo that had any one of those selected tags will now have the combined tag.
Sharing Your Tags (or Collections) with Others
Let’s say you went to the Olympics with a group of photographers, and they’re using Elements 3, too. If you’ve created a nice set of tags for identifying images, you can now export these tags and share them with the other photographers from that trip. That way, they can import them and start assigning tags to their Olympics photos without having to create tags of their own.
Step One:
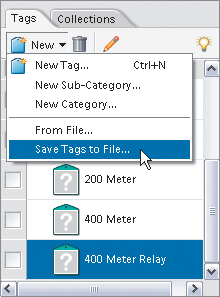
To export your tags to share with others, start by going to the Tags tab (on the right side of the Organizer), then click on the New pop-up menu and choose Save Tags to File.
Step Two:
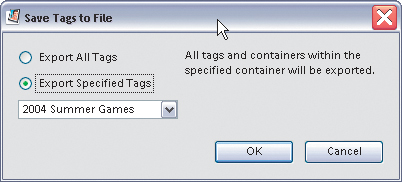
When the dialog appears, you can choose to Export All Tags, or better yet, click on the Export Specified Tags radio button, and then you can choose which tags you want to export from the pop-up menu. Choose the tags you want to export, and click OK. A standard Windows Save dialog will appear, so you can choose where you want your file saved. Name your file, click Save, and now you can email your exported tags to a friend.
Step Three:
Once your friends receive your tags, tell them they can import your tags by going to the Tags tab, clicking on the New pop-up menu, and choosing From File. Now they just locate the file on their hard drive and click Open. The new tags will appear in the Tags tab.

Collections: It’s How You Put Photos in Order One by One
Once you’ve tagged all your photos from the Johnson/Smith wedding, you may want to create a collection of just the best photos (the ones you’ll show to your clients: the bride and groom). You do that by creating a “collection.” An advantage of collections is that once photos are in a collection, you can put the photos in the order you want them to appear (you can’t do that with tags). This is especially important when you start creating your own slide shows and albums.
Step One:
To create a collection, click on the Collections tab on the top-right side of the Organizer (it’s just to the right of the Tags tab when you have the Organize Bin open). You create a new collection by clicking on the New pop-up menu, then choosing New Collection. When the Create Collection dialog appears, enter a name for your collection, and then click OK.

Step Two:
Now that your collection has been created, you can either (a) drag the Collection icon onto the photos you want in your collection, or (b) Control-click photos to select them and then drag-and-drop them onto your Collection icon in the Collections list. Either way, the photos will be added to your collection. To see just the photos in your collection, click on the box in the column to the left of your collection and tiny binoculars will appear. Now, to put the photos in the order you want, just click on any photo and drag it into position. The Organizer automatically numbers the photos for you, so it’s easy to see what’s going on as you drag photos into order. To return to all of your images, click the Back to All Photos button in the top-left corner of the Browser window.
BRAND X PICTURES
Choosing Your Own Icons for Tags and Collections
By default, a tag or collection uses the first photo you add to that tag or collection as its icon. Unfortunately, these icons are so small that you probably can’t tell what the icon represents. That’s why you’ll probably want to choose your own photo icons instead.
Step One:
It’s easier to choose icons once you’ve created a tag or collection, meaning you’ve tagged a few photos or added some photos to a collection. Once you’ve done that, click on your tag or collection, then click on the Pencil icon (it’s right under the tab name). This brings up the Edit Tag (or Collection) dialog. In this dialog, click on the Edit Icon button to launch the dialog you see here.
BRAND X PICTURES
Step Two:
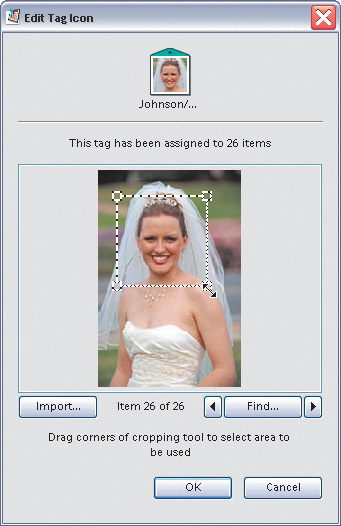
You’ll see the first photo in your collection in the preview window (this is why it’s best to edit the icon after you’ve added photos to the collection). If you don’t want to use this first photo, click the arrow buttons under the bottom-right corner of the preview window to scroll through your photos. Once you find the photo you want to use, click on the little cropping border (in the preview window) to isolate part of the photo. This gives you a better close-up photo that’s easier to see as an icon. Then click OK in the dialogs and that cropped area becomes your icon.

BRAND X PICTURES
Deleting Tags (or Collections)
If you’ve created a tag or a collection, and then later decide that you don’t want that tag or collection, you can delete it in just three clicks.
Step One:
To delete a tag or collection, start by clicking on the tag or collection you want to delete in the list of tags or collections on the right side of the Organizer.
Step Two:
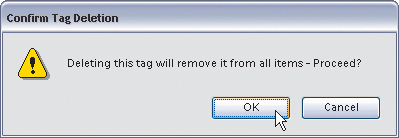
Once you’ve selected the tag or collection you want to delete, just click the Trash icon at the top of the Tags (or Collections) tab (it’s found to the immediate right of the New pop-up menu). If you’re deleting a tag, when you click on the Trash icon, it brings up a warning dialog letting you know that deleting the tag will remove it from all your photos. If you want to remove that tag, click OK. If you’ve got a collection selected when you click the Trash icon, it asks if you want to delete the collection. Click OK and it’s gone. However, it does not delete these photos from your main library—it just deletes that collection.
Seeing Your Photo’s Metadata (EXIF Info)
When you take a photo with a digital camera, a host of information about that photo is embedded into the photo by the camera itself. It contains just about everything, including the make and model of the camera that took the photo, the exact time the photo was taken, what the f-stop setting was, what the focal length of the lens was, and whether or not the flash fired when you took the shot. You can view all this info (called Exchangeable Image File [EXIF] data—also known as metadata) from right within the Organizer. Here’s how:
Step One:
To view a photo’s EXIF data, first click on the photo in the Photo Browser, and then click the Show or Hide Properties button at the bottom-left side of the Photo Browser window to show the Properties palette.
Step Two:
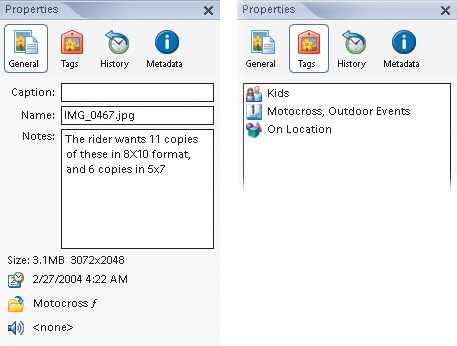
When the Properties palette appears in the bottom-right corner of the window, click the Metadata button at the top of the palette (it’s the fourth button from the left). This shows an abbreviated version of the photo’s EXIF data (basically, the make, model, ISO, exposure, f-stop, focal length of the lens, and the status of the flash). Of course, the camera embeds much more info than this. To see the full EXIF data, under the View section at the bottom of the palette, just select Complete and you’ll get more information on this file than you’d probably ever want to know. One thing that isn’t displayed in the Brief section that you probably might want to know is the date and time the photo was taken, and to see that you will have to open the Complete view.

Adding Your Own Info to Photos
Although your digital camera automatically embeds information into your photos, you can also add your own info from right within the Organizer. This includes simple things like a photo caption (that can appear onscreen when you display your photos in a slide show) or you can add notes to your photos for your personal use, either of which can be used to help you search for photos later.
Step One:
First, click on the photo in the Photo Browser window you want to add your own info to and click the Show or Hide Properties button at the bottom left of the Organizer, or you can also use the keyboard shortcut by pressing Alt-Enter.

© DAVE MOSER
Step Two:
This brings up the Properties palette along the bottom-right corner of the Organizer. At the top of the palette are four buttons for the four different sections of your photo’s properties. By default, the General section is selected. In the General section, the first field is for adding captions (I know, that’s pretty self-explanatory), and then the photo’s file name appears below that. It’s the third field down—Notes—where you add your own personal notes about the photo.
Step Three:
If you want to see other info about your photo (for example, which tags have been added to your photos; the date when you imported the photo or when you last printed, emailed or posted the photo on the Web; or the info embedded into the photo by your digital camera), just click on the various buttons at the top of the palette.
Finding Photos
Finding a group of photos is fairly easy using the Organizer, especially if you’ve tagged your images, but finding an individual photo takes a bit of work. It’s not hard; it just takes some effort because you essentially have to narrow the amount of photos down to a small group (like the month or day you shot the photos). Then you scroll through the photos in that group until you find the individual photo you want. It sounds complicated, but it’s really quite easy. Here are the most popular searching methods:
From the Timeline:
The Timeline, which is a horizontal bar across the top of the Photo Browser, shows you all the photos in your catalog. Months and years are represented along the Timeline. The years are visible below the Timeline; the small light blue bars above the Timeline are individual months. If there is no bar visible, there are no photos stored in that month. A short blue bar means just a few photos were taken that month—a tall bar means lots of photos. If you hover your cursor over a blue bar, the month it represents will appear. To see the photos taken in that month, click on the bar and only those photos will be displayed in the Photo Browser window. Once you’ve clicked on a month, you can click-and-drag the locator bar to the right or left to display different months.

Using Tags:
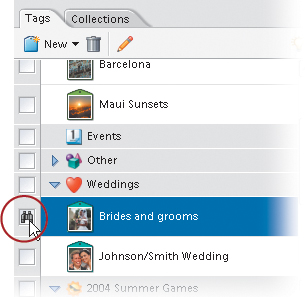
If there’s a particular shot of a bride and groom you’re looking for, and you’ve tagged all your bride and groom shots with a tag named “Brides and grooms,” then just click on the Tags tab and click on the empty box in the column to the left of that tag. Now only shots of brides and grooms will appear in the Photo Browser window.
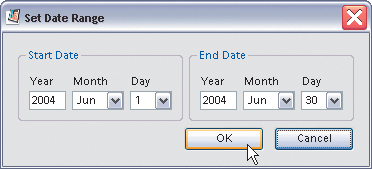
By Date Ranges:
Let’s say you’re looking to find a particular photo you shot on last year’s vacation. If you can remember approximately when you went on vacation, you can display photos taken within a certain date range (for example, all the photos taken between June 1 and June 30, 2004). Here’s how: Go under the Organizer’s Find menu and choose Set Date Range. This brings up a dialog where you can enter start and end dates. Click OK and only photos taken within that timeframe will be visible. Scroll through those images and see if you can find your photo.
By Caption or Note:
If you’ve added personal notes within tags or you’ve added captions to individual photos, you can search those fields to help you narrow your search. Just go under the Organizer’s Find menu and choose By Caption or Note. Then in the resulting dialog, enter the word that you think may appear in the photo’s caption or note, and click OK. Only photos that have that word in a caption or note will appear in the Photo Browser window.

By History:
The Organizer keeps track of when you imported each photo and when you last shared it (via email, print, webpage, etc.); so if you can remember any of those dates, you’re in luck. Just go under the Organizer’s Find menu, under By History, and choose which attribute you want to search under in the submenu. A dialog with a list of names and dates will appear. Click on a date and name, click OK, and only photos that fit that criterion will appear in the Photo Browser window.


Finding Photos Using the Date View
Okay, I have to admit, this particular feature is probably going to be your least-used Organizer feature because it seems so...I dunno...cheesy (for lack of a better word). When you use it, you see a huge calendar, and if photos were created on a particular day in the currently visible month, you’ll see a small version of one of those images on that date. Personally, when I see this view, I feel like I’ve just left a professional-looking application and entered a “consumer” application, so I avoid it like the plague, but just in case you dig it (hey, it’s possible), here’s how it works:
Step One:
To enter the Date View in the Organizer, click the Date View button at the top-right side of the Organizer window.

Step Two:
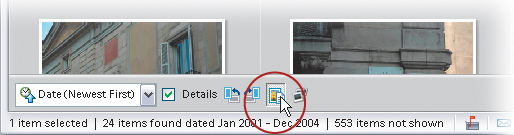
This brings up the Date View calendar window with the Month view showing by default (if you’re not in Month view, click the Month button along the bottom center of the window). If you see a photo on a date, it means there are photos that were taken on that day (or there are photos that you scanned and imported on that day). To see a photo, click on it within the calendar and a larger version will appear in the window at the top right of the Date View window. To see the rest of the photos on this day, press the Next Item on Selected Day button found directly under this preview window. Each time you click this button, the window displays a preview of the next photo taken on that day.
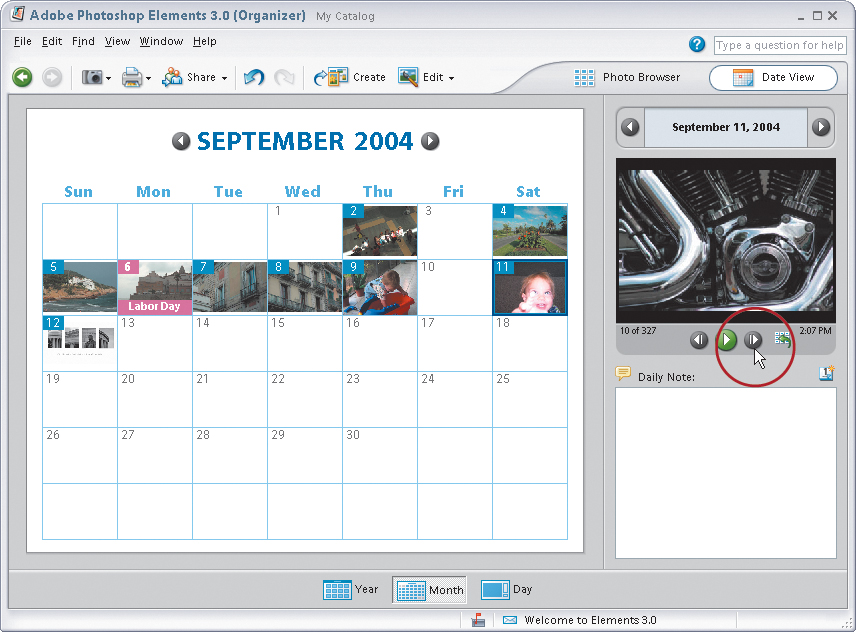
Step Three:
If you find the photo you’re looking for (I’m assuming that if you’re searching around in the Date View, you’re looking for a particular photo), press the little square icon to the immediate right of the Next Item on Selected Day button. This takes you out of Date View, opens the Organizer’s Photo Browser window, and jumps right to where your photo is and highlights it. Now if you want to edit that photo in Photoshop Elements 3, just press the Standard Edit button in the Organizer’s Options Bar.

Step Four:
Return to the Organizer and press the Date View button again to show the Date View. While we’re here, I want to show you a couple of the other features. Although the Month view is shown by default, there are buttons at the bottom of the Date View window for viewing the entire year (where days that have photos appear as solid-color blocks) or an individual day (where all the photos from that day appear in a slide-show-like window).

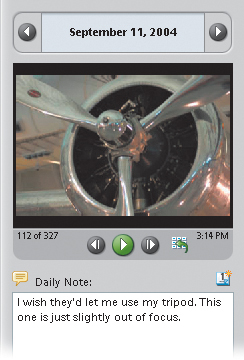
Step Five:
While in the Date View, you can add a Daily Note, which is a note that doesn’t apply to the current photo—it applies to every photo taken on that calendar day. If you change to the Day view (by clicking the Day button at the bottom of the Date View window), fields for adding a Caption and a Daily Note to the currently displayed photo will appear along the right side of the window. Now when you’re in Day view, you can not only see your caption for your photo, but you can also see the Daily Note for each photo taken on that calendar day.
Seeing an Instant Slide Show
If you want to see a quick slide show of a collection or currently selected photos in the Organizer, it’s pretty much just a two-click process. Later in this book I’ll show you how to create rich, full-featured slide shows using an entirely different feature of Elements 3, but for now we’ll just look at how to create a quickie slide show with minimum time and effort.
Step One:
Open the Organizer and make sure the Photo Browser window is active by clicking the Photo Browser button in the top right of the Organizer. Now hold the Control key and click on each photo you want to appear in your slide show (if the photos are contiguous, you can click on the first photo, hold the Shift key, click on the last photo, and all the photos in between will be selected). Once the photos you want are selected, click on the Photo Review button (it looks like little slides) at the bottom left of the Organizer window.

Step Two:
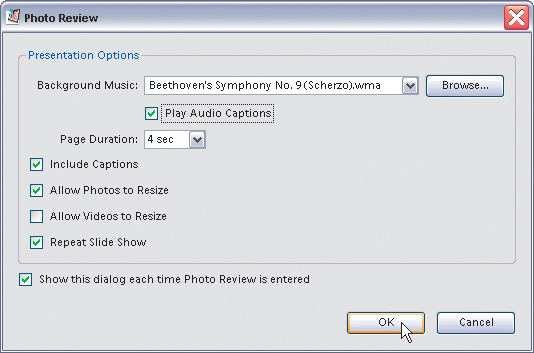
This brings up the Photo Review dialog, which contains presentation options for your slide show. You can choose music that will play during your slide show from the Background Music pop-up menu. You can also choose how long each photo will appear onscreen. By default, it assumes you want any captions included, but you can turn that off by clicking the Include Captions checkbox, and you can also have your slide show loop when it reaches the end by clicking on the Repeat Slide Show checkbox. Now click OK to begin your slide show.
Step Three:
Once you click OK, you’ll enter Photo Review mode, where you’ll see a floating slide show Control Bar on the top-left side of your screen. Your slide show won’t actually start advancing until you click the green Play button (or press the shortcut F5). To stop your slide show from advancing (to pause it), press the Play button again in the Control Bar (to resume the slide show, just press Play one more time).

Step Four:
Besides the standard Previous, Play, Next, and Stop buttons that appear in the Photo Review Control Bar, you’ll also see other controls on the right. These extra controls are for comparing still images and are not for use during your slide show. To hide these other controls, click on the tiny left-facing arrow on the far-right side of the Control Bar and it will collapse down to just display the slide show controls.

Step Five:
To quit your slide show and return to the Photo Browser, press the Escape key on your keyboard or click the Stop (X) button on the Control Bar.

Comparing Photos
Let’s say you’ve just shot a bike show, and now you’re looking at 14 close-up shots of the prize-winning Harley-Davidson. The Organizer has a great feature that lets you compare two images onscreen (either side by side or one above the other) to help you narrow down your choice to the best possible photo.
Step One:
Open the Organizer and make sure the Photo Browser window is active by clicking the Photo Browser button in the top right of the Organizer. To compare (or review) photos side by side, first hold the Control key and click on all the photos you want to compare. Then press the Photo Review button at the bottom left of the Photo Browser window (or just press the F11 key on your keyboard). This brings up the Photo Review dialog, which presents options for a slide show. You can ignore those slide show options and just click OK to enter Photo Review mode, which is really a full-screen mode that can be used to compare images.
Step Two:
The photo you selected first will appear in Full Screen mode, and you’ll see a floating Control Bar at the top-left side of your screen. Click on the Photo Compare button (it looks like two boxes), which puts the first and second photos you selected side by side onscreen. The first photo (on the left) has the number 1 in its upper-left-hand corner, and the second photo (the one being compared) is noted as number 2.

Step Three:
Now visually compare these two photos. You’ll want the one that looks best to remain onscreen so you can compare other selected photos against it, right? To do that, click on the “bad” photo, and a blue highlight will appear around that photo, indicating that this is the one that will change. In this example, I thought the first photo looked better, so I clicked on photo number 2 (the one on the right).

Step Four:
Now go to the Control Bar, click on the Next Photo button, and the second photo will be replaced with your next photo in that series. Again, review which of these two looks the best, then click on the photo that looks worst (that way, you can replace it with another photo you want to compare). Click the Next Photo button to compare the next photo (and so on). To back up and review a previous photo, click the Previous Photo button in the Control Bar.

Step Five:
Besides this side-by-side mode, there’s also an option that lets you see your photos stacked one on top of the other (which you might like for comparing photos in landscape orientation). To change to that mode, click on the down-facing arrow to the immediate right of the Photo Compare button, and from the drop-down menu that appears, choose Above and Below. Cycle through the images as you did before—just repeat Steps Three and Four until you find the photo you like best. When you’re finished, press the Escape key on your keyboard or click the Stop (X) button in the Control Bar. The photo you selected will appear highlighted in the Photo Browser window.

Comparing Photos by Zooming and Panning
This isn’t exactly an Organizer technique, but there’s also a new way to compare photos in the Elements Editor. This is a cool feature that Elements 3 borrows from Photoshop CS—the ability to view multiple images at once (for comparison purposes)—but more importantly, to be able to view each one at the same magnification (even when changing zoom magnifications). You can scroll around (pan) to inspect images and have all the images pan at the same location and rate. This is one you need to try to really appreciate.
Step One:
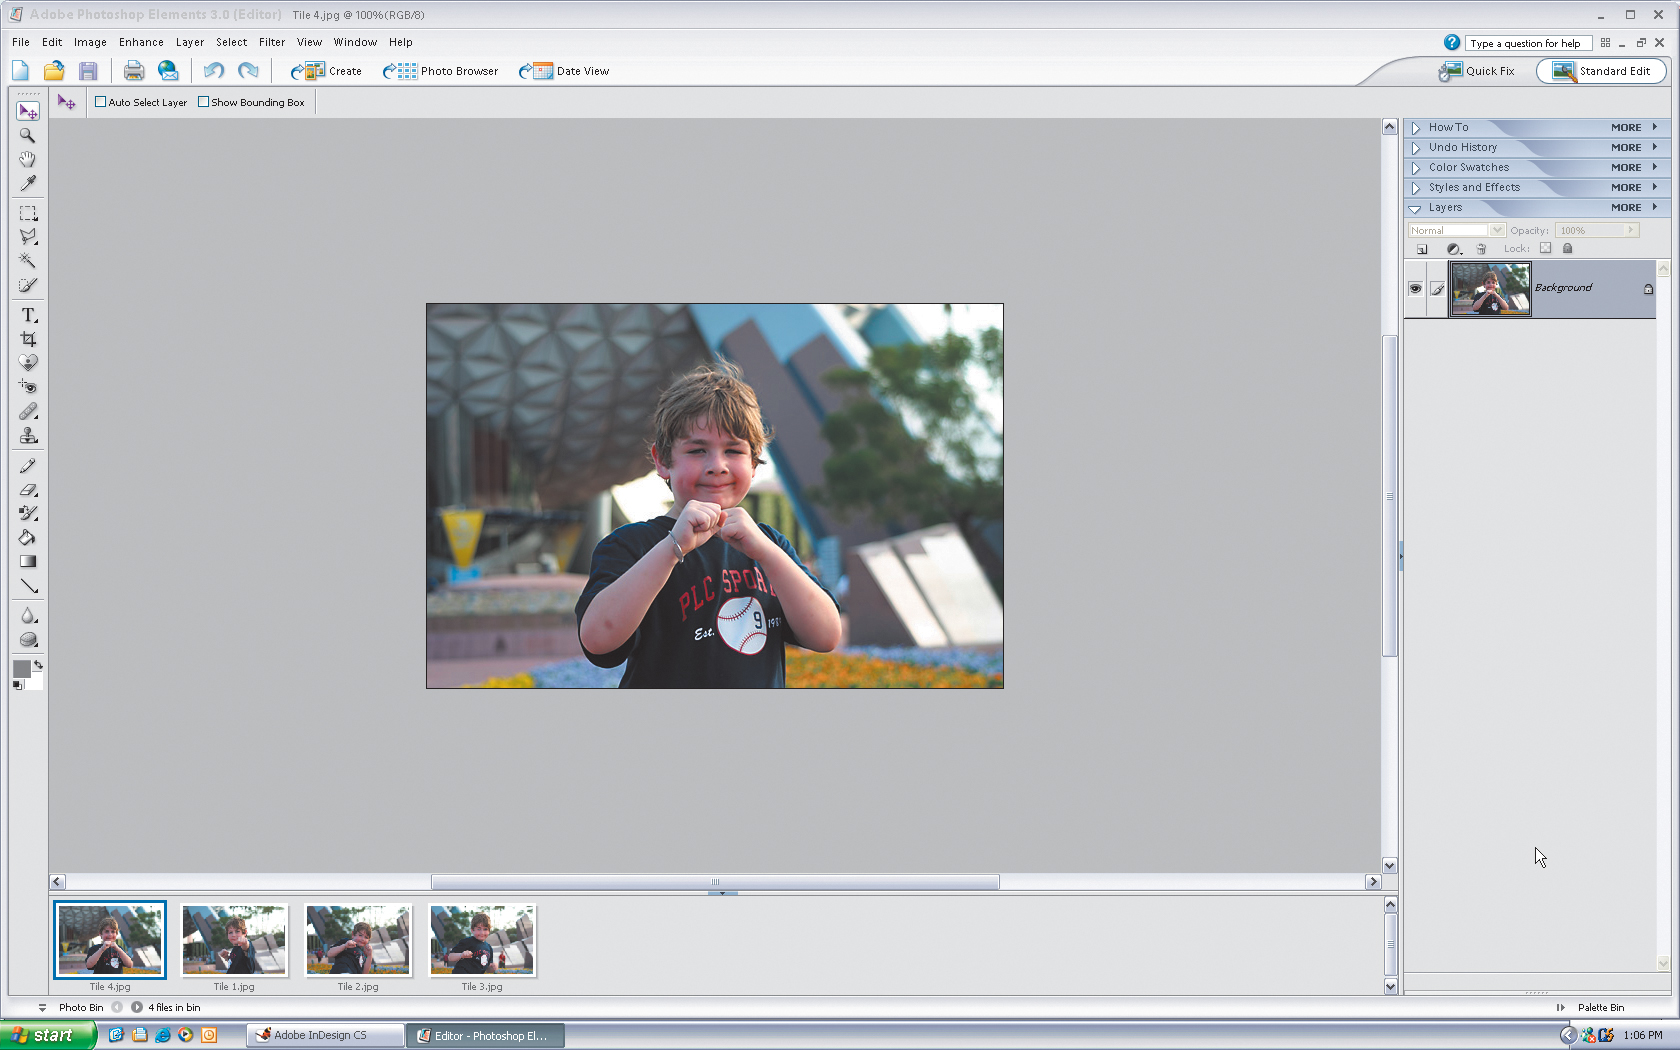
Open the multiple photos you want to compare in the Editor. (In this instance, we’ll compare four photos, so open four photos, which will appear in the Photo Bin at the bottom of the Elements window. The power of this feature will be more apparent if you open four similar images, like four portraits of the same person at one sitting, etc.)
Step Two:
Go under the Window menu, under Images, and choose Tile. This will put all your photos in their own separate windows, and then it will tile these four open windows across your screen so you can see all four photos at once.

Step Three:
Now that your photos are tiled, return to the Window menu, under Images, and choose Match Zoom. Now, press-and-hold the Shift key, press Z to switch to the Magnifying Glass tool (okay, it’s called the Zoom tool, but its icon looks like a magnifying glass), and click-and-drag a selection around the eyes of the person in one of the active image windows. You’ll notice that all four photos jump to the same zoom.

Step Four:
Now go under the Window menu, under Images, and choose Match Location. Press H to switch to the Hand tool (it’s right under the Zoom tool in the Toolbox), press-and-hold the Shift key, then click within your image and drag to pan around your photo. If you don’t hold the Shift key first, it will just pan around the front-most active window. By holding Shift, all the windows pan at the same time and speed, enabling you to compare particular areas of your photos at the same time.

Reducing Clutter by Stacking Your Photos
This is one of my favorite new features added in version 3, because it lets you reduce “photo clutter” and makes things more organized when working in the Photo Browser. It’s called “stacking,” and it lets you stack similar photos together, leaving just one photo to represent a stack of photos. So, if you took 120 shots at the rehearsal dinner, and you’ve already sorted the best of the bunch into a collection, you don’t have to have 120 shots cluttering up your catalog. Instead, you can have just one representative photo, and underneath it are the 120 others.
Step One:
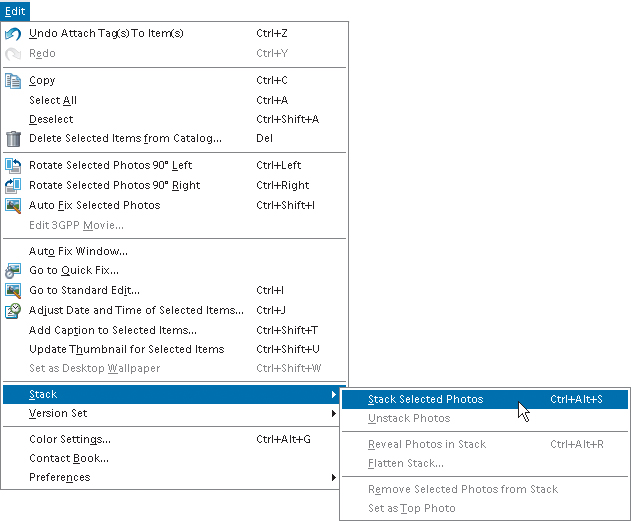
With the Photo Browser open in the Organizer, hold the Control key on your keyboard and click on all the photos you want to add to your stack (or if the images are contiguous, simply click the first image in the series, press-and-hold the Shift key, and click on the last image in the series). Once they’re all selected, go under the Organizer’s Edit menu, under Stack, and choose Stack Selected Photos in the submenu.
Step Two:
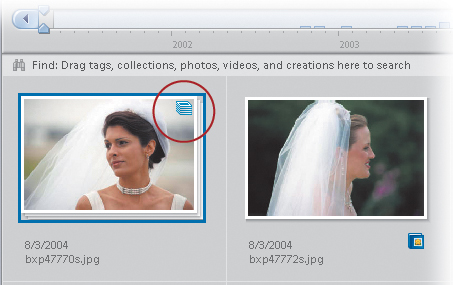
No dialog appears, it just happens—your 120 photos now are stacked behind the first photo you selected (think of it as 120 layers, and on each layer is a photo, stacked one on top of another). You’ll know a thumbnail photo contains a stack because a Stack icon (which looks like a little blue stack of paper) will appear in the upper-right-hand corner of your photo.
BRAND X PICTURES
Step Three:
Once your photos are stacked, you can view these photos anytime by clicking the photo with the Stack icon, and then going under the Edit menu, under Stack, and choosing Reveal Photos in Stack. This is like doing a “Find,” whereas all the photos in your stack will appear in a “find results” window (called the Photos in Stack window) so you can see them without unstacking them. Then return to the Photo Browser window by clicking on the Back to All Photos button in the top-left corner of the window.

Step Four:
If you do want to unstack the photos, select the photo with the Stack icon in the Photo Browser window, then go under the Edit menu, under Stack, and choose Unstack Photos. If you decide you don’t want to keep any of the photos in your stack, select the photo with the Stack icon in the Photo Browser window, go back under the Edit menu, under Stack, and choose Flatten Stack. It’s like flattening your layers—all that’s left is that first photo. However, when you choose Flatten, you will have the choice of deleting the photos from your hard disk or not.
