Start Me Up: Mastering the File Browser

Photographer Scott Kelby
At first, you might not think that Photoshop Elements’ File Browser deserves its own chapter, but when you look at all the things it’s done for the community (including taking meals to other software applications that are less fortunate), you realize it probably does deserve it after all. Especially when you take into consideration the fact that the File Browser all by itself is probably more powerful than many standalone products, like the Whopper (that computer in the movie War Games with Matthew Broderick) or Microsoft Office 2000. Sure, the Whopper could simulate a Soviet First Strike, but frankly, it was pretty lame at sorting and categorizing your photos (as is Microsoft Office). In fact, I’m not sure the Whopper could sort or categorize photos at all, which is probably why no Photoshop Elements book to date has a chapter on the Whopper; but you’d think that with all the cool things the File Browser does, surely at least one Photoshop Elements book out there would dedicate a chapter to it, right? Well, not as far as I’ve found. So I set out to do just that—really dig into to the meat of the Browser, uncover its hidden power, and see if once and for all it was really written by a man named Professor Faulken (this is precisely why they shouldn’t let me write these chapter intros after 1:00 a.m.).
Saving Your Digital Negatives
I know you want to get right to organizing and editing your photos, but before we get to those “fun parts,” there are a couple critically important things you’ll need to do first—before you even actually open Photoshop Elements 3. They’ll take a minute or two, but if you don’t do them, you’ll be sorry down the road.
Step One:
Plug your card reader (CompactFlash card, Smartcard, etc.) into your computer and the Adobe Photo Downloader will appear. By default, all of your photos are marked to be imported into your computer (that’s why you’ll see a little checkbox marked beneath each photo). If there are photos you don’t want imported, just uncheck the little box beneath the photos you don’t want. If you want to choose a location (folder) on your hard disk in which to save these photos, click the Browse button, choose the location where you’d like these photos saved, and then click the Get Photos button at the bottom-right corner of the Adobe Photo Downloader. When you click that button, a progress dialog will appear showing that the photos are being copied to your hard disk.

Step Two:
Once your photos are imported, they’re automatically loaded into the Photoshop Elements Organizer as their own separate collection. Before you start sorting and editing these photos, you need to burn these photos to a CD. Don’t open the photos, adjust them, choose your favorites, and then burn them to a CD—burn them now—right off the bat. The reason this is so important is that these are your negatives—your digital negatives, which are no different than the negatives you’d get from a film lab after it’s processed your film. By burning a CD now, before you start editing, you’re creating a set of digital negatives that can never be accidentally erased or discarded—you’ll always have these digital negatives.

Step Three:
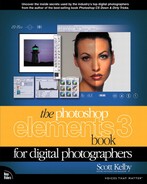
Now, what if you don’t have a CD burner? That’s easy—buy one. It’s that critical, and such a key part of your digital setup. Luckily, burning CDs has become so fast, so inexpensive (you can buy blank writable CDs for less than 50¢ each), and so easy to do that you can’t afford to skip this step. To burn the photos you just imported onto a CD, go under the Organizer’s File menu and choose Backup.
Step Four:
Choosing Backup brings up the Burn/Backup dialog. Click the Backup the Catalog radio button to copy all the images in your current catalog (the ones you just imported) onto a CD. Press the Next button to move to the next step. (You may get a warning dialog asking if you want to “reconnect” your images. This dialog just verifies that the files imported properly. It’s up to you to click Continue or Reconnect, but reconnecting couldn’t hurt.)

Step Five:
On the next screen of the dialog, click the Full Backup radio button, since this is the first time you’re backing up this particular set of photos. Then click the Next button again.

Step Six:
In the Destination Settings section of the dialog, click on your CD burner’s drive in the list at the top of the dialog. When prompted, insert a blank CD in your CD burner, and then give your CD a name in the Name field. Now, click the Done button at the bottom of the dialog to begin the backup process.

Step Seven:
A status dialog will appear while your backup disc is being burned.

Step Eight:
When it’s done writing, another dialog will appear asking if you want to verify that the disc was written correctly. Since this disc contains something very important and is virtually irreplaceable, I would suggest that you absolutely click the Verify button. That way, you’re ensured that the backup worked flawlessly.

Step Nine:
When the verification process is done, you’ll be greeted with a somewhat insulting dialog that reminds you to take a marker and write the name of what’s on your backup disc on the backup disc itself. Think of it as the “Duh!” screen. By the way, if you’re the extra careful type (read as “paranoid”), you can burn yourself another copy to keep as a second backup. There’s no loss of quality, so burn as many copies as you need to feel secure (remember, just because you’re paranoid, doesn’t mean they’re not out to get you).

Creating a Contact Sheet for Your CD
All right, your CD of “digital negatives” is burned and it’s time to get to work, but before you go any further, you can save yourself a lot of time and frustration down the road if you create a CD-jewel-box-sized contact sheet now. That way, when you pick up the CD, you’ll see exactly what’s on the disc before you even insert it into your computer. Luckily, the process of creating this contact sheet is automated, and after you make a few decisions on how you want your contact sheet to look, Photoshop Elements 3 takes it from there.
Step One:
First open the photos you want to appear on your contact sheet in the Elements Editor, then go under the File menu and choose Print Multiple Photos (or press the keyboard shortcut Alt-Control-P). (Note: If you’re already working in the Organizer, you can create a contact sheet from the currently open collection by going under the Organizer’s File menu and choosing Print.)

Step Two:
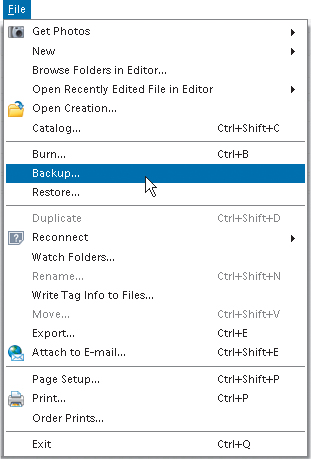
Choosing Print Multiple Photos first brings up the Elements Organizer, and immediately after, the Print Photos dialog will appear. There are three categories on the right side of the dialog. Under the Select Type of Print category, choose Contact Sheet from the pop-up menu.
BRAND X PICTURES
Step Three:
Now that you’ve told Elements that you want to print a contact sheet (and the preview window shows how your selected photos would look as a contact sheet on a letter-sized page, which is its default size), your next step should be to specify the size you need your contact sheet to be (in this case, one that will fit in the front of a CD jewel case). To do that, start by choosing Adobe PDF in the Select Printer pop-up menu. Then, click on the blue-and-white icon that appears to the immediate right of the Select Printer pop-up menu at the top right of the dialog.

Step Four:
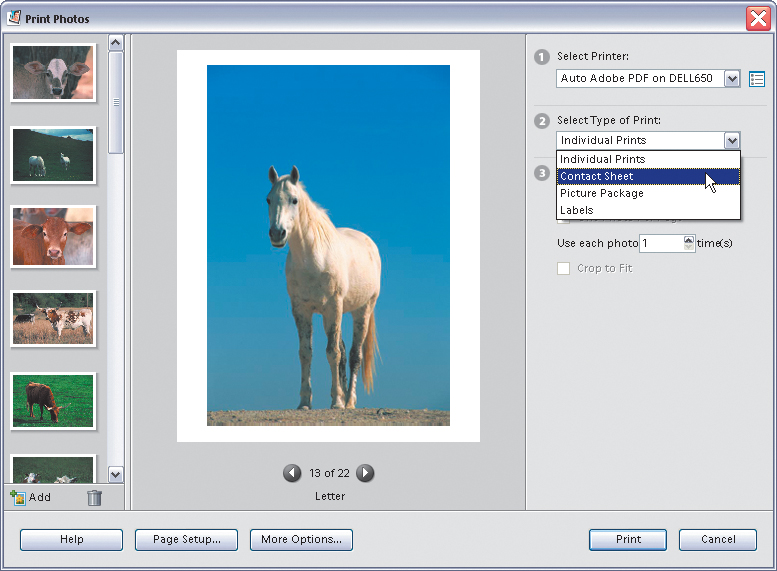
This brings up a dialog with options for your printer (since we’re printing to an Adobe PDF driver rather than printing the file out to a regular printer, you’ll see the options for a PDF). Since Adobe didn’t include a standard size for CD jewel cases, you’re going to create one by clicking on the Add Custom Page button in the top right of the dialog.

Step Five:
Clicking the Add Custom Page button brings up the dialog shown here. First, give your new paper size a name (something like “CD Jewel Case”) in the Paper Name field. Then in the Paper Size section, enter “4.5” for Width and “4.5” for Height, click the Inch radio button in the Unit section, and then click the Add/Modify button to save your custom size in the Adobe PDF Page Size pop-up menu’s list of presets.

Step Six:
When you click Add/Modify, it returns you to the Adobe PDF Document Properties dialog. Click on the Adobe PDF Page Size pop-up menu and when the menu appears, you’ll see that your new custom size (CD Jewel Case) now appears in the list. Click on it to select it as your contact sheet size.
Step Seven:
When you click OK, the contact sheet preview (which appears in the center of the dialog) will now display how your contact sheet thumbnail photos will appear on your CD jewel case. (Note: The name CD Jewel Case will appear below the preview.) If you had more than one page’s worth of photos open, you’ll have more than one page of thumbnails (instead of saying page 1 of 1, it’ll say something like 1 of 2, or 1 of 3, and so on). To see any additional pages, click on the right-facing arrow button below the preview.

Step Eight:
On the right side of the dialog, you can decide if you want to have Elements 3 print the file’s name below each thumbnail on your contact sheet. I strongly recommend turning this feature on because one day you may have to go back to this CD looking for a photo. The thumbnail will let you see if the photo you’re looking for is on this CD (so you’ve narrowed your search a bit), but if there’s no name below the image, you’ll have to manually search through every photo on the CD to locate the exact one you saw on the cover. However, if you spot the photo on the cover, and you can see its name, then you just open Elements 3, then open that file. Believe me, it’s one of those things that will keep you from ripping your hair out by the roots, one by one. Now you can click Print and your contact sheet is created in PDF format and opened in Elements. Now just go the File menu, select Print, and print your contact sheet to your printer.

Step Nine (or so you think...):
This is more like a tip than a step, but a number of photographers add a second contact sheet to make it even easier to track down the exact image they’re looking for. It’s based on the premise that in every roll (digital or otherwise) there’s usually one or two key shots—two really good “keepers”—that will normally be the ones you’ll go searching for on this disc (after all, it’s pretty rare to shoot 30 or 40 shots and each one of them is just fantastic. Usually, there are a couple of great ones, 15 or so that are “okay,” and the rest shall never see the light of day, so to speak). So what they do is make an additional contact sheet that either becomes the front cover of the jewel case (with the regular contact sheet behind it in the cover of the case) or vice versa (the regular contact sheet is visible on the outside of the jewel case, and this additional contact sheet is behind it). This additional contact sheet only includes the one or two key photos from that roll, along with a description of the shots, to make finding the right image even easier.

Step Ten:
Here’s the final result with a two-photo contact sheet for the cover of the CD jewel case, after a regular contact sheet with multiple images was printed and slid into the CD jewel case behind it. To create this contact sheet, open one or two images in the Editor and just repeat Steps One through Eight. When you get to Step Eight, just press the letter T to switch to the Type tool and enter descriptive text next to your contact sheet thumbnail(s). Now print your new contact sheet.

Dealing with the Welcome Screen
I know, the name “Dealing with the Welcome Screen” makes the Welcome Screen sound like something obtrusive, but really it’s not. At least, not at first. In fact, at first it’s welcome (like the way I worked that in there?), but after you’ve seen it a few hundred times, if you’re like most folks you’ll probably want it to go away. But before you make it go away for good, there’s a few things you might want to decide first. And they are...
The First Time:
The Welcome Screen that appears when you launch the program is designed to help first-time users figure out what they want. If you’re holding this book, my guess is you already know what you want, so click the Edit and Enhance Photos button near the top center of the Welcome Screen, which takes you right into the Elements Editor (which, if you’ve used previous versions of Elements, you know simply as Photoshop Elements).

Future Uses:
You can use this Welcome Screen to decide what happens when you launch Elements 3 in the future. For example, by default it wants to show you this Welcome Screen each time you launch Elements. You may want that the first few times, but once the novelty wears off, you’ll want to go straight to the Editor when you launch Elements. Then, you just need to change one thing: At the bottom left-hand corner of the Welcome Screen, where it says “Start Up In” you’ll see the words “Welcome Screen.” Click on Welcome Screen and choose Editor from the pop-up menu that appears. Now when you start up Elements, you’ll get the Editor.

Start with Sorting:
If you’d prefer to skip the Welcome Screen and instead go right into sorting your images rather than editing them, you can go to the built-in Organizer (which used to be the standalone product Photoshop Album) by choosing Organizer from the Start Up In pop-up menu.

Welcome Back Welcome Screen:
Okay, what if you’ve chosen to start up in the Editor or Organizer, and then at some later date you think you’d like to get that Welcome Screen back again? It’s easy—just go under the Window menu (in either the Editor or Organizer) and choose Welcome, and the screen will reappear. However, once you close it, it won’t reappear at startup unless you change the Start Up In pop-up menu in the bottom-left corner to Welcome Screen.

Other Options:
One last thing—just to save you some time: If you have the Welcome Screen open, there are three buttons that actually take you to the Editor—they just take you to different parts. Quickly Fix Photos opens the Editor in the Quick Fix mode; the Edit and Enhance button just launches regular ol’ Elements 3 (the Editor); and Start From Scratch opens the Editor too, but it thoughtfully opens the New (document) dialog for you.

How to Make Elements 3 Look and Act Like Elements 2
By now you’ve already noticed that Elements 3 has a new interface (new Toolbox, new way it displays your photos, new palette scheme—new everything). Now, although I think the new interface is a huge step in the right direction, we both know there are people out there who don’t like change (not you and me, of course—other people. Freaks mostly). Anyway, if you run into those “no-change people,” you can show them how to quickly change the Elements 3 interface to look and act just like previous versions of Elements using the technique below.
Step One:
The most obvious difference between versions is that the Elements 2 floating Toolbox has been replaced by a single-row Toolbox that is attached to the left side of your screen in Elements 3. To make it look like the old floating Toolbox again, just click on the tiny tab that appears at the top of the Toolbox and drag it out into your work area. The old two-row floating Toolbox is back. To return to the single-row look, just drag the top of the Toolbox back to the top-left corner where the single row had been.

Step Two:
The next major thing you’ll notice is that by default photos no longer appear in their own separate windows. They now appear centered onscreen with a gray work area around them. Adobe calls this Maximize Mode. This mode is really great for two reasons: (1) It gives you the maximum working area possible by centering your photo onscreen; and (2) it puts a neutral gray color around your working photo, which pros prefer while color correcting images so background colors don’t interfere with the perception of color. But if you’d like the ol’ “separate-floating-window-for-every-photo” scheme of Elements 2 back (without having your photos centered with the gray area surrounding your images), just go under the Window menu, under Images, and choose Cascade. Voilá—the individual windows are back. (To return to the new view, just go to Window, under Images, and choose Maximize Mode.)

Step Three:
The third thing that’s changed is the introduction of the Palette Bin that appears along the right side of your screen, which replaces the free-floating palettes of Elements 1 and 2. If you want those floating palettes back (and do away with the new Palette Bin altogether), just click on the tab of one of the “nested” palettes in the bin, drag it out into your work area (as I did here with the Layers palette), and it becomes a regular floating palette again. Just like in previous versions of Elements, you can nest your most-used palettes together by dragging-and-dropping their tabs onto any open floating palette.

Step Four:
Once you’ve emptied out the Palette Bin (you’ve taken out, nested, or closed all the palettes that Adobe puts there by default), you can close the Palette Bin by either clicking on the little tab in the center of the vertical divider bar or clicking the arrow to the left of the words “Palette Bin” in the lower-right corner of your screen. (To return to the new layout, click on the arrow next to the words “Palette Bin” again to open it, and drag-and-drop your palettes’ tabs to “re-nest” them in the Bin.)

Step Five:
Elements 3 also introduced the Photo Bin. It appears along the bottom of your screen and shows a small thumbnail of each of your open documents. So even though the Maximize Mode only shows one photo at a time, you can use the Photo Bin to bring the photo of your choice to the front with just one click on a thumbnail. There are also two tiny arrow buttons along the bottom-left corner of the Photo Bin that work much like forward and reverse buttons. Click on the right-facing arrow to move to the next photo in the Bin, or click on the left-facing arrow to move to the previous photo. To close it so Elements 3 looks more like Elements 2, click on the down-facing arrow to the right of the words “Photo Bin” in the bottom-left corner of your screen. (To go back to the Photo Bin, click on the arrow again.)


Standard Elements 3 window

Elements 3 window lookin’ “old school”
It’s Decision Time: File Browser or Organizer?
Back in Photoshop Elements 2 (and in the Macintosh version of Elements 3), your only method of importing and organizing photos was the File Browser. A new-and-improved File Browser exists in Elements 3, but there’s actually something better—the Organizer. It’s an updated version of what previously was a standalone product that Adobe sold separately as Photoshop Album 2. Since they’re both built in, which should you use—the updated File Browser or the new Organizer? Here’s how to determine which one’s right for you.
The Organizer:
The Organizer does double duty—it works wonderfully well with photos you’ve just taken with your digital camera, but its forte is cataloging all your digital camera photos and keeping them one or two clicks away at any time. It was designed for creating a giant (yet very fast) database of all your photos taken through the years; it excels at tracking and organizing your photos; and (perhaps most importantly) it’s designed to help you find the photos you’re looking for fast.

BRAND X PICTURES
Another great thing about the Organizer is its ability to output (share) your photos in a wide variety of formats, including full-featured slide shows, DVDs, websites, online printing services, and HTML-based email.
So who should use the Organizer? (1) Anyone new to Elements should definitely use the Organizer because it’s the future of Elements digital photo management. (It’s not the File Browser or Adobe would have just kept on improving it. I predict the File Browser will probably go away completely in a future version of Elements.) (2) People who want instant access to all their photos without having to search through CDs of photos. (3) Anyone who wants to do other things than just print photos out of a desktop printer (you want slide shows, DVDs, websites, etc.). (4) Anyone who is using Photoshop Album 1 or 2 and is already familiar with it. (5) Anyone who wants something better, more full-featured, more powerful than the File Browser. In short, my recommendation to almost everyone is “use the Organizer.”
The File Browser:
The File Browser is essentially used for managing your current photos. In other words, it works best when importing and sorting photos you just shot from your digital camera. It’s great for separating the good shots from the bad shots before you actually open them in Elements 3 for editing. That’s its forte.

BRAND X PICTURES
Here’s the bad part: It’s not very good at working with a big collection of all your photos (like a catalog of your past two years of photos). It’s too slow, too clunky, and although you could conceivably manage thousands of photos using the File Browser, that’s not really what it was designed for, so it will be a bit laborious and slow using it in that role.
So who should use the File Browser? (1) People who are used to the File Browser from Elements 2 and don’t feel like learning how to use the Organizer; (2) people who think they’ll soon be moving to the full-blown Photoshop CS, which uses a similar File Browser, and who want to familiarize themselves with it before they upgrade; (3) people who don’t care about keeping their entire collection of photos accessible right from their hard drive; and (4) Mac users, whose version of Elements has no Organizer.
Accessing the File Browser
The File Browser (which has been greatly enhanced since version 2) is ideal for working with a folder full of images or images you just saved from your camera. Think of the File Browser as a tool for working with images you just shot today, rather than the new Photo Browser, which is part of the Organizer that’s used for working with a catalog of all of your photos you’ve taken over the years.
One Way:
You can access the File Browser by going under the File menu and choosing Browse Folders. An even quicker way is to use the keyboard shortcut Shift-Control-O.

Another Way:
Or, you can even open it directly from the Window menu by choosing File Browser.

Navigating to Your Photos Using the File Browser
The File Browser is divided into four main palettes, if you will: one for navigating to your photos; one that displays thumbnail versions of your photos (once you find them); one that shows a larger preview of your currently selected thumbnail; and one that lets you see information about the currently selected photo. We’ll start with the navigation window (after all, if you can’t find your photos, the rest of the File Browser will look pretty, um...blank).
Accessing Your Photos:
The left side of the File Browser is the palette area (although they’re palettes, they’re not “floating palettes” like most of the palettes in Elements, because they have to stay within the File Browser). The top-left palette (called Folders) is designed to give you direct access to photos on your digital camera’s memory card, photos on your hard drive, a CD of images, a network drive—you name it. The idea behind this is simple: It gives you access to your digital camera images without leaving Elements. To navigate to the photos inside a folder from the palette, just click once on the folder’s icon.

Saving Your Favorite Folders:
If you find yourself going to a particular folder fairly often, you can save that folder as a “favorite.” Just go under the File Browser’s mini-menu, under File, and choose Add Folder to Favorites. That folder will now appear under the heading Favorite Folders in the pop-down navigation menu that appears directly above the main thumbnail window. To delete a folder from your Favorite Folders list, select the folder in the Folders palette, go under that File menu again, and choose Remove Folder from Favorites.

Moving Photos from Folder to Folder:
Another nice navigation feature of the File Browser is that you can use it to move photos from one folder to another. You do this by dragging the thumbnail of the photo you want to move, then dropping that photo into any folder that appears in the Folders palette (when you move the dragged photo over a folder, a rectangular highlight appears letting you know that you’ve targeted that folder). That photo will now be removed from the currently selected folder and placed into the folder you dragged-and-dropped it into.

BRAND X PICTURES

Tip
If you hold the Control key as you drag, instead of moving your photo, it will place a duplicate of your photo into that folder, rather than the original.
Previewing Your Images
The second palette down on the left side of the File Browser is designed to give you a larger preview of the thumbnail images you click on in the main thumbnail window. Although the Preview palette looks like a one-trick pony, here are a few hidden little features that can make it a much more useful tool.
Bigger Previews are Just a Double-Click Away:
The default size for the Preview palette’s thumbnail is fairly small, but you can make it much bigger by double-clicking—not on the tab that says “Preview,” but instead on the little tab that says “Folders.” This will collapse (hide) the Folders palette to where just its tab is visible, which expands the viewing area of the Preview palette automatically.

BRAND X PICTURES
Portrait Previews:
If you need the preview even bigger, double-click on the Metadata tab at the bottom left of the File Browser and it will collapse, expanding the Preview palette even more. This works particularly well when you’re viewing a photo that was shot in portrait orientation (tall rather than wide).

Landscape Previews:
However, when you have a photo in landscape orientation, to get the preview much bigger you’ll also have to drag the Preview palette out wider by clicking anywhere along the divider bar between the Preview palette and the main thumbnail window and dragging to the right to expand the width of the Preview palette. Note: To make any collapsed palette visible again, just double-click directly on its tab name.

BRAND X PICTURES
Getting Info (Called Metadata) on Your Photos
The third palette down in the palette area is the Metadata palette. It gives you access to information that’s embedded into your photo by your digital camera at the moment you took the shot. (If you’re on a Mac, there’s a Keywords palette nested with the Metadata palette as well, which enables you to search for specific images by assigning keywords.) We’ll start here with a simple look at how to access the embedded background information on your photo by using the Metadata palette.
Background Info on Your Photo:
When you shoot a photo with today’s digital cameras, at the moment you take the shot, the camera automatically embeds loads of information about what just took place: things like the make and model of the camera, the time the photo was taken, the exposure setting, the f-stop, shutter speed, etc. Then, once you bring the digital photo into Elements, the application then embeds more information into the photo (stuff like the file name, when it was last edited, which format the file was saved in, its physical dimensions, color mode, etc.). All this embedded info comes under the heading Metadata, and that’s why it appears in the Metadata palette. At the top of the palette, under the heading File Properties, is the info Elements embeds into your file. The next field down is IPTC metadata, which is where you’ll see any extra data added to the file (Adobe Photoshop CS users can embed their own personal data into files). The next field down, Camera Data (Exif), displays the background info embedded by your camera. You may never use this, but it’s nice to know it’s there in case of a pop quiz.

Setting Up How You’ll View Your Photos
Before you start sorting your photos, it helps to get a handle on how to view your images in the File Browser. In Elements 3 you have a decent amount of control over how this is done, so here I’m basically going to show you what your options are, then show you how to set up the File Browser to display photos in a way that’s most comfortable for you.
Working in the Main Thumbnail Window:
The main window displays the thumbnail views of your photos. If you click on a thumbnail within this window, the photo highlights to let you know it’s selected, and a preview of the photo is displayed in the Preview palette to its left. If you want to open the full-size image in Elements, just double-click on the thumbnail in the main window. (Note: You can also double-click on the Preview palette’s thumbnail to open the photo.)

BRAND X PICTURES
You can select multiple photos to open at the same time by clicking on the first photo you want to open, holding the Control key, clicking on any other photos, and then double-clicking on any one of the selected thumbnails. Also, you can select entire contiguous rows by clicking on the first thumbnail in a row, holding the Shift key, clicking on the last photo in that row, and double-clicking any selected photo.
Tip
You can navigate from thumbnail to thumbnail by using the Arrow keys on your keyboard.
Viewing Things Your Way:
The default setup for your File Browser has the palette area on the left and the main thumbnail window on the right. However, once you’ve located the folder with the image you’ll be working with, you might want to do what many pros do at this point and choose the Expanded View (which hides the palette area, enabling you to see significantly more thumbnails at once). You do that by clicking on the two-headed arrow icon at the very bottom of the File Browser, to the immediate right of the divider bar that separates the palette area from the main thumbnail window. If you want to get back to the standard view, click the same arrow icon again.

BRAND X PICTURES
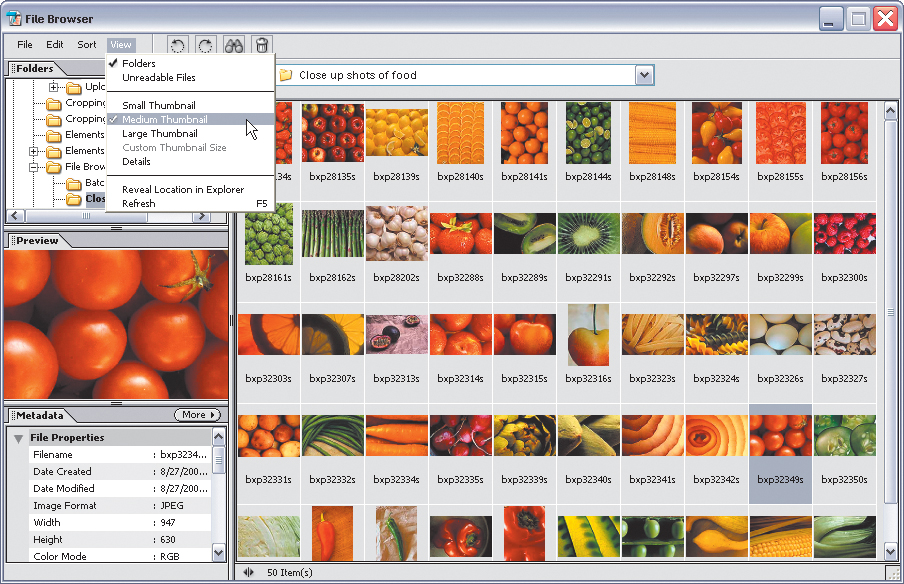
Changing the View Size of Your Thumbnails:
In Elements 3 there are four different thumbnail view sizes to choose from: Small, Medium, Large, and Custom. Choose which view you’d like from the File Browser’s View menu. Here’s my handy tip on how to determine which view is right for you: Small is way too small; ants use small and they complain. Medium is still too small to see what’s going on. Large should probably be called “Small,” but it’s the first thumbnail view that’s big enough in which you can actually tell what’s going on in the photo, so I used Large almost exclusively back in Elements 2. But in Elements 3, something wonderful happened....
BRAND X PICTURES
The Wonderful World of Custom Views:
In Elements 3, Adobe added the view of your dreams—a custom view where you decide how big you want your thumbnails to be. To access this view, just go under the View menu and choose Custom Thumbnail Size. Your thumbnails adjust to a size that’s perhaps even larger than the preview of the image in the Preview palette. This is one sweet view! Oh, but it gets better, because you’re not stuck at this size—remember this is called “Custom Thumbnail Size,” so you can customize it.

Customizing the Custom Size:
To create your own custom-sized thumbnails, go to the File Browser’s mini-menu, under Edit, and choose Preferences. This is basically just a shortcut to the main Elements Preferences dialog, so you can also reach this dialog by going under the Elements Editor’s Edit menu, under Preferences, and choosing File Browser. It brings up the same dialog and does the same thing, but since you’re already in the File Browser, why not use the shortcut, eh?

Changing the Default Size:
When the Preferences dialog appears, there’s a field called Custom Thumbnail Size and by default the size is 256 pixels wide. Highlight that 256 and type in your own preferred size (I changed my view to 330 pixels), and then click OK to set this size as your new Custom Thumbnail Size. (Note: For a more impressive thumbnail view, click on the Expanded View icon [it’s the two-sided arrow along the bottom of the Browser window] to hide the palette area on the left so you can see your large thumbnails side by side.)

Getting the Details:
There’s another layout view for your File Browser window called Details. This particular viewing option is very popular with professional photographers because not only does it display the thumbnail at a decent size, but it also displays some of the File Properties information about the photo to the right of the thumbnail. The Details view is found under the View menu, listed right below Custom Thumbnail Size.

BRAND X PICTURES
Renaming Individual Photos
If you want to rename an individual photo, it’s fairly straightforward. Now, there is a way to instantly rename every photo at once with names that make sense (to you anyway), but that, my friends, is in the next tutorial. For now, here’s how to rename one thumbnail image at a time (this is a great technique to employ if you charge by the hour).
Step One:
It’s hard to imagine why someone wouldn’t like such a descriptive file name like “DSC_0029.jpg,” but if you’re one of those people who enjoys names that actually describe what’s in the photos, here’s how it’s done: When you move your cursor over the file name of a thumbnail, you’ll notice that your cursor changes into a text cursor (an “I-beam”), so all you have to do is click that I-beam cursor once on that text and a text entry field appears, highlighting the old name.

BRAND X PICTURES
Step Two:
Now just type in a new name, press the Enter key, and the thumbnail will have your new-and-improved name. Note: There’s yet another way to rename a photo from within the File Browser; you can Right-click on a thumbnail and a pop-up menu will appear. Choose Rename and it will highlight the naming field for you. Isn’t that more complicated than just clicking on the name field? Yep.

Batch Renaming Your Files
The File Browser will actually let you change the name of an entire folder (or disc) full of images so your digital camera photo names are no longer the cryptic DSC01181.JPG, DSC01182.JPG, DSC01183.JPG variety, but names you choose that will be more recognizable, such as Concert Shot 1, Concert Shot 2, Concert Shot 3, etc., and best of all, the whole process is automated. (Incidentally, this is particularly helpful when you’re working off your CD, because you can have Elements create a duplicate folder of these photos on your hard drive with the new names.) Here’s how:
Step One:
You can hold the Control key and click on only the photos you want to rename, but a more likely scenario is that you’ll want to rename all the photos displayed in your File Browser, so go under the File Browser’s Edit menu and choose Select All.

Step Two:
Once you have selected all the photos that you want to rename, go under the File Browser’s File menu and choose Rename Multiple Files.

Step Three:
When the Batch Rename dialog appears, you first need to choose a destination for these renamed photos. Your choices in the Destination Folder category are limited to either renaming the photos in the same folder where they reside (if you’re working off a CD of saved originals, this really isn’t a choice) or moving them to a new folder (which is what you’ll probably choose). If you choose Move to New Folder, you’ll need to click the Browse button, and in the resulting dialog, navigate to the folder you want your photos moved into once they’re renamed. One limitation of batch renaming is that after it renames your originals it either keeps them in the same folder or moves them to a new folder. I wish there were an option where Elements would make copies (leaving the originals untouched) and rename only the copies; but at this point, there’s not.

Step Four:
Under the File Naming section of the dialog, the first pop-up menu on the top left is where you can type in the name you’ve chosen. Just click your cursor in this field, and type in a name.

Step Five:
The next field to the right is where you tell Elements the numbering scheme you’d like to use after the name you’ve assigned. (After all, you can’t have more than one file in the same folder with the same name. Instead, you need them named with numerals, as in Trip 01, Trip 02, etc.) To use Elements’ built-in auto-numbering, click on the arrow to the immediate right of the field and a pop-up menu will appear. Here you can choose to number your photos with a 1- to 4-digit serial number, letters, or by date. For example, choosing 2 Digit Serial Number will automatically add a sequential number after the name, starting with “01.” You can also choose the starting serial number by entering a number in the field at the bottom-right corner of the dialog.

Tip
If you’re concerned about making a mistake when you rename your files, don’t be, because directly below the File Naming category is a live example of what your file name will look like. Freak Out Warning: Don’t let it freak you out that it always shows .gif as the file extension even though your file is a JPEG—Elements is just using .gif to let you know that an extension will be added. The real extension it adds will be based on the file format of the files you chose to rename. So if your files are in JPEG format, Elements will add the .jpg extension, not .gif as the live example shows. This FOW (Freak Out Warning) is based on actual real-world testing and evaluation (meaning the first time it happened to me, I freaked out).

Step Six:
When you click OK, Elements does its thing, and in just a few seconds, your photos will appear (in a new folder, if you chose that option) sporting their brand-new names. Now when you view those images in the File Browser, they’ll have more meaningful names.

View from the File Browser

View from your new folder
Rotating Photos
Rotating photos within the File Browser is as easy as clicking one button. However, when you rotate photos within the File Browser itself, it’s only really rotating the thumbnail. This is handy, because when you’re sorting photos and you have some photos that have portrait orientation (they’re tall rather than wide), you want to be able to see them upright to make a sorting judgment call, but you have a separate decision to make if you want the actual photo rotated—not just the thumbnail. Here’s how to do both.
Rotating Thumbnails:
Rotating a thumbnail is a total no-brainer: just click on the photo you want to rotate, then click on the circular rotation icons in the File Browser’s Options Bar. The left icon rotates counterclockwise; the right icon rotates clockwise. You can also use the shortcut Control-[ (Left Bracket key) to rotate counterclockwise, and Control-] (Right Bracket key) to rotate clockwise. When you rotate a thumbnail, a warning dialog will appear saying you’re not rotating the actual image—just click OK. A little rotate icon will appear in the lower right-hand corner of the thumbnail.

BRAND X PICTURES
Rotating the Actual Photo:
When you rotate a thumbnail, the photo doesn’t really get rotated until you actually open it in the Elements Editor (look in the image’s folder on your hard drive, and you’ll see—the photo isn’t rotated). However, you can apply the same rotation to the photo by going under the File Browser’s Edit menu and choosing Apply Rotation (or simply Right-click the thumbnail and choose Apply Rotation) when you have the thumbnail selected. You’ll get a warning dialog telling you this will degrade the image a bit (rotating does that, ya know). Click OK to apply the rotation.

Sorting and Arranging Your Photos
Ah, finally we get to the fun part—actually sorting and arranging photos. Back in Elements 2, there really wasn’t much sorting—you just kind of looked at the photos and you left it at that. Luckily, that’s all changed in Elements 3, and now the File Browser is more like your own personal light table. And if moving your photos around manually sounds like too much work, the File Browser can even do some sorting for you—automatically.
Drag-and-drop:
In Elements 3, if you want a particular photo in a particular spot in your main thumbnail window, you just click on that photo and drag it there. For example, if you want an image to appear in a different row, just click on its thumbnail and drag it in that row. A thick, black vertical bar lets you know where the dragged thumbnail will land. You can treat the main thumbnail window like your own personal light box, dragging photos into the exact order you want them. Besides this manual way of sorting photo by photo, you can have Elements 3 do some basic sorting for you (as you’ll see in the next step).
BRAND X PICTURES
Automated Sorting:
You have a number of choices when it comes to having Elements sort your photos, and you make your choices from the Sort menu on the File Brower’s mini-menu. Just click on Sort and choose how you want your photos sorted in the thumbnail window. At the bottom of the menu, you can decide if you want your sorted photos to appear in Ascending Order (the default menu choice) or descending order (which you get by choosing Ascending Order when it’s checked. Choosing it when it’s already checked, unchecks it, giving you descending order. Check it out).

When and Why You Need to Refresh:
Let’s say you chose to sort by Filename (which sorts your file names alphabetically) from the Sort menu, and then you changed a photo named “Hawaii” to “A Big Volcano.” You’d expect that since this new name starts with an “a” it would jump to the top of the thumbnail window, right? Nope. That would be way too easy. Once you’ve sorted your photos, they stay right in the same order they were in until you “refresh” the File Browser. This “refreshing” is basically telling the Browser to update itself. You can refresh by clicking on the More button to the right of the Folders palette and choosing Refresh (it’s the only choice in the menu) or by pressing F5 on your keyboard (which is faster and easier). You can also choose Filename again from the Sort menu, which will Refresh, too.

Searching for Photos
Elements 3 gives you a hand when you’re trying to find a particular photo by including a search function that lets you search by a host of different criteria. Here’s how to use it to find the photo you’re looking for:
Step One:
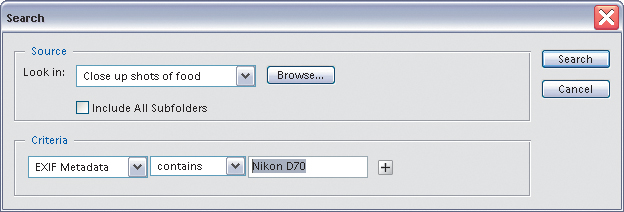
To bring up the Search dialog, click on the little binoculars (Search) icon in the File Browser’s Option Bar.

Step Two:
When the Search dialog appears, first choose where you want to search (in a particular folder, on your card reader, your entire hard disk, etc.) by selecting the folder in the Look In pop-up menu, or click the Browse button to find a folder.

Step Three:
In the Criteria section of the Search dialog, choose how you want to search. You can even search by EXIF Metadata, so if you know you shot a group of photos using a particular camera, you would choose EXIF Metadata from the first Criteria pop-up menu. Set the second pop-up menu to “contains,” then in the third pop-up menu enter your camera model, and then click Search. The results of your search (all the photos you took with your specified camera model) will appear in the main thumbnail window.
Deleting Files from within the File Browser
If a file is so vile that it doesn’t even deserve to be sorted, you may want to delete it altogether just to cut down on clutter (and save drive space). There are a number of different ways to delete files—all of them simple.
Deleting Photos:
If you burned a CD when you first inserted your memory card (and I know you did, because you know how important it is to keep your digital negatives safely stored), you can safely delete any photo you don’t want. You can do this as easily as clicking on the offending thumbnail and pressing the Delete key. You’ll get a warning dialog basically telling you that if you continue this madness (by clicking Yes), Elements will actually move this file from the folder where it resides and put it into the Recycle Bin until you choose to empty the Recycle Bin.


Another way to delete a file is to click on it and then click on the Trash icon in the File Browser’s Options Bar. Or better yet, Right-click the thumbnail and choose Delete in the contextual menu.

And of course, there is (as always) the slow way—go under the File Browser’s File menu and choose Delete.