Sharp Dressed Man: Sharpening Techniques

Photographer David Cuerdon
You’re about to learn some of the same sharpening techniques used by today’s leading digital photographers and retouchers. Okay, I have to admit, not every technique in this chapter is a professional technique. For example, the first one, “Basic Sharpening,” is clearly not a professional technique, although many professionals sharpen their images exactly as shown in that tutorial (applying the Unsharp Mask to the RGB composite—I’m not sure what that means, but it sounds good). There’s a word for these professionals—“lazy.” But then one day, they think, “Geez, I’m kind of getting tired of all those color halos and other annoying artifacts that keep showing up in my sharpened photos,” and they wish there was a way to apply more sharpening, and yet avoid these pitfalls. Then, they’re looking for professional sharpening techniques that will avoid these problems—and the best of those techniques are in this chapter. But the pros are busy people, taking conference calls, getting pedicures, vacuuming their cats, etc., so they don’t have time to do a series of complicated, time-consuming steps. So they create advanced functions that combine techniques. For some unexplainable sociological reason, when pros do this, it’s not considered lazy. Instead, they’re seen as “efficient, productive, and smart.” Why? Because life ain’t fair. How unfair is it? I’ll give you an example. A number of leading professional photographers have worked for years to come up with these advanced sharpening techniques, which took tedious testing, experimentation, and research, and then you come along, buy this book, and suddenly you’re using the same techniques they are, but you didn’t even expend a bead of sweat. You know what that’s called? Cool!
Basic Sharpening
After you’ve color corrected your photos and right before you save your file, you’ll definitely want to sharpen them. I sharpen every digital camera photo, either to help bring back some of the original crispness that gets lost during the correction process, or to help fix a photo that’s slightly out of focus. Either way, I haven’t met a digital camera (or scanned) photo that didn’t need a little sharpening. Here’s a basic technique for sharpening the entire photo.
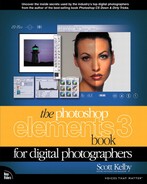
Step One:
Open the photo that you want to sharpen. Because Elements displays your photo in different ways at different magnifications, it’s absolutely critical that you view your photo at 100% when sharpening. To ensure that you’re viewing at 100%, once your photo is open, double-click on the Zoom tool in the Toolbox, and your photo will jump to a 100% view (look up in the image window’s title bar or Options Bar, depending on your viewing mode, to see the actual percentage of zoom).

BRAND X PICTURES
Step Two:
Go under the Filter menu, under Sharpen, and choose Unsharp Mask. (If you’re familiar with traditional darkroom techniques, you probably recognize the term “unsharp mask” from when you would make a blurred copy of the original photo and an “unsharp” version to use as a mask to create a new photo whose edges appeared sharper.) Of Elements’ sharpening filters, Unsharp Mask is the undisputed first choice because it offers the most control over the sharpening process.

Step Three:
When the Unsharp Mask dialog appears, you’ll see three sliders. The Amount slider determines the amount of sharpening applied to the photo; the Radius slider determines how many pixels out from the edge that the sharpening will affect; and the Threshold slider determines how different a pixel must be from the surrounding area before it’s considered an edge pixel and sharpened by the filter. Threshold works the opposite of what you might think—the lower the number, the more intense the sharpening effect. So, what numbers do you enter? I’ll give you some great starting points on the following pages, but for now, we’ll just use these settings: Amount: 125%, Radius: 1, and Threshold: 3. Click OK and the sharpening is applied to the photo.


Sharpening Soft Subjects:
At right is an Unsharp Mask setting—Amount: 150%, Radius: 1, Threshold: 10—that works well for images where the subject is of a softer nature (e.g., flowers, puppies, people, rainbows, etc.). It’s a subtle application of sharpening that is very well suited to these types of subjects.

BRAND X PICTURES
Sharpening Portraits:
If you’re sharpening a close-up portrait (head and shoulders type of thing), try this setting—Amount: 75%, Radius: 2, Threshold: 3—which applies another form of subtle sharpening.

BRAND X PICTURES
Moderate Sharpening:
This is a moderate amount of sharpening that works nicely on product shots, photos of home interiors and exteriors, and landscapes. If you’re shooting along these lines, try applying this setting—Amount: 225%, Radius: 0.5, Threshold: 0—and see how you like it (my guess is—you will).

BRAND X PICTURES
Maximum Sharpening:
I use these settings—Amount: 65%, Radius: 4, Threshold: 3—in only two situations: (1) The photo is visibly out of focus and it needs a heavy application of sharpening to try to bring it back into focus, or (2) the photo contains lots of well-defined edges (e.g., buildings, coins, cars, machinery, etc.).

BRAND X PICTURES
All-Purpose Sharpening:
This is probably my all-around favorite sharpening setting—Amount: 85%, Radius: 1, Threshold: 4—and I use this one most of the time. It’s not a “knock-you-over the-head” type of sharpening—maybe that’s why I like it. It’s subtle enough that you can apply it twice if your photo doesn’t seem sharp enough after the first application (just press Control-F), but once will usually do the trick.

BRAND X PICTURES
Web Sharpening:
I use this setting—Amount: 400%, Radius: 0.3, Threshold: 0—for Web graphics that look blurry. (When you drop the resolution from a high-res, 300-ppi photo down to 72 ppi for the Web, the photo often gets a bit blurry and soft.) I also use this same setting on out-of-focus photos. It adds some noise, but I’ve seen it rescue photos that I would have otherwise thrown away. If the effect seems too intense, try dropping the Amount to 200%.

BRAND X PICTURES
Coming Up with Your Own Settings:
If you want to experiment and come up with your own custom blend of sharpening, I’ll give you some typical ranges for each adjustment so you can find your own sharpening “sweet spot.”

BRAND X PICTURES
Amount:
Typical ranges go anywhere from 50% to 150%. This isn’t a rule that can’t be broken. It’s just a typical range for adjusting the Amount, where going below 50% won’t have enough effect, and going above 150% might get you into sharpening trouble (depending on how you set the Radius and Threshold). You’re fairly safe to stay under 150%.
Radius:
Most of the time, you’ll use just 1 pixel, but you can go as high as (get ready)—2. I gave you one setting earlier for extreme situations, where you can take the Radius as high as 4, but I wouldn’t recommend it very often. I once heard a tale of a man in Cincinnati who used 5, but I’m not sure I believe it.
Threshold:
A pretty safe range for the Threshold setting is anywhere from 3 to around 20 (3 being the most intense, 20 being much more subtle. I know, shouldn’t 3 be more subtle and 20 more intense? Don’t get me started). If you really need to increase the intensity of your sharpening, you can lower the Threshold to 0, but keep a good eye on what you’re doing (watch for noise appearing in your photo).

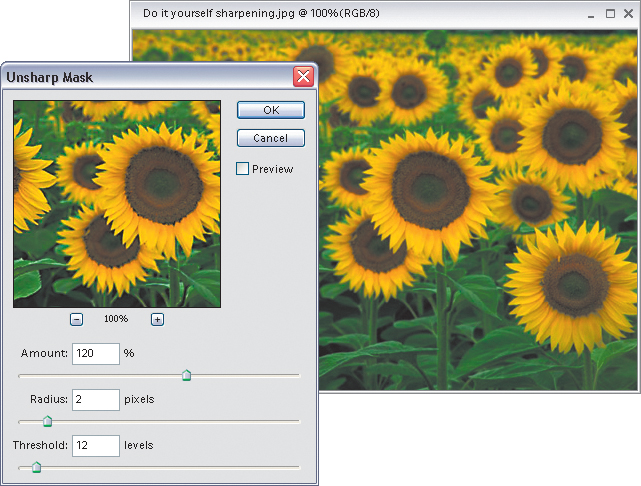
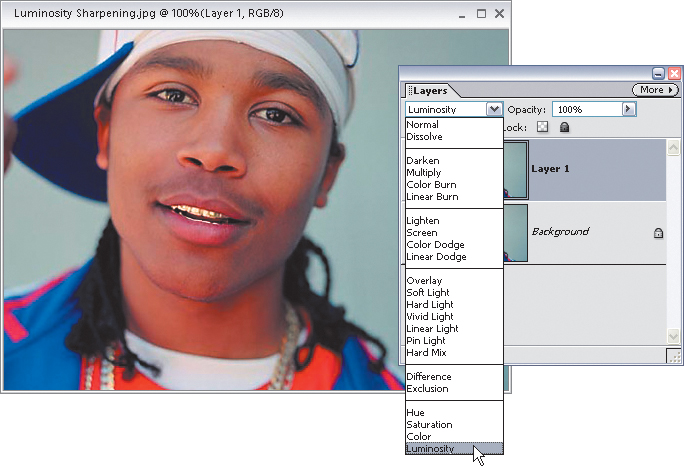
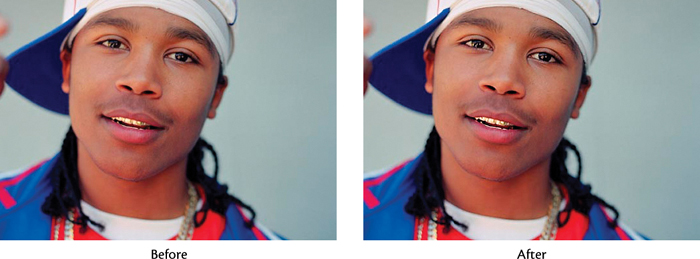
Luminosity Sharpening
Okay, you’ve already learned that sharpening totally rocks, but the more you use it, the more discerning you’ll become about it (you basically become a sharpening snob), and at some point, you’ll apply some heavy sharpening to an image and notice little color halos. You’ll learn to hate these halos, and you’ll go out of your way to avoid them. In fact, you’ll go so far as to use this next sharpening technique, which is fairly popular with pros shooting digital (at least with the sharpening snob crowd).
Step One:
Open a photo that needs some moderate to serious sharpening.
BRAND X PICTURES
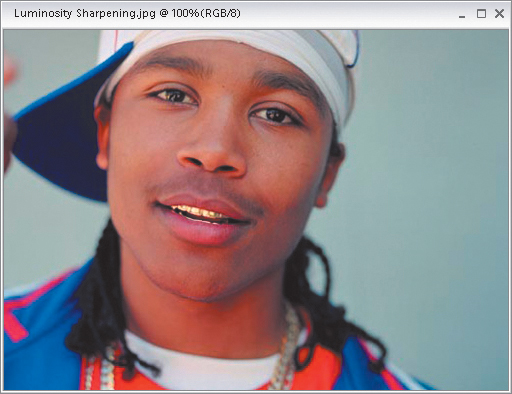
Step Two:
Duplicate the Background layer by going under the Layer menu, under New, and choosing Layer via Copy (or press Control-J). This will duplicate the Background layer onto a new layer (Layer 1).
Step Three:
Go under the Filter menu, under Sharpen, and choose Unsharp Mask. (Note: If you’re looking for some sample settings for different sharpening situations, look at the “Basic Sharpening” tutorial at the beginning of this chapter.) After you’ve input your Unsharp Mask settings, click OK to apply the sharpening to the duplicate layer.

Step Four:
Go to the Layers palette and change the layer blend mode of this sharpened layer from Normal to Luminosity. By doing this, it applies the sharpening to just the luminosity (lightness details) of the image, and not the color. This enables you to apply a higher amount of sharpening without getting unwanted halos. You can now choose Flatten Image from the Layers palette’s More flyout menu to complete your luminosity sharpening.
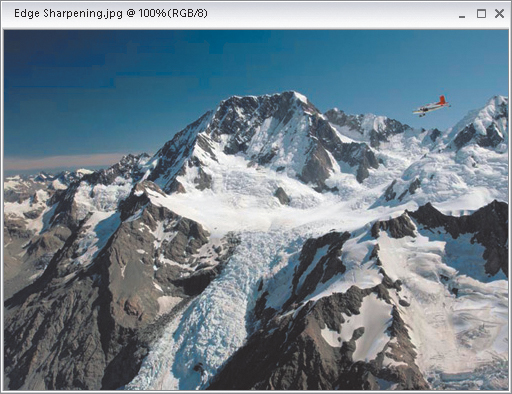
Edge Sharpening Technique
This is a sharpening technique that doesn’t use the Unsharp Mask filter but still leaves you with a lot of control over the sharpening, even after it’s applied. It’s ideal to use when you have an image that can really hold a lot of sharpening (a photo with a lot of edges) or one that really needs a lot of sharpening.
Step One:
Open a photo that needs edge sharpening.
BRAND X PICTURES
Step Two:
Duplicate the Background layer by going under the Layer menu, under New, and choosing Layer via Copy (or press Control-J). This will duplicate the Background layer onto a new layer (Layer 1).
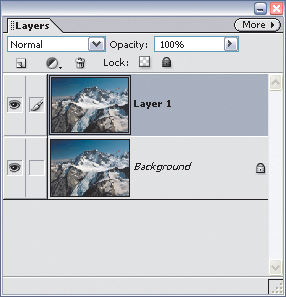
Step Three:
Go under the Filter menu, under Stylize, and choose Emboss. You’re going to use the Emboss filter to accentuate the edges in the photo. You can leave the Angle and Amount settings at their defaults (135° and 100%), but if you want more intense sharpening, raise the Height amount from its default setting of 3 pixels to 5 or more pixels (in the example here, I left it at 3). Click OK to apply the filter, and your photo will turn gray, with neon-colored highlights along the edges.

Step Four:
In the Layers palette, change the layer blend mode of this layer from Normal to Hard Light. This removes the gray color from the layer, but leaves the edges accentuated, making the entire photo appear much sharper.

Step Five:
If the sharpening seems too intense, you can control the amount of the effect by simply lowering the Opacity of this layer in the Layers palette.


Sharpening with Layers to Avoid Color Shifts and Noise
This is another technique for avoiding noise and color shifts when sharpening, and just as in some of the techniques shown earlier in this chapter, this one also makes use of layers and layer blend modes. The method is a cross between a technique that I learned from Chicago-based retoucher David Cuerdon, and a method from Jim DiVitale, in one of his articles from Photoshop User magazine.
Step One:
Open the photo you want to sharpen using this technique. Duplicate the Background layer by going under the Layer menu, under New, and choosing Layer via Copy (or press Control-J). This will duplicate the Background layer onto a new layer (Layer 1).

BRAND X PICTURES
Step Two:
Change the layer blend mode of this duplicate layer from Normal to Luminosity in the Layers palette.

Step Three:
Apply the Unsharp Mask filter to this duplicate layer. (If you’ve read this far, you already know which settings to use, so have at it.)

Step Four:
Now, duplicate this sharpened Luminosity layer by going under the Layer menu, under New, and choosing Layer via Copy (or press Control-J again). This will duplicate the layer onto its own layer (Layer 1 copy).

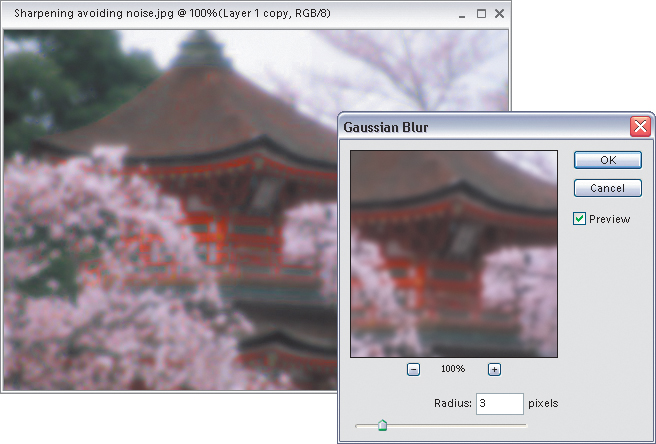
Step Five:
Go under the Filter menu, under Blur, and choose Gaussian Blur. When the dialog appears, enter 3 pixels to add a slight blur to the photo. If this setting doesn’t make your photo look as blurry as the one shown here, increase the amount of blur until it does. This hides any halo or noise, but obviously, it makes the photo really blurry—just click OK.
Step Six:
To get rid of the blur on this layer, but keep the good effects from the blurring (getting rid of the noise and halos), change the layer blend mode of this blurred layer from Luminosity to Color. Press the Z key and zoom in on edge areas that would normally have halos or other color shifts, and you’ll notice the problems just aren’t there. Now you can flatten the photo (by choosing Flatten Image in the Layers palette’s More flyout menu) and move on. Note: In some cases this technique mutes some of the red in your photo. If you notice a drop-out in red, lower the Opacity of the blurred layer until the color is restored.

