Create (or Die): How to Make Presentations with Your Photos

Photographer Scott Kelby
Back in the old days, we’d edit a digital photo and then we’d just print it out. It was a simpler time. If we got the photo centered on the page, it was considered a minor miracle and people would come from local towns and villages just to see our centered prints. But now, the young kids these days have these newfangled contraptions that let you take your photos and turn them into slide shows, webpages, wall calendars, and Video CDs. Some folks call this progress, but I say it’s just not right! It’s not what photos were intended to do. They’re supposed to be still, lifeless, static and centered on a white piece of paper. But then along comes Photoshop Elements 3, with its new “Creation” features and all of a sudden every crackerjack with 2 gigs of RAM thinks he’s Dennis Hopper (who coincidentally starred in the documentary Create [or Die], which was released in 2003 to a worldwide audience, many of whom own digital cameras, yet most of whom were not able to adequately center their photos on a page). Leave stuff like centering photos to the pros, I say.
Creating with Your Photos
There is an entire area of Elements 3 dedicated to creating projects with your photos. By projects, I mean transforming your photos from just prints into “Creations” like full-fledged slide shows, wall calendars, postcards, or Web photo galleries. Here’s just one way to access Elements 3’s Create feature.
Step One:
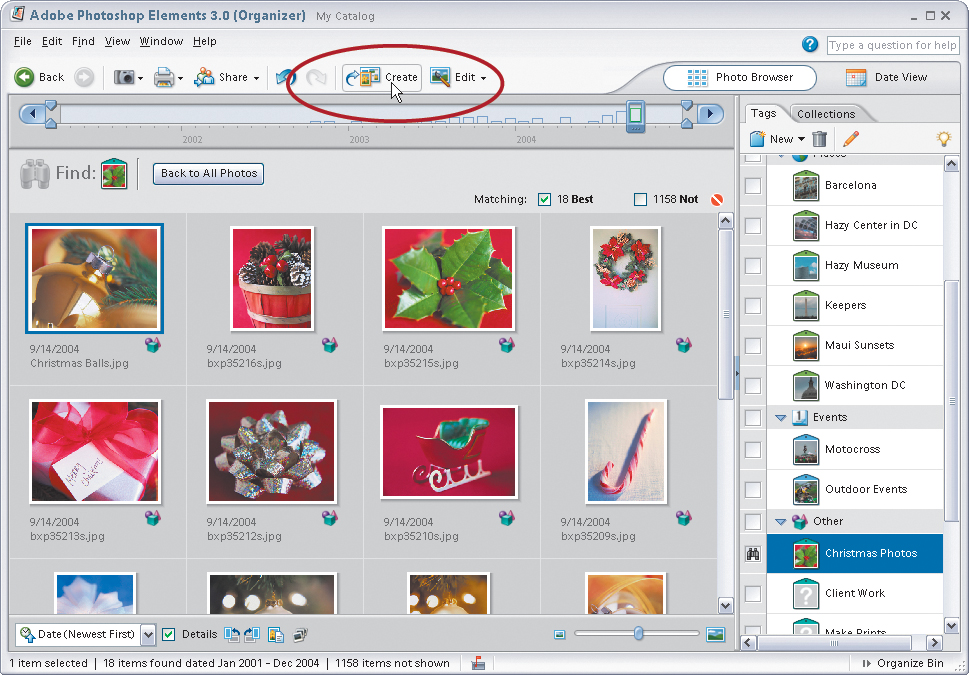
There are about half a dozen ways to get to the Create section of Elements, but the easiest and most visible way to get there is to just click on the Create button that appears in the Options Bar of both the Elements 3 Editor and Organizer. By the way, if you click the Create button in the Editor, it will just launch the Organizer for you, and then it launches the Create section, so if you’re already working in the Organizer, you’re halfway there.
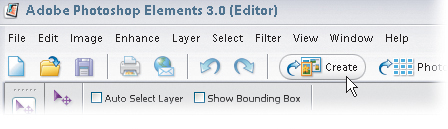
Create button in the Editor

Create button in the Organizer
Step Two:
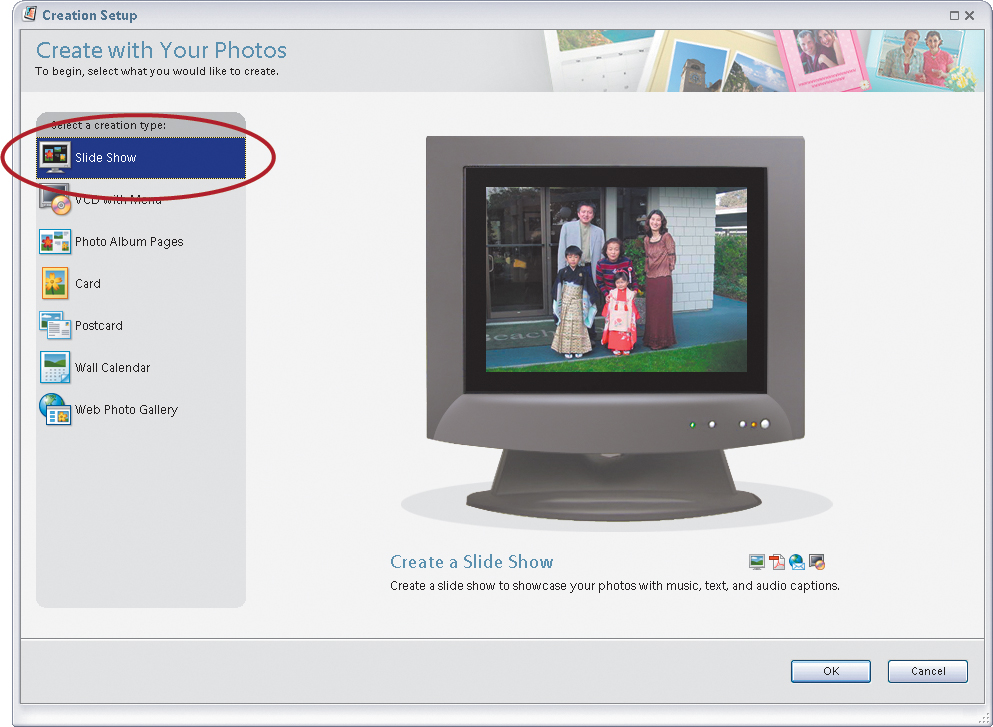
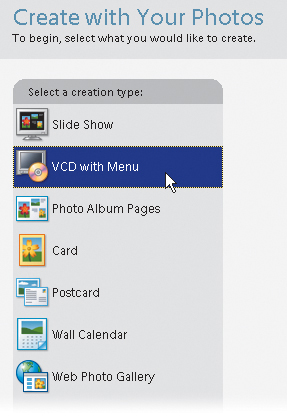
This brings up the Creation Setup dialog with a list of the creation options on your left, and a brief description of each creation in the main area of the dialog on the right. To choose one of these creations, first click on the one you want in the list on the left, and then click the OK button on the bottom right.

Tip
If you look in the bottom-right corner of the dialog, you’ll see a row of tiny icons. These tell you what the final versions of each creation will be. In the screen shot shown here, the tiny monitor icon means it can be displayed onscreen; the Acrobat icon means you can make a PDF of your creation; the globe with an envelope means it can be emailed; and the monitor with a disc means you can make a video disc of your creation.
Making Full-Blown Slide Shows
Earlier in the book, we looked at how to create a simple slide show from selected photos in the Organizer, but if you really want to create a slide show masterpiece, this is where you come.
Step One:
Once you’ve clicked on the Create button and the Creation Setup dialog appears, in the list of Creations on the left, click on Slide Show, and then click the OK button.
Step Two:
This brings up the Select a Slide Show Format window, where you choose if you want a Simple Slide Show (which is a PDF that you can email to friends, but it doesn’t provide as many bells and whistles), or a Custom Slide Show (which is the full-blown version I was talking about). Click on Custom Slide Show, then click OK.

Step Three:
This brings up the Slide Show Editor, and this is where you’ll create your magic (okay, “magic” is probably pushing it a bit, but this is where you’ll “do your stuff”). If you selected photos in the Organizer before you clicked the Create button, these photos will appear in the Slide Show Editor’s Photo Bin at the bottom (which means you can skip the rest of this step along with Step Four). If not, you’ll notice a blank black screen is staring at you. It’s waiting for you to choose which images will appear in your slide show, so go under the Add menu and choose where the photos to be used in your slide show are coming from.

Step Four:
Depending on where your files are located (mine are in the Organizer), this brings up the Add Photos dialog, which gives you access to the photos in the Organizer without actually taking you back to the Organizer itself. It lets you narrow your choice by browsing just one collection or even sorting by tag, but it’s pretty easy to find the photos you’re looking for. In the example shown here, under Tags, I choose a set of images I had tagged earlier. When your tagged photos appear in the window, just click on the ones you want to appear in your slide show, then click OK. When you click OK, your photos will appear in the Photo Bin (as seen in the capture in the next step).

Step Five:
To see the default slide show (meaning just straight cuts to the photos you imported in the order they were imported), press the Play button just below the preview window. To stop, press the Stop Preview button (the X button that appears next to the Play button while the slide show is in motion). Pretty boring, eh? Well, that’s about to change because now you’re going to start customizing your slide show.

Step Six:
The first thing to do is put the slides in the order you want them. To do that, just click on a thumbnail in the Photo Bin at the bottom of the dialog and drag it where you want it (the slides play from left to right, so if you want a particular slide to be first, drag that slide all the way to the left). As you drag slides around in the Photo Bin, you’ll see a black bar indicating where the slide will appear when you release the mouse button.

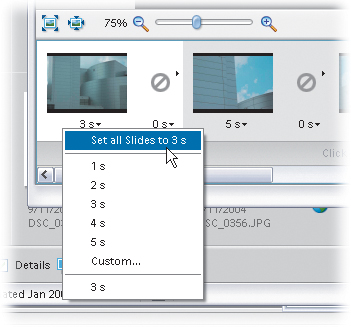
Step Seven:
Now that the slides are in order, take a look directly beneath your photo thumbnails in the Photo Bin. You’ll see “5s.” That’s telling you that this slide will stay onscreen for 5 seconds. If you want it onscreen for a shorter amount of time, just click directly on that number and a contextual menu of duration times will appear. If you want to apply a particular duration to all your slides (for example, you want them all to appear onscreen for 3 seconds), after you choose 3s for one slide, click on the time again for that same slide and choose Set All Slides to 3s.
Step Eight:
Finally, the fun part—choosing your transitions. By default, there is no transition; when one slide is finished, it will “cut” to the next slide. However, if you’d like a nice, smooth dissolve between slides—or some fancy-schmancy transition—change your slide’s transition by clicking on the international symbol for “No!” that appears to the right of your photo thumbnail (it’s the circle with the slash through it) and choosing a transition from the contextual menu. If you want all your slides to have the same transition, click on the transition symbol again and this time choose Apply to All. Now click the Play button again and see how much better your slide show looks. By the way, if you want to change the duration of your transitions, you select it the same way you do for a slide—just click on the number that appears below the transition and choose a length from the contextual menu.

Step Nine:
Now, on to titles. If you want to add a title to the beginning of your slide show, click on the first slide in the Photo Bin, and then click the Add Text button at the top center of the dialog.

Step Ten:
This brings up the Edit Text Properties dialog, where you can choose which font, style, and color you want for your text. You’ll also see a field where you can enter the text you want to appear on top of your photo. As you enter your text, you get a live preview in the dialog so you can see how it looks. When you’re done setting your text, click OK.

Step Eleven:
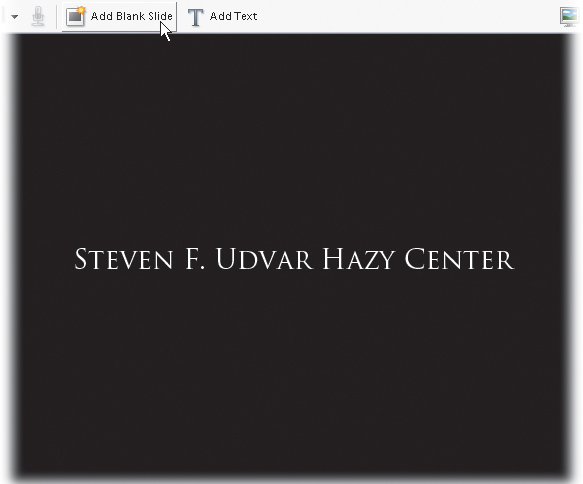
If you want your title to appear over a blank slide, rather than over a photo, you can create your title over a blank background by clicking the Add Blank Slide button in the dialog’s Options Bar. This creates an empty black slide. Now you can click the Add Text button to create the text that will appear over your black slide. This blank slide will appear with the default transition (a hard cut), so don’t forget to change the transition to match the rest of your slide show and/or reposition this slide in the Photo Bin.
Step Twelve:
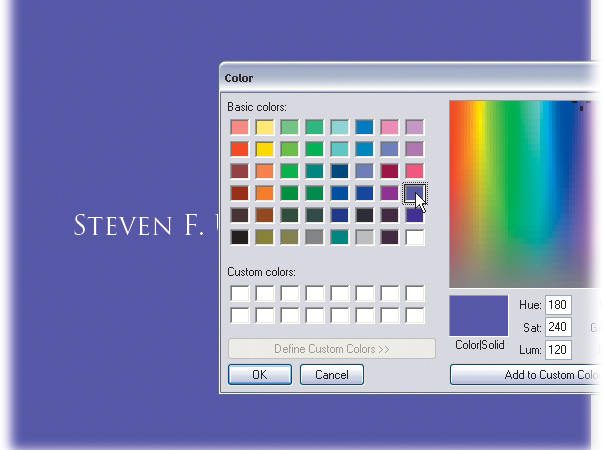
If you want to change the color of your slide (from the default black color), you can do that by selecting your slide in the Photo Bin, and then going under the Slide Show Editor’s Edit menu and choosing Change Background Color. This brings up a dialog where you can choose a different color by clicking on a color swatch. Choose a color, click OK, and your currently selected slide’s color is now changed.
Step Thirteen:
All right, the slides are in order, the transitions have been chosen, and the titles have been created. Now, for the finishing touch—music. To add some background music to your slide show, click on the Add Audio icon (it looks like music notes found in the Options Bar of the dialog) and choose Add Audio from Organizer. This brings up the Add Audio dialog, where you can browse for your own music files or choose from a list of music files in your catalog. To hear a song that appears in your catalog, click on its name in the list and then click the Play button within that dialog. When you find a song you like, click on its name in the list, and then click the OK button.

Step Fourteen:
Now it’s time to see the finished slide show. Click the Full Screen Preview button in the top-right corner of the Slide Show Editor, then sit back, relax, and enjoy the “magic.” If, while watching your full-screen preview, you see something you want to change, just double-click on your screen to return to the Slide Show Editor.

“Magical” Full Screen Preview
Step Fifteen:
When the show is tweaked to perfection (or your personal satisfaction, whichever comes first), it’s time to output it into its final form. Go under the Slide Show Editor’s File menu and choose either Output as WMV (to create a Windows Media Video Movie, in which case you’ll get a dialog that lets you determine the quality setting) or Burn to Video CD (in which case you’ll get a dialog asking you to save your slide show). That’s it—you’ve made your first full-blown slide show. Now go have a cocktail (hey, it’s what directors do!).

Creating Photo Album Pages
This is one of my favorite things in Elements 3 because Adobe did such a slick job with it. They’ve created some great-looking templates for photo album pages and digital scrapbooking—and all you have to do is choose which layout you want and it does the rest. Here’s how to start using this way-cool feature:
Step One:
Start by going to the Organizer and Control-clicking on the photos you want on your first photo album page. Then, click the Create button in the Options Bar in the top center of the Organizer window.

Step Two:
When the Create dialog appears, in the list of creations on the left side of the dialog, click on Photo Album Pages, and then click the OK button.

Step Three:
This is where you choose which layout you’d like for your album pages by clicking on one of the styles in the list on the right side of the dialog. As you click on a layout, it gives you a preview of that style on the left. Once you’ve chosen your layout, then choose how many photos you want to appear on your page from the Photos Per Page pop-up menu in the Options category on the bottom-left side of the dialog. Also choose to include any captions, a title page, etc., and then click the Next Step button.

Step Four:
Now it’s time to drag-and-drop the photos into the order you want them to appear. By default, the first photo imported winds up as the photo on the title page (if you chose that option in the previous step), so if you want a different photo on the title page, just click-and-drag it over into the first position. Once you have your photos in the order you want them, click the Next Step button.

Step Five:
The first page you’ll see is the title page, and you can edit some text above your title page if you’d like later, but for now, click the arrow button to the right of the title page preview to jump to your first photo album page.

Step Six:
This is where you determine how your photos are cropped into their frames. If you click on one of your photos, you’ll see a cropping border around the photo. You can move or resize the photo by grabbing one of the corner points.

Step Seven:
In the example shown here, I grabbed the bottom right-corner point of the cropping border and dragged outward, which crops the photo closer in. The transparent areas that appear outside the fixed border of your photo will be clipped off when the photo album page is printed. To see how your crop looks, just click on any other photo. If you don’t like the order of the photos (let’s say you wanted the daisies up top), then click the Previous Step button and drag the daises to the second position (just after the title page). When the photos are in order, click the Next Step button. (Note: If you want to edit your title page, now’s the time to do it. Just click the Previous Page arrow button to the left of the preview window, double-click the placeholder text that appears, and enter your text in the Title dialog. Just click the right arrow button to return to your album page.)

Step Eight:
Now it’s time to save your album page, so just give it a name (in the Album Pages Name field on the right side of the dialog), and then click the Save button. Just one more step...

Step Nine:
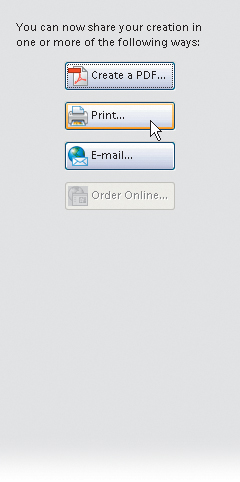
Now you’ll see a list of things you can do with your photo album page: create a PDF, print it out, or email it. Click on the one that sounds best to you, and you’re done! By the way, if you want to edit or otherwise mess with your album page, you’ll find it in the Organizer window (right now it’s the first thumbnail in the window).
Creating Greeting Cards or Postcards
If you’re interested in cheating Hallmark out of a few bucks, here’s a great way to do it—create your own greeting cards. But it’s not just about the money—it’s about the personalization that can only come from using one of your own photos that makes the card really special (and cheap!). Here’s how to do the holidays on a budget (kidding):
Step One:
Start by going to the Organizer and choosing the photo you want to use on the front of your greeting card. Then, click the Create button in the Options Bar at the top of the Organizer.
BRAND X PICTURES
Step Two:
When the Creation Setup dialog appears, in the list of creations on the left side of the dialog, click on Card, and then click OK.

Step Three:
Here’s where you choose your layout from the list of styles on the right side of the dialog. If you scroll down a bit, you’ll find a variety of pre-made templates (like the one shown here from the section called Season’s Greetings), or you can go with more traditional layouts by scrolling back up to the top (hint: go with the traditional). Once you’ve chosen a layout (please don’t choose the one I chose here), click the Next Step button.

Step Four:
Here’s where it asks you which photo you want to use. Why don’t we use the one we chose earlier? (This is kind of a “Duh!” screen.) Click the Next Step button.

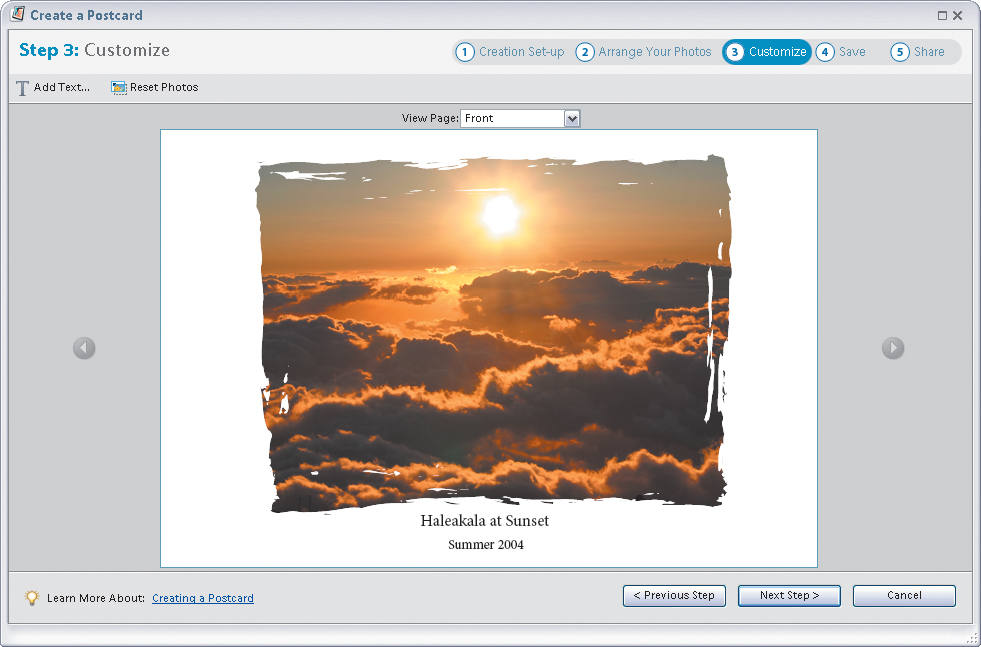
Step Five:
This section lets you customize the text that will appear on your card and it also lets you crop your photo within the border by dragging the cropping handles outward (the image will be cropped within the preset photo frame). To add your own text, double-click directly on the words “Double-Click to Insert Title” and the Title dialog will appear. After you’ve entered your text (and chosen your font, color, etc., in the Title dialog), click on the Done button. (Note: To add text inside your card, choose Inside from the View Page pop-up menu above the preview area, double-click the placeholder text in the preview, and enter your text in the Greeting dialog.) Now, click on the Next Step button.

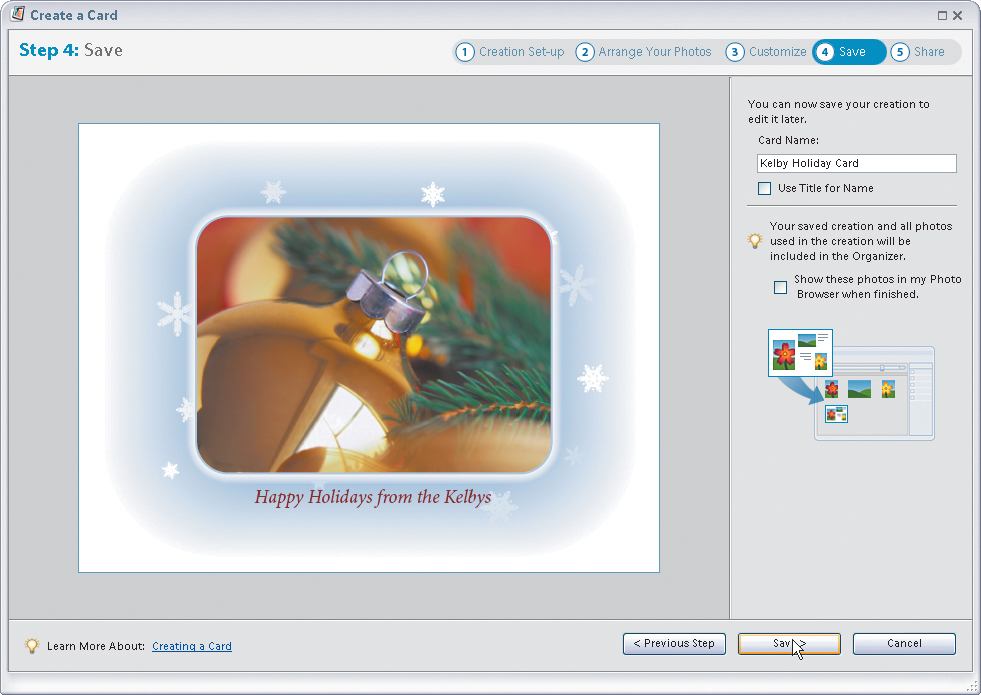
Step Six:
In this screen you simply enter a name in the Card Name field, and then click the Save button, so if you need to edit it later, you’ve got the original.
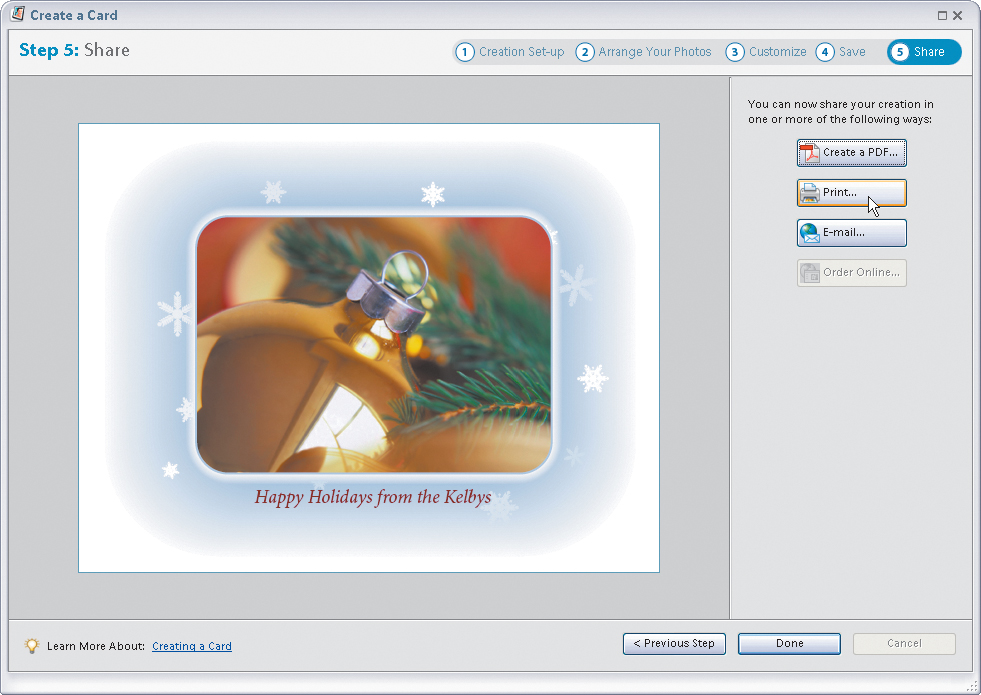
Step Seven:
On the final screen, you’ll see a list of things you can do with your greeting card: create a PDF, print it out, or email it. Click on the one you want and it’s on its way.
Postcards
Step One:
You create them the same way as creating a greeting card, so I won’t put you through that whole thing again, just follow the steps above, except in Step Two choose Postcard instead of Card.
Creating Calendars
Okay, let’s say you have 12 really great shots. Now what do you do? That’s right—it’s calendar time—and using the built-in templates (and auto-dating), it’s really so simple that you almost have to create your own calendars.
Step One:
Open the Organizer and Control-click on all the photos you want to appear in your calendar. (I probably don’t have to say this, but open at least 13 so you have one for the cover and then one for every month.) Then, click the Create button in the Options Bar at the top of the Organizer.

Step Two:
When the Creation Setup dialog appears, in the list of creations on the left side of the dialog, click on Wall Calendar, and then click OK.

Step Three:
Here you’ll do two important things: (1) You’ll choose the layout for your calendar from the list of calendar templates on the right side of the dialog, and (2) along the bottom-left corner you’ll choose when your calendar starts and ends from the pop-up menus. By choosing those starting and ending dates, Photoshop Elements 3 will do the hard part (putting in the dates) for you. When you’ve made your choices, click on the Next Step button.

Step Four:
Here’s where you’ll decide which month gets which photo by simply dragging-and-dropping your photos into the order you want (notice the month for each image appears in the top-left corner of the images’ thumbnails). When they’re in order, click the Next Step button.
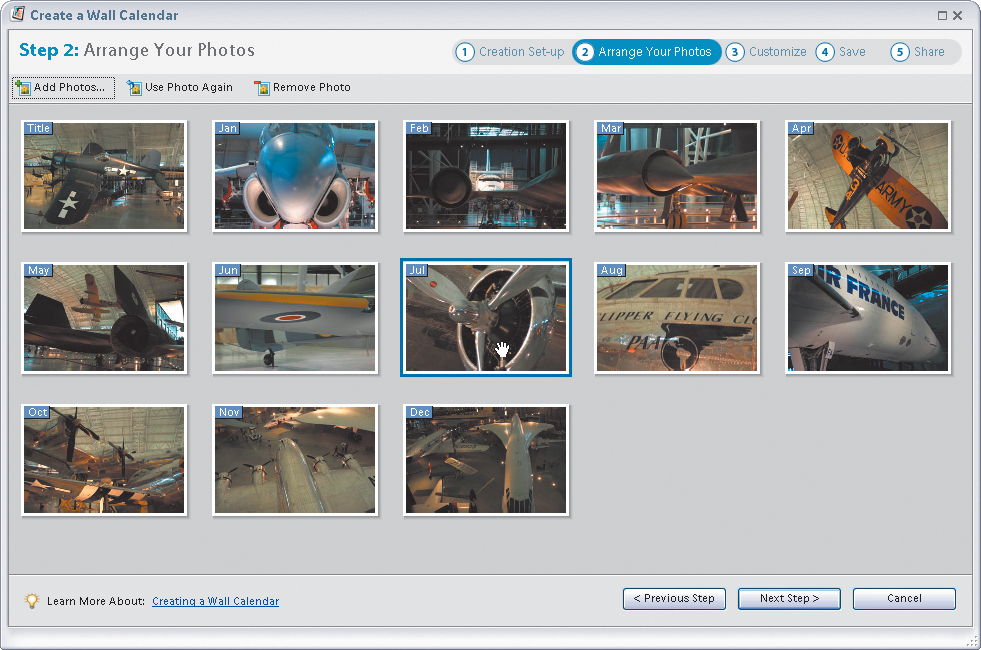
Step Five:
The next dialog lets you add captions and crop your photos, starting with the cover. To add a caption, just double-click on the placeholder text that’s already there and the Caption dialog will appear, in which you can add your own titles. Next, click the right arrow button to the right of the preview so you can go to and edit individual months. To crop your photos to size, just click on one of the corners of the visible cropping border and drag out until it fits in the preset frame the way you want it to. (Note: Transparent areas that fall outside the original border will be clipped away.) When it looks good to you, click the Next Step button.

Step Six:
In this next screen, you’ll simply enter a name in the Wall Calendar Name field, and then click the Save button at the bottom of the dialog. In the final screen you can choose how you want to finally output your calendar on the right side of the dialog: by creating a PDF of it, printing it out, or emailing it. That’s it—your first calendar.

Creating Your Own Photo Website
If you want to expand the reach of your photos to a wider audience, there’s no better way than to create a photo website, and once again Elements 3 does all the hard work for you. All you have to do is basically choose which photos you want, which layout you want, and it does the rest. (I covered the Web Photo Gallery in detail earlier in the book, but I wanted to cover it briefly here as well, since it’s one of the “Create” functions, and you’ll probably come looking for it here in this chapter.) Here’s how to go global with your photos:
Step One:
Open the Organizer and Control-click on the photos you want to appear on your Web gallery. Then, click the Create button in the Options Bar at the top of the Organizer.

BRAND X PICTURES
Step Two:
When the Creation Setup dialog appears, in the list of creations on the left side of the dialog, click on Web Photo Gallery, and then click OK.

Step Three:
This brings up a dialog where you make all of your most important choices, with the first choice being which layout you want for your gallery. You choose this from the Gallery Style pop-up menu at the top of the dialog. There is a preview of how each gallery looks, but you have to choose it first by name from the list, then when you release the mouse button, the preview of that Gallery Style appears in the dialog window.

Step Four:
If the Banner tab isn’t active, click on the word “Banner” to bring up the options. This is where you get to add a name to your site and an email address if you like (this is especially important if you’re having clients do their proofing from your website). At the bottom of the Banner tab (in the Destination category) is the location on your hard disk that your HTML file and image folder will be saved to, so click the Browse button and choose that now, so later you’ll be able to find your gallery easily for uploading to the Web.

Step Five:
The Thumbnails tab and the Large Photos tabs are where you determine how large the thumbnail images will appear on your website, and how large the full-size photos will appear when a client clicks on one of the thumbnails. You can stick with the default sizes, or click on the Large Photos tab to choose a size and quality setting of your own. You can also choose whether captions will appear below your photos, and if so, you can choose the font and size, too.


Step Six:
Hit the Save button at the bottom of the dialog, and your webpage will be created and saved. Then Elements 3 displays a full-size preview of your finished HTML webpage in the Web Photo Gallery Browser (as shown here). Now look in that folder you specified earlier, and you’ll find an HTML document (named “index”), along with folders of your images, thumbnails, pages, etc., ready for you to upload to the Web (providing you have a place to upload them to, of course). Note: Everything in that folder gets uploaded: files, folders, and the whole shebang.

Creating a Video CD
If you’ve created some slide shows (using the Slide Show feature mentioned earlier in this chapter), you can take those slides shows and transfer them to a Video CD, which will play on many DVD players (so you can watch them directly on your TV), and you do the whole thing right from within Elements 3. Here’s how it works:
Step One:
First, you need to create your slide shows, so go ahead and do that first, because essentially what you’ll create is a CD of slide shows with a default menu that’s created by Elements. So if you don’t have slide shows first, you can’t create a CD, so start there (see the slide show tutorial earlier in this chapter). Once you have your slide shows created, go to the Organizer and click on the Create button.

Step Two:
When the Creation Setup dialog appears, in the list of creations on the left side of the dialog, click on VCD with Menu, and then click OK.
Step Three:
This dialog is where you choose which slide shows will comprise your Video CD. To add slide shows to your list, click the Add Slide Shows button in the top-left corner and a dialog will appear, where you can choose which of your saved slide shows will appear on your VCD by clicking on them. Then, click OK to add them to the main dialog.

Step Four:
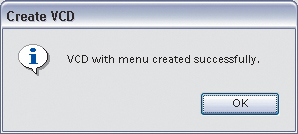
Once your slides appear in the main window, you can insert a blank CD into your computer’s CD burner, then click the Burn button on the bottom right-hand side of the dialog to burn your slide shows to disc. Note: Be sure that NTSC is selected in the Video Options section of the dialog. Now you can insert your VCD into your DVD player and watch your slide show on your TV.