Chapter 6. The Mask: Selection Techniques
Photographer: Matt Kloskowski
Exposure: 1/10
Focal Length: 200mm
Aperture Value: ƒ/11
One of the problems with people is you can’t always get them to stand in front of a white background so you can easily select them and place them on a different background in Elements 8. It’s just not fair. If I were elected president, one of my first priorities would be to sign an executive order requiring all registered voters to carry with them a white, seamless roll at all times. Can you imagine how much easier life would be? For example, let’s say you’re a sports photographer and you’re shooting an NFL Monday Night Football game with one of those Canon telephoto lenses that are longer than the underground tube for a particle accelerator; and just as the quarterback steps into the pocket to complete a pass, a fullback comes up from behind, quickly unfurls a white, seamless backdrop, and lets you take the shot. Do you know how fast you’d get a job at Sports Illustrated? Do you know how long I’ve waited to use “unfurl” in a sentence and actually use it in the proper context? Well, let’s just say at least since I was 12 (three long years ago). In this chapter, you’ll learn how to treat everyone, every object, every thing, as though it were shot on a white, seamless background.
Selecting Square, Rectangular, or Round Areas
Selections are an incredibly important topic in Elements. They’re how you tell Elements to affect only specific areas of your photos. Whether it’s moving part of one photo into another or simply trying to draw more attention to or enhance part of a photo, you’ll have so much more control if you know how to select things better. For starters, Elements includes quick and easy ways to make basic selections (square, round, rectangle). These are probably the ones you’ll use most, so let’s start here.
Step One:
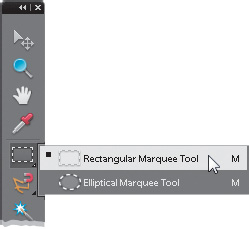
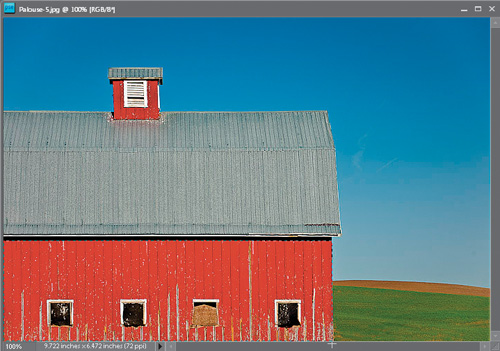
To make a rectangular selection, choose (big surprise) the Rectangular Marquee tool by pressing the M key. Adobe’s word for selection is “marquee.” (Why? Because calling it a marquee makes it more complicated than calling it what it really is—a selection tool—and giving tools complicated names is what Adobe does for fun.)
Step Two:
We’re going to start by selecting a rectangle shape, so click your cursor in the upper left-hand corner of the barn wall and drag down and to the right until your selection covers the entire shape, then release the mouse button. That’s it! You’ve got a selection, and anything you do now will affect only the area within that selected rectangle (in other words, it will only affect the red wall and windows of the barn).
Step Three:
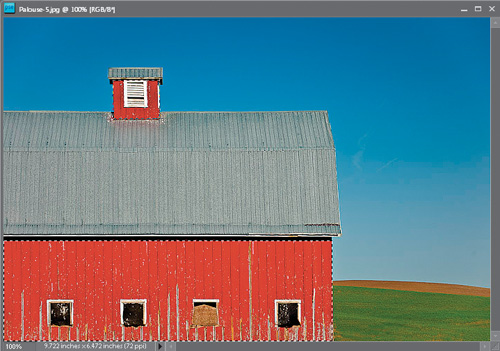
To add another area to your current selection, just press-and-hold the Shift key, and then draw another rectangular selection. In our example here, you’ll want to select the red cupola at the top, so press-and-hold the Shift key, drag out a rectangle around it, and release the mouse button. Now all the red is selected.
Step Four:
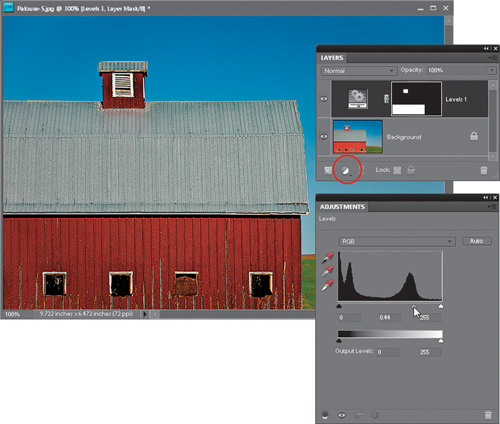
Now let’s make an adjustment and you’ll see that your adjustment will only affect your selected areas. Click on the Create New Adjustment Layer icon at the bottom of the Layers palette, and choose Levels from the pop-up menu. In the Adjustments palette, drag the middle gray slider under the histogram to the right (or left), and you’ll see the red changes as you drag. More importantly, you’ll see that nothing else changes—just those areas. This is why selections are so important—they are how you tell Elements you only want to adjust a specific area. You can also drag the white and black sliders to get the lighting you want. To Deselect (making your selection go away), just press Ctrl-D (Mac: Command-D).
Step Five:
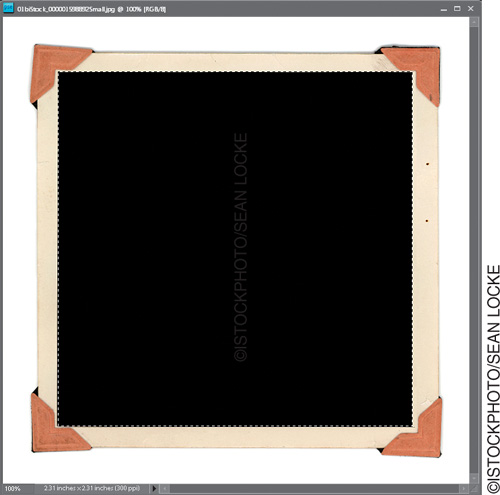
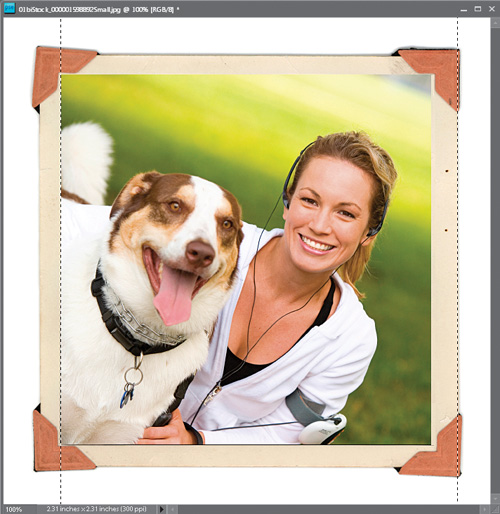
Okay, you’ve got rectangles, but what if you want to make a perfectly square selection? It’s easy—the tool works the same way, but before you drag out your selection, you’ll want to hold the Shift key down. Let’s try it: open another image, get the Rectangular Marquee tool, press-and-hold the Shift key, and then draw a perfectly square selection (around the black area inside of this fake Polaroid frame, in this case).
Step Six:
While your selection is still in place, open a photo that you’d like to appear inside your selected area and press Ctrl-A (Mac: Command-A); this is the shortcut for Select All, which puts a selection around your entire photo at once. Then press Ctrl-C (Mac: Command-C) to copy that photo into Elements’ memory.
Step Seven:
Switch back to the Polaroid image, and you’ll notice that your selection is still in place. Go under the Edit menu and choose Paste Into Selection. The image held in memory will appear pasted inside your square selection. If the photo is larger than the square you pasted it into, you can reposition the photo by just clicking-and-dragging it around inside your selected opening.
Step Eight:
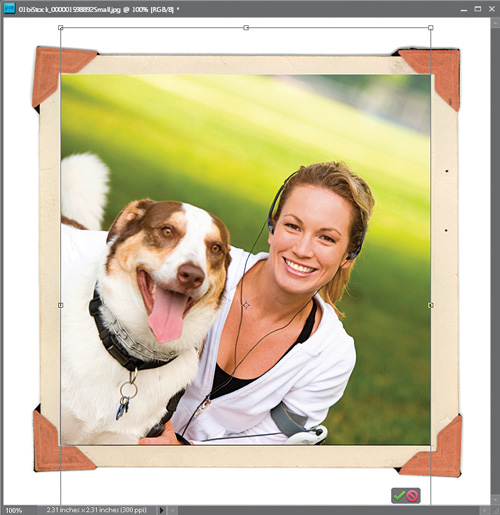
You can also use Free Transform (press Ctrl-T [Mac: Command-T]) to scale the pasted photo in size. Just grab a corner point (press Ctrl-0 [Mac: Command-0] if you don’t see them), press-and-hold the Shift key (or turn on the Constrain Proportions checkbox in the Options Bar), and drag inward or outward. When the size looks right, press the Enter (Mac: Return) key and you’re done. (Well, sort of—you’ll need to deselect, but only do this once you’re satisfied with your image, because once you deselect, Elements flattens your new image into your Background layer, meaning there’s no easy way to adjust this image.) Now, on to oval and circular selections…
Step Nine:
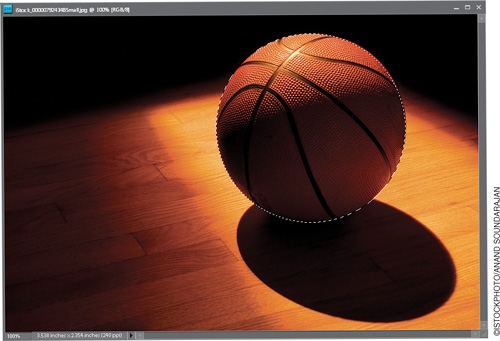
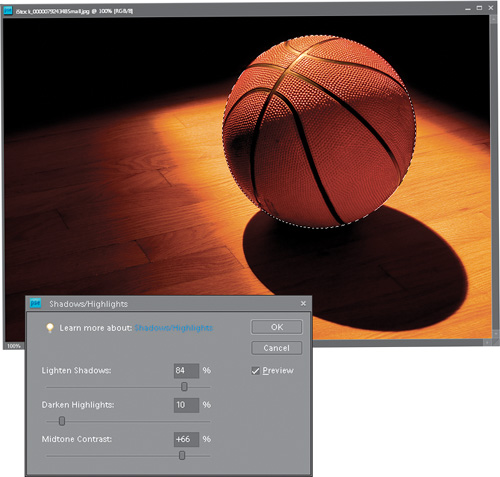
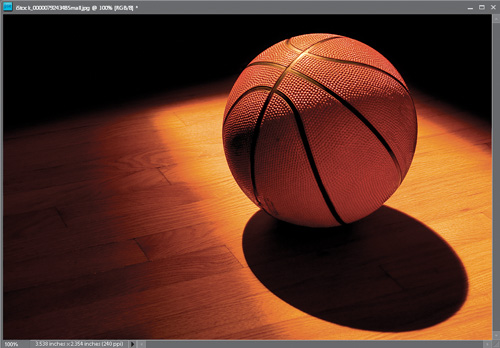
Open an image with a circle shape you want to select (the basketball here), and then press M to switch to the Elliptical Marquee tool (pressing M toggles you between the Rectangular and Elliptical Marquee tools by default). Now, just click-and-drag a selection around your circle. Press-and-hold the Shift key as you drag to make your selection perfectly round. If your round selection doesn’t fit exactly, you can reposition it by moving your cursor inside the borders of your round selection and clicking-and-dragging to move it into position. You can also press-and-hold the Spacebar to move the selection as you’re creating it. If you want to start over, just deselect, and then drag out a new selection. Hint: With circles, it helps if you start dragging before you reach the circle, so try starting about ¼″ to the top left of the circle.
Step 10:
We’ll change the ball’s lighting to really make it pop, so go under the Enhance menu, under Adjust Lighting, and choose Shadows/Highlights. Crank the Lighten Shadows slider way up to 84%. Move the Darken Highlights slider up to around 10%. Finally, take the Midtone Contrast slider up to 66%. That should make the rather blah-looking basketball nice and crisp. Now deselect.
Step 11:
This isn’t really a step, it’s more of a recap: To make rectangles or ovals, you just grab the tool and start dragging. However, if you need to make a perfect square or a circle (rather than an oval), you press-and-hold the Shift key before you start dragging. You’re starting to wish you’d paid attention in geometry class now, aren’t you? No? Okay, me either.
Saving Your Selections
If you’ve spent 15 or 20 minutes (or even longer) putting together an intricate selection, once you deselect it, it’s gone. (Well, you might be able to get it back by choosing Reselect from the Select menu, as long as you haven’t made any other selections in the meantime, but don’t count on it. Ever.) Here’s how to save your finely-honed selections and bring them back into place anytime you need them.
Step One:
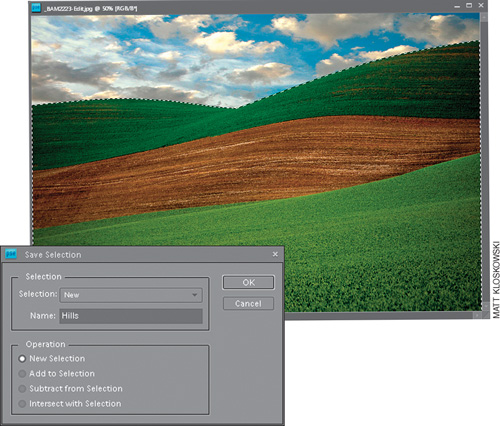
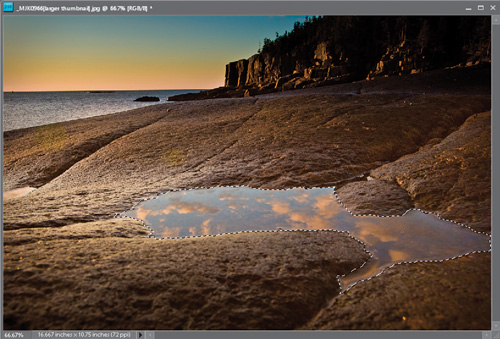
Open an image and then put a selection around an object in your photo using the tool of your choice. Here I used the Quick Selection tool (A) to select the sky, then went under the Select menu and chose Inverse to select the ground. To save your selection once it’s in place (so you can use it again later), go under the Select menu and choose Save Selection. This brings up the Save Selection dialog. Enter a name in the Name field and click OK to save your selection.
Step Two:
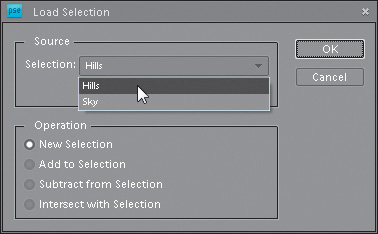
Now you can get that selection back (known as “reloading” by Elements wizards) at any time by going to the Select menu and choosing Load Selection. If you’ve saved more than one selection, they’ll be listed in the Selection pop-up menu—just choose which one you want to “load” and click OK. The saved selection will appear in your image.
How to Select Things That Aren’t Round, Square, or Rectangular
By now you know that selecting squares, rectangles, circles, or ovals is a total no-brainer. But things get a little stickier when the area you want to select isn’t square or rectangular or, well…you get the idea. Luckily, although it’s not quite the no-brainer of the Marquee tools, making those selections isn’t hard—if you don’t mind being just a little patient. And making these “non-conformist” selections can actually be fun. Here’s a quick project to get your feet wet:
Step One:
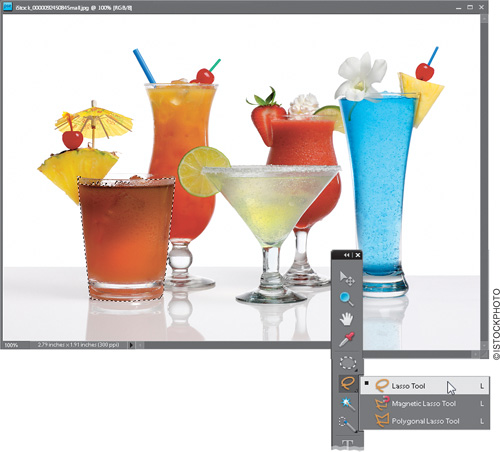
Open a photo with an odd-shaped object that’s not rectangular, square, etc. This is what the Lasso tool was born for, so press the L key to access it from the Toolbox.
Step Two:
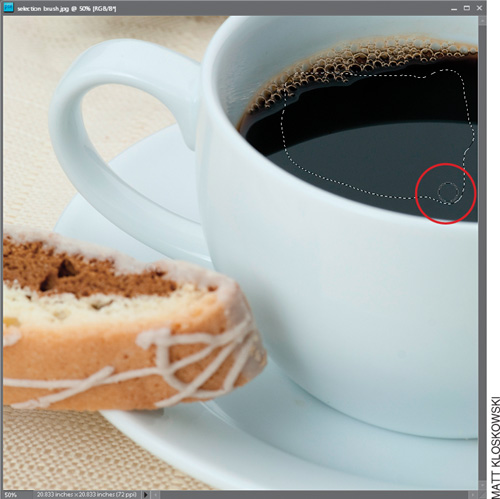
Click-and-hold the Lasso tool on the object you want to select (in this case, you’ll be selecting the drink glass on the left) and slowly (the key word here is slowly) drag the Lasso tool around the object, tracing its edges. If, after you’re done, you’ve missed a spot, just press-and-hold the Shift key and click-and-drag around that missing area—it will be added to your selection. If you selected too much, press-and-hold the Alt (Mac: Option) key, click-and-drag around the area you shouldn’t have selected, and it will be removed.
Step Three:
When the object is fully selected, click on the Refine Edge button in the Options Bar. This dialog lets you make your edges smoother (and just plain better), so no one can tell you’ve modified the image. We’ve always been able to do these things in Elements, but this dialog lets you see the changes so you don’t have to guess what they’ll look like.
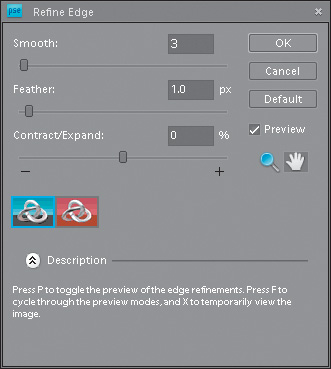
Step Four:
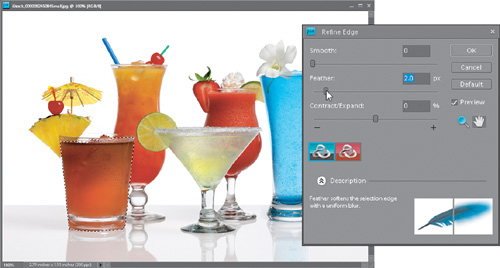
Set Smooth and Contract/Expand to 0 (zero). Then set the Feather amount to 2 px. This will soften the edges of the selection (turn the Preview checkbox on and off to see the difference). Click OK. Now we can make adjustments to the object without “getting caught.”
Step Five:
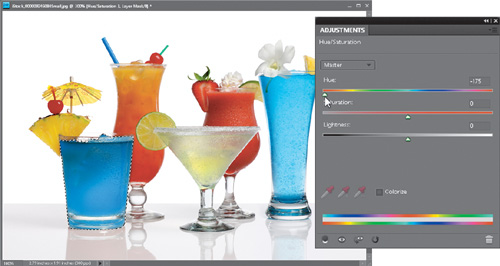
In the example here, we’re going to make the orange drink blue. Click on the Create New Adjustment Layer icon at the bottom of the Layers palette, and choose Hue/Saturation. In the Adjustments palette, drag the Hue slider to the left until the drink turns blue. When you do this, you’ll quickly see if you made an accurate selection or not. If you see little slivers of orange, you missed those spots when you were doing your tracing with the Lasso tool. If you want to try again, just press Ctrl-D (Mac: Command-D) to Deselect, and then press Ctrl-Z (Undo; Mac: Command-Z) a few times until the original color comes back. Now you can try again, making sure you’ve got the entire drink accurately selected. Remember, this adjustment affects only the orange drink on the left, not the whole photo, because you selected it with the Lasso tool before you altered the color.

Softening Those Harsh Edges
When you make an adjustment to a selected area in a photo, your adjustment stays completely inside the selected area. That’s great in many cases, but when you deselect, you’ll see a hard edge around the area you adjusted, making the change look fairly obvious. However, softening those hard edges (thereby “hiding your tracks”) is easy—here’s how:
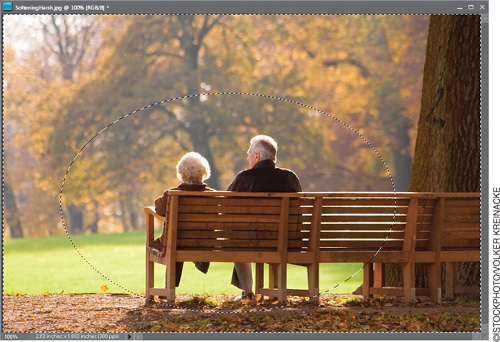
Step One:
Let’s say you want to darken the area around the couple, so it looks almost like you shined a soft spotlight on them. Start by drawing an oval selection around the couple using the Elliptical Marquee tool (press M until you have it). Make the selection big enough so the couple and the surrounding area appear inside your selection. Now we’re going to darken the area around them, so go under the Select menu and choose Inverse. This inverses the selection so you’ll have everything but the couple selected (you’ll use this trick often).
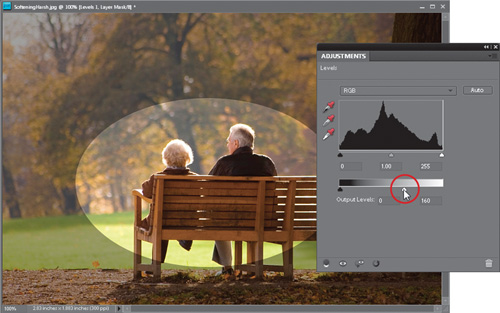
Step Two:
Click on the Create New Adjustment Layer icon at the bottom of the Layers palette, and choose Levels. In the Adjustments palette, drag the bottom right-hand Output Levels slider to the left to about 160 and then press Ctrl-D (Mac: Command-D) to Deselect. You can see the harsh edges around the oval, and it looks nothing like a soft spotlight—it looks like a bright oval. That’s why we need to soften the edges so there’s a smooth blend between the bright oval and the dark surroundings.
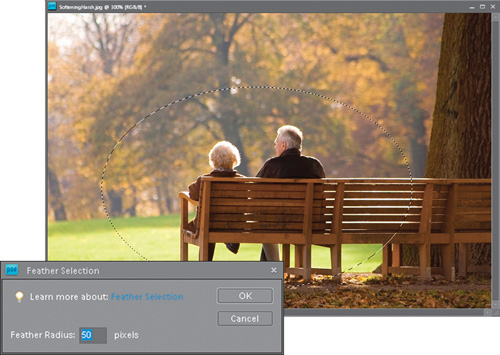
Step Three:
Press Ctrl-Z (Mac: Command-Z) three times so your photo looks like it did when you drew your selection in Step One (your selection should be in place—if not, drag out another oval). With your selection in place, go under the Select menu and choose Feather. When the Feather Selection dialog appears, enter 50 pixels (the higher the number, the more softening effect on the edges) and click OK. That’s it—you’ve softened the edges. Now, let’s see what a difference that makes.
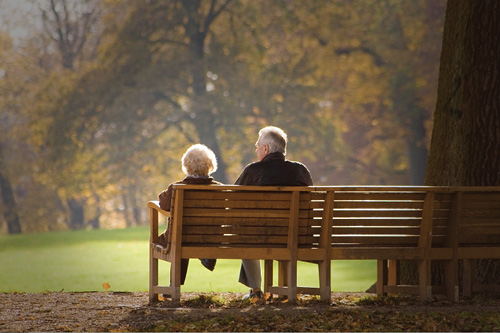
Step Four:
Go under the Select menu and choose Inverse again. Add a Levels adjustment layer again, drag the bottom-right Output Levels slider to between 150 and 160, deselect, and you can see that the edges of the area you adjusted are soft and blending together smoothly, so it looks more like a spotlight. Now, this comes in really handy when you’re doing things like adjusting somebody with a face that’s too red. Without feathering the edges, you’d see a hard line around your person’s face where you made your adjustments, and it would be a dead giveaway that the photo had been adjusted. But add a little bit of feather (with a face, it might only take a Feather amount of 2 or 3 pixels), and it will blend right in, hiding the fact that you made an adjustment at all.
Selecting Areas by Their Color
So, would you select an entire solid-blue sky using the Rectangular Marquee tool? You probably wouldn’t. Oh, you might use a combination of the Lasso and Rectangular Marquee tools, but even then it could be somewhat of a nightmare (depending on the photo). That’s where the Magic Wand tool comes in. It selects by ranges of color, so instead of clicking-and-dragging to make a selection, you click once and the Magic Wand selects things in your photo that are fairly similar in color to the area you clicked on. The Magic Wand tool is pretty amazing by itself, but you can make it work even better.
Step One:
Open a photo that has a solid-color area that you want to select (in this case, it’s the girl’s bucket). Start by choosing the Magic Wand tool from the Toolbox (or press the W key). Then, click it once in the solid-color area you want to select. You can see that part of the bucket is selected, but not all of it (because, although the bucket is pink, there are all different shades of pink in it, caused by shadows and highlights. That’s why this is such a good example—sometimes one click is all it takes and the whole object will be selected, but more often than not, you’ll need to do a little more Magic Wanding to get all of the color).
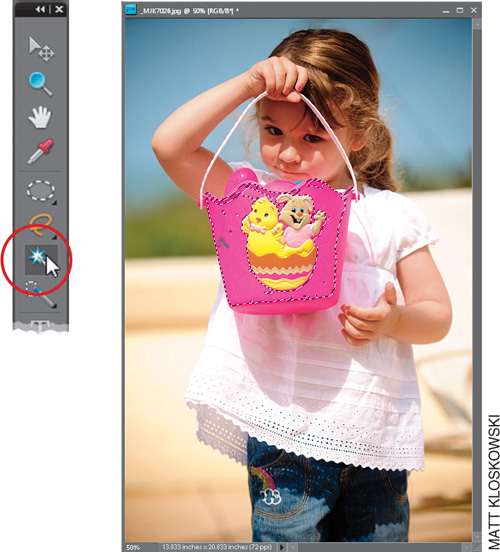
Step Two:
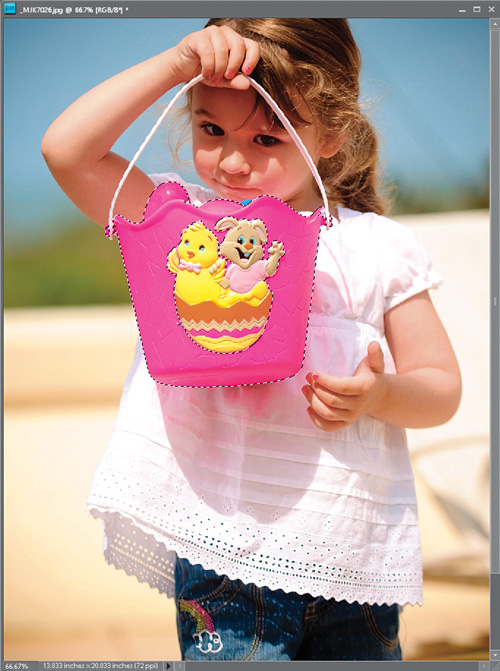
As you can see above, the first click didn’t select the entire area, so to add other areas to what you already have selected, just press-and-hold the Shift key, and then click on those parts of the bucket that aren’t selected. Keep holding down the Shift key and clicking on all the areas that you want to select until the entire bucket is selected, as shown here. It took about 10 Shiftclicks with the Magic Wand for me to get this bucket selected.
Step Three:
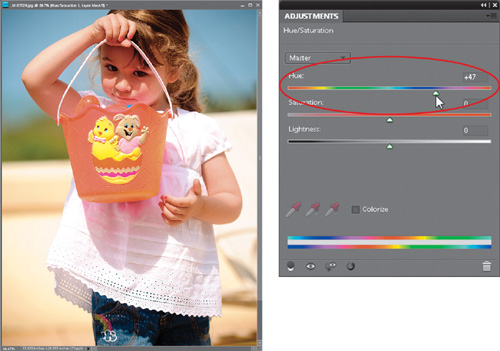
Now you can use a Hue/Saturation adjustment layer to change the color of the bucket, just like you did in an earlier technique. Click on the Create New Adjustment Layer icon at the bottom of the Layers palette, and choose Hue/Saturation. In the Adjustments palette, drag the Hue slider until the bucket looks the way you want it.
TIP: Increase the Tolerance
If you click in an area with the Magic Wand and not all of that area gets selected, then deselect (Ctrl-D [Mac: Command-D]), go to the Options Bar, increase the Tolerance setting, and try again. The higher the setting, the wider the range of colors it will select; so as a rule of thumb: if the Magic Wand doesn’t select enough, increase the Tolerance amount. If it selects too much, decrease it.
![]()
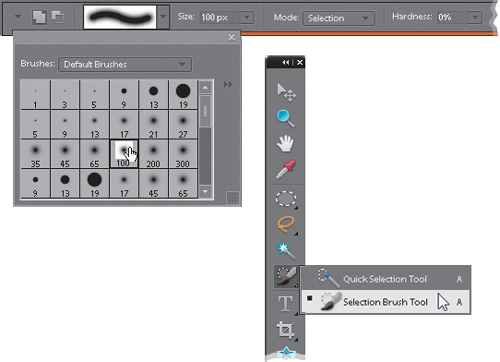
Making Selections Using a Brush
A lot of people are more comfortable using brushes than using Marquee tools. If you’re one of those people (you know who you are), then you’re in luck—you can make your selections by painting over the areas you want selected. Even if this sounds weird, it’s worth a try—you might really like it (it’s the same way with sushi). A major advantage of painting your selections is that you can choose a soft-edged brush (if you like) to automatically give you feathered edges. Here’s how it works:
Step One:
Choose the Selection Brush tool from the Toolbox (press the A key until you have it). Before you start, you’ll want to choose your brush size by clicking on the Brush thumbnail in the Options Bar to open the Brush Picker. If you want a soft-edged selection (roughly equivalent to a feathered selection), choose a soft-edged brush in the Picker or change your brush’s Hardness setting in the Options Bar: 0% gives a very soft edge, while 100% creates a very hard edge.
Step Two:
Now you can click-and-drag to “paint” the area you want selected. When you release the mouse button, the selection becomes active. Note: You don’t have to hold down the Shift key to add to your selection when using this brush—just start painting somewhere else and it’s added. However, you can press-and-hold the Alt (Mac: Option) key while painting to deselect areas.
Selecting Everything on a Layer at Once
Once you have one or more objects on a layer, putting a selection around everything on that layer is a one-click affair. What’s especially great about this ability is that not only does it select the hard-edged areas in a layer, but it also selects the soft-edged areas, such as drop shadows. It’ll make sense in a moment.
Step One:
Open a layered image in which one layer contains elements you want to select and alter. To instantly put a selection around everything on that layer, just Ctrl-click (Mac: Command-click) on that layer’s thumbnail in the Layers palette (not its name; its thumbnail).
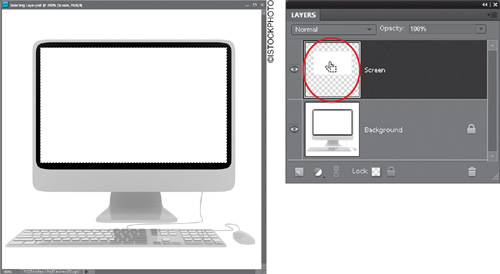
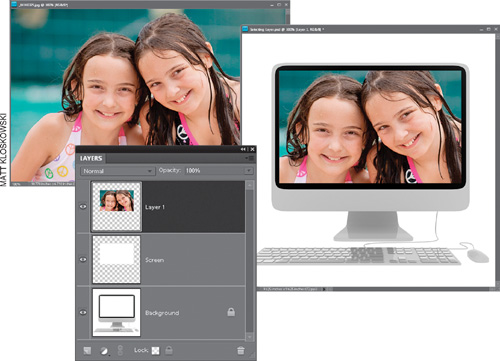
Step Two:
For one example of why you might want to do this, while your selection is still in place, open another photo, such as the girls seen here. Then press Ctrl-A (Mac: Command-A) to select the entire photo and Ctrl-C (Mac: Command-C) to copy it. Go back to the photo with the iMac in it and click on the Create a New Layer icon at the bottom of the Layers palette to make a new blank layer. Now go to the Edit menu and choose Paste Into Selection. If the photo is too big, just press Ctrl-T (Mac: Command-T) to bring up Free Transform and click-and-drag the corner handles to resize the photo so it fits better. Press Enter (Mac: Return) to lock in your transformation, then press Ctrl-D (Mac: Command-D) to Deselect.
Getting Elements to Help You Make Tricky Selections
If you’ve tried the Lasso tool for making selections, then you know two things: (1) it’s pretty useful, and (2) tracing right along the edge of the object you’re trying to select can be pretty tricky. But you can get help in the form of a tool called (are you ready for this?) the Magnetic Lasso tool! If the edges of the object you’re trying to select are fairly well defined, this tool will automatically snap to the edges (as if they’re magnetic), saving you time and frustration (well, it can save frustration if you know this technique).
Step One:
Click-and-hold for a moment on the Lasso tool in the Toolbox and a menu will pop up where you can choose the Magnetic Lasso tool (or just press the L key until you have it). Then, open an image in which you want to make a selection. Click once near the edge of the object you want to select. Without holding the mouse button, move the Magnetic Lasso tool along the edge of the object, and the selection will “snap” into place. Don’t move too far away from the object; stay close to it for the best results.
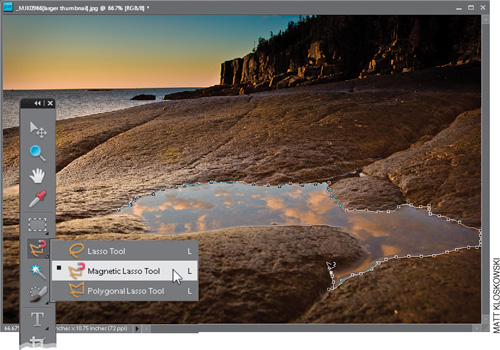
Step Two:
As you drag, the tool lays down little points along the edge. If you’re dragging the mouse and it misses an edge, just press Backspace (Mac: Delete) to remove the last point and try again. If it still misses, press-and-hold the Alt (Mac: Option) key and then hold down the mouse button, which temporarily switches you to the regular Lasso tool. Drag a Lasso selection around the trouble area, then release the Alt key and the mouse button, and BAM—you’re back to the Magnetic Lasso tool to finish up the job. Note: You can also click the Magnetic Lasso tool to add selection points if needed.
Easier Selections with the Quick Selection Tool
This is another one of those tools in Photoshop Elements that makes you think, “What kind of math must be going on behind the scenes?” because this is some pretty potent mojo for selecting an object (or objects) within your photo. What makes this even more amazing is that I was able to inject the word “mojo” into this introduction, and you didn’t blink an eye. You’re one of “us” now….
Step One:
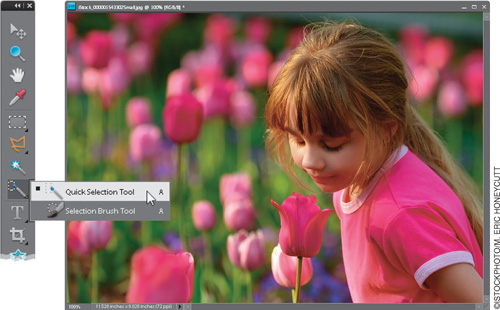
Open the photo that has an object you want to select (in this example, we want to select the pink tulip the little girl is smelling). Go to the Toolbox and choose the Quick Selection tool (or just press the A, for Awesome, key).
Step Two:
The Quick Selection tool has an Auto-Enhance checkbox up in the Options Bar. By default, it’s turned off. My line of thinking is this: when would I ever not want an enhanced (which in my book means better) selection from the Quick Selection tool? Seriously, would you ever make a selection and say, “Gosh, I wish this selection looked worse?” Probably not. So go ahead and turn on the Auto-Enhance checkbox, and leave it that way from now until the cows come home. And if they ever do really come home, then you’ve probably got bigger problems.

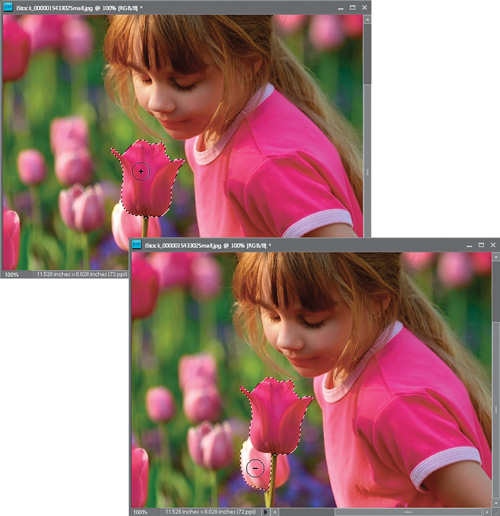
Step Three:
Take the Quick Selection tool and simply paint squiggly brush strokes inside of what you want to select. You don’t have to be precise, and that is what’s so great about this tool—it digs squiggles. It longs for the squiggles. It needs the squiggles. So squiggle.
Step Four:
Once you release the mouse button, the Quick Selection tool makes your selection for you, based on the area that you painted over. If the selection includes areas you don’t want, such as the lighter pink tulip below the darker one, simply press-and-hold the Alt (Mac: Option) key and paint over the unwanted part. This removes it from your selection.
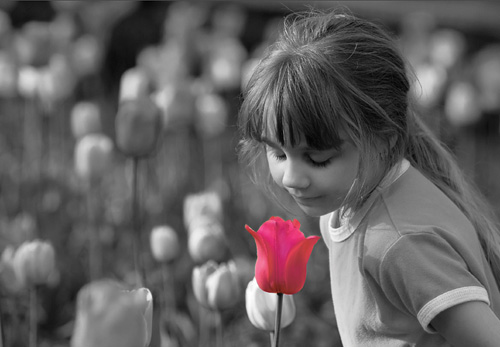
Step Five:
Now that we’ve got it selected, we might as well do something to it, eh? How about this: let’s leave the tulip pink, and make the background and little girl black and white. You start by going under the Select menu and choosing Inverse (which inverses your selection so you’ve got everything selected but the tulip). Go under the Enhance menu, under Adjust Color, and choose Remove Color. That’s it. Now you can deselect by pressing Ctrl-D (Mac: Command-D).
Removing People (or Objects) from Backgrounds
One of the most requested selection tasks is how to remove someone (or something) from a background. Luckily, this task has been made dramatically easier thanks to a fairly amazing tool called the Quick Selection tool (and you know if they use the word “quick” it must be true, thanks to rigid enforcement of the truth in advertising laws).
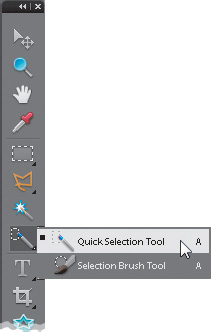
Step One:
You’ll find the Quick Selection tool in the Toolbox (as you might expect) nested with the Selection Brush tool (or you can press A to get it).
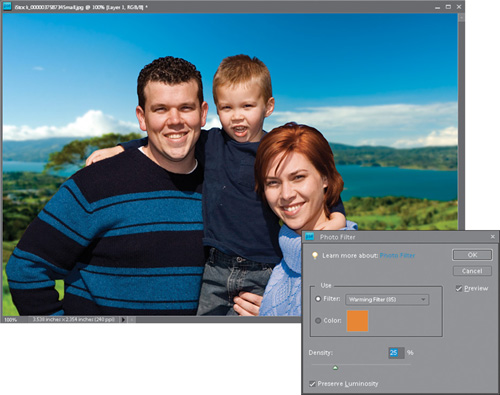
Step Two:
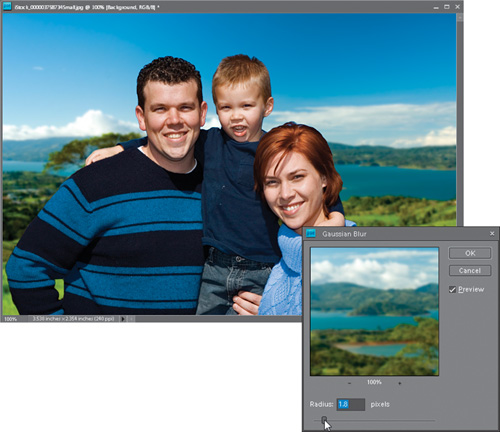
Here’s how it works: Just take the brush and drag it over the person or object you want to select (in this case, I wanted to select the whole family from the background, so I dragged across them). The first time I tried it, it almost selected all of them. The key word here is “almost.” Sometimes, it does a perfect job and other times, well…not so perfect. But more often than not, it really works wonders. Now, if you drag over an area, and it doesn’t get the entire person, just drag again over (or just click on) any areas it missed the first time. So, be prepared to drag one or more times to get them all. If you get part of the background in your selection, press-and-hold the Alt (Mac: Option) key and paint over the area you want removed.
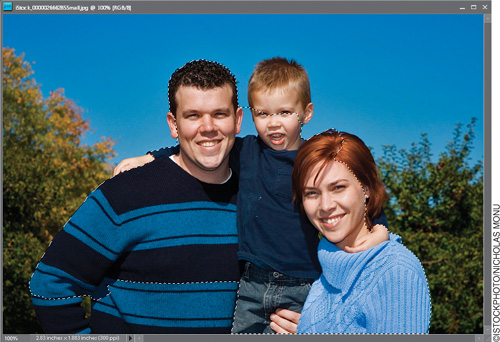
Step Three:
Here the family is selected after just a couple of paint strokes. Then I used the Zoom tool (Z) to zoom in, and removed a few areas of sky and trees that were selected accidentally.
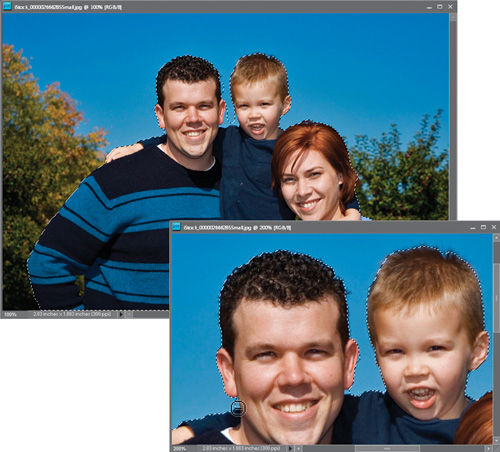
Step Four:
Well, now that we’ve got a selection, we might as well have some fun with it. Open a different image (in this case, a hilly landscape), then go back to your selected family image (make sure all your windows are floating by going under Window, under Images). Press V to get the Move tool, and drag your selected family right over onto the hilly landscape photo. If the people are too big, press Ctrl-T (Mac: Command-T) to bring up the Free Transform bounding box, then press-and-hold the Shift key (or turn on the Constrain Proportions checkbox in the Options Bar), grab a corner handle, and drag inward to scale it down to size. Press Enter (Mac: Return) to lock in your resizing. Note: If you can’t see the corner handles, press Ctrl-0 (zero; Mac: Command-0).
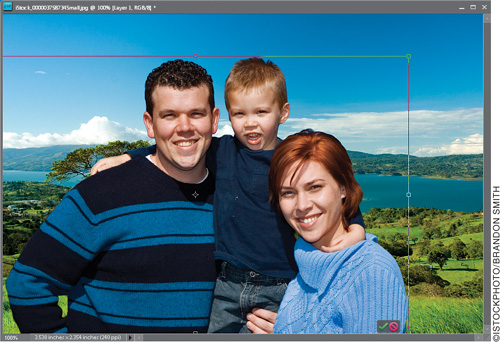
Step Five:
Since you’re a photographer, you’ve probably already noticed a problem or two. First, the depth of field doesn’t look realistic here. Generally, the people should be in focus in the photo and the background should be blurry. The people also look too “cool” for the surroundings, so we’ll have to remove some of the blue tint to make it look like the family is really in the scene. Let’s take care of the depth of field first. Click on the landscape layer (the Background layer). Go under the Filter menu and, under Blur, choose Gaussian Blur. Enter a setting of around 1 to 2 pixels and click OK. This should make the people look more like they were really there.
Step Six:
Now, click on the family image layer (Layer 1) in the Layers palette. Go under the Filter menu, under Adjustments, and choose Photo Filter. From the Filter popup menu, choose Warming Filter (85). If the effect is too intense, reduce the Density a little, and the family will better match the warmer tones of the landscape photo. Click OK and you’re done.