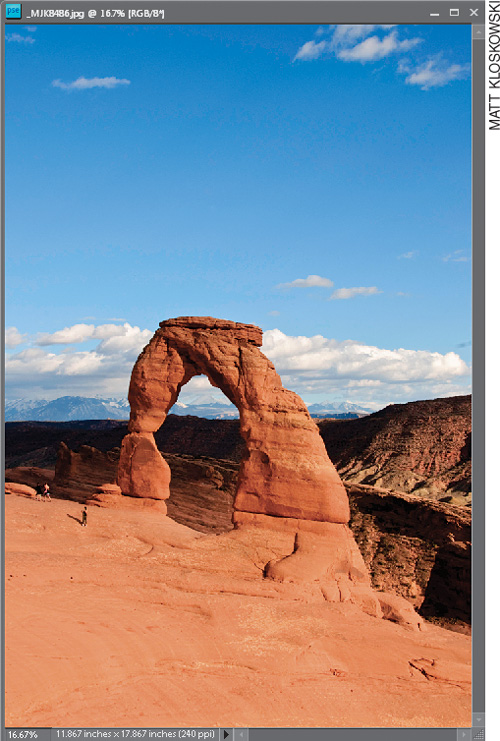
Photographer: Matt Kloskowski
Exposure: 1/60
Focal Length: 50mm
Aperture Value: ƒ/16
Is “Take Me Away” a perfect title for a chapter about removing unwanted objects from your photos or what? I’ve heard the song (by Avril Lavigne) a couple of thousand times now, because my son likes to listen to it (over and over again) on the way to school each morning. Not only have I unconsciously memorized the words, I’ve actually begun to like the song. It happened around the 13-hundredth time I heard it. By my 14-hundredth listen, I started developing my own background harmonies, and by the 15-hundredth time, I went out and bought the sheet music. This is highly embarrassing stuff, so don’t tell anyone. Anyway, this chapter shows you how to remove things that ruin otherwise beautiful photos. For example, let’s say you got married, and you’ve got some great photos from your wedding, but then a year or so later, you get divorced. You looked really great in your wedding dress, so you want to keep the photos, but you hate seeing your ex in there. Well, this chapter will show you how to remove him. Well, it doesn’t show you exactly that—how to remove your ex from your wedding photos—but it does show you how to remove any annoying thing, so really you could apply these techniques to your wedding photos. But I gotta tell ya, if you spend your time removing your ex from your wedding photos, perhaps learning new Elements techniques shouldn’t be your biggest concern.
The Clone Stamp tool has been the tool of choice for removing distracting or other unwanted objects in photos for years now. Although the Healing Brush in many ways offers a better and more realistic alternative, there are certain situations where the Clone Stamp tool is still the best tool for the job. Here’s an example of how this workhorse removes unwanted objects:
Step One:
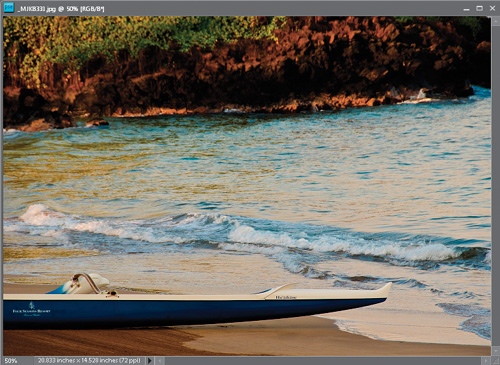
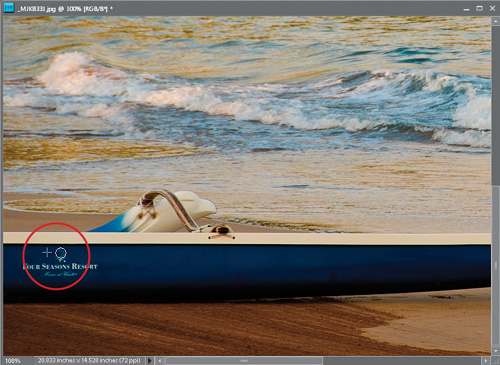
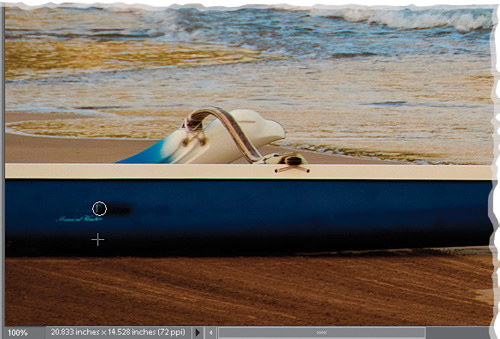
Nothing ruins a nice shot like distracting objects on your subjects. Here we have a nice shot of a canoe on a beach, but the writing on the far left side of it is kinda distracting, so let’s get rid of it.
MATT KLOSKOWSKI
Step Two:
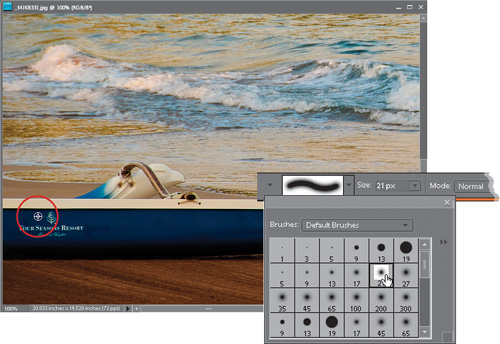
Use the Zoom tool (Z) to zoom in if you need to. Then, press S to get the Clone Stamp tool. In the Options Bar, click on the Brush thumbnail to the left of the Size pop-up menu and choose a small, soft-edged brush in the Brush Picker. Now, press-and-hold the Alt (Mac: Option) key and click once in an area to the left of the writing on the canoe. This is called “sampling.” You just sampled an area, and in the next step, you’re going to clone that blue area over the writing to completely cover it. (By the way, when you sample, a little “target” cursor appears letting you know you’re sampling, as you see here.)
Step Three:
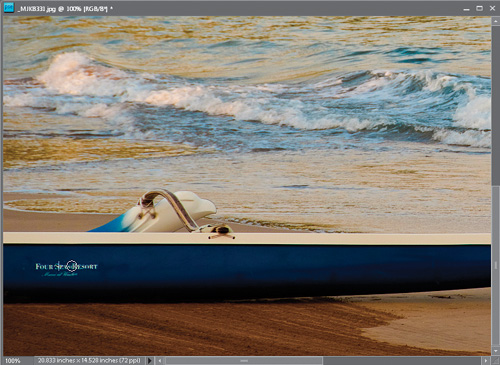
Move directly over and begin painting with the Clone Stamp tool. As you paint over the writing, the blue area you sampled is cloned right over it, so it looks like the writing has disappeared. Paint a little in this area to get a feel for how the Clone Stamp works (at least, if it’s your first time cloning; if it’s not, then you know what to do—start cloning over that writing). As you can see here, the writing disappears as you clone. But what if you’re not able to clone the whole thing in one brush stroke? Read on to the next page, and I’ll show you a little trick.
Tip: Sample a Similar Area
The key technique to remember is to sample in an area where the basic light and texture are the same (next to the writing), then move straight over to the writing. Note: The little plus-sign cursor (the area where you sampled) is immediately to the left of the circular brush cursor (where you’re painting now). By keeping them next to each other, you’re making sure you don’t pick up patterns or colors from other parts of the photo that would make your cloning look obvious (you’ll want to Alt-click [Mac: Option-click] in different but nearby areas to sample the multiple colors on the canoe and around the writing).

Step Four:
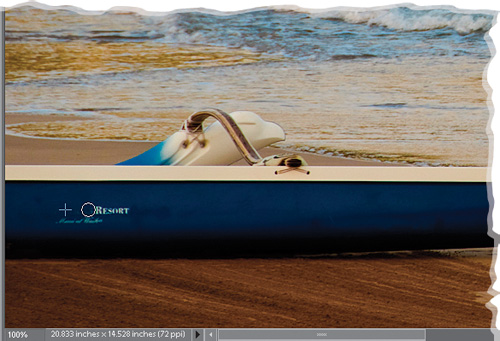
Now, what happens if you can’t clone all the way over the writing in one brush stroke? This actually happens a lot. In my example here, if I continue to paint with one brush stroke, my sample point starts going over the original writing on the canoe and I wind up cloning over the writing with more writing (as shown here, where I sampled just to the left of the word “Four,” started painting over “Four,” and moved to the right, where it cloned the word).
Step Five:
Here’s the trick: You’ll need to release your mouse button and click to paint again. Each time you release your mouse button, Elements resamples the area you’re cloning from and basically resets it. This lets you paint a little more of the blue area over the writing each time. Just keep an eye on that little crosshair as you’re cloning. If it starts going over a part of the canoe where the writing once existed, then weird things are going to happen. So release the mouse button often, let the source reset itself on the empty blue area, and paint smaller areas at a time, instead of one large area.
Step Six:
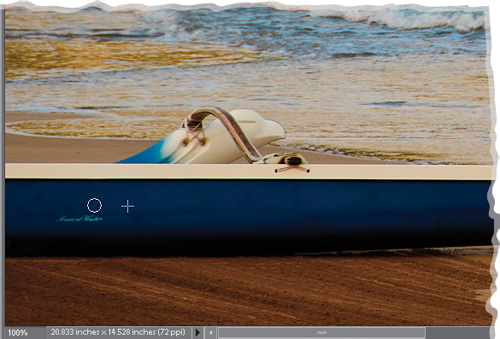
One more thing. Try sampling from an area to the right of the writing on the canoe. Look at the plus-sign cursor (where we just sampled from). Now you can start painting over the writing to clone over it (as shown here), but it’s important to understand why you have to sample from an area that has similar color and texture. For example, try this: Alt-click (Mac: Option-click) by the bottom of the canoe near the shadier area, then go back and start cloning over the writing. Look how much darker (and more obvious) the cloning looks (as shown in the bottom image). That’s why you usually have to sample very close to where you clone. If not, it’s a dead giveaway.
Tip: Sample Different Areas
One of the tricks to removing objects realistically is to sample often (by Alt-clicking [Mac: Option-clicking]) in different but nearby areas so that your cloning appears random, therefore avoiding repeating patterns.
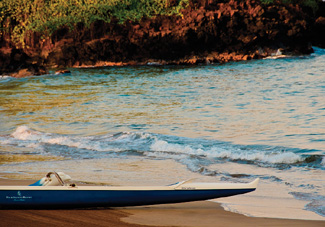
Before
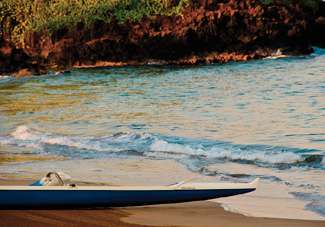
After
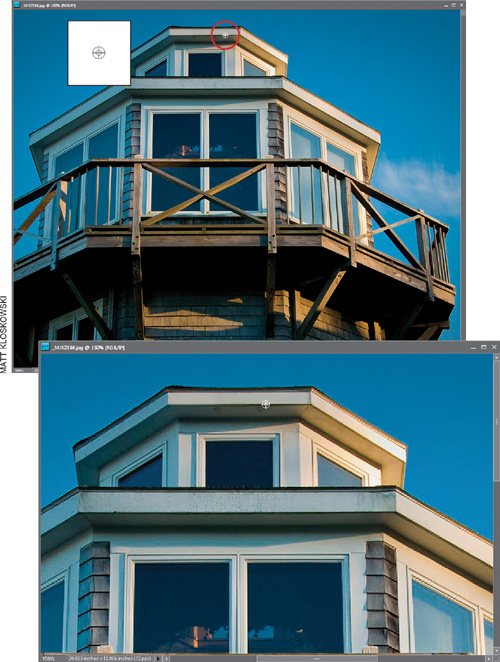
This is an incredibly handy little trick I learned from a friend, and I’ve found no better way to clone away objects on things that are straight (like horizons, walls, etc.).
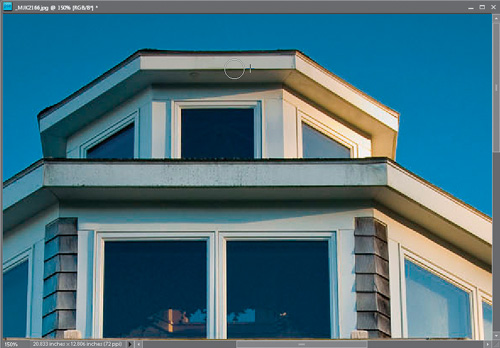
Step One:
Open your image, and then press S to get the Clone Stamp tool (here, we are going to remove the two spots under the eaves at the very top). Now press-and-hold the Alt (Mac: Option) key, and take a look at your cursor (shown here enlarged in the white box). See the horizontal and vertical lines inside the circle? That’s the key. You must position the cursor’s center “target” line (either horizontal or vertical) on the straight edge that you want to clone in your image (in this case, the eaves). With the Alt key held down, click once when the target (called the “sample cursor”) is aligned on the straight edge in your image.
Step Two:
Drag directly to the left while pressing-and-holding the Alt key, but don’t click yet. With this key held down, drag to align the sample cursor’s horizontal center line along the edge in your image. (Use the Zoom tool [Z] to zoom in, if you need to.)
Step Three:
With the horizontal line positioned along the edge in your photo, release the Alt key and now click-and-drag to start cloning. As you clone, paint along the same straight line. It’s all about making sure that the cursor’s horizontal line is aligned with the edge in your image before you start painting.
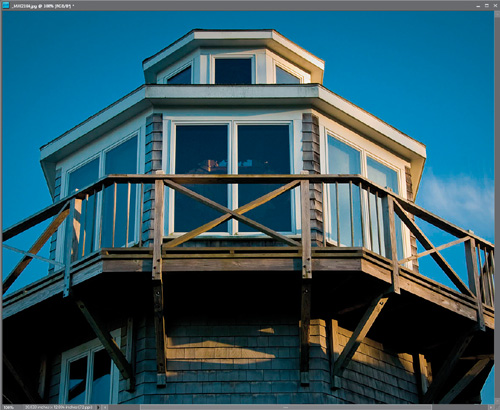
Step Four:
After using a smaller brush to clone away part of your object along a straight line, you may need to switch to a larger brush to start cloning away other areas of the object. Then, get your smaller brush again to finish cloning along the line. Here is the finished image.
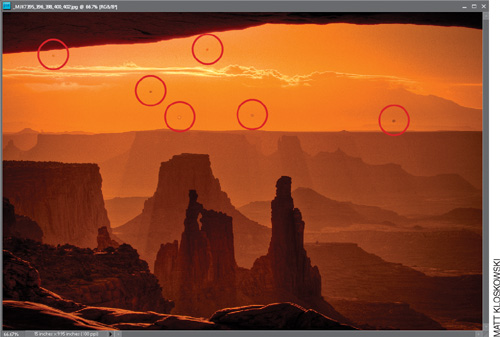
In Elements 3, Adobe added the Spot Healing Brush tool, which is just about the perfect tool for getting rid of spots and other artifacts. (By the way, the term “artifacts” is a fancy “ten-dollar” word for spots and other junk that wind up in your photos.) Believe it or not, it’s even faster and easier to use than the regular Healing Brush, because it’s pretty much a one-trick pony—it fixes spots.
Step One:
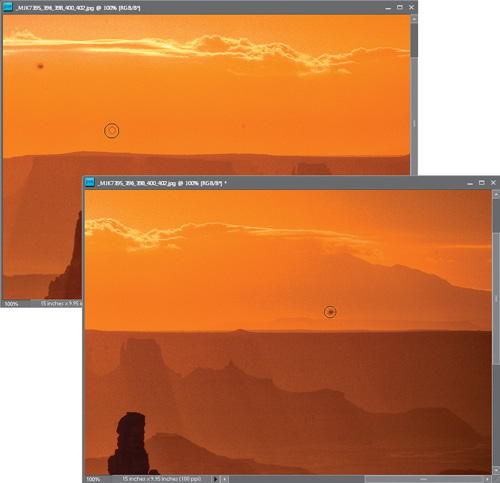
Open a photo that has spots (whether they’re in the scene itself or are courtesy of specks or dust on either your lens or your camera’s sensors). In the photo shown here, there are all sorts of distracting little spots in the sky.
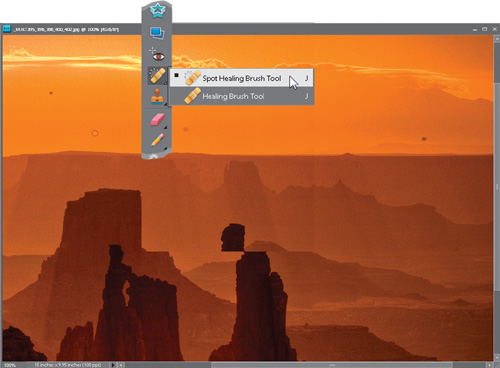
Step Two:
Press Z to get the Zoom tool and zoom in on an area with lots of spots (in this case, I zoomed in on an area of sky). Now get the Spot Healing Brush tool from the Toolbox (or just press the letter J).
Step Three:
Position the Spot Healing Brush directly over the spot you want to remove and click once. That’s it. You don’t have to sample an area or Alt-click anywhere first—you just move it over the spot and click, and the spot is gone.
Step Four:
You remove other spots the same way—just position the Spot Healing Brush over them and click. I know it sounds too easy, but that’s the way it works. So, just move around and start clicking away on the spots. Now you can “despot” any photo, getting a “spotless” version in about 30 seconds, thanks to the Spot Healing Brush.
Before
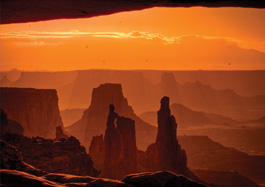
After

The Healing Brush is ideal for removing spots, little rips, stains, and stuff like that because it keeps more of the original texture and the fixes look more realistic, but it isn’t as good as the Clone Stamp tool at removing larger, unwanted objects. For example, if the thing you want to remove is all by itself (it’s not overlapping or touching anything else in your photo), then it works great. If not, it “frays” the ends and looks messy. So here you’ll see how it works, why it doesn’t always work, and a great trick for making it work most of the time (with some help from the Clone Stamp tool).
Step One:
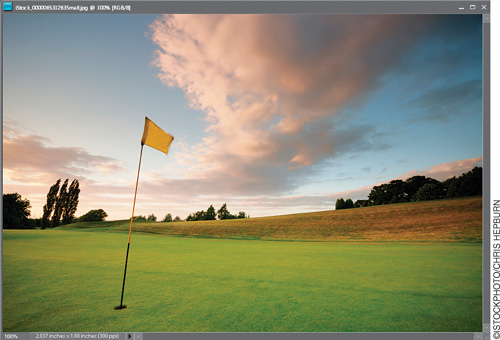
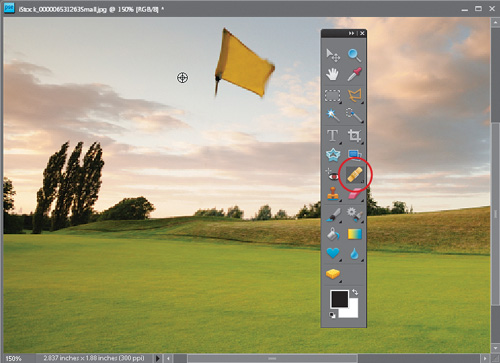
In this photo, let’s say a creative director wants the flagpole removed before some text is added, because he feels it’s distracting. So, we’re going to use a combination of the Healing Brush and a little bit of the Clone Stamp tool to remove it, while maintaining as much of the original texture and grain as possible.
Step Two:
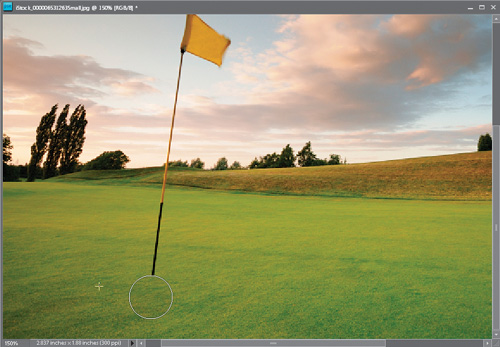
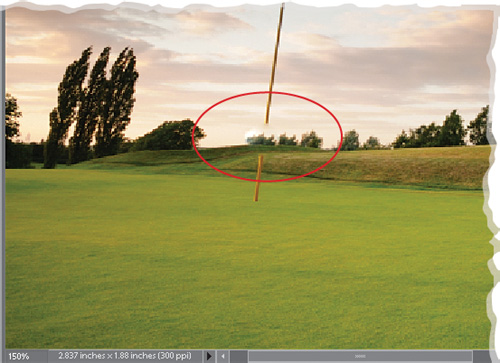
First we’ll look at how the Healing Brush works, and then you’ll see what the limitation of the Healing Brush is. Start by pressing Z to get the Zoom tool and zoom into an area you want to fix (in this case, we’re going to fix the hole and flagpole on the green). Press J until you get the Healing Brush, and then Alt-click (Mac: Option-click) in an area near that flagpole on the green. At this stage, the Healing Brush works kind of like the Clone Stamp tool, so just click-and-drag on the hole and pole. See, it’s gone. Piece of cake so far.
Step Three:
Now you’re going to see the main limitation of the Healing Brush—when objects touch. Look at the area where the flagpole goes over the back of the green in the background. That’s trouble. Go ahead and Alt-click anywhere near that part of the photo and try to use the Healing Brush to remove that area of the pole. Ahh, now you see the problem: Where the pole meets the background, it’s all smudged. The Healing Brush only gives you a clean removal if you can paint around the entire object without hitting an edge.
Step Four:
Undo your healing by pressing Ctrl-Z (Mac: Command-Z). Now we’ll try getting around that limitation: The first thing we want to do is make sure we don’t accidentally remove any part of the sky, so choose your favorite selection tool from the Toolbox (here, I used the Lasso tool [L]). You’re going to use it to select the area you want to clone, which will protect the sky, because you can only clone inside your selected area. Carefully select the pole between the green and the sky, pressing Shift to add to the selection (for the Lasso tools or the Magic Wand tool) or Alt (Mac: Option) to subtract from it.
Step Five:
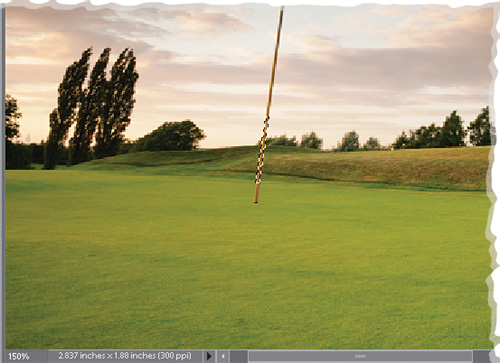
Press S to get the Clone Stamp tool from the Toolbox, and then Alt-click (Mac: Option-click) once just to the right of the pole. Now paint a stroke right over the pole to remove it. In the example here, the plus-sign cursor shows where I sampled, and the circular brush cursor shows where I’ve painted over the pole. Again, having that selection in place prevents you from accidentally cloning over any of the sky, because you can only clone inside the selected area. Alt-click again and sample near the grassy hill to the right when cloning over the pole near those areas.
Step Six:
Once you’ve cloned over enough area so the pole is no longer visible over the green or the hill behind the green, you can press Ctrl-D (Mac: Command-D) to Deselect. You’ll see part of the pole has been removed, but without all the smudging, thanks to using the Clone Stamp tool. Go ahead and use the Clone Stamp tool again to remove the rest of the pole up to the top, near the flag. Try sampling to the right of the pole in the cloudy sky area to get a good replacement source.
Step Seven:
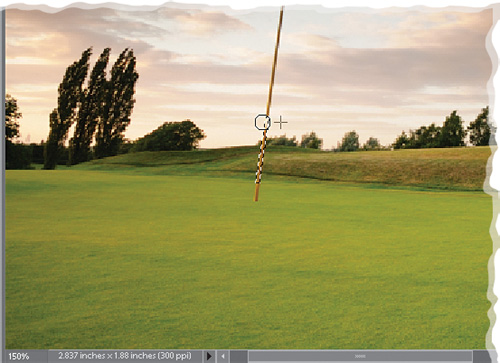
Now switch back to the Healing Brush (as shown in the Toolbox), and Alt-click somewhere over to the left of the top of the flagpole, in the empty sky (unlike the Clone Stamp tool, you don’t have to Alt-click right next to the area where you’ll be healing—just pick a spot, any spot, that has a similar texture or color).
Step Eight:
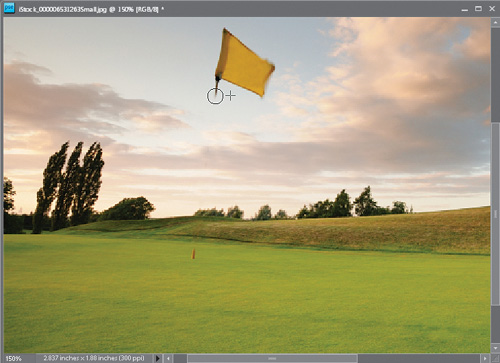
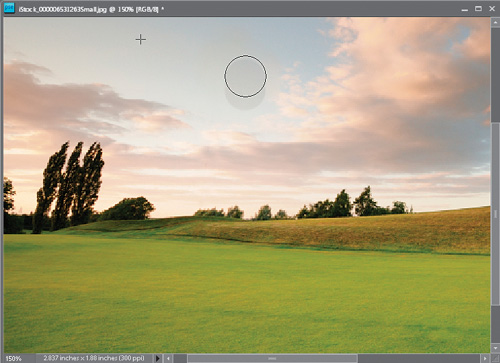
Begin painting over the flag to remove it. Don’t let it throw you off that the tone looks a bit funny as you’re painting. The final healing doesn’t take place until you release the mouse button, so there’s a second or two where your healing looks bad, but just be patient for a moment.

Step Nine:
If you can’t get the entire flag in just one stroke—don’t sweat it. Just Alt-click in a different area (again, I’d try somewhere to the left of the flag), and paint another stroke until the entire flag has been removed. So, in short, if you don’t mind using the Clone Stamp just a little bit, you can turn the Healing Brush into a real tool for removing larger, unwanted objects. Below is a before/after of our fix.
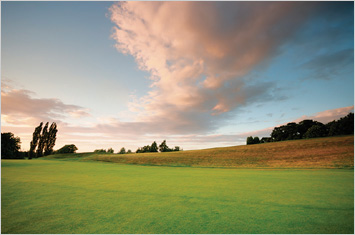
Before

After
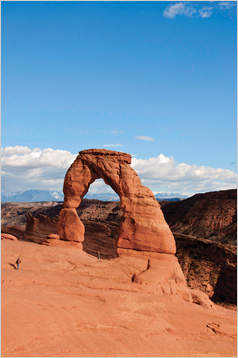
If you’ve ever tried to photograph a popular landmark or national monument, you’ll know that it’s pretty unlikely you’ll be there alone. Unless you’re willing to get up really early in the morning (when most people are still sleeping), you’re bound to get a tourist or two (or 20) in your photos. In this tutorial, you’ll learn a few tricks to help clean up those scenes and remove the tourists with just a few brush strokes.
Step One:
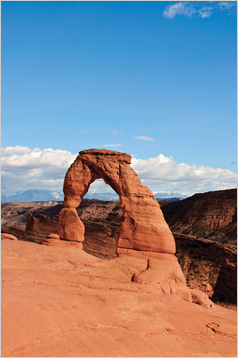
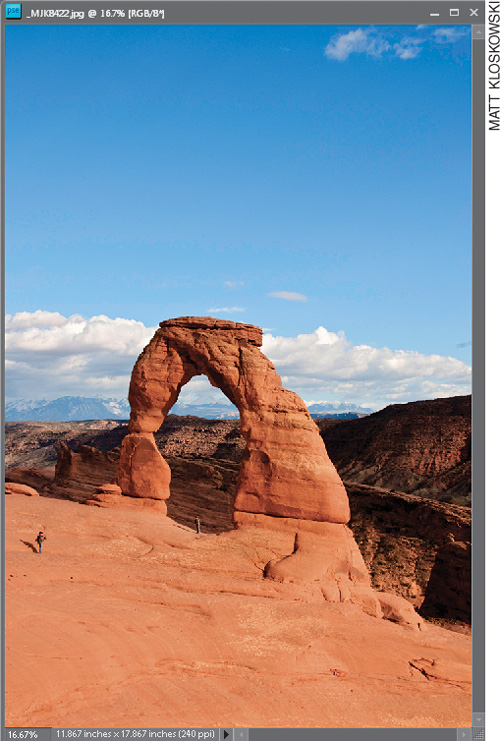
The first step starts in the camera. You’ll need to photograph at least two shots of the same scene (but you can use up to 10 if you’d like). Here’s a photo of Delicate Arch in Arches National Park, Utah.
Step Two:
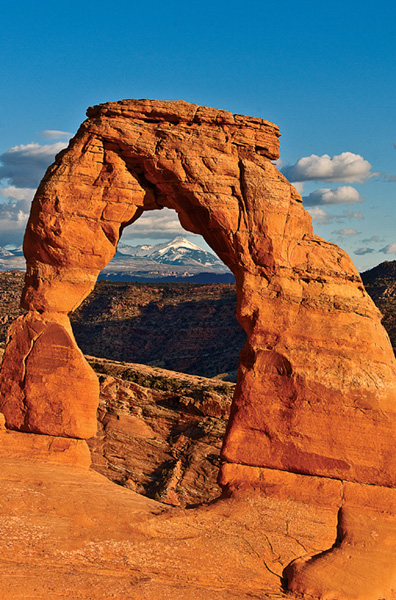
I realized it was going to be really difficult for me to get a photo when someone wasn’t walking near or under the arch. I knew that I had a feature that could fix this available to me in Elements, so I decided to take another photo. As you can see, I wasn’t able to capture a photo with no tourists, but at least I had another one where they had moved.
Tip: Shoot with a Tripod
I was on a tripod when I shot this, and doing this makes your life dramatically easier when you use Elements to clean up the scene. However, I know it’s not always possible, so if you’re hand-holding the camera, try to make sure you don’t move locations or shoot from another angle. Basically, stand really still and wait for tourists to move or, more likely, relocate and start over. Also, check out the tip after Step Three.
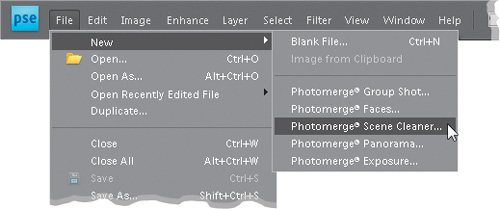
Step Three:
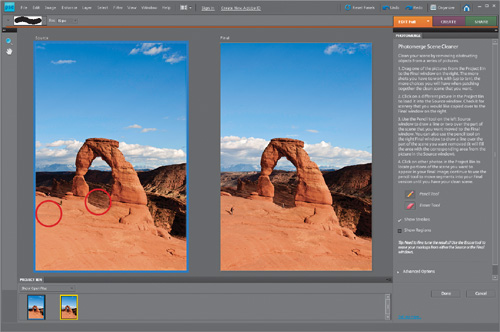
Go ahead and open the photos you’ve taken (remember, you’ll need at least two but can use up to 10. In this example, I’m only using two) in the Elements Editor. Then select them down in the Project Bin by clicking on the first one and Shift-clicking on the last one. Now, go under the File menu, under New, and choose Photomerge® Scene Cleaner. This will take you into Photomerge.
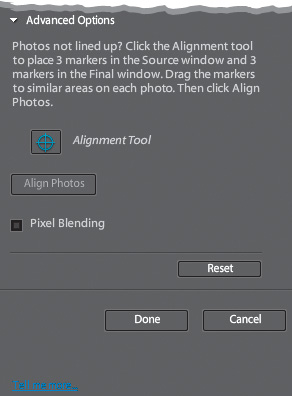
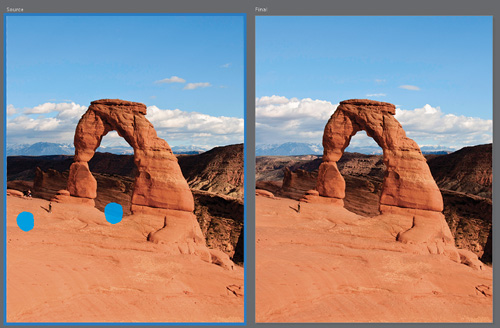
Advanced Tip: Try the Advanced Options
Here’s a follow-up to the previous tip. In fact, just file this tip away, because you may or may not need it. If you didn’t shoot on a tripod, and you’re not getting good results from Photomerge, then click on the Advanced Options section at the bottom of the Photomerge palette. Use the Alignment tool to place three markers in the Source window and three in the Final window, on similar places in the photos. Then click Align Photos, and Elements will do its best to align the photos based on those markers. This helps the Scene Cleaner give more predictable results. Again, give Step Three through Step 10 a try first and see how things work out. If everything looks good, then you don’t need the Advanced Options.
Step Four:
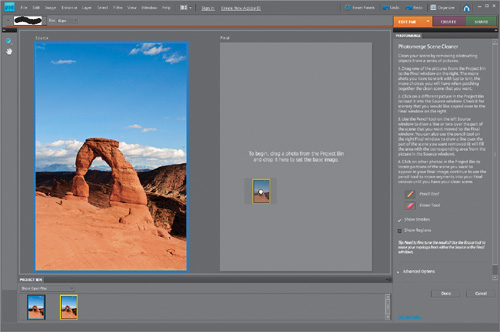
The Source window on the left will automatically be populated with the first photo you chose. You’ll need to create a Final photo though, so drag the other photo from the Project Bin into the Final window on the right.
Step Five:
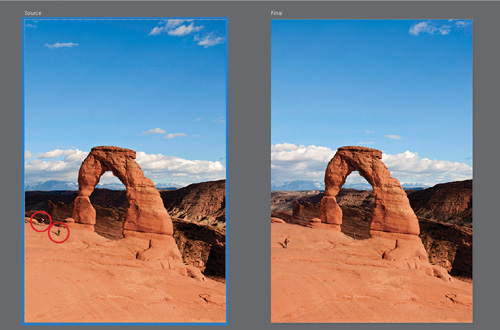
Now look over at the Source window and find the clean areas from this photo that you’d like copied over to the Final photo. Here, I’d like to copy the clean area under the center of the arch, as well as the tourist-free area near the far-left edge of the photo.
Step Six:
If you’re thinking, “But what about those two tourists in the Source window to the immediate left of the arch?” Don’t sweat it. Remember, that left window is the source image and not the final. As long as we stay away from those two tourists, they won’t get copied over to our final image.
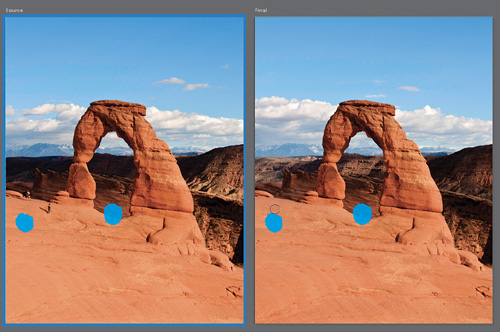
Step Seven:
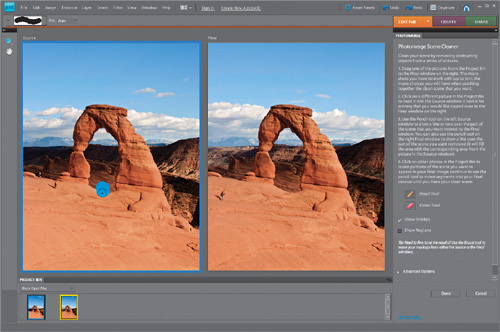
All right, let’s get rid of some tourists. First, use the Pencil tool and paint on the Source image (on the left) under the middle of the arch to get rid of that tourist. It doesn’t have to be perfect, so just paint a small area right in the center. When you release your mouse button, you’ll see the Scene Cleaner automatically remove the tourist from the center of the arch in the Final image on the right. You can use the Zoom tool (the one that looks like a magnifying glass in the Toolbox on the left) to zoom in to the area if you need to.
Tip: Getting Rid of the Pencil Marks
If you move your mouse over the Final image, you’ll see the blue pencil marks on it, too. If you want to see your Final image without the blue pencil marks over it, just move your mouse away from it and they’ll disappear. If you want to see the Source image without the blue marks, then turn off the Show Strokes checkbox in the Photomerge palette on the right.
Step Eight:
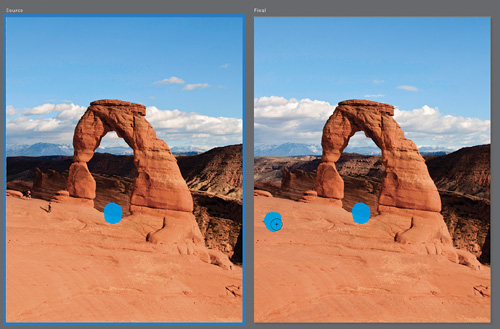
We still have one more tourist to remove. You could use the Pencil tool and scribble over the clean area of rock on the Source image (on the far-left side, near the edge) to try to match it up with the other tourist in the Final image, but that takes a bit of guesswork. Elements lets you paint in the Final image, too. So, using the Pencil Tool, paint over the remaining tourist on the far-left side of the Final image (as shown here).
Step Nine:
A couple of things happened in my example here: The tourist on the far left was indeed removed, but in doing so, Elements grabbed a little too much from the Source image, and pulled one of the tourists from there into the Final image. No sweat. Elements does two things to help: (1) it leaves your Pencil tool marks on the photo (you can see them in the next step), in case you don’t get the results you were looking for, and 2) it has an Eraser tool, so you can finesse your changes.
Step 10:
So grab the Eraser tool (it’s right under the Pencil tool on the right) and click to erase away some of the blue pencil marks in the Final image on the right. Not much, just the top area to force the Scene Cleaner to look more closely at the parts of the Source image it’s pulling from. When you release the mouse button, you should see the unwanted tourist disappear from the Final image. If you’ve taken more than two photos, you can click on another one in the Project Bin to set it as the Source image on the left. Then continue to paint with the Pencil tool just like we did in Step Seven and Step Eight. When you’re done cleaning up the image, click the Done button to return to the Editor.
Before
After