8. Tips and Tricks
You’re far enough along in this little guide to understand that the iPod and iTunes hold more secrets than just Rip, Click, and Play. This dynamic duo have other wonders to behold if you know how to unleash them. And that’s exactly the point of this chapter: to shed light on the lesser-known marvels of the iPod and iTunes.
Let the magic begin.
Move Media off the iPod
To deter piracy, iTunes and the iPod were designed so that media would travel in one direction only: from the computer to the iPod. When you double-click an iPod mounted on a computer, you’ll find no folder within that holds the device’s music or movies. Yet this material has to be there somewhere.
It is. It’s invisible.
When Apple designed the original iPod’s copy-protection scheme, it understood one of the fundamental laws of this new millennium: That which can be locked will be unlocked (by a 12-year-old).
In past editions of this book, I revealed ways to make the iPod’s Music folder visible and then copy files from this folder to your computer. Although this process is an interesting academic exercise, it’s largely a waste of your time. Scan sites such as Download.com and VersionTracker (www.versiontracker.com), and you’ll discover a host of utilities designed to pull media off your iPod and put it on your computer. Some of these utilities are more sophisticated than others, allowing you to copy not only the music the iPod carries, but its playlists as well. Here are a handful of my favorites.
Macintosh utilities
Sci-Fi Hi-Fi’s $8 PodWorks (www.scifihifi.com/podworks) is the goods for Mac users (Figure 8.1). Because it reads the iPod’s internal database rather than individual song data, it’s fast. It can also sort tracks by the ID3 tags (see Chapter 4) contained in that internal database, making it easier to find just the tracks you want. It can copy entire playlists—as well as individual items—from the iPod in a single drag, and when it does, it maintains the original’s play count, star ratings, and date-added information.
Additionally, PodWorks lets you preview songs from the iPod—a helpful feature if you’re not sure whether you’re looking at the studio version or the live version of a particular cut.
Finally, you can run PodWorks directly from the iPod. This capability is useful for those rare occasions when you’ve lost your iTunes Library (and, thus, need this tool) because your entire hard drive has gone the way of the dodo and taken its copy of PodWorks with it.
Windows utilities
WindSolutions’ $20 CopyTrans (www.copytrans.net) works with click-wheel iPods as well as the iPod touch and iPhone. Its capabilities match those of PodWorks. Also like PodWorks, it features an iPod-like interface and can copy music as well as video from the iPod to a Windows PC.
iPodSoft’s $20 iGadget (www.ipodsoft.com) can also move media from the iPod to your PC (or Mac, as a version is available for that computing platform too), exporting movies, single songs, or playlists. In addition, it can transfer data such as weather forecasts, local movie times, driving directions, and RSS news feeds. This information appears in the iPod’s Notes area.
Get the Greatest Charge out of Your iPod
No, I’m not being colloquial. I don’t intend to tell you how to get the greatest thrill out of your iPod, but how to coax the longest play time from a single battery charge. Try these tips.
Keep it warm (but not too warm)
Lithium-ion polymer batteries perform at their best when they’re operated at room temperature. If your iPod is cold, warm it up by putting it under your arm (which, with a really chilly iPod, is an invigorating way to wake up in the morning). And keep your iPod out of your car’s hot glove compartment.
Use it at least once a month
I can’t imagine owning an iPod that you never unplug from a power source, but it takes all kinds to make a world. The iPod’s battery likes to have its little electrons banged around at least once a month. Do so by unplugging it and using it as Jobs intended.
Flip on the hold switch
If you accidentally turn on your traditional iPod while it’s in a pocket, purse, or backpack, you’ll be disappointed hours later when you discover that its battery has been drained by playing only for itself. An engaged hold switch will keep this from occurring.
Don’t touch it
OK, that’s a bit extreme. What I really mean is that every time you press a button, the iPod has to make an additional effort, which drains the battery faster.
Turn off the extras
Try shutting down EQ and Sound Check, and don’t use backlighting. These extras—particularly backlighting—eat into your battery’s charge.
Load your iPod classic with smaller files
The more often your iPod classic’s hard drive spins up, and its memory cache fills and empties, the more quickly its battery is drained. Files that exceed 9 MB force more frequent hard-drive spins and cache activity. For this reason, you’ll get more play time from your iPod classic if your song files are in the compressed AAC and MP3 formats versus the big ol’ AIFF, WAV, and Apple Lossless formats.
Turn down the brightness control
All of today’s screen-bearing iPods include brightness controls. The brighter your iPod’s display, the faster your battery drains.
Shift Your iTunes Library
It may not happen today, tomorrow, or next year, but if you’re an iTunes enthusiast, your computer’s startup drive will eventually be so choked with media that you won’t have room for anything else. When this happens, you’ll want to move your iTunes Library to another hard drive. Here’s how:
1. Create a new location for your media files (a folder on an additional internal or external hard drive, for example).
2. Launch iTunes, and choose iTunes > Preferences (Mac) or Edit > Preferences (Windows) to open the iTunes Preferences window.
3. Click the Advanced tab and then click the Change button.
The Change Music Folder Location dialog box opens.
4. Navigate to the new location you created in step 1, and click Open.
5. In that same Advanced tab of the iTunes Preferences window, enable the options labeled Keep iTunes Media Folder Organized and Copy Files to iTunes Media Folder When Adding to Library; then click OK to dismiss the Preferences window.
6. Choose File > Library > Organize Library.
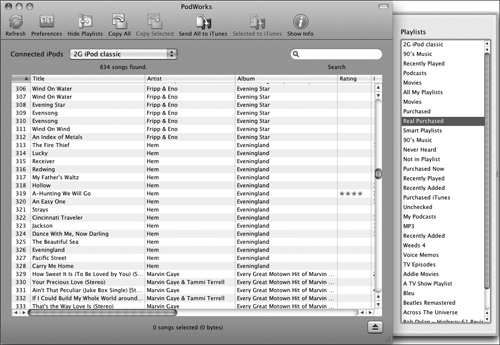
In the Organize Library dialog box that appears, you see two options: Consolidate Files and Upgrade to iTunes Media Organization (Figure 8.2). Consolidate Files is the option you’re interested in. Enable this option to copy all your media files to the iTunes Music folder that you’ve designated in the Advanced preference. The original files remain in their original locations, so when you’re sure that your files have been copied where you want them, you may want to dispose of the originals.
Figure 8.2 Select the Consolidate Files option in iTunes’ Organize Library dialog box.
iTunes copies not only your files to the destination you designated, but also your library’s playlists. (It maintains ratings as well.)
![]() With iTunes 7 and later, you can span an iTunes Library across volumes. To do this, open the Advanced tab of the iTunes Preferences window, click the Change button, and designate a new iTunes Music folder location. When you turn off the Copy Files to iTunes Music Folder When Adding to Library option, iTunes will look to this new folder while maintaining contact with the old one; you can play the files in your old iTunes Music folder as well as the files in the new folder. When you add new music, that music will be added to the new location.
With iTunes 7 and later, you can span an iTunes Library across volumes. To do this, open the Advanced tab of the iTunes Preferences window, click the Change button, and designate a new iTunes Music folder location. When you turn off the Copy Files to iTunes Music Folder When Adding to Library option, iTunes will look to this new folder while maintaining contact with the old one; you can play the files in your old iTunes Music folder as well as the files in the new folder. When you add new music, that music will be added to the new location.
Copy Media from Other Computers
It’s quite common to have more than one computer in your home and nearly as common to have media libraries with different contents on each computer. In the past, moving media from one computer to another was inconvenient. No more. Apple has made this process easier, thanks to the new Home Sharing feature in iTunes 9. Here’s how it works between two computers:
1. Open iTunes’ Preferences window on each computer, and click the Sharing tab.
2. On the computer from which you want to copy media, enable the Share My Library on My Local Network option.
If you like, you can share just selected playlists or your entire iTunes Library.
3. On the computer to which you want to copy media, enable the Look for Shared Libraries option.
4. On the computer that will receive the copies, go to iTunes’ Source list (below the Shared heading), and select the computer you want to copy from.
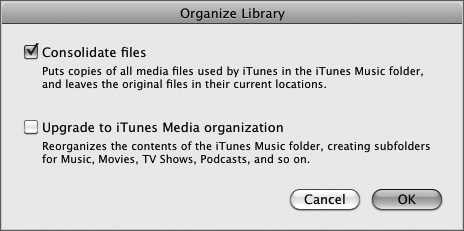
5. Still on the destination computer, from the Show pop-up menu at the bottom of the iTunes window, choose Items Not in My Library (Figure 8.3).
Figure 8.3 Copying music from one computer to another with iTunes’ Home Sharing feature.
You also have the option to show all items in the other library, but for this exercise, you’re concerned about copying just the media you don’t have.
6. Select the files that you’d like to copy from the other computer, and click the Import button at the bottom of the iTunes window.
The files will be copied to the computer’s iTunes Library.
Home Sharing offers an additional benefit that you should be aware of: You can automatically transfer media that you purchase from the iTunes Store to another computer. Click the Settings button at the bottom of the iTunes window (again, with the shared computer selected), and a Home Sharing Settings dialog box appears. In this dialog box, you can designate the kinds of media to be transferred to this computer automatically when they’re purchased on the other computer (Figure 8.4).
Figure 8.4 iTunes’ Home Sharing screen.
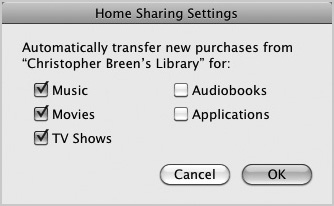
So, for example, if your husband just picked up Weezer’s new album on his laptop, and if you enabled the Music option on your computer prior to that purchase, that album will be transferred to your computer automatically.
![]() Before you can transfer purchased content from one computer to another, both computers must be authorized with the Apple ID used to purchase that content.
Before you can transfer purchased content from one computer to another, both computers must be authorized with the Apple ID used to purchase that content.
Rip Your DVDs
Here’s a little scientific fact that may have missed your notice.
If you take a 5-year-old, wash him thoroughly, dress him in sterile garb, and put him inside a “clean room” along with your favorite DVD, he—and the DVD—will emerge 20 minutes later covered in jam even though there’s no jam within 50 miles of the facility!
Yes, 5-year-olds have an unearthly power to channel jam (typically, strawberry) from the ether and smear it on your precious movie discs. And because they do, it’s imperative that you find a way to back up those discs before they get smeared and you have to replace them with unjammed copies.
Also, given that you have an iPod, wouldn’t it be cool if you could take the DVDs that you own and convert them so that they can be played on your iPod? Yes, it would—and yes, you can.
You have a variety of ways to perform this feat, as I show you in the following sections.
Macintosh
If you have a Mac, you’re in luck; you can do this for free. Here’s how:
1. Download and install a copy of the VideoLAN Client (VLC) from www.videolan.org.
VLC contains components that help remove the copy protection from commercial DVDs.
2. Download and install a copy of HandBrake from http://handbrake.fr.
3. Slip a DVD into your Mac’s media drive.
4. When you’re prompted, select the DVD in the resulting sheet and then choose the disc’s Video_TS folder.
HandBrake scans the disc, seeking the main disc’s main feature. The main title appears in the Title pop-up menu.
5. Choose your encoding preset.
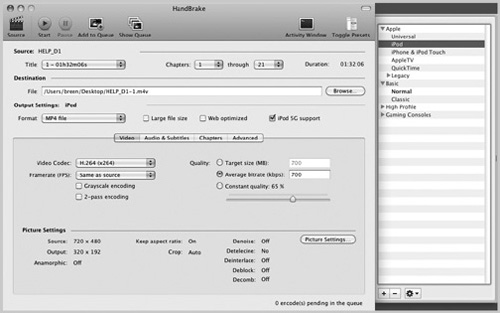
If the Presets pane doesn’t appear, click the Toggle Presets button at the top of the window, and from the Presets pane, choose the device you’d like to watch the movie on—iPod, for example (Figure 8.5).
Figure 8.5 HandBrake is a terrific (and free) tool for ripping DVDs on the Mac.
6. Wait about an hour for HandBrake to rip your disc.
When it’s done, it automatically places a copy of the movie in your iTunes Library so that the movie is ready to sync to your iPod.
Or …
1. Download a copy of Metakine’s Fairmount (which is free) from www.metakine.com/products/fairmount.
Fairmount will mount the DVD as an unprotected disc.
2. Convert the disc with a third-party utility.
We leave the land of the free at this point, I’m afraid. Utilities such as Roxio’s $100 Toast Titanium (www.roxio.com) and the €40 DVD2one (www.dvd2one.com) can convert the now-unprotected DVD to a form that’s playable on your iPod.
1. Purchase a copy of The Little App Factory’s $20 RipIt (http://ripitapp.com).
RipIt is the simplest of the Mac bunch.
2. Insert your disc, launch RipIt, and click the Rip button.
In about an hour, an exact copy (without the copy protection) will be on your Mac. At that point, you can use HandBrake to convert it to a format that’s compatible with your iPod.
Windows
Yes, there are tools for Windows users as well. The one that gets the bulk of the attention is SlySoft’s AnyDVD (www.slysoft.com), which is sold on a subscription basis. You can use it for a year for € 41, 2 years for €49, 3 years for €56, or 4 years for €61, and €64 gets you a lifetime subscription. You’re welcome to give it a go for 21 days to see whether you like it. If so, go ahead and buy.
It works this way:
1. Launch AnyDVD, and insert a DVD.
2. Select Video DVD in the Status pane.
3. Enable the Remove Annoying Adverts and Trailers options.
These options ensure that just the main feature will be ripped.
4. Click OK.
AnyDVD rips the movie.
Put Old Media on New iPods
Rummage around in the garage, attic, or wherever you keep your old junk, and you’re sure to find at least one box that contains old VHS tapes, LPs, and cassettes. Word to the wise: This stuff isn’t improving with age. Wouldn’t it be nice if you could move some of that material to your computer and, thus, your iPod?
Of course you can. The process for doing this is called digitizing your media—converting it from its analog form to digital. Here’s how to go about it.
VHS tapes
I hope that in addition to that box of VHS tapes, you still have your VHS player. These players aren’t being made much anymore, so if you can’t find yours, call your best packrat friend and borrow hers.
Using your camcorder
One method (a free one at that) for transferring VHS tapes to a computer is to use a camcorder as a go-between. Many camcorders have a pass-through mode that works like this:
1. String a cable between the video and audio outputs of the VHS player and the input ports of the camcorder.
The VHS player likely has S-Video and composite video outputs and certainly will sport RCA audio jacks. Use S-Video if it’s available, as it provides better-quality video.
2. Run a cable between the camcorder and your computer.
This cable will be either FireWire or USB, depending on the kind of connection your camcorder supports for transferring video to a computer.
3. Read the camcorder’s manual to find out how it handles pass-through.
It may work without your having to do a thing, but some camcorders require you to enable a setting that allows video to pass through the camera.
4. Launch the video-capture software on your computer, and record the output of the VHS player.
For the Mac, this software would be iMovie. For Windows, use Windows Movie Maker.
Buying an adapter
If you don’t have a camcorder or one that supports pass-through, worry not; there’s another way. That other way is simply to purchase a product intended for exactly this purpose.
For said purpose, I’d turn to Roxio, which offers two products for the job—one for Windows and another for the Mac. The Windows version, called Easy VHS to DVD, costs $60. The other version, Easy VHS to DVD for Mac, costs $80 (Figure 8.6). Why the $20 difference? The hardware is exactly the same, so let’s just say that Mac users are known to have bits of extra cash sitting in their wallets.
Figure 8.6 Easy VHS to DVD for Mac can help you digitize your old VHS tapes.

There’s not much to using these tools. Just plug the USB capture device into a free USB 2.0 port on your computer, attach the proper cables (the capture device supports composite and S-Video as well as RCA audio), launch the software, and follow the steps. Each product walks you through the process. These devices allow you to encode video so that it plays natively on an iPod.
LPs and tapes
Like capturing and converting video, converting LPs and tapes is largely a matter of taking the output from the player (the turntable or cassette player), conveying it to the audio input of your computer, and then using software to capture and edit the sound.
After you’ve made the connection to your computer, the process is fairly simple. Like so:
1. If you don’t have an audio-editing application, download a copy of Audacity (http://audacity.sourceforge.net).
Audacity is a free, open-source audio recording and editing application that comes in versions for the Mac as well as Windows.
2. Launch Audacity, and choose an audio input.
Open Audacity’s Preferences, and in the Audio I/O preference, choose the input used by your turntable or cassette player. (This could be the Line-In port or a turntable’s USB port, if you have a USB turntable.)
3. From the Channels pop-up menu, choose 2 (Stereo), and click OK to dismiss the Preferences window.
4. Play a sample, and adjust the input (if necessary).
Play the record or tape, and look at the meters at the top of the window. They should touch the red only rarely. If they’re in the red all the time, the sound will be distorted. If the green bars appear in only the first quarter of the meters, the sound will be too soft.
To adjust the input, use the slider with the Microphone icon next to it.
5. Click the Record button, and play the record or cassette.
The Record button is the round red button next to the green, triangular Play button.
It’s likely that you’ve captured a little more audio than you want. You can click and drag over the portion you don’t want and then press the keyboard’s Delete key to remove the detritus.
7. Split the audio.
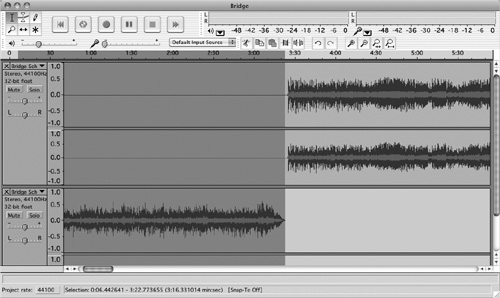
If you’ve recorded the side of an LP or cassette that includes multiple cuts, you’ll want to split them into individual tracks. You can do this by clicking and dragging over the first track to select it and then choosing Edit > Split. This command cause a new track to appear below the first, containing the song you selected (Figure 8.7).
Figure 8.7 Splitting audio tracks from a captured LP with Audacity.
8. While that track is still selected, choose File > Export As WAV or File > Export As MP3, depending on whether you want an uncompressed or compressed version of the track.
9. Repeat this splitting-and-saving process (steps 7 and 8) for each track.
![]() I suggest Audacity because it’s free and available for the computer you own, but lots of audio editors can do the job. Some will even detect the silence between tracks and then split and save the tracks for you.
I suggest Audacity because it’s free and available for the computer you own, but lots of audio editors can do the job. Some will even detect the silence between tracks and then split and save the tracks for you.
Take Your iPod on the Road
Here are just a few of the travel tips I’ve picked up over the years.
No, it’s not a flashlight, but …
I understand that a good way to run down an iPod’s battery is to leave backlighting on all the time. I also understand that when you travel with a small child, and you leave the nightlight at home, you could be in for a lot of trouble from spouse and child.
I’ve had occasion to use an iPod as a nightlight under these very conditions. To ensure that the battery didn’t poop out in the middle of the night, I plugged it into a power adapter.
Hotel TV + iPod = Entertainment
When I pack for a trip, I take not only my iPod, but an iPod AV composite cable too. Convenient though it may be to watch movies on my iPod while I’m on the plane, when I finally get where I’m going, I want to watch my movies and TV shows on a bigger screen. Every TV in the world has a composite video input—even the ones you find in hotels and motels.
Laptop + iPod = Entertainment
Suppose that you get roped into going to one of those romantic-getaway places that doesn’t have a TV. (Shocking, I know, but I hear that there are such places.) If you can sneak your laptop along, just plug your iPod into it, using the included USB cable. Then do this:
1. When the iPod is mounted in iTunes, select it, and enable the Manually Manage Music and Videos option.
2. Click the triangle next to the iPod’s name in the Source list and then select Movies or TV Shows.
The movies or TV shows on your iPod appear in iTunes.
3. Double-click one, and you’ll discover that you can play it on your laptop’s screen.
4. Choose View > Full Screen to expand the video to take up the entire screen.
Why not just store the videos on your laptop in the first place? Laptop drives don’t always have a lot of room to spare. That 160 GB iPod classic, on the other hand, was meant for nothing but media. Put its hard drive to good use.
![]() This tip works for audio too. If your laptop has a decent set of speakers, play music from your iPod through those speakers. Instant boombox!
This tip works for audio too. If your laptop has a decent set of speakers, play music from your iPod through those speakers. Instant boombox!