2. Controls and Interface
The iPod has rightly been praised for its ease of use. As with all its products, Apple strove to make the iPod as intuitive as possible, placing a limited number of controls and ports on the device and making moving from one screen to another a logical progression. In the following pages, I scrutinize each iPod’s controls and examine the screens that populate the display-bearing iPods.
On the Face of It
On the front of an iPod classic or iPod nano, you’ll find a display and set of navigation controls. The shuffle has no display; its controls are located on the headset. On the first two generations (1G and 2G) of the iPod, these controls are arrayed around a central click wheel and are mechanical—meaning that they move and activate switches underneath the buttons. On the 3G iPods, these controls are placed above the click wheel and are touch-sensitive; they activate when they come into contact with your flesh but, allegedly, not when a nonfleshy object (such as the walls of your backpack, pocket, or purse) touches them.
The iPod mini, the 4G and later full-size iPods, and the iPod nano bear a click wheel that incorporates the navigation buttons. Unlike the first two generations of the iPod, on which the buttons are arrayed around the outside of the wheel, these iPods feature buttons that are part of the wheel itself (Figure 2.1). The buttons’ sensors sit beneath the wheel at the four compass points, and the click wheel sits on a short spindle that allows it to rock in all directions. To activate one of the buttons, just press the wheel in the direction of that button.
Figure 2.1 iPod’s click wheel.
The 3G iPod shuffle’s navigation controls are based on three buttons on the control incorporated into the cord of the right earbud. The top button increases volume, and the bottom button turns it down. The Center button has a variety of functions, including play/pause, next, previous, fast-forward, rewind, and playlist selection. Because the shuffle lacks a display and has unique controls, I discuss it separately in this chapter.
The iPod display
Near the top of an iPod classic sits a 2.5-inch-diagonal, color liquid crystal display that can show up to 65,536 colors at a resolution of 320 by 240 pixels. Like the nano’s, the classic iPod’s display features backlighting (illumination that makes the display easier to read in dim light), which you can switch on simply by touching the click wheel. (On older iPods, you switch on backlighting by pressing the Menu button.) By default, the backlight is configured to shine for 10 seconds.
Measured diagonally, the color display of the 5G nano is 0.3 inch smaller than that of the iPod classic, yet it projects more text than its sibling because it’s taller. The taller screen isn’t the only factor, however. The iPod nano also uses a different font from the one used on the iPod classic and also has greater pixel density (meaning that it packs in more pixels per inch onscreen).
iPod classic and iPod nano controls
The controls of the iPod classics and iPod nanos are identical, so it makes sense to discuss them together.
Play/Pause button
If you scan the surface of your iPod classic or iPod nano, you’ll notice that it bears no recognizable on/off switch. To switch on a current iPod classic or iPod nano, press the Center button. This same technique works with the 5G iPod; the original iPod classic; and the 1G, 2G, 3G, and 4G iPod nanos.
On models earlier than the 5G iPod, start up by using the Play/Pause button. To switch off any display-bearing iPod, press and hold its Play/Pause button for about 3 seconds. This button is located at the bottom of the iPod control wheel on older iPods, in the third position in the row of buttons on 3G iPods, and at the bottom of the click wheel on today’s iPod classics and iPod nano. As you’d expect, pressing this button also starts and pauses music, video playback, and photo slideshows. On a 5G iPod nano, it pauses and plays FM radio too.
Each of these iPods includes a preview area—a place where you can see album or video art or learn how much free space remains on your iPod. On the classic, the preview area is on the right side of the display; on the nano, it’s at the bottom.
Previous button
This button is located on the far-left side of the wheel on 1G, 2G, and click-wheel iPods; it’s the far-left button on 3G iPods. In most cases, pressing this button once takes you to the beginning of the currently playing song or video.
![]() Click-wheel iPods are capable of playing a variety of videos: TV shows, movies, music videos, video podcasts, and (in the case of the 5G iPod nano) videos you’ve captured with the built-in camera. When I mention video in a generic sense, I’m speaking of all these different kinds of videos.
Click-wheel iPods are capable of playing a variety of videos: TV shows, movies, music videos, video podcasts, and (in the case of the 5G iPod nano) videos you’ve captured with the built-in camera. When I mention video in a generic sense, I’m speaking of all these different kinds of videos.
The exception involves movies that you purchased or rented from the iTunes Store, audiobooks, and enhanced podcasts. If these items have chapter marks (and all do, as far as I know), pressing Previous moves the movie, audiobook, or podcast to the previous chapter. Press Previous multiple times to move back multiple chapters. If, with a movie, you’ve pressed Previous more times than the movie has chapters, you’re taken back to the Movies screen.
When you press Previous twice while listening to an audiobook’s first chapter, you’ll be taken to the previous section of that audiobook (Part 1 if you were listening to Part 2, for example) or, if there is no previous section, to the audiobook whose entry in the Audiobooks screen appears above the one you’re listening to. If you’re already listening to the first entry in this list, you’re taken to the Audiobooks screen.
Similarly, for an enhanced podcast, if you press Previous, and some episodes of this particular podcast appear above the one you’re currently listening to in that podcast’s list of episodes, you’ll be taken to the beginning of the previous episode. Suppose that you have episodes of NPR’s Fresh Air on your iPod, and you’re listening to the third episode in the list. Pressing Previous at the beginning of that third episode will cause the iPod to play the second episode from the beginning. Press Previous again, and you hear the first episode in the list. Press Previous one more time, and you’re taken back to that podcast’s list of episodes.
Pressing Previous twice in succession in a music playlist moves you to the previous song in the playlist. Do this with a video track, and you’re taken back to the Video screen or to that video’s playlist screen. Hold down Previous to rewind through a song, video, movie, audiobook, or podcast. When you rewind or fast-forward through a song, video, audiobook, or podcast, you move in small increments at first; as you continue to hold the button down, you move in larger increments.
On iPods with a color display, the Previous button also moves you back through a slideshow.
Next button
Look to the far right on 1G, 2G, and click-wheel iPods; look to the rightmost button on 3G iPods. This button behaves similarly to the Previous button. Press it when you’re viewing a movie or listening to a chaptered audiobook or enhanced podcast to move forward through chapters. Press this button once to go to the next song in a music playlist. Press it once while you’re viewing a nonmovie video, and you return to the Video screen or to that video’s playlist screen. Hold Next down to fast-forward through a song, video, movie, or podcast. As is true of rewinding, fast-forwarding moves you through small increments of a song, video, audiobook, or podcast at first; as you continue to hold the button down, the increments get larger.
On iPods with a color display, the Next button also advances you through a slideshow.
Menu button
Pressing the well-marked Menu button takes you back through the interface the way you came. If you’ve moved from the main iPod screen to the Music screen, for example, and you press the Menu button, you’ll move back to the main iPod screen. If you’ve moved from the main iPod screen through the Music screen to the Playlists screen to a particular song within a particular playlist, each time you press the Menu button, you’ll move back one screen.
On iPods earlier than the iPod classics and 3G iPod nano, holding the Menu button down for about 2 seconds turns backlighting on or off. On today’s iPods, press and hold the Menu button, and you’re taken to the iPod’s main screen, thereby avoiding what may be a tedious trip back up the hierarchy.
Click wheel
Inside the ring of buttons on 1G and 2G iPods, below the bevy of buttons on 3G iPods, and marked with the navigation controls on Dock-connector iPods is the click wheel. Moving your thumb clockwise highlights items below the selected item; moving your thumb counterclockwise highlights items above the selected item. If a window is larger than the display, moving the click wheel causes the window to scroll up or down when the first or last item in the list is highlighted.
You use the click wheel to adjust volume and to move to a particular location in a song, video, audiobook, or podcast. On a 5G iPod nano, you use the click wheel’s scrolling capabilities to select radio stations and pick points in a buffered radio recording to begin playback. (I discuss all things FM radio in Chapter 3.)
Center button
The bull’s-eye of all iPods—the Center button—selects a menu item. If the Settings menu item is selected, for example, pressing the Center button moves you to the Settings screen, where you can select additional settings.
When you press the Center button while a song is playing and the Play screen is visible, you move to another Play screen, where you can scrub (quickly navigate forward and back with the click wheel) your song or video. On the 2G iPod classic and 5G nano, press this button again, and you can engage the Genius playlist feature (see the next section, “The Genius of click-wheel iPods”). One more press on these iPods, and you move to the Ratings screen, where you can assign a rating of one to five stars to the song by using the click wheel. Press the Center button yet again, and the Shuffle screen appears, where you can tell the iPod to shuffle playback by songs or albums (or not at all, if another shuffle setting has been selected). If you’ve added lyrics to the song in iTunes (more on this topic in Chapter 4), one more press of the Center button displays those lyrics in the next screen.
While you’re watching a movie with chapter marks, pressing the Center button once displays a progress bar that includes the movie’s chapter marks. Press the button again, and the scrub control appears. Press one more time, and a brightness bar appears. Just thumb the click wheel up or down to adjust brightness.
If you’re listening to a podcast, one press of the Center button reveals the scrub bar, another press shows ratings, and one more press displays a screen where you see information about that podcast episode (the creator’s name and a blurb about the episode’s content).
For audiobooks, the first press shows the scrub bar; a second press gives you ratings; and a third press takes you back to the first screen, which holds a progress bar and time readouts that detail the audiobook’s elapsed and remaining times.
The Genius of click-wheel iPods
With iTunes 8, Apple introduced the compelling Genius feature. I explain Genius as it relates to iTunes in greater detail in Chapter 4, but the gist is this: When you turn on Genius, you voluntarily (and anonymously) submit the contents of your iTunes Library to Apple. In exchange, Apple analyzes that content and sends a database file of related music in your library back to your computer. Using this file, Genius can create playlists of music that it believes will work well with a track that you’ve selected.
Say that you select The Rolling Stones’ “19th Nervous Breakdown” as the source track in iTunes and then click the Genius icon at the bottom of the iTunes window. Genius creates a playlist of 25 tracks that includes classic rock tracks from your iTunes Library—Donovan’s “Mellow Yellow,” The Allman Brothers’ “Whipping Post,” and Deep Purple’s “Hush,” for example.
You can initiate a Genius playlist from the Music screen. The process works like this:
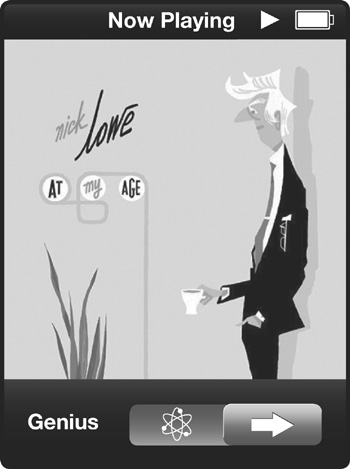
1. Start playing a track, and press the Center button until you see a screen that features the word Genius at the bottom.
2. In that screen, scroll the click wheel clockwise so that the arrow at the bottom of the screen moves to the right and you see the blue Genius icon.
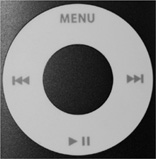
In a second or so, the iPod will take you to a Genius screen that lists the song you were playing and 24 additional songs that your iPod believes work well with the original song (Figure 2.2).
Figure 2.2 The Genius playlist on a 5G iPod nano.
To refresh this playlist, just select Refresh and then press the Center button. The iPod will cobble together 24 other related tracks.
3. If you like what the iPod came up with, select Save Playlist and then press the Center button.
You move to the Playlists screen, where a new Genius playlist appears, bearing the name of the original track. Select this playlist and press the Center button to see the contents of the playlist; refresh those contents by selecting Refresh and pressing the Center button.
Here’s another way to do the same thing: Simply select a song (within a playlist or in an Album, Artist, or Genre screen, for example) and then press and hold the Center button. Do this on a 2G iPod classic, and you’re taken to a screen that includes these commands: Start Genius, Add to On-The-Go, Browse Album, Browse Artist, and Cancel. Here, I’ll focus on Start Genius. Select it and press the Center button, and the iPod creates a Genius playlist. This playlist works just like the one I describe earlier in this section, and you can refresh or save it.
The 4G and 5G iPod nanos work almost exactly the same way. The difference is that when you press and hold the Center button with a track selected, a small sheet drops down from the top of the screen. This sheet bears the same commands I just mentioned. Select Start Genius, and you’ve created a Genius playlist based on the selected track.
What if you want to revisit an unsaved Genius playlist on either iPod? Just navigate to the Music screen, select Genius, and press the Center button. You’ll be taken to that playlist.
![]() This press-and-hold-to-create-a-Genius-playlist business doesn’t work in Cover Flow view on either iPod model.
This press-and-hold-to-create-a-Genius-playlist business doesn’t work in Cover Flow view on either iPod model.
iPod shuffle status light and controls
There’s no need to mention the shuffle’s display, because it has none. It does have a status light that tells you what it’s doing, however. The 2G model has controls, whereas the 3G shuffle is controlled via the headphone switch. Both of the clip-on models (meaning the 2G and 3G shuffles) also have power and play-order switches, and the 1G shuffle has a single power/play-order switch on the back. Here’s how they work.
The three-position switch (3G iPod shuffle)
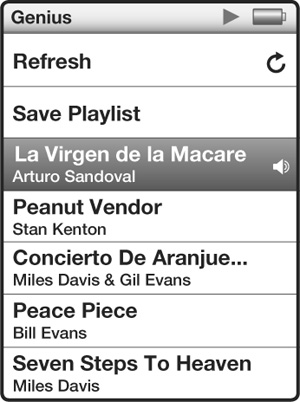
The top of the 3G shuffle has a single three-position switch: Off, Play in Order, and Shuffle (Figure 2.3). Push the power switch one notch to turn the shuffle on and enter Play in Order mode, which plays the currently selected playlist from beginning to end and then cycles back to the beginning of the playlist. Push the switch as far from the Off position as possible, and you enter Shuffle mode. In Shuffle mode, the iPod plays songs within the current playlist in random order. (No, the iPod doesn’t shuffle among playlists.)
Figure 2.3 3G iPod shuffle’s three-position switch, LED, and headphone port.
When you move the switch to Play in Order mode, you’ll hear three ascending tones (a major triad, for you musicians out there). Choose Shuffle mode, and you hear four descending tones.
![]() If you’re listening to an audiobook or want to listen to podcast episodes in the order in which they were produced, choose Play in Order rather than Shuffle. Fail to do so, and the audiobook’s chapters and podcast episodes will be presented in random order.
If you’re listening to an audiobook or want to listen to podcast episodes in the order in which they were produced, choose Play in Order rather than Shuffle. Fail to do so, and the audiobook’s chapters and podcast episodes will be presented in random order.
Power and play-order switches (2G iPod shuffle)
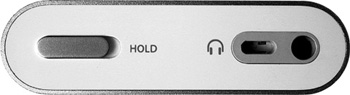
The top of the 2G shuffle has two switches: one for power and another that toggles between Play in Order and Shuffle modes (Figure 2.4). Push the power switch to the right to turn the shuffle on. Push the play-order switch to the left, and the iPod lives up to its name and shuffles its playlist randomly. Push this switch to the right, and the shuffle plays its playlist, in order, from beginning to end before repeating.
Figure 2.4 2G iPod shuffle’s power and play-order switches.

![]() Because this shuffle and the original iPod shuffle can hold only a single playlist, you can imagine that mixing audiobook chapters with other tracks and then switching on Shuffle mode would make for a unique listening experience. To help prevent this sort of thing, Apple won’t let you copy audiobooks and podcasts automatically to a 1G or 2G shuffle. Instead, you must copy them manually (indicating that you really want them on the iPod). I talk much more about syncing in Chapter 4.
Because this shuffle and the original iPod shuffle can hold only a single playlist, you can imagine that mixing audiobook chapters with other tracks and then switching on Shuffle mode would make for a unique listening experience. To help prevent this sort of thing, Apple won’t let you copy audiobooks and podcasts automatically to a 1G or 2G shuffle. Instead, you must copy them manually (indicating that you really want them on the iPod). I talk much more about syncing in Chapter 4.
Status light
The top and bottom of the clip-on iPod shuffles feature small light-emitting diodes (LEDs). When you first turn on a fully charged shuffle, a light on these LEDs glows green for about 3 seconds. If the shuffle has a low charge, you’ll see an amber light for those 3 seconds. A really low charge produces a red light. You get no glow at all when there’s no charge.
When you press Play (or any part of the outer ring) on a 2G shuffle or press the Center button on a 3G shuffle’s headset controller, the green light briefly appears again. If you pause playback on a 2G iPod shuffle, the green light blinks for a minute. Do the same on a 3G shuffle, and the light blinks for 30 seconds. In general, other commands—Volume Up and Down, Next Track, Previous Track, Fast Forward, Rewind, Hear Playlist Menu (3G shuffle), and Exit Playlist Menu (3G shuffle)—produce a green blink. (Those blinks are longer for Play, Rewind, and Fast Forward on a 2G iPod shuffle.)
When you plug the shuffle into a power source, the amber LED light glows continuously until the shuffle is fully charged; then the light switches to green.
Headset controls (3G iPod shuffle only)
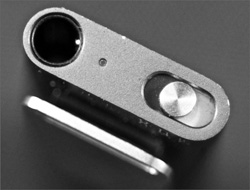
As I mention earlier in this chapter, the 3G iPod shuffle is controlled entirely by the headset controller embedded in the right earbud’s cord (Figure 2.5).
Figure 2.5 The 3G iPod shuffle’s headset controller.
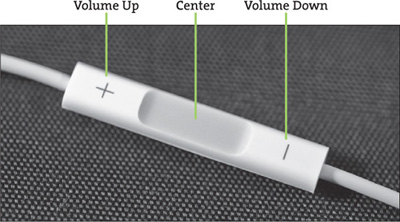
The controller has three buttons, which you use this way:
• Play or pause. Press the Center button to toggle between Play and Pause.
• Adjust the volume. Press the Volume Up button (at the top of the controller) to increment the volume one notch. Press the Volume Down button (at the bottom of the controller) to turn the volume down one notch.
• Skip to the next track. Double-press the Center button.
• Move to the previous track. Triple-press the Center button when the track has been playing for fewer than 6 seconds. If the track has been playing for longer than 6 seconds, triple-press to move to the beginning of the playing track and then triple-press again to move to the previous track.
• Fast-forward the current track. Double-press and hold the Center button.
• Rewind the current track. Triple-press and hold the Center button.
• Hear the track title and artist name. Press and hold the Center button.
• Choose a playlist. Press and hold the Center button until you hear a tone. The iPod begins reciting the names of playlists on the iPod. When you hear the playlist you want to listen to, press the Center button again.
![]() If you have a lot of playlists on your iPod shuffle and want to dash through them, press the Volume Up or Volume Down button. With each press, you move to the next (Volume Up) or previous (Volume Down) playlist.
If you have a lot of playlists on your iPod shuffle and want to dash through them, press the Volume Up or Volume Down button. With each press, you move to the next (Volume Up) or previous (Volume Down) playlist.
Outer ring (2G iPod shuffle only)
The ring that surrounds the inner Play/Pause button on the 2G iPod shuffle (Figure 2.6) handles track “navigation” (such as it is) and volume control. Press the top of the ring (marked with +) to increase volume; press the bottom of the ring (marked with −) to turn the volume down. The right side of the ring controls the iPod’s Next function; press once to move to the next track, or press and hold to fast-forward through the current track.
Figure 2.6 2G iPod shuffle’s outer ring.
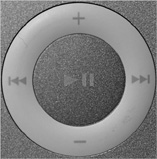
The Previous button on the left side of the ring works like the Previous buttons on other iPods. Press once, and the currently playing song starts again at the beginning. Press twice quickly in succession to move to the previous song in the playlist.
Play/Pause button (2G iPod shuffle only)
Yes, the Play/Pause button does what it says. With the 2G shuffle switched on, press the button once to play; press it again to pause.
Because the shuffle has so few controls, Apple has pressed this button into service to perform other jobs. To go to the beginning of a playlist, for example, press Play/Pause three times quickly (within a second). To lock the iPod (disable its buttons), press and hold the button for about 3 seconds. To unlock it, press and hold the button again.
![]() When you lock the shuffle, its status light blinks three times. When you unlock it, the light briefly glows green.
When you lock the shuffle, its status light blinks three times. When you unlock it, the light briefly glows green.
Battery-status button/light
Unlike the original iPod shuffle, which carries its own battery status light, the clip-on iPod shuffles indicate their current charge through the LED on the top. To see how much charge you have left, quickly flick the power switch off and then on. The shuffle will continue playing if you do this rapidly enough. A green-glowing LED indicates a full charge (even after the shuffle has played for several hours). If you see an amber light, the shuffle is low on power. A red light indicates that it’s really low on power, and no light at all tells you that the shuffle is completely drained and should be plugged into a power source to charge.
Ports and connectors: Dock-connector iPods
The iPod doesn’t work by osmosis. You need a hole for the sound to get out (and, in some cases, in) and another hole for moving data on and off the device. Here’s what you’ll find on today’s iPods.
Headphone port and hold switch
The 3G and all click-wheel iPods except the iPod nano, 5G iPod, and iPod classics sport a headphone port, a hold switch, and an iPod Remote Control connector up top (Figure 2.7 and Figure 2.8).
Figure 2.7 Top of the 4G iPod.
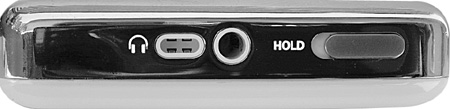
Figure 2.8 Top of the iPod mini.
You’ll find the 3G iPod nano’s hold switch and headphone port on the bottom (Figure 2.9). The 4G and 5G iPod nanos’ headphone port is also on the bottom, but the hold switch is on top (Figure 2.10).
Figure 2.9 Bottom of the 3G iPod nano.
![]()
Figure 2.10 Top of the 5G iPod nano.
![]()
Today’s iPods have no Remote Control port. The headphone port and hold switch provide audio output and disable the iPod’s controls, respectively, working nearly the same way on today’s iPods and iPod nanos as they do on older models.
![]() I say nearly because the headphone port, in combination with the Remote Control connector on 3G-and-later standard iPods up to the 5G iPod, supports not only audio output, but also audio input. With a compatible microphone, you can record low-quality audio (8 kHz) on these iPods. Display-bearing iPods—including the 5G iPod, 2G and 3G iPod nanos, and original iPod classic—support higher-resolution audio recording via their Dock-connector ports and a compatible microphone. The 4G and 5G iPod nanos and the 2G iPod classic support audio recording via the headphone port.
I say nearly because the headphone port, in combination with the Remote Control connector on 3G-and-later standard iPods up to the 5G iPod, supports not only audio output, but also audio input. With a compatible microphone, you can record low-quality audio (8 kHz) on these iPods. Display-bearing iPods—including the 5G iPod, 2G and 3G iPod nanos, and original iPod classic—support higher-resolution audio recording via their Dock-connector ports and a compatible microphone. The 4G and 5G iPod nanos and the 2G iPod classic support audio recording via the headphone port.
![]() The 5G iPod can also transmit composite video via its headphone port with a compatible cable. The iPod classics and the 3G, 4G, and 5G iPod nanos can transmit composite or component video from their Dock-connector ports with a compatible accessory or cable.
The 5G iPod can also transmit composite video via its headphone port with a compatible cable. The iPod classics and the 3G, 4G, and 5G iPod nanos can transmit composite or component video from their Dock-connector ports with a compatible accessory or cable.
Dock-connector port
On the bottom of a Dock-connector iPod, you’ll find a proprietary port that handles both power and data chores for the device. This port, on the bottom of the 3G iPods and all click-wheel iPods save the iPod nano and the 5G iPod, supports data transfer via both FireWire and USB 2.0 (Figure 2.11). The first three generations of nanos, the 5G iPod, and both the 1G and 2G iPod classics can be charged via FireWire and USB but sync only over USB. The 4G and 5G iPod nanos can be charged only with a USB connection.
Figure 2.11 Bottom of the iPod classic.

Ports and connectors: iPod shuffle
The iPod shuffle has exactly one hole: the headphone port. On the original iPod shuffle, this port is exactly what its name implies: a place to plug in your earbuds or other headphones.
The clip-on iPod shuffles’ headphone port (refer to Figure 2.3 earlier in this chapter) allows you to do two things: listen to music through it, and sync and charge the iPod through it via the shuffle’s Dock. To charge or sync your 3G shuffle, plug the cylindrical end of the USB cable into the headphone port and the USB end into a powered USB 2.0 port on your computer.
To charge or sync a 2G shuffle, plug the Dock cable into a powered USB 2.0 port on your computer; then slip the shuffle into the Dock so that its headphone port slides over the Dock’s miniplug.
The original shuffle charges and syncs differently. Flip this shuffle over, pull off its protective cap, and spy the USB connector. Plug that connector into your computer’s powered USB 2.0 port to charge the iPod and then transfer music and data to it.
Navigating the Screens
Considering how easy the iPod is to use, it’s hard to believe the number of navigation screens that make up its interface. In the following pages, I scrutinize each screen. At one time, the iPod classic and iPod nano had exactly the same interface, but the 4G nano brought to the midsize iPod a couple of talents that are missing from the more capacious classic (and the 5G brought even more compelling talents). I’ll be sure to point out how those talents are reflected in the nano’s interface.
Main screen
The main screen (Figure 2.12), which displays the word iPod at the top, is your gateway to the iPod. In a way, it’s akin to the Mac’s Finder or Windows’ My Computer window—a place to get started.
Figure 2.12 5G iPod nano’s main screen.
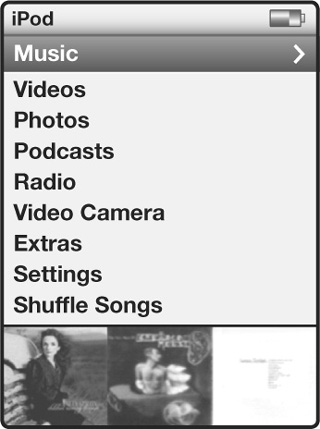
You’ll find these commands on today’s iPod classic and iPod nano:
• Music
• Videos
• Photos
• Podcasts
• Radio (5G iPod nano only)
• Video Camera (5G iPod nano only)
• Extras
• Voice Memos (if you’ve plugged in a compatible microphone or recorded and saved any voice memos)
• Settings
• Shuffle Songs
• Now Playing (if a song is playing or paused)
The iPod classics and the 3G–5G iPod nanos offer a split-screen view. (Previous iPods list commands only.) On the classics and the 3G nano, these commands are arrayed along the left side of the display, and different graphics appear on the right side of the display; the kind of graphic you see depends on which command you’ve selected. If Music is selected, and you’ve synced album art to the iPod, album covers swoop across the display. Choose Videos, and similarly swooping still images from the movies, TV shows, music videos, and video podcasts on your iPod appear in this area. Choose Photos, and you see previews of the photos stored on your iPod. Selecting Podcasts tells you how many podcasts are on your iPod. Scroll to Extras, and you see the time and date. Select Settings, and you’ll see how many gigabytes of free space the iPod has (or megabytes, if you have less than 1 GB of storage free). Choose Shuffle Songs, and the iPod tells you the number of songs stored on it. Finally, scroll to Now Playing, and you see the name, artist, and album of the currently playing track.
The 4G and 5G nanos’ information display is a bit different: Artwork is shown at the bottom of the screen. On the 4G nano, the artwork and information that appear here are the same as on the 2G iPod classic, save that choosing Extras displays the artwork for the three Apple games bundled with the nano. The 5G nano additionally includes the Radio entry, which, when selected, displays the station the iPod is tuned to (107.5, for example).
![]() If, in iTunes, you’ve chosen to not sync artwork to your iPod, selecting Music or Videos displays a gray screen on the right side (3G nano and iPod classics) or bottom (4G and 5G iPod nanos) of the display that details the number of songs or videos, respectively, on these iPods.
If, in iTunes, you’ve chosen to not sync artwork to your iPod, selecting Music or Videos displays a gray screen on the right side (3G nano and iPod classics) or bottom (4G and 5G iPod nanos) of the display that details the number of songs or videos, respectively, on these iPods.
Here’s what you’ll find within each area.
Music
When you choose the Music command and press the Center button, the resulting Music screen reveals these entries on the 2G iPod classic: Cover Flow, Genius, Playlists, Artists, Albums, Compilations, Songs, Genres, Composers, Audiobooks, and Search (Figure 2.13). I explain the purposes of all these entries in the following sections. On the 4G and 5G iPod nanos, the Compilations entry is missing. On a 5G iPod nano, Genius Mixes—a feature in iTunes 9 that creates nine genre-based albums pulled from your iTunes Library—replaces Genius. (I discuss Genius Mixes in greater depth later in this chapter and in Chapter 4.)
Figure 2.13 5G iPod nano’s Music screen.
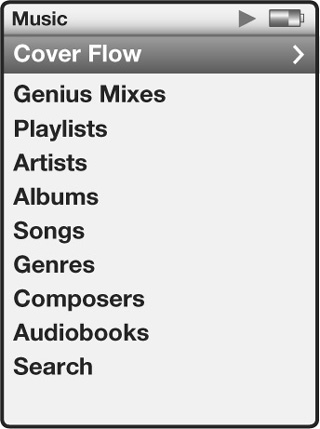
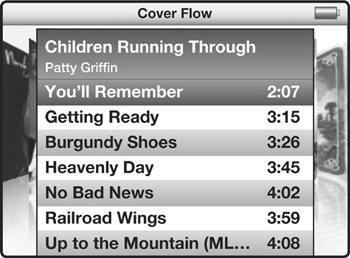
Cover Flow (3G–5G iPod nanos and iPod classics only)
Both iPod classics and the 3G–5G iPod nanos include a Cover Flow view—a way to view your music collection by album cover. Select Cover Flow and press the Center button, and you’ll see your iPod’s music collection as a series of album covers, sorted by the artists’ names. Swirl your finger around the click wheel to move through the album covers. When you find an album you like, press the Center button; the cover flips around to reveal the tracks it contains.
Use the usual scrolling gesture to move down the list of tracks and select the one you want; then press the Center button to play it. When you do, the track appears in the iPod’s Now Playing screen, where you can adjust its volume and perform the tricks you can do in any other Now Playing screen. The one difference is that when you press the Menu button, you return to Cover Flow view rather than go back to an album screen or menu. To leave Cover Flow view, just press Menu; you’ll return to the Music screen.
With 4G and 5G nanos, you can initiate Cover Flow in an additional way. When you’re viewing the main screen or the Music screen, or when you’re in an area within the Music screen (Albums or Genres, for example), just turn the nano sideways. Cover Flow view appears, showing you the album covers of all the songs stored on the iPod (Figure 2.14). You navigate and play songs just as I describe above. Select an album cover and press the Center button to flip the cover around to its track list (Figure 2.15).
Figure 2.14 Cover Flow view on a 5G iPod nano.

Figure 2.15 Tracks in Cover Flow view on a 5G iPod nano.
Genius (4G iPod nano and iPod classics only)
If you’ve created a Genius playlist, you’ll find it by selecting this command and pressing the Center button. If you haven’t created a Genius playlist on your iPod yet, you’ll see instructions for how to do so when you execute this command.
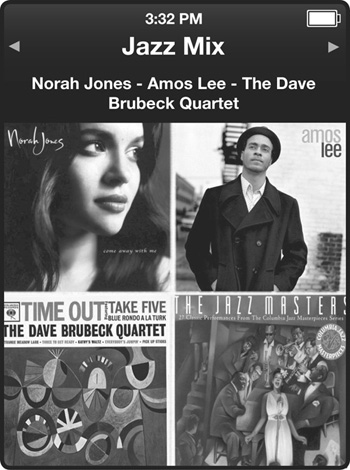
Genius Mixes (5G iPod nano only)
iTunes 9 introduced a feature called Genius Mixes. Similar to Genius playlists, Genius Mixes creates 250-track playlists made up of songs organized by genre—Rock, Jazz, and Folk, for example. It works this magic by examining the contents of your iTunes Library, determining the predominant genres in the library, and then creating up to 12 of these large playlists of genre-related tracks.
You have the option to select and sync Genius Mixes to your attached 5G iPod nano within the iTunes Music tab. (As I write these words, the 5G iPod nano and iPod touch are the only iPods that support Genius Mixes.) Do this, and the selected mixes are copied to your iPod and become accessible from the Genius Mixes entry (Figure 2.16).
Figure 2.16 A Genius Mix on a 5G iPod nano.
![]() You can also access the songs, artists, and albums represented in a Genius Mix by using the iPod’s Song, Artists, and Albums commands. When you use those methods, however, you won’t see the tracks organized by the mix.
You can also access the songs, artists, and albums represented in a Genius Mix by using the iPod’s Song, Artists, and Albums commands. When you use those methods, however, you won’t see the tracks organized by the mix.
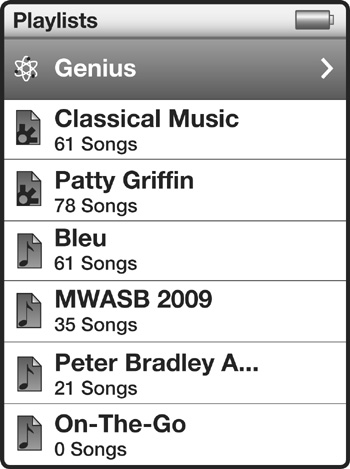
Playlists
Regardless of which iPod you’re using, when you choose Playlists and press the Center button, you’ll see a screen that contains the playlists you’ve downloaded to your iPod (Figure 2.17), as well as any Genius and On-The-Go playlists you’ve created on the iPod. Genius playlists are denoted by the Genius icon next to them. On these iPods, playlists synced from your computer indicate the number of songs each playlist contains. Genius playlists don’t—and don’t need to, as they always contain 25 tracks.
Figure 2.17 5G iPod nano’s Playlists screen.
![]() If you’ve created a folder in iTunes and placed multiple playlists in that folder, that folder hierarchy is present on the iPod as well. If I create a folder called Great ’50s Jazz and place my Miles Davis, John Coltrane, and Bill Evans playlists in that folder, when I sync the Great ’50s Jazz folder to my iPod, it appears in the Playlists screen. When I select that folder and press the Center button, the playlists associated with these jazz greats appear in the resulting screen.
If you’ve created a folder in iTunes and placed multiple playlists in that folder, that folder hierarchy is present on the iPod as well. If I create a folder called Great ’50s Jazz and place my Miles Davis, John Coltrane, and Bill Evans playlists in that folder, when I sync the Great ’50s Jazz folder to my iPod, it appears in the Playlists screen. When I select that folder and press the Center button, the playlists associated with these jazz greats appear in the resulting screen.
These playlists are created and configured in iTunes. How you configure them is up to you. You may want to gather all your polka favorites in one playlist and put ska in another. Or if you have an iPod shared by the family, Dad may gather his psychedelic songs of the ’60s in his personal playlist, whereas sister Sue creates a playlist full of hip-hop and house music. When I discuss iTunes in Chapter 4, I’ll look at additional approaches for putting together playlists.
After you select a playlist and press the Center button, the songs within that playlist appear in a scrollable screen, with the name of the playlist at the top. Just select the song you want to play and press the Center button. When you do, you’ll move to the Now Playing screen (Figure 2.18), which on the 4G iPod nano displays the name of the song playing and alternately scrolls the name of the artist and album. Because the iPod classics and the 5G iPod nano have larger screens, the Now Playing screen shows the song title, artist, and album without scrolling. The number of songs in the playlist also appears on the iPod classics.
Figure 2.18 Now Playing screen.
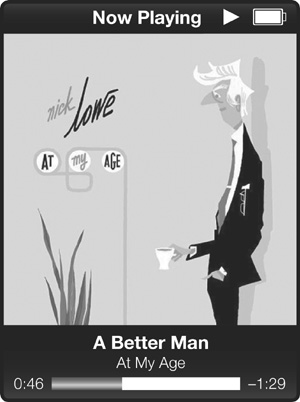
On color iPods and iPod nanos, you’ll see a picture of the album cover if the song has this information embedded in it and iTunes’ Display Album Artwork on Your iPod option is enabled. (Monochrome iPods don’t display album artwork.) Also appearing in this screen are two timer displays: elapsed time and remaining time. In addition, the screen contains a graphic thermometer display that gives you a visual representation of how far along you are in the song.
![]() Text that runs off the screen in the Song, Artist, and Album screens is treated differently on color iPods and the iPod nano from the way it’s treated on other iPods. Earlier iPods and the iPod mini place an ellipsis (…) at the end of an entry that exceeds the width of the screen. A color-display iPod or nano, however, scrolls selected text from right to left if the text is longer than the screen can accommodate. It also scrolls text from right to left on the Now Playing screen if the text doesn’t fit.
Text that runs off the screen in the Song, Artist, and Album screens is treated differently on color iPods and the iPod nano from the way it’s treated on other iPods. Earlier iPods and the iPod mini place an ellipsis (…) at the end of an entry that exceeds the width of the screen. A color-display iPod or nano, however, scrolls selected text from right to left if the text is longer than the screen can accommodate. It also scrolls text from right to left on the Now Playing screen if the text doesn’t fit.
Additional features lie within the Now Playing screen; you reach one of those features by using the click wheel and the others by pressing the Center button.
Change volume. If you turn the click wheel, the timeline at the bottom of the screen shifts off the screen, and a Volume thermometer display appears in its place. Scroll the click wheel clockwise to raise the volume; scroll counterclockwise to lower it.
Scrub music. If you press the Center button while you’re in the Now Playing screen, you’ll be able to scrub through the song. Scrubbing means that you can move back or forward through a track and hear little snippets of the track as you move from place to place. This feature makes it easy to tell where you are in a track. I find it particularly helpful for finding my place in podcasts and audiobooks.
The scrub thermometer display indicates the playing location with a small diamond. Just move your finger across the click wheel to start scrubbing. Stop pushing your digit across the click wheel in either of these screens, and you’ll return to the timeline after a couple of seconds.
Recent display-bearing iPods include screens beyond the scrub screen, allowing you to do additional things:
• As I describe earlier in the chapter, when you press the Center button twice, you have the option to invoke the Genius playlist feature (Figure 2.19).
Figure 2.19 Now Playing screen’s Genius Playlist control.
• Press the Center button three times while you’re in the Now Playing screen to go the Ratings screen; then use the click wheel to assign ratings of one to five stars.
• Press the Center button four times, and you arrive at the Shuffle screen, where you find three options: Off, Songs, and Albums. Use the click wheel to move among these options, and press the Center button to select one.
• If you’ve added lyrics to a track with iTunes 5 or later, pressing the Center button five times in the Now Playing screen takes you to a Lyrics screen.
On-The-Go (Dock-connector iPods)
Scroll to the bottom of the Playlists screen on a Dock-connector iPod, and you’ll find an additional playlist that you didn’t create: the On-The-Go playlist.
Introduced with iPod Software 2.0 Updater, this playlist is a special one that you create directly on the iPod. It’s particularly useful when you want to create a new playlist right now and don’t have a computer you can plug your iPod into. It works this way with the 2G iPod classic and the 4G and 5G iPod nanos:
1. Select a song, artist, playlist, album, genre, composer, or compilation.
In other words, select one of the items available to you in the Music screen.
2. Hold down the Center button.
On the iPod nano, a sheet appears that includes an Add to On-The-Go command (as well as other commands if you’ve done this with a track selected, rather than an item like an album that contains multiple tracks). On the 2G iPod classic, you’ll see a new screen that contains an Add-to-On-The-Go playlist and, perhaps, those other commands.
3. Select Add-to-On-The-Go, and press Center.
The iPod returns to the screen it came from, and the item you’ve added blinks, indicating that it’s been added to the On-The-Go playlist.
4. Repeat this procedure for any other items you want to add to the playlist.
5. When you’re ready to play your selections, choose On-The-Go from the Playlists screen, and press Center.
In the resulting On-The-Go screen, you’ll see a list of songs you’ve added to the list, in the order in which you added them. (The song, artist, playlist, or album you selected first appears at the top of the list.)
6. Press the Center button to begin playing the playlist.
To save an On-The-Go playlist, just select Save Playlist in the On-The-Go screen and press the Center button. The first playlist will be called New Playlist 1. After you’ve saved an On-The-Go playlist, you can create another (and likewise save it). Subsequent saved On-The-Go playlists are numbered in order—New Playlist 2, for example. To clear the On-The-Go playlist, choose Clear Playlist in this same screen, and press the Center button. A confirmation message appears, letting you choose Clear or Cancel (which you select by scrolling the click wheel and then confirm by pressing Center).
On-The-Go playlists for the previous generation of display-bearing iPods work a little differently. To add an item to the On-The-Go playlist, just select it and hold the Center button. The item will blink, which tells you it’s been added.
When you synchronize your click-wheel iPod with iTunes, your saved On-The-Go playlists appear successively numbered in iTunes: On-The-Go 1, On-The-Go 2, and (you guessed it) On-The-Go 3, for example. During synchronization, these On-The-Go playlists are removed from the iPod. If you’d like them to remain on the iPod, you must direct iTunes to sync them back to the iPod (more on this in Chapter 4).
Artists
The Artists screen displays the names of all the artists represented on your iPod (Figure 2.20). Choose an artist’s name and press the Center button, and you’ll be transported to that artist’s screen. If the tracks listed in that screen are all from the same album, you’ll see just the track names. If you have tracks from multiple albums by this artist, you can select All Songs—which leads you to a screen that contains a list of all the artist’s songs—or you can select albums individually and choose to play just the tracks on a particular album.
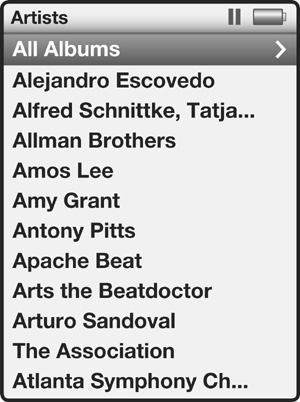
You’ll also spy the All Albums entry at the top of the Artists screen. Should you choose this entry, you’ll be taken to the All Albums screen, where you can select all albums by all artists. The All Albums screen contains an All Songs command of its own. Select this command, and you’ll move to the All Songs screen, which lists all songs by all artists on your iPod. (But if a song doesn’t have an Artists entry, the song won’t appear in this screen.)
Albums
Choose the Albums entry and press the Center button, and you’ll see every album represented on your iPod (Figure 2.21). Choose an album and press the Center button to play the album from beginning to end. The Albums screen also contains an All Songs entry, which, when selected, displays all the songs on all the albums on your iPod. (If the song doesn’t have an Albums entry, it won’t appear in this screen.)
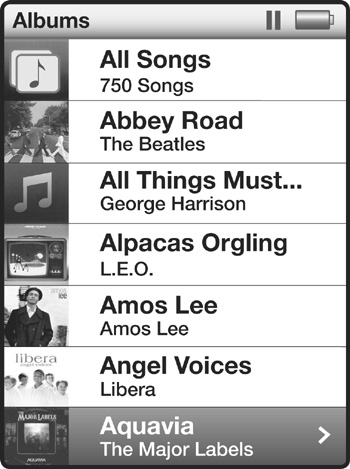
![]() An album entry can contain a single song. As long as the album field has been filled in for a particular song within iTunes or another iPod-compatible application (I discuss this topic in Chapter 4), that song will appear in the Albums screen.
An album entry can contain a single song. As long as the album field has been filled in for a particular song within iTunes or another iPod-compatible application (I discuss this topic in Chapter 4), that song will appear in the Albums screen.
Compilations (iPod classics only)
iTunes and the iPod define compilation recordings as those that are part of anthologies and greatest-hits collections. You’d find Dr. Bobo and the Chiropractic Quintet’s 50 Fave Hits here, as well as the live recording from the Three Days in the Mud and Merriment festival. Only the iPod classics get a Compilations command and screen.
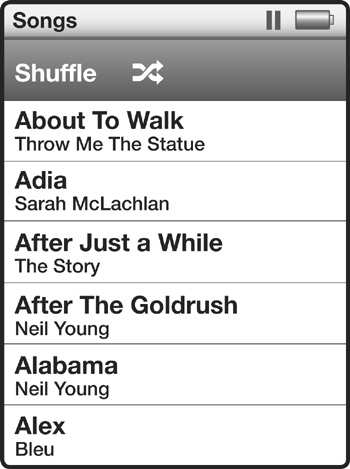
Songs
Choose Songs and press the Center button, and you’ll see a list of all the songs on your iPod (Figure 2.22).
Genres
The iPod has the capability to sort songs by genre: Acoustic, Blues, Reggae, and Techno, for example. If a song has been tagged with a genre entry, you can choose it by genre in the Genres screen (Figure 2.23). On the 3G, 4G, and 5G nanos and iPod classics, below each genre entry you’ll see the number of artists and albums that belong to that genre—6 Artists, 9 Albums, for example.

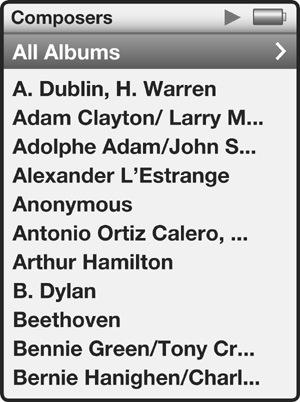
Composers
The iPod can also group songs by composers. This feature, added in iPod Software 1.2 Updater, allows you to sort classical music more easily (Figure 2.24). In the Composers screen, you’ll see an All Albums screen as well as composers’ names. Select All Albums and press the Center button, and all the albums that have been tagged with a composer’s name will appear in the resulting All Albums screen.
Audiobooks
The iPod is capable of playing audiobook files purchased from Audible.com and the iTunes Store, as well as audiobooks you’ve ripped from CDs and tagged as audiobooks (more on this topic in Chapter 4). Audiobooks purchased from Audible.com bear the .aa file extension, and the .m4b extension identifies those bought from the iTunes Store. Audiobooks that you rip yourself can be in any format supported by iTunes (AIFF, WAV, MP3, AAC, or Apple Lossless). When an iPod stores one of these files, the audiobook’s name appears in the iPod’s Audiobooks screen (which appears when you choose the Audiobooks command in the Music screen and press the Center button).
Search
When Apple released the updated 5G iPod and 2G iPod nano in late 2006, it gave them a new Search feature. Search is also available on the 3G, 4G, and 5G iPod nanos and the iPod classics. Select Search and press the Center button, and you’ll see a Search screen. Using the click wheel, you scroll through an alphabetical list. (The 5G iPod’s and 2G iPod nano’s Search feature includes both letters and numbers.) When you reach the letter you seek, press the Center button to enter that letter in the Search field. When you do this, a list of matching items appears in the top part of the screen (Figure 2.25).
Figure 2.25 Searching for items on the 5G iPod nano.
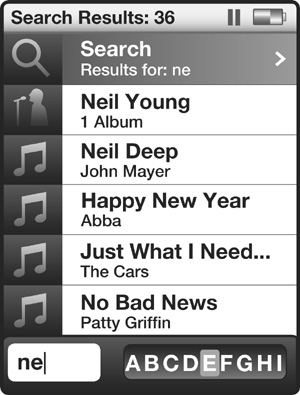
Continue scrolling and clicking to enter more characters to narrow your search. To remove an unwanted character, press the Previous button to erase the last character you entered. When you’ve entered as many characters as you care to, select Done on the 5G iPod and 2G iPod nano, and press the Center button. On a 3G, 4G, or 5G nano or iPod classic, just press Menu to exit Search. Doing so takes you to the Search Results screen, where you’ll see a list of all albums, artists, and songs containing the character sequence you entered. (Search doesn’t work for videos or movies.) Scroll to the item you want, and press the Center button to select it.
If you select a song, it starts playing. If you select an album or artist, you’ll see an Albums or Artists screen, and you can continue selecting items and pressing the Center button until you get exactly the track you want.
![]() The Search feature is smarter than you may think. Although the list of results generally begins with the first letter you’ve entered, that list can also contain entries that contain the letters you’ve entered within the body of the item. Entering DC, for example, produces not only AC/DC as an artist entry, but also selections that contain the word podcast.
The Search feature is smarter than you may think. Although the list of results generally begins with the first letter you’ve entered, that list can also contain entries that contain the letters you’ve entered within the body of the item. Entering DC, for example, produces not only AC/DC as an artist entry, but also selections that contain the word podcast.
All 5G iPods (with the latest iPod software), the 2G–5G iPod nanos, and the iPod classics also support one other kind of searching. Navigate to the Artists, Albums, Songs, or Composers screen, and start scrolling. In short order, a square gray overlay appears in the middle of the screen, including the letter that reflects where you are in the list. If you’re scrolling through the Jack Johnson, Jackie Gleason, Jackie Wilson, James Brown, Janis Joplin, and The Jayhawks section of your Artists screen, you’ll see the letter J overlaid as you scroll.
Videos
Not surprisingly, on traditional iPods, the Videos command is available only on those iPods that are capable of playing video—which, as this book goes to press, are the 5G iPod, the iPod classics, and the 3G–5G iPod nanos. Within the Videos screen (Figure 2.26), you’ll find the entries that I describe in the following sections.
Figure 2.26 5G iPod nano’s Videos screen.
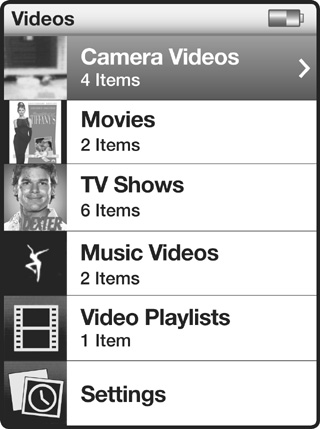
Camera Videos (5G iPod nano only)
By now, you’re well aware that the 5G iPod nano carries a video camera. When you record a video with your 5G nano, this entry is where you find it for playback on the iPod. Videos are sorted by the days when they were shot. I discuss the video capabilities of the 5G iPod nano in Chapter 3.
Movies
In iTunes, you can tag a video as a Movie, Music Video, or TV Show (I tell you how in Chapter 4). Any video that has the Movie tag assigned to it will show up in the list that appears when you select Movies in the Videos screen and press the Center button.
Rentals
You can rent movies from the iTunes Store. When you do and then sync them to your iPod, they appear when you select Rentals and press the Center button. I cover movie rentals in Chapter 5.
TV Shows
At the risk of repeating myself, this tag works the same way as the Movie tag. If you have programs tagged as TV Shows, they appear in this list. In the list, you’ll see the name of the show and the number of episodes you have on the iPod. Select a show and press the Center button, and you’ll see a list of all the show’s episodes, complete with episode title and broadcast date. Episodes are sorted from oldest to newest.
Music Videos
This tag works the same way as Movie. Tag a video as a Music Video in iTunes, and it appears in the Music Videos list.
Video Playlists
As I explain in Chapter 4, you can create playlists that contain videos and then copy these playlists (and their contents) to a compatible iPod. When you do, those playlists appear when you select Video Playlists in the Videos screen and press the Center button. Select a playlist and press the button again, and you’ll see a list of the videos contained in that playlist. Select an item in the playlist and press the Center button or Play, and the selected video will play.
Settings (Video Settings on 5G iPod, 3G and 4G iPod nanos, and iPod classics)
Select this command in the Videos screen on a 3G, 4G, or 5G nano or iPod classic, and press the Center button to see seven options: TV Out, TV Signal, TV Screen, Fit to Screen, Alternate Audio, Captions, and Subtitles (Figure 2.27).
Figure 2.27 Video Settings screen.
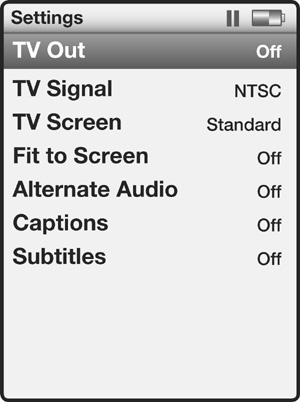
You use TV Out to tell the iPod whether to output its video signal via the headphone port (the 5G iPod outputs video from this port with the assistance of Apple’s AV cable) or the Dock-connector port on a 3G, 4G, or 5G iPod nano or iPod classic. Off means no signal. Ask means that when you call up a video on the iPod and press Play to begin the show, a screen will appear, asking you whether you’d like the TV signal turned on or left off. On means that the iPod will automatically send the signal out the Dock-connector port on a 3G, 4G, or 5G iPod nano and iPod classic, and out the headphone port on a 5G iPod.
The world has two major television standards: NTSC (United States and Japan) and PAL (Europe and Australia). You can choose either for your iPod’s video output with the TV Out command.
TV Screen tells the iPod what kind of television set you’re connecting it to: Standard (4:3) or Widescreen (16:9). The iPod needs to know the TV-screen type so that it can format the video properly. Choose Standard and connect the iPod to a widescreen TV, and you’ll see the entire picture, but it will be smaller than what you’d see if you’d chosen Widescreen instead.
Fit to Screen determines both how the video will appear on the iPod’s screen as well as on a connected standard-definition TV. Leave this option off, and the video will be letterboxed—meaning that you’ll see the entire picture but with black bars above and below it. Turn Fit to Screen on, and the movie will expand to fill the screen but lose the left and right edges of the picture in doing so.
If a movie has an alternative audio track that you’d like to hear (French or Italian, for example), you can tell the iPod to play that track by toggling this option on.
The iPod nanos and iPod classics support closed-captioned videos. As this book goes to press, the iTunes Store sells just under 200 movies with closed captions. If you obtain one of these movies—either through purchase or rental—turning on Captions will allow you to see those movie’s captions.
Today’s click-wheel iPods can also display subtitles in movies from the iTunes Store that contain subtitles.
![]() The 5G iPod lists just three commands: TV Out, TV Signal, and Widescreen. The only difference is that Widescreen is the default setting on the 5G iPod. Turning it on displays video in letterbox view; turn it off, and you enter full-screen view.
The 5G iPod lists just three commands: TV Out, TV Signal, and Widescreen. The only difference is that Widescreen is the default setting on the 5G iPod. Turning it on displays video in letterbox view; turn it off, and you enter full-screen view.
Photos (color-display iPods only)
The Photos command appears only on iPods with color displays. This command is your avenue for viewing pictures on your iPod, as well as for configuring how slideshows are displayed on it and (if you have a full-size color iPod) on an attached TV set or projector.
At the top of the Photos screen, you’ll find an All Photos command. Select it and press the Center button to see thumbnail images of every photo stored on the iPod (Figure 2.28). The 4G iPod nano displays 20 thumbnails; the 5G iPod nano, with its larger screen, shows 24 thumbnails; and the classics, 15. Use the click wheel to select an image. When you select an image, the date when it was taken appears at the top of the display on 3G and 4G nanos and iPod classics. No date appears on the 5G iPod nano. To display the image in full-screen view, press the Center button. To move to the next or previous image, press the Next and Previous buttons, respectively, or use the click wheel to move forward or back. To play a slideshow of your images from the point where you selected an image, press the Play/Pause button. To leave the slideshow, press Menu.
Figure 2.28 Thumbnails in the Photos screen.

The Photos screen also contains a list of any photo albums you’ve synced to the iPod via iTunes. (I talk about photo albums and iTunes in Chapter 4.) When you select an album on a 3G iPod nano or iPod classic, images from that album swoop across the right side of the split-screen display. The 4G and 5G iPod nanos don’t offer this kind of preview of images when you select an album.
Additionally, the Photos screen includes a Settings command. Select it and press the Center button, and you’ll see these commands:
Time Per Slide. You can configure the iPod so that slideshows are under manual command, and you need to press the Next or Previous button to navigate the slideshow. You can also have the iPod change slides automatically every 2, 3, 5, 10, or 20 seconds.
Music. Your slideshow can be accompanied by music. In the Slideshow Music screen, choose Now Playing, Off, one of the playlists on the iPod, or the On-The-Go playlist.
Repeat. If you like, you can have your slideshow repeat forever (or at least until the iPod runs out of power). This command is a simple On/Off command.
Shuffle Photos. This command is another On/Off command. Off means that your slides play in order; choose On, and they’re displayed randomly.
Transitions. The color iPods offer built-in transitions (effects that occur when you move from one slide to another). The included effects on the 3G iPod nano and iPod classics are Random (a random mix of effects), Cross Fade, Fade to Black, Zoom Out, Wipe Across, and Wipe Center. The 4G iPod nano includes Random, Dissolve, Slide, Push, Fade Through Black, and Zoom transitions. The 5G iPod nano offers Random, Dissolve, Cube, Ken Burns, Flip, and Push. The 5G iPod offers a broader set of transitions, including Random, Cube Across, Cube Down, Dissolve, Page Flip, Push Across, Push Down, Radial, Swirl, Wipe Across, Wipe Down, and Wipe from Center.
TV Out (including the 5G iPod, 3G–5G iPod nanos, and iPod classics). This command works just as it does for video settings.
![]() Turning on TV output depletes the battery charge in a big way. Switch this option on only if you really need it.
Turning on TV output depletes the battery charge in a big way. Switch this option on only if you really need it.
TV Signal (including the 5G iPod, 3G–5G iPod nanos, and iPod classics). Same here: Your options are NTSC and PAL.
Photo Import (full-size color iPods before the iPod classics). Full-size color iPods produced before the iPod classics can import photos from many digital cameras, using Apple’s now-discontinued $29 iPod Camera Connector. When you connect a supported camera to your iPod via this device, the Photo Import command appears in the Photos screen. Click it, and you’ll find a list of all the rolls (import sessions) for photos you’ve brought into the iPod. The iPod classics and 3G, 4G, and 5G iPod nanos are not compatible with this accessory.
Podcasts (click-wheel iPods only)
As you likely know, podcasts are Internet broadcasts that you download and place on your iPod for later listening. Podcasts downloaded through the iTunes Store are routed to your iPod and placed under this heading on click-wheel iPods (Figure 2.29). On earlier iPods, you’ll find the Podcasts entry in the Playlists screen.
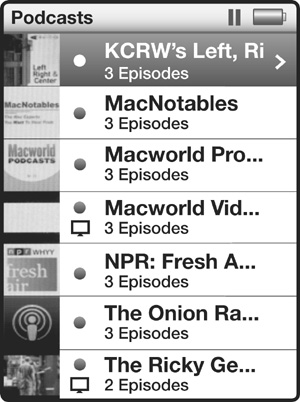
If you’ve listened to podcasts on older iPods, you should be aware of this convenient feature. When you play an episode of a podcast on a 3G nano or iPod classic, when the episode concludes, the iPod immediately plays the next episode, if there is one (starting with the most recent episode and then playing the next most recent). On older iPods and, inexplicably, the 4G and 5G nanos, at the conclusion of the episode you’re taken back to the Podcasts screen. This “keep on keepin’ on” feature is useful when you’re listening to a podcast in your car—and safer, too. No longer do you have to take your eyes off the road to listen to another episode of your favorite podcast.
Radio
The 5G iPod nano has a built-in FM radio. Choose this command, and you’ll see the station the iPod is currently tuned to. I discuss this radio in detail in Chapter 3.
Video Camera
This feature, introduced with the 5G iPod nano, also gets its due in Chapter 3.
Extras
The Extras screen is the means to all the iPod’s nonmusical functions—its contacts, calendars, clock, and games. Here’s what you’ll find for each entry.
Alarms
When you select Alarms and press the Center button, you’ll see the Alarms screen, which has at least two entries: Create Alarm and Sleep Timer. If you’ve created any events in your computer’s calendar program that have alarms attached to them, those events appear in this screen as well (Figure 2.30).
Figure 2.30 Alarms synced from iCal.

To create a new alarm, select Create Alarm and press the Center button. In the resulting screen, you’ll see the option to turn the alarm on or off, as well as entries for Date, Time, Repeat, Alert (4G and 5G iPod nanos) or Sound (iPod classics), Label, and Delete.
Select Date and press the Center button, and the Alarms screen appears. You can enter dates by using the click wheel to scroll through the month, day, and year fields and pressing the Next and Previous buttons to move from one field to the next. The Time entry works very much the same way.
Repeat allows you to choose how often the alarm occurs. You can select Once, Every Day, Weekdays, Weekends, Every Week, Every Month, or Every Year.
Alert (4G and 5G iPod nanos)/Sounds (iPod classics) lets you choose Tones (None, which displays just a visual alarm, or Beep, which displays that visual alarm and causes the iPod to beep) or Playlists. When you choose Playlists and press the Center button, you can choose a playlist to play when the alarm goes off. This option is useful if your iPod is plugged into a speaker system or an iPod-compatible alarm clock.
A Label feature that appears for the first time on today’s traditional iPods lets you choose one of 23 labels for your alarm, including Wake Up, Work, Party, Anniversary, and Take Medicine.
Finally, you can undo the alarm you’re creating by scrolling down to Delete and pressing the Center button.
When an alarm goes off, a visual alarm appears that details the alarm—the time, date, and label. In this screen, you can choose to dismiss the alarm or snooze.
![]() The Sleep Timer entry in the Alarms screen is for all those who like to fall asleep to music. Just plug your iPod into a speaker system (or wear headphones, I suppose, if you don’t mind sleeping with them on), start it playing, and set a sleep timer (Off or 15, 30, 60, 90, or 120 minutes). The iPod will play for the time indicated; then it, too, will go to sleep.
The Sleep Timer entry in the Alarms screen is for all those who like to fall asleep to music. Just plug your iPod into a speaker system (or wear headphones, I suppose, if you don’t mind sleeping with them on), start it playing, and set a sleep timer (Off or 15, 30, 60, 90, or 120 minutes). The iPod will play for the time indicated; then it, too, will go to sleep.
![]() The order of commands in the Extras screen is different for the 4G iPod nano, 5G iPod nano, and the iPod classics. The 4G nano lists Alarms, Calendars, Clocks, Contacts, Games, Notes, Screen Lock, and Stopwatch. The 5G iPod nano includes Alarms, Calendars, Clocks, Contacts, Fitness, Games, Notes, Screen Lock, Stopwatch, and Voice Memos. The iPod classics list Clocks, Calendars, Contacts, Alarms, Games, Notes, Screen Lock, and Stopwatch. I’ve opted to use the order listed on the 5G iPod nano, as it’s the more popular device.
The order of commands in the Extras screen is different for the 4G iPod nano, 5G iPod nano, and the iPod classics. The 4G nano lists Alarms, Calendars, Clocks, Contacts, Games, Notes, Screen Lock, and Stopwatch. The 5G iPod nano includes Alarms, Calendars, Clocks, Contacts, Fitness, Games, Notes, Screen Lock, Stopwatch, and Voice Memos. The iPod classics list Clocks, Calendars, Contacts, Alarms, Games, Notes, Screen Lock, and Stopwatch. I’ve opted to use the order listed on the 5G iPod nano, as it’s the more popular device.
Calendars
I also address calendar creation later in the book, so for now, just know that when you select the Calendars entry on one of today’s click-wheel iPods, you’ll see, at the very least, an All Calendars entry, To Do’s, and Alarms. If you’ve created multiple calendars in an application such as Apple’s iCal, you see separate calendar entries if you’ve asked iTunes to sync individual calendars (see Chapter 6).
When you select All Calendars and press the Center button, the current month is displayed in a window with the current day highlighted. If a day has an event attached to it, that day displays a small red flag on the 5G iPod, the iPod classics, and all iPod nanos except the 4G and 5G iPod nanos, which display a small black dot. (Earlier iPods display events as small black rectangles.) The 3G iPod nano and iPod classics place small bell icons on days that include an alarm. The 4G and 5G iPod nanos don’t include this bell icon but list any events for the selected day at the bottom of the screen. That list includes the time of the event and its title—9:00 AM–10:30 AM Meeting with Curly, for example (Figure 2.31 on the next page).
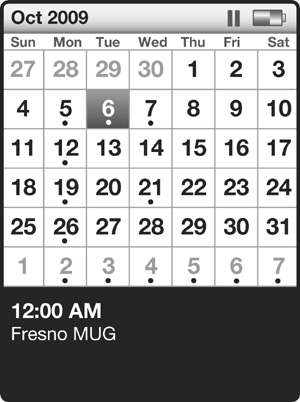
Use the click wheel to move to a different day; scroll forward to look into the future; and scroll back to be transported back in time. To jump to the next or previous month, press the Next or Previous button, respectively. When you want to see the details of an event, scroll to its day and press the Center button. Any events scheduled for that day will appear in the resulting screen. You can move to the next or previous day by pressing Next and Previous, respectively. Select an event and press the Center button, and you’ll see any details attached to the event—the date, time, location, and any notes you’ve added, for example.
The To Do’s entry is for any to-do items you’ve created in your computer’s calendar application. A To Do’s screen will give you a summary of the item (Finish the Book!, for example); its priority (hot items are given a priority of 1); and a due date, if you’ve created one. Notes are not included. You can move among To Do items in this Summary screen by pressing the Next and Previous buttons.
Finally, selecting Alarms and pressing the Center button cycles the options through Off, Beep, and None. Off means that the iPod won’t alert you to alarms. Beep indicates that the iPod will produce an audible beep. Setting the iPod to None activates a visual alert but no audible alarm.
Clocks
Yes, the iPod can tell time. Clicking Clocks displays the current time and date on today’s click-wheel iPods. The top of the Clocks screen displays both an analog and a digital clock (Figure 2.32).
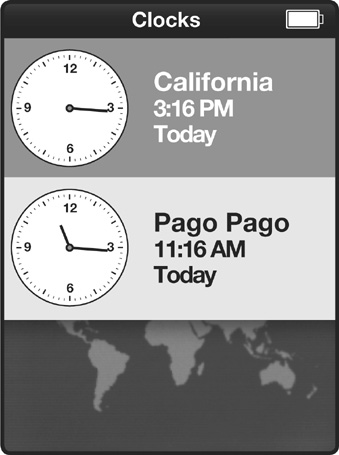
You can add clocks or edit the selected clock by pressing the Center button. When you do, a small bar appears that includes the words Add, Edit, and Delete (when you’ve added a clock), with Add selected by default. Press the Center button again, and a Region screen appears. Choose a region with the click wheel, press the Center button, and choose a city in the resulting City screen to create a clock that reflects the time in that city.
When you choose Edit, you can choose a new region and city for that clock. Choosing Delete removes the selected clock. (If you have just one clock on the screen, though, it can’t be removed.)
Contacts
I also discuss how to create contacts in Chapter 6. In the meantime, you need to know only that to access your contacts, you choose Contacts in the Extras screen and press the Center button. On all click-wheel iPods save the 4G and 5G iPod nanos, scroll through your list of contacts and press the button again to view the information within a contact. If a contact contains more information than will fit in the display, use the click wheel to scroll down the window.
On the 4G and 5G iPod nanos, any groups you’ve created will appear in a Contract Group screen when you select Contacts and press the Center button. Then you can select a group, press the Center button, and view just the contacts in that group.
If you haven’t placed any contacts on your 3G iPod nano or iPod classic, when you select Contacts in the Extras screen, the right side of the display reads No Contacts. If you press the Center button at this point, nothing happens. Select Contacts on a 4G or 5G iPod nano and press the Center button when you have no contacts on the iPod, and you see a screen that reads No C ontacts.
On earlier iPods, clicking the Contacts entry with no contacts on the iPod reveals two entries in the Contacts screen: Instructions and Sample. You can probably guess that selecting Instructions provides directions on how to move contacts to your iPod. The Sample command shows you what a complete contact looks like.
Fitness (5G iPod nano)
The 5G iPod nano has a pedometer feature that counts the steps you take. Fitness is another of those 5G iPod nano features that I discuss in the next chapter.
Games
The 3G iPod nano and iPod classics include three games: iQuiz, Klondike, and Vortex. To play one of them, just select Games, press the Center button, select the game, and press that button once again. The 4G and 5G iPod nanos replace iQuiz with Maze, a game that takes advantage of the iPods’ accelerometer. The games work this way:
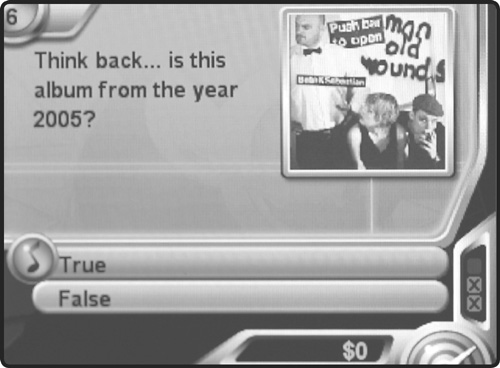
iQuiz. As its name implies, iQuiz is a quiz-show kind of game. By default, you have a choice of four quizzes: Music Quiz 2, Movie Trivia, Music Trivia, and TV Show Trivia. Music Quiz 2 uses music stored on your iPod as the basis of its questions (Figure 2.33). It may play a tune, for example, and ask you whether such-and-such a title is correct. Answer yes or no by using the click wheel and Center button. Movie Trivia, Music Trivia, and TV Show Trivia use prepackaged questions and answers contained on the iPod. For all questions, you have about 15 seconds to answer.
![]() You can create your own games for iQuiz. Apple tells you how at www.apple.com/games/ipod/iquiz.
You can create your own games for iQuiz. Apple tells you how at www.apple.com/games/ipod/iquiz.
Klondike. Klondike is the classic solitaire game (Figure 2.34). To play, arrange alternating colors of cards in descending sequence—a sequence that could run jack of hearts, 10 of spades, 9 of diamonds, 8 of clubs, and so on—in the bottom portion of the screen. In the top portion of the window, you arrange cards in an ascending sequence of the same suit—ace, 2, 3, 4, and 5 of hearts, for example.
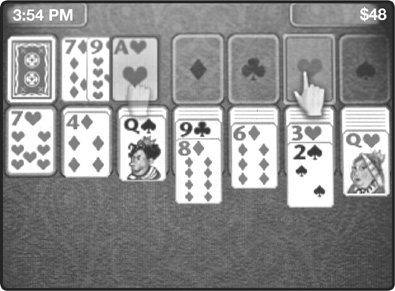
Use the click wheel to move the hand pointer to the card you want to move. Press the Center button to select a card that you want to place somewhere and the logical destination for it is highlighted (for example, you choose an ace, and one of the four spaces at the top of the display lights up). Press the Center button again, and the card moves to that place.
On the 4G and 5G iPod nanos, this game plays in landscape mode, meaning that you have to turn the iPod on its side to play the game.
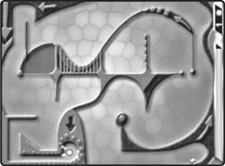
Vortex. This game is a bit like the arcade game Breakout (or Brick), in which you bounce a ball off a wall to break down a barrier (Figure 2.35). In this case, the wall is round, and your paddle rotates around the outside of the wall. Press the Center button to unleash the ball, and control the paddle with the click wheel.

On the 4G and 5G iPod nanos, you can play this game in either orientation—landscape or portrait.
![]() Apple sells games made for recent click-wheel iPods at the App Store. These games include such perennials as Monopoly, Yahtzee, Bejeweled, and Pac-Man. The 4G and 5G iPod nanos play these games in landscape mode, which seemingly makes the controls unintuitive. You may think you have to continue to press Menu to go up, even though the Menu button is now on the left. Don’t worry—when you rotate the iPod, the orientation of the controls changes as well, so that Menu and Play/Pause become left and right, respectively. The nano displays a screen before these games start to familiarize you with these changes (Figure 2.36).
Apple sells games made for recent click-wheel iPods at the App Store. These games include such perennials as Monopoly, Yahtzee, Bejeweled, and Pac-Man. The 4G and 5G iPod nanos play these games in landscape mode, which seemingly makes the controls unintuitive. You may think you have to continue to press Menu to go up, even though the Menu button is now on the left. Don’t worry—when you rotate the iPod, the orientation of the controls changes as well, so that Menu and Play/Pause become left and right, respectively. The nano displays a screen before these games start to familiarize you with these changes (Figure 2.36).
Figure 2.36 The game-control diagram on the 5G iPod nano.

Maze. This 4G and 5G iPod–only game uses the iPod’s accelerometer to nice effect. Similar to the wooden labyrinth games of days gone by, Maze demands that you tilt the iPod to guide a virtual metal ball through a series of mazes, picking up bonuses along the way by rolling over them as well as avoiding traps by maneuvering around them (Figure 2.37).
Notes
Notes allows you to store text files (up to 4 KB, or 4,096 characters) on your iPod. To add notes to your iPod, mount the iPod on your computer (the iPod must be configured to appear on the desktop), double-click the iPod to reveal its contents, and drag a text file into the iPod’s Notes folder. When you unmount your iPod, you’ll find the name of your text file in the Notes area of the Extras screen. The 1G and 2G iPods don’t have this function.
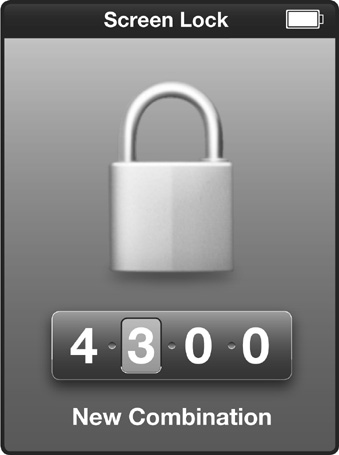
Screen Lock
Screen Lock is a feature for … well, locking your iPod’s screen. Like a cheap bike lock, this lock lets you create a four-digit password by using numbers from 0 through 9. The interface on the 5G iPod and the 1G and 2G nanos features a round combination wheel with four digits above it. The 3G, 4G, and 5G nanos and iPod classics place the four digits in a row (Figure 2.38). To move from one digit to another, press the Next and Previous buttons. Pressing the Center button also takes you to the next digit and, when you reach the final digit, sets the code. You’ll be asked to confirm the combination by entering it again. A lock icon will appear when the iPod is locked. To unlock it, press the Center button and enter the combination when prompted.
Stopwatch
The Stopwatch tracks total time and lap time. Choose Stopwatch and click the Center button to be taken to the Stopwatch screen. The first time you use the stopwatch on a 3G, 4G, or 5G iPod nano or iPod classic, you’ll see a picture of a stopwatch with a Play/Pause button next to it. Press the Center button to start the timer (Figure 2.39).
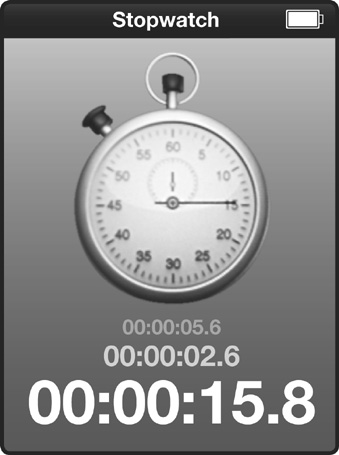
Each time you press the Center button as the timer runs, a lap time is added to the screen, as well as to a timer log. (An iPod classic’s screen can display up to three lap times along with the current timer; the 4G and 5G iPod nanos display two lap times.) To pause the stopwatch, just press the Play/Pause button. You can keep the timer running by pressing the Menu button.
When you press that Menu button on an iPod classic or a 3G iPod nano, the Stopwatch screen splits so that the stopwatch is on the right and a list of commands is on the left. This list includes Resume, which takes you back to the full-screen view of the timer; New Timer, for creating a new timer and saving the previous timer to the timer log; Clear Logs, which deletes any logs saved on the iPod; Current Log, which shows you the statistics for the current log (including the date, the time, and the shortest, longest, and average lap times); and then a list of any logs you’ve saved. Similar to the Current Log, these logs include date, time, and lap data. The 4G and 5G iPod nanos’ screens, being smaller, don’t split. Instead, you’re taken to a separate Stopwatch screen.
Nike + iPod (iPod nano only)
This command appears only if you’ve plugged the Nike + Sport Kit receiver into your iPod nano’s Dock-connector port. It leads to a Workout screen that allows you to choose among four main options: Basic, Time, Distance, and Calories. Within a Settings screen, you’ll also find menu options for PowerSong (one track you’ve chosen that will activate with the press of the Center button at a key point of your workout); Spoken Feedback (choose a male or a female voice to issue feedback); Distances (miles or kilometers); and Sensor, where you calibrate the Sport Kit for your body.
Voice Memos
Late-model full-size iPods and the 2G, 3G, and 4G iPod nanos can record voice memos with a compatible microphone adapter. The 5G iPod nano can record these memos with its built-in microphone. When you plug such an adapter into an iPod classic or a 3G or 4G iPod nano, this command appears in the iPod’s Mail screen. On the 5G iPod nano, this command is located in the Extras screen.
The 4G iPod nano and 2G iPod classic can also record voice memos with a compatible microphone plugged into the headphone port. Apple sells such a compatible microphone as part of its $29 Apple Earphones with Remote and Mic—a variation on the iPhone headphones bundled with these iPods that contains a headphone control complete with microphone. Again, because the 5G iPod nano has a built-in microphone, you don’t need a special set of headphones to record audio. I discuss more of the specifics of the 5G iPod nano’s audio-recording capabilities in Chapter 3.
Regardless of where you find this command on your iPod, press the Center button, and you’re taken to the Voice Memos screen, where you can choose to record a new voice memo or play back memos you’ve already recorded. When you sync your iPod with iTunes, your recordings are transferred to a Voice Memos playlist in iTunes’ Source list. During the process, the memos are removed from the iPod.
Settings
The Settings screen (Figure 2.40) is the path to your iPod preferences—including backlight timer and startup-volume settings, EQ selection, and the language that the iPod displays. The Settings screens of the 4G iPod nano, 5G iPod nano, and iPod classics differ in a few ways; I’ll point out where they do. The following sections look at these settings individually.
Figure 2.40 5G iPod nano’s Settings screen.
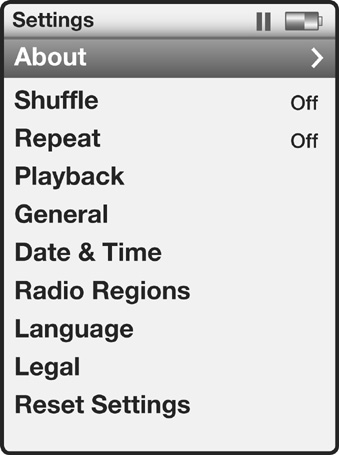
About
Select About and press the Center button once, and you see a graphic display similar to iTunes’ Capacity bar that provides details about the iPod’s storage and how it’s being used. Here, you’ll learn how much space has been used and how much remains, as well as get a general notion of how much of your storage is devoted to audio, video, photos, and data.
For a much more specific idea of what’s on your iPod, press the Center button again. In the next screen, you see exactly how many songs, videos, podcasts, photos, games, and contacts your iPod holds. Press the Center button one more time, and you’ll see your iPod’s serial number, model number, and software version.
![]() You can also press the Next and Previous buttons to move through these screens.
You can also press the Next and Previous buttons to move through these screens.
Shuffle
Selecting Shuffle and pressing the Center button rotates you through three settings: Off, Songs, and Albums. When Shuffle is set to Off, the iPod plays the songs in a playlist in the order in which they appear onscreen. The Songs setting plays all the songs within a selected playlist or album in random order. If no album or playlist is selected, the iPod plays all the songs on the iPod in random order. And the Albums setting plays the songs within each album in order but shuffles the order in which the albums are played.
Repeat
The Repeat setting also offers three options: Off, One, and All. When you choose Off, the iPod won’t repeat songs. Choose One, and you’ll hear the selected song play repeatedly. Choose All, and all the songs within the selected playlist or album will repeat when the playlist or album has played all the way through. If you haven’t selected a playlist or album, all the songs on the iPod will repeat after they’ve played through.
Playback (4G and 5G iPod nanos only)
The 4G and 5G iPod nanos carry a Playback command, which gathers together many of the iPod’s music functions. Select Playback and press the Center button, and you’ll see the commands shown in Figure 2.41.
Figure 2.41 5G iPod nano’s Playback screen.
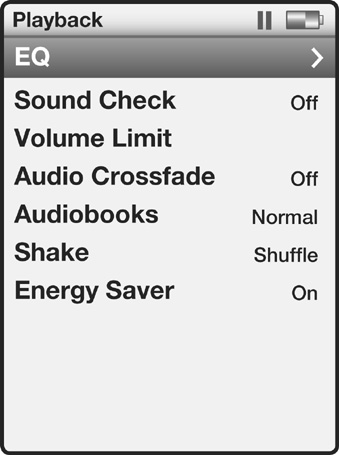
EQ. EQ (or equalization) is the process of boosting or cutting certain frequencies in the audio spectrum—making the low frequencies louder and the high frequencies quieter, for example. If you’ve ever adjusted the bass and treble controls on your home or car stereo, you get the idea.
The iPod comes with the same EQ settings as iTunes:
• Off
• Bass Booster
• Classical
• Deep
• Flat
• Jazz
• Loudness
• Piano
• R & B
• Small Speakers
• Treble Booster
• Vocal Booster
• Acoustic
• Bass Reducer
• Dance
• Electronic
• Hip Hop
• Latin
• Lounge
• Pop
• Rock
• Spoken Word
• Treble Reducer
Although you can listen to each EQ setting to get an idea of what it does, you may find it easier to open iTunes; choose Window > Equalizer; and, in the resulting Equalizer window, choose the various EQ settings from the window’s pop-up menu. The equalizer’s ten band sliders will show you which frequencies have been boosted and which have been cut. Any slider that appears above the 0 dB line indicates a frequency that has been boosted. Conversely, sliders that appear below 0 dB have been cut.
Sound Check. iTunes includes a Sound Check feature that you use to make the volumes of all your tracks similar. Without Sound Check, you may be listening to a Chopin prelude at a lovely, lilting volume and be scared out of your socks when the next track, AC/DC’s “Highway to Hell,” blasts through your brain. When Sound Check is on, each track should be closer to the same relative volume.
The iPod includes an On/Off Sound Check option, but it works only if you’ve first switched Sound Check on in iTunes; iTunes must evaluate your tracks and set an instruction in each one so that all the tracks work with Sound Check. To enable Sound Check in iTunes, open iTunes’ Preferences, click the Playback icon, and enable the Sound Check option. Now when you sync your tracks with the iPod and switch Sound Check on in the iPod’s Music settings screen, you’ll experience all that is Sound Check.
Volume Limit. This feature was added in the middle of 2006 at the request of parents who were afraid that their kids would blow out their eardrums by playing music at too high a volume. On the 3G, 4G, and 5G iPod nanos and iPod classics, select Volume Limit and press the Center button, and you’ll see a volume thermometer. Use the click wheel to adjust the peak volume (indicated by a small triangle) up or down. Press the Center button to set the volume limit, and you’re taken to a screen where you can choose to lock the limit with a four-digit passcode or click Done to impose the limit without a passcode.
Audio Crossfade. Audio Crossfade is a feature introduced with the 4G iPod nano and also available on the 5G iPod nano. Switch it on if you want the end of each track to fade out and the beginning of the next track to fade in.
Audiobooks. One unique feature of the click-wheel iPods is their ability to slow or speed the playback of audiobooks without changing the pitch of the narrator. When you select Audiobooks and press the Center button on your 3G, 4G, or 5G iPod nano or your iPod classic, you cycle through three choices: Slower, Normal, and Faster. The Slower and Faster commands slow or speed playback by about 25 percent, respectively.
You’re likely thinking that it would take a minor miracle to pull this trick off without making the book sound odd. You’re right; it would. And so far, Apple has failed to achieve this miracle. When you slow down an audiobook, the resulting audio sounds like it was recorded in a particularly reverberant bathroom; you hear a very short echo after each word. Files that are speeded up appear to have lost all the spaces between words, making the book sound as though it’s being read by an overcaffeinated auctioneer.
Shake. Shake is another feature that’s unique to the 4G and 5G iPod nanos. If, while listening to music on this nano, you want to change to Shuffle mode and play tracks randomly, just give the nano a good shake. (I mean a pretty severe shake. Apple engineered the nano so that the shaking generated by even vigorous exercise doesn’t throw the iPod into Shuffle mode.) Shake is an On/Off command. You can choose Shuffle (On) or Off. (You can shake it all you like, and nothing results other than a possibly sore wrist.)
Energy Saver. This feature is yet another that’s unique to 4G and 5G nanos. Switch on this On/Off feature, and the nano’s display goes dark if you’re not using the controls. Yes, the Backlight setting should take care of this situation, but if you’ve configured the backlight to always be on, switching Energy Saver on will dim the screen regardless of what the Backlight setting says.
General (4G and 5G iPod nanos only)
Just as Apple created a menu command to encompass the 4G and 5G iPod nanos’ music commands, it created the General command to pull together the iPod’s interface settings (Figure 2.42).
Figure 2.42 5G iPod nano’s General screen.
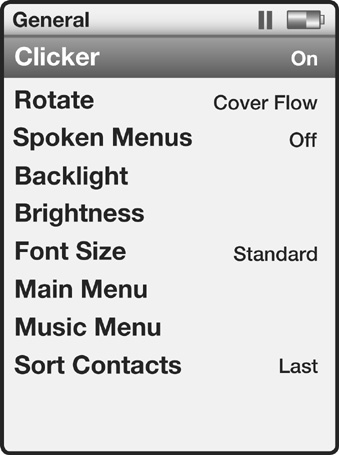
The settings work like this:
Clicker. This option makes your iPod’s click-wheel actually click—a handy option when you’re scrolling through your iPod without looking at it. Clicker provides audible feedback when, for example, you’re trying to move to the next command or playlist while driving. Recent click-wheel iPods allow you only to turn the clicker on and off. When the clicker is on, the click sound plays both through the headphones and through the iPod’s tiny internal speaker.
Rotate. When your iPod displays the Main or Music menu (or items within the Music-menu hierarchy), and you turn your iPod nano on its side, Cover Flow view appears. If you’d rather that it didn’t, just choose Rotate and click the Center button so that option reads Off.
Spoken Menus. Imagine being visually impaired or blind and trying to use a display-bearing iPod. Before the 4G iPod nano, doing that was nigh-on impossible. With that 4G nano, however, Apple brought far greater accessibility to the nano line with Spoken Menus. The command does exactly what it suggests. When Spoken Menus is switched on in both iTunes (in the iPod’s Summary tab) and on the iPod, the iPod will speak the name of any highlighted item, including commands, playlists, albums, artists, and tracks.
![]() The voice you hear depends on the kind of computer you sync the iPod to. If you’re using a Mac, by default you’ll hear Mac OS X’s Alex voice. (You also have the option to choose the system voice that you’ve selected in the Speech system preference’s Text to Speech tab. On a Windows PC, you hear a more “computery” voice.
The voice you hear depends on the kind of computer you sync the iPod to. If you’re using a Mac, by default you’ll hear Mac OS X’s Alex voice. (You also have the option to choose the system voice that you’ve selected in the Speech system preference’s Text to Speech tab. On a Windows PC, you hear a more “computery” voice.
Although the 5G iPod nano maintains this feature, you have an additional way to make the nano speak to you. In iTunes 9 and later, you have the option to enable VoiceOver separately from Spoken Menus. Enable this feature in iTunes and sync your 5G iPod nano; thereafter, whenever you press the Center button while a track is playing, the iPod will announce the name and artist of that track. This feature is helpful when you’re driving with an iPod and don’t want to take your eyes off the road to learn the title and artist of a playing track.
Backlight. The iPod’s backlight pulls its power from the battery, and when backlighting is left on for very long, it significantly shortens the time you can play your iPod on a single charge. For this reason, Apple includes a timer that automatically switches off backlighting after a certain user-configurable interval. You set that interval by choosing the Backlight setting (called Backlight Timer on earlier iPods).
On iPods before the color iPods, the settings available to you are Off, 2 Seconds, 5 Seconds, 10 Seconds, 20 Seconds, 30 Seconds, and (for those who give not a whit about battery life or who are running the iPod from the Apple Power Adapter) Always On.
Brightness. Today’s traditional display-bearing iPods carry a Brightness setting. Select it and press the Center button, and you can dial your iPod’s brightness up or down.
Font Size. You won’t find this command on other iPods. Because the 4G and 5G iPod nanos’ screens are on the small side, Apple tried to do something for those of us who have to squint at the standard font size. Using this command, you can toggle between Standard and Large font sizes. This setting affects menu commands only. Text in the Now Playing screen, for example, doesn’t change.
Main Menu. The Main Menu command offers you a way to customize what you see in the iPod’s main screen. Choose Main Menu and press the Center button. In the resulting screen, you can choose to view a host of commands. To enable or disable a command, press the Center button to toggle the command on or off. To return the main menu to its default setting, choose the Reset Menu command, press the Center button, choose Reset in the Reset Menus screen, and press the button again. The one unique command in this screen is Preview Panel. Select it and click the Center button so that it reads Off, and you won’t see artwork or information in the nano’s main screen.
Music Menu. This menu works just like the Main Menu command. The difference is that the commands in this screen apply to the Music menu. The menu also includes a Reset Menu entry.
Sort Contacts. You use this command to choose whether to sort contacts stored on the iPod by first or last name.
Date & Time
The Date & Time command is your means of setting the time zone that your iPod inhabits, as well as the current date and time. In the Date & Time screen, you’ll find these options:
Date. Click this command, and in the resulting screen, you’ll see a numeric display of the date, including fields for month, date, and year. Move among these fields by pressing the Next and Previous buttons, and increase or decrease their values with the click wheel. Press Menu when you’re done.
Time. This screen is very similar to the Date screen. You use the click wheel to change the hour, minutes, AM/PM, date, month, and year values, and use the Forward and Previous buttons to move from value to value.
Time Zone. On the 3G–5G nanos and iPod classics, the Time Zone screen displays a map of the world. Use the click wheel to increment or decrement time. As you do, a red pushpin icon that represents the current time zone moves to the location of major cities within the current time zone.
Setting the time zone on a 5G iPod isn’t nearly as much fun. The Time Zone screen on this iPod simply provides a list of major world cities. Select the one that represents your time zone, and press the Menu button.
24 Hour Clock. If you’re fond of military or international time (or if you just like saying “Fourteen hundred hours, sir!” in a commanding voice), this option is for you. It allows the iPod to keep time by using either a 12- or 24-hour clock.
Time in Title. This command allows the iPod to display the time in the iPod’s title bar.
Radio Regions (5G iPod nano only)
FM frequencies are different around the world. In the United States, we tune a radio from 87.5 to 107.9, but in Japan, these frequencies run from 76.0 to 90.0. Having the option to choose among the world’s five regions—Americas, Asia, Australia, Europe, and Japan—makes the 5G iPod nano a terrific international companion that’s radio-compatible regardless of which country you’re visiting.
Language
The 3G and 4G iPod nano and the iPod classics can display 22 languages (earlier iPods display 21 languages). The 5G iPod nano displays 30 languages. Here’s where you set which language your iPod will show.
Legal
If you care to view a few copyright notices, feel free to choose the Legal setting and press the Center button.
Reset Settings
As the name implies, selecting Reset Settings, using the click wheel to select Reset, and pressing the Center button will reset settings to their default. Your iPod’s music will stay right where it is; this command just restores the interface to the way it was when the iPod came out of the box.
Shuffle Songs
You may think that choosing this option causes the iPod to play all the material it contains in random order. Not exactly. Shuffle Songs changes the iPod’s behavior based on the Shuffle setting in the Settings screen. It works this way:
If you press Shuffle Songs when Shuffle is set to Off or to Songs, the iPod will play songs at random. (Note that it won’t play any files it recognizes as audiobooks.)
If you press Shuffle Songs when Shuffle is set to Albums, the iPod picks an album at random and then plays the songs on that album in succession (the order in which they appear on the album). When that album finishes playing, the iPod plays a different album.
If you also switch the Repeat command in the Settings menu to All and press Shuffle Songs, the iPod plays through all the songs on the iPod in the order determined by the Shuffle command and then repeats them in the same order in which they were shuffled originally. If you have three songs on your iPod—A, B, and C—and the iPod shuffles them to be in B, C, A order, when they repeat, they’ll repeat as B, C, and A. The iPod won’t reshuffle them.
Now Playing
When you select Now Playing, you’ll see the name of the currently playing (or paused) track. On an iPod classic, this name appears on the right side of the split-screen display. If you have the Preview Panel enabled on your 4G iPod nano, you’ll see the song title at the bottom of the screen. Press the Center button, and you’re taken to the Now Playing screen.