
3. 5G iPod nano Special Features
Descendant of the midpriced, modestly capable, and highly popular iPod mini, the iPod nano inherited each of these traits. It cost less than the capacious full-size iPod and more than the limited iPod shuffle; it had just enough features to make it a capable music player, but not much more; and its svelte design made it a popular choice for those who desired a screen-bearing iPod but didn’t want or need a full-size iPod.
With the third generation of this iPod, Apple did something unexpected: It brought every important feature of the full-size iPod of the time (the 5G iPod) to the iPod nano. Unless you really needed the higher capacity of the full-size iPod to hold a large media collection, or you just couldn’t bear to watch video on the nano’s small screen, the midsize iPod was your meat.
Proving that these benefits weren’t due to a slip-up at the head office, Apple gave the 4G iPod nano features that weren’t available on the full-size iPod, such as an accelerometer and Spoken Menus. Now, with the 5G iPod nano—which offers a video camera, integrated microphone, FM radio, and pedometer—Apple has pretty well indicated that those who want the fullest-featured click-wheel iPod will eschew the iPod classics and instead look to the nano.
In this chapter, I examine the 5G iPod nano’s special talents.
Video Camera
You’ve heard of this YouTube thing, yes? You know about this Internet-based place to share videos you’ve produced with the rest of the world, right? It turns out that people—young people in particular—like nothing better than feeding this beast and services similar to it. Whether the filmed content is an aspiring musician in her bedroom crooning a song she’s written, a daredevil on his skateboard trying (and failing) to leap over 17 burros, or the foot-in-mouth pronouncement of a soon-to-be-unemployed politician, it’s all ripe for YouTube.
To cash in on the public’s desire to feed YouTube and other video sharing services, a variety of companies have found ways to bring inexpensive video capture to the masses. Some—such as Pure Digital, Kodak, and Creative Technology—have developed easy-to-use pocket camcorders. Others have incorporated video cameras into existing devices such as point-and-shoot cameras, mobile phones, and music players.
With the iPhone 3GS, Apple jumped on this bandwagon by allowing its latest iPhone to shoot not only still images, but also standard-definition video. The 5G iPod nano is the second Apple media device to shoot video.
![]() The 5G iPod nano shoots video only—no stills—because Apple claims that the circuitry necessary for shooting decent still images is too thick for the nano’s thin design. How thick would it have to be? The iPhone’s camera (which can take still images) is about 6 mm thick, whereas the 5G nano’s video camera (meaning the sensor and surrounding circuits) is just 3 mm thick. The thickest part of the whole nano is just 6.2 mm.
The 5G iPod nano shoots video only—no stills—because Apple claims that the circuitry necessary for shooting decent still images is too thick for the nano’s thin design. How thick would it have to be? The iPhone’s camera (which can take still images) is about 6 mm thick, whereas the 5G nano’s video camera (meaning the sensor and surrounding circuits) is just 3 mm thick. The thickest part of the whole nano is just 6.2 mm.
Speaking of specs
Unlike the majority of today’s pocket camcorders (and many new point-and-shoot cameras), the 5G iPod nano shoots standard-definition video (640 by 480 pixels) rather than 720p (1280 by 720 pixels) high-definition video. It encodes video by using the H.264 scheme—a variant of MPEG-4 video that produces good results at low bit rates. And speaking of encoders and bit rates . . .
Reality-checking expectations and results
When Steve Jobs introduced the 5G iPod nano in September 2009, he made it clear where the nano’s video camera fit in the scheme of things by displaying a picture of Pure Digital’s popular Flip Ultra pocket camcorder. Here, he said, is a device that holds 4 GB of flash memory, costs $150, and only shoots video (oh, and look how thick it is). The 5G iPod nano holds twice the memory for the same price and is not only a video camera, but also a darned fine media player.
What Jobs didn’t do was compare the quality of the video recorded by these devices—and that’s probably for the best, as the 5G nano’s video camera doesn’t perform as well as the Flip Ultra. There’s only so much that a 3mm camera circuit can do. In this case, only so much means that the nano’s outside shots are a little dark; its inside shots are also dark, with a lot of artifacts; and just about everything it captures has a blue hue. Also, like all pocket camcorders, this one lacks image stabilization, meaning that you’ll see a fair amount of camera shake unless you hold the device very steady. In addition, the nano lacks any variety of zoom and doesn’t have a flash. In short, its camera isn’t the one you’ll use to create your next big-budget movie or music video.
The nano’s camera can, however, be the one you’ll use to capture any spontaneous moment, because the camera you have with you captures the world around you far better than no camera at all. If the moment—rather than how the moment looks—is what’s important to you, the 5G iPod nano’s camera is fine. That said, if you also happen to have a dedicated pocket camcorder, a point-and-shoot camera that also takes movies, or an iPhone 3GS with you, that’s the better camera to use.
Shooting video
To shoot video with your 5G iPod nano, just follow these steps:
1. Select Video Camera in the main screen.
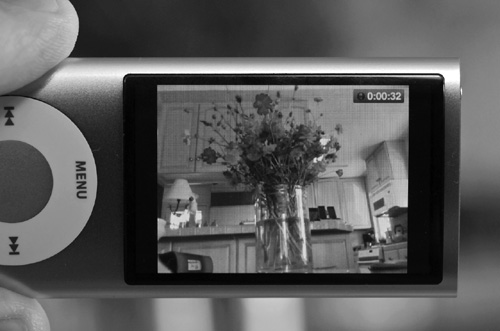
2. Point the iPod at your subject, and look at the display (Figure 3.1).
You can shoot in either portrait or landscape orientation.
Figure 3.1 Shooting video with the 5G iPod nano.
![]() The iPod will shoot in the orientation you use when you start recording. So, for example, if you hold the iPod straight up and down, you’ll get a tall movie. If you rotate the iPod while shooting, the resulting video will turn on its side, just as though you were shooting with a regular camcorder.
The iPod will shoot in the orientation you use when you start recording. So, for example, if you hold the iPod straight up and down, you’ll get a tall movie. If you rotate the iPod while shooting, the resulting video will turn on its side, just as though you were shooting with a regular camcorder.
3. Curse when you realize that your hand or finger is in the way.
The location of the nano’s camera is such that when you’re holding the iPod in portrait orientation, you’ll cover the lens with your hand, and when you’re holding it in landscape orientation, your right index finger makes an occasional appearance.
4. Hold the nano differently.
It’s important to understand that you can hold the iPod in any of four directions: top pointing up, top pointing down, sideways with the click wheel on the right, and sideways with the click wheel on the left. Regardless of the direction in which you hold the iPod, the built-in accelerometer tells the iPod which way is up, so it knows its orientation and shoots video accordingly.
This means that when you’re shooting in portrait orientation, you can avoid putting your hand in the way of the lens by holding the iPod upside down. If your index finger gets in the way when you shoot with the click wheel on the right, rotate the iPod 180 degrees so that the lens is on the bottom right (as you face the iPod).
![]() Or don’t sweat the orientation and just shoot the way people do in the nano ads: one-handed, with the click wheel on the right. Do things that way, and your fingers shouldn’t obscure the lens.
Or don’t sweat the orientation and just shoot the way people do in the nano ads: one-handed, with the click wheel on the right. Do things that way, and your fingers shouldn’t obscure the lens.
5. Press and hold the Center button to choose an effect.
You can apply any of 15 effects to the video you shoot with the 5G nano: Sepia, Black & White, X-Ray, Film Grain, Thermal, Security Cam, Cyborg, Bulge, Kaleido, Motion Blur, Mirror, Light Tunnel, Dent, Stretch, and Twirl (Figure 3.2). There’s also a Normal setting, if you want to shoot just straight video.
Figure 3.2 Video shot with the Cyborg effect.

6. Press the Center button to record.
Your iPod will start recording, as indicated by the small red flashing dot in the top-right corner of the display. A timer next to the recording light indicates time in hours, minutes, and seconds.
7. Press the Center button again to stop recording and save the video.
The video frame will briefly seem to be sucked down into the display. This effect tells you that the iPod is saving the video.
8. Locate your videos.
Click the Menu button to go to the Camera Roll screen, where you’ll find clips organized by the dates when they were shot. Select an appropriate day, and press the Center button.
Videos for each day are organized on a screen that bears the date—November 14, 2009, for example. Rotate your thumb around the click wheel to select a clip, and press the Center button. The clip will fill the display and show a Play icon. Press Center again to play it.
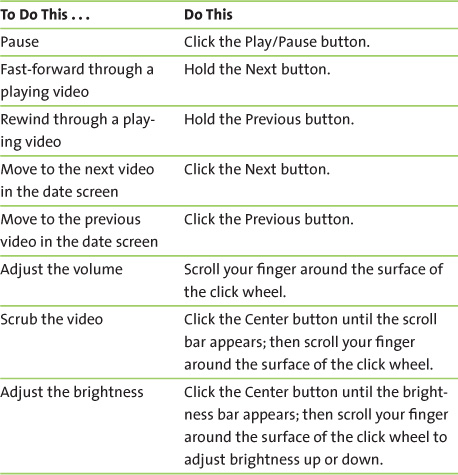
10. Make adjustments.
The iPod nano allows you to control video playback in a variety of ways:
Importing video
iTunes very definitely handles the lion’s share of the work when it comes to synchronizing the iPod’s media and data, but it adopts a strict hands-off policy when it comes to importing video from a 5G iPod nano. You must use other applications on your computer to import the nano’s video. The application you use depends on whether you’re using a Mac or a Windows PC.
Macintosh
With regard to importing video from the 5G iPod nano to a computer, Apple (naturally, perhaps) gives an edge to its own Macintosh. When you shoot some video with your iPod and then jack the iPod into your Mac, iTunes launches, of course—and so does iPhoto, the photo-managing and -editing application that’s part of the iLife suite (which is bundled with every new Mac).
Don’t let the name iPhoto fool you. iPhoto (not iMovie) is indeed the application you use to import movies that you’ve shot with your iPod nano. To do that, just follow these steps:
1. Plug the iPod into your Mac’s powered USB 2.0 port.
2. If iPhoto doesn’t launch, launch it yourself.
It’s possible that you’ve configured the application to not launch automatically.
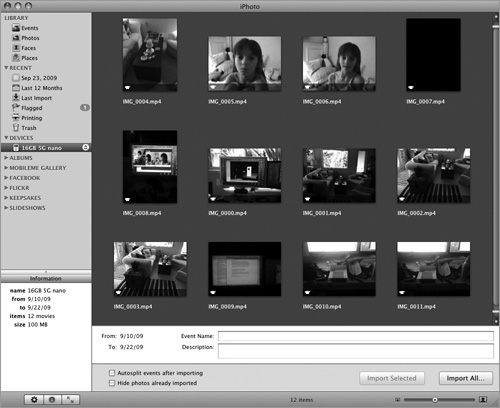
3. Select the iPod in iPhoto’s Library pane, where it appears below the Devices heading (Figure 3.3 on the next page).
Figure 3.3 A 5G iPod nano’s videos shown in iPhoto.
4. Import your video.
iPhoto allows you to import all the video on the iPod or just selected clips. If you’d like to import everything, simply click the Import All button at the bottom of the iPhoto window. If you’d like to import just some of the clips, hold down the Mac’s Command key, click the clips you want to import to select them, and then click the Import Selected button at the bottom of the iPhoto window.
5. Locate the videos.
Click the Last Import entry in iPhoto’s Library pane, and you’ll see the video clips you just imported. On your Mac, the videos will be stored here by default: your user folder/Pictures/iPhoto Library/Originals/year/date. In this path, your user folder is, of course, your user folder (chris, for example) inside the Users folder at the root level of your Mac’s hard drive, and year and date are the year and date when you imported (not shot) the videos.
To play one of the videos on your Mac, just double-click it. By default, it opens and plays in Apple’s QuickTime Player.
Windows
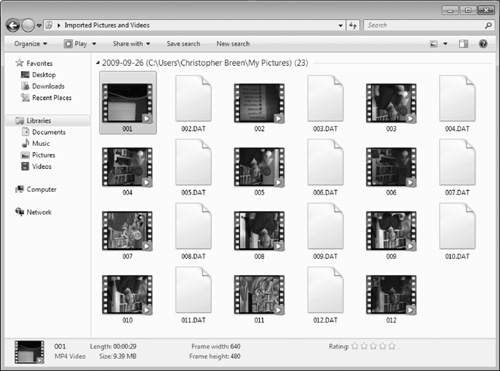
Although Apple is thrilled that Windows users also purchase iPods, it and Microsoft have made no special arrangements for an Apple application to import the movies. It’s possible, however, that Windows will toss up an Autoplay window when you plug in a 5G iPod nano that contains videos. If it does, choose the option to import pictures and videos. Windows should do the right thing, pulling the videos from your iPod and storing them in your My Pictures folder (Figure 3.4).
iPod nano videos viewed in Windows.
I’m being a little cagey about this situation because Windows doesn’t always produce the Autoplay window. If it doesn’t, try this:
1. Plug your iPod into your PC’s powered USB 2.0 port.
2. Launch iTunes, if it doesn’t launch automatically.
3. Select the iPod in iTunes’ Source list, and in the Summary tab, enable the Enable Disk Use option.
4. Navigate to your mounted iPod.
Click the Start menu, and locate the My Computer entry. The iPod will be listed as a removable storage device.
5. Copy the videos from the iPod to the computer.
Double-click the iPod, and open the DCIM folder. Inside this folder, you’ll see the 000APPLE folder. Inside that folder are videos marked IMG_0000, IMG_0001, IMG_0002, and so on. Select the movies, and drag them to the desktop.
![]() You actually have two entries for each video—two IMG_0000 files, for example. One is a data file; the other, the movie. You can differ-entiate the files by their icons. The data file will bear the generic icon for all Windows data files, and the movie file will show a thumbnail of the video’s first frame.
You actually have two entries for each video—two IMG_0000 files, for example. One is a data file; the other, the movie. You can differ-entiate the files by their icons. The data file will bear the generic icon for all Windows data files, and the movie file will show a thumbnail of the video’s first frame.
6. Double-click a video to play it.
When you downloaded iTunes, Apple also gave your PC a copy of QuickTime Player, which should launch and play your movie. If you have a different application assigned to play H.264 videos—Windows Media Player, for example—that application will open and play the movie.
![]() If you play these movies in Windows Media Player, you may see—as shown in Figure 3.4—that some movies are upside down. That’s because Windows Media Player doesn’t understand the orientation of these movies. QuickTime Player for Windows does understand, however. To view the movies in the correct orientation, use QuickTime Player or a video-playing application that allows rotation.
If you play these movies in Windows Media Player, you may see—as shown in Figure 3.4—that some movies are upside down. That’s because Windows Media Player doesn’t understand the orientation of these movies. QuickTime Player for Windows does understand, however. To view the movies in the correct orientation, use QuickTime Player or a video-playing application that allows rotation.
Radio
Dear Reader of the Future Who Unearths This Book
from the Time Capsule Buried in My Back Yard,
There was a time, generations before you floated across this flooded-yet-oddly-parched globe in your hoverboots, when sound came through the air. No, not as music beamed directly into your auditory cortex, but as electromagnetic waves intercepted by antennas and amplified by electronic devices called radios. A radio could play music, commentary, news, sports broadcasts, and (increasingly) the ravings of those with a quaint social outlook.
Years after radios had largely been eclipsed by iPods, Apple determined to throw a radio into an iPod—specifically, the 5G iPod nano. Why? Some people still enjoyed listening to radio on occasion. Others, who belonged to swanky exercise facilities, found it useful to tune their iPod’s radios to the frequency on which the gym’s TVs were broadcasting that day’s episode of Oprah. (Oprah was like a queen of our time.) Also, I suppose, the radio was one more feature added to tempt people to purchase a new iPod.
But because Apple was Apple, this radio wasn’t just any old radio. No, it was a special radio that buffered audio—meaning that as it received radio programming, it simultaneously stored that programming in a small memory space. It stored exactly 15 minutes of audio, and when those 15 minutes elapsed, the oldest programming dripped out of that memory space to make room for new, incoming programming. You guys have found a TiVo by now, surely. Similar idea. The iPod’s radio let people back up and listen to material received up to 15 minutes in the past.
This radio received programming only on the FM band. Although the other band, AM, offered desirable content in the form of sports broadcasts, AM radios required larger circuitry than FM radios, and Apple was uninterested in fattening up its ultraslim iPod simply for the sake of a few ball games.
Hope this adds another piece to the puzzle that is the early 21st century. Sorry about the mess. If you come across any members of the Breen clan, pass along my regards.
—Chris
Operating the radio
You’ve got the history. Now take a look at how the 5G nano’s radio works. Just follow these steps:
1. Attach the antenna.
No, don’t bother rummaging around in the iPod box. The antenna is the headset that came with the iPod. Fact is, any cable—headphone or otherwise—that you plug into the iPod’s headphone port will act as an antenna. Fail to fill this port, and the iPod will tell you that the radio can’t play.
2. Start the radio.
Navigate to the Radio entry in the iPod’s main screen, and click the Center button.
3. Scan available stations.
The radio can scan stations around it that have fairly strong signals. To find one, just press and hold either Next or Previous. The radio dashes to the first robust frequency it finds and plays the station’s transmission for a few seconds. If you like what you hear, click the Center button, and the iPod will stay on that station (Figure 3.5). Otherwise, wait a few seconds, and the radio will scan to the next strongish station.
Figure 3.5 The 5G iPod nano’s radio interface.
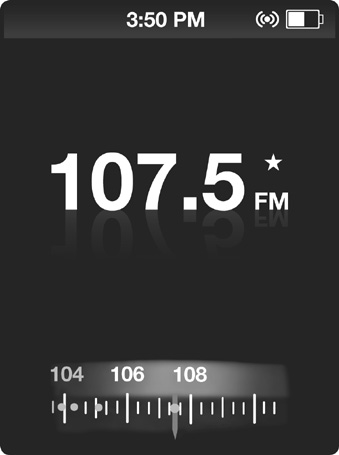
4. Tune into a station manually.
You don’t have to scan for stations. If you know the number of a station that you want to listen to—107.5, for example—just scroll your finger around the click wheel when the tuning dial appears at the bottom of the display. The readout in the middle of the display will tick off the frequencies.
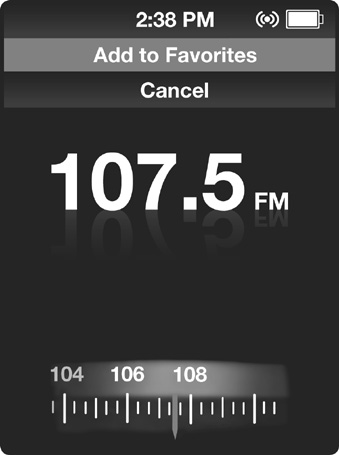
5. Save favorite stations.
When you find a station you like, click and hold the Center button. A menu will appear at the top of the display, offering the options Add to Favorites and Cancel (Figure 3.6 on the next page). Click Center again with Add to Favorites highlighted, and you’ll save that station as a favorite. Later, you can access favorites easily by clicking the Next or Previous button; each click moves you to the next favorite in that direction. Additionally, you can call up favorites by clicking the Menu button to move to the Radio screen, selecting Favorites, clicking Center, choosing a favorite station, and clicking Center once again.
Figure 3.6 Adding a favorite radio station.
6. Turn it up (or down)!
To adjust the radio’s volume, wait for the tuning dial to disappear. (It hangs around for only about 7 seconds.) Then, at the bottom of the screen, you’ll see a gray bar, which I discuss shortly. When you see that gray bar, you’re welcome to adjust the iPod’s volume by scrolling your finger around the click wheel.
Using the buffer
The radio’s buffer is where the magic happens. If someone routinely interrupts your favorite radio programs with calls or conversations that last up to 15 minutes, you’re going to love this feature.
When Lassie bursts into the room barking something about wells and small boys, for example, calmly click Play/Pause. A gray bubble will appear above the gray bar at the bottom of the radio’s display. That gray bubble displays the current time (Figure 3.7). You’ve just “paused” live radio.
Figure 3.7 The radio’s buffer in action.
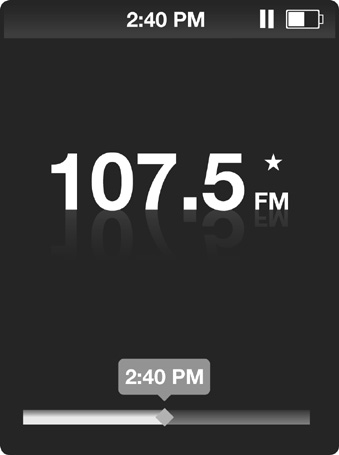
After you’ve dashed to the well, extracted the kid, cautioned him that falling into four wells in a week is a bit much, and returned to your iPod, press Play/Pause again. The radio broadcast will pick up exactly where you left off, because the programming that played during your absence has been stored in the iPod’s memory.
But suppose that in all the excitement, you lost the thread of what was being talked about during the broadcast. No problem. Click Play/Pause again, and when you see the gray time bubble, scroll your finger counterclockwise around the click wheel to “rewind” the broadcast. The time bubble will move to the left, and the time will decrease. When you find a spot that makes sense, stop scrolling, and press Play/Pause to play the buffered broadcast from that point.
The buffer is completely temporary. You can’t record radio in the sense that you can save it and then transfer it to your computer via iTunes. When those 15 minutes have elapsed, the buffer stops, and whatever played 15 minutes and 1 second ago is gone.
![]() When you change stations, the buffer is cleared. If you hope to rewind in time, don’t station-surf.
When you change stations, the buffer is cleared. If you hope to rewind in time, don’t station-surf.
iTunes Tagging
The iPod’s radio has one additional noteworthy feature: iTunes Tagging. This feature takes advantage of the fact that some radio stations’ signals contain embedded information. This information, which is displayed on compatible radios, can include the station’s call letters, program title, and track and artist names. The track and artist names are our concern here.
When track and artist information appears below a station’s frequency number on your 5G iPod nano, along with a small tag icon, you’ve tuned into a station that supports iTunes Tagging. This information can be saved to your iPod and, when you sync that iPod to your computer, transferred to your Mac or Windows PC.
Who cares? You, perhaps. Suppose that you’re listening to a station and hear a terrific song. This station is lax about telling you the name of songs, and before you know it, it’s off to commercial, leaving you wondering. If that station offers iTunes Tagging, you can save that song’s title and artist to your iPod by doing this:
1. Hold down the Center button.
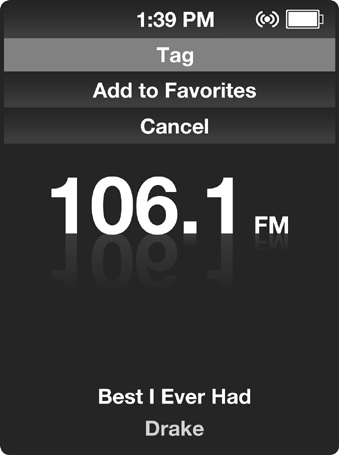
When a station that supports iTunes Tagging is tuned in and a song is playing (you can’t tag commercials, news, or DJ chatter, naturally), holding down the Center button produces a drop-down menu that includes the Tag command, along with Add to Favorites and Cancel (Figure 3.8).
Figure 3.8 Tagging a radio station.
2. Choose Tag, and click the Center button.
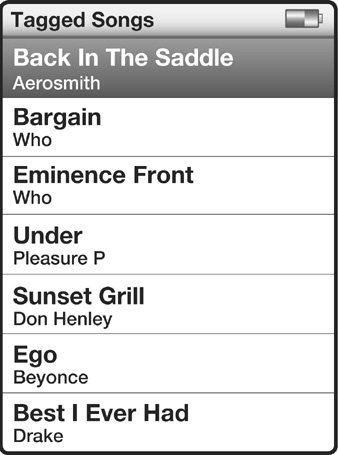
The song is tagged and added to the Tagged Songs screen (Figure 3.9), which you access by clicking the Menu button, choosing Tagged Songs in the resulting Radio screen, and clicking the Center button.
Figure 3.9 The Tagged Songs screen.
![]() The iPod also keeps track of recently played songs on stations that support iTunes Tagging. You’ll find these tracks by clicking the Recent Songs entry in the Radio screen.
The iPod also keeps track of recently played songs on stations that support iTunes Tagging. You’ll find these tracks by clicking the Recent Songs entry in the Radio screen.
3. Sync your iPod, and marvel.
When you next sync your iPod with iTunes, a green Tagged entry will appear below the Store heading in iTunes’ Source list. Select this entry, and you’ll see a list of all the tracks you’ve tagged on your iPod (Figure 3.10). This list contains the track name and artist, and sometimes the album.
Figure 3.10 Tagged songs listed in iTunes.

4. View or buy a tagged track.
Within the Price column, you’ll see either a View or Buy Song button along with the price of the track. Click View, and (provided that you have a live Internet connection) you’re taken to the iTunes Store, where you’ll see the track either as a single or as part of an album. Click Buy Song, and you’ll be prompted for your Apple ID and password so that you can purchase the track without having to visit the Store (which I cover in Chapter 5).
Pedometer
The 5G iPod nano can keep track of your steps with its built-in pedometer and accelerometer. When the accelerometer detects the kind of bump associated with a footfall, its counter increases by 1. This feature is unlike the Nike + iPod Sports Kit—a hardware/software package for earlier iPods that measures and records the length and frequency of your stride and then manages and records a workout based on that data. The nano’s pedometer simply counts steps; it cares not a whit how quickly you took those steps or whether you took them on the flat or while trudging up a mountain.
Viewing the Fitness screen
The Fitness screen is the gateway to the pedometer, its settings, and the history of your workout (or walkouts, if you prefer a gentler form of exercise). It shakes out this way.
Pedometer
To use the pedometer, select Extras in the Main menu, click Center, select Fitness, and click Center again. In the Fitness screen that appears, select Pedometer, and click Center one more time.
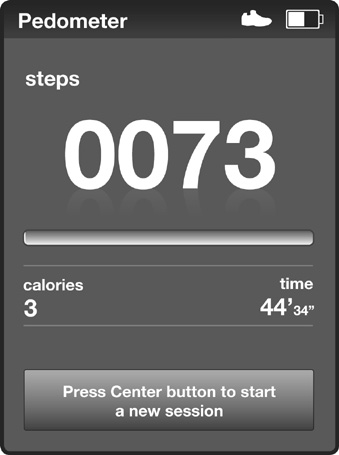
You’ll see the Choose Weight screen first. Just scroll your finger around the click wheel until you arrive at your weight, and press the Center button. (And hey, if you want to shave a few pounds off that estimate, that’s completely between you and your iPod.) You’ll go to the Steps screen (Figure 3.11), which—not surprisingly—is where you see the number of steps you’ve taken, along with a small calorie counter and a timer that tracks the time since you started the pedometer.
Figure 3.11 The pedometer’s Steps screen.
![]() Obviously, the calorie counter is making the roughest guess at how quickly you’re burning energy. Best to think of it as being a motivational tool.
Obviously, the calorie counter is making the roughest guess at how quickly you’re burning energy. Best to think of it as being a motivational tool.
To stop your workout, just click the Center button. In the Fitness screen that appears, you can return to the Pedometer screen by selecting Pedometer and clicking Center.
Settings
The Settings command in the Fitness screen generates four options:
• Pedometer
You can choose whether the pedometer will run at all times or only when you invoke it.
• Daily Step Goal
When you choose this option and click the Center button, you find a variety of options, ranging from None to 2,500 to 25,000 to 100,000 (and some settings in between). You also have the option to enter a custom setting and enter steps in increments of 1,000 until you reach 10,000. At that point, increments are in tens of thousands (10,000, 20,000, and so on).
Your step goal appears on the pedometer’s History screen, along with the number of steps you actually took on a given day.
• Weight
If your weight has changed, you’re welcome to likewise change it on your iPod by invoking this command and entering a new value.
• Screen orientation
A lot of people will want to watch the pedometer’s readout as they exercise. Displaying that readout in a vertical view may not be convenient, depending on the way you’ve strapped on your iPod. Fortunately, this command lets you view the pedometer in right or left landscape orientation.
History
This final command gives you an idea of how you’ve been doing. Invoke the History command, and you see a calendar screen that displays the current month. Those days when you’ve switched on the pedometer have a small dot below the date. Using the click wheel, select a day that has one of these dots, and click the Center button.
The resulting Session History screen indicates the total number of steps recorded that day, along with the date (Figure 3.12). Below that display is a list that includes this data: Step Goal, Duration, Start Time, End Time, Calories, For the Week, and Month Total.
Figure 3.12 The pedometer’s Session History screen.

Turn the iPod to landscape orientation, and you see this data marked out on a graph. Even if you have the pedometer configured so that it’s always on, the information in the History screen and graph won’t update as you walk. Return to the pedometer screen, however, and you’ll see that the iPod has continued to record your steps.
Syncing with Nike+ Active
As much fun as it is to look at this data on your iPod, it’s more fun to track it on your computer, and Apple and Nike have made it possible to do just that. All you need are your 5G iPod nano and a free Nike+ Active account. The process works like this:
1. Plug your iPod into your computer.
If your nano has pedometer data on it, iTunes pops up a dialog box asking whether you’d like to transfer your workout data to iTunes and view it on the Nike+ Active Web site.
2. Sign up for a Nike+ Active account.
If this sounds like fun to you, click the Learn More button in the dialog box. Your Web browser will open and take you to Nike’s Web site. Click the Join button on this site, and you’ll be walked through the process for signing up for a free Nike+ account.
3. Send your steps to Nike.
After you’ve established an account, you can send your step data to Nike. You do this simply by clicking the Send button in the dialog box that iTunes displays whenever your iPod has new pedometer data.
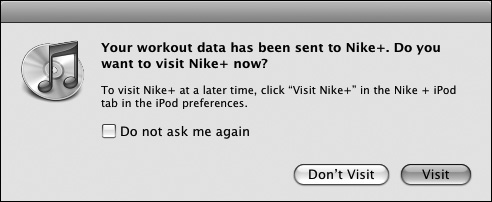
If you click Send, another dialog box asks whether you’d like to visit the site (Figure 3.13). Click Don’t Visit if you’d rather not or Visit if you’d like to pay a call.
Figure 3.13 Why not pay Nike’s Web site a visit?
![]() You can visit the Nike site at any time by selecting your iPod nano in iTunes’ Source list, clicking the Nike + iPod tab that appears in the main window, and then clicking the Visit Nike+ button.
You can visit the Nike site at any time by selecting your iPod nano in iTunes’ Source list, clicking the Nike + iPod tab that appears in the main window, and then clicking the Visit Nike+ button.
4. View your progress.
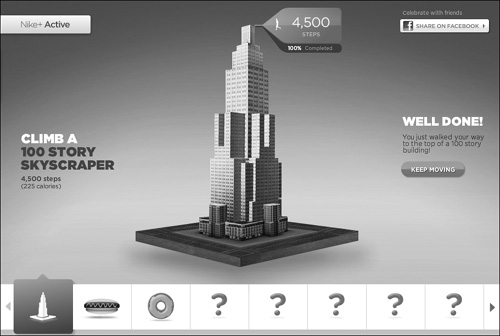
When you visit the site and log in, you’ll see your progress laid out in several views, the first of which is a skyscraper (Figure 3.14). If you record 4,500 steps, you’ve climbed the equivalent of a 100-story skyscraper. When you’ve achieved that goal, you can move on to other goals (stepping enough to work off the caloric content of a hot dog or doughnut, for example).
Figure 3.14 Track your pedometer progress on Nike’s Web site.
At the bottom of the page, you’ll see the number of steps you’ve recorded and synced each day that week, your best day’s total number of steps, the total number of steps you’ve recorded and synced for the week, and all the steps you’ve ever recorded and synced. Again, this feature isn’t hard science, but a fun motivational tool.
Voice Memos
Although voice memos aren’t completely new to the iPod nano, the 5G model is the first nano that doesn’t require an external microphone to record them, thanks to the small microphone that sits above the video-camera lens on the back of the iPod.
To record a voice memo, follow these steps:
1. Launch Voice Memos.
To do this, select Extras in the iPod’s main screen, click the Center button, scroll down to Voice Memos, and click Center again. The resulting screen displays a microphone similar to the one you’d see in the Voice Memos app on an iPhone (Figure 3.15).
Figure 3.15 The 5G iPod nano’s Voice Memos screen.

2. Record a memo.
Click the Center button, and the iPod starts recording. While it records, you see a red Recording bar and a time readout at the top of the display. The needle on the VU meter responds to the sound coming into the microphone, registering greater movement for louder sounds.
![]() Even though the microphone is on the back of the iPod, you needn’t flip it around for the iPod to hear you. The microphone manages to record sound coming from the front quite well. You’ll get a better tone from the microphone if you indeed speak into it, however.
Even though the microphone is on the back of the iPod, you needn’t flip it around for the iPod to hear you. The microphone manages to record sound coming from the front quite well. You’ll get a better tone from the microphone if you indeed speak into it, however.
3. Insert a chapter mark.
To insert a chapter mark into your recording, click Center. The iPod will continue to record. Later, when you copy the voice memos to iTunes (see step 7), you can select the voice memo in iTunes and then select a chapter to listen to by choosing it from the Chapters menu in iTunes’ menu bar.
4. Save your recording.
When you click the Play/Pause button, a menu appears that includes Resume, Delete, and Stop and Save options. Choose Stop and Save to save your recording.
5. Locate your memos.
When you chose Stop and Save, you were taken to the Voice Memos screen, which displays New Memo and Voice Memos commands. Choose Voice Memos, and click the Center button. In the resulting Voice Memos screen, you’ll see any voice memos that you’ve recorded since you last synced your iPod. Choose one, and click the Center button.
6. Play, label, or delete your memo.
In the data screen that you now see, you have the option to play, label, or delete the memo. Choose Play and click the Center button, and you’ll hear the memo played through the iPod’s speakers or the audio device plugged into the headphone port or Dock connector.
If you choose Label and click Center, you have the option to label your memo as a podcast, interview, lecture, idea, meeting, or memo.
Delete, of course, vaporizes the memo.
7. Sync your memos to your computer.
When you next sync your iPod to your computer, its voice memos are copied to your iTunes Library automatically, titled with the date and time when they were recorded—10/31/09 11:35 AM, for example. These files are recorded in AAC format at 128 Kbps (see Chapter 4 for information about formats and bit rates).