4. iTunes and You
A high-performance automobile is little more than an interesting amalgam of metal and plastic if it’s missing tires and fuel. Sure, given the proper slope (and, perhaps, a helpful tailwind), that car is capable of movement, but the resulting journey leaves much to be desired. So, too, the iPod is a less-capable music-making vehicle without Apple’s multitrick media manager/player, iTunes. The two—like coffee and cream, dill and pickle, Fred and Ginger—were simply meant for each other.
To best understand what makes the iPod’s world turn, you must be familiar with how it and iTunes 9 work together to move music (as well as pictures, videos, and games, in the case of some recent iPods) on and off your iPod. In the following pages, you’ll see just that.
Getting the Goods
“Eep!” I hear you squeep. “I’ve never used iTunes or owned an iPod. I have no idea how to get music into iTunes, much less put it on my portable music player. What do I do?”
Relax. I’m not going to tell you how to put your music and movies on your iPod classic or nano until you know how to assemble a music and movie library.
I’ll start with music. You have three ways to get tunes into iTunes:
• Recording (or ripping, in today’s terminology) an audio CD
• Importing music that doesn’t come directly from a CD (such as an audio track you downloaded or created in an audio application on your computer)
• Purchasing music from an online emporium such as Apple’s iTunes Store
The following sections tell you how to use the first two methods. The iTunes Store is a special-enough place that I devote all of Chapter 5 to it.
![]() The procedures for adding movies and videos are similar, except that iTunes offers no option for ripping DVDs. You can do that, but the procedure is more complicated than ripping an audio CD. I cover ripping DVDs in Chapter 8.
The procedures for adding movies and videos are similar, except that iTunes offers no option for ripping DVDs. You can do that, but the procedure is more complicated than ripping an audio CD. I cover ripping DVDs in Chapter 8.
Rip a CD
Apple intended the process of converting audio-CD music to computer data to be painless, and it is. Here’s how to go about it:
1. Launch iTunes.
2. Insert an audio CD into your computer’s CD or DVD drive.
By default, iTunes tries to identify the CD you’ve inserted. It logs on to the Web to download the CD’s track information—a very handy feature for those who find typing such minutia to be tedious.
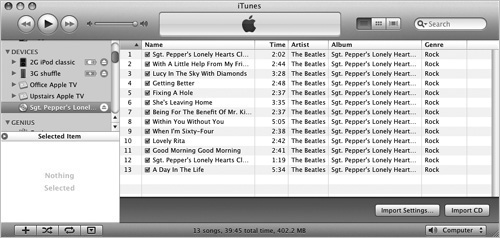
The CD appears in iTunes’ Source list under the Devices heading, and the track info appears in the Song list to the right (Figure 4.1).
Figure 4.1 A selected CD and its tracks.
Then iTunes displays a dialog box, asking whether you’d like to import the tracks from the CD into your iTunes Library.
3. Click Yes, and iTunes imports the songs; click No, and it doesn’t.
![]() You can change this behavior in iTunes’ Preferences window. In the General preference, you find a When You Insert a CD pop-up menu. Make a choice from that menu to direct iTunes to show the CD, begin playing it, ask to import it (the default), import it without asking, or import and then eject it.
You can change this behavior in iTunes’ Preferences window. In the General preference, you find a When You Insert a CD pop-up menu. Make a choice from that menu to direct iTunes to show the CD, begin playing it, ask to import it (the default), import it without asking, or import and then eject it.
4. If you decided earlier not to import the audio but want to do so now, simply select the CD in the Source list and click the Import CD button in the bottom-right section of the iTunes window.
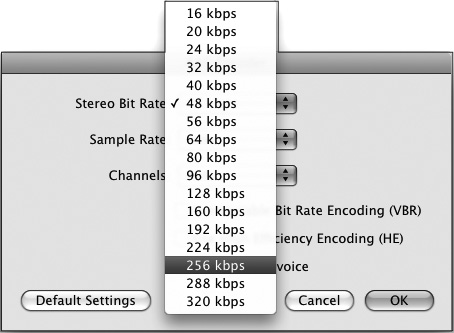
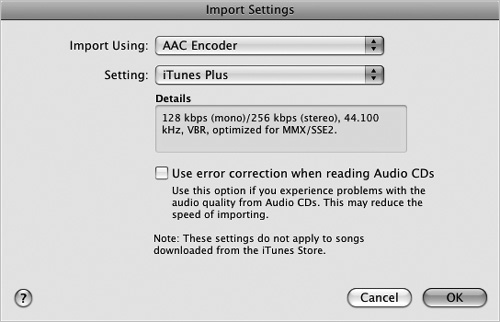
iTunes begins encoding the files via the method chosen in the Import Settings window (Figure 4.2 on the next page), which you access by opening iTunes’ Preferences window (choose iTunes > Preferences on a Mac or Edit > Preferences on a Windows PC), clicking the General tab, and clicking the Import Settings button. By default, iTunes imports songs in iTunes Plus AAC format at 256 Kbps. (For more on encoding methods, see the sidebar “Import Business: File Formats and Bit Rates” in the next section.)
Figure 4.2 iTunes’ Import Settings window.
![]() To import only certain songs, uncheck the boxes next to the titles of songs you don’t want to import; then click the Import CD button.
To import only certain songs, uncheck the boxes next to the titles of songs you don’t want to import; then click the Import CD button.
5. Click the Music entry in the Source list.
You’ll find the songs you just imported somewhere in the list.
6. To listen to a song, click its name in the list and then click the Play icon or press the spacebar.
Move music into iTunes
Ripping CDs isn’t the only way to put music files on your computer. Suppose that you’ve downloaded some audio files from the Web and want to put them in iTunes. You have three ways to do that:
• In iTunes, choose File > Add to Library.
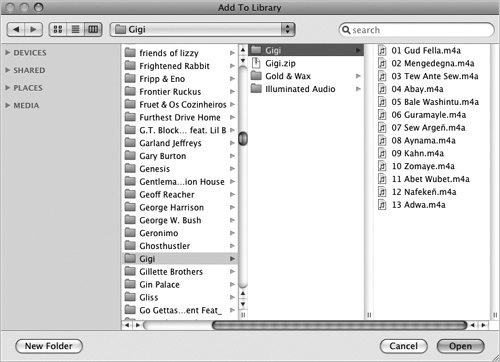
When you choose this command, the Add To Library dialog box appears (Figure 4.3). Navigate to the file, folder, or volume you want to add to iTunes, and click Open. iTunes determines which files it thinks it can play and adds them to the library.
Figure 4.3 Navigate to tracks you want to add to iTunes via the Add To Library dialog box.
• Drag files, folders, or entire volumes to the iTunes icon in Mac OS X’s Dock, the iTunes icon in Windows’ Start menu (if you’ve pinned iTunes to this menu), or the iTunes icon in either operating system (at which point iTunes launches and adds the dragged files to its library).
• Drag files, folders, or entire volumes into iTunes’ main window or the Library entry in the Source list.
In the Mac versions of iTunes, by default you’ll find songs in the iTunes Music folder within the iTunes folder inside the Music folder inside your Mac OS X user folder. The path to my iTunes music files, for example, would be chris/Music/iTunes/iTunes Music.
Windows users will find their iTunes Music folder by following this path: yourusername/My Music (XP) or Music (Vista and Windows 7)/iTunes/iTunes Music.
You can use the same methods to add compatible videos and movies to your iTunes Library. (For more on what makes those videos compatible, see the sidebar “Working with Supported Video Formats” later in the chapter.) Those videos will most likely appear in the Movies playlist in the Source list.
I say most likely because there are a few exceptions: Videos specifically designated as music videos appear in the Music playlist, videos designated as TV shows appear in the TV Shows playlist, and video podcasts are filed under Podcasts in iTunes’ Source list. See the sidebar “Tag, You’re It” later in this chapter for information on how to apply those video designations.
Creating and Configuring a Playlist
Before you put any media files (music or video) on your iPod, organize them in iTunes. Doing so will make it far easier to find the media you want, both on your computer and on your iPod. The best way to organize that material is through playlists.
A playlist is simply a set of tracks and/or videos that you believe should be grouped in a list. The organizing principle is completely up to you. You can organize songs by artist, by mood, by style, by song length … heck, if you like, you can have iTunes automatically gather all your 1950s polka tunes with the letter z in their titles. Similarly, you can organize your videos by criteria including director, actor, and TV-series title. You can mix videos and music tracks within playlists as well, combining, say, music videos and music tracks by the same artist. As far as playlists are concerned, you’re the boss.
The following sections look at ways to create playlists.
Standard playlists
Standard playlists are those that you make by hand, selecting each of the media files you want grouped. To create a standard playlist in iTunes, follow these steps:
1. Click the large plus (+) icon in the bottom-left corner of the iTunes window, or choose File > New Playlist (Command-N on the Mac, Ctrl+N in Windows).
2. In the highlighted field that appears next to that new playlist in the Source list, type a name for your new playlist.
3. Click an appropriate entry in the Source list—Music, Movies, TV Shows, or Podcasts—and select the tracks or videos you want to place in the playlist you created.
4. Drag the selected tracks or videos to the new playlist’s icon.
5. Arrange the order of the tracks or videos in your new playlist.
To do this, click the Number column in the main window, and drag tracks up and down in the list. When the iPod is synchronized with iTunes, this order is how the songs will appear in the playlist on your iPod.
If the songs in your playlist come from the same album, and you want the songs in the playlist to appear in the same order as they do on the original album, click the Album heading.
Playlist from selection
You can also create a new playlist from selected items by following these steps:
1. Command-click (Mac) or Ctrl+click (Windows) songs or videos to select the files you’d like to appear in the new playlist.
2. Choose File > New Playlist from Selection (Command-Shift-N on a Mac, Ctrl+Shift+N on a Windows PC).
A new playlist containing the selected items will appear under the Playlists heading in the iTunes Source list. If all selected tracks are from the same album, the list will bear the name of the artist and album. If the tracks are from different albums by the same artist, the playlist will be named after the artist. If you’ve mixed tracks from different artists or combined music with videos, the new playlist will display the name untitled playlist.
3. To name (or rename) the playlist, type in the highlighted field.
Smart Playlists
Smart Playlists are slightly different beasts. They include tracks that meet certain conditions you’ve defined—for example, Fountains of Wayne tracks encoded in AAC format that are shorter than 4 minutes. Here’s how to work the magic of a basic Smart Playlist:
1. In iTunes, choose File > New Smart Playlist (Command-Option-N on the Mac, Ctrl+Alt+N in Windows).
You can also hold down the Option key on the Mac or the Shift key on a Windows PC and then click the gear icon that replaces the plus icon at the bottom of the iTunes window.
2. Choose your criteria.
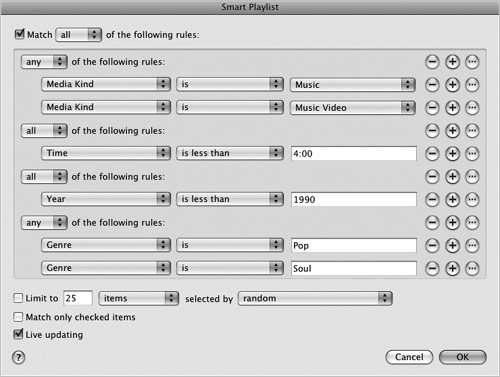
You’ll spy a pop-up menu that allows you to select items by various criteria—including artist, composer, genre, podcast, bit rate, comment, date added, and last played—followed by a Contains field. To choose all songs by Elvis Presley and Elvis Costello, for example, you’d choose Artist from the pop-up menu and then enter Elvis in the Contains field (Figure 4.5).
Figure 4.5 The inner workings of a simple Smart Playlist.
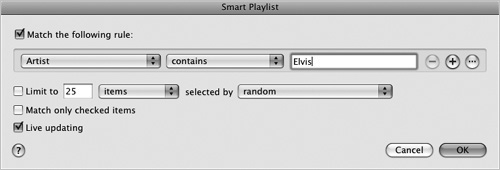
You can limit the selections that appear in the playlist by minutes, hours, megabytes, gigabytes, or number of songs. You may want the playlist to contain no more than 2 GB worth of songs and videos, for example.
You’ll also see a Live Updating option. When it’s switched on, this option ensures that if you add to iTunes any songs or videos that meet the criteria you’ve set, those files will be added to the playlist. If you add a new Elvis Costello album to iTunes, for example, iTunes updates your Elvis Smart Playlist automatically.
3. Click OK.
A new playlist that contains your smart selections appears in iTunes’ Source list.
You don’t have to settle for a single criterion. By clicking the plus icon next to a criterion field, you can add other conditions. You could create a playlist containing, say, only songs you’ve never listened to by punk artists whose names contain the letter J.
Folders for playlists
You can also file playlists in folders. By invoking the File > New Playlist Folder command, you can lump a bunch of playlists into a single folder. Folders are a great way to keep your playlists separate from your spouse’s or to gather groups of similar playlists (All My Jazz Playlists, for example).
At one time, folders didn’t translate to the iPod; however, the 3G–5G iPod nanos and the iPod classics do offer nested playlist hierarchies.
Genius playlists and mixes
If you’re the kind of reader who starts at the beginning of a book and plows through to the end, you’re already aware (from Chapter 2) of the Genius feature on the iPod. iTunes 9 can also create Genius playlists, as well as Genius Mixes (which I also touch on in Chapter 2). As a reminder, Genius playlists are collections of music that iTunes believes to be related to other music in your library, and Genius Mixes are 250-track playlists chosen by genre from your iTunes Library. In the following sections, I look at the ins and outs of each feature.
Genius playlists
To create Genius playlists with iTunes, follow these steps:
1. Switch on the Genius feature.
When you install iTunes, you’re offered the choice to turn Genius on. Doing so requires an iTunes account. If you don’t have one, no worries; when you start the Genius process, you’ll find an option for signing up for an account. If you neglected to turn on Genius, you can do so by choosing Store > Turn on Genius. If you’re connected to the Internet, iTunes will ask you to sign into your iTunes account.
2. Wait while iTunes configures Genius.
iTunes gathers information about your music library—specifically, the songs it contains—and sends that information to Apple’s servers anonymously. That information is compared with similar data from other users and placed in a database. A database file that contains the relationship data is sent back to your computer.
3. Create a Genius playlist.
Select a track in your iTunes Library, and click the Genius button in the bottom-right corner of the iTunes window. iTunes will create a new playlist of 25 songs (by default) that should go well with the track you selected. You can ask Genius to create a longer version of this playlist by making a larger choice from the Limit To pop-up menu at the bottom of the window; your choices are 25, 50, 75, and 100 songs. You can also click Refresh to ask Genius to try again.
4. Save the playlist.
When you click the Save Playlist button at the top of the window, iTunes creates a playlist named after your source track—A Common Disaster, for example. You can return to any Genius playlist you’ve created and change the Limit To settings as well as refresh the playlist.
Click the Sidebar icon in the bottom-right corner of the iTunes window to display the Genius sidebar, which is designed to recommend related music from the iTunes Store (Figure 4.7).
Figure 4.7 The Genius sidebar.

At the top of the sidebar, you’ll find entries that include the name of the artist, Also by This Artist (which includes Top Albums and Top Songs entries), and Genius Recommendations. You might also see an iTunes Essentials entry. A small arrow icon next to an entry indicates a trip to the iTunes Store. Click an artist’s name, for example, and you’ll be taken to the Store page devoted to that artist. Click the arrow icon next to Genius Recommendations, and iTunes creates a list of those recommendations. (Though this list looks like a playlist, you can’t save it as such.)
Next to the song selections, you’ll see both a Preview button (denoted by a small Play icon) and a Buy button. To audition 30 seconds of a track, just click the Preview button. If you like what you’ve heard and would like to own the track, click Buy. In the resulting dialog box, you’ll be prompted for your Apple ID and password. Enter that info and click the Buy button, and the track downloads to your computer.
![]() You can sync Genius playlists to your iPod just as you can any other playlists.
You can sync Genius playlists to your iPod just as you can any other playlists.
Genius Mixes
Genius Mixes are new in iTunes 9 and, as I write this chapter, supported only by the 5G iPod nano, 2G iPod touch, and iPhone. Genius Mixes are broader tools than Genius playlists in that they’re created based on genres—Rock, Jazz, and Classical, for example.
The “genius” of Genius Mixes is that their content is still related, much as is content for a Genius playlist. Unless you have a small music library, it’s unlikely that iTunes will produce a Genius Mix including AC/DC, Donovan, Sheryl Crow, and Ry Cooder, even though all four artists may have had a Rock genre tag applied to them. Instead, you may have one Rock Genius mix that includes ’60s artists such as Janis Joplin, Cream, Jimi Hendrix, and The Small Faces. Another Genius Mix could include modern pop artists such as Death Cab for Cutie, The Finn Brothers, The Apples in Stereo, and Feist. So thanks to the enormous database of related music first created when the Genius feature was introduced with iTunes 8, iTunes has the power to create these large mixes that make sense.
Creating them is really easy:
1. Launch iTunes 9 or later.
2. Click the Genius Mixes entry located under the Genius heading in iTunes’ Source list.
3. There is no step 3.
iTunes will create up to 12 Genius Mixes. Each Genius Mix is represented by an album cover that, in turn, features four album covers taken from the music in that Genius Mix (Figure 4.8). An example Rock Genius Mix, then, could include album artwork from Coldplay, Radiohead, Oasis, and John Mayer albums.

Unlike Genius playlists, Genius Mixes can’t be edited. In fact, you can’t even see the contents of one of these mixes. What iTunes provides is exactly what you get. To play one, just click its icon, and the first track in the mix plays. To skip to the next track, click the Next button in iTunes’ play controls (located in the top-left corner of the iTunes window) or press your keyboard’s right-arrow key.
As I said, Genius Mixes can be synced only to the 5G iPod nano, the iPod touch, and the iPhone (iPod touch and iPhone 3.1 software required). To sync Genius Mixes, do this:
1. Select your compatible device in iTunes’ Source list.
2. Click the Music tab.
3. Enable the Sync Music option.
4. Enable the Selected Playlists, Artists, and Genres option.
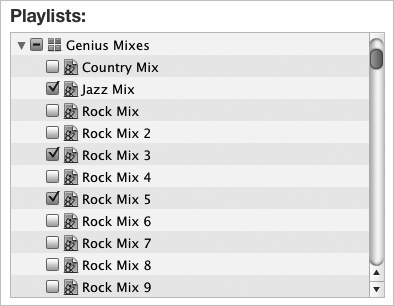
5. In the Playlists column, look for the Genius Mixes entry; then select all of these mixes (by checking the Genius Mixes check box) or specific mixes (Figure 4.9).
Figure 4.9 Selecting Genius Mixes to sync to a 5G iPod nano.
6. Sync the device.
![]() If you choose to sync all your music with the iPod, Genius Mixes will be included automatically. If you don’t have enough room on the iPod to sync your entire music library, however, Genius Mixes won’t be added—which makes sense, as each Genius Mix includes 250 tracks.
If you choose to sync all your music with the iPod, Genius Mixes will be included automatically. If you don’t have enough room on the iPod to sync your entire music library, however, Genius Mixes won’t be added—which makes sense, as each Genius Mix includes 250 tracks.
As I point out in Chapter 2, on the 5G iPod nano, you find the Genius Mixes command in the Music screen. Select it, and the first Genius Mix appears on the iPod’s screen—again, represented by four album covers. To play the Genius Mix, click the Play/Pause button. To skip to the next song in the mix, click the Next button. To skip back a track, click the Previous button twice (clicking once takes you to the beginning of the currently playing track).
![]() To move to another Genius Mix (if you have more than one on your iPod, of course), stop playback and click the Next button.
To move to another Genius Mix (if you have more than one on your iPod, of course), stop playback and click the Next button.
Configuring iTunes
Intuitive though it may be, iTunes packs a lot of features and power—enough that I could write an entire book about just this application. I have bigger fish to fry: showing you how to get the most out of your iPod. But part of frying those fish is introducing the key iTunes features that can make using and listening to your iPod more enjoyable. In this section, I examine those features.
Setting iTunes preferences
Choose iTunes > Preferences on a Mac or Edit > Preferences on a Windows PC, and you open iTunes’ Preferences window. Some of the tabs within this window lead to settings that you should know about.
General
I’ve already mentioned that within the General preference, you specify what happens when you insert a CD. Elsewhere in this tab, you find options for showing or hiding certain items in iTunes’ Source list, including Movies, TV Shows, Podcasts, iTunes U, Audiobooks, Applications, Ringtones, Radio, iTunes DJ, and Genius. If you find iTunes’ interface too cluttered, disabling the items you don’t use will clean things up.
One of iTunes’ most important features is hidden behind the Import Settings button in the General preference. Click Import Settings to open the window of the same name, and you find iTunes’ encoder settings—the settings you configure to determine which codec iTunes uses to rip CDs and convert audio files, as well as what bit rates the encoder uses. I explain the workings of encoders and bit rates earlier in this chapter, in the “Import Business: File Formats and Bit Rates” sidebar.
![]() The Import Settings window also includes the Use Error Correction When Reading Audio CDs option. If you’re having difficulty ripping an audio CD (because it’s dirty, for example), enable this option. iTunes will try that much harder to rip the CD properly, though the process will take longer.
The Import Settings window also includes the Use Error Correction When Reading Audio CDs option. If you’re having difficulty ripping an audio CD (because it’s dirty, for example), enable this option. iTunes will try that much harder to rip the CD properly, though the process will take longer.
Playback
Here, you can determine where in the iTunes interface movies, TV shows, and music videos are displayed (in a separate window, for example) and set the default and subtitle languages for movies. It’s also within this preference that you instruct iTunes to play videos in standard definition by default and show closed captions when they’re available. But the most interesting settings here are Crossfade Songs, Sound Enhancer, and Sound Check:
• Crossfade Songs. This setting causes the end of each song to fade out and the beginning of the next track to fade in. For some people, this feature makes for a less jarring listening experience. You can set the length of the crossfade—1 to 12 seconds—with a slider. These settings don’t transfer to the iPod.
• Sound Enhancer. This feature is a kind of audio filter that can expand and brighten the sound coming from iTunes tracks. It’s worth playing with to see whether its results please you. These settings don’t transfer to the iPod either.
• Sound Check. In Chapter 2, I talk about the Sound Check feature on the iPod and how you have to enable it. This preference is where you do that. The feature’s job is to try to make volumes across all the songs in your library similar.
Sharing
iTunes allows you to easily share your music library or just specific playlists in it with other copies of iTunes running on a local network (and allows those iTunes libraries to be shared with you). You can share your library by enabling the Share My Library on My Local Network option. To seek out other iTunes shared libraries, enable the Look for Shared Libraries option.
Store
As the name implies, this preference is where you tell iTunes how to interact with the iTunes Store. Options include Automatically Check for Available Downloads, Automatically Download Prepurchased Content, Automatically Download Missing Album Artwork, and Use Full Window for iTunes Store. All options but the last one are enabled by default.
Parental
Not all music and video is appropriate for all ages. Within the Parental preference, you can disable podcasts, radio, the iTunes Store (though optionally allow access to iTunes U), and shared libraries, as well as restrict content—certain movies, TV shows, and applications, and explicit material—from the iTunes Store.
Advanced
The Advanced preference is where you tell iTunes the location of your media files and how to organize them. In Chapter 8, I put this preference to good use in shifting an iTunes Library from a cramped startup drive to a more expansive external drive.
Working with the Info window
I talk about tagging a fair amount in this chapter. By tagging, I don’t mean playing the kids’ game, but practicing the subtle art of marking files with identifying bits of information (such as title, artist, album, and genre) so that you can locate and organize them more easily. You do all this in an item’s Info window.
To produce an Info window, just select any hunk of media in your iTunes Library—such as a song, video, or podcast—and choose File > Get Info. The resulting window contains several tabs. For purposes of this chapter, the important ones include the following.
Summary
Should a stranger stop you in the street and demand the format, bit rate, location of a particular track in your iTunes Library, this tab is where you’d look. Additionally, you’ll discover the track’s name, artist, album, sample rate, modification date, play count, and last played date in the Summary tab.
Info
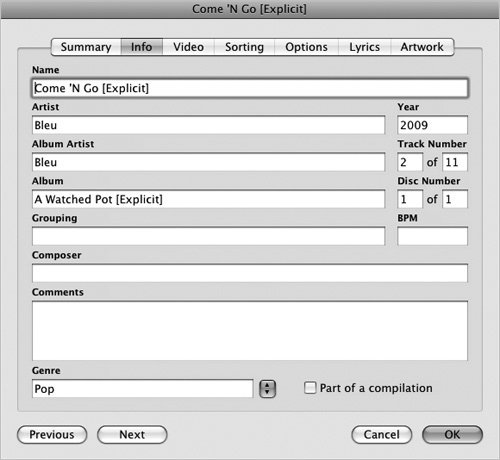
This tab is where all the tagging business takes place. Here, you find fields for such information as name, artist, album, composer, comments, year, and track number, as well as a Genre menu (Figure 4.10). iTunes is pretty good about filling in this information for you, but at times, you may need to tag your own music—when iTunes doesn’t recognize a ripped CD, for example, or when you’ve ripped someone else’s mix CD and iTunes can’t identify its tracks.
Video
When you import TV episodes from sources other than the iTunes Store, that video may lack the proper tags—show name, season, and episode number, for example. The Video tab contains fields for exactly that information.
Sorting
Tracks can be sorted by their real name, artist, album artist, album, composer, and show—or by their sort name, sort artist, sort album artist, sort album, sort composer, and sort show. Why? Suppose that you really like Willie Nelson. As you probably know, Willie has performed duets with every living artist born between 1925 and 1994—sometimes on his albums and sometimes on the duet partner’s album. If you want to listen to all-Willie-all-the-time, you might track down all those duet tracks that aren’t on Willie’s own albums and assign Willie Nelson as the sort artist for those tracks. Do that, and when you sort tracks by artist or search for Willie Nelson, you’ll find these tracks bunched in with the tracks from Willie’s albums.
Options
Within the Options tab, you can adjust a track’s volume so that it’s louder or softer, choose an equalizer (EQ) preset (see the nearby sidebar “EQ and the iPod”), select an item’s media type, and choose a VoiceOver language (for speaking track titles when using an iPod nano or shuffle that supports VoiceOver). For videos, the media type will be music video, movie, TV show, podcast, or iTunes U; for audio files, it will be music, podcast, iTunes U, audiobook, or voice memo.
You can also impose start and stop times on a track. This feature is useful when you can’t stand the first minute of a song or podcast and want to skip that minute automatically whenever you play the track. To do that, enable the Start Time option and then enter 1:00 in the text box.
You’ll also see the Remember Playback Position, Skip When Shuffling, and Part of a Gapless Album options. The first two options are particularly useful for audiobook chapters that you may have ripped. You want to be able to pick up listening where you left off in a 30-minute chapter, and you don’t want your iPod randomly playing the third chapter of Harry Potter and the Usurious Audiobook Purchase when you’re working out.
The last option, Part of a Gapless Album, overrides any crossfade setting that you’ve applied to a song, preventing songs that should naturally flow together (think Dark Side of the Moon or concert recordings) from being crossfaded.
Finally, cock a keen eye at the Rating field in the middle of the tab. Here, you can rate your tracks with one to five stars. (You can also rate tracks by clicking the Rating column next to a track’s name, as well as by selecting a track and choosing a rating from the Rating submenu of the File menu.) Rating your media now is helpful for creating Smart Playlists later, basing those playlists on songs and videos you enjoy.
Lyrics
You recall that your iPod can display lyrics, right? This tab is where you enter them. Regrettably, lyrics don’t come with tracks that you purchase from the iTunes Store (no, not even with the premium-priced iTunes LPs that I discuss in Chapter 5). You’re welcome to enter the lyrics by hand or search for them online. Music publishers have cracked down on Web sites that offer free lyrics, however, so these words are more difficult to find than they once were.
Artwork
iTunes is more than happy to seek out album artwork for you, but it locates artwork only for albums that are available from the iTunes Store. If you import an album that can’t be had from the Store, a generic icon appears in Grid and Cover Flow views. You can add your own artwork simply by dragging a graphic file into the artwork field in the Artwork tab.
![]() You can tag multiple files simply by selecting more than one file and choosing File > Get Info. A Multiple Item Information window appears, and you can add tags therein for such things as artist, album, composer, comments, genre, artwork, and rating. This feature is handy for adding one piece of album artwork to a group of tracks.
You can tag multiple files simply by selecting more than one file and choosing File > Get Info. A Multiple Item Information window appears, and you can add tags therein for such things as artist, album, composer, comments, genre, artwork, and rating. This feature is handy for adding one piece of album artwork to a group of tracks.
![]() The next few pages don’t apply to the iPod shuffle, as its iTunes interface is significantly different from the one used for other iPod models. Because it is so different, I’ve chosen to devote the latter portion of this chapter to the shuffle.
The next few pages don’t apply to the iPod shuffle, as its iTunes interface is significantly different from the one used for other iPod models. Because it is so different, I’ve chosen to devote the latter portion of this chapter to the shuffle.
Setting iPod Preferences
Now that your media is organized, it’s time to put it on your ’pod. The conduit for moving music, podcasts, audiobooks, videos, and (for some models) applications and games to the iPod is iTunes—which, fortunately, can be fairly flexible in the way it goes about the process.
You have several ways to configure iTunes so that your iPod is updated when you want it to be. It’s just as possible to configure iTunes so that only the music and videos you want are copied to your iPod. The key is the iPod Preferences window.
To start, plug your iPod into your computer, and launch iTunes. (By default, iTunes launches when you connect the iPod.) The iPod appears under the Devices heading in iTunes’ Source list (Figure 4.11 on the next page). To open the iPod Preferences window, select the iPod in the Source list.
Figure 4.11 Two iPods in iTunes’ Source list.

Within the iPod Preferences window, you’ll find nine tabs if you have a 5G iPod, 3G or 4G iPod nano, or any iPod classic: Summary, Music, Movies, TV Shows, Podcasts, iTunes U, Photos, Contacts, and Games. If you have a 5G iPod nano and have established a Nike+ account because of the pedometer, you’ll see a tenth tab called Nike + iPod. If you have a color iPod that doesn’t offer video (including 1G and 2G iPod nanos), the Movies, TV Shows, and Games tabs will be absent. For monochrome iPods, the Photos tab will also be missing.
At the bottom of the window, you’ll see the Capacity bar (Figure 4.12), a thermometerlike display that details how much media is on your iPod. With any of today’s display-bearing iPods plugged into your computer, you’ll see entries for Audio, Video, Photos, Games, Other (data such as files you’ve copied to the iPod, notes, contacts, and calendars), and Free.
Figure 4.12 iTunes’ Capacity bar.

Here’s how the tabs shake out.
Summary
In iTunes 7 and later, the Summary tab (Figure 4.13) provides such details about your iPod as its name, capacity, software version number, serial number, and format (Macintosh or Windows). It also tells you the version of the iPod software it’s running and offers you the option to update that software if newer software is available or to restore your iPod (essentially, erase its contents and give it a new operating system). I cover the ins and outs of restoring your iPod in Chapter 9.
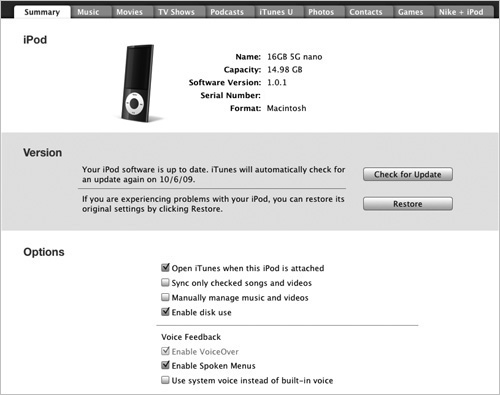
Open iTunes When This iPod Is Attached
Most likely, you’re going to want to sync or otherwise muck with your iPod when you plug it into your computer. This option saves you the trouble of launching iTunes manually.
Sync Only Checked Songs and Videos
This option gives you fine control of which files you sync to the iPod. Checking the box for this option lets you prevent files from loading onto the iPod by unchecking the small check boxes next to their names in playlists and library lists.
![]() Care to check or uncheck all the songs in a playlist at the same time? On the Mac, hold down the Command key and click any check box in the playlist. In Windows, hold down the Ctrl key and do the same thing. When you uncheck a box, all boxes will be unchecked; check a box, and all boxes will be checked.
Care to check or uncheck all the songs in a playlist at the same time? On the Mac, hold down the Command key and click any check box in the playlist. In Windows, hold down the Ctrl key and do the same thing. When you uncheck a box, all boxes will be unchecked; check a box, and all boxes will be checked.
Manually Manage Music and Videos
This small option offers a lot of power. To understand its usefulness, it’s helpful to know that by default, when you sync iTunes and the iPod, iTunes moves only the files you ask it for onto the iPod and erases everything else from the device. This arrangement can be a real bother if you’ve moved your iPod from one computer to another and the contents of the second computer don’t match those of the first.
Managing files manually allows you to add music (and videos, for compatible iPods) to your iPod without erasing any other media. When you select this option, all the playlists on your iPod appear below the iPod’s icon in the iTunes Source list. (For the sake of simplicity, I’ll say that the Music, Movies, TV Shows, Podcasts, and Audiobooks entries count as playlists.)
To add media files to the iPod manually, just select them in one of iTunes’ playlists, and drag them to the iPod’s icon in the Source list or to one of the iPod’s standard (not Smart) playlists. You can also drag files from your computer’s desktop directly to the iPod, which copies the media to the iPod but not to your iTunes Library.
Optionally, you can add songs by genre, artist, or album by using iTunes’ browser. To do so, follow these steps:
1. In iTunes, choose View > Show Column Browser (Command-B in Mac OS X, Ctrl+B in Windows).
An Artists pane appears between iTunes’ Source list and the main window. By choosing View > Column Browser, you can choose to show (or hide, if they’re shown) Genre and Albums columns as well.
2. Click an entry in one of the columns.
If you want to copy all the Kate Bush songs in your iTunes Library to the iPod, for example, click Ms. Bush’s name in the Artists column. To copy all the reggae tunes to the iPod, select Reggae in the Genres column.
3. Drag the selected item to the iPod’s icon in the Source list or to a playlist you’ve created on the iPod.
To remove songs from the iPod, select the songs you want to remove within the iPod entry in the Source list; then press your keyboard’s Delete key (or Control-click on the Mac or right-click for Windows, and choose Clear from the contextual menu). Mac users can also drag the songs to the Trash.
![]() When you remove songs from your iPod, you don’t remove them from your computer. Unless you select a song in your iTunes Library and delete it, the song is still on your hard drive.
When you remove songs from your iPod, you don’t remove them from your computer. Unless you select a song in your iTunes Library and delete it, the song is still on your hard drive.
You can even copy entire playlists to other playlists by dragging one playlist icon on top of another. This method works for both iTunes and iPod playlists, though you can’t drag a playlist on the iPod to an iTunes playlist and expect the songs to copy over. Under most circumstances, tracks on the iPod don’t copy to your computer (unless you know the tricks detailed in Chapter 8).
But wait—there’s more. iTunes 9 lets you expose an Artwork column. To reveal it, either click the small, right-pointing triangle that appears just to the left of the Name column in List view or choose View > Show Artwork Column. This column holds the leftmost position in iTunes’ main window and displays an album’s artwork with the album’s track names in the next column to the right. This view is handy because you can click the album artwork and drag it to the iPod, thus copying all the files on the album to the device.
Want more? Okay, how about two additional views: Grid and Cover Flow? Click the second button in the View palette at the top of the window to see Grid view; Cover Flow view appears when you click the third button. When you click the Grid button, you can view your music in Albums, Artists, Genres, or Composers view. You choose these views by entering Grid view and then choosing Grid Views from the View menu.
![]() There’s another way to select these views. Choose View > Grid View, and select the Show Header command. When you choose Show Header, a bar appears above the covers that includes Albums, Artists, Genres, and Composers buttons, as well as a slider for increasing or decreasing the size of the artwork. If you tend to use Grid view and often want to switch views, using the Header buttons is mighty convenient.
There’s another way to select these views. Choose View > Grid View, and select the Show Header command. When you choose Show Header, a bar appears above the covers that includes Albums, Artists, Genres, and Composers buttons, as well as a slider for increasing or decreasing the size of the artwork. If you tend to use Grid view and often want to switch views, using the Header buttons is mighty convenient.
These views work this way.
Albums. Each album cover in the selected entry (music or a playlist) is displayed (Figure 4.14). Mouse over the cover, and a Play Album entry appears. Click the Play symbol in this icon, and the album begins playing from the first track. Double-click an album cover, and a page opens that displays the album cover and the tracks on the album.
Figure 4.14 Albums displayed in Grid view.
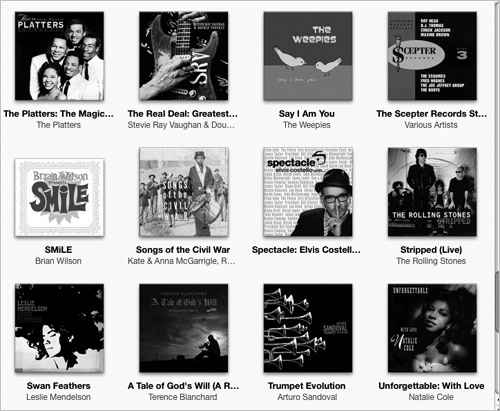
![]() When you choose to view your music by album in Grid view, you have an additional sorting option. Choose View > Sort Album, and you’ll find that you can sort albums by title, artist, genre, year, and rating. Then you can sort further by ascending or descending alphabetical order and, within each artist entry, by title, year, or rating. Say what!? Yes, it’s confusing. Choose to sort by Artist, and you’ll find all your David Bowie albums lined up sorted by the letter D, not B. (Like I said, it’s confusing.)
When you choose to view your music by album in Grid view, you have an additional sorting option. Choose View > Sort Album, and you’ll find that you can sort albums by title, artist, genre, year, and rating. Then you can sort further by ascending or descending alphabetical order and, within each artist entry, by title, year, or rating. Say what!? Yes, it’s confusing. Choose to sort by Artist, and you’ll find all your David Bowie albums lined up sorted by the letter D, not B. (Like I said, it’s confusing.)
![]() If iTunes can’t find the album artwork for a particular album, the cover shows a generic icon of two eighth notes.
If iTunes can’t find the album artwork for a particular album, the cover shows a generic icon of two eighth notes.
Artists. When you select Artists, you’ll still see album covers, but those covers will be grouped by artist. If you have tracks from more than one album by an artist, select an artist and roll your mouse horizontally over the cover; the album covers will change to reflect all the artist’s album entries. A Play Artist entry also appears. Click the Play symbol in it, and iTunes begins playing the first track from the first album title, sorted alphabetically.
If you don’t care for the idea of displaying all your Springsteen albums under a single icon and, instead, would like to see all the album covers separately but together, feel free to view by album and then use the sort-by-artist-within-albums tip I just offered.
Genres. Seeking a quick way to find all the World music in your iTunes Library? Select the Genres entry, and you’ll see the selected playlist’s music categorized by genre. (Those songs must have their Genre tag filled in to appear in this view, however. See the sidebar “Tag, You’re It” earlier in this chapter for more information on tags.) For common genres, you’ll see custom icons provided by Apple—Rock, Soundtrack, and World, for example. If tracks have a less-common genre type assigned to them—such as Ska, Metal, or Fusion—you’ll see the album cover for a track tagged with that genre or with iTunes’ generic eighth-notes icon.
As in Artists and Albums views, select an icon and move your mouse over it horizontally, and album covers appear. Click the Play symbol within the Play Genre entry that appears over selected icons to play all the music within that genre. Music is organized alphabetically by the artist’s first name.
Composers. You know the drill by now. Tracks are organized by composers when those tracks contain a Composer tag. If not, you’ll find the remaining tracks listed under Unknown Composer. Click the Play symbol in the Play Composer entry to play. Tracks are organized first by artist and then by album title. If you choose the leader of The Who, Pete Townshend, his solo albums come first in alphabetical order; then come The Who’s albums in alphabetical order.
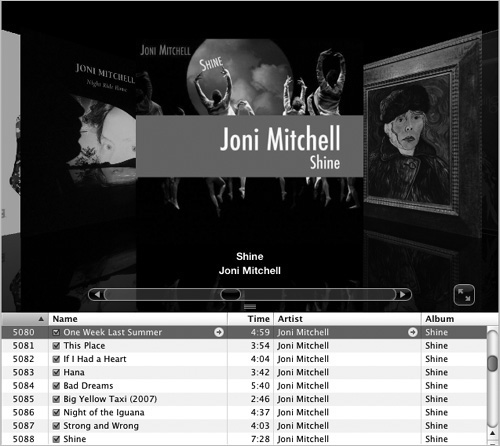
Cover Flow view is kind of a lazy-Susan affair that represents your library as a series of covers (Figure 4.15). You can move music from these views to your iPod simply by dragging the cover art from the view to the iPod’s icon. The contents of that album, video, or podcast will be transferred to the iPod.
Enable Disk Use
The iPod is, at heart, an elegant storage device that happens to play music (and in some cases, slideshows and videos too). You can mount all iPods (except the iPod touch) as a hard drive on your computer by enabling this option. When the iPod is mounted, you can use it just like a hard drive; copy files to it as you desire.
Voice Feedback (5G iPod nano and 3G iPod shuffle only)
The 5G iPod nano and 3G iPod shuffle have the ability to talk back to you. Specifically, they can recite the names of the devices’ menus and commands (nano) as well as playlists, tracks, artists, and albums (both nano and shuffle). For that to happen, you must switch on the iPod’s Voice Feedback feature.
The 5G iPod nano includes three options under the Voice Feedback heading:
• Enable VoiceOver. Enable this option, and you’ll be prompted to download the VoiceOver Kit for the language your computer speaks (as determined by the language preferences set on your Mac or PC). Then sync your iPod. When you click the iPod’s Center button while a track is playing, the music will fade a little, and a voice will announce the track’s name and artist.
• Enable Spoken Menus. When Spoken Menus is enabled in iTunes and on your iPod, the name of every item the 5G iPod nano encounters will be spoken. This feature isn’t for everyone, as it’s somewhat intrusive, but if you’re vision-impaired or blind, it’s priceless.
It’s also worthwhile to switch on when you’re driving with an iPod. Taking your eyes off the road to navigate an iPod’s interface is a very bad idea, and now, thanks to Spoken Menus, you can navigate the device without looking at it.
![]() As I mention in Chapter 2, you can switch Spoken Menus off in the General screen, which is accessible from the nano’s Setting screen.
As I mention in Chapter 2, you can switch Spoken Menus off in the General screen, which is accessible from the nano’s Setting screen.
• Use System Voice Instead of Built-In Voice. If you don’t care to use the voice that comes with the VoiceOver Kit that iTunes downloads, you can enable this option, and the iPod will speak using the voice currently set in your computer’s speech preference. For the Mac, you’ll find this setting by choosing System Preferences from the Apple menu or the Dock. On a Windows PC, look in Control Panels.
Music
The Music tab (Figure 4.16) contains options for syncing music and music videos to your iPod. With iTunes 9, Apple has completely redone the interface in this and other media windows, making it easier to get exactly the media you want onto your iPod.
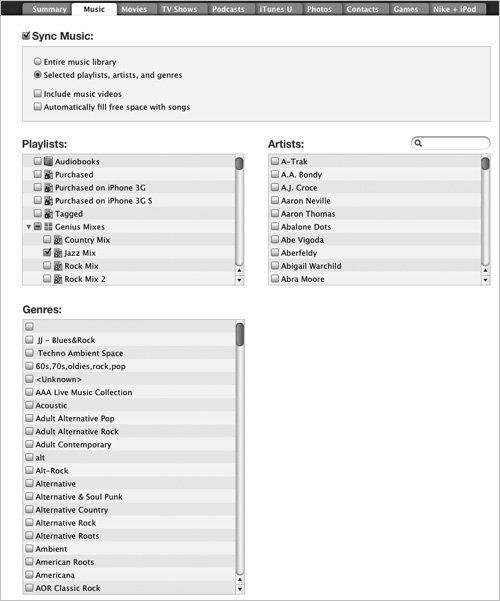
Enabling the Sync Music option tells iTunes that you’d like it to sync its music collection to the iPod automatically. If you’ve enabled the Manually Manage Music and Videos option in the Summary tab, enabling the Sync Music option overrides the Manual option (iTunes will ask you whether you’re sure you want to do this). When you’ve chosen Sync Music, you then have the choice to sync your entire music library or just selected playlists, artists, and genres.
Any songs currently on the iPod that aren’t in the iTunes Library or in the selected playlists are erased from the iPod.
Why choose selected playlists, artists, and genres rather than your entire music library? Your iPod may not have the capacity to hold your entire music collection. This option is also a good one to use when several members of your family share an iPod, because it allows you to chunk a music collection into multiple playlists and then rotate those playlists in and out of the iPod.
When you enable the Selected Playlists, Artists, and Genres option, you get three scrolling lists: Playlists, Artists, and Genres.
• Playlists
This list includes all the playlists in your iTunes Library. If you have a 5G iPod nano, Genius Mixes are also included. (As I’ve told you, Genius Mixes aren’t supported on iPod classics as I write this chapter.) Bear in mind that each Genius Mix contains 250 tracks. If you choose to sync more than a couple of these mixes, there goes all your iPod’s storage.
![]() At the top of this list, you’ll see Audiobooks with no entries below it, which may lead you to believe that you either have to sync all of your audiobooks or none of them. Enable this option, and you will indeed sync every audiobook that appears in this special playlist. You can sync individual audiobooks, however, by placing them in a separate playlist and then syncing that playlist or by choosing an audiobook’s author from the Artists list to the right of the Playlists list.
At the top of this list, you’ll see Audiobooks with no entries below it, which may lead you to believe that you either have to sync all of your audiobooks or none of them. Enable this option, and you will indeed sync every audiobook that appears in this special playlist. You can sync individual audiobooks, however, by placing them in a separate playlist and then syncing that playlist or by choosing an audiobook’s author from the Artists list to the right of the Playlists list.
To sync playlists to your iPod, just enable them in this Playlists list. If you created a folder full of playlists by choosing File > New Playlist Folder and then enabled that folder, all the playlists within the folder will be synced to your iPod.
• Artists
An improvement that came with iTunes 9 is the ability to sync individual artists’ work to your iPod easily. You do this via the Artists list. Just enable the artists whose music you want to copy to your iPod, and so it shall be when you sync the iPod.
![]() Notice the Search field above the Artists list. If you have a large iTunes Library, you’ll find that this Search feature is a godsend.
Notice the Search field above the Artists list. If you have a large iTunes Library, you’ll find that this Search feature is a godsend.
• Genres
Another hat-tip to iTunes 9 for the Genres list. If the holidays are beckoning, and you’d like to add a little musical cheer to the mix, enable the Holiday option in the Genres list, and your iPod will be as full of holiday music as it and your iTunes Library allow. Better yet, when the seemingly endless cheer ends, you can get that stuff off your iPod quickly by unchecking that genre and choosing a less festive one.
![]() If you’ve removed songs from your iTunes Library and want them to remain on your iPod when you sync it, you’ll want to avoid the Selected Playlists, Artists, and Genres option and manage your music manually.
If you’ve removed songs from your iTunes Library and want them to remain on your iPod when you sync it, you’ll want to avoid the Selected Playlists, Artists, and Genres option and manage your music manually.
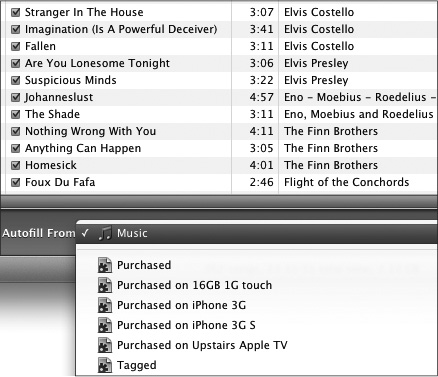
You’ll see two additional options in this tab: Include Music Videos and Automatically Fill Free Space with Songs. Enable the first option, and any music videos in selected playlists will also be synced to your iPod. Turn the option off, and music videos will steer clear, even if they’re part of a playlist. As for the second option, if you haven’t chosen enough music, videos, podcasts, photos, contacts, calendars, and games to fill your iPod, enabling this option instructs iTunes to top off your iPod with music of its choosing.
Movies
The Movies tab has been rejiggered in iTunes 9 as well. As with the Music tab, you can sync all your movies simply by checking the Sync Movies box and leaving the option below it set to automatically include all movies.
You can add a layer of choice by choosing one of the options from the Automatically Include pop-up menu. These options include syncing the 1, 3, 5, or 10 movies most recently added to iTunes; the 1, 3, 5, or 10 most recent unwatched movies (stuff that you haven’t seen and added not all that long ago); or the 1, 3, 5, or 10 least recently unwatched movies (unwatched movies that are starting to gather dust in your iTunes Library).
When you choose one of these options, you’re not committed to syncing only those movies. Below, you’ll see all the movies in iTunes’ Movies playlist with check boxes next to their titles. To sync any of these movies as well, just check their boxes (Figure 4.17).
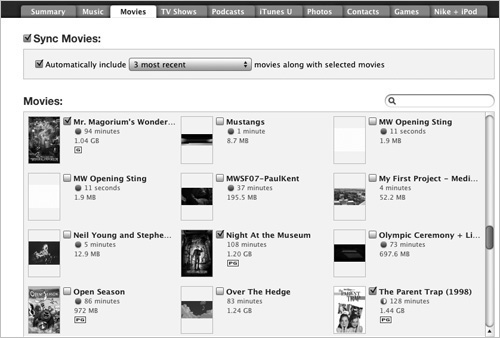
To be far more particular about the movies that are placed on your iPod, clear the Automatically Include check box. When you do, you see a list of all the movies in iTunes’ Movies playlist, plus a list of all the playlists that include movies. Now you can pick just those movies you want, as well as pull movies from playlists you’ve created that may have a mix of movies and music (such as the Purchased playlist, which contains movies, TV shows, and music that you’ve bought from the iTunes Store).
Again, if you enable the Sync Movies option, you undo the Manually Manage Movies and Videos setting if you’ve switched it on.
TV Shows
The TV Shows tab (Figure 4.18) works similarly to the Movies tab. When Sync TV Shows is enabled along with Automatically Include All Episodes of All Shows, all your TV shows will be copied to your iPod when you sync it. But here again, you have the option to sync the 1, 3, 5, or 10 most recent, most recent unwatched, and least recent unwatched episodes of all the shows in your iTunes Library or selected shows.
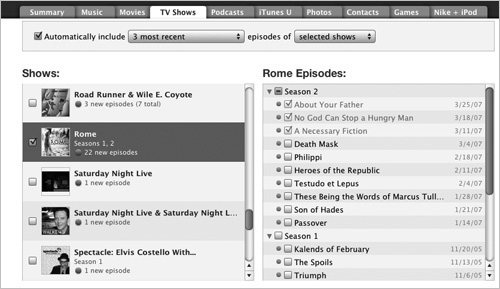
![]() What’s with this “least recent unwatched episodes” stuff? If you’ve downloaded a season of a TV series, you’d choose this option so that the shows sync in order from the beginning of the season to the end. If, instead, you chose the most recent unwatched episodes, playback would start with the last show and then work its way backward. (If that wouldn’t spoil the suspense, I don’t know what would!)
What’s with this “least recent unwatched episodes” stuff? If you’ve downloaded a season of a TV series, you’d choose this option so that the shows sync in order from the beginning of the season to the end. If, instead, you chose the most recent unwatched episodes, playback would start with the last show and then work its way backward. (If that wouldn’t spoil the suspense, I don’t know what would!)
As with the Movies tab, you can clear the Automatically Include check box, select individual shows and episodes within those shows, and sync just those shows and episodes to your iPod. Here, too, you’ll find a list that lets you sync shows that are stored within specific playlists.
Podcasts
What puts the pod in podcast is the iPod. Because people tend to listen to lots of podcasts, some of which tend to be long (their files therefore taking up significant amounts of room), iTunes’ Podcasts tab (Figure 4.19 on the next page) lets you manage which ones are synced to your iPod.
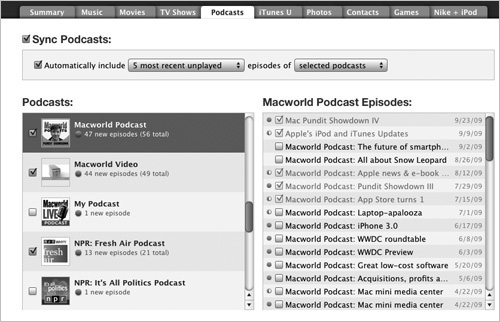
As in each one of these tabs, you have the option to not sync this content, but if you choose to, you have plenty of options. To get it all, just enable Sync Podcasts, and the option below it, by default, reads Automatically Include All Episodes of All Podcasts. If you have a lot of podcast episodes—as many of us do—be choosy by choosing the proper options. Click the All pop-up menu, and you’ll see familiar options—1, 3, 5, or 10 recent, most recent unplayed, and least recent unplayed. Additionally, you’ll find options for playing all unplayed; all new; the 1, 3, 5, or 10 most recent new; and the 1, 3, 5, or 10 least recent new. You can do this for all podcasts or just selected podcasts.
Or—and I know you’ve heard this before—clear the Automatically Include check box, and choose the podcasts and episodes you want to sync. And yes, you can include episodes from podcasts contained within playlists.
Note that video as well as audio podcasts are included here. Because video can consume a lot of storage space, be careful how you choose your video podcasts.
iTunes U
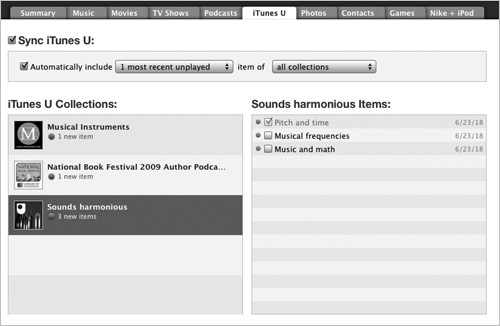
Not terribly long ago, Apple introduced iTunes U, which provides audio and video content from such providers as universities, American Public Media, the Library of Congress, and The Metropolitan Museum of Art. And it’s all free! Download some of this content, and you’ll see that it can be synced very much like podcasts (Figure 4.20).
Photos (color iPods only)
The Mac and Windows versions of the Photos tab differ slightly. Like so.
Macintosh
If you use a Mac, an iPod with a color display can sync photos with Apple’s iPhoto and Aperture, as well as with your Photos folder or a different folder of your choosing. On that Mac, you also have the option to sync all iPhoto albums, events, and faces. Or you can enable the Selected Albums, Events, and Faces, and Automatically Include option (Figure 4.21 on the next page ). Do this, and Albums, Events, and Faces lists appear. You can select specific items from these lists, such as all Faces photos that contain a picture of your boyfriend.
Figure 4.21 The Photos tab in the Mac version of iTunes.
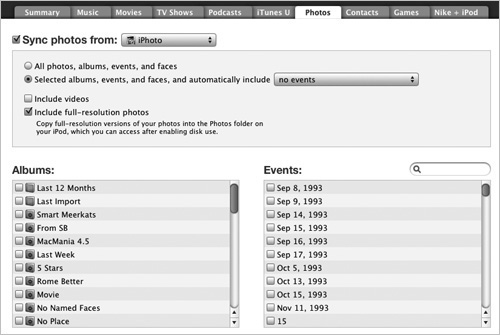
With regard to events, iTunes offers the option to automatically include no events; all events; the most recent, 3, 5, 10, or 20 events; events from the past month; or events from the past 2, 3, 6, or 12 months. If you choose No Events, you can choose the specific events you want on your iPod from the Events list below. iTunes provides a Search field for making these events easier to find.
You also have the option to include videos that have been copied to your iPhoto library—videos you’ve shot with your 5G iPod nano, for example.
Aperture, a tool more often used by pros and advanced photo hobbyists, doesn’t enjoy this level of support. Choose Aperture on a Mac version of iTunes, and you see but three options: All Photos and Albums, Selected Albums, and Include Full-Resolution Photos. Choose Selected Albums, and all your Aperture albums appear in a list below. As with iPhoto, you don’t have the option to choose individual pictures from albums.
You can also select Choose Folder from the Sync Photos From pop-up menu. When you do, up pops a Change Photos Folder Location navigation window. Just traipse to the folder you want to pull pictures from, and click Open. When you do this, the folder you’ve chosen appears in the pop-up menu.
If you choose Pictures from this pop-up menu, the options below it change to All Photos and Albums and Selected Folders. The principles of iPhoto/Aperture import apply here as well. If you choose All Photos, iTunes rummages around in this folder and looks for compatible graphics files. If you choose Selected Folders, you can direct iTunes to look in only those folders that you select.
![]() This method is a good way to copy every picture from your hard drive to your iPod. As far as iTunes is concerned, your hard drive is just another folder. Select it as the source folder with the All Photos option selected, and iTunes grabs all the compatible graphics files it can find, converts them, and plunks them onto your iPod.
This method is a good way to copy every picture from your hard drive to your iPod. As far as iTunes is concerned, your hard drive is just another folder. Select it as the source folder with the All Photos option selected, and iTunes grabs all the compatible graphics files it can find, converts them, and plunks them onto your iPod.
This tab also include an Include Full-Resolution Photos option when you’ve plugged in any color iPod. It says what it means. When you enable it, iTunes creates a Photos folder at the root level of the iPod, and it hurls into that folder full-resolution versions of your photos rather than the slimmed-down photos that iPhoto displays. This option is primarily for transporting your photos; the iPod can’t display them.
To access them, enable disk use on the iPod, locate the iPod on your Mac’s Desktop, open the Photos folder, and then open the Full Resolution folder within. This folder is organized in a logical way. When you open the Full Resolution folder, you’ll see a folder that bears the year the pictures were created. Within this folder are folders marked with the month of creation. Within one of these folders is a folder denoting the day of conception. So the folder hierarchy might look like this: Photos/Full Resolution/2009/10/28/yourphotos.
Windows
On a Windows PC, you can sync with your My Pictures folder, a different folder of your choosing, or photo albums created with Adobe Photoshop Elements 3 or later or Adobe Photoshop Album 2 or later. To do this, enable the Sync Photos From option, and from the pop-up menu that follows it, choose the source for your photos.
If you’ve installed Photoshop Elements (version 3 or later) or Photoshop Album on your PC, the Sync Photos From pop-up menu also contains entries for these programs, allowing you to import pictures from the albums that these programs create.
![]() The tip I propose for copying all the pictures from your Mac to your iPod works in Windows as well. In this case, choose your C drive as the source. When you do, every compatible graphics file will be converted and copied.
The tip I propose for copying all the pictures from your Mac to your iPod works in Windows as well. In this case, choose your C drive as the source. When you do, every compatible graphics file will be converted and copied.
The Windows version of iTunes also includes the option to include full-resolution versions of your photos.
Contacts
iTunes handles synchronization of contacts and calendars between your computer and iPod. The Contacts tab offers synchronization options for your computer’s main contacts and calendars applications (Figure 4.22). From the Contacts tab on a Macintosh, you can choose to synchronize all your Apple Address Book contacts or just those contacts from selected groups. On a Windows PC, iTunes synchronizes Windows’ Address Book (called Windows Contacts in Vista and Windows 7) or Microsoft Outlook contacts in the same way—either all contacts or selected groups of contacts. Each version of iTunes gives you the option to include your contacts’ photos.
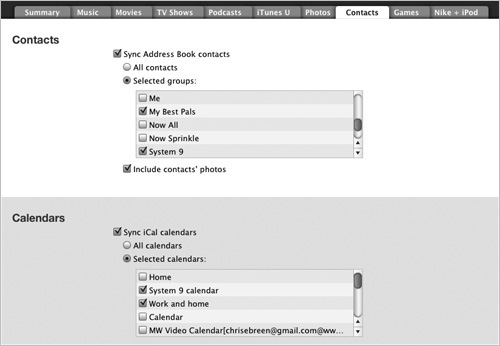
Below the Contacts section of the tab, you’ll spy the Calendars section, which works similarly to Contacts. On a Mac, you can sync all your iCal calendars or just selected calendars. On a Windows PC, you have these same options for Microsoft Outlook calendars.
Games (5G iPod, 3G–5G iPod nanos, and iPod classics only)
The iTunes Store sells not only applications for the iPod touch and iPhone through the App Store, but also games made specifically for click-wheel iPods. Currently, the Store sells a small collection of games that are compatible with the 3G–4G iPod nanos, iPod classics, and 5G iPod. Buy one of these games, and you can play it on any (or all) of these iPod models.
The Games tab is where you choose which games to sync to your iPod. Your choices are all games or selected games (from a list of purchased games below).
Nike + iPod (5G iPod nano only)
If you’ve signed up for a Nike+ Active account and enabled the pedometer on your 5G iPod nano, when you attach your iPod, this tab appears. Within it, you see the number of workout history files waiting to be sent to Nike (if you haven’t turned on the option to have the histories sent automatically). Below the Workout History area is the Nike+ area, which includes the Automatically Send Workout Data to Nike+ option; your Nike+ Login ID; and a Visit Nike+ button that, when clicked, launches your Web browser and takes you to the Nike+ Active Web site.
Configuring the 3G iPod shuffle
As I mention earlier in the chapter, the iPod shuffle interacts differently with iTunes compared with a display-bearing iPod. To begin with, because the shuffle lacks a screen, it doesn’t need to offer options for synchronizing photos, videos, contacts, and calendars. The lack of a screen also means that navigating the device is more challenging than working your way through a display-bearing iPod. You are, in a very real sense, flying blind.
Also consider the shuffle’s limited storage space. Because the 3G iPod shuffle hold just 2 GB or 4 GB, you don’t have a lot of extra room for storing large music files. iTunes can be configured to keep such files from being placed on your music player automatically.
With these limitations in mind, take a look at just what iTunes offers for the shuffle owner.
When you attach an iPod shuffle to your Mac or PC, by default, iTunes launches. When it does, the shuffle appears in the iTunes Source list under the Devices heading, just like any other iPod (save for the fact that its icon looks like a shuffle rather than a full-size iPod). Select that shuffle, and iTunes’ main window shows four tabs: Summary, Music, Podcasts, and iTunes U.
Summary
This tab looks similar to the Summary tab for other iPods (Figure 4.23). Because it does, and because it offers similar options, I won’t dwell on those options.
Figure 4.23 The Summary tab for a 3G iPod shuffle.
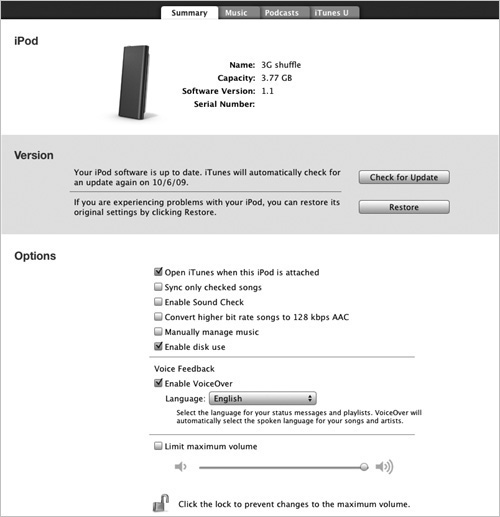
As do other Summary tabs, this one displays the name, capacity, software version, and serial number of the currently connected iPod shuffle. In the Version area below, you see the Check for Update and Restore buttons. As their names imply, the first, when clicked, checks for software updates for your iPod, and the second restores the iPod to its factory settings—meaning a brand-new copy of the latest software and all media wiped off the iPod.
In the Options area, you see several options that I’ve already discussed: Open iTunes When This iPod Is Attached, Sync Only Checked Songs, Enable Sound Check, Manually Manage Music, and Enable Disk Use.
There’s also an option titled Convert Higher Bit Rate Songs to 128 Kbps AAC. As I’ve said, these iPods don’t have a lot of storage capacity. If you want to get a lot of music on this iPod, it’s a good idea to ensure that the files you load on it are on the slim side. Enabling this option will help because (as you recall from the “Import Business: File Formats and Bit Rates” sidebar earlier in this chapter) the lower the bit rate, the smaller the file. Converting those 256 Kbps tracks to 128 Kbps cuts their size in half. If you have particularly keen hearing, you’ll be able to tell the difference if you use very good headphones (I don’t include those included with the iPod among them). But quite honestly, most people—particularly those using Apple’s headphones—can’t tell the difference.
Below these options are the Voice Feedback option and the Enable VoiceOver check box, which work just the way they do with the 5G iPod nano.
![]() Disabling Enable VoiceOver doesn’t mean that you’re ridding the shuffle of Spoken Menus. Switch this option off, and the iPod will still announce the names of playlists when you click and hold the headset’s Center button. What you lose is the iPod’s ability to recite the names of songs and artists when you briefly click and hold the headset’s Center button and skip back or forward.
Disabling Enable VoiceOver doesn’t mean that you’re ridding the shuffle of Spoken Menus. Switch this option off, and the iPod will still announce the names of playlists when you click and hold the headset’s Center button. What you lose is the iPod’s ability to recite the names of songs and artists when you briefly click and hold the headset’s Center button and skip back or forward.
At the bottom of this tab are the Limit Maximum Volume option and slider. On display-bearing iPods, you can limit the iPod’s maximum volume directly on the iPod. Not so with the iPod shuffle. If you want to reduce its maximum volume (as you may want to do before handing the iPod over to a child who might be tempted to destroy his hearing), enable this option, and the volume indicator moves to the center of the slider. Click the Lock icon at the bottom of the tab, and you’ll be prompted for a password (and confirmation of that password). This option locks the iPod so that its volume can’t be adjusted past this limit without the password.
Music
You’ve been here before. Enable the Sync Music option, and you’re offered the choice to sync your entire music library or selected playlists, artists, and genres (with lists of those playlists, artists, and genres appearing below). The Automatically Fill Free Space with Songs option lives here too.
Podcasts
This tab is exactly the same as the Podcasts tab that appears when any other iPod is jacked into your computer—which can be a little deceiving with the iPod shuffle. The reason is that video podcasts also appear in this tab, and you can select them. Try as you might, however, you can’t sync these podcasts to the iPod shuffle, for the obvious reason that the shuffle provides no screen on which to watch those podcasts.
iTunes U
This option also looks exactly the same as the iTunes U tab that appears for other iPods, and the same caveat applies: Any iTunes U video content that you have can’t be synced to an iPod shuffle.
