6. The Informational iPod
By now, you probably realize that the iPod is the world’s greatest portable music player (and a pretty fair video player too!). But take a quick scroll through the Extras screen of a click-wheel iPod, and you’ll get the idea that the iPod is more than a music player. On such an iPod, you’ll find the Contacts, Calendars, and Notes entries, which hint that your iPod is ready to offer up a phone number, remind you of an upcoming appointment, or recall your Aunt Vilma’s recipe for Swedish meatballs. In these pages, I show you how to take best advantage of these features by composing, moving, and synchronizing your contacts, calendars, and notes with your iPod.
Make iContact
There undoubtedly will come a time when a long-forgotten song that shuffles its way around your iPod reminds you of a friend, family member, or deadbeat client, and when that time comes, it may occur to you to get in touch with that person. An iPod packed with contacts can help in these moments. Here’s how to make sure that those contacts and your iPod see eye to eye.
Viva vCard
To understand how the iPod works its contact magic, it’s helpful to know that, like your computer, the iPod supports something called the vCard standard. This standard, concocted a couple of decades ago, allows you to read contact files created on a variety of devices—a computer, mobile phone, or personal information manager device, for example. The idea is that I can create a contact with my Mac’s copy of Address Book and email it to my sister, who uses a Windows PC, and she can view that contact in her copy of Microsoft Outlook.
The iPod—clever little device that it is—supports vCards. Just plunk that vCard into the right folder on your iPod or sync it to your iPod with iTunes, and when you next click your iPod’s Contacts entry, the rich details on that person, place, or thing will be revealed.
A vCard can display the following items:
• Contact’s picture. Available on the 5G iPod, iPod classics, and 3–5G iPod nanos only.
• Contact’s formatted name. Bubba Jones, for example.
• Contact’s name. The name as it appears in the contact (Jones, Bubba, Dr., for example).
• Contact’s address(es). The address types supported by vCard (business, home, mailing, and parcel).
• Contact’s telephone number(s). The phone numbers supported by vCard.
• Contact’s email. The email addresses in the contact.
• Contact’s title. Dr., Ms., Mr., and so on.
• Contact’s organization. The company name displayed in the contact.
• Contact’s URL. The Internet address contained in the contact.
• Contact’s note. The note field in the contact.
vCard support wouldn’t mean much if common applications didn’t support it. Fortunately, the universal nature of the standard means that most information-management and email applications you’re likely to run across support vCard. Mac OS X’s Address Book certainly supports it, as do Microsoft Entourage (Mac), Microsoft Outlook (Windows), Windows Address Book (XP), and Windows Contacts (Vista and Windows 7).
Syncing contacts to your iPod
All iPods save the shuffle can display contacts. To place contacts on your iPod, follow the steps for your operating system in the following sections.
Macintosh
Once upon a time, a program called iSync was responsible for syncing contacts and calendars with an iPod. No longer. Now iTunes offers this feature. Here’s how it works:
1. Plug your iPod into your Mac.
2. Select your iPod in iTunes’ Source list, and click the Contacts tab.
3. Enable the Sync Address Book Contacts option.
To place all the contacts in Address Book on your iPod, make sure that the All Contacts option is enabled. If you’d rather place only certain contacts on the iPod, enable the Selected Groups option, and in the list below, select the groups whose contacts you’d like to copy to the iPod (Figure 6.1). You may want only your business contacts or friends and family contacts on your iPod, for example. Grouping those contacts in Address Book and then selecting those groups in iTunes is the way to do it.
Figure 6.1 Selecting groups of contacts in iTunes.
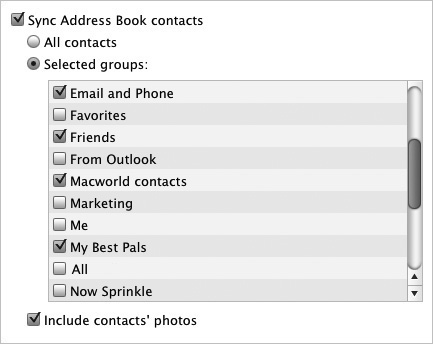
If you plug a 5G iPod, 3G–5G iPod nano, or iPod classic into your Mac, you’ll see an option to copy your contacts’ photos to the iPod. On a compatible iPod nano, these pictures will appear next to the contact’s name as well as on the screen devoted to that contact. On a 5G iPod or iPod classic, the pictures appear only on the contact’s screen.
4. Click the Apply button at the bottom of the pane.
iTunes synchronizes the selected contacts between your Mac and the iPod.
Windows
Fire up iTunes with your iPod connected, select your iPod in iTunes’ Source list, and click the Contacts tab. Within this pane, you can elect to synchronize contacts from Windows Address Book (XP), Windows Contacts (Vista and Windows 7), or Microsoft Outlook. If you choose Outlook, you can synchronize all contacts or just selected groups. When you choose Outlook, by the way, it launches automatically.
Managing contacts on click-wheel iPods
Contacts on iPod classics and the 4G and 5G iPod nanos are not presented in the same way. Although you find contacts in each model by choosing Extras in the Home screen, selecting Contacts, and pressing the Center button, you’ll notice a stark difference after you press Center:
• On an iPod classic, all contacts are presented in a list, even if you’ve chosen to sync just certain groups of contacts. This means that if you have 2,500 contacts, you can expect your scrolling finger to get a workout, as you’ll have to scroll through this long list to find the contact you want.
• The 4G and 5G iPod nanos, on the other hand, respect any groups that you’ve created in your computer’s address-book application. When you select Contacts and press the Center button on one of these nanos, a Contact Group screen appears, listing all the groups you synced with the iPod. Simply select the group you want, press the Center button, and scroll to the contact.
On any of these iPods, to see full contact information, select the contact and press the Center button. You can move to the next or previous contact by pressing the Next or Previous button, respectively.
Make a Date
As I explain earlier in the chapter, contacts and the iPod carry on their cozy relationship thanks to the vCard standard. Another couple of standards, called vCal and iCalendar, help the iPod understand calendar events. These standards are universal formats for exchanging calendar and scheduling information between vCal- and iCalendar-aware applications and devices.
When you add a calendar event to your iPod, the following information appears in the Event screen:
• Date of the appointment. Displayed in day/month/year format (11 Jan 2010, for example).
• Time and duration of the appointment. Displayed as 4:00–5:30 PM, for example.
• Name of the appointment. If you’ve named it My Appointment in your computer’s calendar application, so shall it be named on your iPod.
• Attendees. If you’ve added attendees to the appointment in your computer’s calendar application, those names will appear next in the Event screen.
• Notes. Any notes you’ve entered on your computer will appear last in the Event screen.
Working with calendars
Apple would have looked mighty foolish adding calendaring capabilities to the iPod without also providing Mac users a calendar application. It did so by releasing iCal, a free basic calendar application that runs under Mac OS × 10.2 and later.
iCal isn’t the only Macintosh application that’s compatible with the iPod, however. All of today’s modern calendar applications can also export iPod-compatible calendar files (files saved in the vCal format).
Windows users can create iPod-friendly calendar files, too; unfortunately, they can’t do it with an Apple application. Windows users who have a copy of Microsoft Office will discover that Outlook can export calendar files that are compatible with the iPod, as can other calendar applications that support the vCal format.
Syncing events on click-wheel iPods
The following sections show you how to make the most of the Calendars feature with your computer’s common calendar applications and a click-wheel iPod.
iCal (Mac OS X)
Although you can move iCal calendars to your click-wheel iPod by selecting a calendar in iCal, choosing File > Export, and dragging the resulting calendar file into the iPod’s Calendars folder, why bother when iTunes provides a more expedient method? To use iTunes, just follow these steps:
1. Plug your iPod into your Mac.
2. Select your iPod, and click the Contacts tab.
3. Enable the Sync iCal Calendars option.
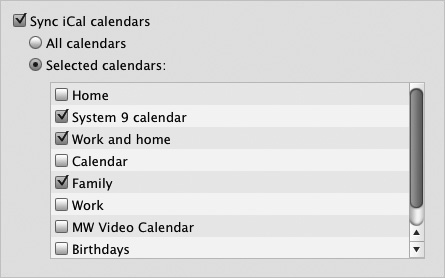
This procedure is sounding familiar, right? Yes, it’s very much like moving contacts via iTunes. Similarly, you can choose to synchronize All Calendars or Selected Calendars. When you choose the latter option, just check the boxes next to the calendars you want to copy to the iPod (Figure 6.2).
Figure 6.2 Selecting specific calendar entries.
4. Click the Apply button.
iTunes synchronizes the selected calendars between your Mac and the iPod.
Outlook (Windows)
You guessed it—syncing calendars on a Windows PC is darned similar to doing it on the Mac. The major difference is that there is no iCal for Windows. Instead, you have the option to synchronize all your Outlook calendars or just selected calendars.
Viewing events on click-wheel iPods
The iPod classics and recent iPod nanos display events in nearly the same way. Just travel from the Home screen to Extras, select Calendars, and press the Center button. In the next screen, you’ll see an All Calendars entry, followed by any separate calendars that you’ve synced to the iPod—Home and Work, for example. Select a calendar and press the Center button to display the current month’s calendar.
On an iPod classic or a 3G iPod nano, days that hold events display a red flag, and those with alarms show a small yellow bell. When you select a date with a flag on it and press the Center button, you see a screen bearing the name of the event. Select the event and press the Center button; yet another screen provides a summary of the event, along with its date, time, location, attendees, and notes.
The 4G and 5G iPod nanos work similarly. The main difference in their approach is that when you select a date with an attached event, the time and name of the event appear at the bottom of the screen. These iPods lack the red flags and yellow bells. Instead, dates with events (with or without alarms attached to them) display a black dot.
To view the details of an event, select a date that has one and press the Center button, and that date’s screen appears. Any events scheduled for that date appear in this screen, displaying the event’s time and title. To move to the next day, press the Next button. To back up a day, press the Previous button. To get even more of an event’s details, select the event and press the Center button. In the resulting screen, you see the event’s title, date, and time, as well as any notes attached to it.
Notes-worthy Feature
Click-wheel iPods allow you to store small bits of text called Notes on them. Unlike their counterparts on an iPod touch or iPhone, however, these Notes are read-only; you can sync bits of text to the iPod and read them on the go, but you can’t edit them.
If you select Notes in the Extras screen on a click-wheel iPod and then select the Instructions entry, you’ll learn that you can view plain-text notes on your iPod. But there’s more to know about Notes than that:
• Notes are strictly limited to 4 Kbits. If a note exceeds 4 Kbits (4,096 bytes), the excess text is cut off.
• The iPod can hold up to 1,000 notes. If the iPod’s Notes folder contains more than 1,000 notes, only the first 1,000 are displayed. (The first 1,000 notes are determined by alphabetical order rather than creation date.)
• Notes are cached in memory. After you’ve viewed a note, its contents are stored in a 64 KB memory cache. This cache is useful because it allows the iPod to display the note without spinning up the hard drive on those iPods that have a hard drive, thereby extending the battery charge. When the cache overflows (because you’ve read more than 64 KB of data into it), the oldest notes are given the boot to make room for the information being copied into the cache.
• Notes support a very basic set of HTML tags (the Hypertext Markup Language codes used to create Web pages). These tags allow you to create notes that link to other notes or to media on your iPod. For more information on creating linked notes, see the iPod Notes Feature Guide (http://developer.apple.com/ipod/iPodNotesFeatureGuideCB.pdf).
Finally, you don’t place notes on a click-wheel iPod through iTunes. Instead, mount the iPod on the desktop (you’ll need to enable disk use for this to happen), double-click the iPod’s icon to open it, and drag text files into the Notes folder. When you next access the Notes feature on the iPod, you’ll find your notes within.