5. The iTunes Store
Chapter 4 shows you how to put the music and video you own on your iPod. Now it’s time to look at a cool way to obtain new media. And by cool, I can mean nothing other than Apple’s online digital media emporium: the iTunes Store.
Apple eschewed the typical Internet-commerce model of creating a Web site that users access through a Web browser. Although this model works reasonably well for countless merchants, it invariably requires customers to slog through Web page after Web page to find and pay for the items they desire. Apple wanted a service as immediate as the experience of going to a media megastore, gathering the music and movies you want, and taking them to the counter.
To replicate this experience, Apple placed The Store inside an application that was already built for music browsing (and, later, video browsing) and that many of its customers were likely to be familiar with: iTunes.
In the following pages, I take you on a tour of The Store and show you the best ways to discover and purchase new media.
Prepare to Shop
Ready to shop? Great. First, make sure that you have the tools you need to get started. After you have those tools, I’ll get you signed up with an account and then take you on an extensive tour of The Store.
What you need
Naturally, you need a Mac or a Windows PC and a copy of iTunes. It’s not necessary to have an iPod to take advantage of The Store. Media purchased at The Store can be played on your computer; music can be burned to CD; and because Apple now sells music free of copy protection, the music you purchase there can be played on any device that supports the AAC format (discussed in Chapter 4).
Also, although you can access The Store via any Internet connection, you’ll find it far more fun to shop with a reasonably speedy broadband connection. A 4-minute song weighs in at around 8 MB. Such a download takes next to no time over a DSL, cable, or fiber-optic connection but can be terribly slow over a poky Wi-Fi connection or—heaven forbid!—a slothlike dial-up modem. Even with a moderately fast broadband connection, you could wait up to an hour to download a full-length movie from The Store.
As these pages go to print, The Store is available in 77 countries. Which store you’re allowed to purchase media from depends on the issuing country of your credit card. If you have a credit card issued in Germany, for example, you can purchase media only from the German iTunes Store (though you don’t physically have to be in Germany to do this; again, the credit card determines where you can shop).
Sign on
You’re welcome to browse The Store the first time you fire up iTunes, but to purchase media, you must establish an account and sign in. Fortunately, Apple makes the process pretty easy.
With your computer connected to the Internet, launch iTunes, and click the iTunes Store entry in iTunes’ Source list; then click the Sign In button in the top-right corner of the iTunes window. If you have either an Apple ID and password or an AOL screen name and password, enter them and click the Sign In button; otherwise, click the Create New Account button.
When creating an account, you’ll be required to agree to the iTunes Store’s terms-of-service agreement, enter a valid email address, and create a password. Along the way, you’ll enter some personal information so that Apple can identify you if need be.
Finally, you’ll be asked for a credit-card number and your name, address, and phone number. Click Done and . . . you’re done. You’re now a member in good standing.
Navigate The Store’s Floors: Main Page
As I tap out these words, The Store carries more than 10 million songs, a million podcasts, 3,000 TV shows, 2,500 films, 40,000 music videos, 75,000 iPod touch/iPhone applications, 20,000 audiobooks, and a trickle of iPod games. You needn’t trudge through an alphabetical list of all these items. Instead, Apple offers you multiple ways to browse its catalog of goodies. In this section, I show you the floor plan of The Store’s main page and the best ways to navigate it.
Main-page layout
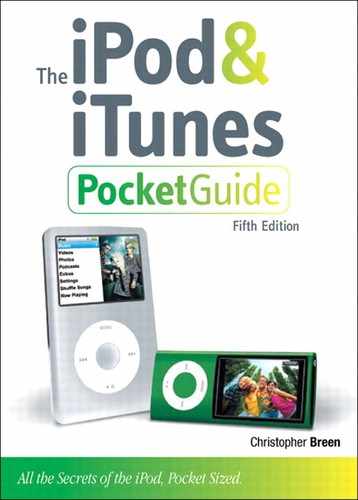
The Store’s main page is all about featured content and helping you find your way around (Figure 5.1). Accordingly, you’ll see lots of images, large and small, that lead you to new and interesting music, movies, TV shows, audiobooks, and iPod touch/iPhone applications. Additionally, the page houses navigation controls and links for exploring various areas of The Store.
Figure 5.1 The Store’s main page.
Quick Links and Top Charts
Along the right edge of the main page are a Quick Links area (which I talk about in greater depth later in the chapter) and a Top Charts area where you see links to the top 10 songs, music videos, albums, movies (for sale and for rent), and TV episodes and seasons.
Top promo banner
Across the top of the main page, you’ll see a banner that changes from time to time, promoting hot new singles or albums, exclusive tracks, music videos, TV shows, applications, and movies.
New Releases
Below this banner is the New Releases section, which consists of side-scrolling panes. The topmost pane displays new albums and singles; you toggle between items by clicking the appropriate button. At the bottom of this pane is a scroll bar that you can click and drag to see more contents of the pane.
Next to the Albums and Singles buttons is a See All link that, when clicked, takes you to a page that lists all of the week’s notable new albums or singles (depending on whether you clicked the Albums or Singles button before clicking Show All). Within this page, you can sort by Name, Release Date, or Featured by making a choice from the Sort By pop-up menu in the top-right corner.
More promos
Below New Releases is an area that promotes recent or upcoming releases—the single of the week, a movie you can preorder, and a pitch for new HD TV episodes, for example.
Genius Recommendations
Travel farther down to see the Genius Recommendations section, which offers recommendations based on the contents of your iTunes Library (if you’ve chosen to share that information with Apple, as I outline in Chapter 4). You can elect to see Music, Movies, or TV Shows recommendations by choosing one of these entries from a View pop-up menu on the right side of the Genius Recommendations area. When Music is selected, you’ll see Album recommendations in a horizontal scrolling area to the left and a list of ten singles you might like on the right side of the page. You can preview these singles by hovering your cursor over a track until it adopts a gray hue and a blue Preview button appears to the left of the track’s name. You can also click the Price/Buy button ($0.99, for example) to purchase the track.
![]() If you haven’t purchased a particular kind of media from the iTunes Store—no movies, for example—you won’t see recommendations for that media type, because Genius has nothing to base recommendations on.
If you haven’t purchased a particular kind of media from the iTunes Store—no movies, for example—you won’t see recommendations for that media type, because Genius has nothing to base recommendations on.
This pane also features a See All link. Click it, and off you go to a pane that displays more recommendations. The interesting thing to note here is that The Store tells you why it’s recommending something. Apparently because I like The Finn Brothers, for example, I will also enjoy Sister Hazel’s Absolutely.
![]() The Store welcomes your reactions to its recommendations. Below each recommendation are Thumbs Up and Thumbs Down icons. If you approve of The Store’s suggestion that your love for Green Day earns a Weezer recommendation, by all means, click Thumbs Up. If, on the other hand, you can’t believe that any entity—human or otherwise—would equate Dexter with Season 1 of 30 Rock, click the Thumbs Down icon.
The Store welcomes your reactions to its recommendations. Below each recommendation are Thumbs Up and Thumbs Down icons. If you approve of The Store’s suggestion that your love for Green Day earns a Weezer recommendation, by all means, click Thumbs Up. If, on the other hand, you can’t believe that any entity—human or otherwise—would equate Dexter with Season 1 of 30 Rock, click the Thumbs Down icon.
New movies and TV shows
Skip down another section, and you find recent additions to The Store’s movie catalog. Again, this section is a side-scrolling pane with a See All link. Down one more section is a TV section that operates exactly the same way.
Featured media
After another row of featured items is an area that highlights a particular collection of media. As I write this chapter, for example, The Store is showcasing $7.99 reggae albums.
Free On iTunes
Finally, way down near the bottom of the page, is one of my favorite sections: Free On iTunes. As the name implies, every bit of media here is free. You’ll find TV-show pilots, short films, featurettes (read: long movie previews), audiobook excerpts, and free singles.
Navigation links
At the very, very bottom of the main page is a collection of links to important areas of The Store. These links are divided into four categories: Explore, Features, Help, and Manage.
Explore
Below this heading is a list of The Store’s main media sections: Music, Movies, TV Shows, App Store, Podcasts, Audiobooks, and iTunes U. Clicking one of these links takes you to the main page for that media type. (These links serve the same purpose as the headings in the navigation bar at the top of the page, which I discuss in short order.)
Features
Here, you find links to The Store’s browser, celebrity playlists, HD movies, iTunes Essentials (collections of music that Apple believes goes well together), and a place to preorder upcoming movies.
Help
Look under this heading for iTunes support, iTunes tutorial videos, contact links, the App Store FAQ, help with movie rentals (where you’ll go if a rental didn’t reach you as it should have), and iTunes Pass (a feature for prepurchasing a band’s upcoming content).
Manage
Manage provides links to your iTunes account information; the Redeem area, where you can redeem iTunes gift cards; My Wish List, where you can store links to items you’re thinking about buying; and Change Country, where you can choose to shop at a different iTunes Store (but you’ll need a credit card issued in that store’s country to purchase anything).
Cruise the Navigation Bar
Apple doesn’t expect you to shop only for items listed on the main page. You need a way to move easily to areas of The Store that interest you. That’s the purpose of the navigation bar, which is always in view regardless of where you are (Figure 5.2). I discuss its many elements in the following sections, discussing in left-to-right order.
Figure 5.2 The Store’s navigation bar.
![]()
Back and Forward buttons
These buttons serve a function similar to those of the same-named buttons in your Web browser. As you traipse through The Store, you can backtrack along your path by clicking the Back button. If you’ve gone back and would like to move forward along ground you previously trod, use the Forward button.
Home
As far as The Store is concerned, Home is the main page. Clicking this button takes you there.
Music
Hover your cursor over the Music entry, and you see a small down-pointing triangle, which indicates that a menu is eager to pop down and provide you options. Click that triangle, and sure enough, a menu appears. That menu includes Music Videos, iTunes Essentials, and Pre-Orders options, as well as a list of genres. Select Music Videos, and you’re taken to an area of The Store that sells them. To find iTunes Essentials—The Store’s greatest-hits packages—choose this item. Choosing Pre-Orders takes you to a collection of upcoming albums by popular artists.
Choose a genre entry—Classical, Rock, Reggae, or World, for example—and you’re transported to a page that features music of that genre. These pages are arranged very much like The Store’s main page but present music in different ways. Each genre page offers a New and Noteworthy area, but beyond that, you could see collections of live recordings, What’s Hot, “What We’re Listening To” recommendations, and classic recordings. Some pages also include music videos related to the genre. On the right side of each page are a Top Charts heading and, below it, the genre’s top ten songs and albums.
If you simply click Music, you’re taken to the main Music page, which includes a mix of music along with Genius Recommendations. The right side of this page has its own links.
Speaking of those links, longtime iTunes Store customers may fear that some of their favorite features—such as iMix, iTunes Essentials, and Celebrity Playlists—have disappeared simply because they’ve vanished from The Store’s main page. Fear not. The music-centric items have been moved to the main Music page and now reside below the More in Music heading on the right side of the page (scroll down to see it).
For those who are unfamiliar with these music features, here’s how the most significant ones shake out.
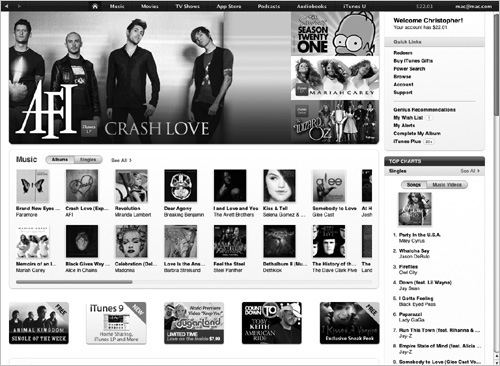
iTunes LP
These items, introduced with iTunes 9, are albums enhanced with bonus material such as photos, videos, liner notes, and lyrics (Figure 5.3). (Regrettably, the lyrics from these albums aren’t transferred to your iPod.) This enhanced content is playable on your Mac or Windows PC, and the albums are generally priced a few dollars more than the unenhanced versions.
Figure 5.3 A collection of iTunes LPs.
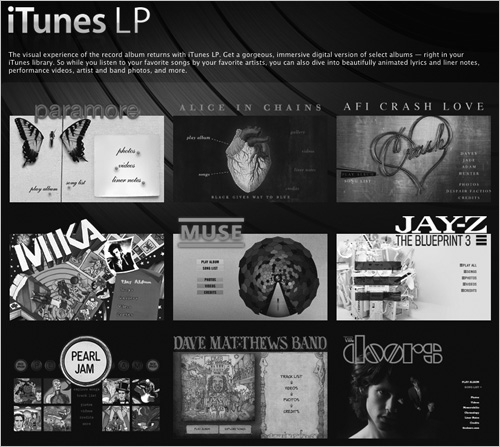
iTunes Essentials
It makes sense that Apple would offer compilations of songs organized by artist or by some catchy sort of theme (Women in Bluegrass, Animation Classics, or Old Friends with New Albums, for example). Apple calls these compilations iTunes Essentials .
Yes, these collections are essentially Apple’s own iMixes (which I cover shortly)—groups of songs that the folks who work at The Store think you’ll like (Figure 5.4 on the next page). Unlike most of The Store’s other albums, these compilations don’t give you a discount. If an iTunes Essential contains 25 songs priced at 99 cents each, you pay $24.75.
iTunes Essentials are offered in four configurations: The Basics, Next Steps, Deep Cuts, and Complete Set. As their names indicate, The Basics includes the most obvious songs that fit a particular theme; Next Steps offers slightly more obscure tracks; Deep Cuts hits the fringes; and Complete Set offers all songs in the previous three categories.
Figure 5.4 An iTunes Essentials collection.
iMix
iMix is your chance to inflict your musical values on the rest of the world by publishing a playlist of your favorite (or, heck, your least-favorite) songs. When you click the iMix link, you’re taken to a page that contains three columns marked Top Rated, Most Recent, and Featured, all listing iMix playlists posted by fellow music lovers. Type a genre, artist name, or keyword (such as summer or drive) in the Search For field to narrow your choices, or just click an “album cover” to view the songs in an iMix (and buy them, if you like).
As enjoyable as it may be to view others’ iMixes, creating your own is more fun. You can do so by following these steps:
1. Create a new playlist in iTunes, and give it a really cool name.
The cooler the name, the more likely other people are to view your iMix.
2. Cruise through your iTunes Library, and drag into it songs you’d like to publish in an iMix.
![]() Your iMix can contain only songs available for purchase from The Store. If the iMix contains songs that aren’t available at The Store, those songs won’t appear in the published playlist.
Your iMix can contain only songs available for purchase from The Store. If the iMix contains songs that aren’t available at The Store, those songs won’t appear in the published playlist.
3. Round out your list with songs at The Store that you don’t own.
An iMix doesn’t require that you actually own the music you’re recommending; you can drag previews of any song or audiobook from The Store into a playlist in iTunes’ Source list. Feel free to add these previews to your iMix playlist.
4. Click the arrow to the right of your playlist’s name.
When you click this arrow, a dialog box asks whether you’d like to give the playlist as a gift or publish it as an iMix.
5. Click Create iMix.
You’ll be asked to sign in with your Apple ID. Then you’ll be taken to The Store, and iTunes’ main window will show you a picture of your iMix’s album cover (a collage of album covers for the songs you’ve included).
6. Edit the title and description to suit your iMix (Figure 5.5).
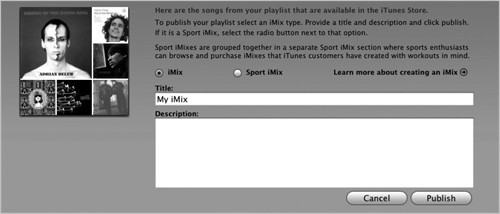
7. Click Publish and then click Done.
Your iMix will be published to The Store, where it will remain for 1 year. You’ll receive an email confirmation of the iMix’s publication and a link to it. Click the link, and iTunes takes you to your iMix’s page. Here, you have the option to advertise your iMix by clicking the Tell a Friend link.
Celebrity Playlists
If you’d like to know what rocks the world of a celebrity such as Robin Williams, Elizabeth Moss, Los Tigres del Norte, or Larry the Cable Guy (and yes, you’d be correct if you suggested “redneck rock” for Larry), click his or her link. The resulting page offers a list of tunes that the artist thinks worthy. You can preview and purchase songs—either individually or the entire list—directly from this page.
Just Added
To see lists of music added in the past 4 weeks, arranged by artist name, click this link.
Starbucks Entertainment
Apple has entered into partnership with Starbucks to sell music from Starbucks’ music label. This section of The Store is reserved for this music and for music that goes well with a double wet nonfat soy cappuccino.
Nike Sport Mix
As I’ve hinted elsewhere in this book, Nike and Apple have teamed to pair music and athletic shoes. This section of The Store features mixes designed for the perfect workout. Each mix includes an opening narration that describes the kind of workout the mix is for, followed by the songs.
Live from Las Vegas at The Palms and Live From SoHo
These sections feature live recordings of concerts performed at the Palms Resort in Las Vegas and at Apple’s New York SoHo store. Some concerts are audio only; others are videos.
Movies
The Movies entry also sports a menu. This one includes iTunes Extras, HD Movies, and New to Own, as well as its own list of genres, such as Action & Adventure, Comedy, Romance, and Western.
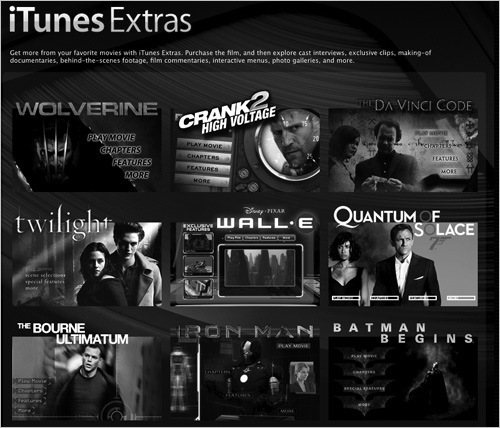
iTunes Extras
iTunes Extras are movies that contain not just the movie, but also the kind of extra content you find on DVDs—cast interviews, deleted scenes, documentaries, commentary tracks, and photo galleries, for example (Figure 5.6). As I write this chapter, just a few of these movies are available, but because they cost more than the other movies that The Store sells (meaning more profit for Apple and the movie companies), more are sure to come soon.
Figure 5.6 A collection of iTunes Extras movies.
HD Movies
This link takes you to high-definition (720p) movies for sale or rent from The Store.
![]() No, you can’t play HD movies on your iPod; it supports standard definition movies only. When you purchase an HD movie, however, you also receive a version compatible with an iPod or iPhone. This bonus applies to purchases only; HD movie rentals don’t include the standard-definition version.
No, you can’t play HD movies on your iPod; it supports standard definition movies only. When you purchase an HD movie, however, you also receive a version compatible with an iPod or iPhone. This bonus applies to purchases only; HD movie rentals don’t include the standard-definition version.
New to Own
The New to Own section features recently released movies that you can purchase. Some are also available to rent.
Genre list
Select a genre in this list, and you’ll be taken to a page that features movies within that genre. Elements include a New and Noteworthy section and a couple of collections of movies organized by theme—Screwball Comedies or Song and Dance, for example. The genre’s top ten movie sales and movie rentals are listed along the right side of the pane.
Click the navigation bar’s Movies button without invoking its menu, and off you go to The Store’s main Movies page. Here are new movies for sale or rent, Genius Recommendations, movies collected by theme, and special offers. On the right side of the pane are the expected top-ten lists, as well as a More in Movies area with links to 99-cent movies of the week, movies under $5 and $6, highlighted collections (Disney, Star Trek, and James Bond, for example), and movies organized by rating. You’ll also find a link to theatrical trailers here. Click that link, and you could easily spend the next couple of days watching the many movie previews offered by The Store.
TV Shows
The TV Shows menu resembles the Movies menu. Click the triangle, and you’re presented with three options plus genre listings. In this case, those three options are HD TV, Shows Just Added, and Network & Studios. You undoubtedly have the idea about how these options work.
Worth mentioning is the fact that you can purchase individual episodes as well as full seasons from The Store. You can also purchase season passes for shows, which means that you pay now to preorder every episode that will come along during the season. When an episode becomes available, iTunes downloads it automatically. You’ll find Buy Season Pass buttons on many currently running shows’ pages.
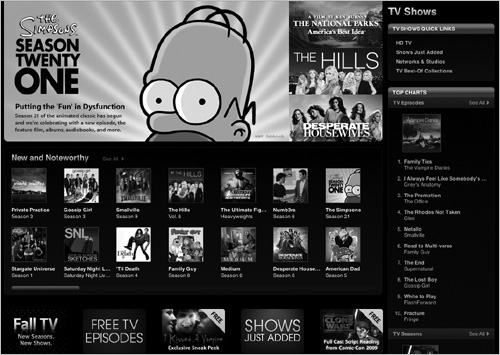
Click the TV Shows button, and you’re presented with the TV Shows main page, which is similar to the Music and Movies main pages (Figure 5.7).
Figure 5.7 The TV Shows main page.
![]() As with HD movies, when you purchase an HD TV episode, you also receive a standard-definition version that you can play on your iPod and/or iPhone.
As with HD movies, when you purchase an HD TV episode, you also receive a standard-definition version that you can play on your iPod and/or iPhone.
App Store
You can’t run iPod touch/iPhone applications on your click-wheel iPod or iPod shuffle, so I’ll save this topic for my iPod touch and iPhone books.
Podcasts
Indeed, the three-plus-genres theme is alive and well in this menu, too. The first three entries this time are Audio Podcasts, Video Podcasts, and New Releases. The list of genres includes such entries as Arts, Health, Kids & Family, News & Politics, and—one of my favorites—Technology.
When you select a podcast (video or audio), you’ll be taken to a page devoted to it. From this page, you can download single episodes (by clicking the Get Episode button that appears to the right of the podcast) or subscribe to the podcast (by clicking the Subscribe button).
When you click Get Episode, iTunes begins downloading the podcast, as evidenced by the spinning download icon next to the Downloads entry in iTunes’ Source list. When the episode has downloaded, click the Podcasts entry in iTunes’ Source list, and you’ll see the name of the show below the Podcast heading. Click the triangle icon next to the show name, and you’ll see the episode you downloaded below.
Next to a show’s subject heading, you’ll spy a Subscribe button (Figure 5.8). When you click this button or the Subscribe button in one of The Store’s podcast pages, some previous episodes of the now-subscribed show will appear in the Podcasts pane, accompanied by a Get button next to each episode that, when clicked, allows you to retrieve the episode. If you want all the episodes offered, just click the Get All button next to the show’s title. When new episodes become available, iTunes will download them automatically.
Figure 5.8 A podcast within iTunes’ Podcasts area.

If you tire of receiving a particular show, just select its subject heading and then click the Unsubscribe button at the bottom of the iTunes window.
Audiobooks
Another menu, another three entries plus genres. The top three slots of this menu are Audiobook of the Month, New in Fiction, and New in Nonfiction. Click the Audiobooks entry itself, and you’re whisked to the Audiobooks main page, complete with New & Noteworthy, top-ten lists, other entries promoting a particular genre of book—Sci-Fi & Fantasy, for example—and Staff Favorites. Along the right side of the page, you’ll also find links to popular authors.
iTunes U
Surprise! The iTunes U menu, although indeed a menu, doesn’t have three special entries at the top. Instead, it simply lists categories: Business, Engineering, Fine Arts, Health & Medicine, History, Humanities, Language, Literature, Mathematics, Science, Social Science, Society, and Teaching & Education. You can obtain this free content by individual episode (lecture? unit? thingie?); by entire course; or, in some cases, by subscribing to an ongoing series. When you download this material, it appears within the iTunes U category in iTunes’ Source list.
Account
If you’ve signed into The Store, the last entry in the navigation bar will be Account, as denoted by your Apple ID (such as [email protected] ). This display is more than just a reminder of your ID. Mouse over it, and you see that darned triangle again. Click the triangle, and a menu appears that includes Account, Redeem, Wish List, and Sign Out. I discuss these options later in the chapter.
Click the Quick Links
Because The Store is an electronic emporium, you have the power to do things you couldn’t dream of doing at a bricks-and-mortar store. The Quick Links area, in the top-right corner of each of The Store’s pages, provides access to much of that power (Figure 5.9).
Figure 5.9 iTunes’ Quick Links.
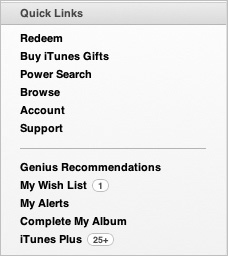
Each section of The Store has its customized collection of Quick Links. For purposes of this section, you’re interested only in those that appear when you’re looking at the home page. There, you’ll spy Redeem, Buy iTunes Gifts, Power Search, Browse, Account, Support, Genius Recommendations, My Wish List, My Alerts, Complete My Album, and iTunes Plus. They work this way.
Redeem
If someone has given you a gift certificate, or if you have a prepaid iTunes card, this page is where you cash it in. Click the Redeem link, and you’ll be taken to the Redeem Code screen, where you enter the card’s code and click Redeem to obtain credits for whatever the card promises. The amount of the card is added to your iTunes account and appears to the left of your Apple ID in the navigation bar.
Buy iTunes Gifts
Just like a real store, the iTunes Store lets you purchase and redeem gift certificates. It also lets you create a monthly iTunes Store allowance for that someone special. Click this link to be taken to a page where you can do this and more (Figure 5.10).
Figure 5.10 Some of The Store’s gift options.
The page works this way.
Email Gift Certificates
Click this link to be taken to a page where you can send someone an iTunes gift certificate via email in amounts ranging from $10 to $200. Just fill in your name, the recipient’s name, and the recipient’s email address; type a personal message, if you like; click Continue; and confirm your Apple ID and password. Your gift is on its way.
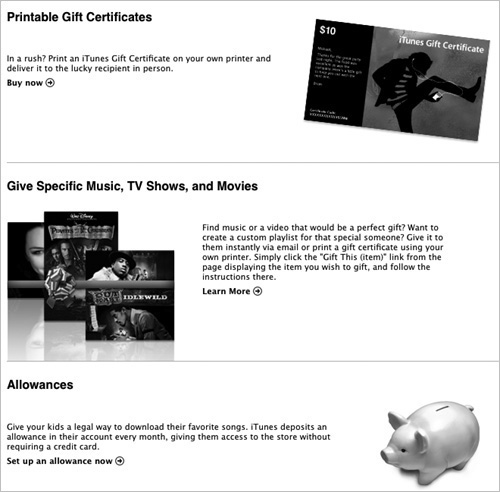
Printable Gift Certificates
This option keeps you in The Store and produces a Printable Gift Certificates page. Fill in your name and the recipient’s name, choose an amount ($10 to $200), type a personal message, and click Continue to purchase a gift certificate that you can print out and give to your dearest and possibly nearest.
Give Specific Music, TV Shows, and Movies
If you’ve ever listened to an album and thought, “My little snookums would love this!”, here’s your chance to do something about it. This option lets you give exactly the music, TV show, or movie you want.
Allowances
An iTunes allowance can best be described as a gift certificate that keeps on giving. After you create an allowance, the recipient of your largesse will have his or her Store credit bumped up by the amount that you’ve designated (values include $10 to $100 in $10 increments, $150, and $200) on the first day of each month. Just as when you purchase a gift certificate, your credit card will be charged, not the recipient’s.
After you’ve created an allowance, a new Manage Allowances button appears on your Apple Account Information page. When you click this button, you go to the Edit Allowances page, where you can add allowances or suspend or revoke any that you’ve created. When you revoke an allowance, any balance placed in the account remains; it won’t be credited back to you.
If you think you’re going to reinstate that allowance later—when your daughter starts making her bed again, for example—click the Suspend button. (If you click Remove, you won’t be able to put that allowance back into service; you must create a new one.) To reactive a suspended account, return to this screen and click the Activate button next to the account name. When you do, a dialog box appears, asking whether you’d like to send the allowance immediately or wait until the first of the next month.
![]() If you tend to spend too much at The Store, you can create an allowance for yourself, but you can’t do it simply by signing up for one. The Store prevents you from purchasing an allowance for the same Apple ID that receives the allowance. Instead, you must create a second Apple ID. (You’ll need a different email address for this account, but you can use the same credit card that you use for your original account.) Sign on with that second ID and then purchase an allowance for your original account.
If you tend to spend too much at The Store, you can create an allowance for yourself, but you can’t do it simply by signing up for one. The Store prevents you from purchasing an allowance for the same Apple ID that receives the allowance. Instead, you must create a second Apple ID. (You’ll need a different email address for this account, but you can use the same credit card that you use for your original account.) Sign on with that second ID and then purchase an allowance for your original account.
iTunes Gift Cards
Click this link, and your Web browser takes you to the online Apple Store, where you can purchase iTunes gift certificates.
Power Search
If you want to be a power shopper, you must learn to take advantage of The Store’s Power Search function.
When you click the Power Search link on the main page, you’re taken to a page where you can get very specific with your search. You’ll see a Power Search pop-up menu that includes All Results, Music, Movies, TV Shows, Applications, Audiobooks, Podcasts, and iTunes U entries. Click the appropriate entry, and the fields below change to reflect search criteria. Choose the Music entry, and you can enter information in the Artist, Composer, Song, and Album fields, as well as choose a genre from the Genre pop-up menu. Click Movies, and you can search for Movie Title, Actor, Director/Producer, Year, Description, Genre, and Rating (All Ratings, G, PG, PG-13, or R).
![]() Many of the entries carry helpful options specific to the medium in question. When you choose Movies, for example, you get options to search for movies available for rent as well as for movies that offer closed captioning. You can also search podcasts for just video podcasts or search TV shows for only those series offered in HD.
Many of the entries carry helpful options specific to the medium in question. When you choose Movies, for example, you get options to search for movies available for rent as well as for movies that offer closed captioning. You can also search podcasts for just video podcasts or search TV shows for only those series offered in HD.
Browse
The Store offers a view much like the one you see in iTunes when you select a library entry or a playlist and choose View > Show Column Browser. (In point of fact, choosing this command produces the same result as clicking the Browse link.) Click Browse, and iTunes’ browser columns appear:
• App Store. Again, I’ll leave this topic for the iPod touch and iPhone books.
• Audiobooks. Choose Audiobooks, and the next column adopts a Genre heading with various literary genres below (such as Classics, Kids & Young Adults, and Mystery). Choose a genre, and authors/narrators writing or speaking in that style appear in the Author/Narrator column to the right. Select an author or narrator, and a list of that person’s available work appears at the bottom of the window.
• Movies. Select Movies, and a list of genres appears to the right—Action & Adventure, Comedy, and Thriller, for example. Select one of these categories to see a list of movies that match.
• Music. Clicking Music produces four additional columns: Genre, Subgenre, Artist, and Album. You know what to do.
• Music Videos. Music Videos are broken into genres as well—Alternative, Blues, Holiday, Jazz, and Soundtrack, for example. Select a genre, and a list of appropriate artists appears to the right. Click an artist to see what he’s or she’s been up to in front of the cameras.
• Podcasts. To the right of this entry, you see Category and Subcategory columns. Choose Technology and then Tech News, for example, and a list of podcasts appears below. (There are so many technology podcasts, and this area is so disorganized, that it helps to know what you’re looking for.)
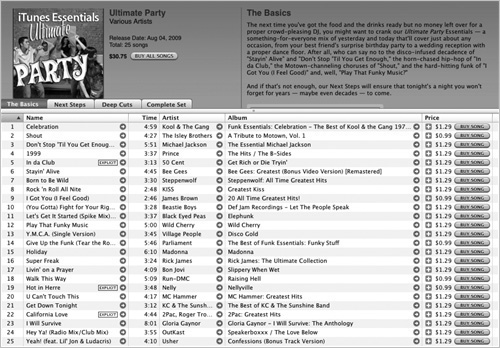
• TV Shows. TV Shows is broken down by Genre (including All HD for those times when you seek the best-looking episodes at The Store), TV Shows (24, The Daily Show with Jon Stewart, Flight of the Conchords, and Weeds, for example), and Season. Select a TV series, and (if offered) a list of seasons appears to the right. Choose a season to view individual episodes below (Figure 5.11). (If the series doesn’t have multiple seasons, just clicking the name of the show will produce the list of available episodes at the bottom of the window.)
Figure 5.11 Browsing The Store’s TV Shows.

The results area is divided into columns titled Name, Time, Artist, Album, Genre, Price, and Popularity, regardless of whether you’re looking at music, movies, music videos, or TV shows. You can sort the list by any of these criteria by clicking the appropriate column head. Click Artist, for example, and the list is sorted alphabetically by artist. Click Time, and the list is sorted by shortest to longest playing time.
![]() You’ll notice a right-pointing arrow to the right of entries in some of these views. Clicking this arrow allows you to travel to the page devoted to that item—a great way to explore an album or an artist’s catalog after searching for a single song, for example.
You’ll notice a right-pointing arrow to the right of entries in some of these views. Clicking this arrow allows you to travel to the page devoted to that item—a great way to explore an album or an artist’s catalog after searching for a single song, for example.
Account
Care to view or edit the information Apple has about you and your credit card? Wonder how you’ve spent your money at The Store? Want to cancel a movie you’ve preordered? You can do it all here. When you click the Account link, you’ll be asked for your iTunes password. (You can also move to your Apple Account Information page by clicking your account name at the top of the iTunes window.)
Support
With this book at your side (or, better yet, open in front of your face), you shouldn’t need to click The Store’s Support link, but should you come across a problem that’s arisen since the publication of this edition, click this link to open your Web browser and be taken to Apple’s iTunes Store Support page. Here, you’ll find answers to frequently asked questions about both iTunes and The Store, as well as customer service, billing, and troubleshooting links.
Genius Recommendations
You’ve been here before. Again, this page displays items that The Store believes you’ll enjoy.
My Wish List
At one time, The Store offered a feature called Shopping Cart. Instead of using the typical “click and buy” approach to shopping, you could click an Add button that would add items to this Shopping Cart holding area. When you were ready to check out, you’d move to Shopping Cart, take another glance at the accumulated items, decide whether you really needed to spend that kind of money, and then buy everything in the cart at one go.
With iTunes 9, Shopping Cart is history, replaced by My Wish List. It works similarly, but unlike Shopping Cart, it doesn’t require you to muck with iTunes’ preferences. To use it, simply click the down-pointing triangle next to something that you’re thinking about purchasing, and choose Add to Wish List. (This feature works only for purchases, not for movie rentals.) Add to Wish List is The Store’s command, and the item will indeed be placed where you asked.
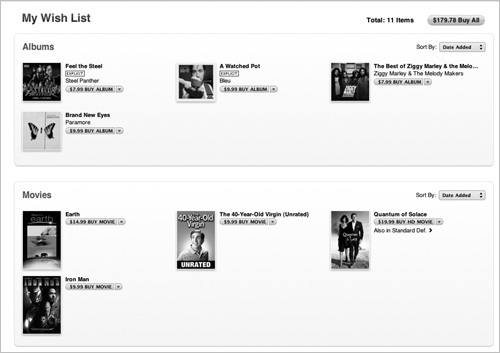
The Wish List entry on the home page will note the number of items in your Wish List. Move to the Wish List page by clicking the same-named link, and all the items you’ve added will appear (Figure 5.12). You can purchase them separately by clicking the Buy button next to each item or purchase everything in the Wish List by clicking the Buy All button at the top of the window. To remove items from the Wish List, just hover your cursor over them and click the small X in the top-left corner of the item (much as you’d click a window’s Close box). Poof , it’s gone.
Figure 5.12 I wish I could afford everything in my Wish List.
My Alerts
If you’d like to stay up to date on the releases of favorite artists, you can do so by clicking the Alert Me link in the Quick Links section of an artist’s page. When you do, you can elect to receive email from Apple whenever that artist has released something new. Additionally, when you click the My Alerts link on The Store’s home page, you’re taken to a page that lists recent releases by artists whose work you’ve purchased from The Store.
Complete My Album
If you purchase a couple of tracks from an album and later decide that you’d like to have the entire album, the Complete My Album feature allows you to do so without having to repurchase those tracks. Click this link, and you see a list of albums of which you’ve purchased portions. Next to each album is what it will cost to complete the album—Complete My Album for $8.70, for example.
iTunes Plus
Up until mid-2007, the iTunes Store offered music that was copy-protected with Apple’s FairPlay digital rights management (DRM) technology. FairPlay limits you to playing your purchased music on five computers. In mid-2007, Apple unveiled iTunes Plus—unprotected music tracks in AAC format encoded at high bit rates (256 Kbps) and sold initially for $1.29 per track, versus 99 cents for protected music tracks. In October 2007, Apple reduced the price of iTunes Plus tracks to 99 cents each (the single track price at the time).
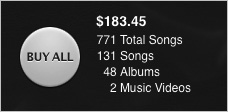
When you click the iTunes Plus link, the iTunes Plus page appears. At the top of the pane is the Buy All button. Next to this button, you see the total number of tracks in your purchased library that you can update, along with the number of single tracks, albums, and music videos (Figure 5.13). Below this area is a list of albums that you can upgrade. At the bottom of the window is a list of upgradable tracks. Song upgrades are 30 cents each, album upgrades are 30 percent of the album’s current sale price, and music videos cost 60 cents each to upgrade. At one time, you couldn’t upgrade individual items; it was all or nothing. Now you’re welcome to pick exactly the items you’d like to upgrade.
Figure 5.13 You can upgrade your protected purchased iTunes music to an unprotected, higher-bit-rate form.
Get the Goods
Now that you have an account and can find your way around The Store, it’s time to stop manhandling the merchandise and actually buy something. You’ll be amazed by how easy (and addictive) this can be.
Typical shopping at The Store is akin to going to a record store, picking up a CD, taking it to the counter, purchasing the disc, returning to the store to pick another CD, purchasing it, going back to the store once again, and … well, you get the idea. You pay as you go. This is how the iTunes Store operates by default:
1. Pick your Poison (or Prince, Prison Break, or Pirates of the Caribbean ).
Using any of the methods I suggest earlier, locate music, audiobooks, or video that you desperately need to own.
2. Click the Buy button.
To purchase a song or TV episode, click the Buy Song or Buy Episode entry in the Price column that appears in iTunes’ main window.
To purchase an album, TV season, movie, or audiobook, look near the top of the window for a Buy button. The price of your purchase is listed next to each of these buttons.
![]() At times, you can’t download an entire album. Instead, The Store may list a partial album—one from which you can purchase only individual songs. At other times, you can’t buy certain music tracks individually; you must purchase the entire album.
At times, you can’t download an entire album. Instead, The Store may list a partial album—one from which you can purchase only individual songs. At other times, you can’t buy certain music tracks individually; you must purchase the entire album.
3. Enter your Apple ID or AOL screen name and password in the resulting window.
4. Click the Buy button.
Just to make sure you weren’t kidding around when you clicked the Buy button, a new window asks you to confirm your intention to make your purchase. Should you care to banish this window forevermore, check the Don’t Warn Me Again check box.
![]() Be careful about enabling the Don’t Warn Me Again option if you have others in the household who have access to your computer. My daughter is now musically aware, for example, and is extremely interested in starting her own music library. I prefer that she not do that on my nickel.
Be careful about enabling the Don’t Warn Me Again option if you have others in the household who have access to your computer. My daughter is now musically aware, for example, and is extremely interested in starting her own music library. I prefer that she not do that on my nickel.
If you’ve decided not to purchase the item, click Cancel and go on with your life.
5. Click the Buy button again.
A Downloads entry appears below the Store heading in iTunes’ Source list. Click this entry, and you can watch your media download to your computer. If you like, click the Pause button next to anything downloading. You can click the Resume button that appears in its place to take up the download where you left off. (You might do this to force something you want to listen to right now to download before other media.) You’re charged for your purchases immediately.
With iTunes 9, the Buy button earned a little company in the form of a down-pointing triangle that, when clicked, produces a short menu of options (Figure 5.14).
Figure 5.14 The Buy-button options.
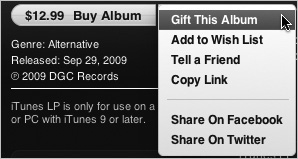
Those options are
• Gift This X (where X is a song, album, movie, TV episode, or audiobook). Yep, the iTunes Store provides a way to purchase specific items and give them to your friends. Do this, and the recipient will get an email message (you must provide the address) with a link to the gift. When the giftee clicks this link, his or her default Web browser opens; then that computer’s copy of iTunes opens to display the gifted item, which is ready to download.
• Add to Wish List. I cover Wish Lists earlier in this chapter.
• Tell a Friend. This option appears in menus associated with movies, TV shows, and albums, but not those for individual music tracks or audiobooks. Choose it, and a Tell a Friend pane appears, from which you can send an email message to one or more friends to promote that hunk of media.
• Copy Link. If you want to send someone a link to the item or publicize it on your blog, this option is how you obtain its address. When that link is clicked, the clicker’s Web browser opens; then iTunes opens, and the linked page appears.
• Share On Facebook/Share On Twitter. What better way to alert your friends and followers to the media you think worth their while? Choose Share On Facebook, and your Web browser opens; then a Facebook message is created that includes the item’s title, artwork, and additional information that may include artist (music), director (movie), or episode (TV show). Choosing Share On Twitter takes you to your Twitter home page and composes a message with the item’s title, a link, an iTunes hash tag (#itunes), and the kind of additional information sent with a Facebook message. If your browser won’t log you into these services automatically, you’ll be prompted for your user name and password.
Play with Your Purchase
After purchased media has found a home on your hard drive, you have several ways to put it to work.
Play it
You’re allowed to play unprotected iTunes Plus music on as many computers, iPods, iPhones, and compatible music players as you like. The whole point of removing the protection was to give you this kind of freedom.
If you have older protected music purchased from the iTunes Store, you can play it on up to five computers. Purchased movies, TV shows, and audiobooks can be played only on computers authorized with your iTunes account. (You can also play these movies and TV shows on Apple’s set-top media player, Apple TV.) When you play purchased media for the first time, iTunes checks to see whether the computer is authorized to play it. If so, the music, movie, audiobook, or TV show plays back with no problem. If the computer hasn’t been authorized, you’ll be prompted for your Apple ID or AOL screen name and password. That name and password, along with some information that identifies your computer, are sent to Apple, where that Mac or PC is counted against your limit of five authorizations.
If you’ve used up your authorizations on five other computers, you’ll be notified that you must deauthorize one of your computers before you’re allowed to play the purchased music. Fortunately, deauthorizing a computer is as simple as choosing Store > Deauthorize Computer. When you choose this command, your computer connects to the Internet, and Apple’s database is updated to reflect the deauthorization of that particular computer.
![]() You say you’ve used up all your authorizations and can’t remember exactly which computers you’ve authorized? No worries. Just start over. You can do that by accessing your Apple Account Information page, taking a gander at the Computer Authorizations entry, and clicking the Deauthorize All button. Doing so will do exactly what the button says and remove the authorization from every computer that had one. Note that this button won’t appear until you’ve authorized five computers and that you can do this only once a year.
You say you’ve used up all your authorizations and can’t remember exactly which computers you’ve authorized? No worries. Just start over. You can do that by accessing your Apple Account Information page, taking a gander at the Computer Authorizations entry, and clicking the Deauthorize All button. Doing so will do exactly what the button says and remove the authorization from every computer that had one. Note that this button won’t appear until you’ve authorized five computers and that you can do this only once a year.
After you deauthorize a computer, of course, you can’t use it to play back purchased media until you authorize it again. (Yes, this means that if you own more than five computers and intend to play purchased media on all of them, you’re going to spend some time playing the deauthorization shuffle.)
![]() Reformatting the computer’s hard drive (or replacing that hard drive) doesn’t deauthorize the machine. Before passing your computer along to someone else, be sure to deauthorize it.
Reformatting the computer’s hard drive (or replacing that hard drive) doesn’t deauthorize the machine. Before passing your computer along to someone else, be sure to deauthorize it.
Burn it
People play music on all kinds of devices and in all kinds of environments—on computers, boom boxes, home stereos, and portable music players, and in cars, boats, and planes. (I’ve even seen a system that allows you to play music in your hot tub.) Apple made this easier by stripping protection from its music, but not all music players support the AAC audio format that iTunes music is encoded with. Fortunately, iTunes allows you to burn your iTunes music to good old audio CDs.
When you do so, the music files are converted to Red Book audio files—the file format used by commercial audio CDs. These CDs are not copy-protected in any way and behave just like regular ol’ audio CDs. Pop ’em into a standard CD player and press Play, and out comes the music.
There’s no limit on how many tracks of unprotected music you can burn to CDs, but that older protected content does have some limitations. You can burn up to seven copies of a particular playlist that contains protected music, for example. If you attempt to burn an eighth copy, you’ll be told that you can’t. If you alter that playlist after the seventh burn—by adding or removing a song—you can burn another seven copies. Alter that playlist, and you get seven more copies.
To burn media to disc, create a playlist that contains the media you’d like to record to the disc. At the bottom of the playlist, you’ll see a Burn Disc button. Insert a blank CD or DVD, and click this button to burn the contents of the playlist onto the disc.
If the playlist contains music only, you’ll burn an audio CD. If you’re attempting to burn video, that’s a different story. iTunes doesn’t allow you to burn video—TV shows, music videos, and movies—to discs that can be played in commercial players (such as the DVD player in your living room). Instead, iTunes lets you burn video only as data for purposes of backup.
Rent Movies
Early in 2008, Apple began offering movies for rent from the iTunes Store. These movies play not only on your computer, but also on iPods, iPhones, and Apple TV. Moving movies from iTunes to your iPod is different from the procedure for moving “regular” movies. It works like so:
1. Find a movie you want to rent at the iTunes Store.
You can find movies by clicking Movies in The Store’s navigation bar. In the resulting page, you’ll see links to top movie rentals, along with thumbnail images of other movies you can rent. Click a thumbnail, and the movie page appears. Rentals cost $3 for older titles and $4 for new titles.
![]() After you rent a movie, you have 30 days to watch it before it’s automatically deleted from your iTunes Library or from the device on which it currently resides. When you start watching a rental movie, you must finish watching it within 24 hours. Within that 24-hour period, however, you can watch it as many times as you like.
After you rent a movie, you have 30 days to watch it before it’s automatically deleted from your iTunes Library or from the device on which it currently resides. When you start watching a rental movie, you must finish watching it within 24 hours. Within that 24-hour period, however, you can watch it as many times as you like.
2. Click the Rent Movie button.
The movie downloads to your computer and appears in the Rented Movie area, which you access by clicking Rented Movies in iTunes’ Source list.
3. Move the rented movie to your iPod.
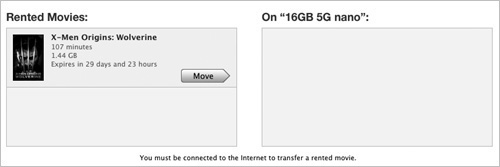
Select your iPod in the Devices area of iTunes’ Source list, and click the Movies tab. (Again, if your iPod can’t play videos, no Movies tab appears, and you’ll have to watch that rental on your computer or Apple TV.) At the top of this screen, you’ll see the Rented Movies area. Below it are any unexpired movies that you’ve rented (Figure 5.15 on the next page). Click the right-pointing Move arrow next to the movies you want to move to your iPod. The Sync button at the bottom of the iTunes window will change to Apply. Click Apply, and the button changes back to Sync. Click Sync, and the movie will be copied to the iPod.
Figure 5.15 A rented movie, ready for transfer to an iPod nano.
4. Watch the movie.
After your rented movies are on the iPod, you can find them by name along with the other movies on your iPod.
5. Move the movie back to your computer, if you like.
When you finish watching the movie, you may want to move it back to your computer so that you can watch it on that computer or move it to another compatible device that’s registered with your iTunes account (a video-capable iPod, an iPhone, or Apple TV).
To do this, mount the iPod, select it in iTunes’ Source list, click the Movies tab, and in On nameofipod (which will be the name of your iPod), click the now-left-pointing Move arrow to return the movie to your iTunes Library.