
Framing your shots is very simple to do, as long as you stop for a moment and think about the composition within the viewfinder. The aspect ratio of an image is the relationship between the width and the height of the image, expressed as a simple proportion. The aspect ratio of the image-capture chips in all DSLRs is 3:2, but there are many other possible aspect ratios for other types of cameras, with 4:3 and 16:9 becoming more popular as consumer equipment is now being designed to work with wide-screen televisions and projectors. What is important is that we see a rectangle that is wider than it is taller when we are shooting in landscape mode, or a rectangle that is taller than it is wider when shooting in portrait mode.
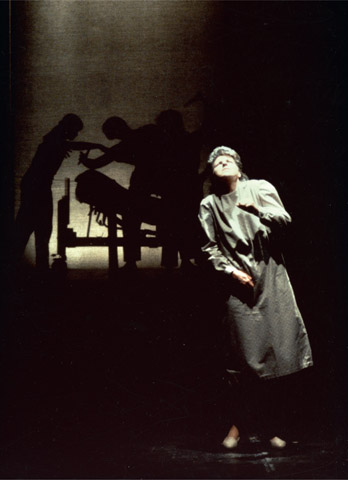
During all of my discussions about holding the camera or using a tripod, I demonstrated everything with the camera in landscape, since that often matches the aspect ratio of most proscenium theatres. Almost every proscenium I’ve ever seen (there are a few odd exceptions) is wider than it is taller. Also, I am usually taking wider shots of the overall stage for my work. I do frequently find that I need to switch to portrait mode for other areas, such as my wife’s costume work. In Figure 9.1 and 9.2, you can see the same setup photographed in both landscape and portrait mode. An argument can be made that each is useful in its own right, depending on the needs of the various artists involved. The landscape version shows more lighting and scenery, while the portrait is better for props, costumes, makeup and hair, and the performer. If you plan to shoot in portrait mode, be sure to practice your stances or set up your tripod for this in advance. To make life easier, when I turn the camera to portrait mode, I try to always turn in the same direction (counterclockwise is my preference for holding), so that I won’t have to deal with rotating images in two different directions when it’s time to review them.
Let’s look a bit closer at these three common aspect ratios, and what they mean. In order to understand what sort of aspect ratio and cropping choices we might make, we also need to discuss the Rule of Thirds. The Rule of Thirds is one of the most basic concepts found in image composition. Take any potential shot that you want, and divide the image into thirds, both vertically and horizontally. This works no matter what size square or rectangle you have.
When you place a subject right in the middle, the shot may feel awkward or overly staged, and it may also lack dynamic energy to the composition. Instead, try to place the objects or subjects that are the primary focus near the intersections of the one-third lines. Another technique, as shown in Figure 9.4, is to align horizontals, like the edge of the horizon, with one of the horizontal one-third lines. This can create interesting and dynamic visuals in your shots.
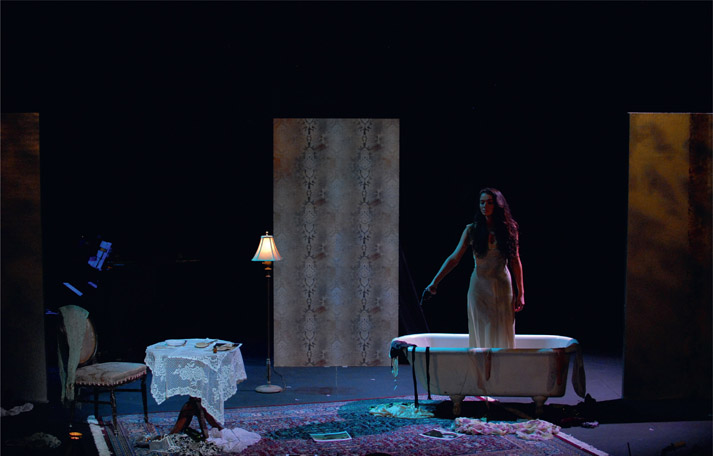
Figure 9.1: Final moment from La Voix Humaine, long shot in landscape mode.
In Figure 9.5, you can see that there is a diagonal line between the character of Billy and the female dancer, which creates a visual link and guides the eye. For the sake of clarity concerning the Rule of Thirds, I chose to artificially crop this photo into a 3” × 3” square, for the sake of clarity concerning the Rule of Thirds. Let’s look at the rule applied to another shot that is adjusted to fit our common aspect ratios. In Figure 9.6, I have imported the image into Photoshop, and the image is natively in a 3:2 aspect ratio. I’ve turned on the crop tool, which includes a handy “Rule of Thirds” overlay grid that can assist you in your editing.
Figure 9.2: Final moment from La Voix Humaine, closer shot in portrait mode.
Figure 9.3:
Rule of Thirds on a 3” × 3” square.
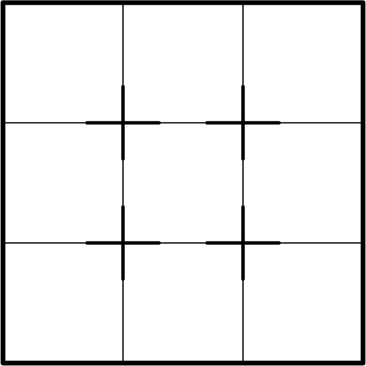
Figure 9.4:
Rule of Thirds with intersections highlighted.
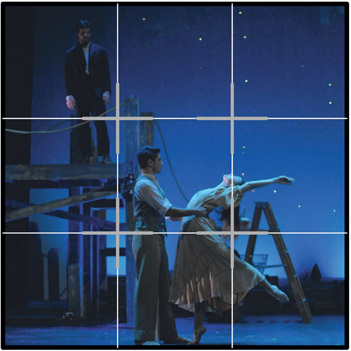
Figure 9.5:
Rule of Thirds applied to Carousel production shot.
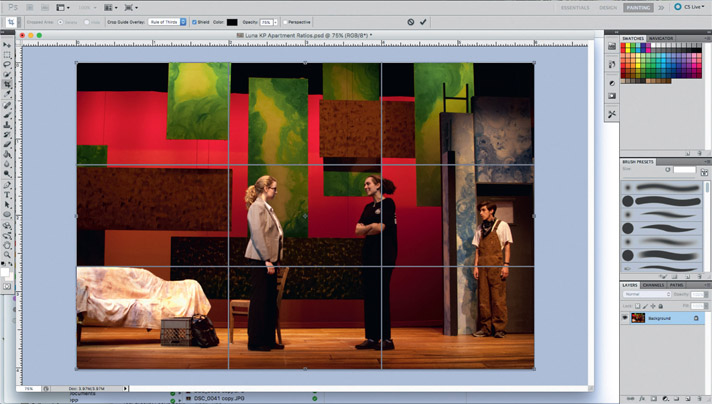
Figure 9.6: 3:2 aspect ratio, Luna Gale, Allegheny College, Feb. 2017.
As you can see, the two main female characters are on or right near the vertical one-third lines. I could crop this image down a bit, losing some of the sofa on the left, and this would proportionally adjust the vertical one-third lines so that both female characters were right on them.
Another option would be to convert this image to a 4:3 aspect ratio. I began by resizing the image so that the vertical height was 6 inches, which means that I need to crop out enough of the image so that the horizontal width is 8 inches, and that will maintain the new 4:3 aspect ratio. Using the crop tool, and my Rule of Thirds overlay grid, I can choose to crop out part of the sofa on the stage right side of the photograph in order to trim the width down to 8 inches. As you can see, this has also moved the female characters so that they are on or adjacent to the vertical one-third lines.
Finally, if we wanted more of a widescreen feel to this photograph, we can resize and crop it to arrive at a 16:9 aspect ratio. In this version, I resized the photograph so that it was 16 inches wide, and then turned on the crop tool again and adjusted the grid so that it covers 16 inches of width and 9 inches of height in the image. As you can see, in order to adjust this photograph to fit this new aspect ratio, I had to make some cropping choices at the top and bottom of the image. I chose to place one of the horizontal one-third lines so that it passes right through the faces of the two female characters, making them strong focal points of the composition.
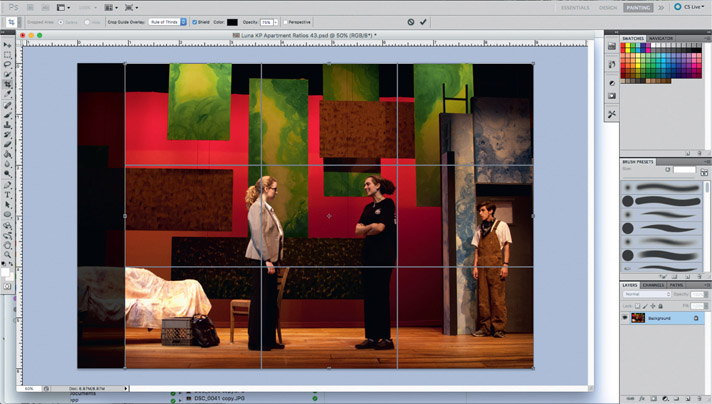
Figure 9.7: 4:3 aspect ratio, Luna Gale, Allegheny College, Feb. 2017.
When scaling images in Photoshop, it is very important to keep the Constrain Proportions option checked, otherwise you will end up with images that are compressed or distorted either horizontally or vertically. You can see in the screenshot where that option appears during the image-resizing process. By keeping the proportions constrained, when I resized the image to be 16 inches wide, I ended up with 10.708 inches of height, which I subsequently cropped down to the 9 inches required to maintain the ratio properly.
There may be some specific reasons why you don’t want to employ the Rule of Thirds, perhaps because you need to capture a specific object or subject that just doesn’t lend itself to this situation. That’s perfectly fine, as long as you are thinking about the composition of the frame. I often suggest that a skill with composition for photography translates very directly to developing your skills for the composition of elements within a proscenium arch. This would especially apply to scene designers, lighting designers, choreographers, and directors.
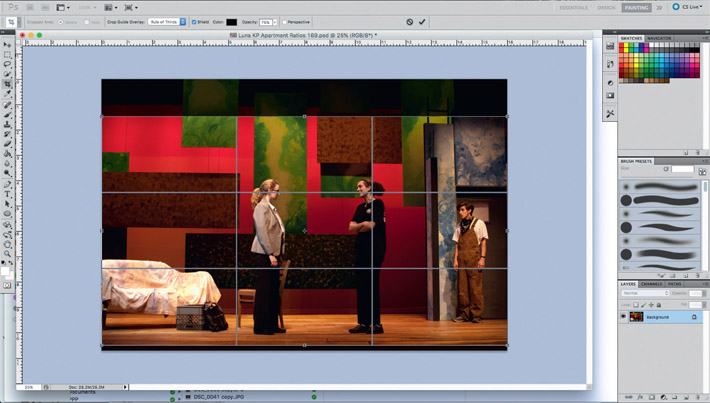
Figure 9.8: 16:9 aspect ratio, Luna Gale, Allegheny College, Feb. 2017.
Ultimately, what do you need for your portfolio or web-site? If you want to adjust or crop your photos so that they conform to these standard ratios, that’s fine, but if you have other overriding reasons to choose other aspect ratios for your final images, then go with what works for you. No one looking at your portfolio is going to get out a ruler to see if you are conforming to these ratios, but you should be aware that the aspect ratios we use are the result of many years of artists determining which aspect ratios are most pleasing to the eye. If you want to delve more deeply into this topic, and don’t mind some math, look into the Golden Rectangle or Golden Ratio, which mathematically define certain desirable and scalable aspect ratios.
There is one more significant mechanical influence on the size and format of your images, which has to do with the image-sensor size. In the days of 35mm film, the frame was 36mm × 24mm per exposure, which is a 3:2 aspect ratio. Full-frame DSLR cameras are made with a sensor that is the same size as this for several reasons, but most important to me is the ability to use older, high-quality lenses on modern DSLR cameras. The downside is that the full-frame sensor cameras tend to be the really expensive ones, and were certainly out of my price range when I started into the digital realm. Most all of the consumer and prosumer camera models are instead fitted with a slightly smaller image sensor often referred to as an APS-C. This size of sensor is derived from a more recent type of film that had a brief heyday before being relegated to the scrap heap with the advent of digital photography. The sensor size varies slightly between manufacturers, and sometimes even between model lines, but averages about 24mm × 16mm, which is still an aspect ratio of 3:2. This means that there is a crop factor of 1.5, or that the APS-C sensor is 67 percent the size of the full-frame sensor. For the most part, this isn’t an issue, as long as you are careful to purchase the correct lenses for your camera. Lenses and bodies are interchangeable within some brands, but this added functionality carries with it some pitfalls. If you do own a brand that allows for this, here are the major compatibility concerns. There are four possible combinations:
- Full-frame body and full-frame lens: in this case, you have the best possible combination of body and lens, and should not experience any cropping or vignetting in your images.
- Full-frame body and cropped-frame lens: in this case, your camera may recognize the fact that you have a cropped-frame lens installed, and may automatically adjust what you can see through the viewfinder to match the reduced size of the image that will be recorded by the image sensor. If this doesn’t happen automatically, you will need to be aware that the image will only be two-thirds as large as what you can see, since it is being mechanically cropped by the architecture of the lens. Basically, the crop lens will only focus its image on the center two-thirds of the image sensor.
- Cropped-frame body and cropped-frame lens: in this case, you should also experience full and effective use of the entire surface of the image sensor, since the crop frame lens is designed to work with the smaller APS-C sensor format.
- Cropped-frame body and full-frame lens: in this case, the image captured by the full-frame lens is actually larger than the APS-C sensor size, which results in some loss of the overall image. Essentially your image will spill over the sides of the smaller sensor and not be fully recorded.
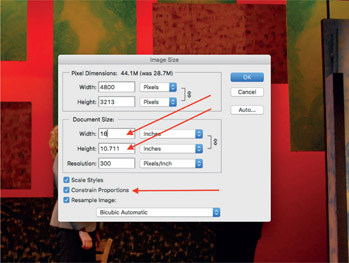
Figure 9.9: Image size adjustment window in Photoshop.
To further investigate this issue, we need to talk a little bit about field of vision. Most humans have a cone of vision around 60 degrees, if we just look at what is directly in front of us with both eyes. Including peripheral vision, our field of view is actually much wider, and approaches 180 degrees for most people. For now, though, let’s concentrate on the area we can see clearly when we focus on something directly in front of us. As a lighting designer, when I am working on the design of a show, I will sit at a tech table that is often two-thirds of the way toward the back of the house. This distance often allows me to see the entire stage from edge to edge within my primary vision. With my full-frame 50mm camera, I could usually capture most of what I wanted, or might have to move back a row or two. With my APS-C format camera, I need to use a 35mm lens instead to get the field of view I want.
Now, if I were to go and try to use my 50mm full-frame lens on my APS-C camera, I have to take into account the fact that the projected image is larger than the sensor, which is similar to having a longer-focal-length lens on the camera. To determine this effect, simply multiply the focal length by the crop factor to get the new “apparent” focal length. In this case, 55mm × a 1.5 crop factor = 75mm apparent lens size. A 75mm lens is getting into the lower end of telephoto lenses, and this makes sense. You will get an image that is zoomed in by a third, as opposed to the entire image you see in the view-finder. Obviously, this is probably the least desirable situation, unless you are hoping to use older lenses you already own, or plan to buy a full-frame DSLR later on, and don’t want to re-buy all your lenses.
One of the most important things you can do to prepare for a successful photo-call is to plan out where you will shoot from. If you can visit the theatre in advance of the call and walk around with your camera, you can pre-plan which lens or lenses you need to use, and if you will need multiple cameras, a tripod, helpers, or not. I also might make notes on my photo-call list of which seat and row I want to be in for certain shots so that I don’t have to figure it all out again on the day of the shoot. Usually you only really have time to shoot each setup from one vantage point, and in a portfolio presentation, I’d rather see three different looks from the show, as opposed to three different views of the same look. That said, not every shot you show has to be from the exact same vantage point. I, as a lighting designer, usually feel the need to show the entirety of the stage so that everyone can see how I treated the whole look, rather than just the part we are focusing on. Other areas might want to show a close-up; for example, a costume technician might want to feature just one outfit that they built, and not worry about the rest of the cast. A props person might want to feature a particular prop that they built in use. Think clearly about your intended use, and what you need to capture for that use to be effective.
You could zoom or crop this photo a bit, if you like, to focus even tighter on the costume, but I like to have some set context available so that you can show how the colors of the main object of interest interact with the rest of the world of the play. If we were talking instead about the prop martini glass, or perhaps her makeup, an even closer shot would probably be better. Of critical importance, however, is your background. When you think about a shot, think about what is behind the object or person you hope to capture. In this case, there is some color and some visual interest with the different set pieces, but if I had moved to my right and shot this image with the amber wall behind the actor, it would have stolen the focus of the photograph. You can even argue that the amber wall is a bit bright, which I could agree with. I did shoot a second version moving much further to the right, and that then uses the darkness as a background, although you will see the ever-present exit light in the shot. You could Photoshop that out if you like. I was trying, however, to frame the actor so that they were centered in the right-hand archway, and the partial arch in the background is also pointing toward the center of the photograph. There are times, although infrequent, where you can use elements of the set to influence the viewer’s eye, especially if you are careful to plan out your shot. This is certainly a regular practice in art photography, where the composition of the photograph is truly up to you. We are bound by the fact that we need to capture certain things in our work, but that doesn’t mean that you can’t look for ways to increase the strength of your composition.
Another way to look at this can be seen in the following sequence of shots. I never do this for real, but the actors were kind enough to hold the pose long enough for me to move around and shoot this moment from some different angles. This production was presented in the Pavilion Theatre, which is a very deep 3/4-thrust space. As such, most of the audience actually sits on the sides of the performance space as opposed to the end. Figure 9.12 shows the view from the audience section located downstage center of the main playing space.
Figure 9.10: Shot of a character’s costume from Twelfth Night, Penn State University, Nov. 2016.
The two characters standing upstage are a main focus of the scene, but the rest of the characters are also participating. From this angle, we don’t see many faces, as is often the case with the necessarily fluid blocking that is called for in thrust venues. This is the view of the action that about 20 percent of the audience saw. Figure 9.13 and Figure 9.14 are both from the seats located stage right of the main playing space. Figure 9.13 is shot from the second lowest row of seating, and Figure 9.14 is shot from the highest row of seating.
Figure 9.11:
Alternate shot of a character’s costume from Twelfth Night, Penn State University, Nov. 2016.
The main difference between these shots is just how many people are visible, and what they are standing in front

Figure 9.12: Scene from Twelfth Night, shot from downstage center seating section.
of. The two characters upstage aren’t included in second and third shots, mainly because I don’t have a wide-angle lens that won’t start to “fisheye” at that distance. If I really needed the other two, I need to move further back to include them, and that also changes the character of the shot. But let’s take a closer look at the difference between Figure 9.13 and Figure 9.14. As I move further up the rows from where I was to take the shot shown in Figure 9.13, two things are changing. As I increase distance, I am able to get more real estate in the shot, but based on the common fact that theatre seating tends to be on an incline, I am also increasing my angle to the stage. The difference is especially visible when you compare the look of the steps on the platform in the lower-right corner of each shot. The third shot in Figure 9.14 is steeper, but I’m able to
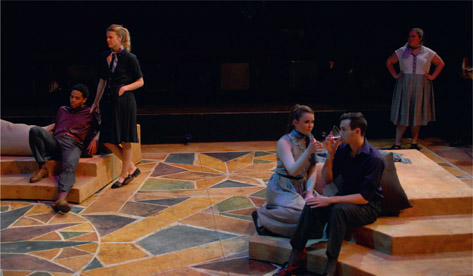
Figure 9.13: Scene from Twelfth Night, shot from a lower row in the stage right seating section.
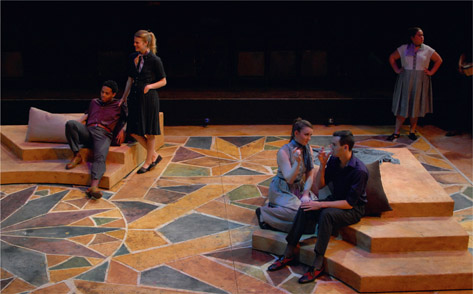
Figure 9.14:
Scene from Twelfth Night, shot from the highest row in the stage right seating section.
include more of the scenic unit than in the second shot. Most houses have a rake to their seating, and sometimes it can be a pretty extreme rake, so this distance-and-rise situation may affect you severely, as it does in this particular space. Think about wider lenses, or shooting from an opening in the seating that allows you to avoid the increased height with the distance if that is possible.
Figure 9.15:
Court scene from Twelfth Night, shot from the downstage center seating section.

Figure 9.16:
Court scene from Twelfth Night, shot from the lower rows in the center of the stage right seating section.
Figure 9.17:
Court scene from Twelfth Night, shot from the downstage right vomitory.
Now, if we look at Figures 9.15 and 9.16, this is again two very different angles of the same moment in the play. I like the fact that Figure 9.15 features the set as a backdrop, rather than the not-very-nice theatre seats seen in the background of Figure 9.16. I actually went through the house during the break between the end of the show and the start of the photo-call and picked up trash and forgotten coats and gloves that would have otherwise been plainly visible. I tried to get all the seats to stay up at a consistent angle, but some were a bit troublesome, and reflected the bounce light a bit differently.
One of the problems, however, with Figure 9.15 is that we can’t see the expression on the face of the actress in the foreground, since she is turned upstage. By moving my position, and shooting from the side, I was able to capture her face in Figure 9.16. Additionally, the actress in the foreground is actually blocking our view of some of the performers in the background, which is a bit awkward. Depending on your needs, one of these pictures may be better than the other, but neither of them solve all the issues. This is certainly one of the challenges with taking pictures in a 3/4-thrust venue. I took a third shot from lower down and deep into a vomitory entrance to the space, so that I could gain distance without gaining height, and ended up with Figure 9.17. We still don’t see the one actress’s face, but she’s not standing directly in front of anybody anymore and the set forms a significant portion of the background instead of chairs. This might be the best option for this particular moment, knowing that we’re never going to see everybody’s faces simultaneously from any possible vantage point in the whole space.
Here are another pair of shots from the same show, with a similar blocking issue. You will notice that the two actors are playing a slightly different angle, which allowed me to tuck into the same vomitory, and still capture a profile and a full face.
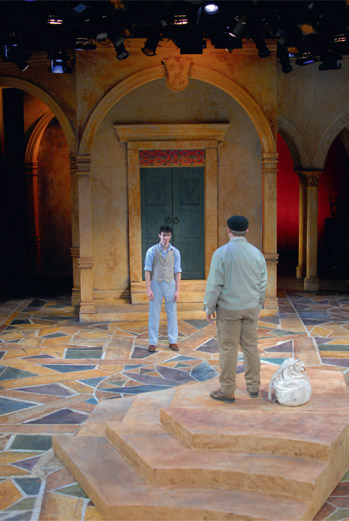
Figure 9.18: Exterior scene from Twelfth Night, shot from the downstage center seating section.
In this production shot (Figure 9.20) from 1776, I took a much more “involved” shot, primarily for the benefit of the costume designer. There are positives and negatives about this shot, so it really depends on your needs if something like this is useful to you. On the one hand, the character to the right is dark and a bit out of focus, but then he isn’t the main subject of the shot, so perhaps that is okay. The main subject is the actress, and especially her dress. For this reason, the shot is limited in its usefulness to the entire company, but is a far better use of framing for the one design area. I also like the fact that the actor’s arm creates a strong visual diagonal that causes our eye to focus right where I wanted it. Note also that the high angle of this shot means that I am capturing some of
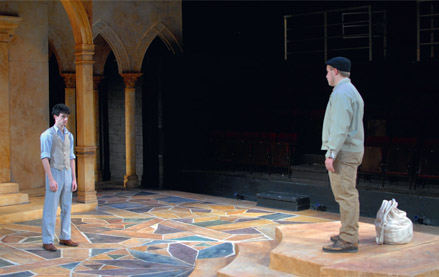
Figure 9.19: Exterior scene from Twelfth Night, shot from the downstage right vomitory.
Figure 9.20:
Production moment from 1776, Penn State University.
the lighting instruments on the grid of the theatre. I carefully moved around to avoid lens flare, and tried to position the visible fixtures so that they help reinforce the imaginary diagonal line that begins with the actor’s arm and ends with the two pale blue fixtures.
If you plan your shots in advance, and know what you want to see in the frame and beyond the frame, you will certainly be more successful in capturing what you need, and be happier with the results.
Framing Practice Session
- 1. If you expect to shoot from a variety of locations at your next call, you should walk around the venue with your camera and confirm a few things.
- a. What’s behind and beyond the shot I want to get?
- b. Do I have the right lens to capture the entire shot without cropping anything important or being zoomed out too far?
- c. Do I need to adjust my plans for a tripod or monopod, or evaluate the stances that I might use to handhold the camera?
- 2. Walk into the theatre, and try to find the row where you can comfortably see everything in your primary cone of vision without having to turn your head side to side. Now look through your viewfinder and see if your lens crops or zooms what you see. If you have multiple lenses, try them all out, and see which one suits your needs the best for the particular venue that you are in. If you were using a zoom lens, and are perhaps taking pictures of individual costumes and full-stage shots, then you should ensure that your zoom lens is capable of zooming in close enough and zooming out far enough to catch both these extremes. Have someone stand on stage as a scale stand-in for the performers so that you can get a sense of this. Once you know how far you have to zoom in and out, then you will also be able to evaluate whether or not you’re going to be in a situation where your zoom lens may not be able to utilize its maximum aperture. This would be useful information for you to have in advance rather than discovering it on the day of the shoot.
- 3. If you haven’t spent much time photographing things in portrait mode, then this would be an excellent chance to see which stances are most comfortable for you, or if your tripod is capable of flipping your camera 90° to the side.
- 4. If you are in an ornate theatre and want to capture the extents of the proscenium, then this is also a good time to see if the 3:2 aspect ratio of your DSLR can appropriately capture that portion of the architecture. If not, you may need to go with a slightly wider focal length lens and then reframe your pictures in a 4:3 aspect ratio, giving you a little more height to the width of the image.
- 5. Carry your camera around with you and try to get in the habit of taking snapshots of interesting people and things, while carefully planning how the people and things in the foreground relate to the background. This will help you plan your shots in non-traditional spaces.
- 6. Grab a common household object, and attempt to photograph it from several different angles and distances. See if you can figure out how to tell a different story with the same object just by varying your view of the object.