

Before we get into all of the settings and concerns regarding exposure, we should talk about focus. Most cameras today have an autofocus setting, which may be easily relied upon for most everything that the average user needs. Most smart-phone cameras or point & shoot cameras are used for taking pictures of friends and family, selfies, or travel destinations.
While not framed particularly well, this shot captures a moment in time on our family travels, and can be forgiven for being a bit grainy and out of balance. Despite the various challenges, though, the autofocus function has effectively done its job. Our faces are in focus, as are the architectural features in the background. Modern DSLR cameras and lenses are usually equipped with an autofocus mode or modes, and the ability to focus manually. Autofocus is further divided into active and passive systems, each of which has some limitations in the theatre. Active autofocus relies on a beam of light to establish the distance to the subject, while passive autofocus uses a special sensor to determine the visual contrast between items to determine the focal distance. The focal distance is the distance from the camera to the subject that, at a given point on the focus ring on the lens, will render the subject in focus.

Figure 2.1: Family selfie in Old Town Square, Prague, 2015.

Figure 2.2:
Autofocus light on Nikon D200.
When using the active autofocus system in your camera, there is a special light separate from the flash unit, often found on the right side of the camera near the base of the lens and the viewfinder. It may be coupled with other features such as red-eye reduction, but those don’t really come into play at the distances we are generally shooting from in the theatre. In fact, the active autofocus light isn’t really of use at those distances either. The concept is that your camera sends out a beam of light, and measures that beam upon its return to the camera, enabling the camera to derive the distance to the subject. Often, your camera may require you to be using a certain metering mode as well, which we will discuss in Chapter 3. Once it knows the physical distance to the object, the camera can adjust the focus of the lens based on the chosen aperture. The active autofocus may help when you are shooting closeups, but is usually only useful at distances of a few feet to your subject. The active autofocus system is also hampered in low-light situations, and may result in the failure of your camera to accurately focus on the stage. I have often found this to be the case with my camera when photographing dark scenes, and often find myself switching to manual focus when the camera can’t figure it out.
The passive autofocus system relies on an extra focus sensor strip that runs horizontally inside the camera when the camera is held in “landscape” mode. The camera uses this focus strip to detect a small portion of the image you are focusing on. It then optimizes the focus to create as high a contrast as possible between the various pixels on the strip. If the image is blurry, then there is more of a gradient from light to dark, whereas if the image is sharp, there will be a major shift in contrast from one pixel to the next. The camera knows what kind of lens you have, and with that knowledge, and the knowledge of what aperture setting you have selected, the camera can automatically dial in the correct focus for the object you are designating as your main point of interest in the shot. This system works particularly well if there are vertical, high-contrast elements in the shot, such as the contrast seen in Figure 2.3 between the character of Billy Bigelow, on the right, and the blue cyclorama behind him. If, however, you are in a low-light situation, or your camera can’t find high-contrast verticals, you may be out of luck and need to switch to manual focus again.
When you look through the viewfinder and line up your shot, you then usually depress the shutter release button only halfway, which triggers the camera to use its autofocus modes, as appropriate, to derive the proper focal distance. Once your camera has settled on a distance and has adjusted the focus, you can then continue to squeeze the shutter release and take the picture. Be sure to give your camera enough time to adjust the focus before taking the picture so that you assure yourself a crisp image.

Figure 2.3: Sharp focus detail of scene from Carousel, Bucknell University, Oct. 2016.
Figure 2.4:
Sharp focus detail of pixel strip from passive autofocus system.
Your camera may appear to run the focus in and out if it can’t find the right distance, and may possibly default to one end of the range or the other, most likely leaving you with nothing even remotely in focus. Many cameras have the ability to hold focus once you’ve pressed the shutter button part of the way. If yours does, then you can take advantage of this trick by focusing the camera on an object that may not necessarily be at the center of your frame and then reframe your shot while continuing to hold the shutter button partially depressed. Once you’ve settled on the proper composition you can press the shutter button the rest of the way and take your shot.

Figure 2.5:
Blurry focus detail of scene from Carousel, Bucknell University, Oct. 2016.
Figure 2.6:
Blurry focus detail of pixel strip from passive autofocus system.
If you happen to be using an older lens on a newer DSLR, you may not have the option for all of these autofocus settings, or you may even be using a lens that was made prior to all of these possibilities, in which case you will need to be sure to set the focus yourself. Most older lenses have a split focus field in the middle, in which the image is sliced in half and thrown slightly out of alignment unless the lens is focused to the proper focal length. It’s best to locate a vertical line (the edge of a set piece, for example) to use as a guide for making sure the right focal length is set. Getting the pictures in focus is fairly easy and is certainly improved with much practice. However, don’t discount the fact that your eyes may get tired over the course of a fast-and-furious photo-call. I find that if I’m not thinking about it, I end up squinting fairly hard through the viewfinder while taking pictures, and I have to take a moment to relax my eyes.
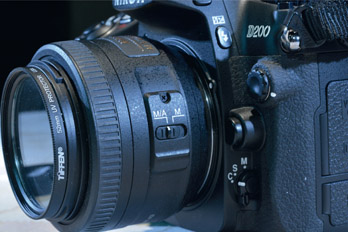
Figure 2.7: Typical manual/autofocus switch location.
A camera may have several different autofocus modes. Mine has four that are representative of the most common options available. They are selected with the switch shown in Figure 2.8. From top to bottom, they are:
- Dynamic Area – Closest Subject: Camera focuses on the object(s) closest to the camera in focus, disregarding the rest of the shot. This mode is not useful for long shots.
- Group Dynamic: Camera focuses on the center of an area in the shot, which is selected by the user with the round rocker pad (see Figure 2.8). This mode allows a user to
focus on a very important subject that may not be in the middle of the frame.

Figure 2.8: Autofocus area mode selector switch.
- Dynamic Area: Camera focuses on the center of an area in the shot selected by the user, but also factors in focal information from other parts of the frame. This is useful for keeping a moving object in focus. If, for example, you are trying to focus on a dancer in motion, this feature will help predict the proper focal length for that dancer as they move through the frame. Some cameras have a feature related to this, which is called predictive focus tracking, where the camera is focusing on where the object will be when the shutter is pressed, as opposed to where it is now, based on the current movement of the object.
- Single Area: Allows the user to focus on one part of the frame, and is best for static compositions.
You may have the same or very similar options in your camera, but with different names. Check out the descriptions in the user manual; then experiment with each of your camera’s specific autofocus modes to see what works for you. I tend to use the single area mode, since I want to make sure I’m focused on the characters that I am usually framing near the center of the shot, and I usually don’t have to worry about people in motion.
In Figure 2.9, you can see nine small rectangular boxes, which are possible focus points that you can have the camera focus on if you choose one of the dynamic settings. Your camera may have a different layout, but most higher-end cameras have a feature similar to this. Many cameras also have a feature that supplements (or replaces) this feature, using sophisticated digital facial recognition algorithms to automatically find all the faces in the shot, highlighting them in your viewfinder, and trying to focus on them. This facial recognition feature may not work at a distance as well as you might like, so again, experiment.

Figure 2.9:
Typical viewfinder in a DSLR camera.
Often, when shooting in the theatre, we run into situations where the lights themselves are in the shot, due either to the angle of the shot you are trying to take, or to the overall architecture of the venue. One of our most used venues at Penn State is a black box with a 16’ grid height, so almost all shots inevitably have some of the lighting grid in view. A single bright-light source in an otherwise low-light setting can often lead to lens flare. Lens flare is the reflection or glare of lights directly shining on the surface of your camera lens. While this can create a very dramatic look, like in this shot from Unto These Hills, it is usually more of an issue to be avoided or mitigated than something you might want to capture in all your shots. I am usually trying to capture the moment as the audience experienced it, and their eyes wouldn’t have reacted to the stage lights in the same way.

Figure 2.10:
Lens flare from Eagle Dance, Unto These Hills, Cherokee Historical Society, 2006.
Many lenses come with an accessory called a lens hood. It attaches to the front rim of the lens (just like the lens cap), and is a simple tube that extends out from the front of the lens to shield the surface of the lens from lights shining on it from oblique angles. (Such hoods may also be purchased as aftermarket accessories if your lens did not come supplied with one.)
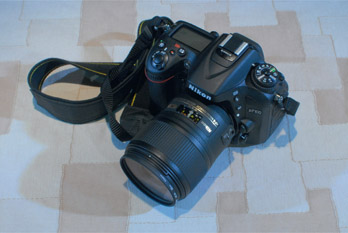
Figure 2.11:DSLR camera and lens without hood.

Figure 2.12:
DSLR camera and lens with hood attached.
The hood adds some length to the lens casing, but so little weight that I almost never notice its presence. For longer-throw lenses, the hood may be a fully intact tube like the one pictured, but for wider-throw lenses, the hood may have some scallops cut out to prevent the edges of the hood from getting into the shot. As such, it is important to get the appropriate hood for the lens that you are using, otherwise you may experience some vignetting, or darkening, at the corners of your shot. If you see this, then you need to replace the hood with one more suited to the focal length of your lens. My wife took the shot in Figure 2.13 for a later chapter. I was using the camera that has the hood on it, and we discovered her camera was being subjected to the lens flare you see in the photograph. Since we couldn’t put the hood on her camera, the solution was to change angles a bit, which you will see the result of in Figure 6.32.

Figure 2.13:
Lens flare without hood.
Camera Focus and Autofocus Settings Practice Session
This is the first set of suggested Practice Sessions that will be found in this book. Try out all the features in your camera to become familiar with them, and if you are already very familiar, you might still want to at least try the exercises that push your camera to its limits when working just with available light. Today’s digital cameras often provide a preview screen on the back that gives us an immediate look at the shot we just took. The practice of taking a shot and immediately checking the results is somewhat humorously referred to as “chimping.” While this is fine if you want some basic info about framing or major exposure questions, you should avoid relying on the small preview screen when it comes to details. It will be difficult to tell if you are truly in the sharpest focus possible, and the details in the highlights and shadows at the edges of your exposure window may be difficult to see.
The first step in reviewing your successes should be to load the pictures into your computer and view them on a quality monitor that has been calibrated. For some exercises, though, you may need to go a step further and print out some of the test shots that you take to see the final quality, since print quality is more demanding than laptop screen quality. Many of the exercises can be easily downloaded and viewed on screen – such as the shutter speed ones. You will be able to see what you need to see on the screen without printing the pictures. Other exercises may require you to print out your pictures in order to see the difference in color or resolution. Just because it looks great on screen doesn’t always mean it will translate well to the final print. If, however, you are living in a totally digital world and aren’t planning on printing things, then you won’t have to be concerned with this aspect of things.
Read your camera manual and check out the focus settings page(s).
- 1. Do you have active or passive autofocus?
- 2. What settings need to be activated for your active autofocus to function properly?
- 3. What settings need to be activated for your passive auto-focus to function properly?
- 4. How many focus zones do you have, and how do you switch between them?
- 5. How many autofocus modes do you have?
- 5.1. How easy is it to switch between them?
- 5.2. In the modes that depend on the user to select the focal point, how do you accomplish that?
- 6. Set up a shot with three different people in it, positioning one close to the camera, one at mid-range, and one far away.
- 6.1. With the lights on brightly, experiment with your autofocus options.
- 6.2. Experiment with switching to manual and getting a sharp focus on the various people in the shot.
- 6.3. Then, with the lights turned low, try to use the autofocus features. If they still work, try turning the lights down even lower.
- 6.4. With the lights still at a low level, switch back to manual and see if you can get a crisp shot with the amount of light present.
- 6.5. Often, manual focus cameras will have a center circle that is bisected horizontally or on a diagonal. When the image is in focus, everything will look fine, but when it isn’t, things won’t line up in the circle where the line cuts through the image. Find a vertical line, either a person against a backdrop, as in Figure 2.3, or the edge of a scenery element. The proscenium arch may work as well, but I often find they are too dark to use for this. Work in the dark to see how easy or difficult it is to manipulate the focus in these conditions.