
White balance is one of the most critical things that you need to be aware of when taking theatrical shots, and is a major difference between stage photography and most other types of photography. The issue at the heart of this situation is that theatrical lights are color-balanced to a different color temperature than daylight, which is where most people take pictures. Color temperature is measured in degrees Kelvin, and is a quantification of how warm or cool the light is. I’m not talking about anything having to do with colored gels or other color-changing effects; I’m just talking about the original source light. We will concern ourselves with the colored stage light later. First, let’s take a look at the visible spectrum of light:
As you can see, the visible spectrum occupies a small but important sector of the electromagnetic spectrum. It transitions from invisible ultraviolet at around 400 nanometers (nm) and is visible from 400nm up to 700nm, where it transitions to infrared light. Our eyes can only perceive this narrow band of electromagnetic energy. Together, these wavelengths make up all the colors we can see. Light can be characterized by referring to its color as red or green, and this is fine when we are talking about light that has been altered through the use of gels, dichroic filters, or the mixing of LEDs. We do need to also be able to characterize the color of the original source light. I’m sure that you have observed that candlelight is much warmer than fluorescent light, although fluorescent lights are a poor example because they are a mix of just a few sets of wavelengths, as opposed to a strong representation across the entire visible spectrum. We often think of sunlight as warm and inviting, but in actuality, aside from sunrise and sunset, the light of the sun is cool and bluish in nature. The Kelvin scale measures its 0° point at –273.15°C, or –459.67°F, also known as “absolute zero.” This is the point where all matter ceases to move or vibrate. Certain forms of matter emit light when they become warm, and we can use a spectrophotometer to measure the color of the light emitted by a “black-body” sphere as it is heated. The color temperature of the light radiating from the object directly correlates to the sphere’s temperature measured in degrees Kelvin. One of the best examples of this phenomenon is the light that is emitted by the metal that forms the filament in a typical incandescent lamp. As more and more electrical current flows through the filament, a greater and greater amount of light energy is created. What is odd for us, though, is the fact that the hotter the temperature, the colder the light emitted becomes.

Figure 8.1: Visible spectrum of light.
The typical incandescent theatrical stage light tends to emit light at 3200°Kelvin, which is actually somewhat lower on the scale. Fluorescents emit light around 5600°Kelvin, and sunlight can range far beyond that, approaching 10,000°Kelvin at high noon on a clear day. This might seem odd, as it goes against everything we tend to think about the sun when we are kids. Most kids have drawn that stereotypical picture of a house with a fence and windows and doors, perhaps with a chimney, and this scene usually includes a yellow sun. Compared to theatrical light, however, the sun is very cold, while theatre lighting is much closer to the warmth of a fire or candlelight. This wide range of color temperatures did not affect early black-and-white photography, which merely recorded the relative intensities of a scene in shades of black, white, and grey. With the advent of color photography, however, the early scientists made a choice to use chemicals that reacted to cold white light, so that early color films could accurately reproduce the colors found outdoors in the sunlight. Since then, almost all films available off the shelf in stores were balanced to render accurate colors in daylight. The flash feature in most cameras is also a colder white light, so the light from the flash doesn’t distort the colors too much.

Figure 8.2:
Kelvin temperature scale.
As you can see from this scale, theatre lights tend to be very, very warm. Since we know that almost all incandescent theatre lamps are designed to emit light at 3200° Kelvin, we use this as our baseline for all other decisions relating to color temperature. We do now use many other types of sources in shows, so you may also find fluorescents, LEDs, arcs, or even the occasional sodium or mercury-vapor lamp. For the most part, however, we use light that is measured at that 3200°Kelvin mark. Humans like warm light. We are drawn to it…it provides comfort and is pleasing to our eye. Cold white light, such as arc or fluorescent, often seems harsh and unforgiving, and does not provide us with the same sense of comfort.

Figure 8.3:
Object lit with incandescent source, D200 set to 3200° Kelvin.

Figure 8.4:
Object lit with incandescent source, D200 set to 5600° Kelvin.

Figure 8.5:
Object lit with incandescent source, D200 set to 6300° Kelvin.

Figure 8.6:
Object lit with incandescent source, D200 set to 10,000° Kelvin.
Since most all film stock and its chemistry were balanced for outdoor lighting primarily, when you use “daylight” film inside, the colors become very orange. Since most people still tend to shoot outdoors or under cooler fluorescent fixtures, today’s DSLRs and point & shoot cameras will come preset for these colder color temperature situations. Often, the main indicator of this mismatch is the tendency of your pictures to appear overly yellow or even orange and brown. Here are a number of test shots taken with the camera set to several different color temperature settings, and under several different light sources. You can see that the settings need to match the source in order to render the colors effectively and accurately. I also included a shot of each source from my camera phone, which has no color temperature settings, although I suspect that there is a bit of automatic white balancing going on.

Figure 8.7:
Object lit with white LED source, D200 set to 3200° Kelvin.

Figure 8.8:
Object lit with white LED source, D200 set to 5600° Kelvin.
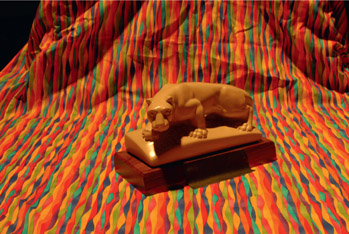
Figure 8.9:
Object lit with white LED source, D200 set to 6300° Kelvin.

Figure 8.10:
Object lit with white LED source, D200 set to 10,000° Kelvin.

Figure 8.11: Object lit with white arc source, D200 set to 3200° Kelvin.

Figure 8.12:
Object lit with white arc source, D200 set to 5600° Kelvin.

Figure 8.13: Object lit with white arc source, D200 set to 6300° Kelvin.

Figure 8.14: Object lit with white arc source, D200 set to 10,000° Kelvin.
The solutions to correct the camera and film, before we had DSLR cameras available, were one of these three techniques:
- Least useful – work with the photo lab to skew the colors back to normal during the printing process. This was all way before Photoshop made digital photo editing so simple and accessible. This option was not cheap, easy, or terribly effective.
- Least expensive – shoot your daylight film with a blue filter over the lens to cool off the incoming light, balancing it to the expectations of the daylight film. Not a perfect solution,
as some colors were less successfully translated than others. You would use an “80A” filter to correct 3200° Kelvin light to 5500° Kelvin light. Looking at the Kelvin scale, this puts us right up there with flash and cloudy daylight, which is right where the chemistry of daylight film is at its best. The real downside of this is that the blue filter costs
you 2 full stops of light, which, as we already know, is tough to lose when you are shooting in a dark theatre. Also, the filter can’t manufacture light intensity in the lower part of the visible spectrum; it can only cut down the warm bias of the theatre light, so again, this is not the most accurate final representation of your look.

Figure 8.15:Object lit with incandescent source, shot with Droid Maxx camera phone.

Figure 8.16: Object lit with white LED source, shot with Droid Maxx camera phone.

Figure 8.17: Object lit with white arc source, shot with Droid Maxx camera phone.
- Best solution – use film that is balanced for tungsten light. Luckily, there is just such a film…or at least there was until Kodak discontinued its manufacturing about a decade ago. Luckily, I also now hear that Kodak is re-releasing some versions of Ektachrome, but it’s unclear if that will include the tungsten-balanced varieties. The rest weren’t appropriately formulated for tungsten light. The issues here are that those are very slow ISO speeds, and that in the end you have slides, not negatives, for making prints. I’ll talk a bit more about how to handle that in Chapter 18. The film, the processing, and the printing from the slides for a portfolio added up to fairly high costs per portfolio-worthy print. This fact drove myself, and many of my colleagues, to be very selective about what shots we kept, and what we spent our meager starting salaries on.
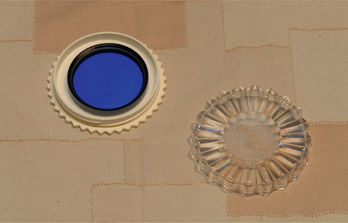
Figure 8.18: 52mm 80A filter for my film cameras.

Figure 8.19:
Roll of Kodak Ektachrome 320T color slide film.
The flexibility of today’s DSLR cameras, as they relate to color temperature, is a huge stride forward in the world of photography. However, your camera may be set up to maximize the color accuracy of your shots in regular daylight, which will lead to the very same issues when it is used to take photographs under theatre light. Luckily, our cameras are able to adjust their color temperature sensitivity on the fly. You can very easily move from shooting in daylight conditions to shooting in tungsten-lit theatrical conditions. This is a setting where precision and flexibility will vary greatly depending on the cost of the camera that you have purchased. Even basic point & shoot cameras have the ability to adjust their color-temperature sensitivity, but may not have the specific Kelvin setting that we’re looking for. Often you will find four simple pictograms, such as a light bulb, a tubular fluorescent bulb, a cloudy sky, and a sunny sky. If this is the case, you’ll want to use the plain light bulb symbol, which should be pretty close to the color temperature of tungsten light. If, however, you have the option of actually setting the color temperature then you’ll want to choose 3200° Kelvin, or at least as close as you can get to that number. One of the great advantages of the higher-end cameras is the ability to actually choose a specific color temperature, and the extreme ease and speed with which you can change that setting. Therein lies the trade-off with white balance:
Your ability to adjust the color-temperature sensitivity of your camera is directly related to how much you are willing or able to spend on the camera equipment.
This doesn’t mean that a less expensive camera can’t do what we need it to, but you may have fewer choices, more difficulty accessing those choices, or less precision in the settings available to you.
Many modern cameras also have a number of special settings, which may include such things as the ability to sepia-tone a photograph, or convert a color photograph to black and white. While these are all very interesting and useful features, don’t let your camera do all that work, which may be difficult to undo later. Instead, you can certainly make a copy of the original and apply similar filters in a program like Photoshop later on. I highly recommend that you set your camera up to only capture the purest, closest possible representation of the actual situation, and then only make changes to copies, so you can still go back to the digital file later on.

Figure 8.20: Setting the D200 to 3200° Kelvin.
Now you may be wondering what all this has to do with anything if you’re dealing with a lighting design where all the lights are colored with gels. There may not be a single white light in the entire rig, but it is still critical to color balance your camera to the source light behind the gel. If you haven’t set your camera to react appropriately to the full spectrum of the tungsten source, then your camera will not be able to correctly interpret the color of the fixtures that have gels in them. Let’s look at the light output of some of the fixtures that might be in use on your show. This is very important to keep in mind if you are also taking process shots. Figures 8.21 through 8.26 show the Spectral Power Distribution (SPD) of various light sources across the visible spectrum. SPD will show the relative power of each of the wavelengths present in the visible portion of the electromagnetic spectrum. You will easily be able to see that the measurements of sunlight and incandescent light show that these two sources emit light across all the wavelengths, while the LED and arc sources are combinations of all of the wavelengths, but not all as equally powered. In fact, the incandescent source has a smoother curve than the two daylight sources, although the daylight sources are constantly shifting around based on atmospheric conditions, so consider those more of a guide than a lab-quality benchmark.
The fluorescent fixtures are the least like anything else, with their big spikes within the spectrum. Our brain tends to fill the gaps a bit, but we can usually tell that the colors are a bit “off.” This is primarily due to the fact that, if the light source doesn’t contain a certain wavelength that correlates to the color of the object being lit, then there isn’t any light for that object’s color to bounce back to our eye. The most obvious example of this is the pale orange-white light you will see late at night in big parking lots. Those fixtures are usually some sort of arc source with a very poor Color Rendering Index (CRI). This is a very useful measurement to look at the next time you go to the hardware store to buy new light bulbs for your house. Now that most incandescent bulbs are no longer manufactured or sold, there has been an explosion of LED replacements flooding the market. Some are far better at replicating the old incandescent bulbs than others, and one good way is to check out the CRI number on the package. The other wrinkle here is that CRI values can only be compared across sources that have the same basic color temperature. For our purposes, the CRI of a standard HPL 575-watt lamp found in the ETC Source Four Leko is usually from 95 to 100, which means that it is essentially equivalent to the reference source.
You can see that the distributions produced by the sun and the regular Leko are very different from each other, hence the strong difference in color temperature. The other sources are either biased in one or more areas of the visible spectrum, or are a combination of spikes in several specific areas. This makes many of these non-incandescent sources tricky to capture accurately, since they are made up of these spikes, which represent an uneven SPD curve. You can’t, however, set your camera to different color-temperature settings for every shot

Figure 8.21: SPD of daylight at noon with a clear sky.

Figure 8.22:
SPD of daylight at noon with a cloudy sky.

Figure 8.23:
SPD of ETC Source Four Leko with incandescent HPL 575-watt lamp and no gel.

Figure 8.24:
SPD of ETC Source Four Leko with Series 2 Lustr+ LED color engine, set to white.

Figure 8.25: SPD of Vari*Lite VL3000 with 1200-watt arc source, set to white.

Figure 8.26:
SPD of cool white fluorescent tubes.
that you are taking, or you’ll go crazy chasing your tail trying to keep up and keep track of what you are doing.
As I said before, it’s important to be thinking about the color temperature of the source, since that will influence the colors of all the gels or color mixing that is going on. The lighting designer is mixing all these colors together on stage with the over-arching influence of warmer theatre light. As a designer, I often choose to use a cold-white fixture as a special since it is something that looks and feels distinctly different from the rest of the rig. Even if I am using LEDs, arcs, or other unusual sources, I am choosing them based on my personal and professional bias to prefer slightly warmer incandescent light. As our technology evolves, we may have a different conversation about this in ten years, but I feel confident in suggesting that we are probably safe in making this assumption for the time being.
Now, let’s look at the influence of gels or color mixing on the Spectral Power Distribution of a fixture. Here are two sets of measurements comparing an incandescent Leko and an LED Leko, both in a saturated red color (Figures 8.27 and 8.28), and another pair of measurements for the same fixtures using a medium-blue color (Figures 8.29 and 8.30). Look at the similarities between the two, but note that they are definitely not identical. Even though it is the most advanced LED engine available in a theatrical fixture, the Lustr+ uses only seven LED emitters to emulate the colors we see, so there are invariably some wavelengths that are not represented the same exact way.
Also, compare these SPD graphs with the graphs of each of these fixtures when they are not colored, as seen in Figures 8.23 and 8.24, and you will see how each fixture is affected by the color used. Notice how much red is in the SPD curve of the Roscolux 68. This is a very warm blue, and all that red and infrared can fool your camera’s color balance. I have also included an SPD graph for Roscolux 90, which is a saturated green color, so that you can see how that performs. Note the slight difference between the incandescent source and the LED source.

Figure 8.27: SPD of ETC Source Four Leko with incandescent HPL 575-watt lamp with Roscolux 26 gel.
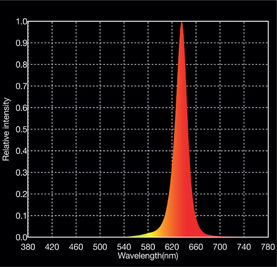
Figure 8.28:
SPD of ETC Source Four Leko with Series 2 Lustr+ LED color engine, set to emulate Roscolux 26 gel.

Figure 8.29:
SPD of ETC Source Four Leko with incandescent HPL 575-watt lamp with Roscolux 68 gel.

Figure 8.30:
SPD of ETC Source Four Leko with Series 2 Lustr+ LED color engine, set to emulate Roscolux 68 gel.

Figure 8.31: SPD of ETC Source Four Leko with incandescent HPL 575-watt lamp with Roscolux 90 gel.

Figure 8.32:
SPD of ETC Source Four Leko with Series 2 Lustr+ LED color engine, set to emulate Roscolux 90 gel.
Along with these graphs, here are photographs of several objects under these different colors of gelled light. The ball is a medium blue, and the rectangle of foam is a cool white, along with the rainbow of colors in the fabric. Look at how some of the colors shift or go grey depending on the color on them.
All of these color interactions are important to be aware of, since there are so many different factors affecting the color in your final shot. As long as you are aware of them and can control how they affect your shots, you will eliminate several unknowns, and will guarantee less frustration and more accuracy in your work. The presence of so much colored light in the theatre also has a direct impact on one of the settings you might have available to you. You may have discovered an auto white-balance feature (AWB) in your camera’s menus while you’ve been adjusting the color temperature. I would urge you to avoid using this setting if at all possible.
The auto white-balance feature is very useful for snapshots in odd lighting conditions for the novice user. By now, though, we know what we are looking at, and know what is going on behind the scenes with color and color temperature. The auto white-balance setting basically tells the camera to look at the scene, find something white, and adjust the camera so that the thing it thinks is white is color shifted to match a reference white stored in the camera’s software. This reference white is probably closer to daylight than theatre light, and your manual may tell you what its color temperature is. The problem here is that you may be taking pictures of a show without any white in it…or maybe the cues use very saturated gels that are heavily affecting the paler colors. Your camera will try to shift and interpret the colors it sees in an attempt to skew them to match an artificial standard reference color. Here’s how things might become skewed. Let’s look at this statuette under clear, pink, and teal light. First, let’s revisit the Spectral Power Distribution of the Leko when it’s clear (Figure 8.23), and compare it to the SPD of the same fixture with Roscolux 44 (Figure 8.37) and Roscolux 70 (Figure 8.38) in the fixture.

Figure 8.33: Ball, foam, rainbow cloth under clear incandescent Leko.

Figure 8.34:
Ball, foam, rainbow cloth under incandescent Leko with Roscolux 26.
Now, let’s look at the still life with the fixture without gel. In Figure 8.39, I’ve set the white balance to 3200° Kelvin, and in Figure 8.40, I set the camera up to auto white balance. You can see that the auto white balance has been strongly influenced by the incandescent light, which is much warmer than the daylight color temperature that the camera is most likely calibrated to. This is a perfect example of one of the biggest issues people ask about when it comes to stage photography.

Figure 8.35:
Ball, foam, rainbow cloth under incandescent Leko with Roscolux 68.
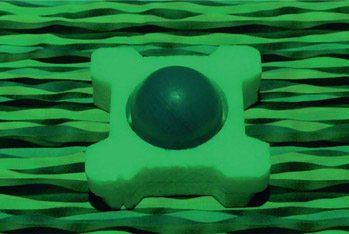
Figure 8.36:
Ball, foam, rainbow cloth under incandescent Leko with Roscolux 90.

Figure 8.37: SPD of ETC Source Four Leko with incandescent HPL 575-watt lamp with Roscolux 44 gel.

Figure 8.38:
SPD of ETC Source Four Leko with incandescent HPL 575-watt lamp with Roscolux 70 gel.

Figure 8.39:
Lion and fabric under clear incandescent light, camera set to 3200° Kelvin.

Figure 8.40:
Lion and fabric under clear incandescent light, camera set to auto white balance.
When you look at the first pair of images, you will see that the camera has shifted the colors somewhat, but you might be able to rescue the second shot in Photoshop, although it won’t be a perfect version of what you could get with the temperature set properly to begin with. However, when we look at the

Figure 8.41: Lion and fabric under Roscolux 44 incandescent light, camera set to 3200° Kelvin.
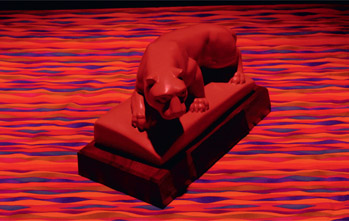
Figure 8.42:
Lion and fabric under Roscolux 44 incandescent light, camera set to auto white balance.
second and third pair of shots, the camera doesn’t have any white to reference, so it has a much harder time interpreting what white is, and how to skew the colors to accommodate the situation. As we might have guessed, the AWB has a tendency

Figure 8.43:
Lion and fabric under Roscolux 70 incandescent light, camera set to 3200° Kelvin.
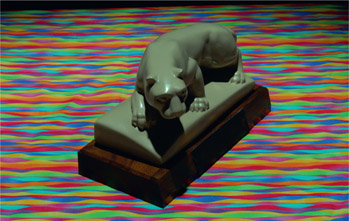
Figure 8.44:
Lion and fabric under Roscolux 70 incandescent light, camera set to auto white balance.
to push the colors into the warmer part of the spectrum, so the nicely rendered fuchsia in Figure 8.41 is pushed too far into an orange-pink color in Figure 8.42. Likewise, the teal color in Figure 8.43 gets warmed up to the point of becoming pale green in Figure 8.44. The resultant images in Figure 8.42 and 8.44 can hardly be considered useful to us in terms of color accuracy.
If you are working in film/TV or video, you will find that the cameras are usually set to a cooler color temperature, and that the fixtures are often balanced to match that color. Often, film/TV lights are arc sources, and are rarely colored with gels, so you need to adjust for a higher color temperature, often in the 5600–6500° Kelvin range. Conversely, you may also be in a situation where the crews are shooting an indoor scene and will put up color-correcting gels over all the windows to shift the daylight coming in to a warmer color temperature to match the additional lights deployed around the set. The most important suggestion I can make here is to check with the lighting and camera crews to see what color temperature the lights are being adjusted to, or what color temperature the cameras are being set to, and go with that number as a starting point in your camera. Shoot a few test shots and see what you get out of that, and modify your settings accordingly.
White-Balance Practice Session
Since this is one of the most overlooked settings, and quite possibly one of the most critical, I urge you to spend a good bit of time experimenting with the capabilities of your specific camera by trying these experiments:
- 1. Find the white-balance or color-temperature settings, and get comfortable with adjusting them. You might need to delve into the manual if your settings are buried in a menu somewhere, but be sure you can quickly and easily find and adjust them.
- 2. Set your camera for 3200° Kelvin, or as close as you can get. If you only have pictograms, your manual may tell you what color temperature those pictograms represent, so you can make the best choice.
- 3. Go into the theatre, and place a multi-colored object under a single tungsten incandescent source without any gel in it. Take a few pictures and then view them on a color-accurate monitor to ensure you are getting the right colors and color balance. If you aren’t, then try viewing the pictures on a different monitor or try changing the settings to another close setting and see if the pictures improve or degrade in terms of color.
- 4. Try printing a picture, or if you can, have one professionally printed and evaluate the color in the final print. Go back and look at it while also viewing the original setup that you photographed. Issues of inaccurate color should be very apparent, if you have any. If not, then write down the settings that are working best for you so that you can recreate the situation easily and quickly at the next photo-call.
- 5. Remember that the color temperature of the light in the room where you are viewing the monitor or the photo prints will also influence what you see. Try to avoid rooms with fluorescent or LED sources, as they are not as full-spectrum as incandescent light.
- 6. Just so you can see the difference, keep your tungsten settings in place, and then take pictures outside in the bright daylight. In addition to having to shift your exposure, you will find that everything has a bluish cast to the colors, and won’t be an accurate representation of the colors in the actual shot.
- 7. Try setting your camera to the other color-temperature options, either according to the pictograms, or according to the Kelvin scale shown in Figure 8.2. Shoot your theatrical setup at 4200° Kelvin, 5600° Kelvin, or even 10,000° Kelvin if your camera can hit that. Note the shift in the color balance and determine the best settings for your situation.
- 8. Now, if you are using primarily LED fixtures, or a hybrid mix of them, try shooting some test shots at 3200° Kelvin, 3600° Kelvin, 4000° Kelvin, 4400° Kelvin, 5000° Kelvin, 5600° Kelvin…etc., or at whatever intervals you find work for your situation. Make sure that the colors of the LED fixtures are set to clear, or possibly to emulate a tungsten source. Evaluate these shots with a calibrated monitor or with a quality print. There are so many brands and models of LED fixtures, with new ones coming out all the time. The manufacturers may specify the color temperature of the fixture, but I’ve found those specifications to be terribly inaccurate, and also, they don’t use the same measurement methods from company to company, so the results could be very misleading. The only way to truly figure this out is with a bit of trial and error. Take the test shots and carefully note the color-temperature settings you are using, and then compare them to the real thing. Once you are viewing some color-calibrated results, you will be able to determine the actual color temperature of the units at full. If you have more than one type of unit, then try this test with each type individually. You might find that one emulates 3200° Kelvin and the other 5600° Kelvin. If you have fairly divergent measurements, then you might need to try this test with a cue from the show a day or two before the photo-call. It’s not easy to say from one cue to the next what the percent of usage of the different fixture types are, but if you are not the lighting designer, you can certainly consult with them about this. Try a few cues that are generally brighter and full-stage, and see what results you get.
- 9. I have found, in my own experience with LEDs so far, that I am still choosing my colors in the LED fixtures with an overall bias toward the feel of the tungsten sources I used through the first 25 years of my design training. So even if there is a mix of different sources, or even in one situation where I was taking photographs of an all-LED rig, I still set my camera to 3200° Kelvin. As we begin to see more and more spaces that are exclusively LED lights, this tungsten bias may shift, but it is worth thinking about for a while yet. Some manufacturers are considering a “red-shift” feature that will cause the LED fixtures to get warmer as they fade down, mimicking the traditional “amber drift” experienced when incandescent fixtures are faded down to a low level on a dimmer.
- 10. If there are arc sources or other non-tungsten sources such as fluorescent or sodium-vapor, then you can try the same experiment on a selection of cues. Some of these types of fixtures take a while to warm up and shift color over time, so consult with the lighting designer about these types of fixtures if you need to.
- 11. In the end, the actual number setting isn’t always as important as finding the setting that gives you the most color-accurate rendition of the scene that you are capturing. Use some careful practice time in advance, and evaluate the results before you get into the photo-call, and then go with the settings that work best for your camera and your eye.