

Even the most basic camera generally has what I refer to as the Primary Settings (although the price you paid for your camera will have a great deal to do with how much control you have over these).
- Aperture or f-stop
- Shutter speed
- Film speed or ASA/ISO
- White balance
These can even be “found” when you consider my oatmeal container camera. Aperture is the size of the opening in the camera that allows light to pass through to whatever medium you are using to capture it, be it film or computer chip. In my case, it was the size of the pinhole I made in the side of the container. Shutter speed controls the duration of time that the capture medium is exposed to light. In my case, it was how long I left the hole open before covering it again with tape. Lastly, film speed and white balance are influenced by the type and sensitivity of the particular film stock I chose to place in the camera. Film speed refers to the sensitivity of the capture medium, and white balance refers to the capture medium’s ability to accurately render colors given a particular quality of light. My first, very basic 35mm SLR-type film camera gave me access to more precise control of these four settings. Now that we live in the digital era, we can enjoy far greater precision still.
No matter how much money you spend, however, keep in mind that current cameras are not quite as capable as the human eye at detecting and processing light. We must work hard as photographers to capture the best possible representative image of what our eye sees easily, and to be successful, we must understand the limitations of and trade-offs required by these Primary Settings. The first three – aperture, shutter speed, and film speed – work in direct concert with each other to affect the exposure of each shot, so their interplay and concurrent effects on the final image must be considered. We will delve into those concerns in subsequent chapters, but for now it is crucial to understand how these settings relate to each other.
Aperture
The aperture setting is also known as the f-stop of the lens. This number is found by dividing the focal length of the lens by the diameter of the lens opening. A lens is usually specified with two numbers: the focal length and the maximum aperture. A 50mm f/1.4 lens thus has a focal length of 50mm and a maximum aperture of f/1.4. Focal length will be discussed more in depth in Chapter 9, but we will focus on aperture for now. Aperture is controlled by a mechanical set of leaves inside the lens that overlap each other and allow the photographer to increase or decrease the diameter of the opening through which light passes as the lens focuses it on the capture medium. On a digital camera, this setting may be manipulated with a dial or other control, with the result showing up on a readout inside the viewfinder. They are often noted without the “f,” as seen in Figure 4.1.
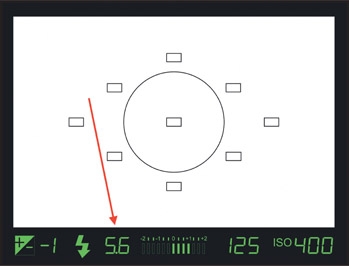
Figure 4.1:
Aperture readout inside the viewfinder display.
Changing the aperture controls how much of the light reflected by the subject is allowed to pass through the lens and register on the capture medium. What the aperture can do is change the amount of light passing through the lens by opening or closing. Each step up in f-stop will double the amount of light passing through the lens; each step down halves it. As you may recall, this is equivalent to a change of plus or minus one stop of light.
Shutter speed
Shutter speed refers to the length of time that the shutter curtain at the back of the camera is open, exposing the capture medium to the light passing through the lens and its aperture. Usually this is measured in fractions of a second, and expressed by the fraction’s denominator. For example, setting the shutter speed to 125 (which might also be referred to as a 125th) means that the shutter will open for 1/125th of a second. This setting usually appears as a whole number in the viewfinder, as shown in Figure 4.2.

Figure 4.2: Shutter speed readout inside the viewfinder display.
The shutter curtain in the camera opens and closes to control how long the capture medium is exposed to light. As with the aperture, it doesn’t change the amount of light reflecting off the subject, but rather controls how long that reflected light is allowed to pass through to the capture medium. Each change in shutter speed results in the shutter remaining open for twice (or half) as long as the prior step. This is again equivalent to a change of plus or minus one stop of light.
Film Speed
Film speed, which in film terms denotes the film’s sensitivity to light, and in digital terms refers to the camera chip’s sensitivity to light, is also referred to as the American Standards Association (ASA) or International Standards Organization (ISO). Simply put, this is a rating of how sensitive the capture medium is to the light passing through the lens-aperture-shutter mechanisms. This number is usually expressed as a whole number, such as ISO 400. If this information shows in your viewfinder, it might appear along with a small ISO indicator, as shown in Figure 4.3.

Figure 4.3:
Film speed readout inside the viewfinder display.
The sensitivity of the camera sensor mimics the changes in the sensitivity of film, and also follows the same numbering scheme. A shift from one setting to the next represents a change that makes the chip either twice or half as sensitive, meaning that you need either twice as much light or half as much light to fix the image with the correct exposure, which again is equivalent to a change of plus or minus one stop of light.
Once you get past all the numbers and acronyms, all three of these settings have essentially the same effect on the exposure of the image. There are a number of other considerations that we need to take into account when choosing between all these settings, but before we get into that, it is crucial that we look at the relationship of these three, which may be seen in Figure 4.4. This might be the most important image in this entire book, so grab a Post-it note and bookmark this page, as you may want to refer to it again.
For now, pay close attention to each side of the triangle, and you will see how the changes in each setting affect the amount of light that is ultimately captured within the camera. Each range of settings accounts for more or less light, and each change from one setting to another results in a change that captures either twice (or half) as much light as before. It is important to remember that these changes are relative to a previous configuration of settings, and not absolute measurements. A particular group of settings may produce the perfect exposure for one shot, but as soon as the amount of light reflecting off the subject(s) changes, the settings will probably need to be adjusted as well. There isn’t a golden setting that always works for theatre photography. To better understand these links, let’s pretend that we have our camera set up for a shot, and we are “on the meter” with the following settings in place:
- Film speed set to ISO 400.
- Aperture set to f-stop of f/5.6.
- Shutter speed set to 1/125th of a second.

Figure 4.4: The Exposure Triangle.

Figure 4.5:
The Exposure Triangle with the camera set to ISO 400, f/5.6 @ 125th.
This relationship can be expressed as shown in Figure 4.5 with the lines connecting up the three settings.
Now, perhaps we want to change the shutter speed because we are taking pictures of a dancer who is moving, and we want the shutter speed quickened to capture her without any motion blur. We could increase our shutter speed to 250 (1/250th of a second), which is twice as fast as 1/125th. This means that the capture medium will only be exposed to the light coming through the lens for half as long as it was before, which will result in a shot that is one stop under-exposed. The solution to bring the shot back to proper exposure would be to open up the aperture to f/4, resulting in twice as much light passing through the lens. After doubling our shutter speed and the diameter of the aperture, twice as much light passes through the aperture but for only half as long, which means that, ultimately, the same amount of light is captured by the sensor as before.

Figure 4.6: The Exposure Triangle with the camera set to ISO 400, f/4 @ 250th.
A third option, if we wanted to increase our shutter speed to 1/250th, but didn’t want to change our aperture to compensate would be to change our film speed. This would be done if we wanted to maintain a certain depth-of-field, which we will discuss in the next chapter. If we move from ISO 400 to ISO 800, we are making the camera’s light sensor twice as sensitive as before. Because the f-stop (aperture) remains the same, in this case the light reaches the sensor for half as long, but the chip is twice as sensitive during that interval, so again we end up with a properly exposed shot.
These three settings all affect proper exposure, and the concepts apply equally to color or black-and-white photography. We are dealing with lights and darks, or the “values” of each item in the shot, but not the “hues,” which are dealt with next. All three of these settings work in concert with each other, and it is wonderfully useful that, despite all the different terms, they each represent the same amount of change in exposure. This symbiotic relationship is at the core of understanding proper exposure and all of the variations that are available to you.

Figure 4.7:
The Exposure Triangle with the camera set to ISO 800, f/5.6 @ 250th.
White Balance
White balance, which deals with the color sensitivity of the film or chip, affects the hues, or colors, of the final image. White-balance settings help your camera understand what “white” is, and thus, how to accurately interpret all the other colors in the shot. Significantly, theatre lights produce a different color of white light than natural daylight or indoor fluorescent light. Since most people use their cameras in these two situations, camera chips are calibrated to accurately render color under those cooler white lights, and not the warmer quality of theatre light. If we don’t adjust for our unique situation, then we will find that our pictures are not color-accurate, and may in fact be so skewed as to be unusable. While white balance doesn’t really have much bearing on exposure, it is just as important as f-stop, shutter speed, and film speed, because of our fairly unique situation with color.
It is a very good practice to decide upon your ASA/ISO and your white-balance settings at the start of each photo-call or session, so that you have a common exposure through-line for the session. If you see, however, from what you are getting on your preview screen that things are way off, feel free to change these settings as well. All of this data concerning the settings in the camera is usually embedded in the metadata of the photo file, so you can refer to it if needed to remind yourself of your choices. What you want to avoid is bouncing all over the place with these two settings during a call, as you will end up with a widely diverse set of shots, and this will burn time you can’t afford to lose. As you gain more experience and knowledge, you will become confident in your settings choices in advance, giving you more time to focus on proper focus, framing, and exposure.
Much of what we do in modern photography is a direct result of how photography developed in the “film” age. The form factor of modern DSLR cameras steals directly from the look and shape of the old film SLRs, although that too is now evolving. The concepts of aperture and shutter speed still apply in the very same way they always did, but the concepts of film speed and white balance have moved from being a result of the type of film you chose to settings that live in the camera. Beyond that, they actually function the same way as far as their effect on the end result.
Another amazing feature of digital photography is the fact that the metadata about each shot you take is embedded within the image file, allowing you to pull up a great deal of info after the shoot is over. This means that you don’t have to recall what your settings were for a specific shot anymore, and can call up that information as needed later on.
Most image-manipulation programs can read and report this data, but you can even find it on some of the more basic image viewers. Figure 4.8 shows the inspector window for the image seen at left, and amongst all the other data there, you can see things like the ISO, f-stop, and shutter speed. This display doesn’t show the actual color temperature (as determined by the white-balance setting), but at least I know it wasn’t on automatic. You can even see the details on the lens I was using. The remaining tabs reveal additional information about the camera used and other settings. When opening the RAW version of the file in Photoshop, I can see an approximation of the color temperature setting, based on what the camera saw.
The next four chapters delve deeper into these four Primary Settings, and provide additional Practice Session suggestions to help you understand the abilities and limitations of each, along with the trade-offs that you may have to make. Getting truly comfortable with these will get you very far down the road to capturing professional shots of your work.

Figure 4.8: The MacBook Preview screen with the Inspector window.