
Film speed is the setting that governs the sensitivity of your camera’s image sensor. It mirrors the way that we used to rate physical film in terms of sensitivity, and follows a pretty standard scale. The speed of the film referred to its ability to sense light and fix the image. The speed was given as an ASA number, or sometimes ASA/ISO, but is now fairly universally referred to as the ISO sensitivity, or simply ISO. Most offthe-shelf slide or print film was available in speeds noted as multiples of 100:
- 1600 – very fast
- 800
- 400 – middle of the road
- 200
- 100 – very slow
There are also several less common variants at both ends of the range. The higher the number, the greater the sensitivity. Films with a higher number are referred to as “fast” films, and lower numbers are “slow” films. Most movie film is very slow, often in the 25 or 50 ISO range. As with apertures and shutter speeds, a move from one setting to another on this list is a change of 1 stop of light sensitivity. Changing from ISO 200 to ISO 400 will give you the same exposure as if you had changed the aperture from f/5.6 to f/4.
For many years, the most common type of film used for theatrical photography was a special slide film made by Kodak in the Ektachrome line. This slide film was color balanced for theatre lighting, and came in speeds of 64T, 160T, and 320T. The “T” stands for tungsten, and we will investigate that aspect of things in the next chapter. For now, let’s just focus on the speed of the film. Slow films need a lot of light to expose properly, whereas fast films are far more sensitive to light, and don’t need nearly as much light to effectively capture the image. Here’s the trade-off we must be aware of:
The faster the film speed, the greater the “grain” or “pixilation” of the resultant image.
The slower the film speed, the greater the amount of light that is required to capture the image.
If all film speeds were the same, then we would just shoot really fast film and be done with things, but the images we get with faster film speeds are potentially very grainy, and may not be suitable for large, glossy portfolio prints. On the other hand, we often find ourselves shooting very dark scenes, which are not conducive to quality exposures with slower film, and we may want to use a faster film speed to help get the correct exposure. We have to find a sweet spot within these trade-offs and maximize the quality of the shot while still getting the correct exposure. For years, because the only good film for theatre use was a fairly slow film, I focused on getting very fast lenses, and working toward using slower shutter speeds, since the ISO could only go so high. When I began, the Ektachrome film was only available in speeds of 64 ASA and 160 ASA, and then a few years later Kodak also brought out a 320 ASA. There is a trick that many of us used to eek a bit more sensitivity out of this line. The 64 ASA was just way too slow, so I never shot with it. With the 160 ASA, and later the 320 ASA, we could “push” the film, which meant that you would set the camera up so that the camera “thought” the film was faster than it really was. Then, when you took the film in to be processed, you would have the lab process the film slightly differently, which was called “push processing.” This would allow you to shoot a roll of 320 ASA film, but set the camera up as if the film was 640 ASA, which was a whole stop better. Some films allow for a great deal of push-or-pull processing, but the Ektachrome was really only tolerant of 1 stop worth of pushing. Regardless, that is a good deal better than plain old 160 ASA film out of the box. If you look at Figure 7.1, you will see that it is actually set up for 640 ASA, since the red indicator is set for the second notch after the 400. The first notch is 500 ASA, and these two settings are 1/3 and 2/3 of a stop from 400 ASA to 800 ASA.
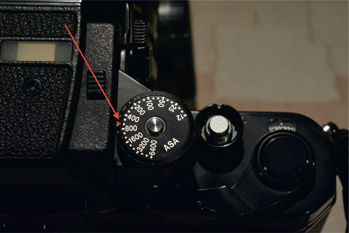
Figure 7.1:
Manual ASA/ISO setting on Nikon SLR camera.
Why is this important with digital photography? The image sensor in your camera is governed by the same set of trade-offs, and is set up to work in a way that is similar to the various film speeds that we used to use. It is adjusted by changing the ISO sensitivity setting. When you set the ISO sensitivity to a lower number, such as ISO 200, you are telling the camera to utilize the pixels in the image-sensing chip in a certain way that results in a high-quality image, but requires a lot of light to accurately expose for. When you set your camera to a higher ISO sensitivity, then you are telling the camera to utilize the pixels in a different way that allows you to capture a properly exposed image while requiring less light. The main concern is that the image quality will not be as high, and may be very noticeable, even at lower levels of enlarging.
What is great about the flexibility of today’s DSLR cameras is the fact that you can switch between various ISO sensitivity settings easily, even during the photo-call. I still recommend, however, determining an ISO sensitivity setting before you begin your shoot, and sticking with it throughout the evening. If you do need to change it, you can always check the metadata to remind yourself of the change in settings that you made. This is certainly much easier and more convenient than keeping a handwritten log during a hectic shoot.
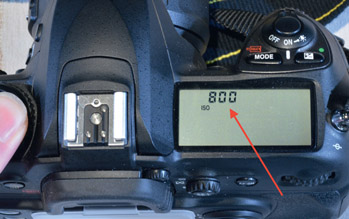
Figure 7.2:
ISO sensitivity setting on Nikon DSLR camera. ISO set to 800.
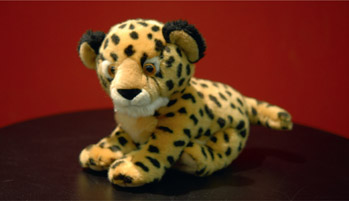
Figure 7.3:
Cheetah toy with film speed set to ISO 100, f/2.8 at 1/8th, no digital NR.
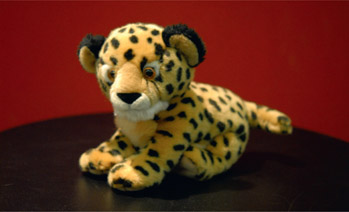
Figure 7.4:
Cheetah toy with film speed set to ISO 800, f/2.8 at 1/160th, low-level digital NR.
Figures 7.3 through 7.6 represent four versions of the same shot. The first example was shot with a fairly low ISO setting, requiring a wide aperture and long shutter speed to hit the correct exposure. The second example uses a much higher ISO setting, enabling us to shoot with a faster shutter speed. Shots three and four allow for even faster shutter speeds, but you may notice that there is a slight degradation in quality with the second shot, and certainly by the third and fourth shots. Oddly, the color of the background also drops off in brightness and vibrancy as we move to the higher ISOs. Is this worth the trade-offs with the other two settings?

Figure 7.5: Cheetah toy with film speed set to ISO 1600, f/2.8 at 1/125th, high-level digital NR.
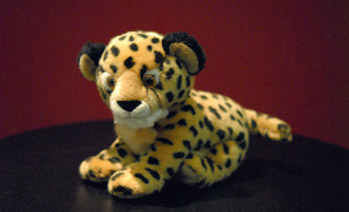
Figure 7.6:
Cheetah toy with film speed set to ISO 3200, f/2.8 at 1/250th, high-level digital NR.
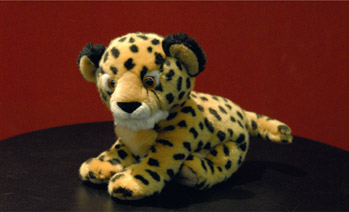
Figure 7.7:
Cheetah toy with film speed set to ISO 1600, f/2.8 at 1/40th, digital NR disabled.
Many cameras now include digital noise reduction (NR), which is a built-in feature that attempts to clean up the image inside the camera. My DSLR has an automatic NR feature that is enabled when the ISO is set above 800, but can be enabled at lower levels as well. Since I shot at 640 ASA for most of my professional career before going digital, I am fairly comfortable with the results I get when I run my DSLR set to 640 ASA. Of late, however, I tend to shoot at 800 ISO, since that’s the fastest ISO setting I can use before the heavier version of the digital noise reduction system kicks in. I try to avoid invoking this feature, even in my camera, in favor of using better lenses and slower shutter speeds. I feel that, while the camera’s CPU is purpose-built for what it does, I’d rather have the image file pure and unchanged by the camera, since I can always change the setting on the picture once I have it in Photoshop. I’m also better off getting a great exposure with lots of light by using a fast lens and slow shutter, as I will have more clean data to work with later on. I retook the shot in Figure 7.5, but with the NR disabled, and you can see the result in Figure 7.7. While the camera seems to have changed its shutter speed from 1/125th to 1/40th, the rest of the settings were the same. I actually prefer the quality in this shot over the one with the NR turned on. Your experiences may differ, but the only way to know is to shoot some test shots and compare.
Given the costs of Ektachrome film ($12–$15 a roll), plus an additional $12–$15 for processing, and a fee to cover the extra costs of doing a “push,” followed by the week or more required for turn around, you can see why DSLRs are much more convenient and flexible, especially related to this situation. If needed, you can change the ISO sensitivity for that one really dark scene in the show, whereas, in the past, you were stuck with the ISO of whatever roll of film was in the camera until it was all used up. I should also mention that Ektachrome film is heat sensitive, so you have to keep it in the fridge (my butter tray is full), and also keep it cool when it is in the camera and out in the theatre. I used to bring a small cooler with me to keep the film at the right temperature. Otherwise, if the film gets heat damaged, the colors become wildly skewed, rendering the roll useless. If this film becomes regularly available again, that certainly will be a concern for anyone who wants to try it.
Now that we have investigated the first three exposure settings, and understand the trade-offs associated with each setting, go back and check out the Exposure Triangle in Chapter 4, and review it again. If you look closely, I have included small pictographs that point out the trade-offs for each of the three settings: depth-of-field, motion blur, and pixilation. I hope this diagram continues to be useful to you as a resource as you get to know your camera well. Just remember that the three settings all represent the same thing: relative changes in light intensity measured in stops. Any change in one direction on the triangle can be countered by a change of one of the other two settings.
As a more practical example, go back and look at the shot of the ballet dancer in Figure 5.20. As I mentioned before, I chose to allow the depth-of-field to be very shallow, but that wasn’t exclusively an artistic choice – it was born out of a certain amount of necessity as well. I was shooting Ektachrome 320 with a 1-stop push, so my film speed was 640, and that fact couldn’t change. I also knew I needed as fast a shutter speed as possible, so I needed to use a wide aperture anyway to help bring in as much light as possible during the quick exposure needed to catch her pose. Now, this was all done well before digital cameras, so I don’t have the metadata on this shot. I can only assume I was shooting with a 50mm f/1.4 lens, probably bracketing the aperture between f/1.4, f/2, and f/2.8 in order to keep the shutter speed consistently fast. I still had a choice with how close I stood to the stage, which influenced the depth of my in-focus focus field.
In my own work, I now tend to run the DSLR set to 800 ISO, an aperture around f/2.8, and then select a shutter speed as appropriate to get the correct exposure. Since I have a great deal of control over motion blur, through careful photo-call planning and a practiced hand, that is the one trade-off that I am least concerned with. Depth-of-field is also not a major concern at the distances I am shooting for most things, but it does come into play with closer process shots.
Film Speed Practice Session
- 1. Determine how to change the film speed setting on your camera, and determine if there are any noise-reduction features. If so, do they apply all or only part of the time?
- 2. Try to duplicate what I did in Figures 7.3 through 7.6, but with a few more ISO settings thrown in. You will have to try blowing these up on the screen to see the pixilation clearly, and this is one of the experiments where you might need to try a quality print or two to see the differences.
- 3. Try to duplicate what I did in Figures 7.5 and 7.7, but focus on one faster ISO sensitivity setting, and take one shot with noise reduction on and one with it off. This may or may not be possible with your particular camera, but if it is, it’s important to know what that setting is doing to the file before you get it out of the camera.