

Overview of Photography
In its simplest form, a camera is a device for capturing light and transmitting it to a medium that allows us to fix an image of a moment in time. The first day of my basic photography class in college found me making a rough “pinhole” camera from a simple, “light-proof” container with a very small hole and something to cover the hole with. I used an empty, round cardboard oatmeal container and several layers of masking tape to seal it up. Inside, I placed an undeveloped sheet of photo paper (not even film), and took this contraption outside. Once in place, I uncovered the pinhole for a few seconds, while holding the camera still. Then I covered the hole back up and took my oats-can camera to the darkroom, where I removed and developed the sheet of paper, revealing a simple landscape scene from outside the Drama-Music Building.
The image was a simple black-and-white landscape, neither well framed nor optimally exposed, but my experience with this experiment demonstrates how ultimately simple the process of fixing an image can be. Beyond this, all the other things that your camera can do are merely ways to alter the resulting outcome. What is crucial to the success of your work is the full understanding of how each of the settings on your camera affects the outcome, and what the limitations of each setting are. Even the most advanced camera available today is still not nearly as capable as the human eye at perceiving light, and as such, everything done with the camera must be with the understanding that we are working to fix an image that is as close as possible to what the audience saw when they were in the theatre.
The human eye is a truly amazing organ and the result of some very interesting twists and turns in the history of evolution. Some animals have a sharper vision than we do, and some see beyond the human’s visible spectrum, but regardless, the ability of our eye to perceive light, capture an image, and transmit that image to our brain is astounding. Much of how a camera works mimics this process, but currently it is merely an attempt to be as capable. Perhaps within our lifetime, we will finally invent enough camera technologies to allow us to duplicate the quality of the sharpest-eyed human vision, which will make many of the points in this book less relevant. Until that time, however, it is important to know the differences and use the camera to its best abilities, which we will discuss in the next few chapters. Sometimes, the constraints of the camera can even be used to our benefit, if we know how to take advantage of them.
The eye has a number of very delicate structures that help to record an image. The lens and iris, which work together, regulate the amount of light penetrating the eye while focusing that image on the retina. The retina itself records the image, translates it into nerve impulses, and sends the image on to the brain. The rest of the structures exist to help focus the lens, dilate the pupil, move the eye around, and maintain the structure of the eye.
The eye works a bit more like a movie camera than a still camera in that it is constantly recording and updating the image that your brain perceives, but you can also generally recall a still image in your mind’s eye.
A traditional SLR (single-lens-reflex) film camera has a few basic parts, including a lens with an aperture, a mirror, a prism, a viewfinder, and a shutter curtain, and film in a transport mechanism. The light enters the front of the lens, and is affected by two parts of the lens: the aperture mechanism and the glass elements that form the optics of the lens. This focusing ability of the lens mimics the ability of the human eye in that the manipulation of the spatial relationship of the lens’s various glass elements can focus the incoming light image onto the surface of the film, much like the human eye’s lens does with the light it focuses on the retina. Wearing glasses or contact lenses simply helps the natural lenses of a person’s eyes to focus incoming light precisely onto the surface of the retina, not in front of nor behind it. Additionally, the lens has an aperture, which controls the amount of light entering the camera, much as the iris of a human eye limits the amount of light that ultimately falls on the retina. In the dark, tiny muscles open the iris wide to allow as much light as possible to enter the lens; whereas in bright daylight, other muscles constrict the iris so that less light gets through. This constant adjustment of the iris maintains the correct “exposure” of the light on your retina.

Figure 1.1:
Cutaway view of the human eye.

Figure 1.2:
Traditional SLR film camera – Nikon F2 with 35mm f/2 lens.
One unique feature of certain camera lenses is their ability to zoom in and out. The human eye can’t zoom. To get a larger image of an object, or in other words, a closer look, the eye must be moved closer to it. As with most features of a camera, a complementary relationship exists between the benefits obtained by using the zoom and the trade-offs that must be sacrificed to get them. We will discuss these later on.

Figure 1.3: Cutaway view of 35mm film camera.
Once the light has passed through a lens, and the lens is adjusted for proper focus and exposure with the focus ring and aperture, the light is directed upwards through a mirror and into a prism, and then onto the viewfinder and the photographer’s eye. This mirror–prism arrangement allows the photographer to see the image through the actual lens, as opposed to other types of cameras where the image is viewed through a secondary lens. When the shutter release button is pressed, the mirror flips up and out of the way, and the shutter curtain retracts for a set amount of time, exposing the film behind the shutter to the light. If all done correctly, a properly framed, focused, and exposed image has been captured. Film cameras are also generally equipped with a light meter, calibrated to the film used in the camera, which helps to set the exposure. Beyond that, there are many settings and features that adjust varied aspects of this basic premise.
A DSLR (digital-single-lens-reflex) camera essentially replaces the film and film transport mechanism with an image-sensing array that captures and records the image as a digital file. Everything else about the process is essentially the same, except that now there are many more features and options that can be added to the mix. Still, all of the aspects of DSLR photography revolve around the proper framing, focus, and exposure of the image sensor to the image you want to capture.
There are other cameras that you might find useful in some circumstances, including mirrorless cameras, point & shoot cameras, and smartphone cameras. Even though we will focus mainly on the use of other DSLR cameras, it is important to be aware of the other types of cameras available, their capabilities, and rough ideas of costs. The modern point & shoot camera is a variation on the older rangefinder or viewfinder camera, where you looked through a secondary lens at the object you wished to photograph, rather than directly through the lens as with an SLR camera. Some point & shoot cameras have this same system, allowing a user to look through a small viewport with a simple lens, usually up high near a corner of the camera.

Figure 1.4:
Cutaway view of DSLR camera.
More recently, point & shoot cameras have moved to display the image on a liquid crystal display (LCD) screen on the back of the camera, allowing the user to hold the camera up and further away from the face. Instead of looking at a secondary version of the image through an additional optical path, you are seeing a live digital preview of the image you are about to capture. Many prefer this, since they can continue to interact with the subjects in the shot rather than be stuck behind the camera body, and they are able to better frame up the shot. This is fine for casual photos, when the camera is functioning according to settings determined by the manufacturer with the intention of providing any user with an acceptable final image.

Figure 1.5: Olympus Stylus 790 SW point & shoot camera.
Point & shoot cameras are a useful resource for process shots, shots in the shops, or perhaps while out doing research. Inexpensive, compact, and easy to carry, they are great to have around when traveling or when portability is a concern. The Olympus camera in Figure 1.5 is also waterproof and shock-proof, and will function at temperatures well below freezing. The downsides, however, are significant when it comes to its ability to capture high-quality images. It doesn’t have a high-quality image sensor, it has a limited set of features, and the lens isn’t very fast. It performs as designed, but it is being quickly replaced with smartphone cameras.
The camera in my current smartphone (a 2010 Motorola Droid Maxx) is as good as the Olympus point & shoot, if not better in certain circumstances. The lens on my phone isn’t very fast, so the camera’s low-light capabilities are limited, but in terms of image quality, it serves me very well for process shots, research shots, or taking pictures in various shops. Still, it’s not going to cut it when it comes to portfolio-grade photographs due to its limited functionality. It is even lighter than the Olympus, and it is always charged and handy, so I don’t have extra gear to carry around. For travel and family events, it is quite sufficient, and I’ve gotten some great pictures from it. Some of the newest smartphones can record in 4K Ultra High Definition (4K ultraHD), and it is inevitable that this level of camera resolution will become more readily available in coming years. Resolution isn’t the only major feature that you need to be aware of, and I feel like it will still be a while yet before smartphones can compete with true DSLR cameras. There is a limitation on smartphones due to the size of the lens that you are able to get. Some aftermarket manufacturers even make lens add-ons that allow for additional levels of quality. These are definitely interesting, but I don’t think they will replace the DSLR for our situation, especially since DSLRs will also continue to evolve in quality and resolution.
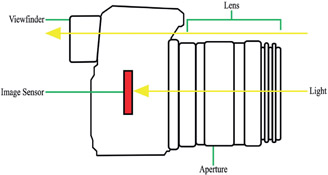
Figure 1.6:
Cutaway view of mirrorless camera.
Mirrorless cameras are a very interesting alternative to DSLRs, and may very well corner a major market share. These cameras eliminate the mirror and prism needed to allow the user to see through the lens. The mirrorless camera allows the light to pass straight through to the image sensor, and provides the user with a second, smaller viewport to use for framing up the shot. Mirrorless cameras are lighter, less expensive, and more compact than DSLRs. The downsides compared to DSLRs are a smaller selection of available lenses, fewer features, and reduced utility in lower-light situations. Still, in the next few years, they may own the market and may have minimized these concerns.
There are two levels of DSLR, the first of which bridges the gap between point & shoot cameras and full DSLR cameras, in both features and price point. The camera in Figure 1.7 is a Canon PowerShot, which has the form factor of a miniaturized DSLR, along with a somewhat richer feature set than most point & shoot cameras. As with most budget-minded designs, most of the features are accessed via menus on the rear LCD screen, and take a bit of time to set up. It has its uses in our world and may be a good choice for designers who need something for process shots as well as final product shots. This particular camera was $400 when new, about one-fifth of the cost of my go-to Nikon DSLR.
The lens in Figure 1.7 is the equivalent of a 28mm– 560mm zoom lens on a regular 35mm film camera, which is an incredible range of focal length for a camera at this price. There are some drawbacks to the one-zoom-fits-all idea, however, especially when it comes to the camera’s light-gathering ability when zoomed. This camera has the ability to capture audio and video as well, which may be very useful for process shots of objects in motion, such as a piece of automated scenery. The LCD screen on the back can flip around and change angles, which is very useful in shooting video.

Figure 1.7:
Canon PowerShot SX10 IS with 20x optical zoom lens.
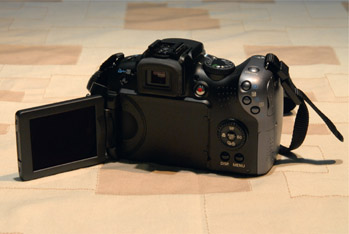
Figure 1.8:
The back of the Canon PowerShot with LCD screen deployed.
It is important to note that this book is not meant as a guide to how your specific camera works. There are way too many brands and models for me to be able to know where every button and dial is on them all. I will talk about how cameras work in a more general way, covering photographic theory based on what most cameras can do. Visit the companion website for more up-to-date information on new models, costs, and user reviews.
As a way to show specific examples, I will demonstrate most all the features I will be talking about using my trusty Nikon D200 DSLR, which I bought in May 2007. When I purchased this DLSR, it was at the top of the “prosumer” range of DSLR camera bodies available. This means it’s situated between the entry-level cameras found at the big-box stores, and the high-end professional-grade cameras used primarily by professional photographers. This range of cameras comes with many (but not all) of the features found on professional-grade cameras, but unfortunately comes with a price tag that is commensurate with its increased feature set. With a Sigma-branded zoom lens, the price for the camera and lens kit came to about $2,000.
There were three reasons I went with this level of camera, aside from the (hopefully) obvious fact that I am really excited by photography as an art form as well as a method of documentation. The first reason was due to some pretty significant brand loyalty. I’ve owned and used Nikons for most everything I’ve done, and they’ve held up well under adverse circumstances. The second reason was that I already owned a collection of older manual-focus Nikon lenses, and the new cameras are designed to be able to use the older lenses as well. The final reason I chose to go this route centers on color sensitivity. At the time, most entry-level models contained a red, green and blue (RGB) color-sensing matrix in the camera’s meter that was fairly small, while the prosumer models used the much larger RGB color-sensing chip from the professional-grade cameras. Since accurate color is critical to what we do, I felt that this was a strong reason to move up to this range of cameras. This model also provided much more control over white balance and had advanced auto-bracketing features, which are very useful in our world, and I will delve into those topics in individual chapters later on.
My advice, if you don’t already own a good camera, is to read through this entire book before settling on a new purchase. Most of the digital pictures in this book were taken with this camera, shown in Figure 1.9, and one of several Nikon lenses. It isn’t my intention for this book to read as a lengthy commercial for Nikon products, as there are many other worthy brands available. I have only included specific brand and model information so that you may make accurate comparisons with other equipment when you are purchasing your own gear.
I know that this level of camera may be beyond the means of many young designers, however, and offer the following suggestions. If you can, borrow or rent a quality camera for a few shoots and see what you like or don’t like. There are some resources in the back of this book that list places to rent lenses, and you may be able to rent lenses or bodies from local camera stores near you. If you are still a student, many schools have an office where you can borrow equipment for short periods, as long as you are using the equipment in conjunction with a class. You may even have a friend, fellow designer, professional contact, or professor with this type of equipment who might be willing to lend it out. If you do any of these things, get the gear a day or two before and practice with it. You do not want to be surprised with a setting you can’t locate or a dead battery 10 minutes before your photo-call begins.

Figure 1.9:
Nikon D200 with 35mm f/1.8 lens.
Find what’s best for your uses and your wallet, and go for it. Canon has also committed to maintaining continuity between bodies and lenses, so that fact has a lot to do with many people I know staying “in the family” of whatever brand they started with. The owner’s manual that comes with your camera should be considered an indispensable sibling to this book. The owner’s manual will tell you how to find the various controls, dials, and menus on your specific camera, and this book will tell you when and why to use the myriad of options available to you.
The best gear, without knowledge of how to employ it, won’t always give you the best pictures, and great photographers with an understanding of the photographic process can get really great shots with basic gear. The explosion of smartphones with cameras has led many students to try to rely on them for their documentation, without a clear understanding of what they risk giving up by not using a full DSLR.
Generally speaking, the more money you spend on a camera, the more features it will have. Additionally, you will most likely have more control over each feature, allowing for greater precision with your work. Much like buying a car or a computer, there are many specifications to look at, not just horsepower or the speed of the processor. With a digital camera, much of the focus may be on the megapixel count, which defines the quality of the image-capturing sensor. While this is certainly important, it isn’t the last word on determining if one camera is better than another. When you look at buying a camera, just like buying a car, the fastest and most expensive one won’t necessarily do the job you need it to. Just the other day I saw a Lamborghini sports car in the parking lot of a Lowe’s hardware store, and remarked to my wife that the owner couldn’t be doing anything more than buying a few nuts and bolts. Compared to our Honda van, which can handle bulk 2x4s and sheets of plywood, it didn’t have nearly the hauling capacity. In the car owner’s case, the Lamborghini may not have been the best tool for the job. With cameras, price and megapixel count are important, but they are not the only specifications to be concerned with. By the end of this book, I hope that you will be confident in your ability to find a camera that serves your purposes and that you enjoy using. If you already own a camera that you plan on using, I hope that this book serves to help you take advantage of all the options available to you with your particular model.