

Digital cameras create photographic image files for each shot you take, and as we learned in the previous chapter, you might even set your camera up to record multiple file types simultaneously. The type of files your camera outputs may be adjustable in terms of file type or file quality, and you should become familiar with the possibilities and options before you start shooting so that you get the best quality images at the end of the day. Most all cameras will output files in a file type that is easy to view, such as JPEG, which is one of the most common. JPEG (or JPG) stands for Joint Photographic Experts Group, and this file type is a compressed version of the original image taken by the camera.
There are two types of file compression, “lossy” and “lossless.” Lossy file compression actually loses some of the data from the original file in order to significantly reduce the file size of the image. These types of compression often make it difficult to blow the pictures up or get high-quality prints. Lossless compression reduces the file size without a major impact on the quality of the image, but you won’t get quite as small a file. JPEG images are a lossy type of compression, which result in much smaller file sizes. They are also subject to generational degradation. This means that the repeated editing and saving of the file will result in a loss of quality in the image.
Other file formats that you might run into include:
- JPEG 2000, which can be either lossy or lossless compression.
- TIFF (Tagged Image File Format), also can be either lossy or lossless compression.
- GIF (Graphics Interchange Format), which is a lossless format, but used primarily for smaller and less complex images, and isn’t suitable for the finer detail we need in our images.
- BMP (Bit Mapped) files are uncompressed and lossless, and are a very common format, especially on Windows-based machines, but may not be as high a quality as you need.
- PNG (Portable Network Graphics) uses lossless compression, and is the successor to GIF files with much better resolution and color ability.
- RAW formats are uncompressed or slightly compressed (lossless) files that represent the greatest possible amount of data saved for an image, and include everything captured by the camera with no in-camera editing. RAW files are sometimes renamed by the various manufacturers, but the concept is the same. Nikon uses the extension NEF (Nikon Encapsulated Format), Canon uses CD2, and there are many others.
There is another format, EXIF (Exchangeable Image File Format), which governs the storage and exchange of metadata associated with each photographic file. Data points such as date, time, shutter speed, aperture, color space, and camera information can be saved with the actual picture data and translated by photo-editing programs. This type of exchange is built into JPEG, TIFF, and PNG files, and this data is also inherently available in RAW format files as well. If you look back at Figure 4.8, you will see that the data on the right comes from the Exif tab in the Mac OSX Preview Inspector window.
Table 14.1 shows the relative sizes and options for the various image files I can produce in my camera. Check your manual for information about the size of your image files, and what quality options may exist; this will be important when you decide on the size of the memory card you need for your camera.
Table 14.1: Image size options, pixel counts, and print size.
| Image Size | Pixel Count | Printed Size at 200dpi |
|
|
||
| Large (10.0M) | 3,872 × 2,592 | 19.36 × 12.96 inches |
| Medium (5.6M) | 2,896 × 1,944 | 14.48 × 9.72 inches |
| Small (2.5M) | 1,936 × 1,296 | 9.68 × 6.48 inches |
| NEF | 3,872 × 2,592 | 19.36 × 12.96 inches* |
* When converted and printed at full scale.
Table excerpted from Nikon D200 Manual, page 32.
Image size refers to the size of the final image in pixels. I recommend that you shoot in the largest size and highest quality format that you can afford to fit on your memory card. Smaller files are great for various web applications, cell-phone wallpaper, and so forth, but you can always shrink down a large-format, high-quality file to a smaller duplicate for those purposes. You can’t blow up a small file for use in portfolios without a serious drop in quality due to the missing pixels that your computer now has to invent according to its image zoom algorithm.
Note that the pixel count and the printed size is the same for the Large JPEG and the NEF files. Where the difference lies is the compression of the two different types. My shots for Carousel, one of the shows featured in this book, average about 4.8MB for the JPEG version of each file, and about 16.5MB for the NEF version of each file. This is approximately four times larger on average for the NEF version, which means there is four times more data (and hence, detail) in the NEF version of the shot.
Table 14.2 shows a bit more information about the level of compression applied to each size of JPEG available. You may or may not have as many options, but you should explore this and determine what you are gaining or losing by utilizing the various compression levels that may be available. These options will also determine how many shots you can fit on the card you have.
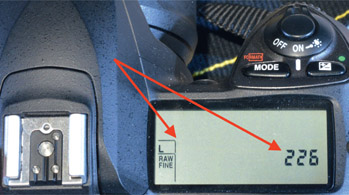
Figure 14.1:
File format and size setting in lower left corner, and remaining exposures counter in lower right corner.
Table 14.2: Image format options.
| Mode | Type of Image Recorded |
|
|
|
| NEF (RAW) | RAW data straight from the image sensor, and stored on the memory card in NEF Format |
| JPEG Fine | Records JPEG image with 1:4 compression |
| JPEG Normal | Records JPEG image with 1:8 compression |
| JPEG Basic | Records JPEG image with 1:16 compression |
| NEF (RAW) + JPEG Fine | Two images, one RAW, and one JPEG Fine |
| NEF (RAW) + JPEG Normal | Two images, one RAW, and one JPEG Normal |
| NEF (RAW) + JPEG Basic | Two images, one RAW, and one JPEG Basic |
Table excerpted from Nikon D200 Manual, page 28.
My camera is showing on the left of the screen that it is set to save a Large size, Fine quality JPEG, and a RAW image file per exposure. It also shows the number 226 to the right, which is a count of how many images I can still save. If I bracket three exposures per shot, which generates six files per shot, that gives me 37 setups I can take. This is probably more than I need, but now I know that if I have 15 to 18 looks to shoot, I can do, on average, two bracketed runs of each.
Table 14.3:Exposure count based on file types (Nikon D200 & 8GB CF card).
| JPEG Quality | JPEG Size | Include RAW File | # of Possible Shots* |
|
|
|||
| Basic | Large | n/a | 3,500 |
| Basic | Medium | n/a | 6,000 |
| Basic | Small | n/a | 12,600 |
| Normal | Large | n/a | 1,800 |
| Normal | Medium | n/a | 3,100 |
| Normal | Small | n/a | 6,600 |
| Fine | Large | n/a | 911 |
| Fine | Medium | n/a | 1,600 |
| Fine | Small | n/a | 3,500 |
| Basic | Large | + RAW | 427 |
| Basic | Medium | + RAW | 450 |
| Basic | Small | + RAW | 469 |
| Normal | Large | + RAW | 383 |
| Normal | Medium | + RAW | 422 |
| Normal | Small | + RAW | 454 |
| Fine | Large | + RAW | 317 |
| Fine | Medium | + RAW | 373 |
| Fine | Small | + RAW | 427 |
| None | n/a | Yes, RAW only | 487 |
* lf I’m recording two files per shot, the counter still treats them as one shot.
I run a tried and true 8GB CF card in my D200 (largest card I could buy at the time), which has a great capacity for a long photo-call, but I do need to clear it out after a big shoot.
If you look closely at the numbers, once you decide to shoot in RAW, the added JPEG doesn’t really reduce your count very much. Looking even further, there isn’t much of a difference between how many pictures I can get with a Large Fine JPEG and a Small Basic JPEG (317 versus 459), when I’m also saving in RAW. I don’t really want to have to look through 300+ images for one show anyway, so this serves my purposes quite effectively. If you like to shoot a great deal more than I do, go for it…there’s nothing wrong with that, and you may hit upon some awesome shots. Just be aware of the extra time and storage space needed when you sit down to cull through everything.
Your camera has a default naming convention for the files it generates, which is usually a sequentially numbered alpha-numeric abbreviation for something. Some cameras allow you to reset the prefix before the numbering, and also will let you restart the numbering sequence. Be aware that this is a double-edged sword. It’s convenient to have your groups of show files all start at 001, instead of some random range of numbers, but that means that you might have three different files all with the same name, but in different folders. So far, that hasn’t been an issue for me, as I keep my files in a careful folder structure, and make copies that get distinct names when I need them for something, such as all the image files for this book. The file-naming setting in my camera is set to DSC, which is the default, and results in files that are sequentially named DSC_0001.jpg and DSC_0001.nef. These files appear next to each other in most file sort/view options, which is very useful, since the JPEG serves as a quick thumbnail that you can view to decide if you are keeping or tossing that image.
Memory cards, which are now our primary storage device, have evolved into many different sizes, shapes, speeds, and storage capacities. Best deals are often found on Amazon or Newegg, but you might find sales at the local electronics stores as well. Pay attention to the user reviews when available to get a sense of reliability. A few basic guidelines to follow:
- Buy as large a storage size as you can afford, in case those cards go out of production (which happened to me with the xD card format for my Olympus point & shoot).
- Buy cards designated as high-speed cards so that you aren’t waiting for pictures to save during a hectic shoot.
- Spend a few extra bucks if you have to, but buy quality brands that have been around. SanDisk, Crucial, Kingston, Lexar, PQI, and Samsung have served me well over the years.
The Compact Flash (CF) Card has been a solid storage card for many years, but most cameras have now moved to Secure Digital (SD) and microSD, which are easy to find and use. Newer cameras may even come with multiple card slots, so you can be downloading one card while still shooting on the other.
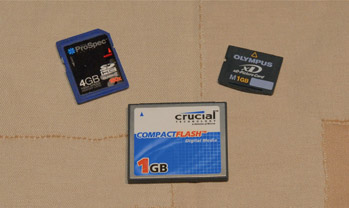
Figure 14.2:
Three memory cards for digital storage of photos. Clockwise from bottom, Compact Flash (CF) Card, Secure Digital (SD) Card, eXtreme Digital (xD) Card.
I just purchased a new adventure camera for outdoors use, and it saves to a microSD card, which is smaller than my thumbnail, and about as thick. For this camera, I bought a SanDisk 64GB microSDXC, which is a high-speed data card capable of 80 megabits per second (MB/s).
This will allow me to take full high-definition (HD) video and have the card save in real time. This wasn’t even the largest capacity card available, but had the best reputation for reliability. This card is also reputed to be waterproof, temperature proof, shock proof, and X-ray proof, although I haven’t tested those extremes yet. In order to easily use these cards, they usually come with a small adapter, which is the same as a regular SD card in size and shape that the microSD slips into for downloads. Certainly, this kind of data speed and card durability is very desirable for what we do, and these types of high-speed cards are available in many different formats.
Just since I started writing this book, there have been some exciting new advances in terms of file formats and types. Apple’s iOS 10 has just been released, and if used in conjunction with the iPhone 6 or 7, along with one of several apps, you can now shoot and save in RAW format. Apple, Samsung, and Motorola are all marketing smartphones with 4K ultraHD displays and 4K resolution cameras. As we discussed before, the quality may still be hampered by the tiny lenses in the phone, but there are accessory lenses that you can purchase that will also mitigate this. Finally, the Droid Moto now pairs with a $250 add-on camera accessory from renowned manufacturer Hasselblad, which includes a 10x optical zoom and shoots in RAW. I look forward to seeing where this technology goes in the next few years, and hope that if you have such a camera, you will share your work on the website.
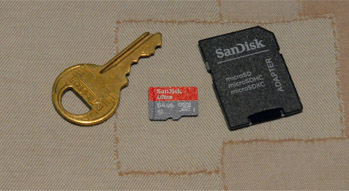
Figure 14.3: MicroSD memory card with SD card adapter.
A final, and important, note about memory cards. You should get in the practice of occasionally reformatting your memory cards, not just deleting the old shots from them after you’ve confirmed they are copied to your storage system. One day I was getting ready for a call with a trusty CF card I had been using for several years, and while it was empty, the camera was also showing that it had about half of the storage capacity I thought it had. On a whim, I reformatted the card, and suddenly regained a ton of space. I suspect that all that garbage on the card may have contributed to a few files that were corrupted on some previous shows. Use your camera to reformat the card, instead of your computer, to ensure that the card’s file structure is truly compatible with the camera’s operating system. Your computer will be far more flexible about reading slight variations in file structures.
File-Formats Practice Session
- 1. Before you are shooting for real, read up on all the options your camera may have in terms of file types, qualities, and sizes.
- a. Figure out how to set those various options, and then take the same photo with all the different options available to you.
- b. Download and view them, and compare the quality with respect to your needs.
- 2. If you plan to use other point & shoot cameras, or your camera phone to take process shots, then take a few test shots with those cameras as well. Then figure out the process of downloading and saving the pictures from those devices. What is the resultant file type from those cameras? How big can you enlarge them? The smart-phone is very convenient for process shots today, since the quality has gone up so much in the past few years, but is it good enough for what you need? If not, consider keeping a slightly higher-quality point & shoot available if process shots are something that you will need often.
- 3. If you do plan to use your smartphone, try this: I have set up my Dropbox account with my Droid so that any pictures I take are automatically uploaded to a special Dropbox folder. This makes utilizing the pictures very easy, and back-up is effortless. Here’s the link to the Dropbox Help article: www.dropbox.com/en/help/307
- 4. If you are interested in looking at generational degradation, try this:
- a. Make a duplicate of an image file and rename it so you don’t ruin a good file.
- b. Open the file in an image-editing program, and make a small edit. It can be a resize, a crop, adding a watermark or text, just something quick.
- c. Resave the file and close it.
- d. Repeat about 10 times, making different slight edits each time, but staying clear of the main part of the image in the file.
- e. Once you are done, print a quality copy of this file and compare to a quality print of the original file you made the duplicate of. How far off is the quality of the edited duplicate? If it is acceptably close, then the combination of your original file size, type, and quality, coupled with whatever image editing you are doing, isn’t contributing much to any loss of quality of the final image. If, however, you can tell the difference after this many edits, then you know you need to do one of three things:
- i Move to a higher-quality start file.
- ii Try using a different image editor.
- iii Avoid reopening, editing, and resaving your files quite as much.