
19. Ubuntu Remote Desktop Access with Vino
Ubuntu can be configured to provide remote access to the graphical desktop environment over a network or internet connection. Although not enabled by default, it is relatively straightforward to display and access an Ubuntu desktop from a system anywhere else on a network or the internet. This can be achieved regardless of whether that system is running Linux, Windows or macOS. In fact, there are even apps available for Android and iOS that will allow you to access your Ubuntu desktop from just about anywhere that a data signal is available.
Remote desktop access can be useful in a number of scenarios. It enables you or another person, for example, to view and interact with your Ubuntu desktop environment from another computer system either on the same network or over the internet. This is useful if you need to work on your computer when you are away from your desk such as while traveling. It is also useful in situations where a co-worker or IT support technician needs access to your desktop to resolve a problem.
The Ubuntu remote desktop functionality is based on technology known as Virtual Network Computing (VNC) and in this and the next chapter we will cover the key aspects of configuring and using remote desktops within Ubuntu.
19.1 Remote Desktop Access Types
Before starting it is important to understand that there are essentially two types of remote desktop access. The approach covered in this chapter is useful if you primarily use Ubuntu as a desktop operating system and require remote access to your usual desktop session. When configured, you will take over your desktop session and view and control it remotely.
The second option, covered in the next chapter entitled , is intended for situations where you need to start and access one or more remote desktop sessions on a remote server-based system, regardless of whether the remote system has a graphical console attached. This allows you to launch multiple desktop sessions in the background on the remote system and view and control those desktops over a network or internet connection.
19.2 Secure and Insecure Remote Desktop Access
In this chapter we will cover both secure and insecure remote desktop access methods. Assuming that you are accessing one system from another within the context of a secure internal network then it is generally safe to use the insecure access method. If, on the other hand, you plan to access your desktop remotely over any kind of public network you must use the secure method of access to avoid your system and data being compromised.
19.3 Enabling Remote Desktop Access on Ubuntu
Remote desktop access on Ubuntu is provided by the Vino package. Vino is a VNC server that was developed specifically for use with the GNOME desktop.
The first step in enabling remote access is to install this package:
# apt install vino
Once Vino has been installed, the next step is to enable remote desktop access from within GNOME. Begin by opening the settings app as shown in Figure 19-1:

From within the Settings application, select the Sharing option (marked A in Figure 19-2):
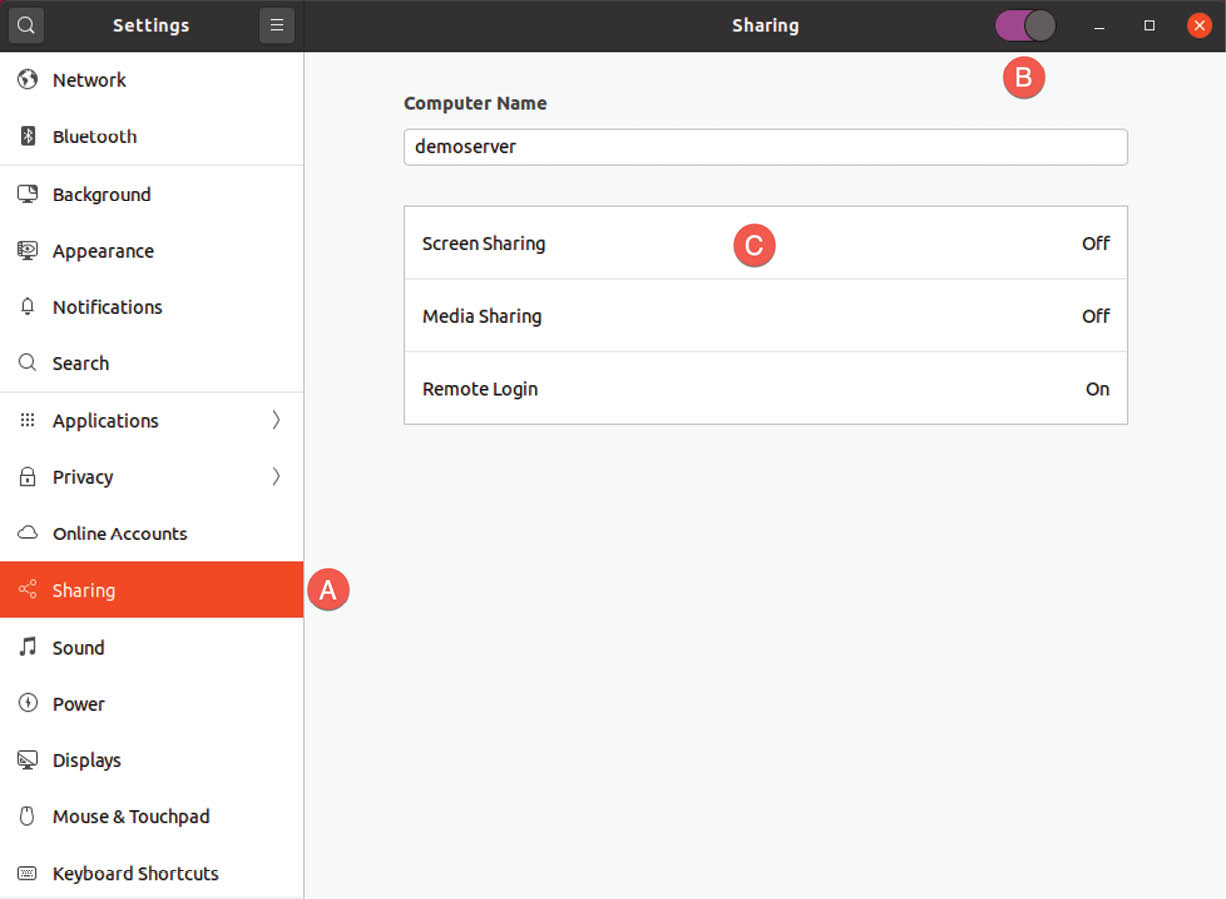
Turn on the Sharing switch (B) and click on the Screen Sharing option (C) to display the dialog shown in Figure 19-3 below:

The Screen Sharing dialog provides the following configuration options to manage remote desktop access:
•Allows connections to control the screen - If enabled, the remote session will be able to use the mouse and keyboard to interact with the desktop environment. If disabled the remote session will only allow the desktop to be viewed.
•New connections must ask for access - When selected, a prompt will appear on the host screen asking to give permission to the remote user to access the desktop. Do not select this option if you plan to access your screen remotely and nobody will be at the host system to accept the connection request.
•Require a password - Requires the user to enter the specified password prior to gaining access to the desktop.
•Networks - The network connections on the host system via which remote access is to be permitted.
After configuring the settings, close both the Screen Settings and Settings dialogs.
19.4 Connecting to the Shared Desktop
Although VNC viewer implementations are available for a wide range of operating systems, a tool such as the Remmina Desktop Client is recommended when connecting from Ubuntu or other Linux-based systems. Remmina is a user friendly tool with a graphical interface that supports the encryption used by Vino to ensure a secure remote connection.
To install this tool, open the Ubuntu Software application and search for and install Remmina:

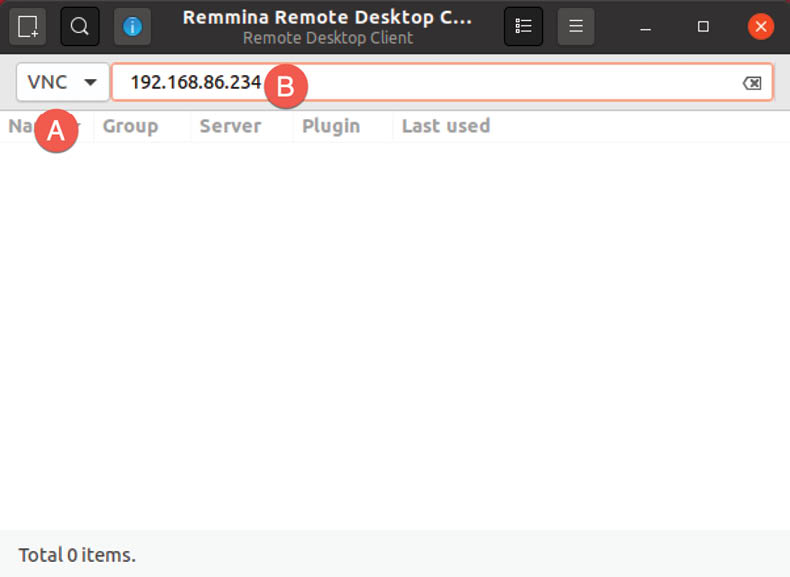
After installing and launching Remmina, change the connection type menu (marked A in Figure 19-5) to VNC and enter into the address field (B) the IP address or hostname of the remote system to which you wish to connect:
To establish the connection, tap the keyboard Enter key to begin the connection process. After a short delay, a second screen will appear requesting the desktop access password (if one was entered when screen sharing was enabled earlier in the chapter):

Figure 19-6
After entering the password, click on OK to access the remote screen:
Figure 19-7
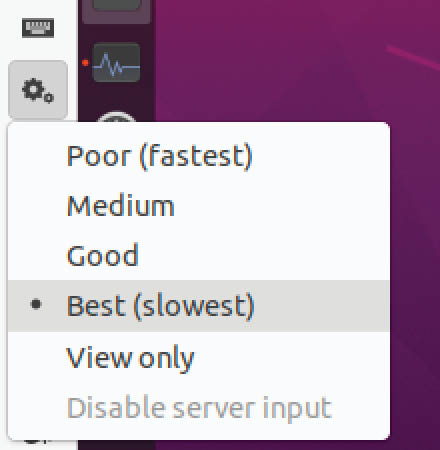
The default settings for Remmina prioritize speed over image quality. If you find that the quality of the desktop rendering is unacceptably poor, click on the settings button (Figure 19-8) in the left-hand toolbar within the remote viewer window and experiment with different settings until you find the ideal balance of performance and image quality:
19.5 Connecting from Non-Linux Clients
The previous section assumed that the remote desktop was being accessed from a Linux or UNIX system. It is important to understand that Vino, by default, requires that the remote connection be encrypted to ensure security. One of the reasons for using Remmina is that it fully supports the encryption used by Vino.
If you need to connect from a non-Linux system such as Windows or macOS you will need to install a third-party VNC viewer such as TightVNC, TigerVNC or RealVNC. Unfortunately, these viewers do not support the encryption that Vino uses by default. To experience this in action, download the RealVNC viewer for your macOS or Windows system from the following URL:
https://www.realvnc.com/en/connect/download/viewer/
Once installed, launch the viewer and enter the hostname or IP address of your remote Ubuntu system. On attempting to connect, a failure dialog will appear similar to the one shown in Figure 19-9:

To allow a connection to be established from a non-Linux system it is necessary to turn off the encryption requirement for the remote desktop connection. To do this, open a terminal window on the Ubuntu system and run the following command (using your account and without sudo privileges):
$ gsettings set org.gnome.Vino require-encryption false
After disabling the Vino encryption requirement, attempt to connect from the RealVNC viewer once again. This time a warning will appear indicating that the connection is not encrypted:

Figure 19-10
Clicking the Continue button will dismiss the warning dialog and establish the remote connection.
Clearly, connecting to a remote VNC server using the steps in this section results in an insecure, unencrypted connection between the client and server. This means that the data transmitted during the remote session is vulnerable to interception. To establish a secure and encrypted connection from an Ubuntu system to a non-Linux client a few extra steps are necessary.
19.6 Establishing a Secure Remote Desktop Session
The remote desktop connection from macOS and Windows in the previous section is considered to be insecure because no encryption is used. This is acceptable when the remote connection does not extend outside of an internal network protected by a firewall. When a remote session is required over an internet connection, however, a more secure option is needed. This is achieved by tunneling the remote desktop through a secure shell (SSH) connection. This section will cover how to do this on Linux, UNIX and macOS client systems.
When a remote desktop session is invoked on an Ubuntu system a connection is made using TCP/IP network port 5900. To prove this, establish a connection to your remote Ubuntu system referencing port 5900 after the hostname or IP address, for example, and note that the connection is still established:
192.168.86.218:5900
To implement an encrypted remote desktop session for non-Linux system the session needs to be tunneled through a secure SSH connection.
If the SSH server has not yet been installed on your Ubuntu system, refer to the chapter entitled “Configuring SSH Key-based Authentication on Ubuntu”.
Assuming the SSH server is installed and active it is time to move to the other system. At the other system, log in to the remote system using the following command, which will establish the secure tunnel between the two systems. This assumes the client system is running macOS, Linux or UNIX (instructions for Windows systems are covered in the next section):
$ ssh -l <username> -L 5900:localhost:5900 <remotehost>
In the above example, <username> references the user account on the remote system for which VNC access has been configured, and <remotehost> is either the host name or IP address of the remote system, for example:
$ ssh -l demo -L 5900:localhost:5900 192.168.86.218
When prompted, log in using the account password. With the secure connection established it is time to launch vncviewer so that it uses the secure tunnel. Leaving the SSH session running in the terminal window, launch the VNC viewer and enter the following into the address field:
localhost:5900
The vncviewer session will prompt for a password if one is required, and then launch the VNC viewer providing secure access to your desktop environment.
Although the connection is now secure and encrypted, the VNC viewer will most likely still report that the connection is insecure. Unfortunately, although the connection is now secure, the VNC viewer software has no way of knowing this and consequently continues to issue warnings. Rest assured that as long as the SSH tunnel is being used, the connection is indeed secure.
In the above example we left the SSH tunnel session running in a terminal window. If you would prefer to run the session in the background, this can be achieved by using the –f and –N flags when initiating the connection:
$ ssh -l <username> -f -N -L 5900:localhost:5900 <remotehost>
The above command will prompt for a password for the remote server and then establish the connection in the background, leaving the terminal window available for other tasks.
If you are connecting to the remote desktop from outside the firewall keep in mind that the IP address for the SSH connection will be the external IP address provided by your ISP or cloud hosting provider, not the LAN IP address of the remote system (since this IP address is not visible to those outside the firewall). You will also need to configure your firewall to forward port 22 (for the SSH connection) to the IP address of the system running the desktop. It is not necessary to forward port 5900. Steps to perform port forwarding differ between firewalls, so refer to the documentation for your firewall, router or wireless base station for details specific to your configuration.
19.7 Establishing a Secure Tunnel on Windows using PuTTY
A similar approach is taken to establishing a secure desktop session from a Windows system to an Ubuntu server. Assuming that you already have a VNC client such as TightVNC installed, the one remaining requirement is a Windows SSH client (in this case PuTTY).
Once PuTTY is downloaded and installed, the first step is to establish a secure connection between the Windows system and the remote system with appropriate tunneling configured. When launched, PuTTY displays the following screen:

Figure 19-11
Enter the IP address or host name of the remote host (or the external IP address of the gateway if you are connecting from outside the firewall). The next step is to set up the tunnel. Click on the + next to SSH in the Category tree on the left-hand side of the dialog and click on Tunnels. The screen should subsequently appear as follows:

Figure 19-12
Enter 5900 as the Source port and localhost:5900 as the Destination and click on the Add button. Finally return to the main screen by clicking on the Session category. Enter a name for the session in the Saved Sessions text field and press Save. Click on Open to establish the connection. A terminal window will appear with the login prompt from the remote system. Enter the appropriate user login and password credentials.
The SSH connection is now established. Launch the VNC viewer, enter localhost:5900 in the VNC Server text field and click on Connect. The viewer will establish the connection, prompt for the password and then display the desktop. You are now accessing the remote desktop of a Linux system from Windows over a secure SSH tunnel connection.
Remote access to the GNOME desktop environment of an Ubuntu system can be enabled by making use of Virtual Network Computing (VNC). Comprising the VNC server running on the remote server and a corresponding client on the local host, VNC allows remote access to multiple desktop instances running on the server.
The standard remote server solution for the GNOME desktop is Vino. Once installed, remote desktop sessions can be established from other Linux systems using a remote desktop viewer such as Remmina.
When connecting from non-Linux systems such as Windows or macOS, it is necessary to disable Vino’s encryption requirements. Once disabled, connections from client systems should be established using SSH tunneling.
When the VNC connection is being used over a public connection with Vino encryption disabled, the use of SSH tunneling is recommended when connecting to ensure that the communication between client and server is encrypted and secure.