
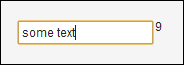
In some cases, we need to use text fields with limited character length, usually for forms that submit data to database. It is nice to tell the user how many characters remain. For that case, we can create our custom text field with a counter, as shown in the following screenshot. In this recipe, we will show how to do it.
Carry out the following steps to create a TextField with a counter:
- We create a Vaadin project with a main UI class named
Demoas follows:public class Demo extends UI {…} - The easiest way to create a new component is to use Eclipse IDE. We open the context menu on the project and choose New | Other…. A wizard will open. In the wizard, we type
vaadin. Then we select the item Vaadin Widget and click on the Next button, as shown in the following screenshot: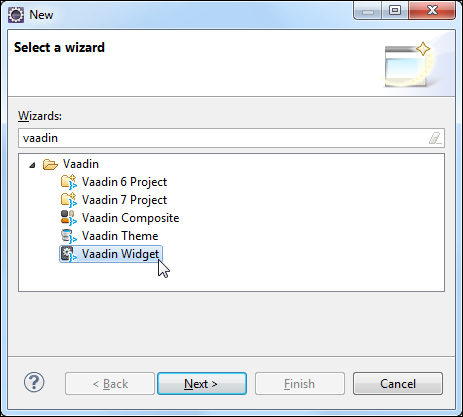
- On the next page, we set some properties. Package will be
com.packtpub.vaadin.widget. The name of our new component will beCountedTextFieldand as a superclass we setcom.vaadin.ui.TextField. After filling in the properties, we click on the Finish button, as shown in the following screenshot:
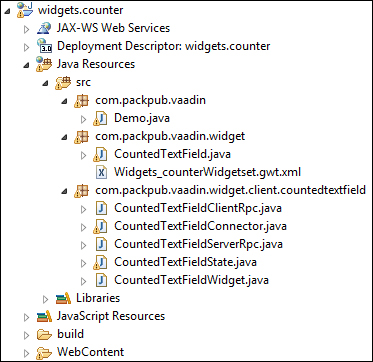
- Eclipse will generate a skeleton of a simple custom component, as shown in the following screenshot. In our next step, we will edit it by removing and adding some methods.
- We start with editing the class
CountedTextFieldWidget. This client-side widget will extendComposite. TheCompositeis a type of widget that wraps another widget. It hides the wrapped widget's methods.import com.google.gwt.user.client.ui.Composite; public class CountedTextFieldWidget extends Composite { … } - This widget consists of two parts:
TextBoxfor user input andLabelfor showing the number of characters inTextBox. These two parts will be added to theHorizontalPanelbecause we want to show the label on the right side of the textbox. We create instances of these classes at the beginning of theCountedTextFieldWidgetclass. The generated constantCLASSNAMEwill be used to set default CSS style name of our widget.import com.google.gwt.user.client.ui.TextBox; import com.google.gwt.user.client.ui.Label; import com.google.gwt.user.client.ui.HorizontalPanel; … private TextBox textBox = new TextBox(); private Label countLabel = new Label("0"); private HorizontalPanel panel = new HorizontalPanel(); public static final String CLASSNAME="countedtextfield"; - In the constructor, we initialize our main panel because our widget is wrapped by the composite. It is very important to initialize the wrapped widget before calling any
Widgetmethods on this object. Otherwise, our widget doesn't appear on the web page. This method may only be called once for a given composite. Then we set the name of our used CSS style and we add the created widgets to the panel.public CountedTextFieldWidget() { initWidget(panel); setStyleName(CLASSNAME); panel.add(textBox); panel.add(countLabel); } - Next, we add getters and setters. The best way to create an API is to hide the implementation of the internally used widgets. On the outside, we provide only the methods that are necessary for our
CountedTextFieldWidget. For example, if we want to return text from our widget, we simply add thegetText()method that hides implementation of the innertextBox.getText()method.public String getText() { return textBox.getText(); } public void setText(String text) { textBox.setText(text); } public void setCount(int count) { countLabel.setText("" + count); } - At the end, we create a method for adding
KeyUpHandler. EachaddXxxHandler()method returns theHandlerRegistrationinterface. This interface contains theremoveHandler()method that can be used to remove the handler from the widget.public HandlerRegistration addKeyUpHandler( KeyUpHandler handler) { return textBox.addKeyUpHandler(handler); } - In the
CountedTextFieldStateclass, we only rewrite the name of the primary style. We will do it using the non-static block that is executed before any constructor. TheprimaryStyleNamestring is inherited from theAbstractFieldStateclass. In that class, it's set tov-textfield. We remove this style because it conflicts with the default GWT stylegwt-TextBox.public class CountedTextFieldState extends com.vaadin.shared.ui.textfield.AbstractTextFieldState { { primaryStyleName = null; } } - Now we continue to edit the
CountedTextFieldConnectorclass. We don't need the generated stuff in the constructor. So, we clean the whole constructor and addKeyUpHandler. On theKeyUpevent we update the value of thecountLabelobject. It causes the count of characters to be updated immediately after each key press.public CountedTextFieldConnector() { getWidget().addKeyUpHandler(new KeyUpHandler() { @Override public void onKeyUp(KeyUpEvent event) { String text = getWidget().getText(); getWidget().setCount(text.length()); } }); } - Next, we edit the overridden method
onStateChanged(). After each change of state, this method will update the value oftextandcounton our created widget. The variabletextis from the inheritedAbstractTextFieldStateclass.@Override public void onStateChanged( StateChangeEvent stateChangeEvent) { super.onStateChanged(stateChangeEvent); final String text = getState().text; getWidget().setText(text); getWidget().setCount(text.length()); } - In the server-side component
CountedTextField, we can delete the generated stuff except thegetState()method. Then we insert the overridden getter and setter of the component'stextvalue. This value is propagated through theCountedTextFieldStatecomponent. Sending events from the server to the client works automatically in Vaadin. But the changes on the client side aren't automatically sent to the server-side component. For this purpose, we can use the Remote Procedure Calls (RPC) mechanism. The link to the Vaadin website about this mechanism is added in the See also section at the end of this recipe.public class CountedTextField extends com.vaadin.ui.TextField { @Override public CountedTextFieldState getState() { return (CountedTextFieldState) super.getState(); } @Override public String getValue() { return getState().text; } @Override public void setValue(String value) { getState().text = value; } } - The last two generated classes
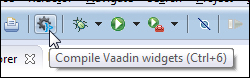
CountedTextFieldClientRpcandCountedTextFieldServerRpcaren't used in our widget. We can delete them. - After editing all classes, we need to compile the widget set. We can do this by pressing Ctrl + 6 or by clicking on the icon, as shown in the following screenshot:
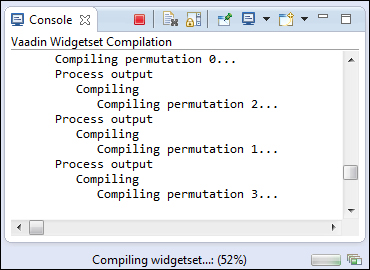
- We can see the compiling process in the console in the following screenshot:
- Generated files are in the
WebContent/VAADIN/widgetsetsfolder.
- Our custom component is created. We can use it in our application as follows:
public class Demo extends UI {

  @Override
  protected void init(VaadinRequest request) {
    setContent(new CountedTextField());
  }

}
Now we can run the server and open our Demo application in a web browser.
We created our custom text field with a counter. The counter shows how many characters are in the textbox. If the user enters some text to this field, then the onKeyUp() method in the KeyUpHandler on the CountedTextFieldWidget is called. Inside this method, we set the value of the label counter. It causes the counter to be updated immediately after each keystroke. Because changes on the client side aren't automatically sent to the server-side component, we can use the RPC mechanism that is described on the Vaadin website mentioned in the See also section.
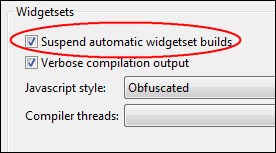
The Vaadin Plug-in for Eclipse can automatically compile the widget set after every client-side source file. This function is suspended by default. If we want to activate it, we can do it in the project properties in the following way. It can help us because we'll still have the last compiled widget set but it can use a lot of CPU and slow down the computer.
- We open the context menu on the project.
- Then we select the last item Properties. The properties wizard opens.
- In menu, we select item Vaadin. The properties page for the Vaadin project opens.
- In the Widgetsets frame, we uncheck Suspend automatic widgetset builds.
- At the end we click on the OK or the Apply button.
- Additional information about creating new widgets is available at the Vaadin website at https://vaadin.com/book/vaadin7/-/page/part-clientside.html
- Information about using the RPC mechanism to send event from the client to the server is described here https://vaadin.com/book/vaadin7/-/page/gwt.rpc.html