
Vaadin supports a simple context menu (mouse right-click) only for table, tree, and calendar. The menu items are handled as actions by an action handler. To enable a context menu, we have to implement a Vaadin Action.Handler and add it to the component with the addActionHandler() method. However, if we need a complex context menu on a different component, we can use the ContextMenu add-on created by Peter Lehto. In this recipe, we will create a context menu for the text area. We will add the context menu with three actions. One action cleans the text area and the two others insert a date and a name in the text area.
- We create a Vaadin project with a main UI class called
Demo.public class Demo extends UI {…} - We will use the
ContextMenuadd-on. We download it from the Vaadin directory (http://vaadin.com/addon/contextmenu) and put the JAR file to our web project under theWebContent/WEB-INF/libdirectory.Alternatively, we can add Maven dependency according to the instructions on the mentioned web page.
- Then we recompile this add-on. In Eclipse, we can do it by pressing Ctrl + 6 or by clicking on the button with the Compile Vaadin widgets tool tip in the top menu bar.
Carry out the following steps to create a custom context menu in the text area:
- We create a class named
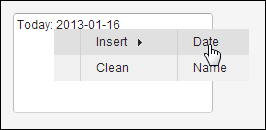
ContextMenuTextAreathat is based onTextArea.public class ContextMenuTextArea extends TextArea {…} - At the beginning of the class, we initialize the objects of the context menu and menu items. In the first level, we have two actions:
insertandclean. The other actionsinsertdateandinsertnameare submenus ofinsertitem. The constant calledNAMEwill be used for the action that will insert a name in the text area.private ContextMenu menu = new ContextMenu(); private ContextMenuItem insertItem = menu.addItem("Insert"); private ContextMenuItem cleanItem = menu.addItem("Clean"); private ContextMenuItem dateItem = insertItem.addItem("Date"); private ContextMenuItem nameItem = insertItem.addItem("Name"); private static final String NAME = "Vaadin"; - In the constructor, we add extensions into the text area and in a separate method we add all required listeners to the context menu items.
public ContextMenuTextArea() { addExtension(menu); addListeners(); } - Now we create a method that adds listeners to the context menu items. First we add a click listener to the
dateItem, which is an instance of theContextMenuItemclass. On the click event in this listener, we insert formatted text in the text area.private void addListeners(){ dateItem.addItemClickListener( new ContextMenuItemClickListener() { @Override public void contextMenuItemClicked( ContextMenuItemClickEvent event) { SimpleDateFormat format = new SimpleDateFormat("yyyy-MM-dd"); insertText(format.format(new Date())); } }); … - Next, we add a click listener to
nameItem. On this click event we insert a name, for example, Vaadin.nameItem.addItemClickListener( new ContextMenuItemClickListener() { @Override public void contextMenuItemClicked( ContextMenuItemClickEvent event) { insertText(NAME); } }); … - The last listener is about cleaning the whole text area. We add it to
cleanItem.cleanItem.addItemClickListener( new ContextMenuItemClickListener() { @Override public void contextMenuItemClicked( ContextMenuItemClickEvent event) { setValue(""); focus(); } }); } - The separate method ,
insertText()helps us to insert some text into the text area to the last cursor position.private void insertText(String text) { int position = getCursorPosition(); String value = getValue(); setValue(value.substring(0, position) + text + value.substring(position)); focus(); } - That's all. Now we can use our new text area in the main UI class
Demo.public class Demo extends UI { @Override public void init(VaadinRequest request) { TextArea area = new ContextMenuTextArea(); area.setWidth(200, Unit.PIXELS); area.setHeight(100, Unit.PIXELS); setContent(area); } }
We run the server and open our application in the web browser.
ContextMenu is a Vaadin 7 Extension that can be added to any Vaadin component. An Extension is an entity that is not a full-fledged UI component, but is instead used to enhance or extend the functionality of an existing component. In this book, ContextMenu version 4.1.1 is used that supports Table, in addition to Layouts, for which the context menu can be customized based on the selected Item and Property.
ContextMenu supports hierarchical menu structures and item-level click listeners as well as on-the-fly management of menu items.
- The author of the add-on
ContextMenuis Peter Lehto. We can download it from Vaadin's directory:http://vaadin.com/addon/contextmenu - Here is information how to use Vaadin add-ons: http://vaadin.com/directory/help/using-vaadin-add-ons
- Here is a demo of ContextMenu on the Table and Tree components: http://demo.vaadin.com/sampler/#TableActions http://demo.vaadin.com/sampler/#TreeActions