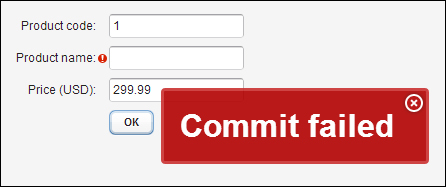
Java Bean Validation—JSR-303 is a framework that has been approved by the JCP (Java Community Process) and is accepted as a part of the Java EE 6 specification. Through this framework, we can easily add validation on the attributes in the bean. In this recipe, we will create a form for the Product bean and we will validate the attributes.

Before we start with bean validation, we need to download a Bean Validation implementation and add it to our project. For example, one of them is available at the following URL:
http://code.google.com/p/agimatec-validation/downloads/list
Alternatively, we can download the Hibernate Validator from the following URL:
http://www.hibernate.org/subprojects/validator/download
Or add the Maven dependency:
<dependency>
    <groupId>org.hibernate</groupId>
    <artifactId>hibernate-validator</artifactId>
    <version>4.3.1.Final</version>
</dependency>
Hibernate Validator requires slf4j-api and slf4j-simple JAR files available at the following URL:
http://www.slf4j.org/download.html
Or add the Maven dependency:
<dependency>
  <groupId>org.slf4j</groupId>
  <artifactId>slf4j-api</artifactId>
  <version>1.7.2</version>
</dependency>
After downloading, we add these JAR files into the lib folder in our project at WebContent/WEB-INF/lib.
Carry out the following steps to create a form with bean validation:
- Create a Vaadin project with a main UI class named
Demo.public class Demo extends UI {…} - We create a bean named
Product. This bean has attributescode,name, andprice. Using bean validation is very easy. For instance, if we want to add a not-null constraint to ensure anullvalue cannot be used on thecodeattribute, we place a@NotNullannotation on it. Using the@Sizeannotation with optional elementsminandmax, we can limit the length of the stringname. To determine the minimum value ofpricewe use an annotation,@Min.public class Product { @NotNull private int code; @Size(min=2, max=10) private String name; @Min(0) private double price; public Product(int code, String name, double price) { super(); this.code = code; this.name = name; this.price = price; } <insert getters and setter> … } - Next, we create our main class named
ProductForm. This class is based on theFormLayoutclass. In this layout, captions are rendered to the left of their respective components.public class ProductForm extends FormLayout {…} - We want to bind fields with bean attributes, so the names of the fields are the same as the attributes of the
Productbean.private TextField code = new TextField("Product code:"); private TextField name = new TextField("Product name:"); private TextField price = new TextField("Price (USD):"); private FieldGroup fieldGroup; - In the constructor, we set size of the form and, using the
setMargin(true)method, we set a margin on all four sides.public ProductForm() { setSizeUndefined(); setMargin(true); … - Next, we create an instance of the
FieldGroupclass.FieldGroupprovides an easy way of binding fields to data and handling commits of these fields. In this object, we also set the bean item.fieldGroup = new BeanFieldGroup<Product>(Product.class); fieldGroup.setItemDataSource(new BeanItem<Product>(product)); fieldGroup.bindMemberFields(this); … - At the end, we add all components to the layout.
addComponent(code); addComponent(name); addComponent(price); addComponent(createOkButton()); } - The
okButtonobject is created in a separate method. We add a click listener on this button. In this listener, we commit all changes made to the bound fields. If some of the fields are not valid, theFieldGroup.commit()method throwsCommitException.private Button createOkButton() { Button okButton = new Button("OK"); okButton.addClickListener(new ClickListener() { @Override public void buttonClick(ClickEvent event) { try { fieldGroup.commit(); Notification.show("Product committed: " + product); } catch (CommitException e) { Notification.show(e.getMessage(), Type.ERROR_MESSAGE); } } }); return okButton; } - That is all. Now we can use our created form in the
Democlass.@Override protected void init(VaadinRequest request) { setContent(new ProductForm()); } }We run the server and open our application in the web browser.
A table showing some bean validation constraints:
|
Constraint |
Description |
Example |
|---|---|---|
|
The value of the field or property must be |
| |
|
The value of the field or property must be a date in the future. |
| |
|
The value of the field or property must be an integer value greater than or equal to the number in the value element. |
| |
|
The value of the field or property must not be |
| |
|
The value can not exceed the value of one of the optional elements |
|
The full list of the built-in Bean validation constraints is described on the Oracle's web page:
- The web page about Hibernate Validator is available at http://www.hibernate.org/subprojects/validator
- The web page about JSR-303: Bean Validation available at http://jcp.org/en/jsr/detail?id=303
