
This recipe is the continuation of the previous Login form with Model View Presenter recipe. In this recipe, we will create a complex view, which will consist of two panels. The first panel will be used for adding new items and the second for showing the list of items.
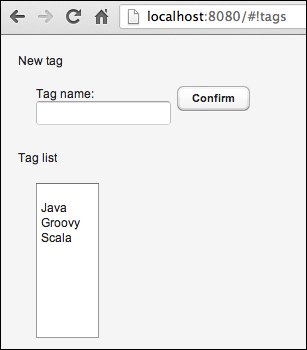
The application will be about adding tags to the database and showing the list of all the tags from a database. The layout of the user interface is as follows:
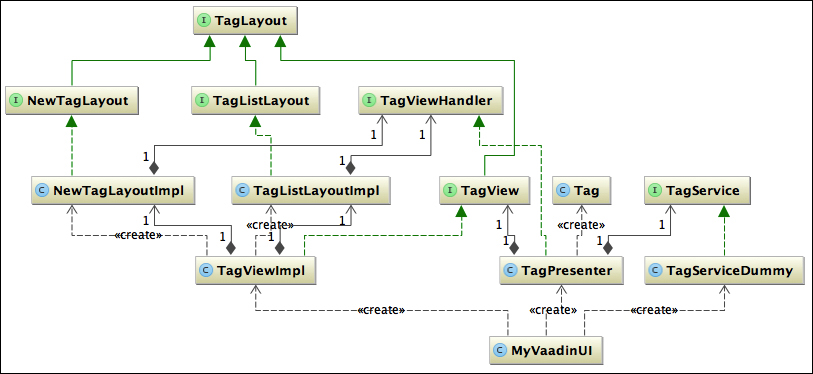
Before we start, we create a simplified class diagram of the application we are going to develop. Start reading the class diagram from the MyVaadinUI class. MyVaadinUI creates the tag view, tag presenter, and the tag service. The implementation of the TagView interface, the TagViewImpl class, contains two layouts, the first one for creating new tags and the second to display the list of the tags. TagService provides and saves the instances of the Tag class. TagPresenter binds view and service layer together via the interfaces TagView and TagService.
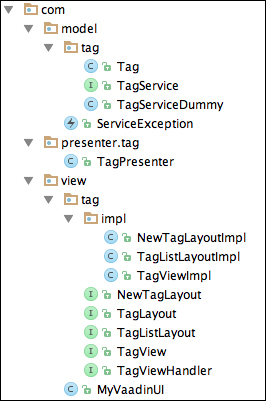
We need to decide where to put our classes. See the following screenshot, which shows the packaging structure for our example:
Perform the following steps:
- Create the interface for the service layer, which takes care of fetching and saving tags. Also create an exception named
ServiceExceptionfor the service layer.public interface TagService { List<Tag> findAll() throws ServiceException; void save(Tag tag) throws ServiceException; } public class ServiceException extends Exception { } - Make a dummy service, which implements the methods from
TagService.TagServiceDummyjust pretends to be a service that fetches data from a data source. The dummy class can be used from the beginning of development and should be replaced by a real service that fetches data from a data source.public class TagServiceDummy implements TagService { ArrayList<Tag> tags = new ArrayList<Tag>(); public TagServiceDummy() { Tag java = new Tag("Java"); Tag groovy = new Tag("Groovy"); Tag scala = new Tag("Scala"); tags.add(java); tags.add(groovy); tags.add(scala); } @Override public List<Tag> findAll() { return tags; } @Override public void save(Tag tag) { tags.add(tag); } } - Create the
Tagclass, which contains the name of a tag. TheTagclass can be expanded with other fields, such ascreationDate,author, and so on. Generate getters, setters, and the constructor for thenamefield:public class Tag { private String name; // generate constructor, getter and setter for name field } - Create an interface that defines common methods for all the layouts inside the tag view.
public interface TagLayout { void setHandler(TagViewHandler handler); void init(); } - Create an interface for the tag view and define two getters—
getNewTagLayout, which returns reference to the layout that contains components for adding of a new tag andgetTagListLayout, which returns a reference to the layout that shows the list of tags.import com.vaadin.navigator.View; public interface TagView extends View, TagLayout { NewTagLayout getNewTagLayout(); TagListLayout getTagListLayout(); } - Create the
NewTagLayoutinterface, which defines methods that are required to handle adding of a new tag:public interface NewTagLayout extends TagLayout { TextField getTxtTagName(); void afterSuccessfulSave(); } - Create
TagListLayoutthat defines theafterSuccessfulFetchmethod, which will be called from the tag presenter after the tags are received from a data source:public interface TagListLayout extends TagLayout { void afterSuccessfulFetch(List<Tag> tags); } - Now, we need to create an interface, which connects the view with a presenter. Create
TagViewHandler, which defines theaddTag()andshowTagList()methods. These two methods will be called from the view layer. The presenter will implement them.public interface TagViewHandler { void addTag(); void showTagList(); } - Next, implement the
NewTagLayoutinterface, which extendsHorizontalLayout, creates, and lays out text field and button components. Add to the button a new click listener that just calls theaddTag()method from theTagViewHandlerinterface:public class NewTagLayoutImpl extends HorizontalLayout implements NewTagLayout { private TextField txtTagName; private TagViewHandler handler; private Button btnConfirm; @Override public void setHandler(TagViewHandler handler) { this.handler = handler; } @Override public void init() { setCaption("New tag"); setSpacing(true); setMargin(true); txtTagName = new TextField("Tag name:"); addComponent(txtTagName); btnConfirm = new Button("Confirm"); btnConfirm.addClickListener(new Button.ClickListener() { @Override public void buttonClick(Button.ClickEvent clickEvent) { handler.addTag(); } }); addComponent(btnConfirm); } public Button getBtnConfirm() { return btnConfirm; } public TextField getTxtTagName() { return txtTagName; } @Override public void afterSuccessfulSave() { txtTagName.setValue(""); txtTagName.focus(); } } - Implementation of
TagListLayoutwill contain aListSelectcomponent for showing the list of tags. We call theshowTagList()method fromTagViewHandler, inside theinit()method, so the tags are fetched when the layout is initialized. Then we implement theafterSuccessfulFetch()method from theTagListLayoutinterface, which is called after the successful fetch of the tag list.public class TagListLayoutImpl extends HorizontalLayout implements TagListLayout { private ListSelect tagList; private TagViewHandler handler; @Override public void init() { setCaption("Tag list"); setSpacing(true); setMargin(true); tagList = new ListSelect(); tagList.setItemCaptionPropertyId("name"); addComponent(tagList); handler.showTagList(); } @Override public void setHandler(TagViewHandler handler) { this.handler = handler; } @Override public void afterSuccessfulFetch(List<Tag> tags) { tagList.setContainerDataSource(new BeanItemContainer<Tag>(Tag.class, tags)); } } - Implement
TagViewImplthat consists ofNewTagLayoutImplandTagListLayoutImpl. We initialize these two layouts and implement thesetHandler()method, which delegates the handler setting to thesetHandler()method fromNewTagLayoutandTagListLayout.public class TagViewImpl extends VerticalLayout implements TagView { private NewTagLayoutImpl newTagLayout; private TagListLayoutImpl tagListLayout; @Override public void enter(ViewChangeListener.ViewChangeEvent e) { } @Override public NewTagLayoutImpl getNewTagLayout() { return newTagLayout; } @Override public TagListLayoutImpl getTagListLayout() { return tagListLayout; } @Override public void setHandler(TagViewHandler handler) { newTagLayout.setHandler(handler); tagListLayout.setHandler(handler); } @Override public void init() { setSpacing(true); setMargin(true); newTagLayout = new NewTagLayoutImpl(); addComponent(newTagLayout); tagListLayout = new TagListLayoutImpl(); addComponent(tagListLayout); } } - Now we create
TagPresenter, which implements the methods that are called from the view—theTagViewHandlerinterface.TagPresenterneeds to have access to the tag view and tag service, in order to handle theaddTag()andshowTagList()methods. Therefore we create a constructor into which we have to pass implementations of theTagViewandTagServiceinterfaces:public class TagPresenter implements TagViewHandler { private TagView tagView; private TagService tagService; public TagPresenter(TagView view, TagService service) { this.tagView = view; this.tagService = service; } @Override public void addTag() { NewTagLayout layout = tagView.getNewTagLayout(); TextField txtTagName = layout.getTxtTagName(); String value = txtTagName.getValue(); try { Tag tag = new Tag(value); tagService.save(tag); layout.afterSuccessfulSave(); showTagList(); } catch (ServiceException e) { // TODO: log the exception // TODO: notify view about failure } } @Override public void showTagList() { try { TagListLayout layout = tagView.getTagListLayout(); layout.afterSuccessfulFetch(tags); } catch (ServiceException e) { // TODO: log the exception // TODO: notify view about failure } } } - Now we create the
MyVaadinUIclass, where we put together all the classes we have made. First we create and initialize the tag view. Then we make the dummy service, which we pass, together with the view, to the tag presenter. Then we set the handler to the view, so the handler is passed to the layouts that are responsible for the tag creation and showing the tag list.public class MyVaadinUI extends UI { @Override protected void init(VaadinRequest request) { Navigator navigator = new Navigator(this, this); TagView view = new TagViewImpl(); view.init(); TagService service = new TagServiceDummy(); TagPresenter handler = new TagPresenter(view, service); view.setHandler(handler); view.getNewTagLayout().init(); view.getTagListLayout().init(); navigator.addView("tags", view); setNavigator(navigator); navigator.navigateTo("tags"); } }
In this recipe, we saw one way to implement MVP for more complex layouts. We need to keep in mind that we always have to consider proper implementation of the MVP pattern for our project and that the way, which we have described in this recipe, is not applicable for all the cases.
Now let's clearly state which classes represent which layers from the Model View Presenter pattern.
Tag, TagService, TagServiceDummy, and ServiceException classes represent the model.
TagLayout, TagView, TagViewHandler, NewTagLayout, TagListLayout, TagViewImpl, TagListLayoutImpl, and NewTagLayoutImpl represent the view layer.
And just one class, TagPresenter, represents the presenter layer.
The service layer in this recipe is used only for loading and saving of items. But we might place some logic inside the service layer. If we do that, we could consider moving database operations, such as database queries, to a Data Access Object (DAO) pattern that could be used by the service layer.
Note
More information about the Data Access Object (DAO) pattern can be found at http://www.oracle.com/technetwork/java/dataaccessobject-138824.html.
We have put little focus on the service layer because the service layer can be implemented in many ways depending on many technical decisions. Describing the service layer in all the details is a big task, which is beyond the scope of this recipe and book. To give you a hint, we can implement the service layer in the Spring framework. The detailed tutorial how to get started with the service layer in Spring can be found at the following link: