
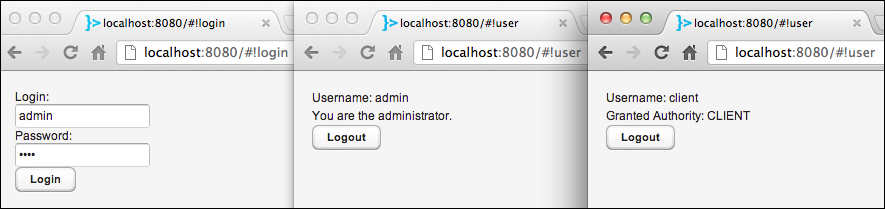
We will create a login functionality in
this recipe. The user will be able to log in as admin or client. We will not use a database in this recipe. We will use a dummy service where we just hardcode two users. The first user will be "admin" and the second user will be "client". There will be also two authorities (or roles), ADMIN and CLIENT.
We will use Java annotation-driven Spring configuration.
Create a new Maven project from the Vaadin archetype.
mvn archetype:generate
 -DarchetypeGroupId=com.vaadin
 -DarchetypeArtifactId=vaadin-archetype-application
 -DarchetypeVersion=LATEST
 -Dpackaging=war
 -DgroupId=com.app
 -DartifactId=vaadin-spring-login
 -Dversion=1.0
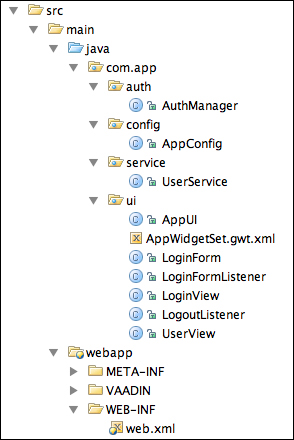
Maven archetype generates the basic structure of the project. We will add the packages and classes, so the project will have the following directory and file structure:
Carry out the following steps, in order to create login with Spring framework:
- We need to add Maven dependencies in
pom.xmltospring-core,spring-context,spring-web,spring-security-core,spring-security-config, andcglib(cglibis required by the@Configurationannotation from Spring).<dependency> <groupId>org.springframework</groupId> <artifactId>spring-core</artifactId> <version>${spring.version}</version> </dependency> <dependency> <groupId>org.springframework</groupId> <artifactId>spring-context</artifactId> <version>${spring.version}</version> </dependency> <dependency> <groupId>org.springframework</groupId> <artifactId>spring-web</artifactId> <version>${spring.version}</version> </dependency> <dependency> <groupId>org.springframework.security</groupId> <artifactId>spring-security-core</artifactId> <version>${spring.version}</version> </dependency> <dependency> <groupId>org.springframework.security</groupId> <artifactId>spring-security-config</artifactId> <version>${spring.version}</version> </dependency> <dependency> <groupId>cglib</groupId> <artifactId>cglib</artifactId> <version>2.2.2</version> </dependency> - Now we edit the
web.xmlfile, so Spring knows we want to use the annotation-driven configuration approach. The path to theAppConfigclass must match full class name (together with the package name).<context-param> <param-name>contextClass</param-name> <param-value> org.springframework.web.context.support.AnnotationConfigWebApplicationContext </param-value> </context-param> <context-param> <param-name>contextConfigLocation</param-name> <param-value>com.app.config.AppConfig</param-value> </context-param> <listener> <listener-class> org.springframework.web.context.ContextLoaderListener </listener-class> </listener> - We are referring to the
AppConfigclass in the previous step. Let's implement that class now.AppConfigneeds to be annotated by the@Configurationannotation, so Spring can accept it as the context configuration class. We also add the@ComponentScanannotation, which makes sure that Spring will scan the specified packages for Spring components. The package names inside the@ComponentScanannotation need to match our packages that we want to include for scanning. When a component (a class that is annotated with the@Componentannotation) is found and there is a@Autowireannotation inside, the auto wiring will happen automatically.package com.app.config; import com.app.auth.AuthManager; import com.app.service.UserService; import com.app.ui.LoginFormListener; import com.app.ui.LoginView; import com.app.ui.UserView; import org.springframework.context.annotation.Bean; import org.springframework.context.annotation.ComponentScan; import org.springframework.context.annotation.Configuration; import org.springframework.context.annotation.Scope; @Configuration @ComponentScan(basePackages = {"com.app.ui" , "com.app.auth", "com.app.service"}) public class AppConfig { @Bean public AuthManager authManager() { AuthManager res = new AuthManager(); return res; } @Bean public UserService userService() { UserService res = new UserService(); return res; } @Bean public LoginFormListener loginFormListener() { return new LoginFormListener(); } } - We are defining three beans in
AppConfig. We will implement them in this step.AuthManagerwill take care of the login process.package com.app.auth; import com.app.service.UserService; import org.springframework.beans.factory.annotation.Autowired; import org.springframework.security.authentication.AuthenticationManager; import org.springframework.security.authentication.BadCredentialsException; import org.springframework.security.authentication.UsernamePasswordAuthenticationToken; import org.springframework.security.core.Authentication; import org.springframework.security.core.AuthenticationException; import org.springframework.security.core.GrantedAuthority; import org.springframework.security.core.userdetails.UserDetails; import org.springframework.stereotype.Component; import java.util.Collection; @Component public class AuthManager implements AuthenticationManager { @Autowired private UserService userService; public Authentication authenticate(Authentication auth) throws AuthenticationException { String username = (String) auth.getPrincipal(); String password = (String) auth.getCredentials(); UserDetails user = userService.loadUserByUsername(username); if (user != null && user.getPassword().equals(password)) { Collection<? extends GrantedAuthority> authorities = user.getAuthorities(); return new UsernamePasswordAuthenticationToken(username, password, authorities); } throw new BadCredentialsException("Bad Credentials"); } }UserServicewill fetch a user based on the passed login.UserServicewill be used byAuthManager.package com.app.service; import org.springframework.security.core.GrantedAuthority; import org.springframework.security.core.authority.GrantedAuthorityImpl; import org.springframework.security.core.authority.SimpleGrantedAuthority; import org.springframework.security.core.userdetails.UserDetails; import org.springframework.security.core.userdetails.UserDetailsService; import org.springframework.security.core.userdetails.UsernameNotFoundException; import org.springframework.security.core.userdetails.User; import org.springframework.stereotype.Service; import java.util.ArrayList; import java.util.List; public class UserService implements UserDetailsService { @Override public UserDetails loadUserByUsername(String username) throws UsernameNotFoundException { List<GrantedAuthority> authorities = new ArrayList<GrantedAuthority>(); // fetch user from e.g. DB if ("client".equals(username)) { authorities.add(new SimpleGrantedAuthority("CLIENT")); User user = new User(username, "pass", true, true, false, false, authorities); return user; } if ("admin".equals(username)) { authorities.add(new SimpleGrantedAuthority("ADMIN")); User user = new User(username, "pass", true, true, false, false, authorities); return user; } else { return null; } } }LoginFormListeneris just a listener that will initiate the login process, so it will cooperate withAuthManager.package com.app.ui; import com.app.auth.AuthManager; import com.vaadin.navigator.Navigator; import com.vaadin.ui.*; import org.springframework.beans.factory.annotation.Autowired; import org.springframework.security.authentication.UsernamePasswordAuthenticationToken; import org.springframework.security.core.Authentication; import org.springframework.security.core.AuthenticationException; import org.springframework.security.core.context.SecurityContextHolder; import org.springframework.stereotype.Component; @Component public class LoginFormListener implements Button.ClickListener { @Autowired private AuthManager authManager; @Override public void buttonClick(Button.ClickEvent event) { try { Button source = event.getButton(); LoginForm parent = (LoginForm) source.getParent(); String username = parent.getTxtLogin().getValue(); String password = parent.getTxtPassword().getValue(); UsernamePasswordAuthenticationToken request = new UsernamePasswordAuthenticationToken(username, password); Authentication result = authManager.authenticate(request); SecurityContextHolder.getContext().setAuthentication(result); AppUI current = (AppUI) UI.getCurrent(); Navigator navigator = current.getNavigator(); navigator.navigateTo("user"); } catch (AuthenticationException e) { Notification.show("Authentication failed: " + e.getMessage()); } } } - The login form will be made as a separate Vaadin component. We will use the application context and that way we get bean from the application context by ourselves. So, we are not using auto wiring in
LoginForm.package com.app.ui; import com.vaadin.ui.*; import org.springframework.context.ApplicationContext; public class LoginForm extends VerticalLayout { private TextField txtLogin = new TextField("Login: "); private PasswordField txtPassword = new PasswordField("Password: "); private Button btnLogin = new Button("Login"); public LoginForm() { addComponent(txtLogin); addComponent(txtPassword); addComponent(btnLogin); LoginFormListener loginFormListener = getLoginFormListener(); btnLogin.addClickListener(loginFormListener); } public LoginFormListener getLoginFormListener() { AppUI ui = (AppUI) UI.getCurrent(); ApplicationContext context = ui.getApplicationContext(); return context.getBean(LoginFormListener.class); } public TextField getTxtLogin() { return txtLogin; } public PasswordField getTxtPassword() { return txtPassword; } } - We will use
Navigatorfor navigating between different views in our Vaadin application. We make two views. The first is for login and the second is for showing the user detail when the user is logged into the application. Both classes will be in thecom.app.uipackage.LoginViewwill contain just the components that enable a user to log in (text fields and button).public class LoginView extends VerticalLayout implements View { public LoginView() { LoginForm loginForm = new LoginForm(); addComponent(loginForm); } @Override public void enter(ViewChangeListener.ViewChangeEvent event) { } };UserViewneeds to identify whether the user is logged in or not. For this, we will useSecurityContextHolderthat obtains theSecurityContextthat holds the authentication data. If the user is logged in, then we display some data about him/her. If not, then we navigate him/her to the login form.public class UserView extends VerticalLayout implements View { public void enter(ViewChangeListener.ViewChangeEvent event) { removeAllComponents(); SecurityContext context = SecurityContextHolder.getContext(); Authentication authentication = context.getAuthentication(); if (authentication != null && authentication.isAuthenticated()) { String name = authentication.getName(); Label labelLogin = new Label("Username: " + name); addComponent(labelLogin); Collection<? extends GrantedAuthority> authorities = authentication.getAuthorities(); for (GrantedAuthority ga : authorities) { String authority = ga.getAuthority(); if ("ADMIN".equals(authority)) { Label lblAuthority = new Label("You are the administrator. "); addComponent(lblAuthority); } else { Label lblAuthority = new Label("Granted Authority: " + authority); addComponent(lblAuthority); } } Button logout = new Button("Logout"); LogoutListener logoutListener = new LogoutListener(); logout.addClickListener(logoutListener); addComponent(logout); } else { Navigator navigator = UI.getCurrent().getNavigator(); navigator.navigateTo("login"); } } } - We have mentioned
LogoutListenerin the previous step. Here is how that class could look:public class LogoutListener implements Button.ClickListener { @Override public void buttonClick(Button.ClickEvent clickEvent) { SecurityContextHolder.clearContext(); UI.getCurrent().close(); Navigator navigator = UI.getCurrent().getNavigator(); navigator.navigateTo("login"); } } - Everything is ready for the final
AppUIclass. In this class, we put in to practice all that we have created in the previous steps.We need to get the application context. That is done in the first lines of code in the
initmethod. In order to obtain the application context, we need to get the session from the request, and from the session get the servlet context. Then, we use the Spring utility class,WebApplicationContextUtils, and we find the application context by using the previously obtained servlet context.After that, we set up the navigator.
@PreserveOnRefresh public class AppUI extends UI { private ApplicationContext applicationContext; @Override protected void init(VaadinRequest request) { WrappedSession session = request.getWrappedSession(); HttpSession httpSession = ((WrappedHttpSession) session).getHttpSession(); ServletContext servletContext = httpSession.getServletContext(); applicationContext = WebApplicationContextUtils.getRequiredWebApplicationContext(servletContext); Navigator navigator = new Navigator(this, this); navigator.addView("login", LoginView.class); navigator.addView("user", UserView.class); navigator.navigateTo("login"); setNavigator(navigator); } public ApplicationContext getApplicationContext() { return applicationContext; } } - Now we can run the application. The password for usernames
clientandadminispass.mvn package mvn jetty:run
There are two tricky parts from the development point of view while making the application:
- First is how to get the Spring application context in Vaadin. For this, we need to make sure that
contextClass,contextConfigLocation, andContextLoaderListenerare defined in theweb.xmlfile. Then we need to know how to get Spring application context from theVaadinRequest. We certainly need a reference to the application context in UI, so we define theapplicationContextclass field together with the public getter (because we need access to the application context from other classes, to get Spring beans). - The second part, which is a bit tricky, is the
AppConfigclass. That class represents annotated Spring application configuration (which is referenced from theweb.xmlfile). We needed to define what packages Spring should scan for components. For this, we have used the@ComponentScanannotation. The important thing to keep in mind is that the@Autowiredannotation will work only for Spring managed beans that we have defined inAppConfig. When we try to add the@Autowiredannotation to a simple Vaadin component, theautowiredreference will remain empty because no auto wiring happens. It is up to us to decide what instances should be managed by Spring and where we use the Spring application context to retrieve the beans.
We have used navigator for navigation between the views. More information about navigator can be found in the Using Navigator for creating bookmarkable applications with back-forward button support recipe in Chapter 2, Layouts.