CHAPTER 9
Shooting People and Objects
Images should not tell you what you already know. It takes no great powers or magic to reproduce somebody’s face in a photograph. The magic is in seeing people in new ways.
Duane Michals, Photographer
While shooting can be a simple process, camera operators and directors must be very intentional in order to shoot the subject in a way that attracts the audience’s attention, holds their attention, and communicates the message effectively (Figures 9.1 and 9.2).

FIGURE 9.1
When the talent is speaking directly to the camera, directors generally want a close-up. This shot gives viewers the feeling that the talent is speaking to them; it is inclusive.

FIGURE 9.2
When shooting talent who is sitting down, be prepared to either follow him with the camera or have a second camera ready, which is already zoomed out, when he stands. Otherwise, his head will be cut off. Similarly, be ready for him to sit if he is standing. Both situations remind us that camera operators cannot lock off the tripod head during action.
SHOOTING PEOPLE
9.1 THE SINGLE PERSON
Let’s examine the basics of shooting a single person.
It is important to make your talent feel comfortable with you whenever possible. As they relax, you will get a better performance.
Framing People
Framing is an issue that significantly impacts your final image. The talent needs to understand how tight the shots will be if he or she is making a presentation. That way they know how much room is available to move around in. If a person moves around a lot in a chair (leans, settles back, or waves arms), then a wider shot will be needed. While an extreme CU does intensify emotion, the audience is also more likely to start inspecting more than listening if the shot is held too long. They begin to look at the trim of a mustache, a facial detail, or teeth. A screen-filled full face shot is out of place most of the time, although it can be dramatically powered when used at the right moment (Figures 9.3 and 9.4).
Contextual Shots
Including context to your shot gives your audience additional information about your subject. While a LS generally gives you plenty of context, it does not show the facial expression well. So, a MS is generally used to show context and expression (Figure 9.5).
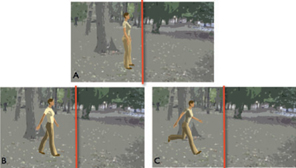
FIGURE 9.3
When a subject moves, it should be kept slightly behind the center of the frame (the red line). The amount of offset should increase as the speed increases.
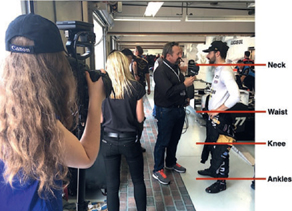
FIGURE 9.4
When framing shots of a person, do not cut off a shot at a natural bend of the body (neck, waist, knee or ankles). Go slightly above or below the bend.
Camera Movement
A sustained shot of someone speaking directly to the camera soon becomes boring to the viewer. Sometimes the shot can be improved by gradually tightening the shot to increase interest or slowly widening it to relax the audience’s concentration. However, don’t overdo the camera movement or it will become tiresome and distracting.

FIGURE 9.5
The buildings in the background give context to the image. They provide additional information to help the audience understand more about the individual.
(Photo by Lynn Owens)
In order to create some visual variety when using multiple cameras, cut to different-sized shots. Cuts made at the end of a sentence or thought sequence will not usually disrupt the visual flow.
Subject Movement
Directors can help to “motivate a cut” by having the talent turn at an agreed moment to be shot from another direction, although this can look staged if it is not done well. This type of cut can be useful when the talent has made a mistake and has to restart from before the mistake. In these circumstances, the cut will hide the intermittent shooting and result in a smoothly flowing narrative. When someone is walking, a MS is generally the closest shot that can be used comfortably.
Show the Talent or Subject?
Instead of continually showing shots of the talent talking, try wherever possible to show what the talent is talking about. This not only makes the production more interesting to watch, but it becomes more informative because it gives the viewer time to examine the subject itself, rather than just hear about it.
If the program is intended to concentrate on the personality of the speaker, then use plenty of shots of the talent. However, if it is really intended to show the viewer how to do something or how something works, that should decide the sort of shots you use—that is, do not show us repeated shots of the cook; instead show us shots of the cooking process.
9.2 ARRANGING PEOPLE SHOTS
Shots showing people talking generally fall into formal, informal, or grouped arrangements:
Formal situations are the normal format seen in studio interviews, newscasts, public affairs programs, games shows, and similar situations where people are intentionally positioned (sitting or standing) in a specific way.
The informal style includes people sitting in their own homes, standing in the street, walking, driving, or speaking while working. Informal approaches may also include wild-track interviews, in which we see images of someone busily occupied (sawing wood, for instance) and yet hear the person in a nonsynchronous audio wild-track of an interview made separately. The audience accepts this convention without wondering how the talent can speak without moving his or her lips.
Arranged groups are mostly found in dramatic productions, where people are deliberately positioned to form compositional patterns that direct the eye and influence our response to the action.
9.3 EFFECTIVE SHOTS
When shooting groups of people (two or more), the shots should always answer the basic questions: Who are they? Where are they? What do they have to say?
We want to see their reactions and hear their replies. Shots of people just sitting and listening quietly without expression have limited visual value. So effective shooting is a matter of the appropriate selection of the right person and the right shot at the right time. A common production approach is to begin with a group shot that shows everyone present (this establishes where everyone is located and sets the scene), cut to the host of the show, then cut to CUs of individuals as they speak (cutting in reaction shots). Shots of part of the group are often included, such as a shot of a person with his or her partner. But if a shot includes more than three people, details of their expressions will probably be lost.
For most purposes, frontal shots (with the person facing the camera) or three-quarter frontal shots (looking 45 degrees to either side) are the most effective. In a profile shot (side view), which is the least familiar view of most people, the camera seems to be scrutinizing the guest, and the effect is not particularly attractive, although admittedly it can be dramatic in a strong, aggressive interview (Figure 9.6).
FIGURE 9.6
The full frontal shot or the three-quarter frontal shots are considered the most effective close-up shots when the talent is speaking.
9.4 SELECTING THE RIGHT SHOT
When watching someone at work—painting, cooking, quilting, or whatever else—it is natural for the camera to concentrate on what they are doing and how they are doing it instead of dwelling on their expressions. When directors cut away from the center of interest for too long to shots of an interviewer, the audience can become impatient, feeling as though they are missing the real action. However, these talent cutaway shots are effective editing techniques that can be used to reduce overlengthy shots of the action. Instead of going on and on watching the bread dough being kneaded, show part of the action with an establishing shot, then go to a cutaway shot (ideally to something that is relevant) to cover the fact that the action has been interrupted and removed during postproduction.
When showing a situation where there is a continual feeling of apprehension as to whether the action will succeed (such as during a cliff climb), regular cutting between the action itself and the person’s expressions of concentration will heighten the impact on the audience. We have all seen situations where the director includes shots of drumming fingers, hands fiddling with jewelry, straightening a tie, and so on. Although such shots may reveal the guest’s unconscious reactions, at times they distract the audience from what is being said.
If someone is being cross-examined during an interview, directors sometimes use a tighter shot than normal. If the situation becomes especially heated, the camera operator can move even closer to the “guest” during questioning. But these are not techniques to be used lightly during a normal, cool, polite interview. There is always the risk that once the closest shot has been reached, anything after it is anticlimactic.
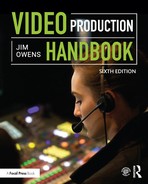
DIRECTION AND SPEED
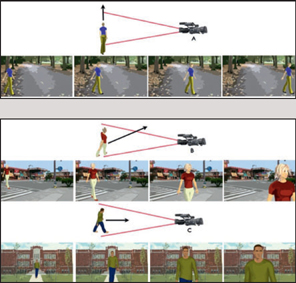
FIGURE 9.7
Direction and effective speed. (A) Talent moving across the screen quickly passes out of shot. Direction and effective speed. (B) Diagonal moves are more interesting (and take longer). (C) Moves toward (or away from) the camera are sustained the longest. However, they may take too long.
WIDELY SPACED MOVES
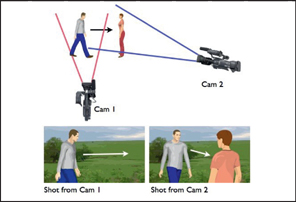
FIGURE 9.8
Widely spaced moves. If two people are quite a distance apart, you can cut between them, pan between them, or just shoot the action from a different angle.
9.5 SINGLE-CAMERA INTERVIEWS
When shooting two people in a continuous interview or discussion with a single camera, treatment is inevitably restricted to some extent. But with a little preplanning, the audience will not even realize that there were any coverage problems.
Interviews are best shot in one continuous take. When restricted to just one camera, the camera operator might, for example, open with an establishing LS that shows the participants and where they are. Slowly the camera moves in to a MS of the interviewer who is introducing the guest. As he or she turns to face the guest, the camera pans slightly and the shot is widened to include them both again. The shot can then be tightened to a single CU of the guest.
Using a different approach, the camera operator could begin with a MS of the interviewer, slowly pull out (zoom or dolly) to include the guest in a two-shot, then gradually pan over and move in at the same time to concentrate on the guest and exclude the interviewer. As the interview ends, the camera operator can simultaneously pull out and pan over to a two-shot, finally tightening on the interviewer for his or her closing words. If the interview is long, the camera operator can vary the guest’s shot from time to time by gradually zooming in and out. However, much depends on how interesting and animated the guest proves to be.
Location interviews are often “one-take” opportunities, in which the camera concentrates on the guest (slowly zooming to vary the shot size). The interviewer, who is unseen, stands near the camera to ask the questions (out of shot, off-camera).
Once a one-camera interview has concluded, it is common practice for the interviewer to record a series of brief on-camera segments. This practice avoids disrupting the actual interview or continually panning between the two people as they talk. Speaking directly to the camera afterward, the interviewer may introduce the guest(s) to the audience. If useful, this segment could be cut in during editing, or it can be used as a voiceover introduction accompanied by informational shots about the subject discussed. The interviewer may also choose to ask the guest some of the original questions, usually looking past the camera as though it was part of the actual interview. Later, these questions can be edited into the interview recording at the appropriate points. When the questions are scripted, this usually means referring to notes or a script. When they are spontaneous, it may involve checking the interview recording itself to get the wording correct. In either case, it is imperative that these are the actual questions, asked with similar intonation to those asked the guest (Figure 9.9).
Many interviews and discussions simply involve straightforward recording. However, results can be disappointing. When the images do not work, do it again and select the best version or use parts of each take. Another approach to interviewing is to record a much longer session than you really need and then extract the highlights to suit the required program length (Figure 9.10).
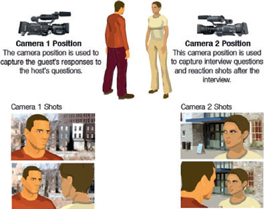
FIGURE 9.9
Single-camera interviews generally require moving the camera into at least two different positions.
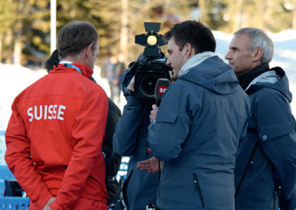
FIGURE 9.10
It can be difficult shooting a single-camera interview. The camera operator must zoom from close-ups to two shots, sometimes repeatedly.
(Photo by Kara Laufenberger)
9.6 EDITING CONTINUOUS INTERVIEWS
A regular method of handling interviews with a single camera is to concentrate the camera on the guest throughout. The interviewer remains out of shot. This treatment is simple and least likely to distract the guest. But it does leave the director with one very long take. The result is usually a sequence that is far too long to hold the audience’s attention. It needs “tightening.” Use the most important and interesting segments, and discard any unwanted or irrelevant portions.
If the editor simply cuts out the segments needed for the interview and then joins them together in the editing process, there will be a distracting jump cut at the start of each new section, with sudden changes in positions, expressions, and shot sizes. Directors often try to cover these cuts with quick dissolves or wipes, but the result is seldom satisfactory. The answer to this dilemma is to take a series of reaction shots at the end of the interview and then edit them into the main sequence.
The reaction shot is a familiar feature in all interviews. It is simply a silent reaction shot of the interviewer looking with interest or reacting with occasional head nods, smiles, or concern. The director may even ask the guest to provide similar reaction shots to give some variety to the editing. During postproduction, directors use the original interview shot with its soundtrack and then cut in the reaction shots wherever necessary, without interrupting the sound. To be convincing, it is important that the person in the reaction shot doesn’t speak. If you are using an over-the-shoulder shot, make sure that the mouth of the person with their back to the camera cannot be seen moving. Too often an interviewer will chat to the guest while the reaction shot is being taken; the result is that after editing, the speaker’s mouth movements do not match the sound (Figure 9.11).
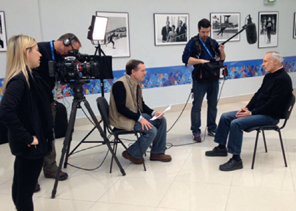
FIGURE 9.11
It is important to shoot reaction shots so that they can be added in postproduction.
9.7 SHOOTING GROUPS
Shooting a group effectively with a single camera is a challenge, but it can be done well. You use the movement techniques we have just discussed for the interview.
If possible, avoid continually panning across the group from one person to another. It looks clumsy, particularly if people are sitting some distance apart and the camera is panning over meaningless background. When shooting with one camera, it is usually better to zoom out, to include the new speaker in a WS, then perhaps zoom in on him or her (Figure 9.12).
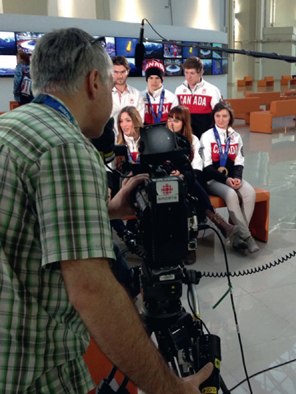
FIGURE 9.12
When shooting with one camera, it is better to zoom out, include the new speaker in the wide shot, and then sometimes zoom back in on the speaker.
The exception is when something really dramatic happens (such as when someone suddenly stands and shouts in opposition). Then the camera can pan over rapidly to show the interrupter. However, the disadvantage of a whip pan (zip pan, blur pan) of this kind is that, although it makes a strong visual impact, you are likely to end up with a defocused or badly framed picture that has to be corrected.
However, if instead of a whip pan, the camera operator had quickly zoomed out from a CU to a group shot, then immediately zoomed in to a close shot of the interrupter, the out-in movement would have looked extremely awkward to the viewer. When shooting a group in which people speak at random, avoid the temptation to continually arc around and move to new positions, particularly when someone out of the shot suddenly begins talking. It is usually less obtrusive to zoom out and include them in a WS.
If two or more cameras are being used to shoot a group, various shots can be prearranged between them. For example, camera 1 can take a LS (WS, master shot, or cover shot) of the entire action and shots of the interviewer or host. Camera 2 can capture the shots of the guest.
If there are more guests, the director can introduce various shots of singles, pairs, subgroups, and group shots. Always be ready to come back to a LS if somebody speaks unexpectedly when you are in a CU on the other camera (see Figure 9.13).
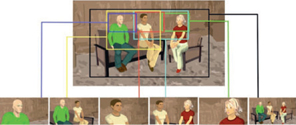
FIGURE 9.13
Shooting groups. Static groups can be broken into a series of smaller individual shots. For single-camera shooting, this involves repositioning the camera (or repeated action). With multicamera shooting, the director can cut between the various viewpoints.
There is an important difference between shooting a group where members are going to speak in an agreed order and a group where members speak whenever they wish. In the first case, cameras and microphones can follow along systematically. When people speak at random, the camera operator, who has been concentrating on a shot, now has to look around, turn, reframe, and refocus on the new speaker before the shot can be used. Again, zooming out to a WS may save the situation. If you are shooting a group of people, it is often an advantage to put people in the front row who you know are going to speak.
During shooting, it is best to check that shots are reasonably compatible so that there are no wild jumps in size, variations in headroom (the space from the top of the head to the upper frame), or changes in camera height. Eye lines (where people appear to be looking) should be sufficiently related to suggest that people are talking to each other. If directors are not careful when cutting between various camera positions around a group, the talent can appear to be looking off-camera or at the wrong person.
9.8 CAR INTERVIEWS
Interviews in cars are common, but how successful they are will vary between individuals. Some drivers find the nearby camera distracting. Their replies are liable to be perfunctory because they are concentrating on driving conditions. The audience may even find the passing scene more interesting than the interview. Camera operators must be careful not to distract the talent to the point of an accident.
A steady camera is essential, whether the operator is located beside the driver (seated or crouched down) or shooting over the front seats. The camera can be clamped or suctioned to the outside or inside of a car, looking in (Figure 9.14).
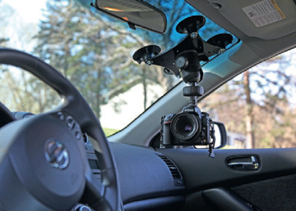
FIGURE 9.14
Car mounts provide a convenient way to shoot a car interview.
(Photo courtesy of Rig Wheels)
To give the shots variety or to provide cutaways, directors can cheat by reshooting the driver alone or with the interviewer (and no camera in the car) from another vehicle traveling alongside or slightly ahead. Some directors create cutaway shots by showing the passing scene through the car windows, shots reflected in the rearview mirror, shots showing a gear change, and so on. But unless these pictures are directly related to the interview (such as discussing road safety, the route, or driving techniques), they are simply a distraction.
9.9 WALKING INTERVIEWS
Walking interviews get away from the regular seated situation, but don’t underestimate their problems. Generally a wireless mic is clipped to the interviewer and guest. However, audio interference from other transmissions can be a problem. That may not be the only problem. Inexperienced talent may not be able to walk and talk naturally. The interview may be stilted, especially if the interviewee has to walk up or down stairs. Arrange the walking interview so that you do not pick up a lot of extraneous noise, such as the crunch of gravel underfoot, wind, or traffic.
If serious sound pickup problems occur, one strategy is to shoot the action so that the interviewee’s mouth movements are not obvious in the image; use LS or rear views and then lay the speech that you have recorded separately over the pictures during the editing process. Occasionally, what looks like a “walking interview” is actually a studio interview, with pictures of the people walking, taken with a carefully angled camera and sweetened with audio effects.
During a walking interview, the camera operator has the option of doing the following:
■ walking backward (usually guided by an assistant’s hand on a back or shoulder) (Figure 9.15);
■ sitting on a dolly of some type (anything from a wheelchair to a professional dolly) being pulled in front of the action;
■ locating the camera at an uninterrupted vantage point and panning with the action;
■ walking behind the talent, taking a three-quarter back or a rear view.
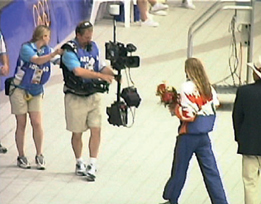
FIGURE 9.15
Camera assistants help guide a camera operator who needs to walk backward.
None of these methods lends itself to steady camerawork for any length of time, especially if the camera is hand or shoulder supported and the ground is uneven. The best solution is usually to break up the walk into a series of sections, perhaps letting the talent walk out of frame at the end of a section. Remember, though, if the person exits frame left, he or she must enter the next shot from frame right so that the person appears to be walking in the same direction. Alternatively, the director can cut to a head-on view of the person coming toward the camera. To avoid any walk becoming unduly long, the talent can pause at intervals and, still talking, lean on a fence, sit on a log, stand and look at the landscape, or engage in some other natural activity.
THE EFFECTIVE INTERVIEW
Interviews range from casual street encounters to friendly chats and probing interviews. Here are a variety of areas to consider and techniques that you can use to capture an effective interview:
■ Why is this person being interviewed? Is he or she a well-known person? Has he or she done something unusual? Or seen something unusual? Is an expert explaining something or giving an opinion? Whatever the reason, this information will form the basis for the type of questions and influence how you approach the interview.
■ Preliminary research on the person always pays off, whether this takes the form of reading the person’s book, biography, newspaper profile, or just asking around.
■ Try to get to know guests whenever possible before the recording begins. This will put them at ease. It is also a good time to explain what will be happening during shooting.
■ Does the guest have any personal items, such as mementos or family album photos, which would be interesting to show during the recording? These may be shot later as cutaway or insert shots. It would also be good to let the guest know, before the interview begins, when the personal items will be discussed during the recording.
■ Before beginning the interview, test the audio level of the microphones. Both the interviewer and guest should speak at a normal volume so that the audio channel gain can be properly adjusted for optimum sound.
■ Develop a fact sheet or background card, noting the points that need to be discussed.
■ It is best if questions appear to develop from the guest’s answers, moving back to prepared topics when possible. Do not simply work through a list of questions. It is better for a host to glance at notes briefly than it is for the host to ignore replies while reading the notes in detail (Figure 9.16).
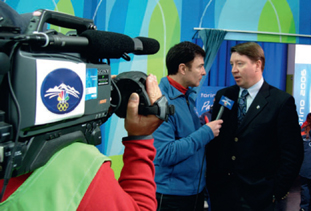
FIGURE 9.16
Avoid questions that can be answered yes or no. The goal is to elicit more information from the guest.
SHOOTING INSTRUCTIONAL PRODUCTIONS
9.10 TYPICAL INSTRUCTIONAL PRODUCTIONS
A wide range of video programs can be described as “instruction.” Besides the programming found on the networks, niche cable channels are filled with shows about cooking hunting home improvement, medicine (surgery), and many other topics. Most of these programs are instructional and are designed for specific markets, such as educational, professional, specialist trades, and so on.
9.11 APPROACHES TO INSTRUCTION
There are some subjects that cannot really be demonstrated effectively in a video program. Instead, directors have to rely on verbal descriptions of processes. Other subjects may be only partly successful because of the limitations of the system, such as a demonstration of sound quality.
One of the weakest instructional methods in a video program is an illustrated talk that shows still photographs, diagrams, maps, and so on. To enhance the project, pan or tilt the camera across the still photo or slowly zoom in and out of the still.
A cooking demonstration, on the other hand, can be extremely effective; it is full of visual movement and change, a process that develops as we watch—even though the audience cannot smell or taste whether it is as successful as it looks (Figure 9.17).
One of the most powerful forms of instruction is when the talent speaks to us directly through the camera, pointing out each feature of the subject (Figure 9.18).
The “documentary format,” in which the host may be heard as a voiceover making observations on the images, is much less personal. However, it can be more authoritative, especially if the speaker’s visual presence is not particularly impressive on camera for any reason. But the documentary approach is extremely greedy for imagery. Compared with the “direct approach,” where directors can always take shots of the talent speaking to the camera, the “documentary” method requires that the camera is continually looking at the subject and its surroundings—which may not have enough interest to sustain the viewer’s attention.
9.12 ADVANCE PLANNING
On the face of it, one might assume that instructional productions merely involve presenting the item before the camera and pointing out its features. Some very boring programs are made this way. The secrets of really successful demonstrations are planning, preparation, and rehearsal, even for the most familiar subjects. In fact, the more familiar it is, the more difficult it can be to make the program interesting and hold the audience’s attention. Too easily, the director can assume that the viewers “know all about that.”
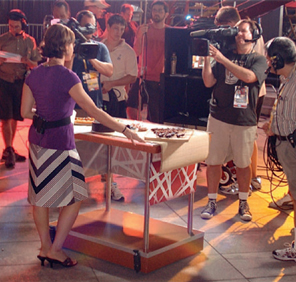
FIGURE 9.17
Since cooking shows are full of visual movement and a process that develops as the audience watches, they are popular on television. This photo is from a cooking segment on NBC’s Today show.
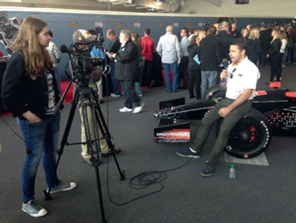
FIGURE 9.18
The most common and usually the most effective form of presentation is when someone speaks to us directly through the camera, pointing out the features of the subject. In this photo an Indy 500 race car driver explains how the race cars have changed.
A good instructional program is designed to fit its audience. If it is produced at too high a level, the uninitiated become bewildered and embarrassed at not being able to grasp the facts. They become confused. They lose their self-confidence. While sorting out what has been said, they get lost.
A successful program encourages curiosity and intrigues, leaving the audience with a sense of satisfaction and fulfilment. “What do you think will happen now?” is much more involving than “When we do this, that happens.”
9.13 CREATING THE INSTRUCTIONAL PROGRAM
Instructional programs can take anything from a few minutes to years to complete. Directors often need to stretch or condense time in various ways to suit the occasion:
■ Shoot everything from start to finish. This ensures that the audience misses none of the action and gets an accurate idea of how long everything takes. Clearly this is a good approach for relatively brief productions, but it is unsuitable when producing a program such as “How to Build a House.”
■ The video can be recorded continuously, then edit out the time-consuming, repetitious, or boring parts. This can produce a shorter, better-paced program and ensures that the audience concentrates on the important stages.
■ Portions of a show can be arranged in prepared sections. For instance, when showing how to bake a cake, the director may first display the ingredients, begin the method of mixing, and then place the prepared mixture in an oven (or not, if one is not available). The talent can then remove the cooked cake and begin to decorate it, and we end with a shot of the fully decorated cake. Not only does this method save a great deal of time, but it also ensures that the results turn out right at each stage. However, directors have to guard against leaving out important information when shortcutting time in this way. For instance, the audience may inadvertently be left wondering how to tell when the food is fully cooked. Preferably the host would both tell and show the audience how to test for doneness.
■ For demonstrations that take a long time to develop, such as a plant grow ing, the simplest plan is to shoot short sequences at strategic moments (hours, days, or weeks apart) and show them one after the other. The alternative is to use some type of an automatic timer that takes a brief video shot at regular intervals.
■ Sometimes a demonstration program has to be made to a prescribed length in order to fit a scheduled time slot. You can achieve this goal by deliberately including material that is interesting but can be trimmed or omitted as necessary.
■ If the video program is to be used as part of a live presentation, such as a classroom lecture where a teacher will also be speaking and answering questions, the production can be designed to be extremely flexible. The program can be arranged as a series of pre-timed, self-contained sections so that the teacher can use as much as is needed for a specific lesson without the students feeling that they are being prevented from seeing the entire program.
9.14 SHOOTING OBJECTS
Here are a few reminders of how you can attain quality shots of objects. Even though they are obvious, it is amazing how often these errors occur in programs (Figure 9.19).
■ Black backgrounds need to be used with care. Although they can create great contrast with a much lighter subject, they may emphasize color, and dark areas around the edges of the subject may vanish into the surroundings. If the backlight is increased to prevent this from happening, it can produce an inappropriate glittering halo of light around the subject.
■ Strong background colors such as red, yellow, or bright green may not only be distracting, but they will modify the apparent colors of the subject.
■ If the subject is flat such as framed artwork, shoot it from a straight-on viewpoint and tilt the frame down a slight bit to avoid light reflections, camera reflections, or shadows.
■ If a demonstrator has to put the item in position for the camera, it is often a good idea to have an unobtrusive mark on the table to guide where the object should be placed. This way, the camera can also prefocus on the spot.
■ Solid objects are best lit with “three-point lighting” (key, fill, backlight) or a side light to left and right with some frontal fill light.
■ Instead of moving the camera in an arc around a smaller object (a difficult move to carry out smoothly), it is better to place the object on a turntable (manual or motor driven) that can be slowly turned, allowing the audience to see the object from all directions.

FIGURE 9.19A
The goal is to simplify the shot so that the viewer does not get distracted.

FIGURE 9.19B
Avoid confusing or distracting backgrounds.

FIGURE 9.19C
Do not show an extreme close-up of the object unless you are showing detail that has already been shown in an establishing shot.

FIGURE 9.19D
Do not unintentionally crop parts of the object. See that handling does not obscure important detail.
Sarah Hogencamp, Director of Photography
When shooting people, what do you think about? What do you look for?
Most of the action I film is people sitting and talking, which can get really boring. Because the action is extremely boring, I have to liven up the shot with something interesting. So I have to look for interesting angles. I usually try to look for something I can juxtapose the action with—for example, a guitar in the foreground or something. You can’t just think about the action. You have to think about what surrounds the action and whether or not it’s relevant to the shot or will make it more appealing or more understandable.
If I am filming someone playing soccer, I have to think about how relevant the context of the action is to the image. For instance, if I am filming a soccer game at a stadium, people know what stadiums look like and don’t need a lot of stadium shots. I can focus on CUs of the action. However, if I am filming a soccer game inside a prison, I’ll probably want to widen up my shots to shoot the context of the prison. It will make the shots more dramatic.
What are the challenges of shooting people?
Usually the challenge is to get people to not look at the camera, to get them to act like I am not there.
Communicating exactly what I have pictured in my head, and getting them to see that image can be extremely difficult. Also, getting the camera actions perfectly lined up with the people’s actions is a challenge. For instance, if I am rack focusing or zooming or tracking while they look away and then at the camera, the timing has to be perfect! This is difficult.

FIGURE 9.20
Sarah Hogencamp, Director of Photography.
How do you get people to do what you need them to do in your productions?
I usually have to do a lot of coaching. I have to be able to not only tell them what to do in an interview, but often I have to take the time to show them exactly what I want them to do. It takes a lot of patience.
Sarah Hogencamp is a corporate television producer/director who creates international documentaries.