CHAPTER 11
Audio for Video
The true mark of an audio track’s success—to sound so natural under a given scene that it draws no attention to itself.
Walter Schoenknecht, Midnight Media Group
If you really want to find out how important audio is to a video production, just turn off the audio and try to follow the story. You will soon get lost. Look away from the screen, with the audio up, and you can still follow the story. Audio is as important to television as the video image. Audio gives images a convincing realism. It helps the audience feel involved. As Dennis Baxter, sound designer for the Olympics, has written, “Audio, in partnership with video, delivers a holistic experience with all of the intense emotion and interesting nuances to the viewer.”
Key Terms
■ Audio mixer: Used to select, control, and intermix audio sources. It may include filter circuits, reverberation control, and other features. It is usually operated by the audio mixer (a job title as well as the name of the board) or A-1 (sound supervisor).
■ Bidirectional microphone: This microphone can hear equally well both in front and in back but is deaf on either side of it. This is sometimes called a “figure of eight” pattern.
■ Condenser microphone: A high-quality microphone that can be very small and is generally powered by an onboard battery, phantom power, or a power supply.
■ Directional microphone: This type of microphone can hear sounds directly in front of it.
■ Dynamic microphone: A rugged, low-maintenance, not easily distorted microphone.
■ Handheld microphone: Widely used by news reporters and musicians.
■ Lavalier microphone (mini-mic, clip-on, lapel mic): These small “Lav” microphones clip onto the talent’s clothing and provide fairly consistent, hands-free, audio pickup of the talent’s voice.
■ Limiter: A device for preventing loud audio from exceeding the system’s upper limit (causing overload distortion) by progressively reducing circuit amplification for louder sounds.
■ Natural sound (NAT sound): The recording of ambient or environmental sounds on location.
■ Omnidirectional microphone: This type of microphone can pick up audio equally well in all directions.
■ Preamplifier: An amplifier used to adjust the strength of audio from one or more audio sources to a standard level (intensity). It may include source switching and basic filtering.
■ Shotgun microphone: A highly directional microphone used to pick up sound from a distance.
■ Stereo: Stereo sound uses two audio tracks to create an illusion of space and dimension.
■ Surround sound: 5.1 surround uses six audio tracks to create a sense of envelopment.
11.1 THE ESSENTIAL COMPONENT
The valuable contribution that sound makes to television cannot be underestimated. In a good production, sound is never a casual afterthought. It is an essential part of the production’s appeal.
People often think of television as pictures accompanied by sound. Yet when the best television productions are analyzed, people are often surprised that most of the time it is the sound that conveys the information and stimulates the audience’s imagination, while the image itself can be a visual accompaniment. Audio has the power to help the audience conjure up mental images that enhance what is being seen.
Sounds are evocative. For example, consider an image of a couple of people leaning against a wall with the open sky as a background. If we hear noises of waves breaking and the shrill cry of birds, we quickly assume that the couple is near the seashore. Replace all those sounds with the noise of a battle, explosions, and passing tanks, and they are immediately transported to a war zone. They might even appear particularly brave and unfazed, as they remain so calm in the middle of this tumult.
In fact, all we really have here is a shot of two people leaning on a wall. The wall itself might have been anywhere—up a mountain, in a desert, or a replica in a studio. The location and the mood of the occasion have been conjured up by the sound and our imagination. Successful audio is a blend of two things: 1) appropriate techniques (the way the equipment is used to capture the audio) and 2) appropriate artistic choices (how the sounds are selected and mixed). Both techniques and artistic choices are largely a matter of technical knowledge combined with experience.
11.2 THE NATURE OF SOUND
The world about us is filled with such an endless variety of sounds that it is difficult to believe each can be resolved into a single complex vibration pattern. When several sources sound together, their separate patterns combine into an even more complicated form. Yet our eardrums, the microphone diaphragm, and the loudspeaker all follow this combined vibration, and, more miraculous still, our brain interprets the result.
11.3 ACOUSTICS
You have only to compare sound in an empty room with the difference that occurs when that same room is furnished or filled with people to realize how acoustics alter sound quality. If we understand the basics of acoustics, we can avoid many of the audio problems that might arise during the production (Table 11.1).
When a sound wave hits a hard surface (plastic, glass, tile, stone walls, metal), little is absorbed, so the reflected sound is almost as loud as the original. This is referred to as a live surrounding. Where there are a lot of hard surfaces around (as in a bathroom, a large hall, or a church), a place can become extremely reverberant or live. Sound waves rebound from one surface to another so easily that the original and the reflected versions, completely intermixed, are heard. This can cause considerable changes in the overall sound quality and significantly degrade its clarity. When surroundings are reverberant, reflections are often heard seconds after the sound itself has stopped; in extreme cases, these sounds reflect as a repeated echo. Whether reverberations add richness to the original sound or simply confuse it will vary with the design of the space, the position of the sound source, the pitch and quality of the sound, and the position of the microphone (or mic).
When a sound wave hits a soft surface (curtains, couches, rugs), some of its energy is absorbed within the material. Soft surfaces create a dead surrounding. Higher notes are the most absorbed, so the sound reflected from this sort of surface is not only quieter than the original sound wave, but it lacks the higher frequencies. Its quality is more mellow, less resonant, even dull and muted. Certain soft materials absorb the sound so well that virtually none is reflected (Figures 11.1 and 11.2). If, on the other hand, the sound is made in a place with many soft surfaces, both the original sound and any reflections can be significantly muffled. When outside, in an open area, sound can be very dead. This is due to the air quickly absorbing the sound because there are few reflecting surfaces. Microphones used outside often have to get closer to a subject than normal to pick up sufficient sound, especially if a person is speaking quietly (Figure 11.3).
FIGURE 11.1
The variety of angles of the set walls, the curtains, carpet, furniture, and people help dampen the live sound—but not too much.
FIGURE 11.2
Acoustic panels were placed on the walls of this audio room to reduce the “liveness” of the room.
Table 11.1 Dealing with acoustics
| When surroundings are too “live,” reduce acoustic reflections
■ Move the microphone closer to the sound source; ■ pull curtains if available; ■ add thick rugs; ■ add cushions; ■ use upholstered furniture; ■ drape blankets on frames or over chairs; ■ add acoustic panels (Figure 11.2). |
| When surroundings are too “dead,” increase acoustic reflections
■ Move the microphone farther away; ■ open curtains to increase hard surface space; ■ remove rugs; ■ remove cushions; ■ remove upholstered furniture; ■ add board or plastic surfaced panels; ■ add floor panels (wood, fiberboard). |
FIGURE 11.3
During the shooting of a dramatic program, the boom operator got the microphone as close as possible, while still being off-camera, because open-air sound does not usually travel far.
11.4 MONO SOUND
The audience is used to listening with the aid of two ears. As listeners compare these two separate sound images of the external world, they build up a three-dimensional impression from which the direction and distance of sound is estimated.
Nonstereo television sound is not as sophisticated as this. It presents a “single-eared” monaural (“mono”) representation of sound in space. The only clue to distance is loudness, and direction cannot be conveyed at all. When listening to mono reproduction, we are not able to distinguish between direct and reflected sounds, as we can when listening in stereo.
11.5 STEREO SOUND
Stereo sound creates an illusion of space and dimension. Stereo gives the viewer the ability to localize the direction of the sound. This localization gives the audience a sense of depth, a spatial awareness of the visual image and the sound. Sound quality and realism are enhanced.
11.6 SURROUND SOUND
Surround sound can provide a sense of envelopment when mixed correctly. Instead of the one channel for mono or two channels for stereo, 5.1 surround has six discrete (distinct, individual) channels: left front, right front (some times called stereo left and right), center, a subwoofer for low-frequency effects (LFE), left rear, and right rear speakers (sometimes called surround left and right). To present the feeling of depth, direction, and realism, audio personnel pan between the five main channels and route effects to the LFE channel (Figure 11.4).
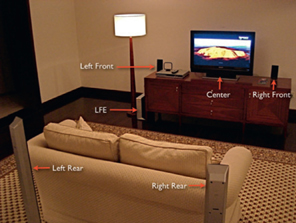
FIGURE 11.4
A home surround system utilizes six speakers.
FIRST SURROUND SOUND
Disney introduced surround sound to the cinemas with the movie Fantasia, released in 1940. Three channels were used behind the theater screen, with three additional speakers used on either side and at the rear. However, implementing this system was extremely expensive, and the system was used in only two theaters.
MICROPHONES
11.7 IT BEGINS WITH THE MICROPHONE
Although some people regard the video camera with a certain apprehension, there are those who tend to dismiss the microphone (or mic) all too casually. They clip it onto the guest’s jacket with an air of “that’s all we have to do for audio” instead of treating the mic as a delicate tool. The microphone (and how it is used) is really at the heart of television program sound. If the microphone is inferior, if it is damaged, or if it is poorly positioned, the program sound will probably suffer. Program sound all begins with the microphone.
It is not important to know how various types of microphones work to use them properly. They all convert sound waves in the air into a fluctuating electrical voltage (the audio signal). It does help, though, to be aware of their different characteristics.
Although most microphones are reasonably robust, they do need careful handling if they are to remain reliable and perform up to specification. If you drop them or get liquid on them, you are asking for trouble.
11.8 DIRECTIONAL FEATURES
Microphones do not all behave in the same way. Some are designed to be nondirectional, meaning they can pick up equally well sounds coming from all directions. Others can pick up sounds directly in front of them clearly but are comparatively deaf to sounds in all other directions. A further design has a bidirectional that can pick up equally well both forward and backward, but it is deaf on either side.
The advantage of an omnidirectional mic (Figure 11.5) is that it can pick up sound equally well over a wide area. It is great for covering a group of people or someone who is moving around. The disadvantage is that it cannot discriminate between the sound you want to hear and unwanted sounds such as reflections from walls, noises from nearby people or equipment, ventilation noise, footsteps, and so on. The more reverberant the surroundings, the worse the problem. The mic must be positioned so that it is closer to the wanted sounds than to the extraneous noises. This mic is great for picking up ambient or natural (NAT) sounds.
When a directional mic is pointed at the desired sound, it will tend to ignore sounds from other directions, providing a much cleaner result. On the other hand, the directional mic needs to be aimed very carefully. It is also important to make sure that the audio source does not move out of the main pickup zone; if it does, the source will be “off mic.” The off-mic sound becomes weaker, and the audience may hear what the mic is pointed at instead of the desired source.
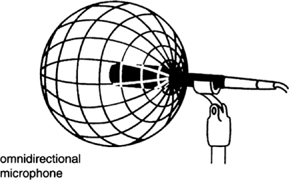
FIGURE 11.5
The omnidirectional pickup pattern is equally sensitive in all directions, generally rugged, and not too susceptible to impact shock. This mic cannot distinguish between direct and reflected sounds, so it must be placed close to the sound source.
(Drawing courtesy of Audio-Technica)
There are several forms of unidirectional pic kup patterns. The cardioid (Figure 11.6) or heart-shaped pattern is broad enough for general use but not over selective, whereas the supercardioid or hypercardioid (Figure 11.7) response has also a limited pickup area at its rear to receive reflected sounds.
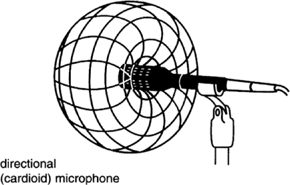
FIGURE 11.6
The directional (or cardioid) mic pickup pattern. This broad, heart-shaped pickup pattern (roughly 160) is insensitive on its rear side.
(Drawing courtesy of Audio-Technica)
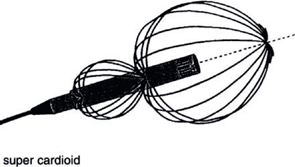
FIGURE 11.7
Use a supercardioid (or highly directional) pickup pattern wherever you want extremely selective pickup, to avoid environmental noises, or for distance sources.
(Drawing courtesy of Audio-Technica)
11.9 DYNAMIC AND CONDENSER MICROPHONES
There are two predominant methods for converting sound energy to an electrical equivalent signal: electrodynamic and electrostatic, better known as dynamic and condenser.
Dynamic microphones are the most rugged, provide good quality sound, and are not easily distorted by loud sounds such as nearby drums. These mics need little or no regular maintenance. They can be handheld without causing unwanted “handling noise” and used in all types of microphone mountings. However, they are just as high quality as the condenser microphone.
The condenser microphone produces very high audio quality and is ideal for picking up music. A significant advantage to the condenser is that it can be very small, making it the logical choice for a shotgun, lavalier mic, and other miniature microphones. The condenser mic is generally powered by an inboard battery, phantom-powered audio board, or a special power supply. The electret condenser microphone has a permanent charge applied when it is manufactured, which remains for the life of the microphone and does not need to be externally powered.
Just as you should preplan camera angles for a shoot, you should preplan mic types and positioning. Carefully plan cable runs and connections, and scout every location to determine if it will cause undesirable noise from air conditioners, trains, traffic, or other uncontrollable sounds that will end up being recorded.
Douglas Spotted Eagle, Grammy Award-Winning Producer
TYPES OF MICROPHONES
11.10 CAMERA MICROPHONES
If the camera is fitted with a microphone, the theory is that when it is aimed at the subject to capture the video, the mic will also pick up quality audio. However, a lot depends on the situation and the type of sound involved. Nothing beats a separate, high-quality microphone placed in exactly the right place. However, single-camera operators, working by themselves and moving around to various shooting positions, may have to use the camera microphone.
The simplest form of camera microphone is a small built-in mic at the front of the camera. These mics are known to pick up sound from all around the camera, including noise from the camera zoom lens and camera operator sounds. With care, though, this basic microphone is useful for general atmospheric background sounds (traffic, crowds) and is almost adequate for close-up voice. However, it should only be used for voice when better options are not available. With most camera mics, trying to pick up a voice more than four to six feet away results in unacceptably high levels of background noise or acoustical reflections.
The most popular type of camera microphone is the shotgun mic, attached to the top of the camera (Figure 11.8). Plugged into the camera’s external mic socket, this mic will give the best-quality long-distance pickup from the subject. As always with directional mics, the shotgun mic must be aimed accurately.
A quality camera microphone can provide the simplest method of picking up program sound:
■ The microphone is positioned on the camera, so you do not need a second person to look after the audio. Wherever the camera points, the microphone will follow.
However, the camera microphone has a number of drawbacks too:
■ The microphone is often too far away from the subject for the best sound. Its position is determined by the camera’s shot, not by the optimum place for the microphone.
■ The camera microphone cannot follow somebody if they turn away from a frontal position, such as to point to a nearby wall map. The sound’s volume and quality will fall off as the subject moves off mic.
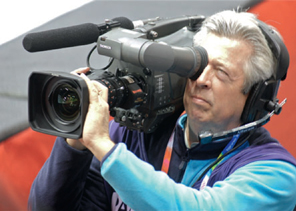
FIGURE 11.8
Shotgun mics are the most popular type of camera microphones.
11.11 THE HANDHELD MICROPHONE
The handheld mic (stick mic) is a familiar sight on television, as it is used by interviewers, singers, and commentators (Figure 11.9). It is a simple, convenient method of sound pickup, provided it is used properly. The handheld mic is best held just below shoulder height, pointed slightly toward the person speaking. It should be as unobtrusive as possible.
To reduce the low rumbling noises of wind on the microphone and explosive breath-pops when it is held too close to the mouth, attach a foam windshield on the microphone. Note the red foam windshield in the interview photo in Figure 11.9. Whenever possible, talk across the microphone rather than directly into it. This will provide the optimal audio quality.
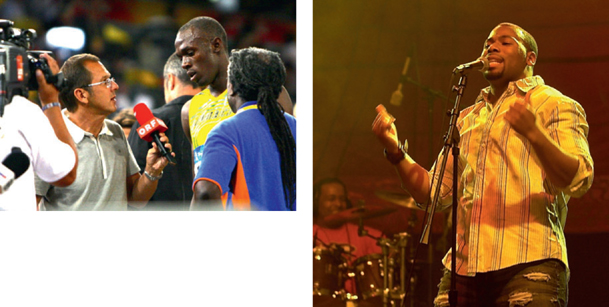
FIGURE 11.9
The handheld microphone is widely used for interviews, commentaries, and stage work. If the mic has a cardioid directional response, extraneous noise pickup is lower. If the mic is omnidirectional, it may need to be held closer to the subject to reduce atmosphere sounds.
Handheld microphones with cardioid patterns help reduce the amount of extraneous sound overheard, so this type of mic can be used about 1 to 1.5 feet from the person speaking. An omnidirectional handheld mic will normally have to be held much closer, about 9 inches away.
11.12 THE SHOTGUN MICROPHONE
The shotgun microphone (hypercardioid) consists of a slotted tube containing an electret microphone at one end. This microphone is designed to pick up sound within a narrow angle while remaining less sensitive to sounds from other directions. It is great for isolating a subject within a crowd or for excluding nearby noises (Figure 11.10).
When shooting in very “live” (reverberant) surroundings, a shotgun microphone has advantages because it will pick up the subject’s sound successfully while reducing unwanted reflections, although how effectively it does this will depend on the pitch or coloration of the reflected sounds.
The shotgun microphone is adaptable and is regularly used as follows:
■ a handheld microphone supported by some type of shock mount (see Figure 11.10);
■ connected to the end of a boom pole or fishpole (see Figure 11.12);
■ in the swiveled cradle support of a regular sound boom or perambulator boom (see Figure 11.1);
■ as a camera microphone, fitted to the top of the camera head (see Figure 11.8).
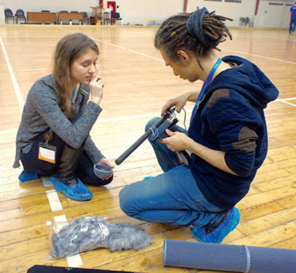
FIGURE 11.10
The shotgun microphone is one of the most used mics in television. These microphones are very susceptible to handling noise and must be held or connected to a pole or stand with a shock mount.
(Photo by Chris Jensen)
Most people working in the field fit a shotgun microphone with some type of a windshield (windjammer or wind muffler; see Figure 11.11). The most effective type for suppressing obtrusive wind noises is a furry overcoat with “hairs” or a plastic/fabric tube. An alter na tive design of wind filter is a tubular plastic sponge (see Figure 11.10). Although much lighter, this may prove inadequate except in the lightest breeze.
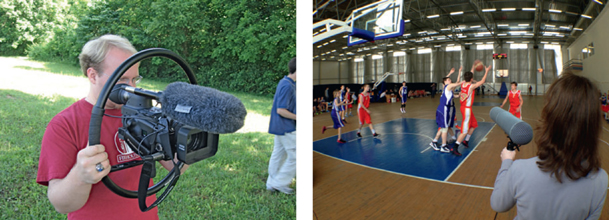
FIGURE 11.11
Different types of windshields are used to protect a shotgun mic from wind noise.
Using the Shotgun Microphone
Selecting the best position for a shotgun microphone takes some preplanning. Audio personnel need a clear idea of how the action is going to develop. They may get this from a briefing beforehand or find out from a camera rehearsal:
■ Will the shotgun be used for long takes or for brief shots? It is one thing to stand in a fixed position as someone talks directly to the camera and another to have to follow action around as people and cameras move through a sequence.
■ Will audio personnel have an uninterrupted view of the action?
Audio personnel should try to position themselves so that the action moves toward them instead of away from them. Whenever the mic boom holder or the talent moves around, it is easy for the talent to pass in and out of the microphone’s main pickup area. If the talent turns away from the microphone, there is usually no way the mic boom holder can compensate or move onto the sound axis.
The Shotgun and the Boom Pole (Fishpole)
The boom pole has become the most popular choice for sound pickup on location and in many smaller studios. This adjustable lightweight aluminum pole is usually about six to nine feet long and carries a microphone at its far end. The sound cable is either designed inside the pole or is taped securely along the pole.
FIGURE 11.12
A mic boom (or fishpole) is a regular method of mounting the shotgun microphone, particularly in the field. It allows the operator to stand several feet away from the subject, reaching over any foreground obstacles to place the microphone at an optimum angle. This position can be tiring if it has to be maintained for a long period of time. However, it may be the only solution when people are standing or walking about.
There are many ways to hold a boom pole:
■ above the head, with arms fully extended along the pole to balance it (see Figure 11.12);
■ set across the shoulders for added stability;
■ with the end of the pole tucked under one shoulder. The goal is to get the microphone close enough without showing up at the bot tom of the camera’s shot (also see Figure 11.3).
11.13 LAVALIER (LAPEL OR CLIP-ON MIC) MICROPHONES
The lavalier microphone, also known as a “lav,” lapel, or clip-on mic, has become a favorite mic in productions when it is okay for the viewer to see a mic attached to someone (Figures 11.13 and 11.14). These microphones are compact, unobtrusive, and provide high sound quality. But they must be used judiciously for optimum results. Clip the microphone to outside clothing (such as the tie, lapel, shirt, or blouse), and noises from clothing rubbing will be kept to a minimum. One of the challenges when using a lavalier mic is that the volume and clarity of the sound can change as a wearer turns his or her head left and right, or toward and away from the microphone.
A lavalier mic can only be relied on to effectively pick up the sound of the person wearing it. When two or three people are speaking, each will need to wear his or her own microphone. This does not mean that the mics won’t pick up the sound from others; it just won’t be the same quality and will not be the same level. As always, it is important to conceal the lavalier mic’s cable beneath a jacket or shirt.
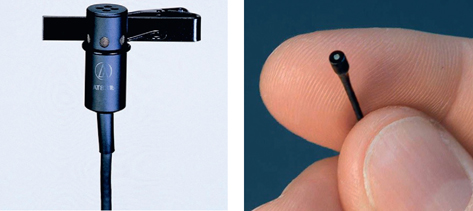
FIGURE 11.13
Lavalier microphones come in different sizes and shapes. Generally, a lavalier mic is clipped to a necktie, lapel, or shirt.
(Photo courtesy of Audio-Technica and Countryman Associates)
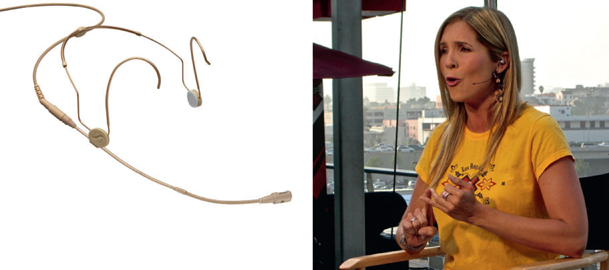
FIGURE 11.14
The talent is using an “earset” microphone that utilizes the lavalier microphone. It is mounted on a tiny mic “boom” and attached to the ear. It is available in different colors and can be almost invisible to the viewing audience. In this situation, it was used on ESPN’s X-Games.
(Photo by Dennis Baxter)
Lavalier microphones can also be used to record subjects other than people. They are used effectively in sports productions (mounted in places like the nets at a soccer field), and they can be used to pick up the sound of some musical instruments. The clip-on mic in Figure 11.15 is actually a type of lavalier mic.
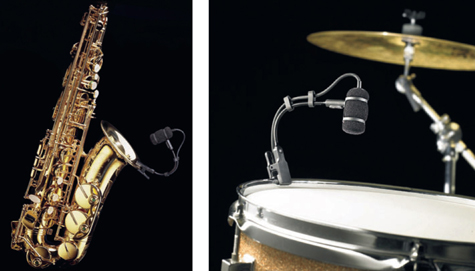
FIGURE 11.15
Lavalier microphones are often used to record musical instruments or any other subject that requires close miking.
(Photos courtesy of Audio-Technica)
11.14 BOUNDARY OR PZM MICROPHONE
The boundary microphone and pressure zone microphone (PZM) are low-profile mics that can be used to capture audio from talent that is six or more feet away and do not produce the hollow sound of a hanging handheld mic (Figure 11.16). Although the pickup technology is very different, these two mics are used similarly. These microphones are especially good for dramatic productions where microphones should not be seen (they can be adhered to the back of set pieces). They are also good for stage performances of large groups. They can be hung from the ceiling, set on a floor, or adhered to furniture. The pickup distance can be increased by mounting these mics on a hard surface.
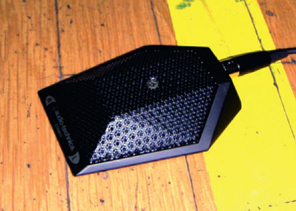
FIGURE 11.16
The boundary microphone is a low-profile mic that can pick up accurate sounds from six or more feet away.
11.15 HANGING MICROPHONE
Hanging microphones are especially designed for high-quality sound reinforcement of dramatic productions, orchestras, and choirs. These mics are suspended over the performance area. Their small size is ideal because they will probably be visible to the viewing audience (Figure 11.17).
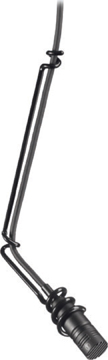
FIGURE 11.17
Hanging microphone.
(Photo courtesy of Audio-Technica)
11.16 SURROUND SOUND MICROPHONE
Surround sound microphones can capture 5.1 to 7.1 channels of discrete (separate) audio with the multidirectional pickup pattern. Using the microphone shown in Figure 11.18, the audio can be recorded directly onto the camera’s internal media along with the video image. This small microphone has five microphone elements—left front (L), right front (R), center (C), left rear or left surround (LS), right rear or right surround (RS)—and a dedicated LFE (.1) micro phone. Some high-end versions provide 7.1 surround sound. Smaller systems, designed specifically for a camcorder, utilize an internal Dolby Pro-Logic II Encoded linelevel stereo output for connection directly to the camera on a single 3.5-mm stereo female miniplug jack (Figure 11.18).
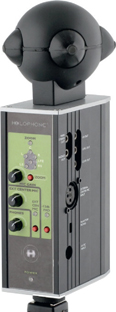
FIGURE 11.18
This small surround sound microphone includes a Dolby Pro-Logic II encoder with a line-level stereo output designed for camcorders.
(Photo courtesy of Holophone)
Some of the nonlinear editing systems, like Final Cut Pro, have a Dolby logic decoder built in, allowing the channels from the stereo input to be split into the five surround channels. This allows a user to record programs in surround sound without the need for a full surround mixing board.
Surround sound microphones must be positioned carefully (Figure 11.19). They should not just be mounted on top of a camera if the camera will be panning and tilting around. Moving the microphone around with the camera can spatially disorient the audience. Generally these microphones are mounted on a separate stand or clamped to something stationary in order to pick up a quality ambient sound.
FIGURE 11.19
ABC Television’s Extreme Home Makeover uses a professional surround sound microphone, separate from the camera, to capture the audio.
(Photo courtesy of Holophone)
Suggestions for using a surround sound microphone:
■ Use the surround mic to provide the “base” ambient surround sound for the audio mix.
■ For a concert situation with arena-style seating, place the sound mic a little higher than the orchestra, tilting the nose down toward the performers.
■ In most situations, try to position the surround mic as close to “front row center” as possible rather than near the back of the room.
MOBILE PHONE MICROPHONES
Since mobile phone cameras are increasingly being used by professionals, especially journalists, microphones have been created to provide optimal audio quality. Microphone connectors have been adapted to popular phones and apps have been created to allow more control over the audio signal (Figure 11.20).
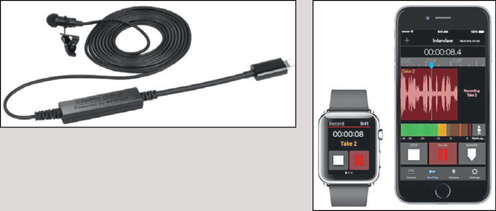
FIGURE 11.20
Multiple manufacturers have created microphones specifically designed for mobile phones. They also provide phone, watch, and tablet apps that allow the user to adjust the audio signal.
(Photos courtesy of Apple and Apogee)
■ When shooting sports events, it is best to place the surround mic either near the center of the field or near a main camera position. Always keep in mind the perspective of the television viewer. Mounting the surround mic on a side of a field or rink opposite to the main camera angle would seem backward and unnatural.
■ For surround recording of acoustic instruments, including drum kits, pianos, and voice at close range, try placing the mic near or above the instrument that is being recorded. For vocal or choirs, position the singers around the mic and monitor in surround to hear the results.
11.17 WIRELESS MICROPHONE
The most commonly used wireless microphones are the lavalier mic and the handheld mics (Figures 11.21 and 11.22). Both can be purchased with the wireless transmitter built into the mic (or belt pack) and include a matching receiver. The lavalier mic has been popular because it allows the talent to generally have unrestricted movement while on location. They are used in the studio with interview shows, on referees to pick up their calls, and hidden on actors to catch their words.
Wireless microphones generally work on radio frequencies (RF) and many are “frequency programmable,” allowing the audio personnel to select the best frequency for a specific location.
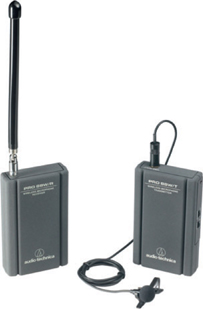
FIGURE 11.21
Pictured here is a wireless (radio) belt pack transmitter and receiver. A lavalier microphone can be plugged into the transmitter.
(Photo courtesy of Audio-Technica)
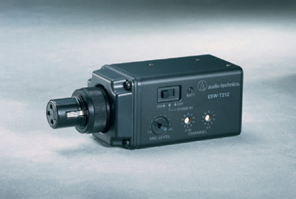
FIGURE 11.22
Any type of microphone can become a wireless microphone if some type of wireless plug-on transmitter is used. This transmitter converts a dynamic or condenser microphone to wireless, transmitting the signal back to a receiver.
(Photo courtesy of Audio-Technica)
There can be a number of challenges when working with wireless microphones:
■ These mics work off of batteries. Each battery life is roughly four to six hours. In freezing temperatures, the battery life is usually cut in half. New batteries should be placed in the mic before each new session.
■ If two or more wireless microphones are being used in an area, it is advisable to set them to different RF channels to avoid interference.
■ When working near large metal structures, there can be difficulties with RF dead spots, fading, distortion, or interference. While diversity reception, using multiple antennas, has improved this situation, it is still cause for some concern.
11.18 HIDDEN MICS
When other methods of sound pickup are difficult, a hidden microphone may be the solution to the problem. Mics can be concealed among a bunch of flowers on a table, behind props, or in a piece of furniture, for example.
However, hidden mics do have their limitations. Although the mic can be hidden, the cable must not be visible and the transmitter must be out of site. Sound quality may also be affected by nearby reflecting or absorbing surfaces. Because the microphone covers a fixed localized area, the talent has to be relied on to play to the mic and not speak off mic.
11.19 MICROPHONE STANDS AND MOUNTS
Microphone stands and mics are useful in situations where the director does not mind the microphone possibly appearing in the shot (Figures 11.23 and 11.24). It is especially useful for stage announcements, singing groups, and for miking musical instruments. It does have some disadvantages. If people move around much, they can easily walk out of the mic’s range. Directors have to rely on the talent to get to the right place and keep the right distance from the mic. It is a good idea to give talent taped marks on the floor to guide them. And, of course, there is always the danger that the talent will kick the stand or trip over the cable.
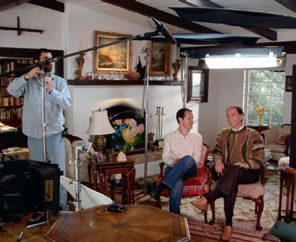
FIGURE 11.23
An audio person adjusts a microphone stand for an onlocation interview project.

FIGURE 11.24
There are many types of microphone stands and mounts, from bottom-weighted telescopic stands to small versions with thin, flexible, or curved tubing intended for lavalier or miniature mics as seen in Figure 11.15.
(Photos courtesy of Audio-Technica)
CONTROLLING AUDIO
11.20 AUTOMATIC GAIN CONTROL (AGC) FOR AUDIO
Cameras generally allow the operator to set the audio manually or automatically. To avoid loud sounds overloading the audio system and causing distortion, most audio and video recording equipment includes AGC. When the sound signal exceeds a certain level, the auto gain control automatically reduces the audio input.
In a completely automatic gain system, which amplifies all incoming sounds to a specific preset level, it “irons out” sound dynamics by preventing over- or underamplification. Quiet sounds are increased in volume, and loud sounds are held back. There are no adjustments to make, and the camera operator must accept the results.
The problem with completely automatic gain systems is that when there is a pause in the audio, the automatic gain system amplifies the room sound, which does not sound natural. Whenever possible, use the manual gain control. Some auto gain systems do have manual adjustments. The idea is to ensure that the gain control is set high enough to amplify the quietest passages without overamplifying the loudest sounds. The auto gain control circuitry only limits sound peaks as an occasional safety measure, depending on the gain adjustment.
11.21 MANUAL CONTROL
The other method of controlling the audio level is to continuously monitor the program while watching an audio level meter. The audio person is responsible for readjusting the audio system’s gain (amplification) whenever necessary to obtain a quality audio signal. That does not mean that the dynamics should be ironed out by making all the quiet sections loud and holding back all the loud passages. “Riding the gain” in this way can ruin the sound of the program. Instead, when sounds are going to be weak, anticipate by gradually increasing the gain and, conversely, slowly move the gain back before loud passages. Then the listeners are unaware that changes are being made.
Unlike automatic control circuits, audio personnel are able to anticipate and make artistic judgments, which can make the final audio far superior. The drawback to manual control is that the audio personnel need to be vigilant all the time, ready to make any necessary readjustments. If they are not careful, the resulting audio may be less satisfactory than the auto-circuits would have produced.
There are several types of volume indicators, but the most common on video equipment take the form of visual displays using bar graphs or some type of volume unit VU meters.
A bar graph (Figure 11.25) has a strip made up of tiny LED segments. This varies in length with the audio signal’s strength. Calibrations vary, but it might have a decibel scale from 250 to 110 dB, with an upper working limit of about 12 dB. Simply adjust the audio gain control so that the sound peaks reach this upper mark. Twin bar graphs are used to monitor the left and right channels.
The VU meter is a more traditional volume indicator. It has two scales: a “volume unit” scale marked in decibels and another showing the “percentage modulation.” Although accurate for steady tones, the VU meter can give deceptively low readings for brief loud sounds or transients such as percussion. Maximum signal coincides with 100 percent modulation /0 dB. Above that, in the red sector, sounds will distort, although occasional peaks are acceptable. The normal range used is 220 to 0 dB, typically peaking between 22 and 0 dB.
In summary, if the camera operator needs the audio system to look after itself because he or she is preoccupied with shooting the scene or is coping with unpredictable sounds, then the AGC has its merits; it will prevent loud sounds from overloading the system. However, if an someone is available who can monitor the sound and adjust the gain for optimum results, then that has significant artistic advantages.

FIGURE 11.25
VU meters and bar graphs are used to monitor the audio signal.
11.22 MONITORING THE AUDIO
Monitoring sound for a video program involves the following:
■ Watching. Check the volume indicator for audio levels and watch a video monitor to make sure that the microphone does not pop into the shot inadvertently.
■ Listening. On high-grade earphones or a loudspeaker, listen to check sound quality and balance, and to detect any unwanted background noises.
Ideally the audio level can be adjusted during a rehearsal. However, if a performance is going to be recorded without a rehearsal, such as an interview, ask the talent to speak a few lines so that the audio level can be accurately adjusted. It is best if the talent can chat with the host in a normal voice for a few minutes, or he or she can read from a script or book long enough to adjust the level. Do not have the talent count or say “test.” Both can give inaccurate readings because they do not necessarily reflect normal speaking levels.
It is important to monitor the sound to also get an impression of the dynamic range while watching the volume level. If the results are not satisfactory, you may need to ask the talent to speak louder, more quietly, or to reposition the mic.
11.23 THE AUDIO MIXER
An audio mixer is needed whenever there are a number of sound sources to select, blend together, and control (such as a couple of microphones, flash drive, CD, audio output from a video recording, etc.). The output of the mixer is sent to the recorder (Figure 11.26).
On the front panel of the audio mixer are a series of knobs or sliders. Each of these “pots” (potentiometers) or “faders” (Figure 11.27) can adjust its channel’s volume from full audio to fade-out (silence). In some designs, the channel can be switched on or off on cue with a mute button.
On a large audio mixing panel, there may be group faders (group masters, submasters). Each of these group faders controls the combined outputs of several channels, and it may have its own group volume indicator. For instance, one group fader can be used for all the mics on the audience.
Finally, there is a master fader that controls the overall audio strength being sent to line (such as on the recorder). This can be used to fade the complete mix in or out. A master volume indicator shows the combined strength of the mixed audio.
Larger audio mixers include a cue circuit (audition, prehear, prefade), which enables audio personnel to listen privately on earphones or a loudspeaker to the output of any individual channel, even when its pot is faded out. That way, the source, such as a CD, can be set up at exactly the right spot, ready to be started on cue, without this being overheard on-air. Mixers are slowly incorporating more and more surround sound capabilities (Figure 11.28).
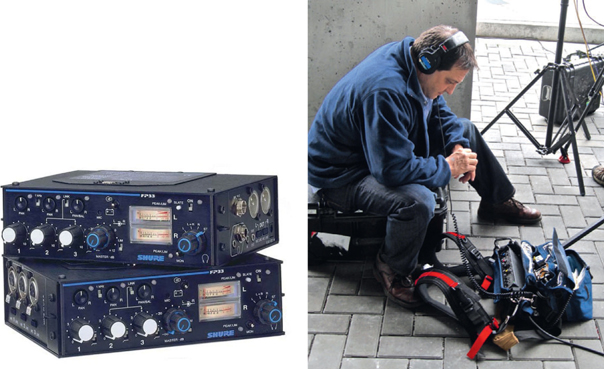
FIGURE 11.26
The portable audio mixer is used in the field to mix up to three mics; the overall output is controlled by a master fader. A VU meter provides the volume indicator.
(First photo courtesy of Shure Incorporated)
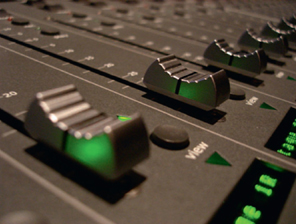
FIGURE 11.27
Faders (potentiometers) on a large audio mixer.
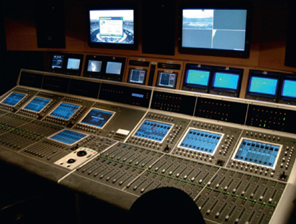
FIGURE 11.28
A large surround sound audio mixer for television productions.
11.24 USING THE AUDIO MIXER
Audio mixing can often be complex, depending on the number of audio sources and the conditions of the location. Here are just a few of the issues that decide how complex the audio mix needs to be. Let’s look at typical operations in some detail:
■ Sound sources should be faded in just before they begin (to the appropri ate pot setting), and they should fade out when the audio source is finished.
■ Source channels should not be left “open” (live) when not in use. Apart from accidentally recording overheard remarks (“Was that all right?”) and other unwanted sounds, the channel may pick up someone who is on another mic.
■ When combining several sound sources, all of them should not be faded up to their full level. They should be blended for a specific overall effect. For example, if a single microphone was used to pick up the sound of a music group, chances are that the one microphone would pick up certain instruments much better than others. Loud ones would dominate and quiet ones would be lost. The overall balance would be poor. Instead, use several microphones, devoted to different parts of the group. Then the volume of the weaker instruments, such as a flute, could be increased, and the volume of the louder ones, such as drums, can be decreased. With care, the result would sound perfectly natural and have a clearer overall balance.
■ Sounds may need to be deliberately emphasized. For example, you may choose to readjust the pot controlling the crowd noise to make it louder at an exciting moment and give it a more dramatic impact.
■ The final audio mix needs to fit the mood of the overall production.
AUDIO CONNECTORS
The most popular audio connector used by television audio professionals is the XLR, a three-pin connector. The 3.5 mini plug is used on most amateur cameras. Figure 11.29 shows common connectors.
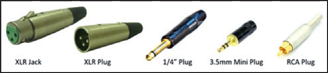
FIGURE 11.29
There are a variety of audio connectors used in television production.
11.25 PREPARING FOR AUDIO
Anticipation comes with experience. When something goes wrong, learn from it and prepare better next time. There are a number of ways to anticipate audio challenges:
■ Check through the script or preplanning paperwork, and then pull together the appropriate equipment so that every audio situation in the production can be covered.
■ Check all of the equipment to make sure that it is working correctly. Don’t rely on the notion that it was okay yesterday. If additional plug-in equipment is being used, such as a portable audio mixer, have someone fade up each source (microphones or other audio source) to ensure that each one is working.
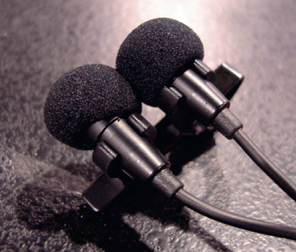
FIGURE 11.30
This lavalier clip is designed to hold two microphones, providing a backup microphone in case one fails.
■ Go to each microphone in turn, scratch its housing (which is an easy way to test the microphone), and state its location to make sure that the microphone is working and plugged into the correct input (“this is boom A”).
■ Have a backup microphone ready in case the main microphone fails. If it is a one-time-only occasion and you are using a lavalier mic, it may be advisable to add a second “dual redundancy” lavalier mic too (see Figure 11.30).
■ Is the microphone cable long enough to allow the boom pole to move around freely?
Of course, these are all a matter of common sense, but it is surprising how often the obvious and the familiar are overlooked. These are just reminders of what should become a regular routine.
PRODUCTION SOUNDS
11.26 NATURAL SOUND
Most video productions are made up of a series of shots, taken in whatever order is most convenient, and edited together later to form the final program. This approach has both advantages and drawbacks. As far as the program sound is concerned, there are several complications.
First of all, although the various shots in a sequence have been taken at different times, it is important that their quality and volume match when they are edited together. Otherwise there will be sudden jumps whenever the shot changes.
If, for instance, a shot is taken of a person walking down a hallway, using a close mic, and then a side view is shot of the same action, using a more distant mic, the difference in the sound, when cutting from one shot to the other, could be quite noticeable. The overall effect would draw attention to the editing.
When editing together a sequence of images shot at different times, the background sounds may not match. In the time between shooting one shot, repositioning the camera, adjusting the light, and then retaking the shot, the background noises often significantly change. Because the crew is busy, they may not notice that the background sounds are different. Sounds that we became accustomed to while shooting the scene—such as overhead aircraft, farm equipment, hammering, or typing—can have a nasty habit of instantly disappearing and reappearing when the shots are edited together.
When on location, it is a good habit to record a few minutes of ambient sound, background noise, on the recorder. It does not matter what the video is showing at this point; we are only really concerned with the audio. However, it is sometimes helpful to shoot the scene being recorded so that it gives the editor a visual reference as to where it was recorded. It is surprising how often this natural (NAT) sound or wild track comes in handy during audio editing for use as background sounds.
Even when shooting under what seems to be quiet conditions, there is a certain amount of background noise from air conditioners, equipment hum, and so on. A wild track of this natural sound can be used later to cover any periods where there is a break in the soundtrack during editing. Wild tracks also can help during those awkward moments when background sounds in successive shots do not match. They can serve as a bridge to disguise when silent and sound shots are edited together.
11.27 PROGRAM MUSIC
As mentioned earlier, music usually has an incredible impact on the viewer. It usually sets the mood for the production. Musical themes often remain in the memory long after the program itself has faded from the mind.
Music can have various purposes:
■ Identifying. Music associated with a specific show, person, or country.
■ Atmospheric. Melodies that are intended to induce a certain mood, such as excitement.
■ Associative. Music reminiscent of, for example, the American West or the Far East.
■ Environmental. Music heard at a specific place, such as a ballroom.
■ Imitative. Music that directly imitates, such as a bird song, or music with a rhythm or melody that copies the subject’s features, such as the jog-trot accompaniment to a horse and wagon.
11.28 SOUND EFFECTS
Sound effects add depth and realism to a video production. They significantly impact the audience’s experience. Interestingly, if a production is shot in a real location yet is missing the everyday sounds that occur there, the audience will perceive that it is a contrived location. However, if the same scene is shot in a well-designed television studio setting but is accompanied by the appropriate sound effects, the audience can easily be convinced that it was shot on location. The barely heard sounds of a clock ticking, wind whistling through trees, bird song, passing traffic, or the barking of a distant dog, bring the scene to life.
Sound effects can come from a number of sources:
■ The original sounds recorded during a scene. For example, a person’s own foot steps accompanying the picture.
■ Reused original sounds. Examples would include the sounds of wind, traffic, or children at play that were recorded during a scene and are copied and mixed with that same scene’s soundtrack to reinforce the overall effect.
Noel Dannemiller, Sound Mixer
What do you like about the field of audio?
I love working as a location sound mixer because I work in a different location with a different crew doing the same job everyday. The world is my office. I’ve recorded sound on the Great Wall of China, Red Square in Moscow, the beaches of Madagascar, and in my own living room. It beats working for a living.
What advice do you have for someone starting out in audio?
I would advise a new person in location sound to meet as many people in the biz as possible. Then call them all of the time to see what work is available. Once they start to hire you, back off on the calls, and hopefully your work speaks for itself and you become a regular on their crew. Also, move to an area where there are a lot of gigs.
How do you select the right microphone for a situation?
I choose the mic based on a couple of factors. These include the number of actors in the scene, location, camera angle, and wardrobe.

FIGURE 11.31
Noel Dannemiller, Sound Mixer.
What are the challenges you have to deal with in audio?
Most of the challenges I deal with are the talent’s wardrobe and environment we shoot in. Sometimes the wardrobe won’t work with a hidden lavalier microphone. Then you have to use a boom pole to capture the talent or get creative. As far as locations are concerned, nobody ever scouts locations for sound. The picture is always the primary concern. If we have problems with the live audio, we either live with the ambience or do everything possible to deaden the sounds. Sometimes you can be saved by a music bed.
Noel Dannemiller has mixed sound for all types of productions.
■ Foley. Creating sounds in a studio that can replace the original sounds. For example, introducing sounds of your own footsteps for the original ones; keeping in time with those in the picture.
■ Sound effects library. Effects from a commercial audio effects library.
■ Digital processing or sound sampling. Computer software offers a plethora of options for creating and manipulating sounds. These effects can be repeated and changed in an endless variety of ways.